本篇文章给大家谈谈Swift初见,以及ASwiftTour的知识点,同时本文还将给你拓展ASwiftTour、ATourofGolang(二)、ATourofGolang(一)、AtourofgRPC
本篇文章给大家谈谈Swift 初见,以及A Swift Tour的知识点,同时本文还将给你拓展A Swift Tour、A Tour of Golang (二)、A Tour of Golang (一)、A tour of gRPC:01 - 基础理论等相关知识,希望对各位有所帮助,不要忘了收藏本站喔。
本文目录一览:")
Swift 初见(A Swift Tour)
总结
以上是小编为你收集整理的Swift 初见(A Swift Tour)全部内容。
如果觉得小编网站内容还不错,欢迎将小编网站推荐给好友。

A Swift Tour
Tradition suggests that the first program in a new language should print the words “Hello,world!” on the screen. In Swift,this can be done in a single line:
print("Hello,world!")
If you have written code in C or Objective-C,this Syntax looks familiar to you—in Swift,this line of code is a complete program. You don’t need to import a separate library for functionality like input/output or string handling. Code written at global scope is used as the entry point for the program,so you don’t need amain()function. You also don’t need to write semicolons at the end of every statement.
This tour gives you enough information to start writing code in Swift by showing you how to accomplish a variety of programming tasks. Don’t worry if you don’t understand something—everything introduced in this tour is explained in detail in the rest of this book.
NOTE
For the best experience,open this chapter as a playground in Xcode. Playgrounds allow you to edit the code listings and see the result immediately.
Download Playground
Simple Values
Useletto make a constant andvarto make a variable. The value of a constant doesn’t need to be kNown at compile time,but you must assign it a value exactly once. This means you can use constants to name a value that you determine once but use in many places.
var myVariable = 42myVariable = 50let myConstant = 42
A constant or variable must have the same type as the value you want to assign to it. However,you don’t always have to write the type explicitly. Providing a value when you create a constant or variable lets the compiler infer its type. In the example above,the compiler infers thatmyVariableis an integer because its initial value is an integer.
If the initial value doesn’t provide enough information (or if there is no initial value),specify the type by writing it after the variable,separated by a colon.
let implicitInteger = 70let implicitDouble = 70.0let explicitDouble: Double = 70
EXPERIMENT
Create a constant with an explicit type ofFloatand a value of4.
Values are never implicitly converted to another type. If you need to convert a value to a different type,explicitly make an instance of the desired type.
let label = "The width is "let width = 94let widthLabel = label + String(width)
EXPERIMENT
Try removing the conversion toStringfrom the last line. What error do you get?
There’s an even simpler way to include values in strings: Write the value in parentheses,and write a backslash (\) before the parentheses. For example:
let apples = 3let oranges = 5let appleSummary = "I have \(apples) apples."let fruitSummary = "I have \(apples + oranges) pieces of fruit."
EXPERIMENT
Use\()to include a floating-point calculation in a string and to include someone’s name in a greeting.
Create arrays and dictionaries using brackets ([]),and access their elements by writing the index or key in brackets. A comma is allowed after the last element.
var shoppingList = ["catfish","water","tulips","blue paint"]shoppingList[1] = "bottle of water"var occupations = ["Malcolm": "Captain","Kaylee": "Mechanic",]occupations["Jayne"] = "Public Relations"
To create an empty array or dictionary,use the initializer Syntax.
let emptyArray = [String]()let emptyDictionary = [String: Float]()
If type information can be inferred,you can write an empty array as[]and an empty dictionary as[:]—for example,when you set a new value for a variable or pass an argument to a function.
shoppingList = []occupations = [:]
Control Flow
Useifandswitchto make conditionals,and usefor-in,for,while,andrepeat-whileto make loops. Parentheses around the condition or loop variable are optional. Braces around the body are required.
let individualscores = [75,43,103,87,12]var teamscore = 0for score in individualscores {if score > 50 {teamscore += 3} else {teamscore += 1}}print(teamscore)
In anifstatement,the conditional must be a Boolean expression—this means that code such asif score { ... }is an error,not an implicit comparison to zero.
You can useifandlettogether to work with values that might be missing. These values are represented as optionals. An optional value either contains a value or containsnilto indicate that a value is missing. Write a question mark (?) after the type of a value to mark the value as optional.
var optionalString: String? = "Hello"print(optionalString == nil)var optionalName: String? = "John Appleseed"var greeting = "Hello!"if let name = optionalName {greeting = "Hello,\(name)"}
EXPERIMENT
ChangeoptionalNametonil. What greeting do you get? Add anelseclause that sets a different greeting ifoptionalNameisnil.
If the optional value isnil,the conditional isfalseand the code in braces is skipped. Otherwise,the optional value is unwrapped and assigned to the constant afterlet,which makes the unwrapped value available inside the block of code.
Another way to handle optional values is to provide a default value using the??operator. If the optional value is missing,the default value is used instead.
let nickName: String? = nillet fullName: String = "John Appleseed"let informalGreeting = "Hi \(nickName ?? fullName)"
Switches support any kind of data and a wide variety of comparison operations—they aren’t limited to integers and tests for equality.
let vegetable = "red pepper"switch vegetable {case "celery":print("Add some raisins and make ants on a log.")case "cucumber","watercress":print("That would make a good tea sandwich.")case let x where x.hasSuffix("pepper"):print("Is it a spicy \(x)?")default:print("Everything tastes good in soup.")}
EXPERIMENT
Try removing the default case. What error do you get?
Notice howletcan be used in a pattern to assign the value that matched the pattern to a constant.
After executing the code inside the switch case that matched,the program exits from the switch statement. Execution doesn’t continue to the next case,so there is no need to explicitly break out of the switch at the end of each case’s code.
You usefor-into iterate over items in a dictionary by providing a pair of names to use for each key-value pair. Dictionaries are an unordered collection,so their keys and values are iterated over in an arbitrary order.
let interestingNumbers = ["Prime": [2,3,5,7,11,13],"Fibonacci": [1,1,2,8],"Square": [1,4,9,16,25],]var largest = 0for (kind,numbers) in interestingNumbers {for number in numbers {if number > largest {largest = number}}}print(largest)
EXPERIMENT
Add another variable to keep track of which kind of number was the largest,as well as what that largest number was.
Usewhileto repeat a block of code until a condition changes. The condition of a loop can be at the end instead,ensuring that the loop is run at least once.
var n = 2while n < 100 {n = n * 2}print(n)var m = 2repeat {m = m * 2} while m < 100print(m)
You can keep an index in a loop by using..<to make a range of indexes.
var total = 0for i in 0..<4 {total += i}print(total)
Use..<to make a range that omits its upper value,and use...to make a range that includes both values.
Functions and Closures
Usefuncto declare a function. Call a function by following its name with a list of arguments in parentheses. Use->to separate the parameter names and types from the function’s return type.
func greet(person: String,day: String) -> String {return "Hello \(person),today is \(day)."}greet(person: "Bob",day: "Tuesday")
EXPERIMENT
Remove thedayparameter. Add a parameter to include today’s lunch special in the greeting.
By default,functions use their parameter names as labels for their arguments. Write a custom argument label before the parameter name,or write_to use no argument label.
func greet(_ person: String,on day: String) -> String {return "Hello \(person),today is \(day)."}greet("John",on: "Wednesday")
Use a tuple to make a compound value—for example,to return multiple values from a function. The elements of a tuple can be referred to either by name or by number.
func calculateStatistics(scores: [Int]) -> (min: Int,max: Int,sum: Int) {var min = scores[0]var max = scores[0]var sum = 0for score in scores {if score > max {max = score} else if score < min {min = score}sum += score}return (min,max,sum)}let statistics = calculateStatistics(scores: [5,100,9])print(statistics.sum)print(statistics.2)
Functions can also take a variable number of arguments,collecting them into an array.
func sumOf(numbers: Int...) -> Int {var sum = 0for number in numbers {sum += number}return sum}sumOf()sumOf(numbers: 42,597,12)
EXPERIMENT
Write a function that calculates the average of its arguments.
Functions can be nested. nested functions have access to variables that were declared in the outer function. You can use nested functions to organize the code in a function that is long or complex.
func returnFifteen() -> Int {var y = 10func add() {y += 5}add()return y}returnFifteen()
Functions are a first-class type. This means that a function can return another function as its value.
func makeIncrementer() -> ((Int) -> Int) {func addOne(number: Int) -> Int {return 1 + number}return addOne}var increment = makeIncrementer()increment(7)
A function can take another function as one of its arguments.
func hasAnyMatches(list: [Int],condition: (Int) -> Bool) -> Bool {for item in list {if condition(item) {return true}}return false}func lessthanTen(number: Int) -> Bool {return number < 10}var numbers = [20,19,12]hasAnyMatches(list: numbers,condition: lessthanTen)
Functions are actually a special case of closures: blocks of code that can be called later. The code in a closure has access to things like variables and functions that were available in the scope where the closure was created,even if the closure is in a different scope when it is executed—you saw an example of this already with nested functions. You can write a closure without a name by surrounding code with braces ({}). Useinto separate the arguments and return type from the body.
numbers.map({(number: Int) -> Int inlet result = 3 * numberreturn result})
EXPERIMENT
Rewrite the closure to return zero for all odd numbers.
You have several options for writing closures more concisely. When a closure’s type is already kNown,such as the callback for a delegate,you can omit the type of its parameters,its return type,or both. Single statement closures implicitly return the value of their only statement.
let mappednumbers = numbers.map({ number in 3 * number })print(mappednumbers)
You can refer to parameters by number instead of by name—this approach is especially useful in very short closures. A closure passed as the last argument to a function can appear immediately after the parentheses. When a closure is the only argument to a function,you can omit the parentheses entirely.
let sortednumbers = numbers.sorted { $0 > $1 }print(sortednumbers)
Objects and Classes
Useclassfollowed by the class’s name to create a class. A property declaration in a class is written the same way as a constant or variable declaration,except that it is in the context of a class. Likewise,method and function declarations are written the same way.
class Shape {var numberOfSides = 0func simpleDescription() -> String {return "A shape with \(numberOfSides) sides."}}
EXPERIMENT
Add a constant property withlet,and add another method that takes an argument.
Create an instance of a class by putting parentheses after the class name. Use dot Syntax to access the properties and methods of the instance.
var shape = Shape()shape.numberOfSides = 7var shapeDescription = shape.simpleDescription()
This version of theShapeclass is missing something important: an initializer to set up the class when an instance is created. Useinitto create one.
class NamedShape {var numberOfSides: Int = 0var name: Stringinit(name: String) {self.name = name}func simpleDescription() -> String {return "A shape with \(numberOfSides) sides."}}
Notice howselfis used to distinguish thenameproperty from thenameargument to the initializer. The arguments to the initializer are passed like a function call when you create an instance of the class. Every property needs a value assigned—either in its declaration (as withnumberOfSides) or in the initializer (as withname).
Usedeinitto create a deinitializer if you need to perform some cleanup before the object is deallocated.
Subclasses include their superclass name after their class name,separated by a colon. There is no requirement for classes to subclass any standard root class,so you can include or omit a superclass as needed.
Methods on a subclass that override the superclass’s implementation are marked withoverride—overriding a method by accident,withoutoverride,is detected by the compiler as an error. The compiler also detects methods withoverridethat don’t actually override any method in the superclass.
class Square: NamedShape {var sideLength: Doubleinit(sideLength: Double,name: String) {self.sideLength = sideLengthsuper.init(name: name)numberOfSides = 4}func area() -> Double {return sideLength * sideLength}override func simpleDescription() -> String {return "A square with sides of length \(sideLength)."}}let test = Square(sideLength: 5.2,name: "my test square")test.area()test.simpleDescription()
EXPERIMENT
Make another subclass ofNamedShapecalledCirclethat takes a radius and a name as arguments to its initializer. Implement anarea()and asimpleDescription()method on theCircleclass.
In addition to simple properties that are stored,properties can have a getter and a setter.
class EquilateralTriangle: NamedShape {var sideLength: Double = 0.0init(sideLength: Double,name: String) {self.sideLength = sideLengthsuper.init(name: name)numberOfSides = 3}var perimeter: Double {get {return 3.0 * sideLength}set {sideLength = newValue / 3.0}}override func simpleDescription() -> String {return "An equilateral triangle with sides of length \(sideLength)."}}var triangle = EquilateralTriangle(sideLength: 3.1,name: "a triangle")print(triangle.perimeter)triangle.perimeter = 9.9print(triangle.sideLength)
In the setter forperimeter,the new value has the implicit namenewValue. You can provide an explicit name in parentheses afterset.
Notice that the initializer for theEquilateralTriangleclass has three different steps:
-
Setting the value of properties that the subclass declares.
-
Calling the superclass’s initializer.
-
Changing the value of properties defined by the superclass. Any additional setup work that uses methods,getters,or setters can also be done at this point.
If you don’t need to compute the property but still need to provide code that is run before and after setting a new value,usewillSetanddidSet. The code you provide is run any time the value changes outside of an initializer. For example,the class below ensures that the side length of its triangle is always the same as the side length of its square.
class TriangleAndSquare {var triangle: EquilateralTriangle {willSet {square.sideLength = newValue.sideLength}}var square: Square {willSet {triangle.sideLength = newValue.sideLength}}init(size: Double,name: String) {square = Square(sideLength: size,name: name)triangle = EquilateralTriangle(sideLength: size,name: name)}}var triangleAndSquare = TriangleAndSquare(size: 10,name: "another test shape")print(triangleAndSquare.square.sideLength)print(triangleAndSquare.triangle.sideLength)triangleAndSquare.square = Square(sideLength: 50,name: "larger square")print(triangleAndSquare.triangle.sideLength)
When working with optional values,you can write?before operations like methods,properties,and subscripting. If the value before the?isnil,everything after the?is ignored and the value of the whole expression isnil. Otherwise,the optional value is unwrapped,and everything after the?acts on the unwrapped value. In both cases,the value of the whole expression is an optional value.
let optionalSquare: Square? = Square(sideLength: 2.5,name: "optional square")let sideLength = optionalSquare?.sideLength
Enumerations and Structures
Useenumto create an enumeration. Like classes and all other named types,enumerations can have methods associated with them.
enum Rank: Int {case ace = 1case two,three,four,five,six,seven,eight,nine,tencase jack,queen,kingfunc simpleDescription() -> String {switch self {case .ace:return "ace"case .jack:return "jack"case .queen:return "queen"case .king:return "king"default:return String(self.rawValue)}}}let ace = Rank.acelet aceRawValue = ace.rawValue
EXPERIMENT
Write a function that compares twoRankvalues by comparing their raw values.
By default,Swift assigns the raw values starting at zero and incrementing by one each time,but you can change this behavior by explicitly specifying values. In the example above,Aceis explicitly given a raw value of1,and the rest of the raw values are assigned in order. You can also use strings or floating-point numbers as the raw type of an enumeration. Use therawValueproperty to access the raw value of an enumeration case.
Use theinit?(rawValue:)initializer to make an instance of an enumeration from a raw value.
if let convertedRank = Rank(rawValue: 3) {let threeDescription = convertedRank.simpleDescription()}
The case values of an enumeration are actual values,not just another way of writing their raw values. In fact,in cases where there isn’t a meaningful raw value,you don’t have to provide one.
enum Suit {case spades,hearts,diamonds,clubsfunc simpleDescription() -> String {switch self {case .spades:return "spades"case .hearts:return "hearts"case .diamonds:return "diamonds"case .clubs:return "clubs"}}}let hearts = Suit.heartslet heartsDescription = hearts.simpleDescription()
EXPERIMENT
Add acolor()method toSuitthat returns “black” for spades and clubs,and returns “red” for hearts and diamonds.
Notice the two ways that theheartscase of the enumeration is referred to above: When assigning a value to theheartsconstant,the enumeration caseSuit.heartsis referred to by its full name because the constant doesn’t have an explicit type specified. Inside the switch,the enumeration case is referred to by the abbreviated form.heartsbecause the value ofselfis already kNown to be a suit. You can use the abbreviated form anytime the value’s type is already kNown.
If an enumeration has raw values,those values are determined as part of the declaration,which means every instance of a particular enumeration case always has the same raw value. Another choice for enumeration cases is to have values associated with the case—these values are determined when you make the instance,and they can be different for each instance of an enumeration case. You can think of the associated values as behaving like stored properties of the enumeration case instance. For example,consider the case of requesting the sunrise and sunset times from a server. The server either responds with the requested information,or it responds with a description of what went wrong.
enum ServerResponse {case result(String,String)case failure(String)}let success = ServerResponse.result("6:00 am","8:09 pm")let failure = ServerResponse.failure("Out of cheese.")switch success {case let .result(sunrise,sunset):print("Sunrise is at \(sunrise) and sunset is at \(sunset).")case let .failure(message):print("Failure... \(message)")}
EXPERIMENT
Add a third case toServerResponseand to the switch.
Notice how the sunrise and sunset times are extracted from theServerResponsevalue as part of matching the value against the switch cases.
Usestructto create a structure. Structures support many of the same behaviors as classes,including methods and initializers. One of the most important differences between structures and classes is that structures are always copied when they are passed around in your code,but classes are passed by reference.
struct Card {var rank: Rankvar suit: Suitfunc simpleDescription() -> String {return "The \(rank.simpleDescription()) of \(suit.simpleDescription())"}}let threeOfSpades = Card(rank: .three,suit: .spades)let threeOfSpadesDescription = threeOfSpades.simpleDescription()
EXPERIMENT
Add a method toCardthat creates a full deck of cards,with one card of each combination of rank and suit.
Protocols and Extensions
Useprotocolto declare a protocol.
protocol ExampleProtocol {var simpleDescription: String { get }mutating func adjust()}
Classes,enumerations,and structs can all adopt protocols.
class SimpleClass: ExampleProtocol {var simpleDescription: String = "A very simple class."var anotherProperty: Int = 69105func adjust() {simpleDescription += " Now 100% adjusted."}}var a = SimpleClass()a.adjust()let aDescription = a.simpleDescriptionstruct SimpleStructure: ExampleProtocol {var simpleDescription: String = "A simple structure"mutating func adjust() {simpleDescription += " (adjusted)"}}var b = SimpleStructure()b.adjust()let bDescription = b.simpleDescription
EXPERIMENT
Write an enumeration that conforms to this protocol.
Notice the use of themutatingkeyword in the declaration ofSimpleStructureto mark a method that modifies the structure. The declaration ofSimpleClassdoesn’t need any of its methods marked as mutating because methods on a class can always modify the class.
Useextensionto add functionality to an existing type,such as new methods and computed properties. You can use an extension to add protocol conformance to a type that is declared elsewhere,or even to a type that you imported from a library or framework.
extension Int: ExampleProtocol {var simpleDescription: String {return "The number \(self)"}mutating func adjust() {self += 42}}print(7.simpleDescription)
EXPERIMENT
Write an extension for theDoubletype that adds anabsoluteValueproperty.
You can use a protocol name just like any other named type—for example,to create a collection of objects that have different types but that all conform to a single protocol. When you work with values whose type is a protocol type,methods outside the protocol deFinition are not available.
let protocolValue: ExampleProtocol = aprint(protocolValue.simpleDescription)// print(protocolValue.anotherProperty) // Uncomment to see the error
Even though the variableprotocolValuehas a runtime type ofSimpleClass,the compiler treats it as the given type ofExampleProtocol. This means that you can’t accidentally access methods or properties that the class implements in addition to its protocol conformance.
Error Handling
You represent errors using any type that adopts theErrorprotocol.
enum PrinterError: Error {case outOfPapercase noTonercase onFire}
Usethrowto throw an error andthrowsto mark a function that can throw an error. If you throw an error in a function,the function returns immediately and the code that called the function handles the error.
func send(job: Int,toPrinter printerName: String) throws -> String {if printerName == "Never Has Toner" {throw PrinterError.noToner}return "Job sent"}
There are several ways to handle errors. One way is to usedo-catch. Inside thedoblock,you mark code that can throw an error by writingtryin front of it. Inside thecatchblock,the error is automatically given the nameerrorunless you give it a different name.
do {let printerResponse = try send(job: 1040,toPrinter: "Bi Sheng")print(printerResponse)} catch {print(error)}
EXPERIMENT
Change the printer name to"Never Has Toner",so that thesend(job:toPrinter:)function throws an error.
You can provide multiplecatchblocks that handle specific errors. You write a pattern aftercatchjust as you do aftercasein a switch.
do {let printerResponse = try send(job: 1440,toPrinter: "Gutenberg")print(printerResponse)} catch PrinterError.onFire {print("I'll just put this over here,with the rest of the fire.")} catch let printerError as PrinterError {print("Printer error: \(printerError).")} catch {print(error)}
EXPERIMENT
Add code to throw an error inside thedoblock. What kind of error do you need to throw so that the error is handled by the firstcatchblock? What about the second and third blocks?
Another way to handle errors is to usetry?to convert the result to an optional. If the function throws an error,the specific error is discarded and the result isnil. Otherwise,the result is an optional containing the value that the function returned.
let printerSuccess = try? send(job: 1884,toPrinter: "Mergenthaler")let printerFailure = try? send(job: 1885,toPrinter: "Never Has Toner")
Usedeferto write a block of code that is executed after all other code in the function,just before the function returns. The code is executed regardless of whether the function throws an error. You can usedeferto write setup and cleanup code next to each other,even though they need to be executed at different times.
var fridgeIsOpen = falselet fridgeContent = ["milk","eggs","leftovers"]func fridgeContains(_ food: String) -> Bool {fridgeIsOpen = truedefer {fridgeIsOpen = false}let result = fridgeContent.contains(food)return result}fridgeContains("banana")print(fridgeIsOpen)
Generics
Write a name inside angle brackets to make a generic function or type.
func makeArray<Item>(repeating item: Item,numberOfTimes: Int) -> [Item] {var result = [Item]()for _ in 0..<numberOfTimes {result.append(item)}return result}makeArray(repeating: "knock",numberOfTimes:4)
You can make generic forms of functions and methods,as well as classes,and structures.
// Reimplement the Swift standard library's optional typeenum OptionalValue<Wrapped> {case nonecase some(Wrapped)}var possibleInteger: OptionalValue<Int> = .nonepossibleInteger = .some(100)
Usewhereright before the body to specify a list of requirements—for example,to require the type to implement a protocol,to require two types to be the same,or to require a class to have a particular superclass.
func anyCommonElements<T: Sequence,U: Sequence>(_ lhs: T,_ rhs: U) -> Boolwhere T.Iterator.Element: Equatable,T.Iterator.Element == U.Iterator.Element {for lhsItem in lhs {for rhsItem in rhs {if lhsItem == rhsItem {return true}}}return false}anyCommonElements([1,3],[3])
EXPERIMENT
Modify theanyCommonElements(_:_:)function to make a function that returns an array of the elements that any two sequences have in common.
Writing<T: Equatable>is the same as writing<T> ... where T: Equatable.
")
A Tour of Golang (二)
是时候继续总结一波golang使用心得了!码的代码越多了解的go就越多,go处理问题的思路确实不一样
9. defer panic recover
defer
接上次的问题继续讨论,先来看下golang blog上怎么说defer
A defer statement pushes a function call onto a list. The list of saved calls is executed after the surrounding function returns. Defer is commonly used to simplify functions that perform varIoUs clean-up actions.
个人感觉像是像 C++放在 destructor 中做的事一样,但是仔细考量下来还是不一样
1. defer语句不会进行求值,在声明defer语句的时进行计算,而不是call defer的时候.
2. 多个defer是 LIFO 的,因为就是说,最后声明的defer会最先call
3. defer可以给函数的return赋值或者进行修改,也就是说你的函数返回值可能会跟你的预期不符,如果你在defer中改变了返回的对象.
func c() (i int) {
    defer func() { i++ }()
    return 1
} \\函数最终返回的是2而不是1
panic
panic比较好理解,一旦触发了panic,这个内置的函数将会导致整个调用栈退出.
触发panic可能是由于 runtime error,当然也可以手动的调用
recover
recover用于从panic流程中重新获得控制权.因此recover只能被定义在defer中才会有效果.主动调用recover只会返回nil而且其他什么也不会发生…
func main() {
    f()
    fmt.Println("Returned normally from f.")
}

func f() {
    defer func() {
        if r := recover(); r != nil {
            fmt.Println("Recovered in f",r)
        }
    }()
    fmt.Println("Calling g.")
    g(0)
    fmt.Println("Returned normally from g.")
}

func g(i int) {
    if i > 3 {
        fmt.Println("Panicking!")
        panic(fmt.Sprintf("%v",i))
    }
    defer fmt.Println("Defer in g",i)
    fmt.Println("Printing in g",i)
    g(i + 1)
}
正常的情况下,输出应该可以预见
Calling g.
Printing in g 0
Printing in g 1
Printing in g 2
Printing in g 3
Panicking!
Defer in g 3
Defer in g 2
Defer in g 1
Defer in g 0
Recovered in f 4
Returned normally from f.
如果去掉recover 可以看一下结果
Calling g.
Printing in g 0
Printing in g 1
Printing in g 2
Printing in g 3
Panicking!
Defer in g 3
Defer in g 2
Defer in g 1
Defer in g 0
panic: 4

panic PC=0x2a9cd8
[stack trace omitted]
退出的goroutine打印了栈信息然后退出而.
10.接口
实现
go接口编程十分优雅,采用的是叫做 非嵌入式接口的模型:
传统的面向对象模型中,接口被设计的需要明确的继承关系,这种关系在声明的时候就必须确定,例如 C++ 和 JAVA. 尽管JAVA采用了implement这种方式表述接口,但接口仍然没有脱离C++中的模型:继承与派生之间的强依赖关系.
go认为,接口之间的这种依赖应该是单向的.接口的使用者不关心接口的实现方式.接口的实现方也不应该提前知道使用方所有的需求的接口.也就是说接口应该是定义了一种规范,双方都遵循的规范,但是对于双方来讲,并不应该存在依赖关系.
go中,一旦有类实现的某个接口所要求的所有的函数,那么就是实现的这个接口.因此go中不应该存在继承树这样的东西:你只需要知道你要提供的是哪些功能.
接口赋值
不过,go同样有一些特殊的规定:
type Integer int

func (a Integer) less (b Integer) bool {
}

func (a *Integer) bigger (b *Integer) bool {
}

type IntInterface interface{
less (a Integer) bool
bigger (a Integer) bool
}
这种情况下的赋值一个接口对象,应该使用
var a Integer = 1

var b IntInterface = &a
在go中会根据less 自动的生成 对于 *Integer 的less方法,而无法从指针类型的方法推导出非指针的方法.
接口查询 & 类型查询
...
if value,ok := object.(type_name); ok{
}
...
也可以更直接的使用switch避免进一步转换
...
switch v := object.(type){
        case int :
        case string:
...
11.goroutine 模型&调度
goroutine 是go语言并发的实现方式,goroutine其实是一种对于Coroutine的实现。go语言通过简单易用的goroutine使得并发程序非常容易写出来。
看到的知乎上一个系统的回答,拿来引用并且改动了一部分:
http://www.zhihu.com/question/20862617/answer/27964865
用户空间线程和内核空间线程之间的映射关系有:N:1,1:1和M:N
N:1是说,多个(N)用户线程始终在一个内核线程上跑,context上下文切换确实很快,但是无法真正的利用多核。
1:1是说,一个用户线程就只在一个内核线程上跑,这时可以利用多核,但是上下文switch很慢。
M:N是说, 多个goroutine在多个内核线程上跑,这个看似可以集齐上面两者的优势,但是无疑增加了调度的难度。
一般来说,如果没有显式的让出cpu,就会一直执行当前协程。关于goroutine何时调度,一般会有3种情况:
调用runtime·gosched函数。
goroutine主动放弃cpu,该goroutine会被设置为runnable状态,然后放入一个全局等待队列中,而P将继续执行下一个goroutine。使用runtime·gosched函数是一个主动的行为,一般是在执行长任务时又想其它goroutine得到执行的机会时调用。
调用runtime·park函数。
goroutine进入waitting状态,除非对其调用runtime·ready函数,否则该goroutine将永远不会得到执行。而P将继续执行下一个goroutine。使用runtime·park函数一般是在某个条件如果得不到满足就不能继续运行下去时调用,当条件满足后需要使用runtime·ready以唤醒它(这里唤醒之后是否会加入全局等待队列还有待研究)。像channel操作,定时器中,网络poll等都有可能park goroutine。
慢系统调用。
这样的系统调用会阻塞等待,为了使该P上挂着的其它G也能得到执行的机会,需要将这些goroutine转到另一个OS线程上去。具体的做法是:首先将该P设置为syscall状态,然后该线程进入系统调用阻塞等待。之前提到过的sysmom线程会定期扫描所有的P,发现一个P处于了syscall的状态,就将M和P分离(实际上只有当 Syscall 执行时间超出某个阈值时,才会将 M 与 P 分离)。RUNTIME会再分配一个M和这个P绑定,从而继续执行队列中的其它G。而当之前阻塞的M从系统调用中返回后,会将该goroutine放入全局等待队列中,自己则sleep去。
Go的调度器内部有三个重要的结构:M,P,S
M:代表真正的内核OS线程,和POSIX里的thread差不多,真正干活的人
G:代表一个goroutine,它有自己的栈,instruction pointer和其他信息(正在等待的channel等等),用于调度。
P:代表调度的上下文,可以把它看做一个局部的调度器,使go代码在一个线程上跑,它是实现从N:1到N:M映射的关键。(这就是为甚么 GOMAXPROCES 可以设置的比系统大的原因)
图中看,有2个物理线程M,每一个M都拥有一个context(P),每一个也都有一个正在运行的goroutine。
P的数量可以通过GOMAXPROCS()来设置,它其实也就代表了真正的并发度,即有多少个goroutine可以同时运行。
图中灰色的那些goroutine并没有运行,而是出于ready的就绪态,正在等待被调度。P维护着这个队列(称之为runqueue),
Go语言里,启动一个goroutine很容易:go func() 就行,所以每有一个go语句被执行,runqueue队列就在其末尾加入一个goroutine,在下一个调度点,就从runqueue中取出一个goroutine执行。
为何要维护多个上下文P?因为当一个OS线程被阻塞时,P可以转而投奔另一个OS线程!
图中看到,当一个OS线程M0陷入阻塞时,P转而在OS线程M1上运行。调度器保证有足够的线程来运行所以的context P。
图中的M1可能是被创建,或者从线程缓存中取出。
当MO返回时,它必须尝试取得一个context P来运行goroutine
1. 一般情况下,它会从其他的OS线程那里steal偷一个context过来

2. 如果没有偷到的话,它就把goroutine放在一个global runqueue里,然后自己就去睡大觉了(放入线程缓存里)。
Contexts们也会周期性的检查global runqueue,否则global runqueue上的goroutine永远无法执行。
另一种情况是P所分配的任务G很快就执行完了(分配不均),这就导致了一个上下文P闲着没事儿干而系统却任然忙碌。但是如果global runqueue没有任务G了,那么P就不得不从其他的上下文P那里拿一些G来执行。一般来说,如果上下文P从其他的上下文P那里要偷一个任务的话,一般就‘偷’run queue的一半,这就确保了每个OS线程都能充分的使用。
")
A Tour of Golang (一)
从入职开始学习Go也有2周了吧,看书比较慢,加上平时使用,对于Golang只能说是有了一个初步的了解。一边翻书,一边简单的总结一点基础的东西。写着写着感觉就变成了一个C++11和Golang的比较。
变量
1、:= 初始化
相对于C,go提供的:=可以推导表达式的类型还是很方便的,如同C11里提供的 auto 类型。
但是也有个坑在这里。:= 操作相当于生命了一个变量,不能用于给已经存在的变量进行赋值,这样会报错。而且:=不能用于声明全局变量。
2、多重赋值
多重赋值实在是方便,比如swap直接写 a,b = b,a就可以。但是因为有了多重赋值,C/C++的 , 逗号表达式被取消了。我个人觉得是因为这个原因,因为这样写就会有歧义:
a,b = 4,c@H_301_30@ 如果有,逗号表达式, 就会有歧义:到底是多重赋值还是声明语句呢?3、iota 与 const 枚举
- 我自己把这俩划分到一起了,因为iota实在是让我感到迷惑。。。这个iota其实跟true false 一样是go的预定义常量,只不过iota可以被编译器修改。iota我个人觉得就是一个const枚举中的行号。iota有些限制只能在 const 里面使用
- 是 const 里面的行数索引器
- 每个 const 里面,iota 都从 0 开始。
const(
    A = iota
    B
    C
)@H_301_30@
4、bool
5、~ 变成了 ^
6、数组 与 切片slice
7、map的查找
value,ok := map[key]
if ok{
 //DO
}@H_301_30@
8、匿名函数 与函数闭包
//C++:举例子,写了一个重载了()的类class F
class F
{
    private:
<pre name="code">    <span>double a = 1.0;</span>@H_301_30@
     <span>public:</span>@H_301_30@
     <span>double operator ()(double x,double y) const;/</span>@H_301_30@};double F::operator ()(double x,double y) const{
     <span>return (x+a)*y;</span>@H_301_30@}int main(){
     <span>F f;</span>@H_301_30@
     std::cout<span><<f(1.5,2.2)<<std::endl;</span>@H_301_30@
     <span>return 0;</span>@H_301_30@}
 @H_301_30@

   这就是一个C++中重载了()函数调用运算符的类的用法。lambda不过是一个匿名的这种类的一个对象,也算是一种语法糖。


   go中的闭包也是如此(demo改了N次终于觉得符合我的想法啦!)


  //golang中的闭包与匿名函数
func main() {
<pre name="code">    <span>var a float64 = 1.0</span>@H_301_30@    f := func(x,y float64) float64 {        return (x + a) * y    }    fmt.Println(f(1.5,2.2))}
  @H_301_30@

    go闭包相当于把 var a和一个匿名函数封装到了一起,声明并调用匿名函数,返回一个接受2参数的匿名函数对象(实在找不到形容的方法,函数对象这个东西算是C++特有?)
   再来对比一下C++中的lambda


  //C++中的lambda
int main() {
	double a = 1.0;
	auto f = [&a](double x,double y) ->return double { return (x + a) * y };
	std::cout << f(1.5,2.2) << std::endl;
}@H_301_30@


   区别并不大,我也是做一个比较,如果不知这样也希望指教。打心里说,我更喜欢C++的lambda一点。


   9、panic() recover() 与 defer


   把这三个放在一起也是没想好能不能这么总结


   defer表示默认执行的,相当于在析构函数中的语句。panic()和defer配合使用,调用panic之后就会执行defer中的语句,defer中遇到recover()就会使得执行错误处理的流程终止(这里不是特别明白,留待以后继续学习吧)

A tour of gRPC:01 - 基础理论
gRPC的动机
在实际工程中后端服务实现方式往往不止一种,并且由于技术或者业务的限制,通常会存在着多种语言 编写的服务。而服务间为了相互通讯就必须使用一种统一的 API 契约达成一种一致的协议。该协议要规 定诸如:通讯信道,身份验证机制、负载格式、数据模型和如何处理异常情况。
当然我们希望通讯可以做到高效(快速且轻量),由于微服务间服务信息交换的数量通常是巨大的,所以通信也理应越快越好。同时在例如移动应用或其他网速和带宽是有限的情景下,有一个轻量级的通信协议与后端服务进行交互非常重要。
最后,我们也希望通信尽可能的简单,例如我们现在一个拥有千个服务的系统,我们不想花大量的时间编写让服务相互通信的代码。我们想要的是某种框架,让框架来帮我们完成一切通信相关内容,让开发人员专注于实现服务的核心业务逻辑。
gRPC 是什么?
gRPC 最初由 google 所开发,所以 gRPC 中的 g 往往被认为代表 google 的意思,事实上在 gRPC 1.0的时候确实是这样,不过后续版本的 g 相当于一个版本代号 (例如1.1 的 g 代表 good),可以在 gRPC版本代号 进行查看。而 gRPC 现在属于 云原生基金会(CNCF) 的一部分(如同 k8s)。那么RPC代表什 么呢?Remote Procedure Calls它是一种调用的形式,通俗的说,它通过底层框架进行的自动处理,允 许一台计算机上的程序调用另一台计算机上的程序。这种调用在服务端看来,我们直接在客户端上调用 了一个服务端代码的方法(或函数)。
gRPC 是如何工作的?
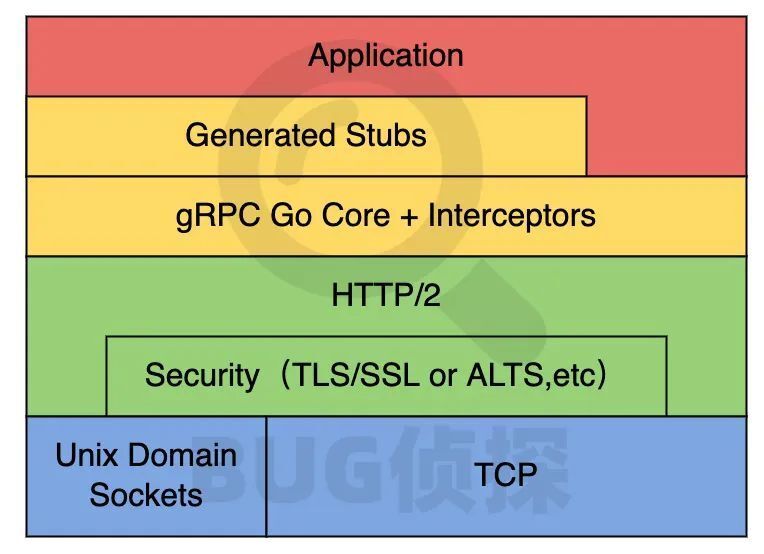
client 拥有一个 stub (桩)它提供与Server 相同的方法,stub 由 gRpc自动生成。 Stub 在后台调用gRPC 框架通过网络与 server 交换信息 。由于 stub 的存在,client 和 server 现在只需要关心实现业务 的核心逻辑 。

gRPC 代码生成
gRPC是如何帮助我们生成 stub的?
为了给 server 和 client 生成 stub 我们必须要先在 Protocol Buffer 文件中编写 API 合约(规则),包 括 服务的描述 和它的 有效消息载荷(payload)。
下面展示一个简单的 protoBuf 格式的 Protocol Buffer
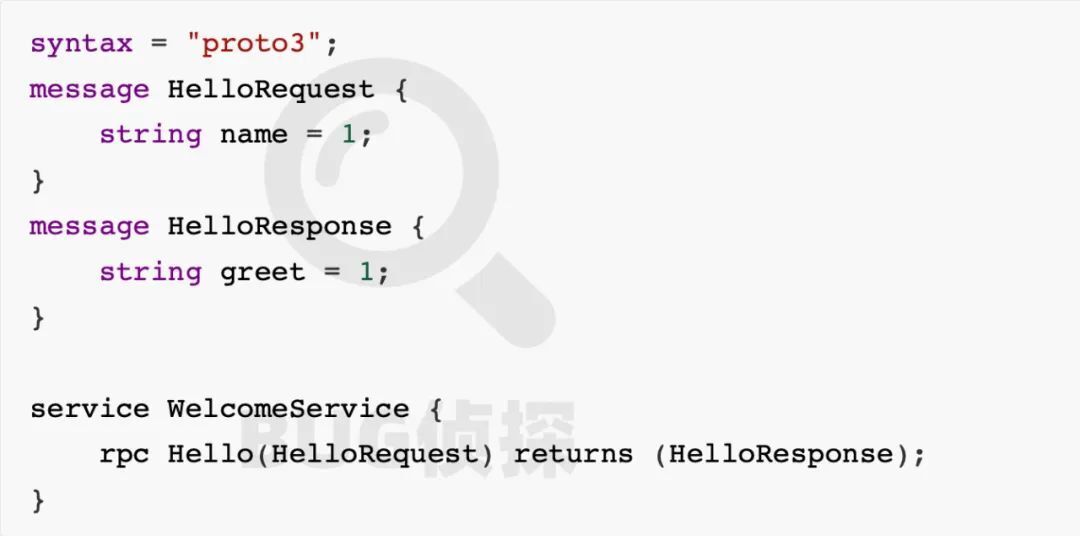
在上的示例文件中,定义了Hello 方法(函数),它以 HelloRequest 作为输入,并返回一个HelloResponse ,其中 HelloRequest 仅包含一个字符串 name, HelloResponse 也有一个字符串greet 。从类似这样的原始文件中,由协议缓冲区编译器根据编程语言,生成server 和 client 的 stub 代码。
那么 gRPC 为什么使用了 protocol buffer 作为 API规约?
1. 它非常容易阅读和理解
2. 让不同编程语言,拥有统一的一种描述
3. 使用二进制格式,同JSON/XML等基于文本的格式相比,更小、更易传输 和 更好的序列/反序列化性能
4. 提供了 client 和 server 间的 强类型(Strongly typed) API 合约
5. 拥有大量的 API 演化规则,保证了API的向前/向后 兼容
事实上 gRPC 并不与 Protocol Buffer 强绑定,我们可以使用 Google Flatbuffers 或 Microsoft Bond代替 Protocol Buffer 。但是 Protocol Buffer 是一个棒的规则,因为它被多种编程语言所支持。
原生实现:GO、Java、NodeJS
包装实现:C/C++、C#、Objective-C、Python、Ruby、Dart、PHP
非官方支持的第三方库:swift rust typescript ....
gRPC 为什么高效
gRPC 使用 HTTP/2 作为其传输协议,因此,它继承了 HTTP/2 所提供的一些出色的功能 。例如 二进制 格式,与其他使用基于文本的协议相比,性能更高、更健壮、传输更轻便、解码更安全,与 protocol buffer 的结合也更好;同时 Http/2还使用 HPACK压缩 HEAD,减少开销并提高性能;Http/2 中还可以 进行多路复用,这意味着客户端和服务端可以通过单个TPC连接并行的发送多个请求和接收多个响应, 这能有效减少延迟以提高网络的利用效率;Http/2 还允许服务器进行推送,在客户端发出单个请求的情 况下,服务端可以返回多个响应,在多数情况下,这对减少 客户端 和 服务端 之间的往返延迟非常有价值。
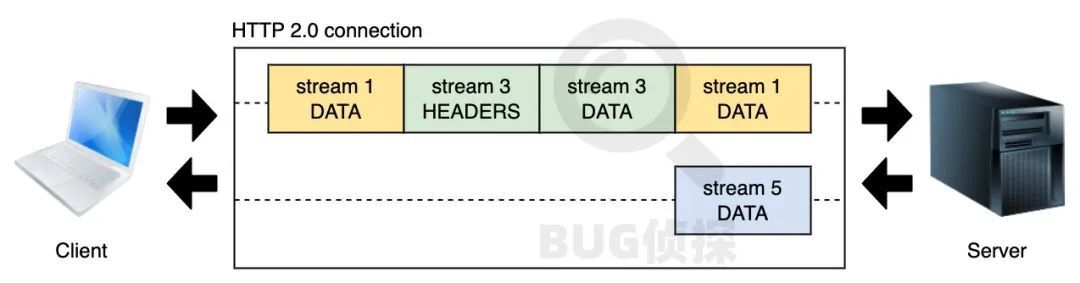
Http/2 底层是怎么运行的
HTTP/2 一个 TCP 连接可承受多个双向流,每个流都有唯一的标识符并携带多个双向消息,每个消息 (请求/响应)都可以分解为多个二进制帧,帧是承载不同数据类型的最小单位,如:HEADERS(头)、SETTINGS(设置)、PRIORITY(优先级)、DATA(数据等)等。

不同流上的帧在连接上交错,并将在到达另一端时重新组装。
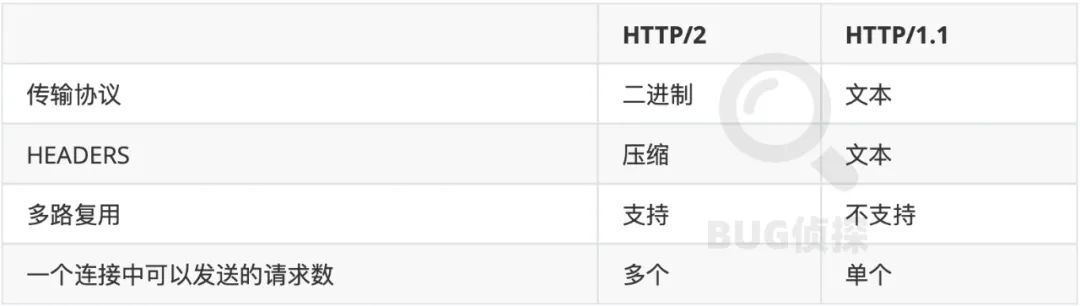
HTTP/2 vs HTTP/1.1
我们再看一眼 HTTP/2 与我们熟悉的 HTTP/1.1 的对比
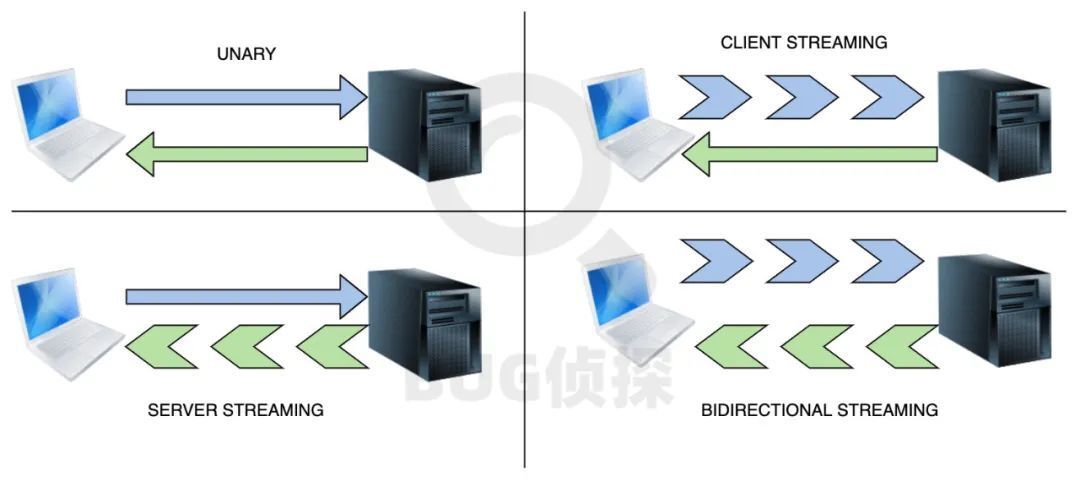
gRPC 的四种类型
一元 unary:client发送一个请求,server 回复一个响应
客户端流 client streaming:客户端发送多个消息流请求,期望server仅回复一个响应
服务器流 server streaming:客户端仅发送一个请求,服务端回复多个消息流响应
双向流 bidirectional streaming:客户端和服务器将平行发送多个请求和响应,它非常灵活并且是 非阻塞的,这意味着,任何一方都不需要在发送下一条消息之前等待响应。
gRPC vs REST

gRPC 的适用场景
微服务是 gRPC 真正发挥作用的地方,因为它可以实现低延迟和高吞吐的通信。由于许多编程语言提供 了开箱即用的代码生成,所以它也适用于多种语言环境。点对点通信也是使用gRPC的好地方因为它对双 向流提供了良好的支持。最后,因为它轻量的消息格式,对于网络受限的环境也是一个不错的选择。


关于Swift 初见和A Swift Tour的问题就给大家分享到这里,感谢你花时间阅读本站内容,更多关于A Swift Tour、A Tour of Golang (二)、A Tour of Golang (一)、A tour of gRPC:01 - 基础理论等相关知识的信息别忘了在本站进行查找喔。
本文标签:


![[转帖]Ubuntu 安装 Wine方法(ubuntu如何安装wine)](https://www.gvkun.com/zb_users/cache/thumbs/4c83df0e2303284d68480d1b1378581d-180-120-1.jpg)

