想了解ansible连接受控主机,报错:UNREACHABLE!的新动态吗?本文将为您提供详细的信息,我们还将为您解答关于ansibleconnection的相关问题,此外,我们还将为您介绍关于And
想了解ansible连接受控主机,报错:UNREACHABLE!的新动态吗?本文将为您提供详细的信息,我们还将为您解答关于ansible connection的相关问题,此外,我们还将为您介绍关于Android C/C++ 内存泄漏分析 unreachable、ansible 002 连接被控端 inventory ansible.cfg ansible-adhoc ansible 原理、ansible 主机清单 /etc/ansible/hosts、ansible 报错 Using a SSH password instead of a key is not possible because Host Key checking is enabl...的新知识。
本文目录一览:- ansible连接受控主机,报错:UNREACHABLE!(ansible connection)
- Android C/C++ 内存泄漏分析 unreachable
- ansible 002 连接被控端 inventory ansible.cfg ansible-adhoc ansible 原理
- ansible 主机清单 /etc/ansible/hosts
- ansible 报错 Using a SSH password instead of a key is not possible because Host Key checking is enabl...
")
ansible连接受控主机,报错:UNREACHABLE!(ansible connection)


问题解决:
可能是受控主机的端口修改了,没有重启sshd服务。请启动一下,具体操作请见图片!!!
总结
以上是小编为你收集整理的ansible连接受控主机,报错:UNREACHABLE!全部内容。
如果觉得小编网站内容还不错,欢迎将小编网站推荐给好友。
原文地址:https://blog.51cto.com/14078730/2419829

Android C/C++ 内存泄漏分析 unreachable
背景
随着对客户端稳定性质量的不断深入,部分的重点、难点问题逐步治理,内存质量逐步成为了影响客户端质量的最突出的问题之一。因此淘宝对此进行了系统性的内存治理,成立了内存专项。
“工欲善其事、必先利其器”。本文主要讲述内存专项的工具之一,内存泄漏分析memunreachable。
内存泄漏
内存泄漏(Memory Leak)是指程序中已动态分配的堆内存由于某种原因程序未释放或无法释放,造成系统内存的浪费,导致程序运行速度减慢甚至系统崩溃等严重后果。
对于 c/c++内存泄漏,由于存在指针要精确找到那些对象没有被引用是非常困难的,一直是困扰 c/c++重点、难点问题之一。目前也有一些基于类似 GC Swap-Mark 的算法去找到内存泄露,常见工具如 libmemunreachable,kmemleak,llvm leaksanitizer 这类工具也需要记录分配信息。
Android 的 libmemunreachable 是一个零开销的本地内存泄漏检测器。 它会使用不精确的“标记-清除”垃圾回收器遍历所有本机内存,同时将任何不可访问的块报告为泄漏。 有关使用说明,请参阅 libmemunacachable 文档[1]。虽然 Android 提供了 libmemunreachable 如此优秀的开源 c/c++内存泄漏工具,并内嵌到 Android 的系统环境,帮忙我们去定位内存泄漏问题,但是目前 libmemunreachable 使用依赖线下的 Debug 配置环境,无法支持淘宝 Release 包。
本文结合 libmemunreachable 源码,我们一起来欣赏 libmemunreachable 的实现原理以及淘宝对 libmemunreachable 改造用来实现对 Release 包的支持,帮助淘宝定位和排查线上的内存泄漏问题。
libmemunreachable 分析
基本原理
我们知道 JAVA GC 算法中,如果内存中的对象中,如果不在被 GcRoot 节点直接或间接持有,那么 GC 在适当的时间会触发垃圾回收机制,去释放内存。那么哪些节点可以被作为 GC 的 Root 节点:
- 虚拟机栈(栈帧中的本地变量表)中引用的对象;
- 方法区中的类静态属性引用的对象;
- 方法区中常量引用的对象;
- 本地方法栈中 JNI(即一般说的 Native 方法)中引用的对象。(JVM 中判断对象是否清理的一种方法是可达性算法.可达性算法就是采用 GC Roots 为根节点, 采用树状结构,向下搜索.如果对象直接到达 GC Roots ,中间没有任何中间节点.则判断对象可回收. 而堆区是 GC 的重点区域,所以堆区不能作为 GC roots。)
而 C/C++内存模型,堆 heap 、栈 stack、全局/静态存储区 (.bss 段和.data 段)、常量存储区 (.rodata 段) 、代码区 (.text 段)。libmemunreachable 通过 C/C++内存模型结合可达性算法,将栈 stack、全局/静态存储区 (.bss 段和.data 段)作为 GC Root 节点,判断堆 heap 中的内存是否被 GC Root 所持有,如果不被直接或间接持有,则被判定为泄漏(别较真,不一定要 100%的判断 C/C++的内存泄漏,而是可以分析可能存在的潜在泄漏)。
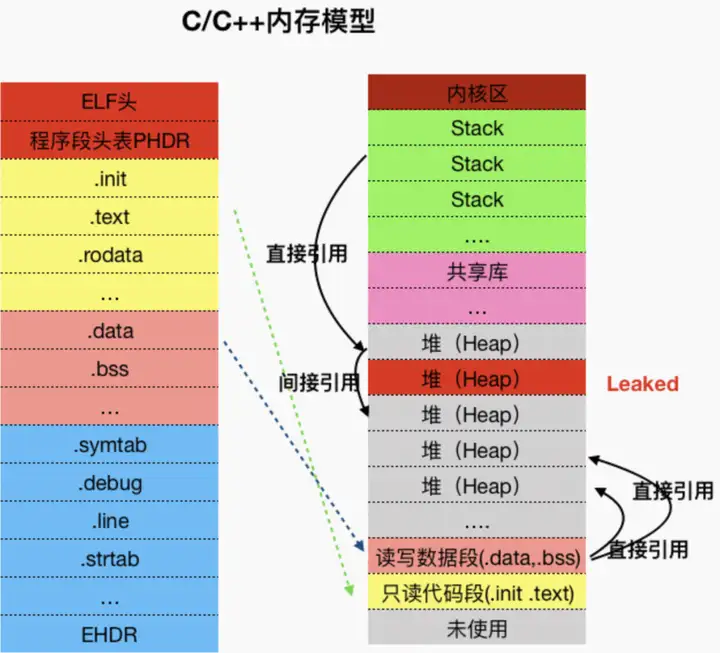
图 1 C/C++内存模型可达性算法示意图
libmemunreachable 会使用不精确的“标记-清除”垃圾回收器遍历所有本机内存,同时将任何不可访问的块报告为泄漏。
libmemunreachable 流程图
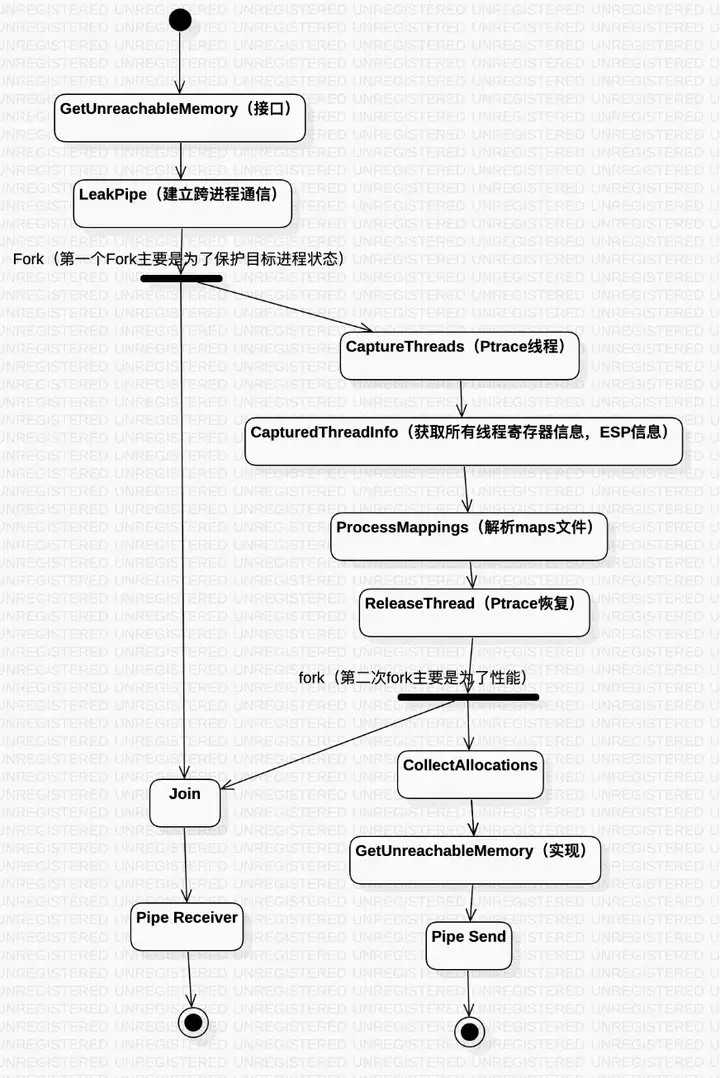
图 2 memunreachable 时序图
memunreachable 时序:
- 创建 LeakPipe:用来与子进程通信,子进程发送数据,父进程接受数据;
- Fork 子进程:通过 fork 子进程的方式来保护当前进程的状态;
- CaptureThreads:通过 Ptrace 的方式使得目标进程可以被子进程 Dump,从而使得子进程获取父进程的信息;
- CaptureThreadInfo:通过 PTRACE_GETREGSET 获取寄存器的信息,部分 Heap 的内存可能被寄存器持有,这些被寄存器持有的 Heap 不应该被判定为泄漏;
- ProcessMappings:解析/proc/self/maps 文件信息,maps 文件记录了堆 heap 、栈 stack、全局/静态存储区 (.bss 段和.data 段)、常量存储区 (.rodata 段) 、代码区 (.text 段)等内存相关的信息;
- ReleaseThreads:通过 Ptrace 的方式恢复目标进程的 Ptrace 状态,并且主进程结束等待,开始接受数据;
- 第二次 Fork 子进程:这里又 Fork 一次子进程,我的理解可能是为了性能,第一次 Fork 的是收集了需要分析内存泄漏的相关信息,第二次 Fork 则在收集的相关信息基础上去分析;
- CollectAllocations:从/proc/pid/maps 的信息中分类,将栈 stack、全局/静态存储区 (.bss 段和.data 段)放入 GC Root 节点,堆 heap 放入被检查的对象;
- GetUnreachableMemory:获取不可达的泄漏内存,C/C++内存模型结合可达性算法开始工作,去分析可能泄漏的 Heaps;
- PipeSend:通过 Pipe 将泄漏信息发送给主进程;
- PipeReceiver:主进程接受泄漏数据。
核心代码如下:
//MemUnreachable.cpp
bool GetUnreachableMemory(UnreachableMemoryInfo &info, size_t limit) {
    int parent_pid = getpid();
    int parent_tid = gettid();
    Heap heap;
    Semaphore continue_parent_sem;
    LeakPipe pipe;
    PtracerThread thread{[&]() -> int {
        /
        // Collection thread
        /
        ALOGE("collecting thread info for process %d...", parent_pid);
        ThreadCapture thread_capture(parent_pid, heap);
        allocator::vector<ThreadInfo> thread_info(heap);
        allocator::vector<Mapping> mappings(heap);
        allocator::vector<uintptr_t> refs(heap);
        // ptrace all the threads
        if (!thread_capture.CaptureThreads()) {
            LOGE("CaptureThreads failed");
        }
        // collect register contents and stacks
        if (!thread_capture.CapturedThreadInfo(thread_info)) {
            LOGE("CapturedThreadInfo failed");
        }
        // snapshot /proc/pid/maps
        if (!ProcessMappings(parent_pid, mappings)) {
            continue_parent_sem.Post();
            LOGE("ProcessMappings failed");
            return 1;
        }
        // malloc must be enabled to call fork, at_fork handlers take the same
        // locks as ScopedDisableMalloc.  All threads are paused in ptrace, so
        // memory state is still consistent.  Unfreeze the original thread so it
        // can drop the malloc locks, it will block until the collection thread
        // exits.
        thread_capture.ReleaseThread(parent_tid);
        continue_parent_sem.Post();
        // fork a process to do the heap walking
        int ret = fork();
        if (ret < 0) {
            return 1;
        } else if (ret == 0) {
            /
            // Heap walker process
            /
            // Examine memory state in the child using the data collected above and
            // the CoW snapshot of the process memory contents.
            if (!pipe.OpenSender()) {
                _exit(1);
            }
            MemUnreachable unreachable{parent_pid, heap};
            //C/C++内存模型结合可达性算法开始工作
            if (!unreachable.CollectAllocations(thread_info, mappings)) {
                _exit(2);
            }
            size_t num_allocations = unreachable.Allocations();
            size_t allocation_bytes = unreachable.AllocationBytes();
            allocator::vector<Leak> leaks{heap};
            size_t num_leaks = 0;
            size_t leak_bytes = 0;
            bool ok = unreachable.GetUnreachableMemory(leaks, limit, &num_leaks, &leak_bytes);
            ok = ok && pipe.Sender().Send(num_allocations);
            ok = ok && pipe.Sender().Send(allocation_bytes);
            ok = ok && pipe.Sender().Send(num_leaks);
            ok = ok && pipe.Sender().Send(leak_bytes);
            ok = ok && pipe.Sender().SendVector(leaks);
            if (!ok) {
                _exit(3);
            }
            _exit(0);
        } else {
            // Nothing left to do in the collection thread, return immediately,
            // releasing all the captured threads.
            ALOGI("collection thread done");
            return 0;
        }
    }};
    /
    // Original thread
    /
    {
        // Disable malloc to get a consistent view of memory
        ScopedDisableMalloc disable_malloc;
        // Start the collection thread
        thread.Start();
        // Wait for the collection thread to signal that it is ready to fork the
        // heap walker process.
        continue_parent_sem.Wait(300s);
        // Re-enable malloc so the collection thread can fork.
    }
    // Wait for the collection thread to exit
    int ret = thread.Join();
    if (ret != 0) {
        return false;
    }
    // Get a pipe from the heap walker process.  Transferring a new pipe fd
    // ensures no other forked processes can have it open, so when the heap
    // walker process dies the remote side of the pipe will close.
    if (!pipe.OpenReceiver()) {
        return false;
    }
    bool ok = true;
    ok = ok && pipe.Receiver().Receive(&info.num_allocations);
    ok = ok && pipe.Receiver().Receive(&info.allocation_bytes);
    ok = ok && pipe.Receiver().Receive(&info.num_leaks);
    ok = ok && pipe.Receiver().Receive(&info.leak_bytes);
    ok = ok && pipe.Receiver().ReceiveVector(info.leaks);
    if (!ok) {
        return false;
    }
    LOGD("unreachable memory detection done");
    LOGD("%zu bytes in %zu allocation%s unreachable out of %zu bytes in %zu allocation%s",
         info.leak_bytes, info.num_leaks, plural(info.num_leaks),
         info.allocation_bytes, info.num_allocations, plural(info.num_allocations));
    return true;
}
CaptureThreads(核心函数)
//ThreadCapture.cpp
bool ThreadCaptureImpl::CaptureThreads() {
    TidList tids{allocator_};
    bool found_new_thread;
    do {
        //从/proc/pid/task中获取全部线程Tid
        if (!ListThreads(tids)) {
            LOGE("ListThreads failed");
            ReleaseThreads();
            return false;
        }
        found_new_thread = false;
        for (auto it = tids.begin(); it != tids.end(); it++) {
            auto captured = captured_threads_.find(*it);
            if (captured == captured_threads_.end()) {
                //通过ptrace(PTRACE_SEIZE, tid, NULL, NULL)使得线程tid可以被DUMP
                if (CaptureThread(*it) < 0) {
                    LOGE("CaptureThread(*it) failed");
                    ReleaseThreads();
                    return false;
                }
                found_new_thread = true;
            }
        }
    } while (found_new_thread);
    return true;
}
CaptureThreads 存在两个核心核心函数
- ListThreads:从/proc/pid/task 中获取全部线程 Tid
- CaptureThread:通过 ptrace(PTRACE_SEIZE, tid, NULL, NULL)使得线程 tid 可以被 DUMP
CaptureThreadInfo(核心函数)
//ThreadCaptureImpl.cpp
bool ThreadCaptureImpl::CapturedThreadInfo(ThreadInfoList &threads) {
    threads.clear();
    for (auto it = captured_threads_.begin(); it != captured_threads_.end(); it++) {
        ThreadInfo t{0, allocator::vector<uintptr_t>(allocator_),
                     std::pair<uintptr_t, uintptr_t>(0, 0)};
        //ptrace(PTRACE_GETREGSET, tid, reinterpret_cast<void *>(NT_PRSTATUS), &iovec)
        if (!PtraceThreadInfo(it->first, t)) {
            return false;
        }
        threads.push_back(t);
    }
    return true;
}
CaptureThreads 的个核心函数
- PtraceThreadInfo:ptrace(PTRACE_GETREGSET, tid...),通过 ptrace 获寄存器信息,部分 Heap 的内存可能被寄存器持有,这些被寄存器持有的 Heap 不应该被判定为泄漏。
ProcessMappings(核心函数)
//ProcessMappings.cpp
bool ProcessMappings(pid_t pid, allocator::vector<Mapping> &mappings) {
    char map_buffer[1024];
    snprintf(map_buffer, sizeof(map_buffer), "/proc/%d/maps", pid);
    android::base::unique_fd fd(open(map_buffer, O_RDONLY));
    if (fd == -1) {
        LOGE("ProcessMappings parent pid failed to open %s: %s", map_buffer, strerror(errno));
        //get self pid to replace
        //Release 包有权限问题只能访问自身进程
        snprintf(map_buffer, sizeof(map_buffer), "/proc/self/maps");
        fd.reset(open(map_buffer, O_RDONLY));
        if (fd == -1) {
            LOGE("ProcessMappings failed to open %s: %s", map_buffer, strerror(errno));
            return false;
        }
    }
    LineBuffer line_buf(fd, map_buffer, sizeof(map_buffer));
    char *line;
    size_t line_len;
    while (line_buf.GetLine(&line, &line_len)) {
        int name_pos;
        char perms[5];
        Mapping mapping{};
        if (sscanf(line, "%" SCNxPTR "-%" SCNxPTR " %4s %*x %*x:%*x %*d %n",
                   &mapping.begin, &mapping.end, perms, &name_pos) == 3) {
            if (perms[0] == ''r'') {
                mapping.read = true;
            }
            if (perms[1] == ''w'') {
                mapping.write = true;
            }
            if (perms[2] == ''x'') {
                mapping.execute = true;
            }
            if (perms[3] == ''p'') {
                mapping.priv = true;
            }
            if ((size_t) name_pos < line_len) {
                strlcpy(mapping.name, line + name_pos, sizeof(mapping.name));
            }
            mappings.emplace_back(mapping);
        }
    }
    return true;
}- ProcessMappings 解析 maps 文件信息。
CollectAllocations(核心函数)
//MemUnreachable.cpp
bool MemUnreachable::ClassifyMappings(const allocator::vector<Mapping> &mappings,
                                      allocator::vector<Mapping> &heap_mappings,
                                      allocator::vector<Mapping> &anon_mappings,
                                      allocator::vector<Mapping> &globals_mappings,
                                      allocator::vector<Mapping> &stack_mappings) {
    heap_mappings.clear();
    anon_mappings.clear();
    globals_mappings.clear();
    stack_mappings.clear();
    allocator::string current_lib{allocator_};
    for (auto it = mappings.begin(); it != mappings.end(); it++) {
        if (it->execute) {
            current_lib = it->name;
            continue;
        }
        if (!it->read) {
            continue;
        }
        const allocator::string mapping_name{it->name, allocator_};
        if (mapping_name == "[anon:.bss]") {
            // named .bss section
            globals_mappings.emplace_back(*it);
        } else if (mapping_name == current_lib) {
            // .rodata or .data section
            globals_mappings.emplace_back(*it);
        } else if (has_prefix(mapping_name, "[anon:scudo:secondary]")) {
            // named malloc mapping
            heap_mappings.emplace_back(*it);
        } else if (has_prefix(mapping_name, "[anon:scudo:primary]")) {
            // named malloc mapping
            heap_mappings.emplace_back(*it);
        } else if (mapping_name == "[anon:libc_malloc]") {
            // named malloc mapping
            heap_mappings.emplace_back(*it);
        } else if (has_prefix(mapping_name, "/dev/ashmem/dalvik")
                   || has_prefix(mapping_name, "[anon:dalvik")) {
            // named dalvik heap mapping
            globals_mappings.emplace_back(*it);
        } else if (has_prefix(mapping_name, "[stack")) {
            // named stack mapping
            stack_mappings.emplace_back(*it);
        } else if (mapping_name.size() == 0 || mapping_name == "") {
            globals_mappings.emplace_back(*it);
        } else if (has_prefix(mapping_name, "[anon:stack_and_tls")) {
            stack_mappings.emplace_back(*it);
        } else if (has_prefix(mapping_name, "[anon:") &&
                   mapping_name != "[anon:leak_detector_malloc]") {
            // TODO(ccross): it would be nice to treat named anonymous mappings as
            // possible leaks, but naming something in a .bss or .data section makes
            // it impossible to distinguish them from mmaped and then named mappings.
            globals_mappings.emplace_back(*it);
        }
    }
    return true;
}
bool MemUnreachable::CollectAllocations(const allocator::vector<ThreadInfo> &threads,
                                        const allocator::vector<Mapping> &mappings) {
    ALOGI("searching process %d for allocations", pid_);
    allocator::vector<Mapping> heap_mappings{mappings};
    allocator::vector<Mapping> anon_mappings{mappings};
    allocator::vector<Mapping> globals_mappings{mappings};
    allocator::vector<Mapping> stack_mappings{mappings};
    if (!ClassifyMappings(mappings, heap_mappings, anon_mappings,
                          globals_mappings, stack_mappings)) {
        return false;
    }
    for (auto it = heap_mappings.begin(); it != heap_mappings.end(); it++) {
        HeapIterate(*it, [&](uintptr_t base, size_t size) {
            if (!heap_walker_.Allocation(base, base + size)) {
                LOGD("Allocation Failed base:%p size:%d name:%s", base, size, it->name);
            }
        });
    }
    for (auto it = anon_mappings.begin(); it != anon_mappings.end(); it++) {
        if (!heap_walker_.Allocation(it->begin, it->end)) {
            LOGD("Allocation Failed base:%p end:%d name:%s", it->begin, it->end, it->name);
        }
    }
    for (auto it = globals_mappings.begin(); it != globals_mappings.end(); it++) {
        heap_walker_.Root(it->begin, it->end);
    }
     if (threads.size() > 0) {
        for (auto thread_it = threads.begin(); thread_it != threads.end(); thread_it++) {
            for (auto it = stack_mappings.begin(); it != stack_mappings.end(); it++) {
                if (thread_it->stack.first >= it->begin && thread_it->stack.first <= it->end) {
                    heap_walker_.Root(thread_it->stack.first, it->end);
                }
            }
            //写入寄存器的信息,作为根节点
            heap_walker_.Root(thread_it->regs);
        }
    } else {
        //由于获取寄存器信息失败,采取降级逻辑
        for (auto it = stack_mappings.begin(); it != stack_mappings.end(); it++) {
            heap_walker_.Root(it->begin, it->end);
        }
    }
    ALOGI("searching done");
    return true;
}
CollectAllocations 将 maps 分四个模块,分别是 1.heap_mappings 存放堆信息,stack_mappings 存放线程栈信息(GC Root),globals_mappings 存放.bss .data 信息(GC Root),anon_mappings 其他可读的内存信息(GC Root,这些也会作为 GC Root 防止有泄漏误报):
- ClassifyMappings:将 maps 信息存放到目标模块中;
- HeapIterate:遍历有效内存分布;Android 内存分配算法,在申请的过程中会通过 mmap 申请一块块的大内存,最后通过内存分配器进行内存管理,Android 11 以上使用了scudo 内存分配[2](Android 11 以下使用的是jemalloc 内存分配器[3]),无论是那种分配器,Android 都提供了遍历有效内存的便利函数 malloc_iterate 这使得我们获取有效内存变得容易很多。相关内容可以看malloc_debug[4]。
GetUnreachableMemory(核心函数)
//HeapWalker.cpp
void HeapWalker::RecurseRoot(const Range &root) {
    allocator::vector<Range> to_do(1, root, allocator_);
    while (!to_do.empty()) {
        Range range = to_do.back();
        to_do.pop_back();
        //将GC Root的节点的一个块内存作为指针,去遍历,直到队列为空
        ForEachPtrInRange(range, [&](Range &ref_range, AllocationInfo *ref_info) {
            if (!ref_info->referenced_from_root) {
                ref_info->referenced_from_root = true;
                to_do.push_back(ref_range);
            }
        });
    }
}
bool HeapWalker::DetectLeaks() {
    // Recursively walk pointers from roots to mark referenced allocations
    for (auto it = roots_.begin(); it != roots_.end(); it++) {
        RecurseRoot(*it);
    }
    Range vals;
    vals.begin = reinterpret_cast<uintptr_t>(root_vals_.data());
    vals.end = vals.begin + root_vals_.size() * sizeof(uintptr_t);
    RecurseRoot(vals);
    return true;
}
bool MemUnreachable::GetUnreachableMemory(allocator::vector<Leak> &leaks,
                                          size_t limit, size_t *num_leaks, size_t *leak_bytes) {
    ALOGI("sweeping process %d for unreachable memory", pid_);
    leaks.clear();
    if (!heap_walker_.DetectLeaks()) {
        return false;
    }
    //数据统计
    ...
    return true;
}
核心函数 DetectLeaks
- ForEachPtrInRange:将 GC Root 的节点的一个块内存作为指针,去遍历,直到队列为空
- DetectLeaks:遍历 GC Root 节点,将能访问到的 Heap 对象标记;
- 数据统计:没有遍历到的 Heap 对象设置为泄漏。
淘宝 Release 包改进
Android 10 之后系统收回了进程私有文件的权限,如 /proc/pid/maps,/proc/pid/task 等,fork 出来的子进程无法获取父进程目录下的文件,否则会抛“Operation not permitted”的异常。因此当我们通过 dlsym 的方式去调用系统 libmemunreachable.so 库的时候在 Release 包的时候会抛“Failed to get unreachable memory if you are trying to get unreachable memory from a system app (like com.android.systemui), disable selinux first using setenforce 0”(当然我们无法去设置用户的系统环境)。
针对这问题,淘宝选择重新编译了 libmemunreachable 库,并且修改了相关所需权限的配置,如/proc/pid/maps 的获取不在获取父进程(目标进程)的 maps(没有权限),而获取/proc/self/maps,因为子进程保留了父进程的内存信息,这与获取/proc/pid/maps 的效果是一致。
Ptrace 失败的修复:google unreachable 在 debug 包可以,在 release 包里不能运行,原因是 PR_GET_DUMPABLE 在 debug 的时候默认是 1,直接可以 ATTACH,而在 release 的默认是 0,不可以 attach,导致 release 跑 unreach 不正常工作 (google 太坏了),修复方案:设置下 prctl(PR_SET_DUMPABLE, 1);
其他改造:
- 工程化的改造,打通 TBRest,使得线上的泄漏数据上报到 EMAS;
- 非核心权限绕开,如/proc/pid/task 获取线程寄存器信息,如果获取失败不终止流程(虽然线程寄存器有可能会指向内存,并且这个内存不被.bss .data 和 stack 等持有,导致误判,但是这样的场景不多)。
可能的误报场景
base+offset 的场景特定的内存分析会失败。比如他申请的内存是 A,但是堆栈和 Global 是通过 Base+offset=A 这种方法来引用的 ,就会误判,因为 Base 和 offset 在堆和.bss 里,但是堆和.bss 没有 A ,就判断 A 泄漏了 就误报了。
原文链接
本文为阿里云原创内容,未经允许不得转载。

ansible 002 连接被控端 inventory ansible.cfg ansible-adhoc ansible 原理

转:
ansible 002 连接被控端 inventory ansible.cfg ansible-adhoc ansible 原理
ssh 用普通用户连接被控端
配置主机清单 (/etc/hosts 域名解析为前提)
[root@workstation ansible]# cat hosts
servera
serverb
[root@workstation ansible]# pwd
/etc/ansible
[root@workstation ansible]#
建立免密
[root@workstation ansible]# ssh-keygen
使被控端创建用户
[root@workstation ansible]# ansible all -m shell -a ''useradd ansible'' -k
SSH password:
servera | CHANGED | rc=0 >>

serverb | CHANGED | rc=0 >>

[root@workstation ansible]# ansible all -m shell -a ''echo redhat | passwd --stdin ansible'' -k
SSH password:
serverb | CHANGED | rc=0 >>
Changing password for user ansible.
passwd: all authentication tokens updated successfully.
servera | CHANGED | rc=0 >>
Changing password for user ansible.
passwd: all authentication tokens updated successfully.
配置与 ansible 用户的免密
[root@workstation ansible]# ssh-copy-id ansible@servera
/usr/bin/ssh-copy-id: INFO: Source of key(s) to be installed: "/root/.ssh/id_rsa.pub"
/usr/bin/ssh-copy-id: INFO: attempting to log in with the new key(s), to filter out any that are already installed
/usr/bin/ssh-copy-id: INFO: 1 key(s) remain to be installed -- if you are prompted now it is to install the new keys
ansible@servera''s password:

Number of key(s) added: 1

Now try logging into the machine, with:   "ssh ''ansible@servera''"
and check to make sure that only the key(s) you wanted were added.

[root@workstation ansible]# ssh-copy-id ansible@serverb
/usr/bin/ssh-copy-id: INFO: Source of key(s) to be installed: "/root/.ssh/id_rsa.pub"
/usr/bin/ssh-copy-id: INFO: attempting to log in with the new key(s), to filter out any that are already installed
/usr/bin/ssh-copy-id: INFO: 1 key(s) remain to be installed -- if you are prompted now it is to install the new keys
ansible@serverb''s password:

Number of key(s) added: 1

Now try logging into the machine, with:   "ssh ''ansible@serverb''"
and check to make sure that only the key(s) you wanted were added.

[root@workstation ansible]#


[root@workstation ansible]# ansible all -m shell -a ''pwd'' -k -u ansible
SSH password:
servera | CHANGED | rc=0 >>
/home/ansible
serverb | CHANGED | rc=0 >>
/home/ansible
[root@workstation ansible]#
默认改为 ansible 用户连接

[root@workstation ansible]# ansible all -m shell -a ''pwd''
servera | CHANGED | rc=0 >>
/home/ansible
serverb | CHANGED | rc=0 >>
/home/ansible
[root@workstation ansible]#
设置被控端提权
[root@workstation ansible]# ansible all -m shell -a ''echo ansible ALL=(ALL) NOPASSWD: ALL > /etc/sudoers.d/ansible'' -u root -k
SSH password:
servera | CHANGED | rc=0 >>

serverb | CHANGED | rc=0 >>
ansible 这边并没有提权
[root@workstation ansible]# ansible all -m shell -a ''id''
servera | CHANGED | rc=0 >>
uid=1001(ansible) gid=1001(ansible) groups=1001(ansible) context=unconfined_u:unconfined_r:unconfined_t:s0-s0:c0.c1023
serverb | CHANGED | rc=0 >>
uid=1000(ansible) gid=1000(ansible) groups=1000(ansible) context=unconfined_u:unconfined_r:unconfined_t:s0-s0:c0.c1023
[root@workstation ansible]#
修改配置文件

成功提权
[root@workstation ansible]# ansible all -m shell -a ''id''
servera | CHANGED | rc=0 >>
uid=0(root) gid=0(root) groups=0(root) context=unconfined_u:unconfined_r:unconfined_t:s0-s0:c0.c1023
serverb | CHANGED | rc=0 >>
uid=0(root) gid=0(root) groups=0(root) context=unconfined_u:unconfined_r:unconfined_t:s0-s0:c0.c1023
[root@workstation ansible]#

[root@workstation ansible]# ansible all -m shell -a ''pwd''
servera | CHANGED | rc=0 >>
/home/ansible
serverb | CHANGED | rc=0 >>
/home/ansible
[root@workstation ansible]#
定义 inventory
列出当前选择的主机
[root@workstation ansible]# ansible servera --list-hosts
hosts (1):
    servera

[root@workstation ansible]# ansible servera,serverb --list-hosts
hosts (2):
    servera
    serverb


[root@workstation ansible]# ansible httpd,mysql --list-hosts
hosts (3):
    servera
    serverb
    abc
[root@workstation ansible]# cat hosts
[httpd]
servera
serverb

[mysql]
abc

[root@workstation ansible]#
这里hosts为ini格式和那个yum差不多
不想加入组的用户得写在第一排。

[root@workstation ansible]# ansible ungrouped --list-hosts
hosts (1):
    servere
[root@workstation ansible]# head -n3 hosts
servere
[httpd]
servera
[root@workstation ansible]#
servere不属于任何组
组包含组
[root@workstation ansible]# vi hosts
[root@workstation ansible]# ansible web --list-hosts
hosts (3):
    servera
    serverb
    abc
[root@workstation ansible]# cat hosts
servere
[httpd]
servera
serverb

[mysql]
abc

[web:children]
httpd
mysql    #那么这里就只能写组,不可以写主机
[root@workstation ansible]#

[web:children]
httpd
mysql
[web]
fox        #这样才可以添加fox主机
ansible选择了两边主机,ansible会自动去重。
支持通配符
组和主机都通配
[root@workstation ansible]# ansible ''server*'' --list-hosts
hosts (3):
    servere
    servera
    serverb
[root@workstation ansible]#
hosts 也可以连续定义

[root@workstation ansible]# ansible ''server*,!*server1'' --list-hosts
hosts (14):
    server2
    server3
    server4
    server5
    server6
    server7
    server8
    server9
    server10
    server11
    server12
    servere
    servera
    serverb
[root@workstation ansible]#
唯独不要 server1
[root@workstation ansible]# ansible ''httpd,&mysql'' --list-hosts
hosts (1):
    server10
[root@workstation ansible]# cat hosts
server[1:12]


servere
[httpd]
servera
serverb
server10
[mysql]
abc
server10
[web:children]
httpd
mysql
[root@workstation ansible]#
既属于 web 又属于 httpd
boston,londor,&prod,!lb
在 boston 与 londor 同时也在 prod 但是去除 lb
正则表达式

有 s 或 h 字母 尾巴为 example.com 的
没带 ^ 就不是开头为 s 或 h
另外指定新的主机清单。读新的 hosts
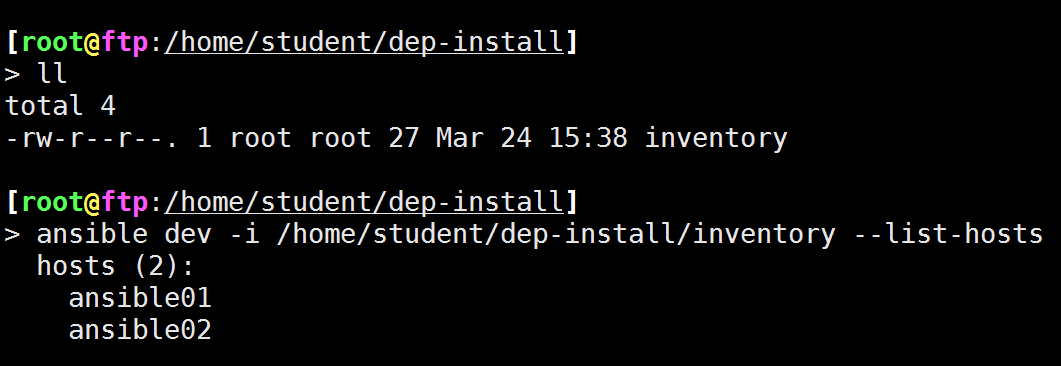
[root@workstation ansible]# echo  servera  > file
[root@workstation ansible]# ansible servera -i file --list-hosts
  hosts (1):
    servera
[root@workstation ansible]#
有关 ansible 常用参数
-m 指定模块
-a 指定模块参数
-u 指定被控端的连接用户 2
-k 密码验证,不指定就是秘钥验证
-i 指定主机清单 ansible servera -i file --list-hosts
--list-hosts 列出所选的主机

yaml 格式定义主机清单

比较完整的 yaml 写法

ini 格式转换 yaml

yaml 语法对程序更友好
配置文件
默认配置文件位置
[root@workstation ansible]# pwd
/etc/ansible
[root@workstation ansible]# ls
ansible.cfg  file  file.yaml  hosts  roles
[root@workstation ansible]#

配置文件有优先级读取顺序
ANSIBLE_CONFIG = /tmp/ansible.cfg
当前目录下的ansible.cfg  ./
家目录   ~/.ansible.cfg
/etc/ansible/ansible.cfg

更改运行主机清单的路径

ansible.cfg 的参数
inventory      = ./hosts
#library        = /usr/share/my_modules/
#module_utils   = /usr/share/my_module_utils/
#remote_tmp     = ~/.ansible/tmp
#local_tmp      = ~/.ansible/tmp
#plugin_filters_cfg = /etc/ansible/plugin_filters.yml
#forks          = 5
inventory      = ./hosts
#library        = /usr/share/my_modules/
#module_utils   = /usr/share/my_module_utils/
#remote_tmp     = ~/.ansible/tmp   被控端路径  py的临时运行目录的位置
#local_tmp      = ~/.ansible/tmp   主控端临时存储目录
#plugin_filters_cfg = /etc/ansible/plugin_filters.yml
#forks          = 5       并发数  一次性连5台,再连5台
#poll_interval  = 15      探测任务执行如何  每15秒探测
#ask_pass      = True    密码验证   -k 默认false
#remote_port    = 22    被控端,端口号
remote_user = ansible    远程主机用什么连
[privilege_escalation]
become=True          要提权
become_method=sudo
become_user=root     提权用户
become_ask_pass=False   不问提权密码
#host_key_checking = False     自动接受公钥  (好用)

log_path=/var/log/ansible.log   普通用户得改这个路径
普通用户写不了var/log
module_name = command  不指定模块默认为command模块
ad-hoc 指令
官方文档
https://docs.ansible.com/

搜索模块时搜索 builtin 内置模块
shell 模块
优点:功能强大
缺点:无法保证幂等性
ansible servera -m shell -a '' 命令''

来自官方文档的教诲 (狗头)
[root@workstation maosible]# ansible  servera -m shell -a ''chdir=/tmp pwd''
servera | CHANGED | rc=0 >>
/tmp
[root@workstation maosible]#

[root@workstation maosible]# ansible  servera -m shell -a ''creates=/tmp/file pwd''
servera | SUCCESS | rc=0 >>
skipped, since /tmp/file exists
[root@workstation maosible]#
文件存在,则不执行pwd

removes相反
command 模块为默认模块
ansible servera -a ''pwd''
command 不允许 > < | 之类。 他会当成字符串
raw 模块就是被削弱的 shell
script 模块
让脚本在被控端执行
这个脚本可以不需要执行权限,因为他会被解析成 py 文件,被控端通过执行 py 文件执行脚本
其他常用模块
authorized_keys 分发公钥
[root@workstation .ssh]# ansible-galaxy collection install ansible.posix -vvv
ansible-galaxy 2.9.11
config file = /etc/ansible/ansible.cfg
configured module search path = [''/root/.ansible/plugins/modules'', ''/usr/share/ansible/plugins/modules'']
ansible python module location = /usr/lib/python3.6/site-packages/ansible
executable location = /usr/bin/ansible-galaxy
python version = 3.6.8 (default, Mar 18 2021, 08:58:41) [GCC 8.4.1 20200928 (Red Hat 8.4.1-1)]
Using /etc/ansible/ansible.cfg as config file
Process install dependency map
Opened /root/.ansible/galaxy_token
Processing requirement collection ''ansible.posix''
Collection ''ansible.posix'' obtained from server default https://galaxy.ansible.com/api/
Starting collection install process
Installing ''ansible.posix:1.4.0'' to ''/root/.ansible/collections/ansible_collections/ansible/posix''
Downloading https://galaxy.ansible.com/download/ansible-posix-1.4.0.tar.gz to /root/.ansible/tmp/ansible-local-5179_oikgerz/tmpqxvizmuo
2.9 没有此内置模块
那么使用 galaxy 从网上下载
通过官方文档发现名字为 ansible.posix.authorized_key

[root@workstation modules]# ansible all -m ansible.posix.authorized_key -a ''user=root key="ssh-rsa AAAAB3NzaC1yc2EAAAADAQABAAABgQCkQdrj0fMPRQiC7f+1I4N23k/OdwAqt0ONpNDmChbD/ehrJ5lrEspinVtolwBdR5lKnhnWpb9iC29QlR4epd0EdLrId1wRwZ1pMteZuAwR7IlfCCzzSo2ND6gBl1KSIPV4aZhigspFC1JyGAuoB4HIjeZ9NI6w1XP+U/hoGNLjKZtEhPK+H5ijXpb9pVMPvCa0uLYta0qqIMSpIkLlNFUQ1hNd4g4b+aj2y+BzBG/+kYS/7+vDuiBw0GoZ18zmY0ueQjeafg00RNLM/qU90soo29T9tRPc67PozFw20RB8z4LH8Iwe3jzOzGEOWFQ0frJyOg8CgOwDoqMTk4oNjwx4HEOSjv9SsaWYQGZxOkJ5iVZ3MLQt1MkEzhJjibCTMIDlQQ+Dj16hFTMRmM7EXc4AHq1gwURqRv96e0pvmC7RIAFWiPd9IvSSmt4HJB/qGmQjCmvvy84FAGddbEiYGOH2YShzoppBVpxQEsCbHxvZQXJbpwb0uAvn22Pxd5AsH6M= root@workstation" state=present''
参考文档:https://docs.ansible.com/ansible/latest/collections/ansible/posix/authorized_key_module.html
可是 2.9 拥有 authorized_key
[root@workstation modules]# ansible all -m authorized_key -a ''user=root key="ssh-rsa AAAAB3NzaC1yc2EAAAADAQABAAABgQCkQdrj0fMPRQiC7f+1I4N23k/OdwAqt0ONpNDmChbD/ehrJ5lrEspinVtolwBdR5lKnhnWpb9iC29QlR4epd0EdLrId1wRwZ1pMteZuAwR7IlfCCzzSo2ND6gBl1KSIPV4aZhigspFC1JyGAuoB4HIjeZ9NI6w1XP+U/hoGNLjKZtEhPK+H5ijXpb9pVMPvCa0uLYta0qqIMSpIkLlNFUQ1hNd4g4b+aj2y+BzBG/+kYS/7+vDuiBw0GoZ18zmY0ueQjeafg00RNLM/qU90soo29T9tRPc67PozFw20RB8z4LH8Iwe3jzOzGEOWFQ0frJyOg8CgOwDoqMTk4oNjwx4HEOSjv9SsaWYQGZxOkJ5iVZ3MLQt1MkEzhJjibCTMIDlQQ+Dj16hFTMRmM7EXc4AHq1gwURqRv96e0pvmC7RIAFWiPd9IvSSmt4HJB/qGmQjCmvvy84FAGddbEiYGOH2YShzoppBVpxQEsCbHxvZQXJbpwb0uAvn22Pxd5AsH6M= root@workstation" state=present''
所以没必要去下载 ansible.posix.authorized_key
但是可以显示出参考文档的重要性
那么遇到问题,可以直接去寻找官方的英文文档,会更有效率。
以下为转载
https://cloud.tencent.com/developer/news/327468
ansible 原理
Ansible 是一个模型驱动的配置管理器,支持多节点发布、远程任务执行。默认使用 SSH 进行远程连接。无需在被管理节点上安装附加软件,可使用各种编程语言进行扩展。
一、Ansible 基本架构

上图为 ansible 的基本架构,从上图可以了解到其由以下部分组成:
核心:ansible
核心模块(Core Modules):这些都是 ansible 自带的模块
扩展模块(Custom Modules):如果核心模块不足以完成某种功能,可以添加扩展模块
插件(Plugins):完成模块功能的补充
剧本(Playbooks):ansible 的任务配置文件,将多个任务定义在剧本中,由 ansible 自动执行
连接插件(Connectior Plugins):ansible 基于连接插件连接到各个主机上,虽然 ansible 是使用 ssh 连接到各个主机的,但是它还支持其他的连接方法,所以需要有连接插件
主机群(Host Inventory):定义 ansible 管理的主机
二、Ansible 工作原理


以上是从网上找到的两张 ansible 工作原理图,两张图基本都是在架构图的基本上进行的拓展。从上面的图上可以了解到:
1、管理端支持 local 、ssh、zeromq 三种方式连接被管理端,默认使用基于 ssh 的连接---这部分对应基本架构图中的连接模块;
2、可以按应用类型等方式进行 Host Inventory(主机群)分类,管理节点通过各类模块实现相应的操作---单个模块,单条命令的批量执行,我们可以称之为 ad-hoc;
3、管理节点可以通过 playbooks 实现多个 task 的集合实现一类功能,如 web 服务的安装部署、数据库服务器的批量备份等。playbooks 我们可以简单的理解为,系统通过组合多条 ad-hoc 操作的配置文件 。
转:
ansible 002 连接被控端 inventory ansible.cfg ansible-adhoc ansible 原理
--Posted from Rpc

ansible 主机清单 /etc/ansible/hosts
主机清单

[webservers]
ansible01
ansible02
ansible03
ansible04
[root@ftp:/root]
> ansible webservers -u root -k -m ping -o
SSH password:
ansible03 | SUCCESS => {"changed": false, "ping": "pong"}
ansible01 | SUCCESS => {"changed": false, "ping": "pong"}
ansible02 | SUCCESS => {"changed": false, "ping": "pong"}
ansible04 | SUCCESS => {"changed": false, "ping": "pong"}

[root@ftp:/root]
>
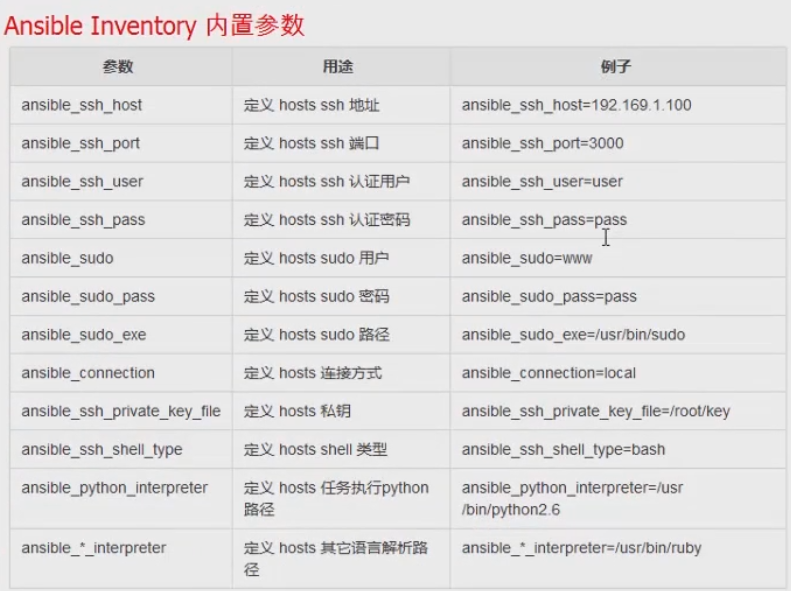
Ansible Inventory 内置参数

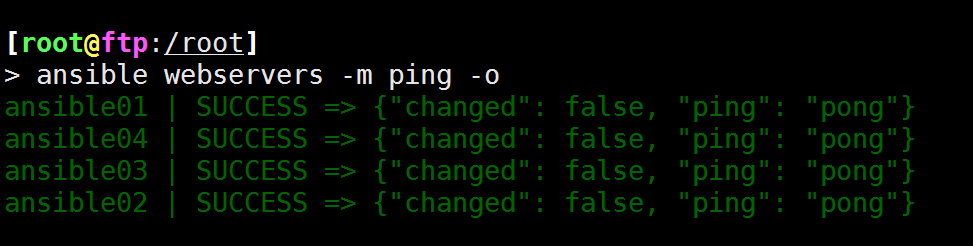
[root@ftp:/root]
> ansible webservers -m ping -o
ansible01 | SUCCESS => {"changed": false, "ping": "pong"}
ansible04 | SUCCESS => {"changed": false, "ping": "pong"}
ansible03 | SUCCESS => {"changed": false, "ping": "pong"}
ansible02 | SUCCESS => {"changed": false, "ping": "pong"}


[webservers]

ansible01 ansible_ssh_port=''22''

ansible[02:04]

[webservers:vars]
ansible_ssh_user=''root''
ansible_ssh_pass=''AAbb0101''
分组
[webservers]

ansible[01:04]

[apache]
ansible[01:02]

[nginx]
ansible[03:04]

[webservers:children]
apache
nginx

[webservers:vars]
ansible_ssh_user=''root''
ansible_ssh_pass=''AAbb0101''
[root@ftp:/root]
> ansible apache -m ping -o
ansible01 | SUCCESS => {"changed": false, "ping": "pong"}
ansible02 | SUCCESS => {"changed": false, "ping": "pong"}

[root@ftp:/root]
> ansible nginx -m ping -o
ansible03 | SUCCESS => {"changed": false, "ping": "pong"}
ansible04 | SUCCESS => {"changed": false, "ping": "pong"}
列出主机清单
[root@ftp:/root]
> ansible nginx --list-hosts
  hosts (2):
    ansible03
    ansible04

[root@ftp:/root]
> ansible apache --list-hosts
  hosts (2):
    ansible01
    ansible02


[root@ftp:/root]
> ansible webservers --list-hosts
  hosts (4):
    ansible01
    ansible02
    ansible03
    ansible04

[root@ftp:/root]
>
自定义指定新的主机清单文件:
[root@ftp:/]
> ansible -i /home/docker dockers -m ping -o
ansible01 | SUCCESS => {"changed": false, "ping": "pong"}
ansible02 | SUCCESS => {"changed": false, "ping": "pong"}

[root@ftp:/]
> cat /home/docker
[dockers]
ansible01
ansible02
[dockers:vars]
ansible_ssh_user=''root''
ansible_ssh_pass=''AAbb0101''

ansible 报错 Using a SSH password instead of a key is not possible because Host Key checking is enabl...
安装和配置好 ansible,执行命令时报错如下
[root@test01 ansible-install]# ansible test -m shell -a ''w''
10.xx.37.26 | FAILED | rc=-1 >>
Using a SSH password instead of a key is not possible because Host Key checking is enabled and sshpass does not support this.  Please add this host''s fingerprint to your known_hosts file to manage this host.

10.xx.37.25 | FAILED | rc=-1 >>
Using a SSH password instead of a key is not possible because Host Key checking is enabled and sshpass does not support this.  Please add this host''s fingerprint to your known_hosts file to manage this host.

10.xx.37.24 | FAILED | rc=-1 >>
Using a SSH password instead of a key is not possible because Host Key checking is enabled and sshpass does not support this.  Please add this host''s fingerprint to your known_hosts file to manage this host.
解决方法:
vi /etc/ansible/ansible.cfg
[defaults]
forks          = 8           #执行时并发数
host_key_checking = False    #不检测host key
关于ansible连接受控主机,报错:UNREACHABLE!和ansible connection的问题我们已经讲解完毕,感谢您的阅读,如果还想了解更多关于Android C/C++ 内存泄漏分析 unreachable、ansible 002 连接被控端 inventory ansible.cfg ansible-adhoc ansible 原理、ansible 主机清单 /etc/ansible/hosts、ansible 报错 Using a SSH password instead of a key is not possible because Host Key checking is enabl...等相关内容,可以在本站寻找。
本文标签:


![[转帖]Ubuntu 安装 Wine方法(ubuntu如何安装wine)](https://www.gvkun.com/zb_users/cache/thumbs/4c83df0e2303284d68480d1b1378581d-180-120-1.jpg)

