在这里,我们将给大家分享关于无服务器身份验证:由保护S3存储桶的CloudfrontViewer请求触发的Lambda@Edge上的Auth0无限重定向循环LambdaCloudFront配置Auth
在这里,我们将给大家分享关于无服务器身份验证:由保护 S3 存储桶的 Cloudfront Viewer 请求触发的 Lambda@Edge 上的 Auth0无限重定向循环 LambdaCloudFront 配置Auth0 配置附加信息:FF 工具:的知识,同时也会涉及到如何更有效地amazon-web-services – 使用CloudFront和目录重定向托管的AWS S3静态网站、angularjs – 在AWS CloudFront和S3上配置X-Frame-Options响应标头、Automated EBS Snapshots using AWS Lambda & CloudWatch、Automating your Amazon Forecast workflow with Lambda, Step Functions, and CloudWatch Events rule的内容。
本文目录一览:- 无服务器身份验证:由保护 S3 存储桶的 Cloudfront Viewer 请求触发的 Lambda@Edge 上的 Auth0无限重定向循环 LambdaCloudFront 配置Auth0 配置附加信息:FF 工具:
- amazon-web-services – 使用CloudFront和目录重定向托管的AWS S3静态网站
- angularjs – 在AWS CloudFront和S3上配置X-Frame-Options响应标头
- Automated EBS Snapshots using AWS Lambda & CloudWatch
- Automating your Amazon Forecast workflow with Lambda, Step Functions, and CloudWatch Events rule

无服务器身份验证:由保护 S3 存储桶的 Cloudfront Viewer 请求触发的 Lambda@Edge 上的 Auth0无限重定向循环 LambdaCloudFront 配置Auth0 配置附加信息:FF 工具:
如何解决无服务器身份验证:由保护 S3 存储桶的 Cloudfront Viewer 请求触发的 Lambda@Edge 上的 Auth0无限重定向循环 LambdaCloudFront 配置Auth0 配置附加信息:FF 工具:?
上下文
我有一个包含静态文件的 S3 存储桶。在这个存储桶前面,我有 Cloudfront,在每个查看器请求上触发 lambda@edge 函数。我的 lambda 函数基于以下项目:
https://github.com/Widen/cloudfront-auth
我想要的是:仅在登录后才能访问我的 S3 存储桶(我使用的是 AUTH 0)。
问题
登录屏幕后,我在 auth0/cloudfront 和 recieve too_many_requests 之间得到一个无限循环的重定向:

配置
Lambda
{
    "AUTH_REQUEST": {
        "client_id": "<myId>","response_type": "code","scope": "openid email","redirect_uri": "https://<myCF>.cloudfront.net"
    },"TOKEN_REQUEST": {
        "client_id": "<myId>","client_secret": "<myRandomGeneratedSecret>","redirect_uri": "https://<myCF>.cloudfront.net","grant_type": "authorization_code"
    },"disTRIBUTION": "serverlessAuth","AUTHN": "AUTH0","PRIVATE_KEY": "<KEY>","PUBLIC_KEY": "<KEY>","disCOVERY_DOCUMENT": "https://<myAuth0>.auth0.com/.well-kNown/openid-configuration","SESSION_DURATION": 259200,"BASE_URL": "https://<myAuth0>.us.auth0.com","CALLBACK_PATH": "/_callback","AUTHZ": "AUTH0"
}
CloudFront 配置

Auth0 配置
仅启用与 google 的社交联系:

似乎工作正常,在 auth0 连接测试中进行测试:

我的 Auth0 配置:

附加信息:
我的 Cloudfront 重定向到一个包含静态文件的 S3 存储桶(生成的docusaurus)。
FF 工具:
我的请求一直处于无限循环直到出错:

有人可以帮我吗?我在做什么错?我几乎要放弃了:/
解决方法
暂无找到可以解决该程序问题的有效方法,小编努力寻找整理中!
如果你已经找到好的解决方法,欢迎将解决方案带上本链接一起发送给小编。
小编邮箱:dio#foxmail.com (将#修改为@)

amazon-web-services – 使用CloudFront和目录重定向托管的AWS S3静态网站
我的问题不仅是在S3上托管一个静态网站,它还远远不止于此.
我的计划是在S3上有一个www.foo.com.
所以我创建了一个名为www.foo.com的存储桶,并将域设置为指向那里.
因此,我在我的桶上的每个文件都是公开的,并且是网站的一部分.
但有一个例外:
>每当我导航到www.foo.com/blog时,我都希望对EC2容器上托管的博客进行内部重定向.
通过使用带有proxy_pass定义的Nginx,可以轻松实现这一点.但S3不是Nginx.
我知道我可以应用一些重定向规则,但是如何进行内部重定向,对于用户来说URL为http://www.foo.com/blog但博客存储在不同的机器上.
解决方法:
由于您提到您正在使用CloudFront,因此您希望将其用于重定向而不是S3.您可以在CloudFront分配,S3存储桶和EC2服务器中配置两个来源.您将S3配置为默认源,并使用指向EC2原点的/ blog模式创建缓存行为.

angularjs – 在AWS CloudFront和S3上配置X-Frame-Options响应标头
解决方法
此处的示例代码使用nodeJS 6.10添加响应头
'use strict';
 exports.handler = (event,context,callback) => {
   const response = event.Records[0].cf.response;
   const headers = response.headers;
   response.headers['x-frame-options'] = [{"key":"x-frame-options","value":"SAMEORIGIN"}];
   console.log(response.headers);
   callback(null,response);
 };
创建Lambda的最终版本,然后将Lambda Version的触发器配置设置为路径模式行为的CloudFront原始响应事件类型.
示例代码将事件记录到CloudWatch日志服务以进行调试.如果您还没有,则需要设置lambda执行IAM角色,该角色允许策略允许edgelambda.amazonaws.com和lambda.amazonaws.com承担CloudWatch日志操作.
允许将日志写入CloudWatch的基本Lambda执行策略:
{
    "Version": "2012-10-17","Statement": [
        {
            "Action": [
                "logs:CreateLogGroup","logs:CreateLogStream","logs:PutLogEvents"
            ],"Resource": "arn:aws:logs:*:*:*","Effect": "Allow"
        }
    ]
}
信任关系允许Lambda和Lambda @ Edge承担角色:
{
  "Version": "2012-10-17","Statement": [
    {
      "Effect": "Allow","Principal": {
        "Service": [
          "edgelambda.amazonaws.com","lambda.amazonaws.com"
        ]
      },"Action": "sts:AssumeRole"
    }
  ]
}
如果AWS简单地允许在GUI中设置x-frame-options标头会更好,但在此之前,此解决方案可以正常运行,并且可以让您的安全审核员满意.

Automated EBS Snapshots using AWS Lambda & CloudWatch
Overview
In this post, we''ll cover how to automate EBS snapshots for your AWS infrastructure using Lambda and CloudWatch. We''ll build a solution that creates nightly snapshots for volumes attached to EC2 instances and deletes any snapshots older than 10 days. This will work across all AWS regions.
Lambda offers the ability to execute "serverless" code which means that AWS will provide the run-time platform for us. It currently supports the following languages: Node.js, Java, C# and Python. We''ll be using Python to write our functions in this article.
We''ll use a CloudWatch rule to trigger the execution of the Lambda functions based on a cron expression.
Create IAM Role
Before we write any code, we need to create an IAM role that has permissions to do the following:
- Retrieve information about volumes and snapshots from EC2
- Take new snapshots using the CreateSnapshot API call
- Delete snapshots using the DeleteSnapshot API call
- Write logs to CloudWatch for debugging
In the AWS management console, we''ll go to IAM > Roles > Create New Role. We name our role "ebs-snapshots-role".
For Role Type, we select AWS Lambda. This will grant the Lambda service permissions to assume the role.

On the next page, we won''t select any of the managed policies so move on to Next Step.
Go back to the Roles page and select the newly created role. Under the Permissions tab, you''ll find a link to create a custom inline policy.
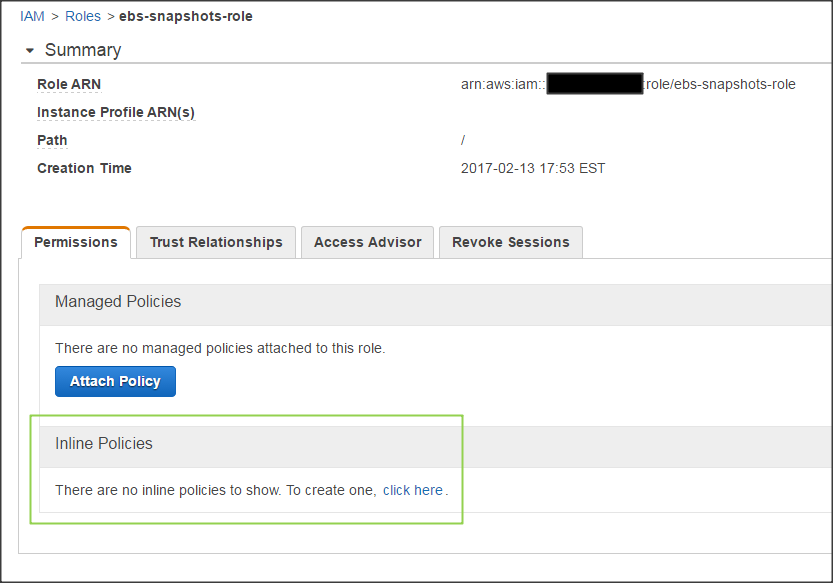
Paste the JSON below for the policy:
{
    "Version": "2012-10-17",
    "Statement": [
        {
            "Effect": "Allow",
            "Action": [
                "logs:*"
            ],
            "Resource": "arn:aws:logs:*:*:*"
        },
        {
            "Effect": "Allow",
            "Action": "ec2:Describe*",
            "Resource": "*"
        },
        {
            "Effect": "Allow",
            "Action": [
                "ec2:CreateSnapshot",
                "ec2:DeleteSnapshot",
                "ec2:CreateTags",
                "ec2:ModifySnapshotAttribute",
                "ec2:ResetSnapshotAttribute"
            ],
            "Resource": [
                "*"
            ]
        }
    ]
}
Create Snapshots Function in Lambda
Now, we can move on to writing the code to create snapshots. In the Lambda console, go to Functions > Create a Lambda Function -> Configure function and use the following parameters:

In our code, we''ll be using Boto library which is the AWS SDK for Python.
Paste the code below into the code pane:
# Backup all in-use volumes in all regions

import boto3

def lambda_handler(event, context):
    ec2 = boto3.client(''ec2'')

    # Get list of regions
    regions = ec2.describe_regions().get(''Regions'',[] )

    # Iterate over regions
    for region in regions:
        print "Checking region %s " % region[''RegionName'']
        reg=region[''RegionName'']

        # Connect to region
        ec2 = boto3.client(''ec2'', region_name=reg)

        # Get all in-use volumes in all regions
        result = ec2.describe_volumes( Filters=[{''Name'': ''status'', ''Values'': [''in-use'']}])

        for volume in result[''Volumes'']:
            print "Backing up %s in %s" % (volume[''VolumeId''], volume[''AvailabilityZone''])

            # Create snapshot
            result = ec2.create_snapshot(VolumeId=volume[''VolumeId''],Description=''Created by Lambda backup function ebs-snapshots'')

            # Get snapshot resource
            ec2resource = boto3.resource(''ec2'', region_name=reg)
            snapshot = ec2resource.Snapshot(result[''SnapshotId''])

            volumename = ''N/A''

            # Find name tag for volume if it exists
            if ''Tags'' in volume:
                for tags in volume[''Tags'']:
                    if tags["Key"] == ''Name'':
                        volumename = tags["Value"]

            # Add volume name to snapshot for easier identification
            snapshot.create_tags(Tags=[{''Key'': ''Name'',''Value'': volumename}])
The code will create snapshots for any in-use volumes across all regions. It will also add the name of the volume to the snapshot name tag so it''s easier for us to identify whenever we view the list of snapshots.
Next, select the role we created in the Lamba function handler and role section.

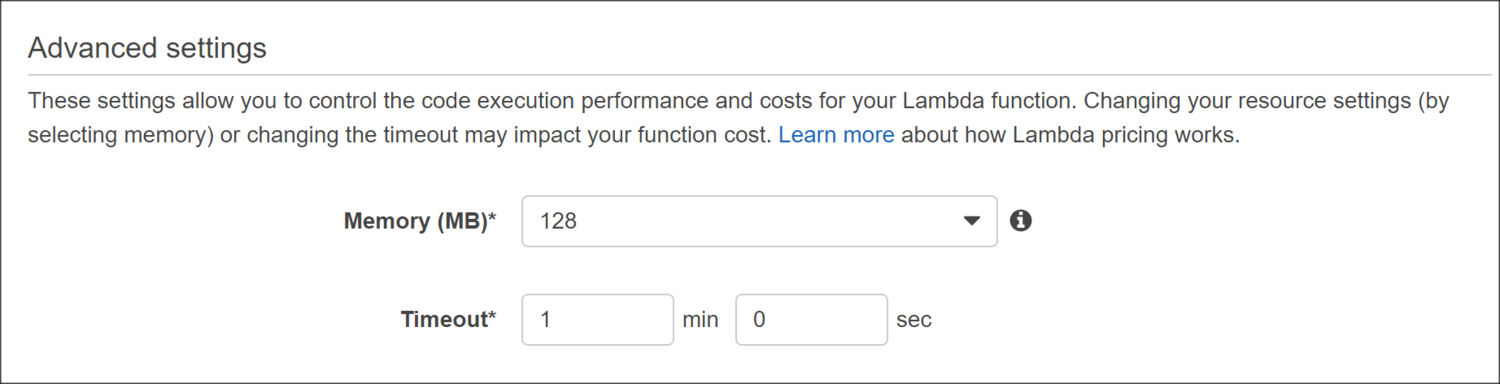
The default timeout for Lambda functions is 3 seconds, which is too short for our task. Let''s increase the timeout to 1 minute under Advanced Settings. This will give our function enough time to kick off the snapshot process for each volume.
Click Next then Create Function in the review page to finish.
Schedule Trigger as CloudWatch Rule
Navigate to the Triggers tab and click on Add Trigger which brings up the following window:
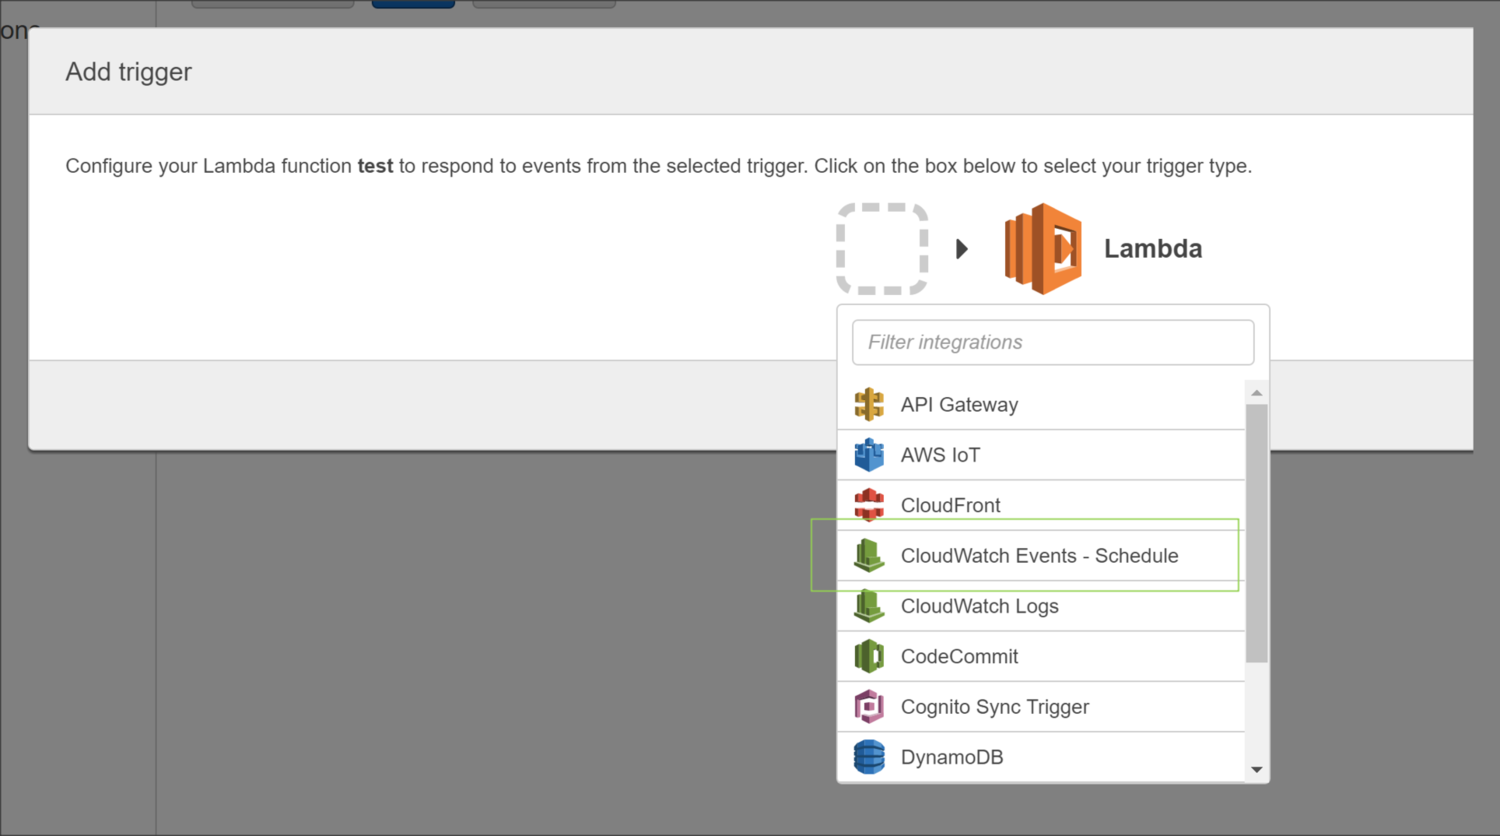
Selecting CloudWatch Event - Schedule from the dropdown list allows us to configure a rule based on a schedule. It''s important to note that the times listed in the cron entry are in UTC.
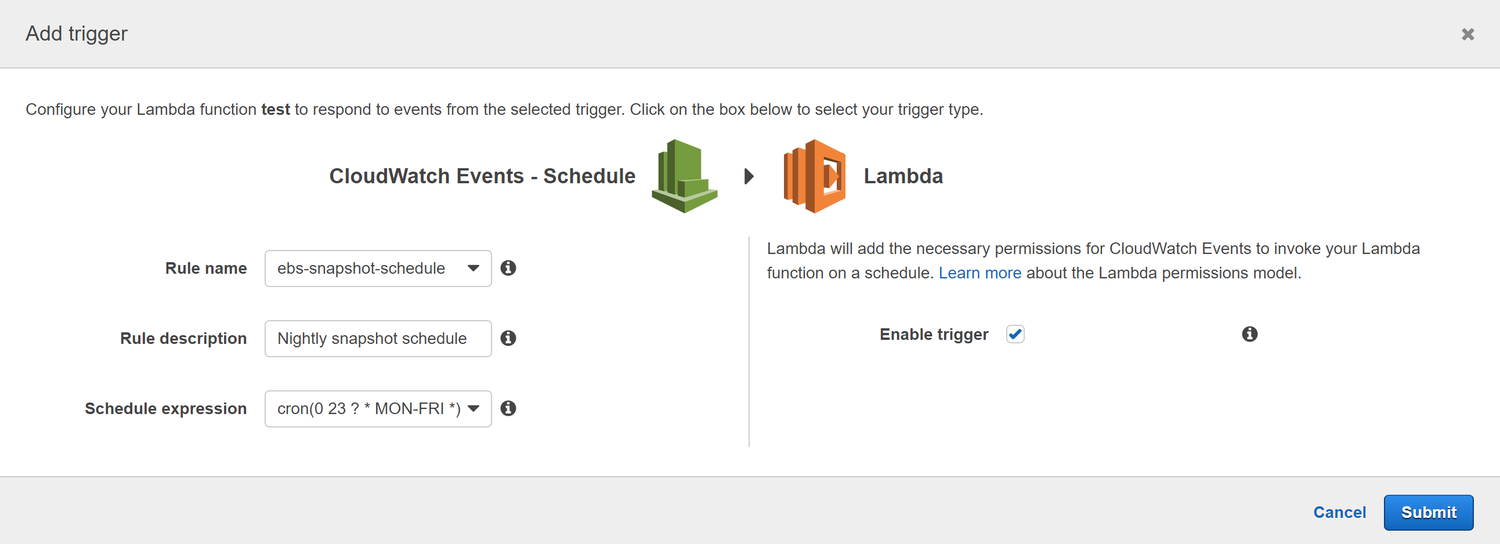
You''ll be prompted to enter a name, description, and schedule for the rule.
It''s important to note that the times listed for the cron expression are in UTC. In the example below, we are scheduling the Lambda function to run each weeknight at 11pm UTC.
Testing
We can test our function immediately by click on the Save and Test button in the function page. This will execute the function and show the results in the console at the bottom of the page.
Logging
After verifying that the function runs successfully, we can take a look at the CloudWatch logs by clicking on the link shown in the Log Output section.
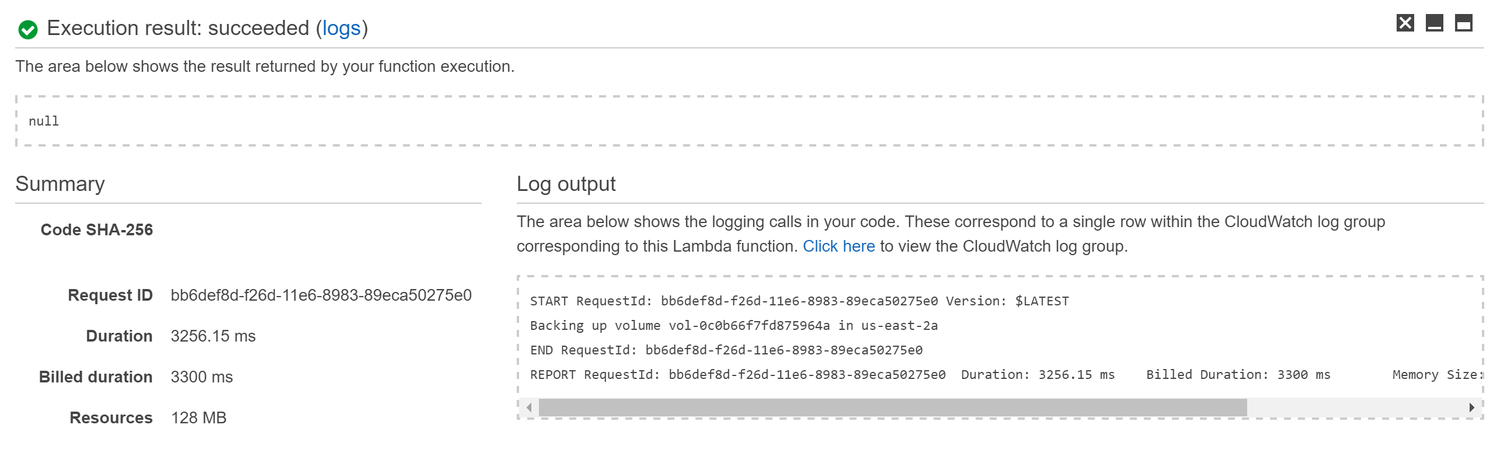
You''ll notice a Log Group was created with the name /aws/lambda/ebs-create-snapshots. Select the most recent Log Stream to view individual messages:
11:00:19  START RequestId: bb6def8d-f26d-11e6-8983-89eca50275e0 Version: $LATEST
11:00:21  Backing up volume vol-0c0b66f7fd875964a in us-east-2a
11:00:22  END RequestId: bb6def8d-f26d-11e6-8983-89eca50275e0
11:00:22  REPORT RequestId: bb6def8d-f26d-11e6-8983-89eca50275e0 Duration: 3256.15 ms Billed Duration: 3300 ms Memory Size: 128 MB Max Memory Used: 40 MB
Delete Snapshots Function in Lambda
Let''s take a look at how we can delete snapshots older than the retention period which we''ll say is 10 days.
Before using the code below, you''ll want to replace account_id with your AWS account number and adjust retention_days according to your needs.
# Delete snapshots older than retention period

import boto3
from botocore.exceptions import ClientError

from datetime import datetime,timedelta

def delete_snapshot(snapshot_id, reg):
    print "Deleting snapshot %s " % (snapshot_id)
    try:
        ec2resource = boto3.resource(''ec2'', region_name=reg)
        snapshot = ec2resource.Snapshot(snapshot_id)
        snapshot.delete()
    except ClientError as e:
        print "Caught exception: %s" % e

    return

def lambda_handler(event, context):

    # Get current timestamp in UTC
    now = datetime.now()

    # AWS Account ID
    account_id = ''1234567890''

    # Define retention period in days
    retention_days = 10

    # Create EC2 client
    ec2 = boto3.client(''ec2'')

    # Get list of regions
    regions = ec2.describe_regions().get(''Regions'',[] )

    # Iterate over regions
    for region in regions:
        print "Checking region %s " % region[''RegionName'']
        reg=region[''RegionName'']

        # Connect to region
        ec2 = boto3.client(''ec2'', region_name=reg)

        # Filtering by snapshot timestamp comparison is not supported
        # So we grab all snapshot id''s
        result = ec2.describe_snapshots( OwnerIds=[account_id] )

        for snapshot in result[''Snapshots'']:
            print "Checking snapshot %s which was created on %s" % (snapshot[''SnapshotId''],snapshot[''StartTime''])

            # Remove timezone info from snapshot in order for comparison to work below
            snapshot_time = snapshot[''StartTime''].replace(tzinfo=None)

            # Subtract snapshot time from now returns a timedelta
            # Check if the timedelta is greater than retention days
            if (now - snapshot_time) > timedelta(retention_days):
                print "Snapshot is older than configured retention of %d days" % (retention_days)
                delete_snapshot(snapshot[''SnapshotId''], reg)
            else:
                print "Snapshot is newer than configured retention of %d days so we keep it" % (retention_days)
FAQ
How do I include or exclude certain volumes from the create snapshots function?
The function we wrote for creating snapshots used a filter when calling ec2.describe_volumes that looked for status of in-use:
result = ec2.describe_volumes( Filters=[{''Name'': ''status'', ''Values'': [''in-use'']}])Including Volumes using Tags
We can also create tags on volumes and filter by tag.
Suppose we wanted to backup only the volumes that had a specific tag named "Backup" with a value of "Yes".
First, we create a tag for each volume by right-clicking on the volume and selecting Add/Edit Tags

Next, we modify the script and use the following line for describe_volumes:
result = ec2.describe_volumes( Filters=[{''Name'':''tag:Backup'', ''Values'':[''Yes'']}] )Excluding Volumes using Tags
Excluding certain volumes using tags is a bit different. The Filters parameter of describe_volumes is for inclusion only. So we cannot use that to tell the script to exclude specific volumes.
Suppose we wanted to backup all volumes EXCEPT ones with a tag named "Backup" with a value of "No".
First, we create a tag for each volume by right-clicking on the volume and selecting Add/Edit Tags

Next, we modify the script and manually filter the volumes inside the loop:
# Backup all volumes all regions
# Skip those volumes with tag of Backup=No

import boto3

def lambda_handler(event, context):
    ec2 = boto3.client(''ec2'')

    # Get list of regions
    regions = ec2.describe_regions().get(''Regions'',[] )

    # Iterate over regions
    for region in regions:
        print "Checking region %s " % region[''RegionName'']
        reg=region[''RegionName'']

        # Connect to region
        ec2 = boto3.client(''ec2'', region_name=reg)

        # Get all volumes in all regions
        result = ec2.describe_volumes()

        for volume in result[''Volumes'']:

            backup = ''Yes''

            # Get volume tag of Backup if it exists
            for tag in volume[''Tags'']:
                if tag[''Key''] == ''Backup'':
                    backup = tag.get(''Value'')

            # Skip volume if Backup tag is No
            if backup == ''No'':
                break

            print "Backing up %s in %s" % (volume[''VolumeId''], volume[''AvailabilityZone''])

            # Create snapshot
            result = ec2.create_snapshot(VolumeId=volume[''VolumeId''],Description=''Created by Lambda backup function ebs-snapshots'')

            # Get snapshot resource
            ec2resource = boto3.resource(''ec2'', region_name=reg)
            snapshot = ec2resource.Snapshot(result[''SnapshotId''])

            instance_name = ''N/A''

            # Fetch instance ID
            instance_id = volume[''Attachments''][0][''InstanceId'']

            # Get instance object using ID
            result = ec2.describe_instances(InstanceIds=[instance_id])

            instance = result[''Reservations''][0][''Instances''][0]

            print instance

             # Find name tag for instance
            if ''Tags'' in instance:
                for tags in instance[''Tags'']:
                    if tags["Key"] == ''Name'':
                        instance_name = tags["Value"]

            # Add volume name to snapshot for easier identification
            snapshot.create_tags(Tags=[{''Key'': ''Name'',''Value'': instance_name}])

Automating your Amazon Forecast workflow with Lambda, Step Functions, and CloudWatch Events rule
https://amazonaws-china.com/blogs/machine-learning/automating-your-amazon-forecast-workflow-with-lambda-step-functions-and-cloudwatch-events-rule/
Amazon Forecast is a fully managed service that uses machine learning (ML) to generate highly accurate forecasts without requiring any prior ML experience. Forecast is applicable in a wide variety of use cases, including estimating product demand, energy demand, workforce planning, computing cloud infrastructure usage, traffic demand, supply chain optimization, and financial planning.
Forecast is a fully managed service, so there are no servers to provision or ML models to build manually. Additionally, you only pay for what you use, and there is no minimum fee or upfront commitment. To use Forecast, you only need to provide historical data for what you want to forecast, and optionally any additional related data that you believe may influence your forecasts. The latter may include both time-varying data, such as price, events, and weather, and categorical data, such as color, genre, or region. The service automatically trains and deploys ML models based on your data and provides you a custom API to retrieve forecasts.
This post discusses the system architecture for Amazon Redshift to use Forecast to manage hardware and help customers spin up Amazon Redshift clusters quickly. This system architecture is use case agnostic; you can reference it in multiple scenarios. To learn more about how to use Amazon Forecast, see Amazon Forecast – Now Generally Available and Amazon Forecast now supports the generation of forecasts at a quantile of your choice.
Use case background
Amazon Redshift is a fully managed, petabyte- or even exabyte-scale data warehouse service in the cloud. An Amazon Redshift cluster is composed of one or more nodes. To set up a cluster as fast as we can to provide superior customer experience, we maintain cache pools to hold a certain number of nodes with preinstalled database software commonly referred to as a warm pool. Whenever a customer requests for a new cluster, Amazon Redshift grabs the required number of nodes from the cache pools. Amazon Redshift records every request and each entry contains the following attributes: Location, Timestamp, and NumberOfNodes. The following table presents example data.
| LocationId | Timestamp | NumberOfNodes |
| A | 2019-01-01T18:05:00Z | 5 |
| A | 2019-01-01T18:20:00Z | 7 |
| A | 2019-01-01T18:52:06Z | 11 |
| A | 2019-01-01T19:06:00Z | 9 |
| B | 2019-01-01T19:31:40Z | 9 |
Accurately predicting demand to maintain the right number of nodes in the cache pool is critical to quickly meeting demand while minimizing operational costs. Maintaining less capacity in the pool causes slow cluster delivery and results in sub-optimal customer experience. On the other hand, maintaining excessive inventory of nodes in the cache pool incurs high operational costs. Amazon Redshift uses Forecast to predict the demand for nodes at any given time. Compared to the percentile-based predictor that Amazon Redshift used prior to Forecast, warm pool capacity utilization has improved by 70%.
Overall system architecture
The following diagram provides an overview of the system architecture that Amazon Redshift has implemented to automate node demand prediction using Forecast. The architecture contains the following steps:
- Publish demand using AWS Lambda, AWS Step Functions, and Amazon CloudWatch Events rule to periodically (hourly) query the database and write the past X-months (count from the current timestamp) demand data into the source Amazon S3
- Generate model using Lambda, Step Functions, and CloudWatch Events rule to call Forecast APIs to create and update the model.
- Generate forecasts using Lambda, Step Functions, and CloudWatch Events rule to periodically (hourly) call Forecast APIs and export the predictions into the target S3 bucket.
- Load data using an S3 event trigger and a Lambda function into an Amazon DynamoDB table, whenever there is a new file with predictions in the target S3 bucket or folder.
- Query DynamoDB directly to determine future demand

Setting up a predictor using Forecast
The following sections discuss how to select parameters when you use the Forecast service APIs to create the necessary resources. For more information, see Amazon Forecast – Now Generally Available.
Creating the dataset
After we create the dataset group, we create a time series dataset and add it to the dataset group. When creating a dataset, we specify the metadata for the time series, such as schema and data frequency. The following screenshot shows the schema, where the item_id is the warm pool ID, and the target_value is the number of nodes for each request. The preparation duration for the host determines the data frequency (i.e. the time between calling an Amazon EC2 RunInstance API and when the instance becomes available to serve as a cluster node). We track this duration by using CloudWatch metrics. Finally, we proceed to use the dataset import job to copy our data from S3 to Forecast.

Creating the prediction
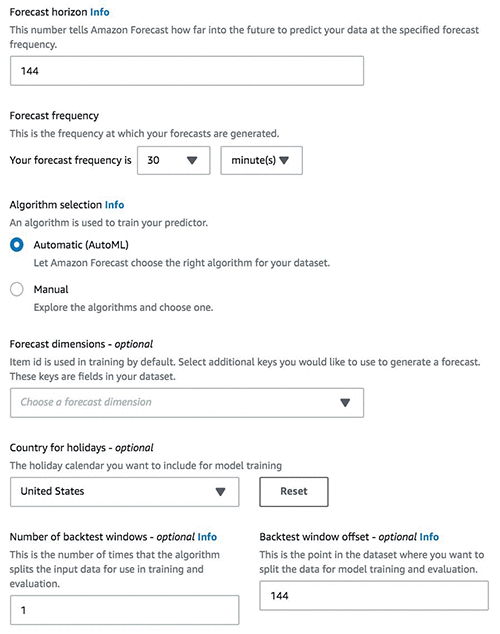
The next step is to create the predictor, which is the ML model. Specify the forecast horizon, which is the number of time-steps the model is trained to predict. This post chooses 144 time-steps, where each time-step is 30 mins (matching the data frequency), which essentially generates forecasts three days into the future. In the following screenshot, we use AutoML to allow Forecast to pick the most accurate model for the data. Finally, we generate the Forecast using the Create Forecast API.
Automating forecast generation at a predefined cadence
You can create a model and use it to generate forecasts at a specific cadence. In most cases, it is unlikely for the data patterns to change substantially over short periods of time. Hence, it is optimal to train a model one time and use it to generate forecasts whenever new data becomes available, and have a separate job or workflow to retrain the model at a cadence at which you expect the data patterns to change. This section lays out the steps to automate your forecast model training and forecast generation workflows using Forecast.
Incorporating system redundancy
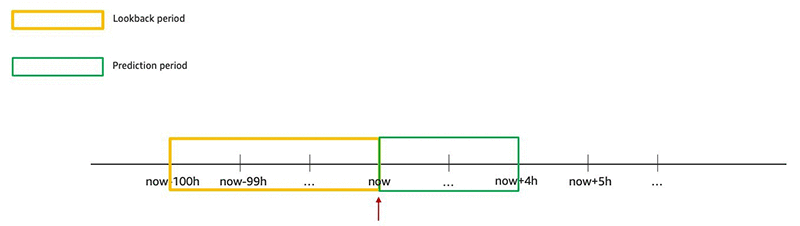
You first need to define the look-back period, which specifies the start time and end time for your historical demand data, and the prediction period, which is the duration in the future you want to predict for. This post uses the past 100 hours as the look-back period and 4 hours as the prediction period. We upload the data within this look-back period, for example, between now-100h and now (marked in yellow in the following graph) and let the service process it to generate results between now to now+4h (marked in green in the following graph). The following graph shows one cycle of the automated prediction process.
We repeat this process one hour later by moving forward both the look-back period and the prediction period by one hour.
The following screenshot shows the updated prediction period.

To have redundancy in production, we create a new forecast every hour (even though our forecast horizon is four hours). There might always be unexpected errors or outages from dependent services. If we let Forecast predict for a longer horizon, we can still use the last generated forecast until the underlying issue is fixed. The new forecast should override the forecast for the overlapping time intervals between two hourly runs.
Automating the forecast workflow
To automate the forecast workflow, we create two cron (time-based job scheduler) jobs. The first to retrain the model periodically and the second to import updated data and generate inferences using the existing model.
The following screenshot shows the first cron job for periodically retraining a model. Because the historical demand does not have a trend that changes often, we do not need to retrain our model often. For our use case, we run it once every 30 days. This cadence might vary depending on your specific use case. If there is a change in the data patterns, the AutoML functionality within Forecast picks this up and suggests the most optimal algorithm when we re-train the model.

The second cron job in the following figure periodically imports new data and the existing model to create a new forecast and associated export job. Forecast uses the updated demand data to generate forecasts for the new horizon. We make this cron job run hourly. Because the publisher keeps replacing the same file name with the new demand data, we keep the S3 Input File Path the same.

Sample code
You can download the sample code from the GitHub repo.
Summary
This post discussed how Amazon Redshift uses Forecast, including the underlying system architecture and how to automate forecast generation using Forecast (along with sample code), for the common scenario of creating a model one time and using it to generate forecasts multiple times. This solution is applicable across multiple use cases and makes your path to automating your forecast workflow easier. Please share feedback about this post either on the AWS forum or through your regular AWS Support channels.
About the authors
 Zhixing Ma is a senior software development engineer on the Amazon Redshift team where he led the Amazon Redshift inventory management project. Being the first internal customer with Amazon Forecast, his team interacted closely with service team scientists, product managers, and engineers to build a reliable and scalable auto prediction system.
 Srinivas Chakravarthi Thandu is a software development engineer on the Amazon Redshift team and his focus areas includes machine learning and data analytics. The range of projects he dealt in Redshift includes cost optimization and infrastructure management related which involves ml modeling and applied computing. He had the opportunity to work closely with the research and engineering teams at Amazon Forecast while the service was taking shape.
 Vivek Ramamoorthy is a Software Development Manager on AWS Redshift and currently leads the team that is responsible for Cluster Management and Infrastructure. In his spare time, he enjoys watching movies and experimenting with building software for IoT devices.
 Yuyang (Bernie) Wang is a Senior Machine Learning Scientist in Amazon AI Labs, working mainly on large-scale probabilistic machine learning with its application in Forecasting. His research interests span statistical machine learning, numerical linear algebra, and random matrix theory. In forecasting, Yuyang has worked on all aspects ranging from practical applications to theoretical foundations.
 Rohit Menon is a Sr. Product Manager currently leading product for Amazon Forecast at AWS. His current focus is to democratize time series forecasting by using machine learning. In his spare time, he enjoys reading and watching documentaries.
关于无服务器身份验证:由保护 S3 存储桶的 Cloudfront Viewer 请求触发的 Lambda@Edge 上的 Auth0无限重定向循环 LambdaCloudFront 配置Auth0 配置附加信息:FF 工具:的问题就给大家分享到这里,感谢你花时间阅读本站内容,更多关于amazon-web-services – 使用CloudFront和目录重定向托管的AWS S3静态网站、angularjs – 在AWS CloudFront和S3上配置X-Frame-Options响应标头、Automated EBS Snapshots using AWS Lambda & CloudWatch、Automating your Amazon Forecast workflow with Lambda, Step Functions, and CloudWatch Events rule等相关知识的信息别忘了在本站进行查找喔。
本文标签:


![[转帖]Ubuntu 安装 Wine方法(ubuntu如何安装wine)](https://www.gvkun.com/zb_users/cache/thumbs/4c83df0e2303284d68480d1b1378581d-180-120-1.jpg)

