在这里,我们将给大家分享关于用于电子邮件的ElasticSearchAnalyzer和Tokenizer的知识,让您更了解讨论电子邮件中使用的一些俚语的本质,同时也会涉及到如何更有效地AnalyzeP
在这里,我们将给大家分享关于用于电子邮件的ElasticSearch Analyzer和Tokenizer的知识,让您更了解讨论电子邮件中使用的一些俚语的本质,同时也会涉及到如何更有效地Analyze PostgreSQL logs with Amazon Elasticsearch Service、Elastic search-search_analyzer与index_analyzer、Elastic search自动完成 typeahead的edgeNGram,我的search_analyzer被忽略、elasticsearch + python 如何使用非全局的 analyzer的内容。
本文目录一览:- 用于电子邮件的ElasticSearch Analyzer和Tokenizer(讨论电子邮件中使用的一些俚语)
- Analyze PostgreSQL logs with Amazon Elasticsearch Service
- Elastic search-search_analyzer与index_analyzer
- Elastic search自动完成 typeahead的edgeNGram,我的search_analyzer被忽略
- elasticsearch + python 如何使用非全局的 analyzer
")
用于电子邮件的ElasticSearch Analyzer和Tokenizer(讨论电子邮件中使用的一些俚语)
对于以下情况,我在Google或ES中都找不到完美的解决方案,希望有人可以在此提供帮助。
假设在“电子邮件”字段下存储了五个电子邮件地址:
1. {"email": "john.doe@gmail.com"}2. {"email": "john.doe@gmail.com, john.doe@outlook.com"}3. {"email": "hello-john.doe@outlook.com"}4. {"email": "john.doe@outlook.com}5. {"email": "john@yahoo.com"}我要满足以下搜索方案:
[搜索->接收]
“ john.doe@gmail.com”-> 1,2
“ john.doe@outlook.com”-> 2,4
“ john@yahoo.com”-> 5
“ john.doe”-> 1,2,3,4
“约翰”-> 1,2,3,4,5
“ gmail.com”-> 1,2
“ outlook.com”-> 2,3,4
前三个匹配项是必须的,对于其他匹配项,越精确越好。已经尝试了索引/搜索分析器,标记器和过滤器的不同组合。还尝试在匹配查询的条件下工作,但是没有找到理想的解决方案,欢迎任何想法,并且对映射,分析器或使用哪种查询没有限制,谢谢。
答案1
小编典典映射 :
PUT /test{ "settings": { "analysis": { "filter": { "email": { "type": "pattern_capture", "preserve_original": 1, "patterns": [ "([^@]+)", "(\\p{L}+)", "(\\d+)", "@(.+)", "([^-@]+)" ] } }, "analyzer": { "email": { "tokenizer": "uax_url_email", "filter": [ "email", "lowercase", "unique" ] } } } }, "mappings": { "emails": { "properties": { "email": { "type": "string", "analyzer": "email" } } } }}测试数据 :
POST /test/emails/_bulk{"index":{"_id":"1"}}{"email": "john.doe@gmail.com"}{"index":{"_id":"2"}}{"email": "john.doe@gmail.com, john.doe@outlook.com"}{"index":{"_id":"3"}}{"email": "hello-john.doe@outlook.com"}{"index":{"_id":"4"}}{"email": "john.doe@outlook.com"}{"index":{"_id":"5"}}{"email": "john@yahoo.com"}要使用的查询 :
GET /test/emails/_search{ "query": { "term": { "email": "john.doe@gmail.com" } }}
Analyze PostgreSQL logs with Amazon Elasticsearch Service
https://amazonaws-china.com/blogs/database/analyze-postgresql-logs-with-amazon-elasticsearch-service/
Amazon RDS supports publishing PostgreSQL logs to Amazon CloudWatch for versions 9.6.6 and above. Aurora PostgreSQL supports publishing logs to CloudWatch Logs for versions 9.6.12 and above, and versions 10.7 and above. By live streaming this data from CloudWatch to Amazon Elasticsearch Service (Amazon ES), you maintain continuous visibility of RDS PostgreSQL DB logs. You can visualize, analyze, and discover data in real time using Kibana with straightforward search syntax. You can also configure monitoring on the PostgreSQL logs and set alarms in Kibana to enable timely detection of logged errors or long-running queries.
Using CloudWatch, you can query the logs and perform visualizations, but this can be challenging if you have multiple databases in multiple AWS accounts. The solution used in this post is ideal in this situation, as we will be streaming the logs to a central location and visualizing dashboards for multiple databases without logging into the multiple consoles for each account.
Amazon ES is a fully managed service that makes it easy to deploy, secure, and operate Elasticsearch at scale with zero downtime. You can analyze unstructured and semi-structured logs generated by websites, mobile devices, servers, and sensors. This ensures operational intelligence, application monitoring, root cause analysis, and more. The service offers open-source APIs, managed Kibana, and integrations with Logstash and other AWS services to securely ingest data from any source. With Amazon ES, you can search, analyze, and visualize it in real time.
This post demonstrates how to publish logs of RDS PostgreSQL databases to CloudWatch and live stream the data into Amazon ES. You will also learn how to get rid of cold data that is above your data retention threshold.
The following are the high-level steps:
- Create an Amazon ES domain.
- Configure the RDS PostgreSQL instance.
- Configure data streaming to Amazon ES.
- Archive and clean out cold data for storage and performance gains.
Prerequisites
- A valid AWS account with access to the appropriate AWS services.
- An Aurora/RDS PostgreSQL database. For more information, see Amazon RDS.
Creating an Amazon ES domain
Amazon ES domains are clusters with the settings, instance types, instance counts, and storage resources that you specify. To create a new domain, see Create an Amazon ES Domain.
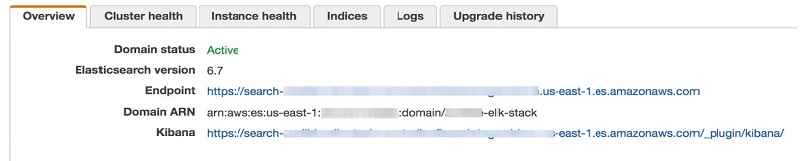
After you create the domain, find the endpoint, ARN, and Kibana URL in the Amazon ES Domain Overview page, as shown in the screenshot preview below.
Configuring the RDS PostgreSQL instance
To configure the RDS PostgreSQL database log files to publish logs to CloudWatch, complete the following steps:
- Log in to the AWS Management Console and under Database category, choose RDS.
- Choose your desired database instance.
- Choose Modify.
- For Log exports, choose PostgreSQL log and Upgrade log as shown in the screenshot preview below.
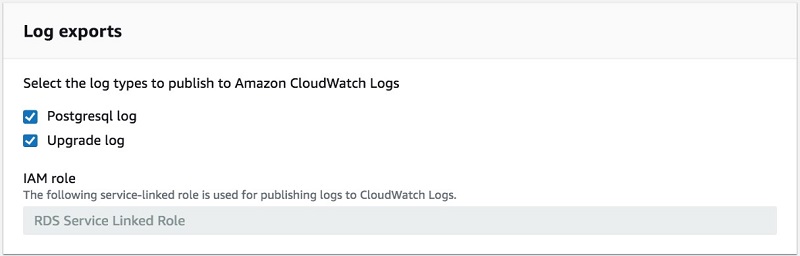
- Choose Continue.
- Choose Apply immediately.
To verify that you created the new log group, go to the CloudWatch console. Under Management and Governance, choose Logs. The new log group should appear as: /aws/rds/instance/<dbname>/postgresql.
Configuring data streaming to Amazon ES
To configure streaming from CloudWatch to Amazon ES, see Streaming CloudWatch Logs Data to Amazon Elasticsearch Service. To configure your log format and filters, complete the following steps:
- On the Configure Log Format and Filters page, under Log Format, choose Common Log Format as shown in the screenshot preview below.
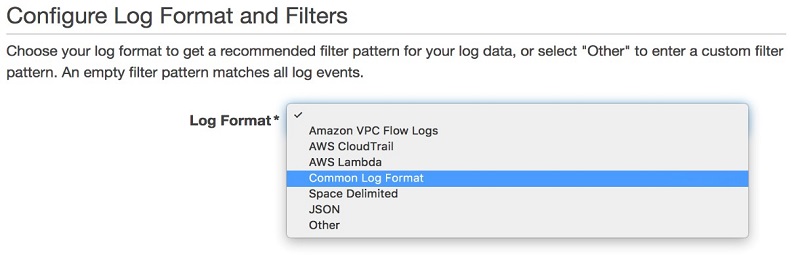
- For Subscription Filter Pattern, enter date, time, misc, and message.
- Choose Test Pattern. The screenshot below is a preview of the Configure Log Format and Filters page demonstrating these three steps.
![Screenshot of the Configure Log Format and Filters page, showing Common Log Format selected and entering [date, time, misc, message] under Subscription Filter Pattern](https://oscimg.oschina.net/itags/b548a4cc2d88cab75117a68778ce5f20a188bda2.jpg) This step tests the pattern to view how your data is organized. You can use filter patterns to organize the data and segregate each log statement based on the structure of logging. This segregation is useful when creating the visualizations in Kibana.
This step tests the pattern to view how your data is organized. You can use filter patterns to organize the data and segregate each log statement based on the structure of logging. This segregation is useful when creating the visualizations in Kibana.
The following code is an example log statement:2019-08-08 02:47:24 UTC:72.21.217.47(7556):uadmin_TyOXrDmzkyCdRXcKdMHCnqqVCgZpDBHDLThdSNunLrzHNqFHNxjqxdwj@<dbname>:[11381]:LOG: connection authorized: user=uadmin_TyOXrDmzkyCdRXcKdMHCnqqVCgZpDBHDLThdSNunLrzHNqFHNxjqxdwj database=<dbname> SSL enabled (protocol=TLSv1.2, cipher=ECDHE-RSA-AES256-GCM-SHA384, compression=off)After you apply the filter, the preceding statement is stored as the following:
date=August 7th 2019, time=02:47:24, misc=UTC:72.21.217.47(7556):uadmin_TyOXrDmzkyCdRXcKdMHCnqqVCgZpDBHDLThdSNunLrzHNqFHNxjqxdwj@<dbname>:[11381]:LOG:, message=connection authorized: user=uadmin_TyOXrDmzkyCdRXcKdMHCnqqVCgZpDBHDLThdSNunLrzHNqFHNxjqxdwj database=<dbname> SSL enabled (protocol=TLSv1.2, cipher=ECDHE-RSA-AES256-GCM-SHA384, compression=off) - Choose Next.
- Choose Review.
- Choose Start streaming.
Modifying the index name pattern in AWS Lambda
To modify your index name pattern in AWS Lambda, complete the following steps:
- Open the Lambda console.
- Choose the new function that was automatically created by the previous step (for example,
LogsToElasticsearchEx_my-elk-stack_<account-number>). - Replace the index prefix in the Lambda function (
index.js). See the following code:// index name format: cwl-<databaseName>-YYYY.MM.DD var idxName = payload.logGroup.toLowerCase().split(''/''); var indexName = [ ''cwl-'' + idxName[4] + ''-'' + timestamp.getUTCFullYear(), // log group + year (''0'' + (timestamp.getUTCMonth() + 1)).slice(-2), // month (''0'' + timestamp.getUTCDate()).slice(-2) // day ].join(''.'');
Best practice is to have one index per database, which helps in performance and scaling.
At this point, the Lambda function transforms the log to JSON format and exports the log to Amazon ES. However, because you did not configure permissions to allow Lambda to export the logs, it errors out with HTTP status 403.
To view the Lambda log, go to CloudWatch and view the logs under /aws/Lambda/LogsToElasticsearchEx_my-elk-stack_<accountid>. The following code shows an example error message:
{ “errorMessage”: “{\”statusCode\”:403,\”responseBody\”:{\”Message\”:\”User: arn:aws:sts::<account_number>:assumed-role/my-elk-stack/LogsToElasticsearchEx_my-elk-stack_<account_number> is not authorized to perform: es:ESHttpPost\”}}” }From this error message, you can copy the ARN to include in the Amazon ES access policy.
Modifying the access policy in the Amazon ES domain
To modify your access policy, complete the following steps:
- Open the Amazon ES console.
- Choose the ES domain that was created in the earlier step.
- Choose Modify access policy that fulfills the following requirements:
- Allows data inflow from CloudWatch and also includes access permissions for users to view the Kibana dashboard.
- Has a corresponding ARN entry in the Amazon ES access policy for each account. Do this if you have database instances in multiple accounts and you have configured the log exports.
- Has a policy for anonymous access to Amazon ES and Kibana endpoints.
- Grants access to a single user or multiple users using CIDR bits.
The following screenshot shows a preview of the ES domain page and the Modify access policy button to select.

See the following example policy for multiple accounts:
{
  "Version": "2012-10-17",
  "Statement": [
    {
      "Effect": "Allow",
      "Principal": {
        "AWS": [
          "arn:aws:sts::<db_account_number1>:assumed-role/my_elk_stack/LogsToElasticsearchEx_my-elk-stack_<es_account_number>",
          "arn:aws:sts::<db_account_number2>:assumed-role/my_elk_stack/LogsToElasticsearchEx_my-elk-stack_<es_account_number>",
          "arn:aws:sts::<db_account_number3>:assumed-role/my_elk_stack/LogsToElasticsearchEx_my-elk-stack_<es_account_number>",
          "arn:aws:sts::<db_account_number4>:assumed-role/my_elk_stack/LogsToElasticsearchEx_my-elk-stack_<es_account_number>",
          "arn:aws:sts::<db_account_number5>:assumed-role/my_elk_stack/LogsToElasticsearchEx_my-elk-stack_<es_account_number>"
        ]
      },
      "Action": [
        "es:ESHttpGet",
        "es:ESHttpHead",
        "es:ESHttpPost",
        "es:ESHttpPut"
      ],
      "Resource": "arn:aws:es:us-east-1:<es_account_number>:domain/my-elk-stack/*"
    },
    {
      "Effect": "Allow",
      "Principal": {
        "AWS": "*"
      },
      "Action": "es:ESHttpGet",
      "Resource": "arn:aws:es:us-east-1:<es_account_number>:domain/my-elk-stack/*",
      "Condition": {
        "IpAddress": {
           "aws:SourceIp": [ "<first two blocks of your ip for multiple users>.0.0/24", "<full ip address for single user>/32" ]
        }
      }
    }
  ]
}
Archive and clean out cold data
The Lambda function creates one index per day per database. To manage the storage and overcrowded indexes in the cluster, it is a best practice to progressively remove older indexes by date. In doing so, you reduce the unwanted load on Amazon ES and improving query performance.
To achieve this, you must create a Lambda function (refer to sample – Node.js Lambda function) that iterates through the indexes and deletes them based on the configured archival period. You may archive as much data as is required.
Create the Node.js Lambda delete function for multiple database indexes and data archival for 15 days. Change the number of days as per your requirement.
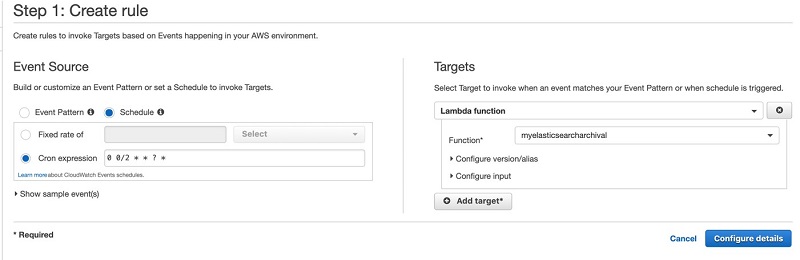
After creating the Lambda function, create a CloudWatch rule that helps invoke the Lambda delete indexes function on a regular schedule. To set up the rule, complete the following steps:
- Log in to the AWS Management Console account containing the Amazon ES domain.
- On the CloudWatch console, under Events, choose Rules.
- Choose Create rule.
- For Events Source, choose Schedule.
- For Cron expression, enter
0 0/2 * * ? *.
This expression invokes the function every two hours. If the automatic snapshot of those indexes is in progress, there is a chance of some indexes remaining. - Choose Add target.
- From the dropdown menu, choose Lambda function and choose Configure details.
- In the next screen, for Function, enter the name and description for the CloudWatch rule as shown in the screenshot preview below.
Also add permission to allow the Lambda function to delete the old indexes:
- Open the Amazon ES console.
- Choose the ES domain that was created in the earlier step.
- Choose Modify access policy.
- Append the existing policy with the following code:
{
"Effect": "Allow",
"Principal": {
"AWS": "arn:aws:iam::<accountNumber>:role/service-role/<curatorFunctionName>"
},
"Action": "es:ESHttpDelete",
"Resource": "arn:aws:es:us-east-1:<accountNumber>:domain/my-elk-stack/*"
}
Summary
This post demonstrated how to stream PostgreSQL logs to Amazon ES and configure a lifecycle policy to help manage storage and performance. You now have a powerful and easy query analytics engine with which you can visualize and analyze logs intelligently.
This blog post is part of a series. To learn how to configure Kibana for the visualization and analysis of data stored in Amazon ES, read Configuring and authoring Kibana dashboards.
About the Author

Marcel George is a Consultant with Amazon Web Services. He works with customers to build scalable, highly available, and secure solutions in AWS cloud. His focus area is homogenous and heterogeneous migrations of on-premise databases to Amazon RDS and Aurora PostgreSQL.

Elastic search-search_analyzer与index_analyzer
如何解决Elastic search-search_analyzer与index_analyzer?
通常在索引时间和查询时间您都具有类似的分析链。相似并不意味着完全相同,但是通常索引文档的方式反映了查询文档的方式。
ngrams示例非常合适,因为它是您在索引和查询时使用不同分析器的主要原因之一。
对于部分匹配,可以使用边缘ngram进行索引,以便“ elasticsearch”成为(使用mingram 3和maxgram 20):
“ ela”,“ elas”,“ elast”,“ elasti”,“ elastic”,“ elastics”,“ elasticse”,“ elasticsea”,“ elasticsear”,“ eleasticsearc”和“ elasticsearch”
现在查询创建的字段。如果查询“弹性”一词,则表示匹配,并且返回预期结果。给定索引后,我们基本上使部分匹配之上的我们称为完全匹配。也无需对查询应用ngram。如果这样做,我们将查询以下所有术语:
“ ela”,“ elas”,“ elast”,“ elasti”和“ elastic”
这将使查询方式更加复杂,并导致获得奇怪的结果。假设您在另一个文档的同一字段中为术语“经过”编制了索引。您将具有以下ngram:
“ ela”,“ elap”,“ elaps”,“ elapse”,“ elapsed”
如果您搜索“ elastic”并对查询进行ngram运算,则术语“ ela”也将与第二个文档匹配,因此即使没有任何术语包含完整的“ elastic”术语,您也会将其与第一个文档一起返回。在寻找。
我建议您看一下分析API,以使用不同的分析器及其不同的结果。
解决方法
我正在查看 http://euphonious-intuition.com/2012/08/more-complicated-mapping-in-
elasticsearch/ ,其中介绍了ElasticSearch分析器。
我不了解有关使用不同的搜索和索引分析器的部分。自定义映射的第二个示例是这样的:
->索引分析器是edgeNgram-
搜索分析器是:
"full_name":{
    "filter":[
        "standard","lowercase","asciifolding"
    ],"type":"custom","tokenizer":"standard"
}
如果我们希望查询“ Race” 由于edgeNgram 不返回诸如 ra * pport和 rac * ial之类的结果,为什么要首先使用edgeNgram对其进行索引?
请举例说明不同的分析仪有用。

Elastic search自动完成 typeahead的edgeNGram,我的search_analyzer被忽略
我有三个带有“ userName”字段的文档:
- ‘briandilley’
- ‘briangumble’
- ‘briangriffen’
当我搜索 ‘brian’时,我将所有三个都按预期返回,但是当我搜索“布莱恩迪利”时,我仍然将所有三个都恢复了。分析API告诉我它在搜索字符串上使用了ngram过滤器,但我不确定为什么。这是我的设置:
index settings:
{
    "analysis": {
        "analyzer": {
            "username_index": {
                "tokenizer": "keyword","filter": ["lowercase","username_ngram"]
            },"username_search": {
                "tokenizer": "keyword","filter": ["lowercase"]
            }
        },"filter": {
            "username_ngram": {
                "type": "edgeNGram","side" : "front","min_gram": 1,"max_gram": 15
            }
        }
    }
}
mapping:
{
    "user_follow": {

        "properties": {
            "targetId": { "type": "string","store": true },"followerId": { "type": "string","dateUpdated": { "type": "date","userName": {
                "type": "multi_field","fields": {
                    "userName": {
                        "type": "string","index": "not_analyzed"
                    },"autocomplete": {
                        "type": "string","index_analyzer": "username_index","search_analyzer": "username_search"
                    }
                }
            }
        }
    }
}
search:
{
    "from" : 0,"size" : 50,"query" : {
        "bool" : {
            "must" : [ {
                "field" : {
                    "targetId" : "51888c1b04a6a214e26a4009"
                }
            },{
                "match" : {
                    "userName.autocomplete" : {
                        "query" : "brian","type" : "boolean"
                    }
                }
            } ]
        }
    },"fields" : "followerId"
}
我尝试过matchQuery,matchPhraseQuery,textQuery和termQuery(java DSL api),每次都得到相同的结果。

elasticsearch + python 如何使用非全局的 analyzer
当我们建立一个 index 的时候,可以为 index 创建专属的 analyzer
这个 analyzer 的只是该 index 可见,而不是全局的
PUT /my_index
{
  "mappings": {
    "properties": {
      "title": {
        "type": "text",
        "analyzer": "my_analyzer"
      },
      "content": {
        "type": "text"
      }
    }
  },
  "settings": {
    "analysis": {
      "analyzer": {
        "my_analyzer": {
          "type": "custom",
          "tokenizer": "standard",
          "filter": [
            "lowercase",
            "my_synonyms"
          ]
        }
      },
      "filter": {
        "my_synonyms": {
          "type": "synonym",
          "synonyms_path": "analysis/synonyms.txt"
        }
      }
    }
  }
}
有这么一个需求,我们希望,使用 python sdk 查看 analyzer 的结果,怎么办?
很简单:
es.indices.analyze(
    index=index_name,
    body={
        "analyzer": "sentence_analyzer",
        "text": content,
    }
)
加上 index=index_name 参数就好了,不然会遇到报错: failed to find global analyzer [sentence_analyzer]
今天的关于用于电子邮件的ElasticSearch Analyzer和Tokenizer和讨论电子邮件中使用的一些俚语的分享已经结束,谢谢您的关注,如果想了解更多关于Analyze PostgreSQL logs with Amazon Elasticsearch Service、Elastic search-search_analyzer与index_analyzer、Elastic search自动完成 typeahead的edgeNGram,我的search_analyzer被忽略、elasticsearch + python 如何使用非全局的 analyzer的相关知识,请在本站进行查询。
本文标签:


![[转帖]Ubuntu 安装 Wine方法(ubuntu如何安装wine)](https://www.gvkun.com/zb_users/cache/thumbs/4c83df0e2303284d68480d1b1378581d-180-120-1.jpg)

