如果您想了解用Elasticsearch搜索/滚动异步等待的相关知识,那么本文是一篇不可错过的文章,我们将对elasticsearch滚动索引进行全面详尽的解释,并且为您提供关于017.Elastic
如果您想了解用Elasticsearch搜索/滚动异步等待的相关知识,那么本文是一篇不可错过的文章,我们将对elasticsearch滚动索引进行全面详尽的解释,并且为您提供关于017.Elasticsearch搜索操作入门篇、020.Elasticsearch搜索操作高级篇、django使用haystack来调用Elasticsearch搜索引擎、Elasticsearch CentOS6.5下安装ElasticSearch6.2.4+elasticsearch-head+Kibana的有价值的信息。
本文目录一览:- 用Elasticsearch搜索/滚动异步等待(elasticsearch滚动索引)
- 017.Elasticsearch搜索操作入门篇
- 020.Elasticsearch搜索操作高级篇
- django使用haystack来调用Elasticsearch搜索引擎
- Elasticsearch CentOS6.5下安装ElasticSearch6.2.4+elasticsearch-head+Kibana
")
用Elasticsearch搜索/滚动异步等待(elasticsearch滚动索引)
我正在将其await用作搜索的一部分,但必须使用+30000个项scroll。
问题在于,搜索的初始部分是在搜索之前完成的scroll,因此await触发和功能将继续进行。我应该怎么做才能阻止这种情况?
var allTitles = [];try { await client.search({ index: ''myindex'', scroll: ''30s'', source: [''title''], q: ''title:test'' }, function getMoreUntilDone(error, response) { response.hits.hits.forEach(function (hit) { allTitles.push(hit._source.title); }); if (response.hits.total > allTitles.length) { client.scroll({ scrollId: response._scroll_id, scroll: ''30s'' }, getMoreUntilDone); } else { console.log(''every "test" title'', allTitles); } });} catch (err) { console.log(err)}答案1
小编典典所以,我已经重新编写了它,以便在这里帮助任何需要它的人。
var stuff = []const q = {params}const searchstuff = (q) => { return new Promise((resolve, reject) => { const get = x => { stuff = stuff.concat(x.hits.hits) if (x.hits.total > stuff.length) { this.client.scroll({ scrollId: x._scrollId, scroll: ''10s''}).then(get) } else { resolve(stuff) } } this.client.search(q).then(get).catch(reject) })}const search = await searchstuff(q)if (search) console.log(''Searched'')
017.Elasticsearch搜索操作入门篇
1. 多种搜索方式
1.1 Query String Search:在请求URL中包括search的参数
# 语法
curl -X GET "ip:port/index_name/type_name/_search?q=key1=value1&key2=value2"

# 举例
# 查看全部文档
curl -X GET "node01:9200/shop/product/_search"
# 搜索商品名称中包含“Toothpaste”的商品,而且按照price降序排序
curl -X GET "node01:9200/shop/product/_search?q=name:Toothpaste&sort=price:desc"

# 扩展
GET /index_name/type_name/_search?q=key:value
GET /index_name/type_name/_search?q=+key:value
GET /index_name/type_name/_search?q=-key:value

# name的值包含"Tom"
GET /test_index/test_type/_search?q=name:Tom
# 无论那个field,只要其值包含"Tom"即可
GET /test_index/test_type/_search?q=Tom
# =+ 与 = 的效果相同
GET /test_index/test_type/_search?q=+name:Tom
# =- 的意思是:field不是指定的字符串(精确匹配,例如本例子不会过滤name=Tommy的document)
GET /test_index/test_type/_search?q=-name:Tom
- "q=value"原理分析
假设有如下的document:
{
    "name": "Tom",
    "age": 25,
    "sex": "male",
    "country": "China"
}
在插入这条数据后,ES会自动将多个field的值,全部用字符串的方式串联起来,组成一个长字符串,作为_all field的值,同时建立索引,本例中,"_all field"="Tom 25 male China",当使用Query String Search:GET /test_index/test_type/_search?q=Tom,实际上并不会去逐一比较每个field的值,而是直接与"_all field"的分词结果做比较
- Query String Search的适用场景
适用于临时的在命令行使用一些工具,比如curl,快速的发出请求,来检索想要的信息;但是如果查询请求很复杂,是很难去构建的,在生产环境中,几乎很少使用Query String Search
1.2 Query String Search实战
# 准备测试数据
PUT /my_index
{
  "mappings": {
    "my_type": {
      "properties": {
        "post_date": {
          "type": "text"
        }
      }
    }
  }
}

PUT /my_index/my_type/1
{
  "post_date": "2020-07-01"
}

PUT /my_index/my_type/2
{
  "post_date": "2020-07-02"
}

PUT /my_index/my_type/3
{
  "post_date": "2020-07-03"
}

# 测试分词结果
GET _analyze
{
  "text": "2020-07-01"
}

{
  "tokens" : [
    {
      "token" : "2020",
      "start_offset" : 0,
      "end_offset" : 4,
      "type" : "<NUM>",
      "position" : 0
    },
    {
      "token" : "07",
      "start_offset" : 5,
      "end_offset" : 7,
      "type" : "<NUM>",
      "position" : 1
    },
    {
      "token" : "01",
      "start_offset" : 8,
      "end_offset" : 10,
      "type" : "<NUM>",
      "position" : 2
    }
  ]
}

# 那么这3条文档建立的倒排索引如下:
---------------------
word  docId
---------------------
2020  1、2、3
07    1、2、3
01    1
02    2
03    3

# 直接与"_all field"的分词结果做比较,于是搜索出3条结果
GET /my_index/my_type/_search?q=2020

{
  "took" : 5,
  "timed_out" : false,
  "_shards" : {
    "total" : 5,
    "successful" : 5,
    "skipped" : 0,
    "failed" : 0
  },
  "hits" : {
    "total" : 3,
    "max_score" : 0.2876821,
    "hits" : [
      {
        "_index" : "my_index",
        "_type" : "my_type",
        "_id" : "2",
        "_score" : 0.2876821,
        "_source" : {
          "post_date" : "2020-07-02"
        }
      },
      {
        "_index" : "my_index",
        "_type" : "my_type",
        "_id" : "1",
        "_score" : 0.2876821,
        "_source" : {
          "post_date" : "2020-07-01"
        }
      },
      {
        "_index" : "my_index",
        "_type" : "my_type",
        "_id" : "3",
        "_score" : 0.2876821,
        "_source" : {
          "post_date" : "2020-07-03"
        }
      }
    ]
  }
}

# 同样,将"2020-07-01"分词后,再去与文档匹配,查询出3条结果
GET /my_index/my_type/_search?q=2020-07-01
{
  "took" : 15,
  "timed_out" : false,
  "_shards" : {
    "total" : 5,
    "successful" : 5,
    "skipped" : 0,
    "failed" : 0
  },
  "hits" : {
    "total" : 3,
    "max_score" : 0.8630463,
    "hits" : [
      {
        "_index" : "my_index",
        "_type" : "my_type",
        "_id" : "1",
        "_score" : 0.8630463,
        "_source" : {
          "post_date" : "2020-07-01"
        }
      },
      {
        "_index" : "my_index",
        "_type" : "my_type",
        "_id" : "2",
        "_score" : 0.5753642,
        "_source" : {
          "post_date" : "2020-07-02"
        }
      },
      {
        "_index" : "my_index",
        "_type" : "my_type",
        "_id" : "3",
        "_score" : 0.5753642,
        "_source" : {
          "post_date" : "2020-07-03"
        }
      }
    ]
  }
}

# 指定field后,就不会进行分词了,而是精确匹配,于是搜索1条数据
# 注意这里需要给完全匹配的字符串加双引号,否则还是查询到3条数据
GET /my_index/my_type/_search?q=post_date:"2020-07-01"

{
  "took" : 5,
  "timed_out" : false,
  "_shards" : {
    "total" : 5,
    "successful" : 5,
    "skipped" : 0,
    "failed" : 0
  },
  "hits" : {
    "total" : 1,
    "max_score" : 0.8630463,
    "hits" : [
      {
        "_index" : "my_index",
        "_type" : "my_type",
        "_id" : "1",
        "_score" : 0.8630463,
        "_source" : {
          "post_date" : "2020-07-01"
        }
      }
    ]
  }
}

# GET /my_index/my_type/_search?q=post_date:"2020"
# GET /my_index/my_type/_search?q=post_date:2020
# 以上两条搜索的结果都是3条数据,原理待更新
1.3 Query DSL(Domain Specified Language):查询领域专用语言
适用场景:更加适合生产环境的使用,可以构建复杂的查询
-
基本语法
GET /index_name/type_name/_search?key=value { "key1": "value1" } # 说明: # 1.HTTP协议,一般不允许get请求带上request body,但是因为get更加适合描述查询数据的操作,因此还是这么用了 # 2.很多浏览器或服务器都支持GET+request body模式,如果不支持,也可以用POST /_search,例如 GET /index1/type1/_search?from=0&size=2 POST /index1/type1/_search { "from": 0, "size": 2 } # 3.查询条件的json中,可以进行复杂的json嵌套,来实现复杂的搜索 -
入门案例
# 查询某索引的全部文档 GET /myindex/my_type/_search { "query": { "match_all": {} } } -
timeout参数
GET /myindex/my_type/_search?timeout=1s
{
  "query": {
      "match_all": {}
      }
}
查询的时候可以指定一个timeout参数,默认没有值,这个timeout比较特殊,是说,最多查询指定的时间,比较index总共有1万条数据,全部查询出来需要1min,那么用户体验肯定是不好的,设置timeout为1s,就是说,在1s秒内,能查到多少就给我返回多少,当然了能全部返回是最好的,常用的单位有毫秒(ms)、秒(s)、分钟(m)
1.4 查询结果元数据分析
{
  "took": 6,
  "timed_out": false,
  "_shards": {
    "total": 6,
    "successful": 6,
    "failed": 0
  },
  "hits": {
    "total": 10,
    "max_score": 1,
    "hits": [
      {
        "_index": ".kibana",
        "_type": "config",
        "_id": "5.2.0",
        "_score": 1,
        "_source": {
          "buildNum": 14695
        }
      }
    ]
  }
}
took:整个搜索请求花费了多少毫秒
hits.total:本次搜索,返回了几条结果
hits.max_score:本次搜索的所有结果中,最大的相关度分数是多少,这个分数越大,排名越靠前,说明这条文档越符合搜索条件
hits.hits:默认查询前10条数据,按照"_score"降序排序
shards.total:此文档在几个shard上存在(包括主分片和其副本)
shards.successful:在这些shard上请求这条数据,可以响应的shard的个数
shards.failed:在这些shard上请求这条数据失败的shard个数
hits.hits._index:文档所属index
hits.hits._type:文档所属type
hits.hits._id:文档id
hits.hits._source:文档内容
2. 词条查询(term)和全文检索(full text)
- 词条查询:词条查询不会分析查询条件,只有当词条和查询字符串串完全匹配时,才匹配搜
索。 - 全文查询:ElasticSearch引擎会先分析查询字符串,将其拆分成多个单词,只要已分析的字
段中包含词条的任意一个,或全部包含,就匹配查询条件,返回该文档;如果不包含任意一
个分词,表示没有任何文档匹配查询条件 - 查询结果与使用
term和match与数据本身的类型息息相关
2.1 准备测试数据
# text:用于全文检索,该类型的字段将通过分词器进行分词
# keyword:不分词,只能搜索该字段完整的值
PUT /shop
{
  "mappings": {
    "product": {
      "properties": {
        "name": {
          "type": "keyword"
        },
        "desc": {
          "type": "text"
        }
      }
    }
  }
}

PUT shop/product/1
{
    "name": "Yunnanbaiyao Toothpaste",
    "desc": "Yunnanbaiyao Toothpaste"
}

PUT /shop/product/2
{
    "name": "Darlie Toothpaste",
    "desc": "Darlie Toothpaste"
}

PUT /shop/product/3
{
    "name": "ZhongHua Toothpaste",
    "desc": "ZhongHua Toothpaste"
}
2.2 term测试
# 词条查询

# 没有结果
POST /shop/product/_search
{
    "query": {
        "term": {
            "name": "Toothpaste"
        }
    }
}

# 有结果(1条)
POST /shop/product/_search
{
    "query": {
        "term": {
            "name": "Darlie Toothpaste"
        }
    }
}

# 没有结果
POST /shop/product/_search
{
    "query": {
        "term": {
            "desc": "Toothpaste"
        }
    }
}

# 没有结果
# 这个没有结果,是因为"Darlie Toothpaste"分词后分成了"darlie"和"toothpaste"
# 所有完全匹配"Darlie Toothpaste"是无法匹配到的
POST /shop/product/_search
{
    "query": {
        "term": {
            "desc": "Darlie Toothpaste"
        }
    }
}


# 有3条结果
POST /shop/product/_search
{
    "query": {
        "term": {
            "desc": "toothpaste"
        }
    }
}
2.3 terms测试
# 没有数据
POST /shop/product/_search
{
    "query": {
        "terms": {
            "name": ["Darlie", "Toothpaste"]
        }
    }
}

# 两条结果
POST /shop/product/_search
{
    "query": {
        "terms": {
            "name": ["Darlie Toothpaste", "Yunnanbaiyao Toothpaste"]
        }
    }
}

# 一条结果
POST /shop/product/_search
{
    "query": {
        "terms": {
            "name": ["Darlie", "Yunnanbaiyao Toothpaste"]
        }
    }
}

# 没有结果
POST /shop/product/_search
{
    "query": {
        "terms": {
            "desc": ["Darlie Toothpaste", "Yunnanbaiyao Toothpaste"]
        }
    }
}

# 1个结果
POST /shop/product/_search
{
    "query": {
        "terms": {
            "desc": ["darlie", "Yunnanbaiyao Toothpaste"]
        }
    }
}
2.4 match测试
# 有结果(1条)
GET /shop/product/_search
{
    "query": {
        "match": {
            "name": "Darlie Toothpaste"
        }
    }
}

# 没有结果
GET /shop/product/_search
{
    "query": {
        "match": {
            "name": "Toothpaste"
        }
    }
}

# 有结果(3条)
GET /shop/product/_search
{
    "query": {
        "match": {
            "desc": "Toothpaste"
        }
    }
}

# 有结果(3条)
GET /shop/product/_search
{
    "query": {
        "match": {
            "desc": "Darlie Toothpaste"
        }
    }
}
2.5 multi_match测试
PUT /shop/product/5
{
    "name": "Apple Toothpaste",
    "desc": "Apple Darlie"
}

PUT /shop/product/6
{
    "name": "Orage Darlie",
    "desc": "Orage"
}

# 3条结果
POST /shop/product/_search
{
    "query": {
        "multi_match": {
            "query": "Darlie",
            "fields": ["name", "desc"]
        }
    }
}

# 4条结果
POST /shop/product/_search
{
    "query": {
        "multi_match": {
            "query": "Orage Darlie",
            "fields": ["name", "desc"]
        }
    }
}
2.6 match_phrase测试
# 有结果(1条)
POST /shop/product/_search
{
    "query": {
        "match_phrase": {
            "desc": "Darlie Toothpaste"
        }
    }
}

# 有结果(3条)
POST /shop/product/_search
{
    "query": {
        "match_phrase": {
            "desc": "Toothpaste"
        }
    }
}

# 没有结果
POST /shop/product/_search
{
    "query": {
        "match_phrase": {
            "name": "Toothpaste"
        }
    }
}

# 有结果(1条)
POST /shop/product/_search
{
    "query": {
        "match_phrase": {
            "name": "Darlie Toothpaste"
        }
    }
}
2.7 match_all测试
# 查询全部数据
POST /shop/product/_search
{
    "query": {
        "match_all": {}
    }
}

GET /shop/product/_search
{
    "query": {
        "match_all": {
            "desc": "Darlie Toothpaste"
        }
    }
}

# 结果
{
    "error":{
        "root_cause":[
            {
                "type":"parsing_exception",
                "reason":"[5:13] [match_all] unknown field [desc], parser not found","line":5,
                "col":13
            }
        ],
        "type":"parsing_exception",
        "reason":"[5:13] [match_all] unknown field [desc], parser not found",
        "line":5,
        "col":13,
        "caused_by":{
            "type":"x_content_parse_exception",
            "reason":"[5:13] [match_all] unknown field [desc], parser not found"}
        },
        "status":400
    }
}

# 分页
GET /shop/product/_search
{
    "query": {
        "match_all": {}
    },
    "from": 0,
    "size": 10
}
2.8 match_phrase_prefix测试
PUT /shop/product/7
{
    "name": "Darlie Pro Toothpaste",
    "desc": "Darlie Pro Toothpaste"
}

# 有结果(1条)
POST /shop/product/_search
{
    "query": {
        "match_phrase_prefix": {
            "name": "Darlie Toothpaste"
        }
    }
}

# 没有结果
POST /shop/product/_search
{
    "query": {
        "match_phrase_prefix": {
            "name": "Darlie"
        }
    }
}

# 有结果(2条)
POST /shop/product/_search
{
    "query": {
        "match_phrase_prefix": {
            "desc": "Darlie"
        }
    }
}

# 有结果(1条)
POST /shop/product/_search
{
    "query": {
        "match_phrase_prefix": {
            "desc": "Darlie Pro"
        }
    }
}

# 有结果(1条)
POST /shop/product/_search
{
    "query": {
        "match_phrase_prefix": {
            "desc": "Darlie Toothpaste"
        }
    }
}
2.9 总结
| keyword | text | |
|---|---|---|
| term | 完全匹配才返回 | 完全匹配分词后的单词才返回 |
| terms | 传入多个字符串,返回那些可以完全匹配的结果 | 每个传入的单词,在分词后的所有单词中进行匹配,完全匹配才返回 |
| match_all | 查询全部数据,不能传入任何参数 | 查询全部数据,不能传入任何参数 |
| match | 完全匹配才返回 | 对输入字符串进行分词,指定的字段文本分词后的词语中包含任意一个输入字符串的分词词语,就算匹配,就可以作为结果返回 |
| multi_match | 指定的多个字段都完全匹配才返回 | 对输入字符串进行分词,指定的字段文本分词后的词语中包含任意一个输入字符串的分词词语,就算匹配,就可以作为结果返回 |
| match_phrase | 完全匹配才返回 | 输入字符串不分词,指定的字段文本分词后的词语中包含完整的输入字符串,才可以算匹配,才能作为结果返回 |
| match_phrase_prefix | 完全匹配才返回 | 输入一个单词,例如"hello",只要指定的字段文本分词后的词语中有一个词语是以"hello"作为前缀,就算匹配,输入一个短语例如"hello world tom",那么先匹配分词的后的词语中包含"hello world"的文档,然后在这些文档中过滤,只要这些文档的词语中包含以"tom"开头的词语,就算匹配 |
3. 范围查询
GET /company/employee/_search
{
  "query": {
    "range": {
      "age": {
        "gte": 31
      }
    }
  }
}
4. query上下文和filter上下文
query上下文:在搜索中,计算每个满足条件的document的相关度,进行评分,即给document的"_score"赋值,并进行倒序排序,然后返回结果,使用query上下文查询的结果无法缓存
filter上下文:在搜索中,只是过滤出符合条件的document,不计算相关度,使用filter上下文查询的结果将被缓存,以提高整体的查询效率,缓存不需要太多的内存,它只缓存哪些文档与此filter条件相匹配
-
说明:这里说的query上下文和filter上下文是描述的两种现象,而非使用"query"就是query上下文,使用"filter"就是filter上下文,例如:
# 既有query上下文,也有filter上下文
GET /_search
{
  "query": {
    "bool": {
      "must": [
        {"match": {"title": "Search"}},
        {"match": {"content": "Elasticsearch" }}
      ],
      "filter": [
        {"term": {"status": "published" }},
        {"range": {"publish_date": {"gte": "2015-01-01" }}}
      ]
    }
  }
}

# 这个查询,虽然DSL语句中有"query"这个单词,但是它本质上只有一个filter上下文
GET /_search
{
    "query" : {
        "bool" : {
            "filter" : {
                "term" : {
                    "author_id" : 1
                }
            }
        }
    }
}

# 这个查询也是一个filter上下文查询,并且"constant_score"规定将符合条件的document的score都设置为"bootst"指定的值
# 如果没有boost,则查询出的document的score都为1.0
GET /_search
{
    "query": {
        "constant_score" : {
            "filter" : {
                "term" : { "user" : "kimchy"}
            },
            "boost" : 1.2
        }
    }
}
一般来说,如果是进行搜索,需要将最匹配搜索条件的数据先返回,那么用query上下文;如果只是要根据条件筛选出一部分数据,不关注其排序,那么用filter,如果希望越符合搜索条件的document排名越靠前,就把这些搜索条件要放在query上下文中,如果只是想查询到数据并不关注其排名,就放到filter上下文中。
5. 多条件组合查询
# 语法
GET /index_name/type_name/_search
{
    "query": {
        "bool": {
            "must": [],
            "should": [],
            ...
        }
    }
}

# 示例
POST _search
{
  "query": {
    "bool" : {
      "must" : {
        "term" : { "user" : "kimchy" }
      },
      "filter": {
        "term" : { "tag" : "tech" }
      },
      "must_not" : {
        "range" : {
          "age" : { "gte" : 10, "lte" : 20 }
        }
      },
      "should" : [
        { "term" : { "tag" : "wow" } },
        { "term" : { "tag" : "elasticsearch" } }
      ],
      "minimum_should_match" : 1
    }
  }
}

# bool中可以放置的内容
must,must_not,should,filter
- must:属于query上下文,单个或多个条件必须都满足,参与评分
- filter:属于filter上下文,根据条件进行过滤,不参与评分
- should:如果查询条件组合同时存在should和query上下文,那么should中的一个或者多个条件都可以不满足,如果查询条件组合中只有should或者只有should和filter上下文,那么should中的一个或者多个条件必须满足一个,should的条件参与评分
- must_not:属于filter上下文,单个或者多个条件必须都不满足,不参与评分,使用must_not查询出的document的分数都为0
- minimum_should_match:使用这个参数来指定should的具体行为
- 正数,例如3,那么should的多个条件中必须满足3个条件
- 负数,例如-2,代表可以有2个条件不满足,其他都应该满足
- 百分比正数:代表should条件总数的百分比个条件应该满足,例如总共10个条件,百分比为30%,那么至少3个条件应该满足,需满足条件的个数向下取整
- 百分比负数:代表占此比例的条件可以不满足,其余的均需要满足,计算结果向下取整
- 百分比和数字组合:3<90%,如果条件个数<=3,那么必须全部满足,否则,满足90%(向下取整)即可
- 多个组合(空格隔开):2<-25% 9<-3,如果条件个数<=2,则必须都满足,如果条件个数为[3,9],则需要25%的条件满足,否则,只能有3个条件不满足,其余都需要满足
- must、must_not、should、filter之间是&的关系,即这些条件都应该满足
6. 自定义排序规则
默认情况下,是按照"_score"降序排序的,使用"sort"参数来自定义排序规则
GET /company/employee/_search
{
  "query": {
    "range": {
      "age": {
        "gte": 30
      }
    }
  },
  "sort": [
    {
      "join_date": {
        "order": "desc"
      }
    }
  ]
}

GET /company/employee/_search
{
  "query": {
    "constant_score": {
      "filter": {
        "range": {
          "age": {
            "gte": 30
          }
        }
      }
    }
  },
  "sort": [
    {
      "join_date": {
        "order": "asc"
      }
    }
  ]
}
7. DSL校验
构建好一个复杂的查询之后,可以先校验一下语句,通过返回的异常信息来修改语句,校验语法如下:
GET /test_index/test_type/_validate/query?explain
{
  "query": {
    "math": { # 这里故意把match写为了math
      "test_field": "test"
    }
  }
}

{
  "valid": false,
  "error": "org.elasticsearch.common.ParsingException: no [query] registered for [math]"
}

GET /test_index/test_type/_validate/query?explain
{
  "query": {
    "match": {
      "test_field": "test"
    }
  }
}

{
  "valid": true,
  "_shards": {
    "total": 1,
    "successful": 1,
    "failed": 0
  },
  "explanations": [
    {
      "index": "test_index",
      "valid": true,
      "explanation": "+test_field:test #(#_type:test_type)"
    }
  ]
}
8. 搜索参数总结
- preference:决定了哪些shard会被用来执行搜索操作,有以下值可选:
- _primary:只在主分片中查询,在6.1版本已经废弃
- _primary_first:优先在主分片中查询,在6.1版本已经废弃
- _only_local:只在本地查询,查询结果可能不全
- _local:优先在本地的分片中查询
- _prefer_nodes:abc,xyz:在指定的node上查询,abc和xyz是node的id,查询顺序不确定
- _only_nodes:abc*,x*yz,...:在指定的node上查询,这里可以使用正则表达式
- _shards:2,3:在指定shard上查询
GET /my_index/my_type/_search?preference=_primary
{
  "query": {
    "match_all": {}
  }
}

GET /my_index/my_type/_search?preference=_primary_first
{
  "query": {
    "match_all": {}
  }
}

GET /my_index/my_type/_search?preference=_only_local
{
  "query": {
    "match_all": {}
  }
}

GET /my_index/my_type/_search?preference=_local
{
  "query": {
    "match_all": {}
  }
}

GET /my_index/my_type/_search?preference=_shards:1,2,3
{
  "query": {
    "match_all": {}
  }
}

GET /my_index/my_type/_search?preference=_prefer_nodes:bfkgPqlhSbWH8O6fL1R47Q
{
  "query": {
    "match_all": {}
  }
}
Bouncing Result问题:
两个Document排序,Field值相同,但是请求到不同的shard上,排序结果可能不同,每次请求轮询到不同的shard上,每次页面上看到的搜索结果的排序可能都不一样,这就是Bouncing Result问题,解决问题就是利用preference设置每次请求都到同一个shard上。
解决方案就是将preference设置为一个字符串,比如说user_id,让每个user每次搜索的时候,都使用同一个replica shard去执行,就不会看到bouncing results了
timeout:限定在一定时间内,将获取到的部分数据直接返回,避免查询耗时过长
routing:使用routing的值来获取document所在的shard编号,默认为document的id,在一些场景下可以使用routing=user_id(或者其他业务数据),这样的话可以让同一个user对应的数据到一个shard上去
search_type:默认值为"query_then_fetch",使用"dfs_query_then_fetch"可以提升相关度排序的精准度
本文同步分享在 博客“CoderJed”(JianShu)。
如有侵权,请联系 support@oschina.cn 删除。
本文参与“OSC源创计划”,欢迎正在阅读的你也加入,一起分享。

020.Elasticsearch搜索操作高级篇
1. 准备测试数据
PUT nba
{
  "mappings": {
    "_doc": {
      "properties": {
        "birthDay": {"type": "date"},
        "birthDayStr": {"type": "keyword"},
        "age": {"type": "integer"},
        "code": {"type": "text"},
        "country": {"type": "text"},
        "countryEn": {"type": "text"},
        "displayAffiliation": {"type": "text"},
        "displayName": {"type": "text"},
        "displayNameEn": {"type": "text"},
        "draft": {"type": "long"},
        "heightValue": {"type": "float"},
        "jerseyNo": {"type": "text"},
        "playYear": {"type": "long"},
        "playerId": {"type": "keyword"},
        "position": {"type": "text"},
        "schoolType": {"type": "text"},
        "teamCity": {"type": "text"},
        "teamCityEn": {"type": "text"},
        "teamConference": {"type": "keyword"},
        "teamConferenceEn": {"type": "keyword"},
        "teamName": {"type": "keyword"},
        "teamNameEn": {"type": "keyword"},
        "weight": {"type": "text"}
      }
    }
  }
}

POST /_bulk
{"index":{"_index":"nba","_type":"_doc","_id":"1"}}
{"countryEn":"United States","teamName":"老鹰","birthDay":831182400000,"country":"美国","teamCityEn":"Atlanta","code":"jaylen_adams","displayAffiliation":"United States","displayName":"杰伦 亚当斯","schoolType":"College","teamConference":"东部","teamConferenceEn":"Eastern","weight":"86.2 公斤","teamCity":"亚特兰大","playYear":1,"jerseyNo":"10","teamNameEn":"Hawks","draft":2018,"displayNameEn":"Jaylen Adams","heightValue":1.88,"birthDayStr":"1996-05-04","position":"后卫","age":23,"playerId":"1629121"}
{"index":{"_index":"nba","_type":"_doc","_id":"2"}}
{"countryEn":"New Zealand","teamName":"雷霆","birthDay":743140800000,"country":"新西兰","teamCityEn":"Oklahoma City","code":"steven_adams","displayAffiliation":"Pittsburgh/New Zealand","displayName":"斯蒂文 亚当斯","schoolType":"College","teamConference":"西部","teamConferenceEn":"Western","weight":"120.2 公斤","teamCity":"俄克拉荷马城","playYear":6,"jerseyNo":"12","teamNameEn":"Thunder","draft":2013,"displayNameEn":"Steven Adams","heightValue":2.13,"birthDayStr":"1993-07-20","position":"中锋","age":26,"playerId":"203500"}
{"index":{"_index":"nba","_type":"_doc","_id":"3"}}
{"countryEn":"United States","teamName":"热火","birthDay":869198400000,"country":"美国","teamCityEn":"Miami","code":"bam_adebayo","displayAffiliation":"Kentucky/United States","displayName":"巴姆 阿德巴约","schoolType":"College","teamConference":"东部","teamConferenceEn":"Eastern","weight":"115.7 公斤","teamCity":"迈阿密","playYear":2,"jerseyNo":"13","teamNameEn":"Heat","draft":2017,"displayNameEn":"Bam Adebayo","heightValue":2.08,"birthDayStr":"1997-07-18","position":"中锋-前锋","age":22,"playerId":"1628389"}
{"index":{"_index":"nba","_type":"_doc","_id":"4"}}
{"countryEn":"South Sudan","teamName":"骑士","birthDay":854773200000,"country":"南苏丹","teamCityEn":"Cleveland","code":"deng_adel","displayAffiliation":"University of Louisville/South Sudan","displayName":"邓 Adel","schoolType":"","teamConference":"东部","teamConferenceEn":"Eastern","weight":"90.7 公斤","teamCity":"克利夫兰","playYear":1,"jerseyNo":"32","teamNameEn":"Cavaliers","draft":2018,"displayNameEn":"Deng Adel","heightValue":2.01,"birthDayStr":"1997-02-01","position":"前锋","age":22,"playerId":"1629061"}
{"index":{"_index":"nba","_type":"_doc","_id":"5"}}
{"countryEn":"United States","teamName":"马刺","birthDay":490593600000,"country":"美国","teamCityEn":"San Antonio","code":"lamarcus_aldridge","displayAffiliation":"Texas/United States","displayName":"拉马库斯 阿尔德里奇","schoolType":"College","teamConference":"西部","teamConferenceEn":"Western","weight":"117.9 公斤","teamCity":"圣安东尼奥","playYear":13,"jerseyNo":"12","teamNameEn":"Spurs","draft":2006,"displayNameEn":"LaMarcus Aldridge","heightValue":2.11,"birthDayStr":"1985-07-19","position":"中锋-前锋","age":34,"playerId":"200746"}
{"index":{"_index":"nba","_type":"_doc","_id":"6"}}
{"countryEn":"Canada","teamName":"鹈鹕","birthDay":887000400000,"country":"加拿大","teamCityEn":"New Orleans","code":"nickeil_alexander-walker","displayAffiliation":"Virginia Tech/Canada","displayName":"Nickeil Alexander-Walker","schoolType":"College","teamConference":"西部","teamConferenceEn":"Western","weight":"92.5 公斤","teamCity":"新奥尔良","playYear":0,"jerseyNo":"","teamNameEn":"Pelicans","draft":2019,"displayNameEn":"Nickeil Alexander-Walker","heightValue":1.96,"birthDayStr":"1998-02-09","position":"后卫","age":21,"playerId":"1629638"}
{"index":{"_index":"nba","_type":"_doc","_id":"7"}}
{"countryEn":"United States","teamName":"公牛","birthDay":878101200000,"country":"美国","teamCityEn":"Chicago","code":"rawle_alkins","displayAffiliation":"University of Arizona/United States","displayName":"劳勒 Alkins","schoolType":"","teamConference":"东部","teamConferenceEn":"Eastern","weight":"102.1 公斤","teamCity":"芝加哥","playYear":1,"jerseyNo":"20","teamNameEn":"Bulls","draft":2018,"displayNameEn":"Rawle Alkins","heightValue":1.96,"birthDayStr":"1997-10-29","position":"后卫","age":22,"playerId":"1628959"}
{"index":{"_index":"nba","_type":"_doc","_id":"8"}}
{"countryEn":"United States","teamName":"灰熊","birthDay":813124800000,"country":"美国","teamCityEn":"Memphis","code":"","displayAffiliation":"Duke University/United States","displayName":"格雷森 艾伦","schoolType":"College","teamConference":"西部","teamConferenceEn":"Western","weight":"89.8 公斤","teamCity":"孟菲斯","playYear":1,"jerseyNo":"","teamNameEn":"Grizzlies","draft":2018,"displayNameEn":"Grayson Allen","heightValue":1.96,"birthDayStr":"1995-10-08","position":"后卫","age":24,"playerId":"1628960"}
{"index":{"_index":"nba","_type":"_doc","_id":"9"}}
{"countryEn":"United States","teamName":"篮网","birthDay":893131200000,"country":"美国","teamCityEn":"Brooklyn","code":"jarrett_allen","displayAffiliation":"Texas/United States","displayName":"贾瑞特 艾伦","schoolType":"College","teamConference":"东部","teamConferenceEn":"Eastern","weight":"107.5 公斤","teamCity":"布鲁克林","playYear":2,"jerseyNo":"31","teamNameEn":"Nets","draft":2017,"displayNameEn":"Jarrett Allen","heightValue":2.11,"birthDayStr":"1998-04-21","position":"中锋","age":21,"playerId":"1628386"}
{"index":{"_index":"nba","_type":"_doc","_id":"10"}}
{"countryEn":"United States","teamName":"尼克斯","birthDay":727074000000,"country":"美国","teamCityEn":"New York","code":"kadeem_allen","displayAffiliation":"Arizona/United States","displayName":"卡迪姆 艾伦","schoolType":"College","teamConference":"东部","teamConferenceEn":"Eastern","weight":"90.7 公斤","teamCity":"纽约","playYear":2,"jerseyNo":"0","teamNameEn":"Knicks","draft":2017,"displayNameEn":"Kadeem Allen","heightValue":1.9,"birthDayStr":"1993-01-15","position":"后卫","age":26,"playerId":"1628443"}
2. Term查询
2.1 Term Query:精确匹配查询
# 查找号码为32号的球员
GET /nba/_doc/_search
{
  "query": {
    "term": {
      "jerseyNo": "32"
    }
  }
}
2.2 Exsit Query:查询某字段非空的document
# 查询"teamNameEn"字段非空的全部文档
GET /nba/_doc/_search
{
  "query": {
    "exists": {
      "field": "teamNameEn"
    }
  }
}
2.3 Prefix Query:查询某字段的前缀是指定字段的全部文档,指定的前缀精确匹配
# 查询"teamNameEn"字段的前缀是"Kni"的全部文档
# 有结果
GET /nba/_doc/_search
{
  "query": {
    "prefix": {
      "teamNameEn": "Kni"
    }
  }
}

# 无结果
GET /nba/_doc/_search
{
  "query": {
    "prefix": {
      "teamNameEn": "kni"
    }
  }
}
2.4 Wildcard Query:通配符查询
# 搜索"teamNameEn"以"Kn"开头以"s"结尾的全部document
# *可以代表多个字符
GET /nba/_doc/_search
{
  "query": {
    "wildcard": {
      "teamNameEn": "Kn*s"
    }
  }
}
# ?只能代表一个字符
GET /nba/_doc/_search
{
  "query": {
    "wildcard": {
      "teamNameEn": "Knic?s"
    }
  }
}
2.5 Regexp Query:正则表达式查询
GET /nba/_doc/_search
{
  "query": {
    "regexp": {
      "teamNameEn": "Kn.*s"
    }
  }
}
2.6 Ids Query:查询多个指定id的document
GET /nba/_doc/_search
{
  "query": {
    "ids": {
      "values": [1, 2, 3]
    }
  }
}
3. 范围查询
# 查询在nba打了[2,10]年的球员
GET /nba/_doc/_search
{
  "query": {
    "range": {
      "playYear": {
        "gte": 2,
        "lte": 10
      }
    }
  }
}
# 查询[1980,1999]年出生的球员
GET /nba/_doc/_search
{
  "query": {
    "range": {
      "birthDay": {
        "gte": "1980",
        "lte": "01/01/1999",
        "format": "dd/MM/yyyy||yyyy"
      }
    }
  }
}
4. 排序查询
# 查询篮网队的球员,并按照球龄降序排序
GET /nba/_doc/_search
{
  "query": {
    "match": {
      "teamNameEn": "Nets"
    }
  },
  "sort": {
    "playYear": {
      "order": "desc"
    }
  }
}

# 查询篮网队的球员,并按照球龄降序排序,如果球龄相同,那么按照身高升序排序
GET /nba/_doc/_search
{
  "query": {
    "match": {
      "teamNameEn": "Nets"
    }
  },
  "sort": [
      {
        "playYear": {
          "order": "desc"
        }
      },
      {
        "heightValue": {
          "order": "asc"
        }
      }
  ]
}
5. 聚合统计
5.1 max/min/sum/avg
# 求尼克斯队球员的平均年龄
GET /nba/_doc/_search
{
  "query": {
    "term": {
      "teamNameEn": {
        "value": "Knicks"
      }
    }
  },
  "aggs": {
    "avgAge": {
      "avg": {
        "field": "age"
      }
    }
  },
  "size": 0
}
5.2 value_count:统计某字段非空的document数
# 求尼克斯队球员打球时间不为空的数量
GET /nba/_doc/_search
{
  "query": {
    "term": {
      "teamNameEn": {
        "value": "Knicks"
      }
    }
  },
  "aggs": {
    "countPlayYear": {
      "value_count": {
        "field": "playYear"
      }
    }
  },
  "size": 0
}
5.3 Cardinality:去重统计次数
# 统计尼克斯队的球员有多少种不同的年龄
GET /nba/_doc/_search
{
  "query": {
    "term": {
      "teamNameEn": {
        "value": "Knicks"
      }
    }
  },
  "aggs": {
    "countAge": {
      "cardinality": {
        "field": "age"
      }
    }
  },
  "size": 0
}
5.4 stats:统计count/max/min/avg/sum这5个值
GET /nba/_doc/_search
{
  "query": {
    "term": {
      "teamNameEn": {
        "value": "Knicks"
      }
    }
  },
  "aggs": {
    "statsAge": {
      "stats": {
        "field": "age"
      }
    }
  },
  "size": 0
}

{
  "took" : 8,
  "timed_out" : false,
  "_shards" : {
    "total" : 5,
    "successful" : 5,
    "skipped" : 0,
    "failed" : 0
  },
  "hits" : {
    "total" : 1,
    "max_score" : 0.0,
    "hits" : [ ]
  },
  "aggregations" : {
    "statsAge" : {
      "count" : 1,
      "min" : 26.0,
      "max" : 26.0,
      "avg" : 26.0,
      "sum" : 26.0
    }
  }
}
5.5 extended_stats:除stats统计的5个值,还加入了平方和、方差、标准差、平均值加/减两个标准差的区间
{
  "query": {
    "term": {
      "teamNameEn": {
        "value": "Knicks"
      }
    }
  },
  "aggs": {
    "extendedStatsAge": {
      "extended_stats": {
        "field": "age"
      }
    }
  },
  "size": 0
}

{
  "took" : 6,
  "timed_out" : false,
  "_shards" : {
    "total" : 5,
    "successful" : 5,
    "skipped" : 0,
    "failed" : 0
  },
  "hits" : {
    "total" : 1,
    "max_score" : 0.0,
    "hits" : [ ]
  },
  "aggregations" : {
    "extendedStatsAge" : {
      "count" : 1,
      "min" : 26.0,
      "max" : 26.0,
      "avg" : 26.0,
      "sum" : 26.0,
      "sum_of_squares" : 676.0,
      "variance" : 0.0,
      "std_deviation" : 0.0,
      "std_deviation_bounds" : {
        "upper" : 26.0,
        "lower" : 26.0
      }
    }
  }
}
5.6 percentiles:占比百分位对应的值统计,默认返回[1, 5, 25, 50, 75, 95, 99]分位上的值
GET /nba/_doc/_search
{
  "query": {
    "term": {
      "teamNameEn": {
        "value": "Knicks"
      }
    }
  },
  "aggs": {
    "percentAge": {
      "percentiles": {
        "field": "age"
      }
    }
  },
  "size": 0
}

# 结果分析
# 1%的age在26.0以内
# 5%的age在26.0以内
# 25%的age在26.0以内
# 50%的age在26.0以内
# ......
{
  "took" : 19,
  "timed_out" : false,
  "_shards" : {
    "total" : 5,
    "successful" : 5,
    "skipped" : 0,
    "failed" : 0
  },
  "hits" : {
    "total" : 1,
    "max_score" : 0.0,
    "hits" : [ ]
  },
  "aggregations" : {
    "percentAge" : {
      "values" : {
        "1.0" : 26.0,
        "5.0" : 26.0,
        "25.0" : 26.0,
        "50.0" : 26.0,
        "75.0" : 26.0,
        "95.0" : 26.0,
        "99.0" : 26.0
      }
    }
  }
}

# 指定分位值
GET /nba/_doc/_search
{
  "query": {
    "term": {
      "teamNameEn": {
        "value": "Knicks"
      }
    }
  },
  "aggs": {
    "percentAge": {
      "percentiles": {
        "field": "age",
        "percents": [20, 50, 75]
      }
    }
  },
  "size": 0
}
6. 分组聚合
6.1 Terms Aggregation:根据字段值进行分组聚合
# 将尼克斯队的球员根据年龄进行分组,并统计每组中document的个数
GET /nba/_doc/_search
{
  "query": {
    "term": {
      "teamNameEn": {
        "value": "Knicks"
      }
    }
  },
  "aggs": {
    "aggsAge": {
      "terms": {
        "field": "age"
      }
    }
  },
  "size": 0
}

# 将尼克斯队的球员根据年龄进行分组,并统计每组中document的个数,结果按照年龄降序排序
GET /nba/_doc/_search
{
  "query": {
    "term": {
      "teamNameEn": {
        "value": "Knicks"
      }
    }
  },
  "aggs": {
    "aggsAge": {
      "terms": {
        "field": "age",
        "order": {
          "_key": "desc"
        }
      }
    }
  },
  "size": 0
}

# 将尼克斯队的球员根据年龄进行分组,并统计每组中document的个数,结果每组中的文档个数降序排序
GET /nba/_doc/_search
{
  "query": {
    "term": {
      "teamNameEn": {
        "value": "Knicks"
      }
    }
  },
  "aggs": {
    "aggsAge": {
      "terms": {
        "field": "age",
        "order": {
          "_count": "desc"
        }
      }
    }
  },
  "size": 0
}

# 按照队名进行分组,最多分5组,其他文档直接忽略
# 每组内按照球员平均年龄降序排序
GET /nba/_doc/_search
{
  "aggs": {
    "aggsTeamName": {
      "terms": {
        "field": "teamNameEn",
        "size": 5,
        "order": {
          "avgAge": "desc"
        }
      },
      "aggs": {
        "avgAge": {
          "avg": {
            "field": "age"
          }
        }
      }
    }
  },
  "size": 0
}

# 按照队名进行分组,可以指定只对"Hawks"和"Nets"队进行分组以及不对"Heat"队进行分组
# 每组内按照球员平均年龄降序排序
GET /nba/_doc/_search
{
  "aggs": {
    "aggsTeamName": {
      "terms": {
        "field": "teamNameEn",
        "include": ["Hawks", "Nets"],
        "exclude": ["Heat"],
        "order": {
          "avgAge": "desc"
        }
      },
      "aggs": {
        "avgAge": {
          "avg": {
            "field": "age"
          }
        }
      }
    }
  },
  "size": 0
}

# 分组筛选时可以使用正则表达式
GET /nba/_doc/_search
{
  "aggs": {
    "aggsTeamName": {
      "terms": {
        "field": "teamNameEn",
        "include": "Hawks|Ne.*|Kn.*",
        "exclude": "Heat",
        "order": {
          "avgAge": "desc"
        }
      },
      "aggs": {
        "avgAge": {
          "avg": {
            "field": "age"
          }
        }
      }
    }
  },
  "size": 0
}
6.2 Range Aggregation: 范围分组聚合
# 统计nba小于20岁、年龄在[20,30)之间以及年龄>=30的球员个数
GET /nba/_doc/_search
{
  "aggs": {
    "ageRange": {
      "range": {
        "field": "age",
        "ranges": [
          {"to": 20},
          {"from": 20, "to": 30},
          {"from": 30}
        ]
      }
    }
  },
  "size": 0
}

# 自定义组名
GET /nba/_doc/_search
{
  "aggs": {
    "ageRange": {
      "range": {
        "field": "age",
        "ranges": [
          {"to": 20, "key": "A"},
          {"from": 20, "to": 30, "key": "B"},
          {"from": 30, "key": "C"}
        ]
      }
    }
  },
  "size": 0
}

{
  "took" : 2,
  "timed_out" : false,
  "_shards" : {
    "total" : 5,
    "successful" : 5,
    "skipped" : 0,
    "failed" : 0
  },
  "hits" : {
    "total" : 10,
    "max_score" : 0.0,
    "hits" : [ ]
  },
  "aggregations" : {
    "ageRange" : {
      "buckets" : [
        {
          "key" : "A",
          "to" : 20.0,
          "doc_count" : 0
        },
        {
          "key" : "B",
          "from" : 20.0,
          "to" : 30.0,
          "doc_count" : 9
        },
        {
          "key" : "C",
          "from" : 30.0,
          "doc_count" : 1
        }
      ]
    }
  }
}
6.3 Date Range Aggregation:时间范围分组聚合
# 统计nba球员出生年份小于1980、出生年份在[1980,1990)之间以及出生年份>=1990年的球员个数
GET /nba/_doc/_search
{
  "aggs": {
    "birthDayRange": {
      "date_range": {
        "field": "birthDay",
        "format": "yyyy",
        "ranges": [
          {"to": "1980"},
          {"from": "1980", "to": "1990"},
          {"from": "1990"}
        ]
      }
    }
  },
  "size": 0
}
6.4 Date Histogram Aggregation:时间柱状图聚合
# 求每个年份出生的球员的个数
GET /nba/_doc/_search
{
  "aggs": {
    "birthDayAggs": {
      "date_histogram": {
        "field": "birthDay",
        "format": "yyyy",
        "interval": "year"
      }
    }
  },
  "size": 0
}

# interval的值可以是:
year
quarter
month
week
day
hour
minute
second
7. 滚动查询
如果一次性要查寻大量数据,比如10万条数据,那么性能会很差,此时一般会采取用scoll滚动查询,一批一批的查,直到所有数据都查询完处理完。
使用scoll滚动搜索,可以先搜索一批数据,然后下次再搜索一批数据,以此类推,直到搜索出全部的数据来。scoll搜索会在第一次搜索的时候,保存一个当时的视图快照,之后只会基于该旧的视图快照提供数据搜索,如果这个期间数据变更,是不会让用户看到的。
采用基于_doc进行排序的方式,性能较高。每次发送scroll请求,我们还需要指定一个scoll参数,指定一个时间窗口,每次搜索请求只要在这个时间窗口内能完成就可以了。
# 第一次查询
# scroll=1m,本次滚动查询返回的scroll_id的有效期为1min
# "sort": [ "_doc" ],基于_doc进行排序,提升查询性能
# "size": 1,本次查询1条数据
GET /nba/_doc/_search?scroll=1m
{
  "query": {
    "match_all": {}
  },
  "sort": [ "_doc" ],
  "size": 1
}

# 返回一个_scroll_id
{
  "_scroll_id" : "GET /_search/scroll
{
  "scroll": "1m",
  "scroll_id" : "DnF1ZXJ5VGhlbkZldGNoBQAAAAAAAO6xFmhnMlMxTUN1UVVxQXlZbkhnREJkSEEAAAAAAAAAdBZ2ZVB2ZHFURFNtQ0xHZ1laUjJFVVNnAAAAAAAAAHMWdmVQdmRxVERTbUNMR2dZWlIyRVVTZwAAAAAAAPEYFmJma2dQcWxoU2JXSDhPNmZMMVI0N1EAAAAAAADushZoZzJTMU1DdVFVcUF5WW5IZ0RCZEhB"
}",
  "took" : 3,
  "timed_out" : false,
  "_shards" : {
    "total" : 5,
    "successful" : 5,
    "skipped" : 0,
    "failed" : 0
  },
  "hits" : {
    "total" : 10,
    "max_score" : null,
    "hits" : [
      {
        "_index" : "nba",
        "_type" : "_doc",
        "_id" : "5",
        "_score" : null,
        "_source" : {
          "countryEn" : "United States",
          "teamName" : "马刺",
          "birthDay" : 490593600000,
          "country" : "美国",
          "teamCityEn" : "San Antonio",
          "code" : "lamarcus_aldridge",
          "displayAffiliation" : "Texas/United States",
          "displayName" : "拉马库斯 阿尔德里奇",
          "schoolType" : "College",
          "teamConference" : "西部",
          "teamConferenceEn" : "Western",
          "weight" : "117.9 公斤",
          "teamCity" : "圣安东尼奥",
          "playYear" : 13,
          "jerseyNo" : "12",
          "teamNameEn" : "Spurs",
          "draft" : 2006,
          "displayNameEn" : "LaMarcus Aldridge",
          "heightValue" : 2.11,
          "birthDayStr" : "1985-07-19",
          "position" : "中锋-前锋",
          "age" : 34,
          "playerId" : "200746"
        },
        "sort" : [
          0
        ]
      }
    ]
  }
}

# 之后的每一次查询都要带上上一次查询时返回的scroll_id
GET /_search/scroll
{
  "scroll": "1m",
  "scroll_id" : "DnF1ZXJ5VGhlbkZldGNoBQAAAAAAAO6xFmhnMlMxTUN1UVVxQXlZbkhnREJkSEEAAAAAAAAAdBZ2ZVB2ZHFURFNtQ0xHZ1laUjJFVVNnAAAAAAAAAHMWdmVQdmRxVERTbUNMR2dZWlIyRVVTZwAAAAAAAPEYFmJma2dQcWxoU2JXSDhPNmZMMVI0N1EAAAAAAADushZoZzJTMU1DdVFVcUF5WW5IZ0RCZEhB"
}

# 可以手动清除scroll_id
DELETE /_search/scroll
{
    "scroll_id": "xxx"
}
8. 搜索建议
suggest:查询建议,给用户提供更好的搜索体验,包括:词条检查、自动补全等
本文介绍三种建议器:Term suggester、Phrase suggester和Completion suggester
8.1 Term suggester
作用:对输入的文本进行分词,为每个分词提供建议
Term suggester包括以下3种建议模式:
- missing(默认):用户搜索的单词不存在时提供建议词
- popular:给用户提供TF更高的建议词
- always:总是给用户提供相似的建议词,不管他输入的单词是否存在
# 用户想搜索allen,但是不小心输入错误,输入了allon
# allon是在文档中匹配不到的,于是ES就可以找到与allon最接近的多个单词(按照评分降序排序)建议给用户
# field指定在哪个字段中寻找与用户输入接近的单词
POST /nba/_search
{
  "suggest": {
    "my-suggestion": {
      "text": "allon",
      "term": {
        "suggest_mode": "missing",
        "field": "displayNameEn"
      }
    }
  }
}

{
  "took" : 43,
  "timed_out" : false,
  "_shards" : {
    "total" : 5,
    "successful" : 5,
    "skipped" : 0,
    "failed" : 0
  },
  "hits" : {
    "total" : 0,
    "max_score" : 0.0,
    "hits" : [ ]
  },
  "suggest" : {
    "my-suggestion" : [
      {
        "text" : "allon",
        "offset" : 0,
        "length" : 5,
        "options" : [
          {
            "text" : "allen",
            "score" : 0.8,
            "freq" : 3
          }
        ]
      }
    ]
  }
}
8.2 Phrase suggester
比Term suggester更高级,会考量输入的多个term之间的关系,比如是否同时出现在索引的原文中,相邻程度以及TF等综合因素然后给出建议
POST /nba/_search
{
  "suggest": {
    "my-suggestion": {
      "text": "jamse harden",
      "phrase": {
        "field": "displayNameEn"
      }
    }
  }
}
8.3 Completion suggester
自动补全建议
# 注意:自动补全要求字段类型是
PUT my_index
{
  "mappings": {
    "_doc": {
      "properties": {
        "teamCityEn": {
          "type": "completion"
        }
      }
    }
  }
}

# 创建测试数据
POST _bulk/?refresh
{"index": {"_index": "my_index", "_type": "_doc"}}
{"teamCityEn": "Miami"}
{"index": {"_index": "my_index", "_type": "_doc"}}
{"teamCityEn": "Miama"}
{"index": {"_index": "my_index", "_type": "_doc"}}
{"teamCityEn": "Chicago"}
{"index": {"_index": "my_index", "_type": "_doc"}}
{"teamCityEn": "Brooklyn"}
{"index": {"_index": "my_index", "_type": "_doc"}}
{"teamCityEn": "Memphis"}

# 用户想搜索"Miami"(迈阿密)这个城市,但是输入"Miam"这个单词,ES就可以给出建议,建议用户进行补全
POST /my_index/_search
{
  "suggest": {
    "my-suggestion": {
      "text": "Miam",
      "completion": {
        "field": "teamCityEn"
      }
    }
  }
}

# 结果
{
  "took" : 11,
  "timed_out" : false,
  "_shards" : {
    "total" : 5,
    "successful" : 5,
    "skipped" : 0,
    "failed" : 0
  },
  "hits" : {
    "total" : 0,
    "max_score" : 0.0,
    "hits" : [ ]
  },
  "suggest" : {
    "my-suggestion" : [
      {
        "text" : "Miam",
        "offset" : 0,
        "length" : 4,
        "options" : [
          {
            "text" : "Miama",
            "_index" : "my_index",
            "_type" : "_doc",
            "_id" : "BCGIUHMBb-5p3uGM0Evn",
            "_score" : 1.0,
            "_source" : {
              "teamCityEn" : "Miama"
            }
          },
          {
            "text" : "Miami",
            "_index" : "my_index",
            "_type" : "_doc",
            "_id" : "AyGIUHMBb-5p3uGM0Evn",
            "_score" : 1.0,
            "_source" : {
              "teamCityEn" : "Miami"
            }
          }
        ]
      }
    ]
  }
}
本文同步分享在 博客“CoderJed”(JianShu)。
如有侵权,请联系 support@oschina.cn 删除。
本文参与“OSC源创计划”,欢迎正在阅读的你也加入,一起分享。

django使用haystack来调用Elasticsearch搜索引擎
如何使用django来调用Elasticsearch实现全文的搜索
环境:django ==1.11.11
Haystack为Django提供了模块化的搜索。它的特点是统一的,熟悉的API,可以让你在不修改代码的情况下使用不同的搜索后端(比如 Solr, Elasticsearch, Whoosh, Xapian 等等)。
1.首先安装相关的依赖包:
pip install drf-haystack
pip install elasticsearch==2.4.1
2. 在django项目配置文件中注册应用:
INSTALLED_APPS = [
    ...
    ''haystack'',
    ...
]
3.在django项目配置文件中指定搜索的后端:
# Haystack
HAYSTACK_CONNECTIONS = {
    ''default'': {
        ''ENGINE'': ''haystack.backends.elasticsearch_backend.ElasticsearchSearchEngine'',
        ''URL'': ''http://your_ip:9200/'',  # 此处为elasticsearch运行的服务器ip地址,端口号固定为9200
        ''INDEX_NAME'': ''demo'',  # 指定elasticsearch建立的索引库的名称
    },
}

# 当添加、修改、删除数据时,自动生成索引
HAYSTACK_SIGNAL_PROCESSOR = ''haystack.signals.RealtimeSignalProcessor''
4.创建索引类:
from haystack import indexes

from .models import Demomodel


class DemoIndex(indexes.SearchIndex, indexes.Indexable):
    """
    索引数据模型类
    """
    text = indexes.CharField(document=True, use_template=True)

    def get_model(self):
        """返回建立索引的模型类"""
        return Demomodel

    def index_queryset(self, using=None):
        """返回要建立索引的数据查询集"""
        return self.get_model().objects.filter(is_launched=True)
"""

说明:
  在DemoIndex建立的字段,都可以借助haystack由elasticsearch搜索引擎查询。
  其中text字段声明为document=True,表名该字段是主要进行关键字查询的字段, 该字段的索引值可以由多个数据库模型类字段组成,具体由哪些模型类字段组成,我们用use_template=True表示后续通过模板来指明。
  在REST framework中,索引类的字段会作为查询结果返回数据的来源
"""
5. 在templates目录中创建text字段使用的模板文件
templates/search/indexes/demo/demo_text.txt文件中定义
{{ object.name }}
{{ object.id }}
6.创建haystack序列化器
from drf_haystack.serializers import HaystackSerializer

class DemoSerializer(serializers.ModelSerializer):
    """
    序列化器
    """
    class Meta:
        model = Demo
        fields = (''id'', ''name'')

class DemoIndexSerializer(HaystackSerializer):
    """
    SKU索引结果数据序列化器
    """
    object = DemoSerializer(read_only=True)

    class Meta:
        index_classes = [DemoIndex]
        fields = (''text'', ''object'')
7.创建视图
from drf_haystack.viewsets import HaystackViewSet

class DemoSearchViewSet(HaystackViewSet):
    index_models = [Demo]

    serializer_class = DemoIndexSerializer
8. 添加路由,使用通过REST framework的router来定义路由
router = DefaultRouter()
router.register(''/'', views.DemoSearchViewSet, base_name=''demo_search'')

...

urlpatterns += router.urls
9.测试
http://127.0.0.1:8000/?text=something

Elasticsearch CentOS6.5下安装ElasticSearch6.2.4+elasticsearch-head+Kibana
CentOS6.5下安装ElasticSearch6.2.4
(1)配置JDK环境
配置环境变量
export JAVA_HOME="/opt/jdk1.8.0_144"
export PATH="$JAVA_HOME/bin:$PATH"
export CLASSPATH=".:$JAVA_HOME/lib"
(2)安装ElasticSearch6.2.4
下载地址:https://www.elastic.co/cn/downloads/past-releases/elasticsearch-6-2-4
启动报错: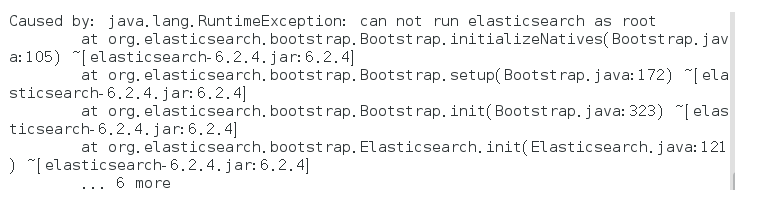
解决方式:
bin/elasticsearch -Des.insecure.allow.root=true
或者修改bin/elasticsearch,加上ES_JAVA_OPTS属性:
ES_JAVA_OPTS="-Des.insecure.allow.root=true"
再次启动: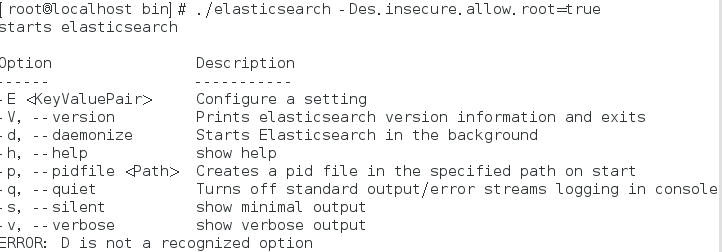
这是出于系统安全考虑设置的条件。由于ElasticSearch可以接收用户输入的脚本并且执行,为了系统安全考 虑,建议创建一个单独的用户用来运行ElasticSearch。
如果没有普通用户就要创建一个普通用户组和普通用户,下面介绍一下怎么创建用户组和普通用户
创建用户组和用户:
groupadd esgroup
useradd esuser -g esgroup -p espassword
更改elasticsearch文件夹及内部文件的所属用户及组:
cd /opt
chown -R esuser:esgroup elasticsearch-6.2.4
切换用户并运行:
su esuser
./bin/elasticsearch
再次启动显示已杀死: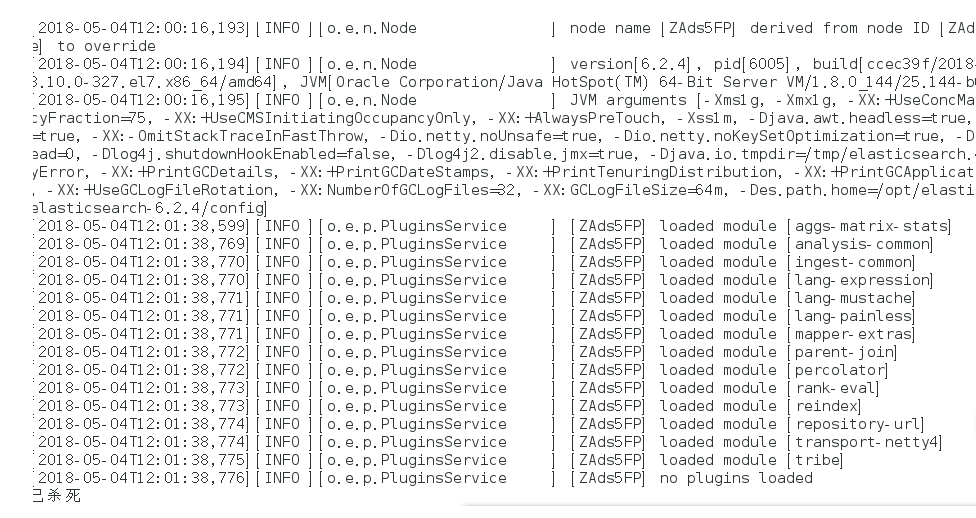
需要调整JVM的内存大小:
vi bin/elasticsearch
ES_JAVA_OPTS="-Xms512m -Xmx512m"
再次启动:启动成功
如果显示如下类似信息:
[INFO ][o.e.c.r.a.DiskThresholdMonitor] [ZAds5FP] low disk watermark [85%] exceeded on [ZAds5FPeTY-ZUKjXd7HJKA][ZAds5FP][/opt/elasticsearch-6.2.4/data/nodes/0] free: 1.2gb[14.2%], replicas will not be assigned to this node
需要清理磁盘空间。
后台运行:./bin/elasticsearch -d
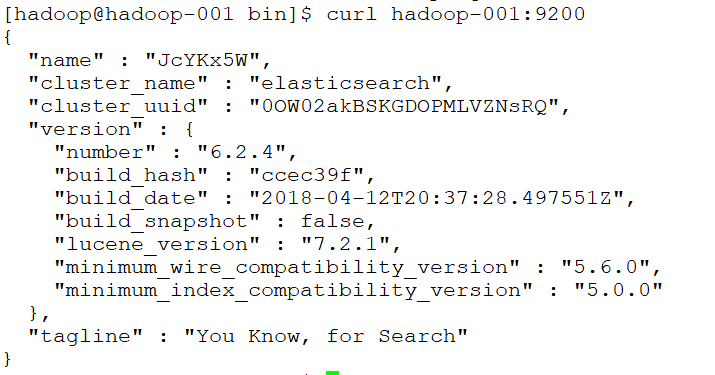
测试连接:curl 127.0.0.1:9200
会看到一下JSON数据:
[root@localhost ~]# curl 127.0.0.1:9200
{
"name" : "rBrMTNx",
"cluster_name" : "elasticsearch",
"cluster_uuid" : "-noR5DxFRsyvAFvAzxl07g",
"version" : {
"number" : "5.1.1",
"build_hash" : "5395e21",
"build_date" : "2016-12-06T12:36:15.409Z",
"build_snapshot" : false,
"lucene_version" : "6.3.0"
},
"tagline" : "You Know, for Search"
}
实现远程访问:
需要对config/elasticsearch.yml进行 配置:
network.host: hadoop-001
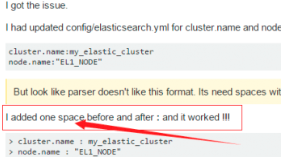
再次启动报错:Failed to load settings from [elasticsearch.yml]
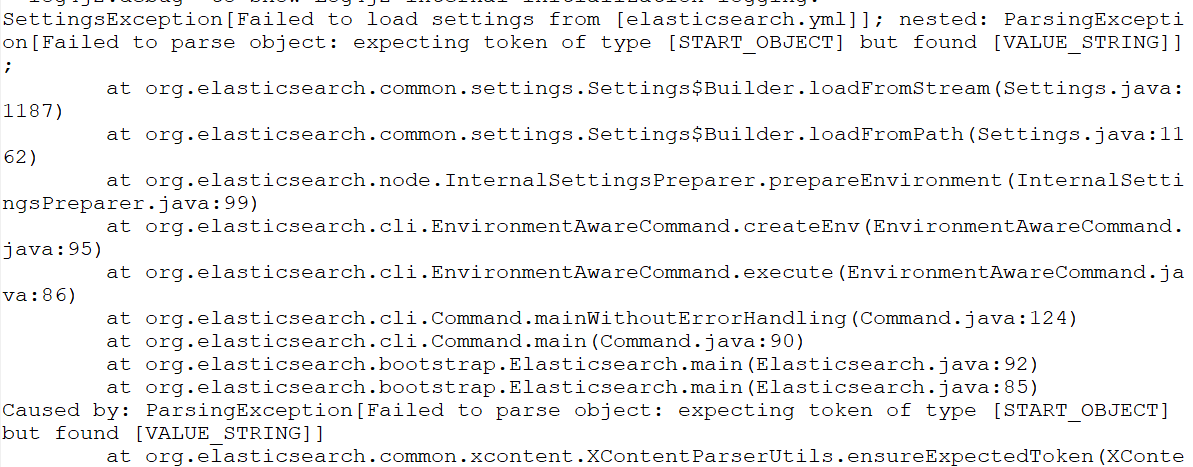
这个错就是参数的冒号前后没有加空格,加了之后就好,我找了好久这个问题;
后来在一个外国网站找到了这句话.
Exception in thread "main" SettingsException[Failed to load settings from [elasticsearch.yml]]; nested: ElasticsearchParseException[malformed, expected end of settings but encountered additional content starting at line number: [3], column number: [1]]; nested: ParserException[expected ''<document start>'', but found BlockMappingStart
in ''reader'', line 3, column 1:
node.rack : r1
^
];
Likely root cause: expected ''<document start>'', but found BlockMappingStart
in ''reader'', line 3, column 1:
node.rack : r1
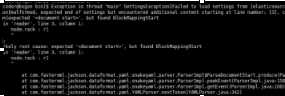
这个是行的开头没有加空格,fuck!
Exception in thread "main" SettingsException[Failed to load settings from [elasticsearch.yml]]; nested: ScannerException[while scanning a simple key
in ''reader'', line 11, column 2:
discovery.zen.ping.unicast.hosts ...
^

参数冒号后加空格,或者是数组中间加空格
例如:
# discovery.zen.minimum_master_nodes: 3
再次启动
还是报错
max file descriptors [4096] for elasticsearch process is too low
处理第一个错误:
vim /etc/security/limits.conf //文件最后加入
esuser soft nofile 65536
esuser hard nofile 65536
esuser soft nproc 4096
esuser hard nproc 4096
处理第二个错误:
进入limits.d目录下修改配置文件。
vim /etc/security/limits.d/20-nproc.conf
修改为 esuser soft nproc 4096
注意重新登录生效!!!!!!!!
处理第三个错误:
vim /etc/sysctl.conf
vm.max_map_count=655360
执行以下命令生效:
sysctl -p
关闭防火墙:systemctl stop firewalld.service
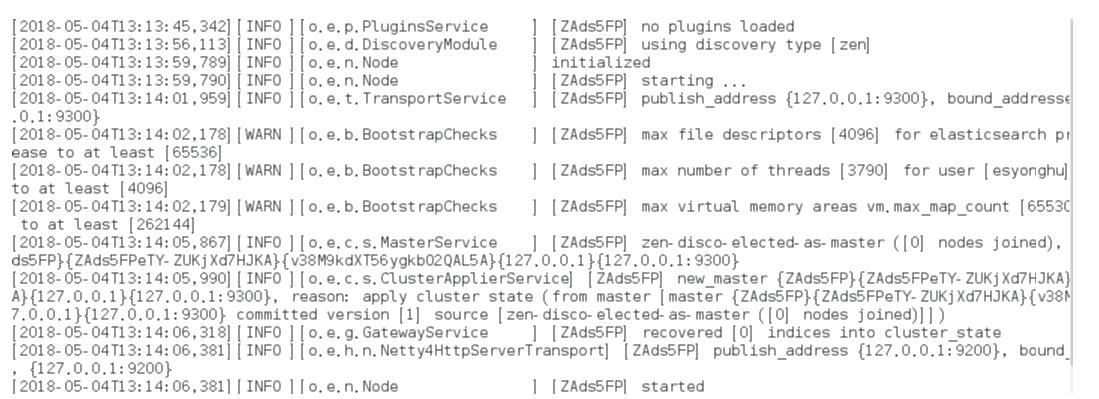
启动又又又报错
system call filters failed to install; check the logs and fix your configuration or disable sys

直接在
config/elasticsearch.yml 末尾加上一句
bootstrap.system_call_filter: false再次启动成功!
安装Head插件
Head是elasticsearch的集群管理工具,可以用于数据的浏览和查询
(1)elasticsearch-head是一款开源软件,被托管在github上面,所以如果我们要使用它,必须先安装git,通过git获取elasticsearch-head
(2)运行elasticsearch-head会用到grunt,而grunt需要npm包管理器,所以nodejs是必须要安装的
nodejs和npm安装:
http://blog.java1234.com/blog/articles/354.html
git安装
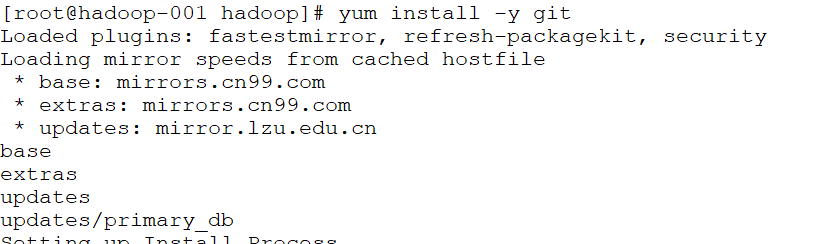
yum install -y git

(3)elasticsearch5.0之后,elasticsearch-head不做为插件放在其plugins目录下了。
使用git拷贝elasticsearch-head到本地
cd ~
git clone git://github.com/mobz/elasticsearch-head.git
(4)安装elasticsearch-head依赖包
[root@localhost local]# npm install -g grunt-cli
[root@localhost _site]# cd /usr/local/elasticsearch-head/
[root@localhost elasticsearch-head]# cnpm install
(5)修改Gruntfile.js
[root@localhost _site]# cd /usr/local/elasticsearch-head/
[root@localhost elasticsearch-head]# vi Gruntfile.js
在connect-->server-->options下面添加:hostname:’*’,允许所有IP可以访问
(6)修改elasticsearch-head默认连接地址
[root@localhost elasticsearch-head]# cd /usr/local/elasticsearch-head/_site/
[root@localhost _site]# vi app.js
将this.base_uri = this.config.base_uri || this.prefs.get("app-base_uri") || "http://localhost:9200";中的localhost修改成你es的服务器地址
(7)配置elasticsearch允许跨域访问
打开elasticsearch的配置文件elasticsearch.yml,在文件末尾追加下面两行代码即可:
http.cors.enabled: true
http.cors.allow-origin: "*"
(8)打开9100端口
[root@localhost elasticsearch-head]# firewall-cmd --zone=public --add-port=9100/tcp --permanent
重启防火墙
[root@localhost elasticsearch-head]# firewall-cmd --reload
(9)启动elasticsearch
(10)启动elasticsearch-head
[root@localhost _site]# cd ~/elasticsearch-head/
[root@localhost elasticsearch-head]# node_modules/grunt/bin/grunt server 或者 npm run start
(11)访问elasticsearch-head
关闭防火墙:systemctl stop firewalld.service
浏览器输入网址:hadoop-001:9100/

安装Kibana
Kibana是一个针对Elasticsearch的开源分析及可视化平台,使用Kibana可以查询、查看并与存储在ES索引的数据进行交互操作,使用Kibana能执行高级的数据分析,并能以图表、表格和地图的形式查看数据
(1)下载Kibana
https://www.elastic.co/downloads/kibana
(2)把下载好的压缩包拷贝到/soft目录下
(3)解压缩,并把解压后的目录移动到/user/local/kibana
(4)编辑kibana配置文件
[root@localhost /]# vi /usr/local/kibana/config/kibana.yml
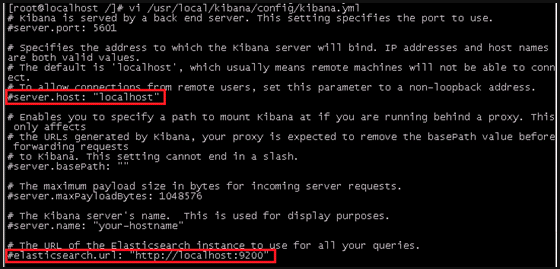
将server.host,elasticsearch.url修改成所在服务器的ip地址
server.port: 5601 //监听端口
server.host: "hadoo-001" //监听IP地址,建议内网ip
elasticsearch.url: "http:/hadoo-001" //elasticsearch连接kibana的URL,也可以填写192.168.137.188,因为它们是一个集群
(5)开启5601端口
Kibana的默认端口是5601
开启防火墙:systemctl start firewalld.service
开启5601端口:firewall-cmd --permanent --zone=public --add-port=5601/tcp
重启防火墙:firewall-cmd –reload
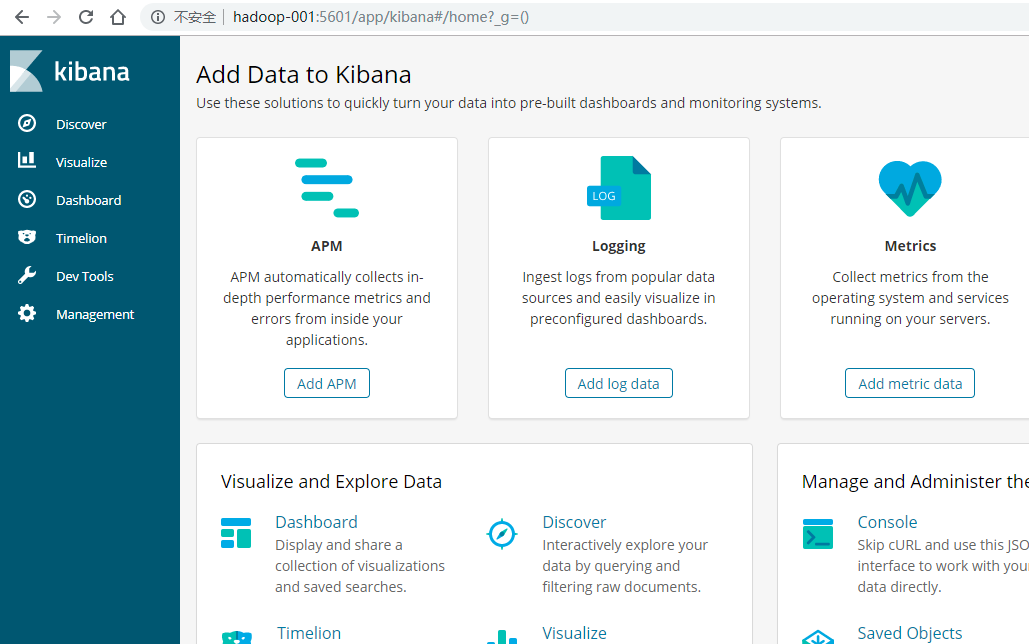
(6)启动Kibana
[root@localhost /]# /usr/local/kibana/bin/kibana
浏览器访问:http://192.168.137.188:5601
安装中文分词器
一.离线安装
(1)下载中文分词器
https://github.com/medcl/elasticsearch-analysis-ik
下载elasticsearch-analysis-ik-master.zip
(2)解压elasticsearch-analysis-ik-master.zip
unzip elasticsearch-analysis-ik-master.zip
(3)进入elasticsearch-analysis-ik-master,编译源码
mvn clean install -Dmaven.test.skip=true
(4)在es的plugins文件夹下创建目录ik
(5)将编译后生成的elasticsearch-analysis-ik-版本.zip移动到ik下,并解压
(6)解压后的内容移动到ik目录下
二.在线安装
./elasticsearch-plugin install https://github.com/medcl/elasticsearch-analysis-ik/releases/download/v6.2.4/elasticsearch-analysis-ik-6.2.4.zip
今天关于用Elasticsearch搜索/滚动异步等待和elasticsearch滚动索引的介绍到此结束,谢谢您的阅读,有关017.Elasticsearch搜索操作入门篇、020.Elasticsearch搜索操作高级篇、django使用haystack来调用Elasticsearch搜索引擎、Elasticsearch CentOS6.5下安装ElasticSearch6.2.4+elasticsearch-head+Kibana等更多相关知识的信息可以在本站进行查询。
本文标签:


![[转帖]Ubuntu 安装 Wine方法(ubuntu如何安装wine)](https://www.gvkun.com/zb_users/cache/thumbs/4c83df0e2303284d68480d1b1378581d-180-120-1.jpg)

