对于微信公众号错别字修改功能字数上限增至10个感兴趣的读者,本文将会是一篇不错的选择,我们将详细介绍微信公众号改错别字字数限制,并为您提供关于11-网页,网站,微信公众号基础入门(配置自己的微信公众号
对于微信公众号错别字修改功能字数上限增至10个感兴趣的读者,本文将会是一篇不错的选择,我们将详细介绍微信公众号改错别字字数限制,并为您提供关于11-网页,网站,微信公众号基础入门(配置自己的微信公众号,添加一个按钮)、7-网页,网站,微信公众号基础入门(微信配网_申请微信公众号)、Java微信公众号开发之通过微信公众号获取用户信息、nodejs微信公众号开发——1.接入微信公众号的有用信息。
本文目录一览:- 微信公众号错别字修改功能字数上限增至10个(微信公众号改错别字字数限制)
- 11-网页,网站,微信公众号基础入门(配置自己的微信公众号,添加一个按钮)
- 7-网页,网站,微信公众号基础入门(微信配网_申请微信公众号)
- Java微信公众号开发之通过微信公众号获取用户信息
- nodejs微信公众号开发——1.接入微信公众号
")
微信公众号错别字修改功能字数上限增至10个(微信公众号改错别字字数限制)
微信公众号对错别字修改功能进行功能升级,将此前每篇文章可修改字数从5个增加至10个,修改机会同样只有一次,但此次还增加了支持增、删和替换,不允许标题及摘要修改。

具体操作方面与此前基本一致,登陆公众平台后,在首页“已群发消息”文章列表后方可以看到错别字修改入口,点击修改按钮后进入编辑页面,可进行“修改”或“删除”。
修改完毕后,文章状态变为“已修改”,用户访问推送文章可看到已经更新的内容,同时文章底部将显示修改时间。
此次微信公众平台错别字修改上限提升到10个,将进一步增加运营者的便利,但标题审核依然需要严格把关。
")
11-网页,网站,微信公众号基础入门(配置自己的微信公众号,添加一个按钮)
https://www.cnblogs.com/yangfengwu/p/11066472.html
接着看官方文档
https://mp.weixin.qq.com/wiki?t=resource/res_main&id=mp1421140183
这篇文章的最后
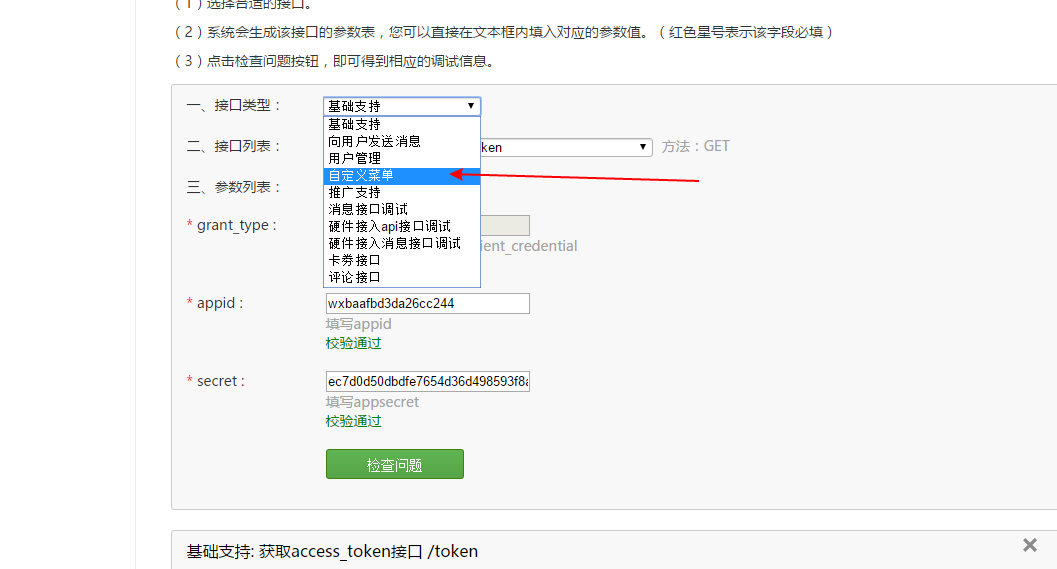
这是官方给的自定义菜单规定
https://mp.weixin.qq.com/wiki?t=resource/res_main&id=mp1421141013 大家想实现复杂点的,看这个文档就可以
咱呢就弄个按钮就好了
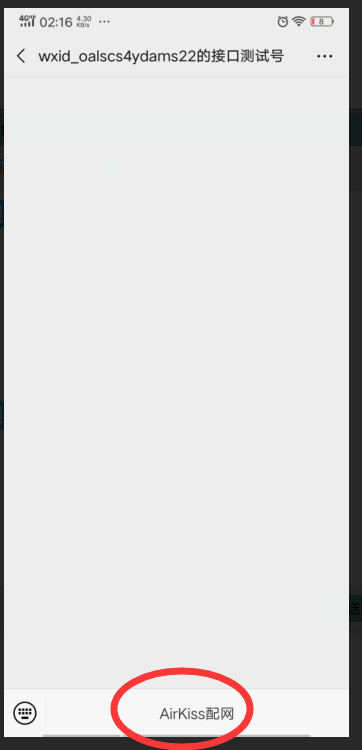
点击按钮的时候跳转到 http://mnifdv.cn/airkiss 这个里面 ,咱在这里面写配网程序页面
{ "button": [ { "type": "view", "name": "AirKiss配网", "url": "http://mnifdv.cn/airkiss" } ] }
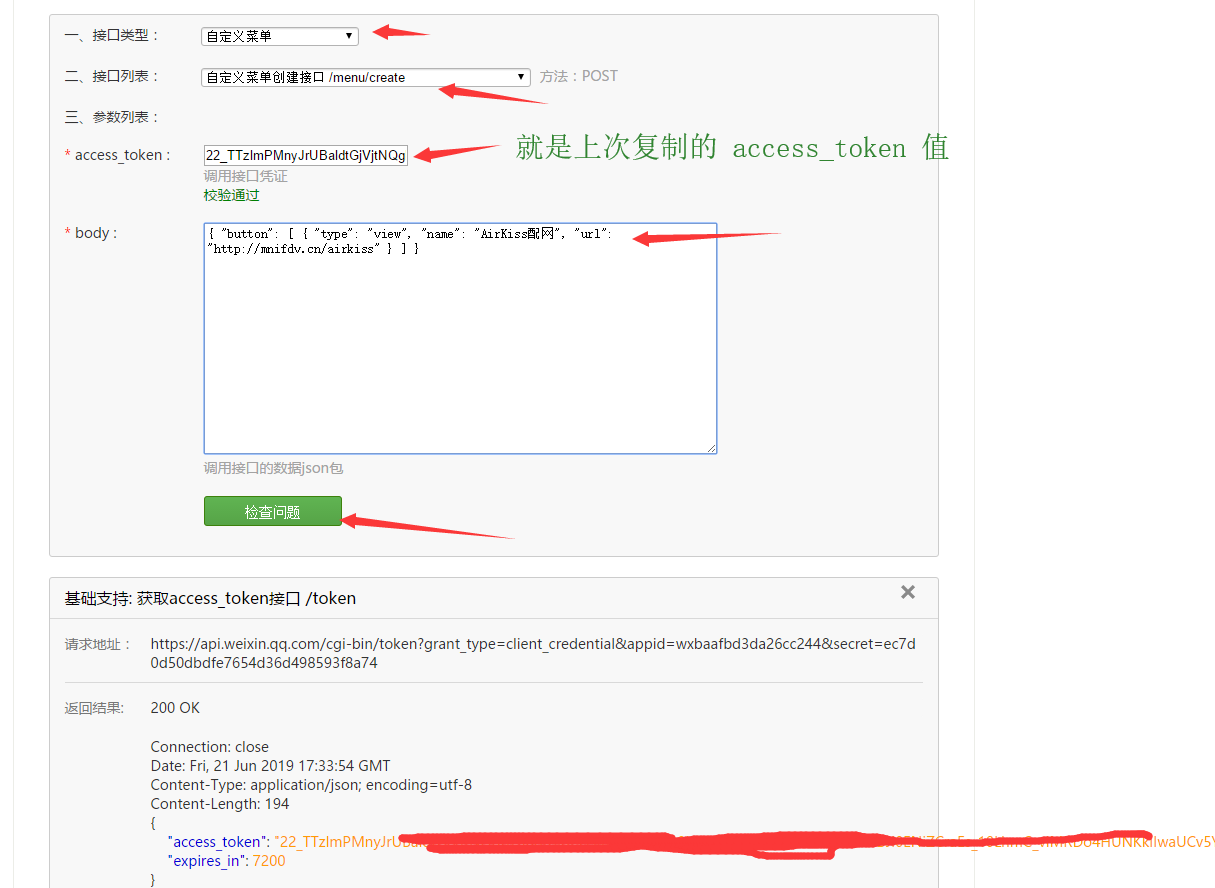

咱现在去咱的微信公众号里面,,会有个按钮 ,不过点击这个按钮现在就会报错,因为访问的地址里面咱还没写程序
咱先看一下
扫描这个二维码
因为咱还没写逻辑程序,所以点击访问应该显示404,就是说不存在
https://www.cnblogs.com/yangfengwu/p/11148976.html
")
7-网页,网站,微信公众号基础入门(微信配网_申请微信公众号)
老是学习枯燥乏味的东西容易烦躁,所以呢,接着这几节咱实现下微信配网
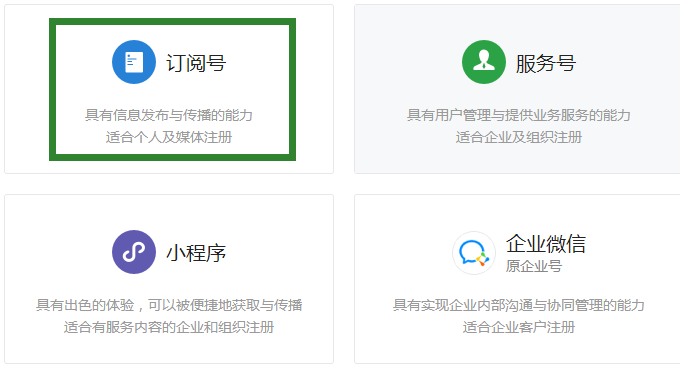
为了让所有人都可以都可以使用,咱就用微信订阅号实现(里面提供测试版服务号),实质上只有服务号和微信企业号才具有此功能。
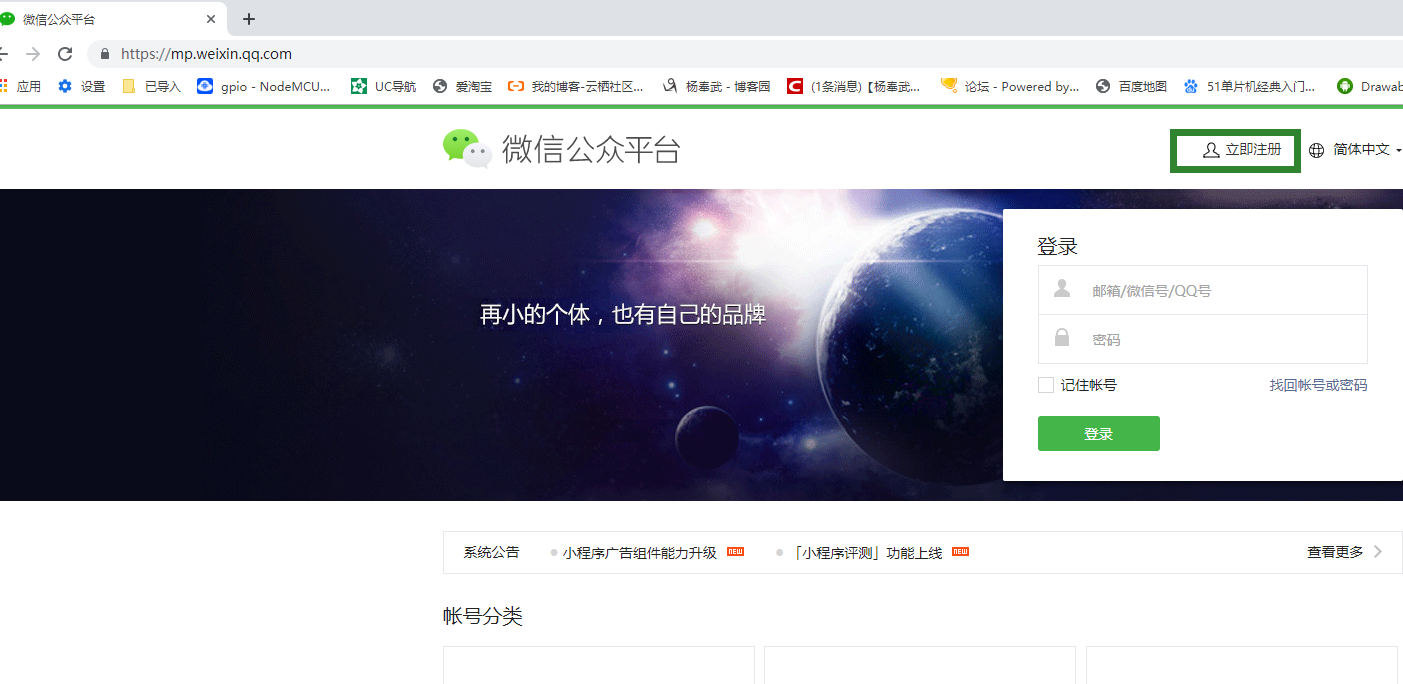
咱呢注册登录订阅号
https://mp.weixin.qq.com/


https://item.taobao.com/item.htm?spm=a1z38n.10677092.0.0.3e3b1deb80xzYz&id=569295486025
https://www.cnblogs.com/yangfengwu/p/11062422.html

Java微信公众号开发之通过微信公众号获取用户信息
这篇文章主要介绍了Java微信公众号开发之通过微信公众号获取用户信息,需要的朋友可以参考下
最近由于公司业务,就开始研究微信开发的流程,说实话,这东西刚开始看到时候和看天书的一样,总算,看了一天的文档,测试代码终于出来了。
1、首先需要到微信网站去设置一下,我是直接用的微信测试号。
接口配置信息必须要填写的,所以说必须能将自己的服务发布出去


到此微信配置完毕,接下来就是直接上代码了
2、获取用户信息的方式一共是两种,前提都是用户关注微信公众号,一种是静默获取(snsapi_base,这种方式只能获取openid),另一种是授权获取(snsapi_userinfo,可以获取用户的详细信息)。
先说第一种
(1)首先需要先访问微信的链接
https://open.weixin.qq.com/connect/oauth2/authorize?appid=xxxxxxxxxxxxxxxx&redirect_uri=http://xxxxxx/open/openid&response_type=code&scope=snsapi_base
这里的 uri就是直接回掉我们的服务地址,一定要记住,服务校验的判断,我是按照来判断的echostr(第二种方式也是这样)
package net.itraf.controller; import java.io.IOException; import java.io.InputStream; import java.io.PrintWriter; import java.net.HttpURLConnection; import java.net.MalformedURLException; import java.net.URL; import javax.servlet.http.HttpServletResponse; import org.springframework.stereotype.Controller; import org.springframework.web.bind.annotation.RequestMapping; import org.springframework.web.bind.annotation.ResponseBody; import com.alibaba.fastjson.JSONObject; @Controller @RequestMapping("/open") public class OpenController { @RequestMapping("/toOpenId") public @ResponseBody String getopenId(String code,String echostr,HttpServletResponse res) throws IOException{ if(echostr==null){ String url="https://api.weixin.qq.com/sns/oauth2/access_token?appid=wx24d47d2080f54c5b&secret=95011ac70909e8cca2786217dd80ee3f&code="+code+"&grant_type=authorization_code"; System.out.println(code); String openId=""; try { URL getUrl=new URL(url); HttpURLConnection http=(HttpURLConnection)getUrl.openConnection(); http.setRequestMethod("GET"); http.setRequestProperty("Content-Type","application/x-www-form-urlencoded"); http.setDoOutput(true); http.setDoInput(true); http.connect(); InputStream is = http.getInputStream(); int size = is.available(); byte[] b = new byte[size]; is.read(b); String message = new String(b, "UTF-8"); JSONObject json = JSONObject.parSEObject(message); openId = json.getString("openid"); } catch (MalformedURLException e) { e.printstacktrace(); } catch (IOException e) { e.printstacktrace(); } return openId; }else{ PrintWriter out = res.getWriter(); out.print(echostr); return null; } } //做服务器校验 @RequestMapping("/tovalid") public void valid(String echostr,HttpServletResponse res) throws IOException{ PrintWriter out = res.getWriter(); out.print(echostr); } }
第二种
(1)
https://open.weixin.qq.com/connect/oauth2/authorize?appid=xxxxxxxx&redirect_uri=http:// 域名
/open/openid&response_type=code&scope=snsapi_userinfo&state=1&connect_redirect=1#wechat_redirect
package net.itraf.controller; import java.io.IOException; import java.io.PrintWriter; import javax.servlet.servletexception; import javax.servlet.http.HttpServletRequest; import javax.servlet.http.HttpServletResponse; import net.sf.json.JSONObject; import org.springframework.stereotype.Controller; import org.springframework.web.bind.annotation.RequestMapping; @Controller @RequestMapping("/weixin") public class Oauth2Action { @RequestMapping("/oauth") public void auth(HttpServletRequest request, HttpServletResponse response) throws servletexception, IOException { String echostr = request.getParameter("echostr"); if(echostr==null){ String appId = "wx24d47d2080f54c5b"; String appSecret = "95011ac70909e8cca2786217dd80ee3f"; //拼接 String get_access_token_url = "https://api.weixin.qq.com/sns/oauth2/access_token?" + "appid=" + appId + "&secret=" + appSecret + "&code=CODE&grant_type=authorization_code"; String get_userinfo = "https://api.weixin.qq.com/sns/userinfo?access_token=ACCESS_TOKEN&openid=OPENID&lang=zh_CN"; request.setCharacterEncoding("UTF-8"); response.setCharacterEncoding("UTF-8"); String code = request.getParameter("code"); System.out.println("******************code=" + code); get_access_token_url = get_access_token_url.replace("CODE", code); String json = HttpsGetUtil.doHttpsGetJson(get_access_token_url); JSONObject jsonObject = JSONObject.fromObject(json); String access_token = jsonObject.getString("access_token"); String openid = jsonObject.getString("openid"); get_userinfo = get_userinfo.replace("ACCESS_TOKEN", access_token); get_userinfo = get_userinfo.replace("OPENID", openid); String userInfoJson = HttpsGetUtil.doHttpsGetJson(get_userinfo); JSONObject userInfoJO = JSONObject.fromObject(userInfoJson); String user_openid = userInfoJO.getString("openid"); String user_nickname = userInfoJO.getString("nickname"); String user_sex = userInfoJO.getString("sex"); String user_province = userInfoJO.getString("province"); String user_city = userInfoJO.getString("city"); String user_country = userInfoJO.getString("country"); String user_headimgurl = userInfoJO.getString("headimgurl"); response.setContentType("text/html; charset=utf-8"); PrintWriter out = response.getWriter(); out.println(""-//W3C//DTD HTML 4.01 Transitional//EN">"); out.println(""); out.println(" A Servlet"); out.println(" "); out.print(" This is "); out.print(this.getClass()); out.println(", using the POST method n"); out.println("openid:" + user_openid + "nn"); out.println("nickname:" + user_nickname + "nn"); out.println("sex:" + user_sex + "nn"); out.println("province:" + user_province + "nn"); out.println("city:" + user_city + "nn"); out.println("country:" + user_country + "nn"); out.println("

"); out.println(" "); out.println(""); out.flush(); out.close(); }else{ PrintWriter out = response.getWriter(); out.print(echostr); } } }
package net.itraf.controller; import java.io.IOException; import java.io.InputStream; import java.net.HttpURLConnection; import java.net.MalformedURLException; import java.net.URL; public class HttpsGetUtil { public static String doHttpsGetJson(String Url) { String message = ""; try { System.out.println("doHttpsGetJson");//Todo:dd URL urlGet = new URL(Url); HttpURLConnection http = (HttpURLConnection) urlGet.openConnection(); http.setRequestMethod("GET"); //必须是get方式请求 24 http.setRequestProperty("Content-Type","application/x-www-form-urlencoded"); http.setDoOutput(true); http.setDoInput(true); System.setProperty("sun.net.client.defaultConnectTimeout", "30000");//连接超时30秒28 System.setProperty("sun.net.client.defaultReadTimeout", "30000"); //读取超时30秒29 30 http.connect(); InputStream is =http.getInputStream(); int size =is.available(); byte[] jsonBytes =new byte[size]; is.read(jsonBytes); message=new String(jsonBytes,"UTF-8"); } catch (MalformedURLException e) { e.printstacktrace(); } catch (IOException e) { e.printstacktrace(); } return message; } }
以上所述是小编给大家介绍的Java微信公众号开发之通过微信公众号获取用户信息,希望对大家有所帮助,如果大家有任何疑问请给我留言,小编会及时回复大家的。在此也非常感谢大家对小编网站的支持!

nodejs微信公众号开发——1.接入微信公众号
接入微信公众号是开发的第一步,万事开头难,走好第一步,后面的路就更宽广。(项目github地:https://github.com/Panfen/wem... )
1.公众平台测试帐号的使用
登录微信公众平台,由于很多开发人员并没有认证的的微信公众号,所以比较折中的方式是使用公众平台测试帐号来测试功能,其优势是能够测试微信公众号的绝大部分功能,不受认证门槛的限制。
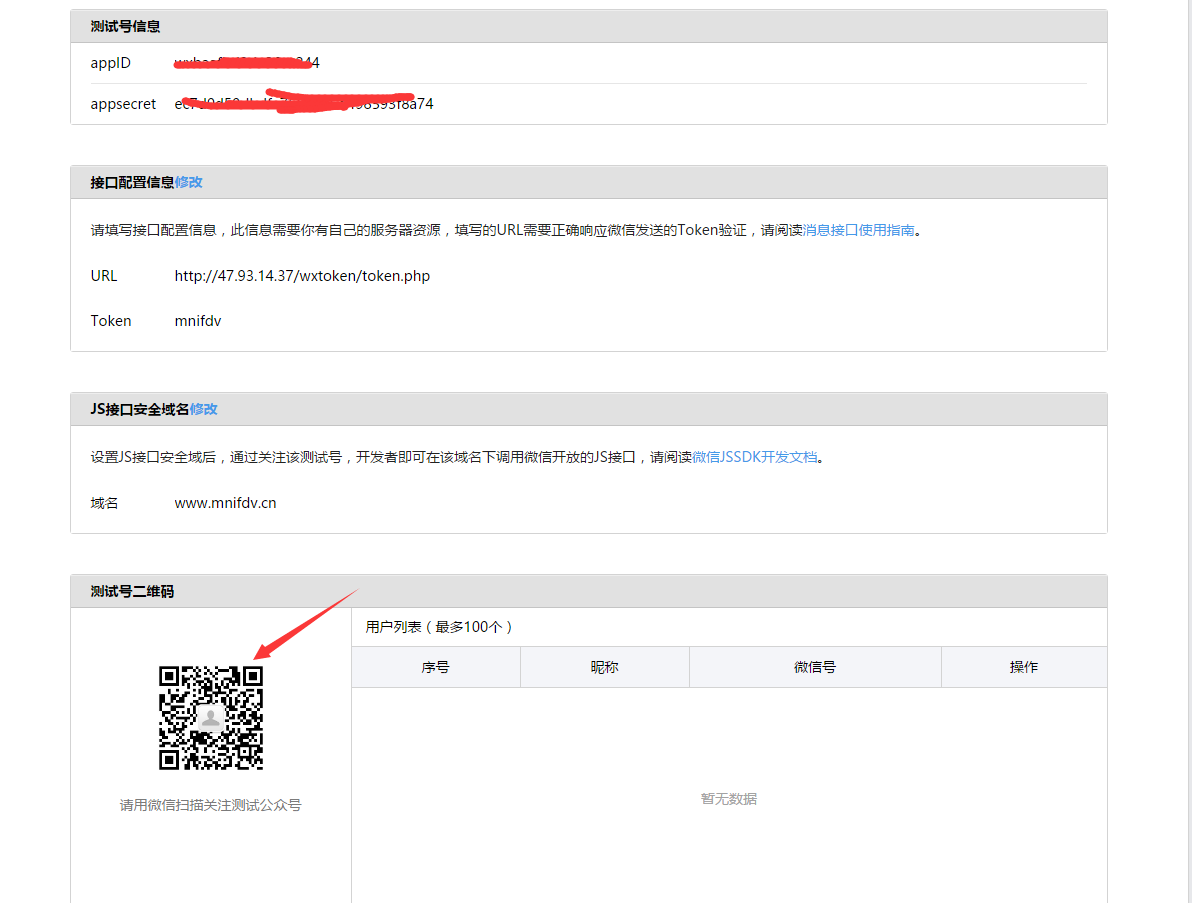
进入测试账号管理界面:
我们需要配置接口的信息,URL和Token是微信公众平台和本地开发服务建立连接的桥梁。
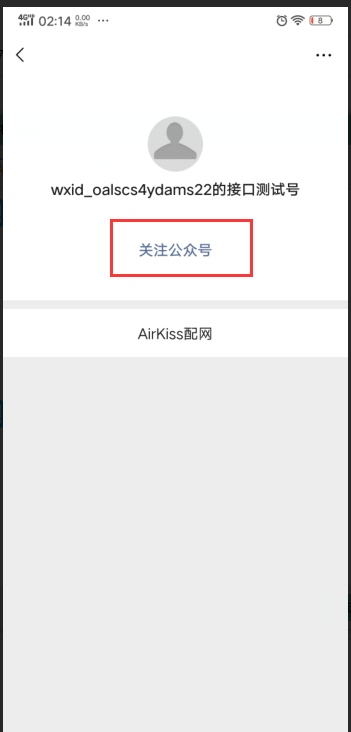
微信配置好后,扫面下方的测试号二维码,即可以在手机上测试开发的功能。


2.验证公众号
一图胜千言。接入公众号时,微信公众平台需要验证开发者的身份,向开发者填写的URL发送一个GET请求,请求中包含4个参数:signature、echostr、timestamp和nonce,收到该请求,我们需要做的事情:

- 将
token、timestamp和nonce三个参数进行字典排序; - 将三个字符串拼接成一个字符串进行sha1加密;
- 将加密后的字符串与
signature进行比较,如果相同,表示这个请求来自微信,我们直接原样返回echostr的内容,接入验证成功。
3.搭建开发服务器
搭建开发服务器的方式有很多,如购买云服务器、使用花生壳、ngrok、localtunnel等。这里为了简单起见采用localtunnel。先全局方式安装localtunnel,
npm install -g lt启动lt
lt --port 8080 //对外暴露8080端口,可端口号可自己随便设定
4.编写代码
好了,现在开始编写app.js的代码:
''use strict''

var Koa = require(''koa'');
var sha1 = require(''sha1'');

var config = {
    wechat:{
        appID:''...'', //填写你自己的appID
        appSecret:''...'',  //填写你自己的appSecret
        token:''...''  //填写你自己的token
    }
};

var app = new Koa();

app.use(function *(next){
    var token = config.wechat.token;
    var signature = this.query.signature;
    var nonce = this.query.nonce;
    var timestamp = this.query.timestamp;
    var echostr = this.query.echostr;
    var str = [token,timestamp,nonce].sort().join(''''); //按字典排序,拼接字符串
    var sha = sha1(str); //加密
    this.body = (sha === signature)? echostr + '''' : ''failed'';  //比较并返回结果
});
app.listen(8080);
5.配置测试公众号信息
代码编写完毕,现在开始正式配置啦。在终端中输入lt --port 8080启动localtunnel,得到对外可访问的URL:
这个URL填写到测试账号管理界面中的URL,Token字段可随意填写,方便起见,就用wemovie吧!
填写完毕,点击提交,发现验证成功,恭喜!注:


- 由于localtunnel不是很稳定,所以可能一开始点击
提交提示的是黄条的配置失败,需要多点一两次按钮; - 每次重启程序,都需要重启localtunnel获取新的
URL,然后重新配置。(这就是选择简单付出的代价T_T)
到此为止,已经打开了通向微信公众号开发的大门,接下来,我们将继续探索nodejs微信公众号开发之旅。
关于微信公众号错别字修改功能字数上限增至10个和微信公众号改错别字字数限制的介绍现已完结,谢谢您的耐心阅读,如果想了解更多关于11-网页,网站,微信公众号基础入门(配置自己的微信公众号,添加一个按钮)、7-网页,网站,微信公众号基础入门(微信配网_申请微信公众号)、Java微信公众号开发之通过微信公众号获取用户信息、nodejs微信公众号开发——1.接入微信公众号的相关知识,请在本站寻找。
本文标签:


![[转帖]Ubuntu 安装 Wine方法(ubuntu如何安装wine)](https://www.gvkun.com/zb_users/cache/thumbs/4c83df0e2303284d68480d1b1378581d-180-120-1.jpg)

