本文将为您提供关于如何使用复合可绘制对象而不是包含ImageView和TextView的LinearLayout的详细介绍,我们还将为您解释复合对象图形合并的相关知识,同时,我们还将为您提供关于And
本文将为您提供关于如何使用复合可绘制对象而不是包含 ImageView 和 TextView 的 LinearLayout的详细介绍,我们还将为您解释复合对象图形合并的相关知识,同时,我们还将为您提供关于Android CheckBox和ImageView、Textview在ListView中显示...、Android ImageView按重量调整大小,不以父LinearLayout为中心、android – ConstraintLayout:将textview的顶部与imageview对齐、android – LinearLayout ImageView调整所有图像宽度以适应的实用信息。
本文目录一览:- 如何使用复合可绘制对象而不是包含 ImageView 和 TextView 的 LinearLayout(复合对象图形合并)
- Android CheckBox和ImageView、Textview在ListView中显示...
- Android ImageView按重量调整大小,不以父LinearLayout为中心
- android – ConstraintLayout:将textview的顶部与imageview对齐
- android – LinearLayout ImageView调整所有图像宽度以适应
")
如何使用复合可绘制对象而不是包含 ImageView 和 TextView 的 LinearLayout(复合对象图形合并)
针对我的代码运行新的 Lint 工具。它提出了很多好的建议,但我无法理解这一点。
这个标签和它的孩子可以被一个和一个复合drawable替换
问题:检查当前节点是否可以使用复合可绘制对象替换为 TextView。
包含 ImageView 和 TextView 的 LinearLayout 可以更有效地处理为复合可绘制对象
这是我的布局
<LinearLayoutandroid:layout_width="wrap_content"android:layout_height="wrap_content"android:orientation="horizontal"android:layout_centerInParent="true"><ImageView android:id="@+id/upImage" android:layout_width="20dp" android:layout_height="20dp" android:layout_gravity="center_vertical" android:scaleType="centerInside" android:src="@drawable/up_count_big"></ImageView><TextView android:id="@+id/LikeCount" android:layout_width="wrap_content" android:layout_height="wrap_content" android:layout_marginLeft="2dp" android:layout_marginBottom="1dp" android:textColor="@color/gray" android:textSize="16sp" android:layout_gravity="center_vertical"></TextView></LinearLayout>有人可以提供一个具体的例子来说明在这种情况下如何使复合物可绘制吗?
答案1
小编典典TextView带有 4 个复合可绘制对象,左、上、右和下各一个。
在您的情况下,您根本不需要LinearLayoutandImageView。只需添加android:drawableLeft="@drawable/up_count_big"到您的TextView.
有关详细信息,请参阅TextView#setCompoundDrawablesWithIntrinsicBounds。

Android CheckBox和ImageView、Textview在ListView中显示...
1.首先创建一个适配器类CheckBoxListViewAdapter,此类继承BaseAdapter类:
package com.test;

import java.util.ArrayList;
import java.util.HashMap;
import java.util.List;
import java.util.Map;

import android.app.Activity;
import android.content.Context;
import android.view.LayoutInflater;
import android.view.View;
import android.view.ViewGroup;
import android.widget.BaseAdapter;
import android.widget.CheckBox;
import android.widget.ImageView;
import android.widget.TextView;

public class CheckBoxListViewAdapter extends BaseAdapter  {
      //Inflater英文意思是膨胀,在Android中应该是扩展的意思吧。LayoutInflater的作用类似于
      //findViewById(),不同点是LayoutInflater是用来找layout文件夹下的xml布局文件,并且实例化!
      //而 findViewById()是找具体某一个xml下的具体 widget控件(如:Button,TextView等)。
        private LayoutInflater mInflater;
	private List<Map<String, Object>> mData;
	public static Map<Integer, Boolean> isSelected;   //记录checkbox状态的
	String  []string ={"Android","IOS","Windows Phone","WebOs","Blackberry"};
	int  [] img ={R.drawable.android,R.drawable.ios,R.drawable.windowshone,R.drawable.webos,R.drawable.blackberry};
	public CheckBoxListViewAdapter(Context context) {
		mInflater = LayoutInflater.from(context);
		init();
		}


	//初始化
	private void init() {
	mData=new ArrayList<Map<String, Object>>();

	for (int i = 0; i < 5; i++) {
	Map<String, Object> map = new HashMap<String, Object>();
	map.put("img", img[i]);
	map.put("title", string[i]);
	mData.add(map);
	}

	//这儿定义isSelected这个map是记录每个listitem的状态,初始状态全部为false。
	isSelected = new HashMap<Integer, Boolean>();

	for (int i = 0; i < mData.size(); i++) {
	isSelected.put(i, false);
	}
}

	public int getCount() {
	return mData.size();
	}

	public Object getItem(int position) {
	return
	null;
	}

	public long getItemId(int position) {
	return
	0;
	}

	public View getView(int position, View convertView, ViewGroup parent) {
	ViewHolder holder = null;
	//convertView为null的时候初始化convertView。
	if (convertView == null) {
	holder = new ViewHolder();
	convertView = mInflater.inflate(R.layout.my_data, null);
	holder.img = (ImageView) convertView.findViewById(R.id.img);
	holder.title = (TextView) convertView.findViewById(R.id.title);
	holder.cBox = (CheckBox) convertView.findViewById(R.id.cb);
	convertView.setTag(holder);
	} else {
	holder = (ViewHolder) convertView.getTag();
	}
	holder.img.setBackgroundResource((Integer) mData.get(position).get( "img"));
	holder.title.setText(mData.get(position).get("title").toString());
	holder.cBox.setChecked(isSelected.get(position));

	return convertView;
}

	public final class ViewHolder {
	public ImageView img;
	public TextView  title;
	public CheckBox  cBox;
	}

}
2.接下来定义布局文件my_data.xml,此布局文件中定义是在listView显示的组件信息
<?xml version="1.0" encoding="utf-8"?>
<LinearLayout xmlns:android="http://schemas.android.com/apk/res/android"
    android:layout_width="fill_parent"
    android:layout_height="fill_parent"
    android:orientation="horizontal" >
				<ImageView
				android:id="@+id/img"
				android:layout_width="wrap_content"
				android:layout_height="wrap_content"
				android:layout_gravity="center_vertical"/>
				<TextView
				android:id="@+id/title"
				android:textSize="18dip"
				android:layout_weight="1"
				android:textandroid:gravity="center_horizontal|center_vertical"
				android:layout_width="wrap_content"
				android:layout_height="wrap_content"/>
				<CheckBox
				android:id="@+id/cb"
				android:layout_width="wrap_content"
				android:layout_height="wrap_content"
				android:focusable="false"
				android:focusableInTouchMode="false"
				android:clickable="false"
				android:checkMark="?android:attr/listChoiceIndicatorMultiple"/>
</LinearLayout>
3.接下来定义my_list.xml显示布局文件
<?xml version="1.0" encoding="utf-8"?>
<LinearLayout xmlns:android="http://schemas.android.com/apk/res/android"
    android:layout_width="fill_parent"
    android:layout_height="fill_parent"
    android:orientation="vertical" >
	<ListView
	android:id="@+id/lv"
	android:layout_width="fill_parent"
	android:layout_height="wrap_content"/>

</LinearLayout>
4.接下来就是TestQActivity
package com.test;
import com.test.CheckBoxListViewAdapter.ViewHolder;
import android.app.Activity;
import android.database.Cursor;
import android.os.Bundle;
import android.view.View;
import android.widget.AdapterView;
import android.widget.AdapterView.OnItemClickListener;
import android.widget.ArrayAdapter;
import android.widget.ListAdapter;
import android.widget.ListView;
import android.widget.SimpleCursorAdapter;
public class TestQActivity extends Activity {
/** Called when the activity is first created. */
private ListView listview;
@Override
public void onCreate(Bundle savedInstanceState) {
super.onCreate(savedInstanceState);
setContentView(R.layout.my_list);
listview =(ListView)findViewById(R.id.lv);
CheckBoxListViewAdapter checkBoxListViewAdapter =new CheckBoxListViewAdapter(this);
listview.setChoiceMode(ListView.CHOICE_MODE_MULTIPLE);
listview.setItemsCanFocus(false);
listview.setAdapter((ListAdapter) checkBoxListViewAdapter);
listview.setOnItemClickListener(clickListener);
listview.getCheckedItemPositions();
}
private OnItemClickListener clickListener =new OnItemClickListener() {
@Override
public void onItemClick(AdapterView<?> parent, View view, int position,
long id) {
ViewHolder vHollder = (ViewHolder) view.getTag();
//在每次获取点击的item时将对于的checkbox状态改变,同时修改map的值。
vHollder.cBox.toggle();
CheckBoxListViewAdapter.isSelected.put(position, vHollder.cBox.isChecked());
}
};
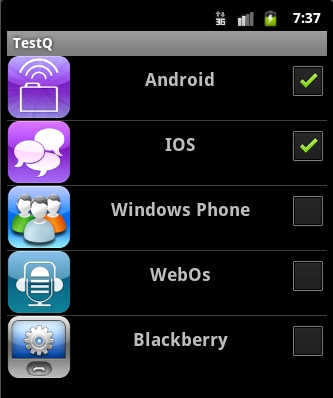
}运行效果如下:

Android ImageView按重量调整大小,不以父LinearLayout为中心
> ImageView的宽度是其父级宽度的一定百分比(现在的屏幕宽度).
> ImageView在屏幕内水平居中.
我使用XML布局创建了一个测试用例,但实际上我将以编程方式创建这些布局和视图;我认为这不是为了找出正确的布局.
我对Android布局中的权重以及它们通常用于如何使用相对加权因子布局多个视图有些熟悉.为了满足条件1,我创建了一个容器LinearLayout(水平方向),设置它的weightSum = 1,然后使用我想要的任何百分比的权重嵌入我的ImageView,比如说0.5.这有效!
接下来,我希望ImageView最终在屏幕上水平居中.所以我将引力设置为“center”/“centerHorizontal”.这是我被卡住的地方,因为无论我选择什么引力/布局重力设置,它似乎始终与左侧对齐.
布局文件:
<LinearLayout xmlns:android="http://schemas.android.com/apk/res/android"
    android:orientation="vertical"
    android:layout_width="fill_parent"
    android:layout_height="fill_parent"
    android:background="#FFFFFF">
    <LinearLayout
        android:orientation="horizontal"
        android:layout_width="fill_parent"
        android:layout_height="wrap_content"
        android:weightSum="1.0">
        <ImageView
            android:src="@drawable/earth"
            android:adjustViewBounds="true"
            android:layout_width="0"
            android:layout_height="wrap_content"
            android:layout_weight="0.5"
            android:layout_gravity="center_horizontal"
            android:id="@+id/imageView1" />
    </LinearLayout>
</LinearLayout>
结果:
我真正想要实现的是这样的:
但为了实现这一点,我不得不在我的ImageView的两侧插入两个权重为0.25的虚拟LinearLayouts,如下所示:
<LinearLayout xmlns:android="http://schemas.android.com/apk/res/android"
    android:orientation="vertical"
    android:layout_width="fill_parent"
    android:layout_height="fill_parent"
    android:background="#FFFFFF">
    <LinearLayout
        android:orientation="horizontal"
        android:layout_width="fill_parent"
        android:layout_height="wrap_content"
        android:weightSum="1.0">
        <LinearLayout
            android:orientation="horizontal"
            android:layout_width="0"
            android:layout_height="wrap_content"
            android:layout_weight="0.25"/>
        <ImageView
            android:src="@drawable/earth"
            android:adjustViewBounds="true"
            android:layout_width="0"
            android:layout_height="wrap_content"
            android:layout_weight="0.5"
            android:layout_gravity="center_horizontal"
            android:id="@+id/imageView1" />
        <LinearLayout
            android:orientation="horizontal"
            android:layout_width="0"
            android:layout_height="wrap_content"
            android:layout_weight="0.25"/>
    </LinearLayout>
</LinearLayout>
在我看来,这是一个丑陋且笨拙的布局,不仅因为我现在不得不使用除了我的顶级LinearLayout之外的3个额外的LinearLayout来调整视图的大小和位置,还因为我想以编程方式执行所有布局并动态地.我可能决定在运行时左右对齐我的视图,或者相对于屏幕宽度更改其缩放系数,在此解决方案中需要可能添加/删除虚拟布局视图并适当设置所有权重.
我希望有人在布局上比我有更好的解决方案!理想情况下,我可以设置“重力”(虽然我无法使其工作),或者设置宽度而不需要水平LinearLayout容器和重量的一些替代方法,因为没有那个容器我可以居中在我的顶级垂直LinearLayout中水平放置.
谢谢!
编辑:我刚刚意识到在我的第二次布局尝试使用虚拟填充LinearLayouts我可以取消第二个填充LinearLayout(设置为0.25的重量)并在我的ImageView之前使用一个虚拟填充LinearLayout,因为它们是相对于预定的父母的weightSum.例如.:
<LinearLayout
        android:orientation="horizontal"
        android:layout_width="fill_parent"
        android:layout_height="wrap_content"
        android:weightSum="1.0">
        <LinearLayout
            android:orientation="horizontal"
            android:layout_width="0"
            android:layout_height="wrap_content"
            android:layout_weight="0.25"/>
        <ImageView
            android:src="@drawable/earth"
            android:adjustViewBounds="true"
            android:layout_width="0"
            android:layout_height="wrap_content"
            android:layout_weight="0.5"
            android:layout_gravity="center_horizontal"
            android:id="@+id/imageView1" />
    </LinearLayout>
仍然不是我希望的理想解决方案.
解决方法
我希望它有所帮助.

android – ConstraintLayout:将textview的顶部与imageview对齐
我试图通过提供在约束布局中对齐图像顶部和textview
<ImageView
    android:id="@+id/img_medal"
    android:layout_width="32dp"
    android:layout_height="32dp"
    android:layout_marginStart="24dp"
    android:layout_marginTop="16dp"
    android:contentDescription="@string/default_content_description"
    android:src="@drawable/medal_gold"
    app:layout_constraintLeft_toLeftOf="@+id/view_award_region"
    app:layout_constraintTop_toTopOf="@+id/view_award_region" />

<TextView
    android:id="@+id/txt_medal_title"
    android:layout_width="wrap_content"
    android:layout_height="wrap_content"
    android:layout_marginLeft="16dp"
    android:layout_marginTop="0dp"
    android:text="You are gold Now."
    app:layout_constraintLeft_toRightOf="@+id/img_medal"
    app:layout_constraintTop_toTopOf="@+id/img_medal"/>
,但这些视图的顶部是对齐的,而不是内容,因为字体的顶部和底部有一些空的空间.有谁知道如何解决这个问题? (问题可以在下面的图片中看到)

解决方法:
试试这个黑客:
<?xml version="1.0" encoding="utf-8"?>

<android.support.constraint.ConstraintLayout
    xmlns:android="http://schemas.android.com/apk/res/android"
    xmlns:app="http://schemas.android.com/apk/res-auto"
    android:layout_width="match_parent"
    android:layout_height="match_parent">

    <ImageView
        android:id="@+id/img_medal"
        android:layout_width="32dp"
        android:layout_height="32dp"
        android:layout_marginStart="24dp"
        android:layout_marginTop="16dp"
        android:paddingTop="6dp"
        android:contentDescription="@string/app_name"
        android:src="@android:drawable/sym_def_app_icon"
        app:layout_constraintLeft_toLeftOf="parent"
        app:layout_constraintTop_toTopOf="parent" />

    <TextView
        android:id="@+id/txt_medal_title"
        android:layout_width="wrap_content"
        android:layout_height="wrap_content"
        android:layout_marginStart="16dp"
        android:text="You are gold Now."
        android:textSize="20sp"
        app:layout_constraintStart_toEndOf="@+id/img_medal"
        app:layout_constraintTop_toTopOf="@+id/img_medal" />

</android.support.constraint.ConstraintLayout>
现在,它将如下图所示:

希望这对你有所帮助.快乐的编码.

android – LinearLayout ImageView调整所有图像宽度以适应
<RelativeLayout xmlns:android="http://schemas.android.com/apk/res/android"
    xmlns:tools="http://schemas.android.com/tools"
    android:layout_width="fill_parent"
    android:layout_height="fill_parent"
    tools:context=".MainActivity" >

    <LinearLayout
        android:layout_width="fill_parent"
        android:layout_height="wrap_content"
        android:layout_alignParentTop="true"
        android:layout_centerHorizontal="true" >

        <ImageView
            android:id="@+id/imageView1"
            android:layout_width="wrap_content"
            android:layout_height="wrap_content"
            android:src="@drawable/image200" />

        <ImageView
            android:id="@+id/imageView2"
            android:layout_width="wrap_content"
            android:layout_height="wrap_content"
            android:src="@drawable/image200" />

        <ImageView
            android:id="@+id/imageView3"
            android:layout_width="wrap_content"
            android:layout_height="wrap_content"
            android:src="@drawable/image200" />

    </LinearLayout>

</RelativeLayout>
这是它的样子:
注意左边的第三个图像是如何调整大小我假设的,因为没有足够的空间来容纳3x 200像素宽的图像.
我宁愿发生的不是仅缩小最后一张图像,而是将所有三张图像均匀调整大小以使它们都适合整个屏幕.如何设置我的布局以均匀地适合所有三个图像?
谢谢
更新 – 在更改我的设置后,这是什么样的事情:
请注意,图像视图周围的边框仍然是200像素高.为什么会这样?
解决方法
今天的关于如何使用复合可绘制对象而不是包含 ImageView 和 TextView 的 LinearLayout和复合对象图形合并的分享已经结束,谢谢您的关注,如果想了解更多关于Android CheckBox和ImageView、Textview在ListView中显示...、Android ImageView按重量调整大小,不以父LinearLayout为中心、android – ConstraintLayout:将textview的顶部与imageview对齐、android – LinearLayout ImageView调整所有图像宽度以适应的相关知识,请在本站进行查询。
本文标签:


![[转帖]Ubuntu 安装 Wine方法(ubuntu如何安装wine)](https://www.gvkun.com/zb_users/cache/thumbs/4c83df0e2303284d68480d1b1378581d-180-120-1.jpg)

