本文的目的是介绍CentOS7下rsync服务端与Windows下cwRsync客户端实现数据同步配置方法的详细情况,我们将通过专业的研究、有关数据的分析等多种方式,同时也不会遗漏关于CentOS7R
本文的目的是介绍CentOS7 下 rsync 服务端与 Windows 下 cwRsync 客户端实现数据同步配置方法的详细情况,我们将通过专业的研究、有关数据的分析等多种方式,同时也不会遗漏关于CentOS7 Rsync 服务搭建 - Rsync+Inotify 架构实现实时同步、Centos7 rsync+crontab 定时备份、Centos7 rsync+inotify实现实时同步更新、CentOS7 rsync+inotify数据同步的知识。
本文目录一览:- CentOS7 下 rsync 服务端与 Windows 下 cwRsync 客户端实现数据同步配置方法
- CentOS7 Rsync 服务搭建 - Rsync+Inotify 架构实现实时同步
- Centos7 rsync+crontab 定时备份
- Centos7 rsync+inotify实现实时同步更新
- CentOS7 rsync+inotify数据同步

CentOS7 下 rsync 服务端与 Windows 下 cwRsync 客户端实现数据同步配置方法
最近需求想定期备份服务器 d 盘的数据到 Linux 服务器上面,做个笔记顺便写下遇到的问题
以前整过一个 win 下的 cwrsync(客户端)+rsync(服务端:存储)的 bat 脚本
和整过一个 Linux 下的 rsync(客户端)+rsync(服务端:存储)的 sh 脚本
这次整一个 Linux 下 rsync(服务端) +windows(客户端)的笔记

客户端:192.168.10.19(cwrsync-Windows)
服务端:192.168.10.20(rsync-Linux)
rsync 简介:
rsync 是 linux 系统下的数据镜像备份工具。使用快速增量备份工具 Remote Sync 可以远程同步,支持本地复制,或者与其他 SSH、rsync 主机同步。
1、Centos7-rsync 服务端配置:
[root@zabbix /]# vi /etc/rsyncd.conf  #创建配置文件,添加以下代码
log file = /var/log/rsyncd.log
[backup]
path = /data1/backup
comment = backup
uid = root
gid = root
port = 873
read only = no
write only = no
auth users = ktrsync
secrets file = /data1/rsyncd/rsyncd.pass
hosts allow = *
#hosts deny = 192.168.10.30   禁止数据同步的客户端IP地址,可以设置多个,用英文状态下逗号隔开
list = yes

▲配置参数说明,注意配置里面不要把这些中文复制进去了!
log file = /var/log/rsyncd.log   #日志文件位置,启动rsync后自动产生这个文件,无需提前创建。
[backup]    #自定义名称
path = /data1/backup   #Rsync服务端数据目录路径
comment = backup    #模块名称与[backup]自定义名称相同
uid = root  #设置rsync运行权限为root
gid = root  #设置rsync运行权限为root
port=873    #默认端口
read only = no   #设置为no,cwRsync客户端可上传文件,yes只读
write only = no  #设置为no,cwRsync客户端可下载文件,yes不能下载
auth users = ktrsync   #执行数据同步的用户名,可以设置多个,用英文状态下逗号隔开
secrets file = /data1/rsyncd/rsyncd.pass   #用户认证配置文件,里面保存用户名称和密码,后面会创建这个文件
hosts allow = *  #允许进行数据同步的客户端IP地址,可以设置多个,用英文状态下逗号隔开,都应许写*
hosts deny = 192.168.10.30  #禁止数据同步的客户端IP地址,可以设置多个,用英文状态下逗号隔开
list = yes  #显示Rsync服务端资源列表
2、创建用户认证文件
vi  /data1/rsyncd/rsyncd.pass  #配置文件,添加以下内容
ktrsync:123456  #格式,用户名:密码,可以设置多个,每行一个用户名:密码
:wq! #保存
3、设置文件权限
chmod 600 /etc/rsyncd.conf  #设置文件所有者读取、写入权限
chmod 600 /data1/rsyncd/rsyncd.pass #设置文件所有者读取、写入权限
4、启动 rsync
systemctl start rsyncd   #启动
systemctl stoprsyncd   #停止
systemctl restart rsyncd #重新启动
5、Windows-cwRsync 客户端
安装 cwrsync 客户端说明:https://www.cnblogs.com/Sungeek/p/9042049.html

CentOS7 Rsync 服务搭建 - Rsync+Inotify 架构实现实时同步
一.rsync 概念
1.rsync
rsync 是类 unix/linux 系统下的数据镜像备份工具。使用快速增量备份工具 Remote Sync 可以远程同步,支持本地复制,或者与其他 SSH、rsync 主机同步。rsync 是通过超级守护进程 xinetd 进行触发同步和管理的。CentOS6.4 默认已经安装 rsync,但未安装 xinetd
2.inotify
Inotify 是一种强大的、细粒度的、异步的文件系统事件监控机制,linux 内核从 2.6.13 起,加入了 Inotify 支持,通过 Inotify 可以监控文件系统中添加、修改、移动等各种细微事件,利用这个内核接口,第三方软件就可以监控文件系统下文件的各种变化情况,而 inotify-tools 就是这样的一个第三方软件。
3、rsync+inotify 之推荐理由
1)服务器性能:rsync+crontab 会定时去检查是否有文件更新,即便没有更新也会去检查,这势必会造成服务器性能下降;而 rsync+inotify 组合是触发式更新,只有在数据文件有变化时,才会去更新,因此相对前者而言,是提高了服务器性能
2)数据实时性:rsync+crontab 是周期性任务计划,不能保证数据的实时性;rsync+inotify 组合是触发式更新,只要有数据变化,就立刻同步更新
3)当同步的目录数据量巨大时,建议使用 Rsync+sersync 架构,具体配置参考:http://www.osyunwei.com/archives/7447.html
二.rsync 安装
yum install rsync -y
三.rsync 的选项说明。
-a,--archive (存档) 归模式,表示以递归的方式传输文件,并且保持文件属性,等同于加了参数 - rlptgoD
-r,–recursive 对子目录以递归模式处理
-l,--links 表示拷贝链接文件
-p , --perms 表示保持文件原有权限
-t , --times 表示保持文件原有时间
-g , --group 表示保持文件原有属用户组
-o , --owner 表示保持文件原有属主
-D , --devices 表示块设备文件信息
-z , --compress 表示压缩传输
-H 表示硬连接文件
-A 保留 ACL 属性信息
-P 显示传输进度
-u, --update 仅仅进行更新,也就是跳过所有已经存在于目标位置,并且文件时间晚于要备份的文件。(不覆盖更新的文件)
--port=PORT 指定其他的 rsync 服务端口 873
--delete 删除那些目标位置有而原始位置没有的文件
--password-file=FILE 从 FILE 中得到密码
--bwlimit=KBPS 限制 I/O 带宽,Kbytes /second
--filter “- 文件名” 需要过滤的文件
--exclude= :需要过滤的文件
-v 显示同步过程的详细信息
四。测试环境
1. 环境
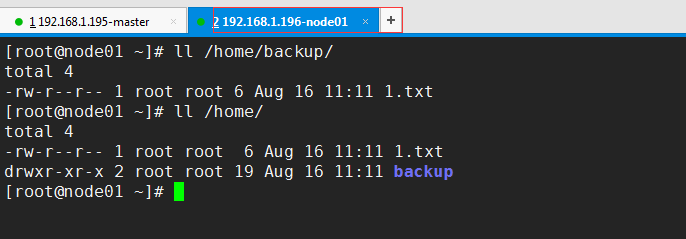
数据服务器: 192.168.1.195
目标服务器:192.168.1.196
2. 免秘钥登录服务器
3. 同步命令:
[root@master home]#rsync -avz /home/backup root@192.168.1.196:/home

目标服务:
五.inotify 部署安装
1. 下载网址
wget http://github.com/downloads/rvoicilas/inotify-tools/inotify-tools-3.14.tar.gz
2. 安装
#tar -zxvf inotify-tools-3.14.tar.gz
#cd inotify-tools-3.14
#./configure --prefix=/usr/local/inotify-tools-3.14
#make && make install
#ln -s /usr/local/inotify-tools-3.14//usr/local/inotify-tools ## 创建软链接
#cd /usr/local/inotify-tools
## 提示编译成功后会生成 4 个目录,分别是:
#ll
total 16
drwxr-xr-x. 2 root root 4096 Jan 31 01:55 bin ##inotify 执行命令 (二进制)
drwxr-xr-x. 3 root root 4096 Jan 31 01:55 include ##inotify 程序所需用的头文件
drwxr-xr-x. 2 root root 4096 Jan 31 01:55 lib ## 动态链接的库文件
drwxr-xr-x. 4 root root 4096 Jan 31 01:55 share ## 帮助文档
六。工具集合介绍:
一共安装了 2 个工具 (命令),即 inotifywait 和 inotifywatch
inotifywait: 在被监控的文件或目录上等待特定文件系统事件 (open、close、delete 等) 发生,执行后处于阻塞状态,适合在 shell 脚本中使用。
inotifywatch: 收集被监视的文件系统使用度统计数据,指定文件系统事件发生的次数统计。
七.inotify 命令常用参数详解:
# ./bin/inotifywait --help
inotifywait 3.14
Wait for a particular event on a file or set of files.
Usage: inotifywait [ options ] file1 [ file2 ] [ file3 ] [ ... ]
Options:
-r|--recursive Watch directories recursively. ## 递归查询目录
-q|--quiet Print less (only print events) ## 打印很少的信息,仅仅打印监控相关的信息
-m|--monitor Keep listening for events forever. Without
this option, inotifywait will exit after one
event is received. ## 始终保持事件监听状态
--excludei <pattern>
Like --exclude but case insensitive. ## 排除文件或目录时,不区分大小写
--timefmt <fmt> strftime-compatible format string for use with
% T in --format string. ## 指定时间的输出格式
八、测试监控事件(开两个窗口,一个窗口执行命令,另一窗口对监控目录做增、删、改操作)
1. 测试脚本
 1 #!/bin/bash
 2
 3 #实行当前命令后,界面处于阻塞状态,只有在另外一个客户端测试时,才会显示监控状态
 4
 5 /usr/local/inotify-tools/bin/inotifywait -mrq -e modify,create,move,delete,attrib /home/backup |while read events
 6
 7 do
 8 rsync -a --delete /home/backup 192.168.1.196::test
 9 echo "`date +''%F %T''` 出现事件 $events" >>/tmp/rsync.log 2>&1
10 done
2. 目标主机添加 test 用户
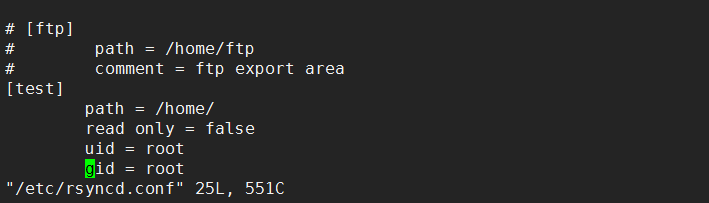
[root@node01 backup]# vi /etc/rsyncd.conf (配置文件最下面添加)
[test]
path = /home/
read only = false
uid = root
gid = root
3. 执行命令
[root@master inotify-tools]# nohup ./rsync_back.sh &
4. 开启另一个窗口执行删除, 修改,创建等命令

5. 查看 nohup 的日志

6. 目标服务器,自动生成文件和修改的内容。

Centos7 rsync+crontab 定时备份
rsync 远程备份的功能
rsync 常用选项:
-v: 详细信息输出
-z: 传输时进行压缩 --compress-level=NUM 可按级别压缩
-a: 归档模式传输并保持文件属性相当于 - rtopgDL
-r : 递归模式
-t : 保持文件的时间属性
-o: 保持文件属主属性
-p: 保持文件权限属性
-g: 保持文件属组属性
-D: 保持设备文件信息
-l : 保持文件软链接
-e: 使用指定协议
–include=PATTERN: 指定排除不需要传输的文件
–exclude-from=file: 从文件中读取需要排除的内容
-bwlimit=KBPS: 限速限制 I / O 带宽;每秒 KBytes
–delete: 删除源目录中不存在的文件使目标目录和源目录一致,慎用
crontab 周期计划任务
*   *    *    *    *
分  时   日   月   周
准备两台虚拟机测试
192.168.27.137 备份源
192.168.27.138 备份端

关掉防火墙 setenforce
[root@localhost ~]# systemctl stop firewalld
[root@localhost ~]# setenforce 0
备份源操作
安装rsync
[root@localhost ~]# yum -y install rsync
修改配置文件
[root@localhost ~]# vim /etc/rsyncd.conf
uid = nobody
gid = nobody
use chroot = yes
port 873
log file = /var/log/rsyncd.log
pid file = /var/run/rsyncd.pid
hosts allow = 192.168.27.0/24
[wwwroot]
path = /opt/aaa
comment = Document Root of www.51xit.top
read only =no
dont comperss = *.gz *.bz2 *.tgz *.zip *.rar *.z
auth users =tom
secrets file = /etc/rsyncd_users.db

[root@localhost ~]# mkdir /opt/aaa
设置账户 密码
[root@localhost ~]# vim /etc/rsyncd_users.db
tom:123

加权限
[root@localhost ~]# chmod 600 /etc/rsyncd_users.db
启动rsync 查看端口
root@localhost ~]# rsync --daemon
[root@localhost ~]# netstat -nlput |grep 873
tcp        0      0 0.0.0.0:873             0.0.0.0:*               LISTEN      13360/rsync
tcp6       0      0 :::873                  :::*                    LISTEN      13360/rsync
备份端操作
安装rsync
[root@localhost ~]# yum -y install rsync
备份端只需设置用户密码
[root@localhost ~]# vim /etc/server.pass
123

加权限
[root@localhost ~]# chmod 600 /etc/server.pass

设置定时任务 每分钟执行一次
[root@localhost ~]# crontab -e
* * * * * rsync -az --password-file=/etc/server.pass tom@192.168.27.137::wwwroot /root/

[root@localhost ~]# crontab -l
* * * * * rsync -az --password-file=/etc/server.pass tom@192.168.27.137::wwwroot /root/
测试
在备份端的创建个测试
[root@localhost aaa]# cd /opt/aaa/
[root@localhost aaa]# touch a

在备份源等1分钟查看 是否同步
[root@localhost ~]# ls
a

Centos7 rsync+inotify实现实时同步更新
inotify slave部署
把master上指定文件下载到本地的主机指定目录


yum install rsync –y
 [root@localhost ~]# useradd rsync -s /sbin/nologin -M
 [root@localhost ~]# mkdir -p /home/yxh/back
 [root@localhost ~]# chown rsync.rsync /home/yxh/back/

  echo rsync_backup:yxh >>/etc/rsync.password
   rsync_backup 为用户名
   yxh  为密码

[root@localhost ~]# chmod 600 /etc/rsync.password
[root@localhost ~]# rsync --daemon
[root@localhost ~]# ss -tunlp | grep rsync
tcp    LISTEN     0      5         *:873                   *:*                   users:(("rsync",pid=12133,fd=4))
tcp    LISTEN     0      5        :::873                  :::*                   users:(("rsync",pid=12133,fd=5))

重启rsync
[root@localhost back]# ps -ef | grep rsync
root      13472      1  0 20:10 ?        00:00:00 rsync --daemon
root      14185   9059  0 20:19 pts/1    00:00:00 grep --color=auto rsync
[root@localhost back]# kill -9 13472
[root@localhost back]# ps -ef | grep rsync
root      14253   9059  0 20:19 pts/1    00:00:00 grep --color=auto rsync
[root@localhost back]# rsync --daemon
failed to create pid file /var/run/rsyncd.pid: File exists
[root@localhost back]# rm -fr /var/run/rsyncd.pid
[root@localhost back]# ls
[root@localhost back]# rsync --daemon

[root@localhost etc]# vi rsyncd.conf

# /etc/rsyncd: configuration file for rsync daemon mode

# See rsyncd.conf man page for more options.

# configuration example:

uid = rsync
gid = rsync
use chroot = no
max connections = 400
pid file = /var/run/rsyncd.pid
# exclude = lost+found/
# transfer logging = yes
timeout = 900
# ignore nonreadable = yes
# dont compress   = *.gz *.tgz *.zip *.z *.Z *.rpm *.deb *.bz2

[backup]
  path = /home/yxh/back/
  ignore errors
  read only = no
  write only = no
  list = false
  fake super = yes
  auth users = rsync_backup
  secrets file = /etc/rsync.password
inotify master部署
master主机上的文件发生变化的时候 slave主机会自动进行同步变化的文件


[root@node2 ~]# yum install rsync –y
[root@node2 ~]# wget http://github.com/downloads/rvoicilas/inotify-tools/inotify-tools-3.14.tar.gz
[root@node2 ~]# tar zxf inotify-tools-3.14.tar.gz
[root@node2 ~]# cd inotify-tools-3.14
[root@node2 inotify-tools-3.14]# ./configure --prefix=/usr/local/inotify
[root@node2 inotify-tools-3.14]# mkdir -p /home/yxh/back/
[root@node2 inotify-tools-3.14]# echo "yxh" >/etc/rsync.password
[root@node2 inotify-tools-3.14]# chmod 600 /etc/rsync.password


测试同步
[root@node2 back]# ls
test.txt
[root@node2 back]#  rsync  -avz /home/yxh/back/test.txt rsync_backup@192.168.11.175::backup --password-file=/etc/rsync.password

sending incremental file list
test.txt

sent 100 bytes  received 43 bytes  286.00 bytes/sec
total size is 7  speedup is 0.05

[root@node2 local]# vi inotify.sh

#!/bin/bash

host01=192.168.11.175
user=rsync_backup
rsync_passfile=/etc/rsync.password
inotify_home=/usr/local/inotify

#judge
if [ ! -e "$src" ] \
|| [ ! -e "${rsync_passfile}" ] \
|| [ ! -e "${inotify_home}/bin/inotifywait" ] \
|| [ ! -e "/usr/bin/rsync" ];
then
echo "Check File and Folder"
exit 9
fi

${inotify_home}/bin/inotifywait -mrq --timefmt ''%d/%m/%y %H:%M'' --format ''%T %w%f'' -e close_write,delete,create,attrib $src \
| while read file
do

#  rsync -avzP --delete --timeout=100 --password-file=${rsync_passfile} $src $user@$host01::$dst >/dev/null 2>&1
cd $src && rsync -aruz -R --delete ./  --timeout=100 $user@$host01::$dst --password-file=${rsync_passfile} >/dev/null 2>&1
done
exit 0
3.执行脚本实现自动更新
[root@node2 local]# sh inotify.sh & 这种方式虽然可以实现脚本在后台运行 但是一旦关闭终端便会失效
nohup sh inotify.sh >run.log 2>&1 & 采取这种执行方式 即使关闭终端也可以生效 只要不重启系统即可一直在后台运行


[root@node2 local]# sh inotify.sh &
[1] 32260

在master上添加一个test2.txt文件保存
[root@node2 back]# ls
test.txt
[root@node2 back]# vi test2.txt
[root@node2 back]# ls
test2.txt  test.txt


然后到slave节点上查看指定目录
test2.txt被自动同步到本地来
[root@localhost back]# ls
test2.txt  test.txt
[root@localhost back]# vi test2.txt


加入开机启动
# echo  "/bin/bash  /home/yxh/inotify.sh &" >>/etc/rc.local
NFS实现映射远程磁盘目录


nfs安装
   在两台机器上安装nsf 、 portmap
   yum  install  nfs-utils  portmap

88配置
  88机器上的/uploaddir目录映射到89本地的/uploaddir目录
  88编辑配置文件
  [root]# vi /etc/exports
  /uploaddir/ 10.199.142.89(rw,sync,no_root_squash)

  systemctl start rpcbind
  systemctl start nfs

  89配置
   systemctl start rpcbind
   systemctl start nfs

   mkdir /uploaddir
   mount -t nfs 10.199.142.88:/uploaddir/  /uploaddir/

   mount
    10.199.142.88:/uploaddir on /uploaddir type nfs4
线上案例


vi /etc/rsync.password

root:rootpass


chmod 600 /etc/rsync.password

root@9 etc]# vi rsyncd.conf

# /etc/rsyncd: configuration file for rsync daemon mode

# See rsyncd.conf man page for more options.

# configuration example:

uid =root
gid =root
use chroot = yes
max connections = 400
pid file = /var/run/rsyncd.pid
# exclude = lost+found/
# transfer logging = yes
timeout = 900
# ignore nonreadable = yes
# dont compress   = *.gz *.tgz *.zip *.z *.Z *.rpm *.deb *.bz2

# [ftp]
#        path = /home/ftp
#        comment = ftp export area

uid = root
gid = root
use chroot = no
max connections = 10
strict modes = yes
hosts allow = 88
port = 873
pid file = /var/run/rsyncd.pid
lock file = /var/run/rsync.lock
log file = /var/log/rsyncd.log


[backup]
path = /deploydir
ignore errors
read only = no
write only = no
list = false
fake super = yes
secrets file = /etc/rsync.password

[root@88 inotify-tools-3.14]# echo "rootpass" >/etc/rsync.password
[root@88 inotify-tools-3.14]#  chmod 600 /etc/rsync.password


[root@88 uploaddir]# rsync -avz /uploaddir/22.txt root@10.89::backup --password-file=/etc/rsync.password

[root@88 ~]# vi inotify.sh

#!/bin/bash
src=/uploaddir
host01=1.89
host02=1.90
user=root
dst=backup
rsync_passfile=/etc/rsync.password
inotify_home=/usr

#judge
if [ ! -e "$src" ] \
|| [ ! -e "${rsync_passfile}" ] \
|| [ ! -e "${inotify_home}/bin/inotifywait" ] \
|| [ ! -e "/usr/bin/rsync" ];
then
echo "Check File and Folder"
exit 9
fi

${inotify_home}/bin/inotifywait -mrq --timefmt ''%d/%m/%y %H:%M'' --format ''%T %w%f'' -e close_write,delete,create,attrib $src \
| while read file
do

cd $src && rsync -aruz -R --delete ./  --timeout=100 $user@$host01::$dst --password-file=${rsync_passfile} >/dev/null 2>&1

cd $src && rsync -aruz -R --delete ./  --timeout=100 $user@$host02::$dst --password-file=${rsync_passfile} >/dev/null 2>&1
done
exit 0

[root@-88]# cat /etc/rsync.password
rootpass

[root@88]# cat /etc/rsync/rsync.password
root:rootpass

[root@88]# cat /etc/rsyncd.conf
pid file = /var/run/rsyncd.pid
uid = nobody
gid = nobody
use chroot = no
log format = %t %a %m %f %b
syslog facility = local3
timeout = 300
address = 10.8

[backup]
uid =root
gid =root
use chroot = yes
max connections = 400
path = /deploydir
ignore errors
read only = no
write only = no
list = false
fake super = yes
secrets file = /etc/rsync/rsync.password
CentOS7 rsync+inotify数据同步
CentOS7 rsync+inotify数据同步
环境:CentOS7
服务端:ip: 192.168.1.30(63) (备份源master)
客户端 : ip: 192.168.1.31(64) (发起端slave)
备份方式: 完全备份 、增量备份
rsync优点:
- 支持增量备份.
- 选择性的保持:符号链接、硬链接、文件属性、权限及时间等。
- 传输前执行压缩,适用于异地备份,镜像服务器等应用。
- 使用ssh作为传输端口 sftp ssh xshell
rsync与scp的区别:
当文件数据量很大的时候:scp 无法备份大量数据,特点:先统计信息 ,像windows复制.
,rsync 边复制,边比较,边统计
端口: 873
模式 C/s 如果直接使用命令rsync ,就是点到点的传输
首先认识同步数据的方式:
推:一台主机负责把数据传给其他主机.(服务器开销大,适合后端服务器比较少)
拉:所有主机定时去找一台主机拉数据,可能会导致数据同步缓慢. (适合服务器很多的情况)
安装:
$ yum install  -y rsync
$ yum install -y xinetd
CentOS7安装之后没有/etc/xinetd.d/rsync 这个文件,只能自己拷贝一个上去
$ cat /etc/xinetd.d/rsync
# default: off
# description: The rsync server is a good addition to an ftp server, as it \
#       allows crc checksumming etc.
service rsync
{
        disable = no
        flags           = IPv6
        socket_type     = stream
        wait            = no
        user            = root
        server          = /usr/bin/rsync
        server_args     = --daemon
        log_on_failure  += USERID
}
cat /etc/xinetd.d/rsync
disable = yes 修改为no 上面已经修改过了.
启动服务xinetd:
systemctl restart  xinetd.service
systemctl status  xinetd.service
启动rsync服务
$ /usr/bin/rsync --daemon --config=/etc/rsyncd.conf
可以查看端口是否启动
$ netstat -antup |grep 873
tcp        0      0 0.0.0.0:873             0.0.0.0:*               LISTEN      5996/rsync
tcp6       0      0 :::873                       :::*                      LISTEN      5996/rsync
查看服务是否启动
$ ps -ef | grep rsync
root 5996 1 0 04:58 ? 00:00:00 /usr/bin/rsync --daemon --config=/etc/rsyncd.conf
root 8049 7308 0 06:32 pts/2 00:00:00 grep --color=auto rsync
```
```
$ vim /etc/services
```

###实战1
> 将192.168.1.30服务器的/var/www/html目录下的文件备份->到192.168.1.31服务器的/web-back目录下面
1.创建用户rget1用于下载,读
2.创建用户rput1 用于上传,写.
需要备份数据的服务端:ip : 192.168.1.63(192.168.1.30) master
客户端:ip : 192.168.1.64 (192.168.1.31) slave
创建用户
63(192.168.1.30)服务器上创建用户rget1
64(192.168.1.31)服务器上创建用户rput1
```
$ useradd rget1 #添加账号
$ echo ''123456''|passwd --stdin rget1 #设置密码
$
$ useradd rput1 #添加账号
$ echo ''123456''|passwd --stdin rput1 #设置密码
Changing password for user rput1.
passwd: all authentication tokens updated successfully.
$
```
添加用户权限
```
$setfacl -R -m user:rput1:rwx /var/www/html/ #添加读写权限
$setfacl -R -m default:rput1:rwx /var/www/html/ #默认之后也是这个权限
$setfacl -R -m user:rget1:rwx /var/www/html/
$ setfacl -R -m default:rget1:rwx /var/www/html/
```
开始备份操作
在客户端64( 192.168.1.31 )上执行下面命令:
```
$ mkdir /web-back
$ rsync -azP --delete rget1@192.168.1.30:/var/www/html/ /web-back
The authenticity of host ''192.168.1.30 (192.168.1.30)'' can''t be established.
ECDSA key fingerprint is 11:9a:a1:2d:a6:a6:1c:08:e7:dc:fa:4c:81:55:34:5f.
Are you sure you want to continue connecting (yes/no)? yes
Warning: Permanently added ''192.168.1.30'' (ECDSA) to the list of known hosts.
rget1@192.168.1.30''s password:
Permission denied, please try again.
rget1@192.168.1.30''s password:
receiving incremental file list
created directory /web-back
./
code.py
0 100% 0.00kB/s 0:00:00 (xfer#1, to-check=0/2)
sent 33 bytes received 86 bytes 7.21 bytes/sec
total size is 0 speedup is 0.00
```
###实战2
> 使用ssh密钥实现无交互备份,做成脚本,将192.168.1.63(192.168.1.30) master上的数据,定期备份到192.168.1.64 (192.168.1.31) slave上.
192.168.1.64 (192.168.1.31) 机器上生成密钥
```
$ ssh-keygen -t rsa
Generating public/private rsa key pair.
Enter file in which to save the key (/root/.ssh/id_rsa):
Enter passphrase (empty for no passphrase):
Enter same passphrase again:
Your identification has been saved in /root/.ssh/id_rsa.
Your public key has been saved in /root/.ssh/id_rsa.pub.
The key fingerprint is:
85:68:60:3d:b2:d2:e0:1b:d9:97:2c:d7:9e:d2:c1:36 root@localhost.localdomain
The key''s randomart image is:
+--[ RSA 2048]----+
| o. |
| ....o. . |
| . = +o=. . |
| = =.= E. |
| + + +S+ |
| . . + |
| . |
| |
| |
+-----------------+
$
$
$ssh-copy-id rget1@192.168.1.30 //拷贝密钥
/usr/bin/ssh-copy-id: INFO: attempting to log in with the new key(s), to filter out any that are already installed
/usr/bin/ssh-copy-id: INFO: 1 key(s) remain to be installed -- if you are prompted now it is to install the new keys
rget1@192.168.1.30''s password:
Number of key(s) added: 1
Now try logging into the machine, with: "ssh ''rget1@192.168.1.30''"
and check to make sure that only the key(s) you wanted were added.
$
$ssh rget1@192.168.1.30 //链接到了30
Last failed login: Tue Oct 25 07:08:26 PDT 2016 on ssh:notty
There were 2 failed login attempts since the last successful login.
[rget1@localhost ~]$ ifconfig -a
eno16777736: flags=4163<UP,BROADCAST,RUNNING,MULTICAST> mtu 1500
inet 192.168.1.30 netmask 255.255.255.0 broadcast 192.168.1.255
$
$exit #退出
```
开始备份操作:
```
$ rsync -azP --delete rget1@192.168.1.30:/var/www/html/ /web-back
receiving incremental file list
created directory /web-back
./
code.py
0 100% 0.00kB/s 0:00:00 (xfer#1, to-check=2/4)
test.py
0 100% 0.00kB/s 0:00:00 (xfer#2, to-check=1/4)
test2.py
0 100% 0.00kB/s 0:00:00 (xfer#3, to-check=0/4)
sent 71 bytes received 192 bytes 526.00 bytes/sec
total size is 0 speedup is 0.00
$
```
在192.168.1.31(salve)服务器上编写脚本:
```
$ vi /root/rsync-ssh-get-wwwroot.sh
#!/bin/bash
rsync -az --delete rget1@192.168.1.30:/var/www/html/ /web-back
$
$ chmod +x !$
$ rm -rf /web-back/*
```
测试:
```
$ /root/rsync-ssh-get-wwwroot.sh //执行脚本
$
$ ls /web-back/ //测试成功
```
设置备份时间(在192.168.1.31服务器上操作)
```
$ crontab -e
01 3 * * * /root/rsync-ssh-get-wwwroot.sh &
$
$保存退出
01 3 * * * /root/rsync-ssh-get-wwwroot.sh &
分 小时 天 月 星期 后台运行
//每天的三点一分执行脚本
$
$
```
###实战3
> 配置rsync服务器及需要备份的目录,不使用系统用户进行备份.
需要自己创建自己的配置文件: /etc/rsyncd.conf ;然后 创建备份账户。最后把rsync 以daemon的方式运行.
配置文件: /etc/rsyncd.conf 整体分为两个部分:
全局参数: 对于rsync服务器生效
模块参数: 定义rsync输出的目录的参数
我们在63(192.168.1.30)服务器master端创建
```
$ vi /etc/rsyncd.conf
uid=nobody #运行进程的身份
gid=nobody #运行进程的组
address= 192.168.1.30 #监听的IP地址,我这里监听的就是30服务器备份到31服务器上
port=873 #端口
hosts allow=192.168.1.31 #允许同步的客户端IP地址(允许同步到那台机器上去)
#hosts deny = 0.0.0.0/32
use chroot = yes #锁定家目录。rsync被黑了,黑客无法在rsync允许的家目录之外创建文件,该项设置为yes
max connections = 10 #最大连接数
pid file=/var/run/rsyncd.pid #pid文件,存放进程ID,自动生成.
lock file=/var/run/rsync.lock #指定支持 max connections 参数的锁文件
log file=/var/log/rsyncd.log #日志
motd file=/etc/rsyncd.motd #客户端登录后的弹出的信息,需要自己创建
[wwwroot] #共享模块名
path=/var/www/html/ #备份文件夹的路径(需要备份的内容存放的位置)
comment=rsync wwwroot of www.xuegod.cn #描述
read only = yes #以只读的方式提供备份
list = yes #允许查看模块信息
auth users = bachuper #指定执行备份操作的用户名。和系统root用户无关
secrets file = /etc/rsync.passwd #指定存放用户名和密码的文件。格式: 用户名:密码
```
hosts allow可以同步到指定IP也可以同步到整个网段可以写成如下:
192.168.1.0/24,也可以是192.168.0.0/255.255.255.0
"*" 表示允许所有,默认是允许所有主机连接.
在拷贝 /etc/rsyncd.conf 这个文件的时候把中文去掉.
为了避免出错,我们采用下面这种方式创建
创建/etc/rsyncd.motd
```
$ grep motd /etc/rsyncd.conf
motd file=/etc/rsyncd.motd
$ echo "welcome to backup server" >/etc/rsyncd.motd #写入信息
$
创建/etc/rsync.passwd
$ grep passwd /etc/rsyncd.conf
secrets file = /etc/rsync.passwd
$
$ vi /etc/rsync.passwd
backuper:pwd123 #用户名:密码
$
$ chmod 600 /etc/rsync.passwd #添加权限
```
启动服务:
```
$ systemctl restart xinetd.service
$ systemctl status xinetd.service
```
测试备份:
语法: rsync 选项 用户名@备份源服务器IP::共享模块名 目标目录
```
使用共享模块名却一直报错,错误如下:
在192.168.1.31服务器上执行以下命令
[root@localhost ~]# rsync -azP backuper@192.168.1.30::wwwroot /web-back/
welcome to backup server
Password:
@ERROR: auth failed on module wwwroot
rsync error: error starting client-server protocol (code 5) at main.c(1516) [Receiver=3.0.9]
[root@localhost ~]#
不使用共享模块名,使用绝对路径就可以成功
$ rsync -azP backuper@192.168.1.30:/var/www/html/ /web-back/
backuper@192.168.1.30''s password:
receiving incremental file list
./
code.py
0 100% 0.00kB/s 0:00:00 (xfer#1, to-check=2/4)
test.py
0 100% 0.00kB/s 0:00:00 (xfer#2, to-check=1/4)
test2.py
0 100% 0.00kB/s 0:00:00 (xfer#3, to-check=0/4)
sent 71 bytes received 192 bytes 47.82 bytes/sec
total size is 0 speedup is 0.00
$
$ ls /web-back/ #查看数据
```
实现无交互脚本,备份数据.
在192.168.1.31服务器上修改变量: RSYNC_PASSWORD
```
export RSYNC_PASSWORD=pwd123 #这样就 无需在输入密码了
```
脚本执行:
```
vi backup.sh
#!/bin/sh
export RSYNC_PASSWORD=pwd123
rsync -azP backuper@192.168.1.30::wwwroot /web-back/
$
$ chmod +x backup.sh
$./backup.sh
$
$ crontab -e #创建计划任务,设置定时备份
01 3 * * * /home/wtb/backup.sh &
```
防火墙设置
添加防火墙端口
```
firewall-cmd --permanent --zone=public --add-port=873/tcp
firewall-cmd --permanent --zone=public --add-port=873/udp
这样就开放了相应的端口。
$ firewall-cmd --reload 使最新的防火墙设置规则生效。
$
$
$ sudo systemctl stop firewalld.service
$ sudo systemctl disable firewalld.service
```
### 实战4 配置rsync + inotify 实现实时同步
> Linux内核从2.6.13版本开始提供了inotify通知接口,用来监控文件系统的各种变化情况,如文件存取、删除、移动等。利用这一机制,可以非常方便的实现文件异动警告、增量备份、并针对目录或者文件的变化及时作出响应。
使用rsync工具与inotity机制相结合,可以实现触发式备份(实时同步),只要原始位置的文档发生变化,则立即启动增量备份操作,否则处于静态等待状态,这样一来,就避免了按固定周期备份进存在的延迟性,周期过密等问题.
要求: 把 192.168.1.30服务器上的/var/www/html目录实时同步到192.168.1.31主机上的/web-back目录中
inotify-tools服务器: IP: 192.168.1.30 在这台机器上安装inotify-tools软件
客户端: IP 192.168.1.31
[inotify-tools下载地址:](https://sourceforge.net/projects/inotify-tools/)
```
[root@localhost wtb]# uname -r #查看是否支持inotify
3.10.0-229.el7.x86_64
[root@localhost wtb]# ll /proc/sys/fs/inotify
total 0
-rw-r--r--. 1 root root 0 Oct 28 05:23 max_queued_events
-rw-r--r--. 1 root root 0 Oct 28 05:23 max_user_instances
-rw-r--r--. 1 root root 0 Oct 28 05:23 max_user_watches
$
在linux内核中,默认的inotify 机制提供了三个调控参数:
max_queued_events #表示监控事件队列
max_user_instances #表示最多监控实列数
max_user_watches #表示每个实列最多监控文件数
注: 当监控的目录、文件数量较多或者变化较大是,把值设置得大一些
$
$ vim /etc/sysctl.conf #添加这三个数的值,修改得大一点
fs.inotify.max_queued_events = 30000
fs.inotify.max_user_instances = 20000
fs.inotify.max_user_watches =9000000
$
$sysctl -p #及时生效
fs.inotify.max_queued_events = 30000
fs.inotify.max_user_instances = 20000
fs.inotify.max_user_watches = 9000000
$
```
安装inotify-tools
安装inotify-tools 后,将拥有inotifywait、inotifywatch辅助工具程序,从而来监控、汇总文件系统改动情况.
下载[inotify-tools-3.13.tar.gz]
(http://211.162.74.235:9011/jaist.dl.sourceforge.net/c3pr90ntc0td/project/inotify-tools/inotify-tools/3.13/inotify-tools-3.13.tar.gz)
```
$ tar zxvf inotify-tools-3.13.tar.gz
$ cd inotify-tools-3.13/
$ ./configure
$ make -j 4 #4个CPU快速编译
$make install
$
```
测试inotify监控:
使用inotifywait 命令监控网站目录/var/www/html发生的变化。然后在另一个终端向/var/www/html目录下添加文件、修改文件、查看屏幕输出结果.
终端1

测试终端2

编写脚本
192.168.1.31备份192.168.1.30上面的数据,备份时不需要输入密码.
192.168.1.30发生变化后,直接将发生变化的数据同步到192.168.1.31,同步时不需要输入密码
```
第一步: 先在192.168.1.30 服务器上生成密钥
$ ssh-keygen -t rsa
Generating public/private rsa key pair.
Enter file in which to save the key (/root/.ssh/id_rsa):
Enter passphrase (empty for no passphrase):
Enter same passphrase again:
Your identification has been saved in /root/.ssh/id_rsa.
Your public key has been saved in /root/.ssh/id_rsa.pub.
The key fingerprint is:
85:68:60:3d:b2:d2:e0:1b:d9:97:2c:d7:9e:d2:c1:36 root@localhost.localdomain
The key''s randomart image is:
+--[ RSA 2048]----+
| o. |
| ....o. . |
| . = +o=. . |
| = =.= E. |
| + + +S+ |
| . . + |
| . |
| |
| |
+-----------------+
$
第二步: 拷贝密钥到192.168.1.31服务器上面
[root@localhost .ssh]# ssh-copy-id root@192.168.1.31
The authenticity of host ''192.168.1.31 (192.168.1.31)'' can''t be established.
ECDSA key fingerprint is fe:a6:81:f0:48:6d:df:9a:63:88:8b:d4:8a:95:82:db.
Are you sure you want to continue connecting (yes/no)? yes
/usr/bin/ssh-copy-id: INFO: attempting to log in with the new key(s), to filter out any that are already installed
/usr/bin/ssh-copy-id: INFO: 1 key(s) remain to be installed -- if you are prompted now it is to install the new keys
root@192.168.1.31''s password:
Number of key(s) added: 1
Now try logging into the machine, with: "ssh ''root@192.168.1.31''"
and check to make sure that only the key(s) you wanted were added.
$ 拷贝成功了,这样就实现了ssh 直接可以登录到192.168.1.31 上面了
$ ssh 192.168.1.31 #登录成功
Last login: Fri Oct 28 05:59:57 2016 from 192.168.1.101
$
$
```
现在就可以编写脚本了
```
vim a.sh
#!/bin/bash
inotifywait -mrq -e create,move,delete,modify /var/www/html/ | while read a b c
do
rsync -azP --delete /var/www/html/ root@192.168.1.31:/web-back
done
```
脚本优化
```
#!/bin/bash
SRC=/var/www/html
DST=root@192.168.1.31:/web-back
inotifywait -mrq -e create,move,delete,modify,attrib ${SRC} | while read D E F
do
/usr/bin/rsync -ahqzt --delete $SRC $DST
done
```
chmod +x a.sh
现在进行测试:
```
我现在在终端1执行a.sh脚本
$ ./a.sh
$
```
现在另外开一个终端,进行测试
```
$ echo bbb > /var/www/html/index.html
$ echo bbb > /var/www/html/index1aac.html
```
结果如下:

最后:
```
把脚本a.sh 拷贝到/opt 下面并改名为inotify_rsync.sh
$ cp ./a.sh /opt/inotify_rsync.sh
$ echo ''/opt/inotify_rsync.sh & '' >> etc/rc.local 后台一直执行
```
> 1问题记录
[root[@localhost](https://my.oschina.net/u/570656) /]# rsync -azP --delete rget1@192.168.1.30:/var/www/html/ /web-back
ssh: connect to host 192.168.1.63 port 22: No route to host
rsync: connection unexpectedly closed (0 bytes received so far) [Receiver]
rsync error: unexplained error (code 255) at io.c(605) [Receiver=3.0.9]
vi /etc/ssh/sshd_config:
然后将这两项的注释号去掉
Port 22
Protocol 2
>2.检查sshd服务
$ sudo service ssh status
Redirecting to /bin/systemctl status ssh.service
● ssh.service
Loaded: not-found (Reason: No such file or directory)
Active: inactive (dead)
[root[@localhost](https://my.oschina.net/u/570656) html]#
安装sshd
$ sudo yum install openssh-server -y
3 检查名字是否一致
/etc/hostname, and /etc/hosts.
今天关于CentOS7 下 rsync 服务端与 Windows 下 cwRsync 客户端实现数据同步配置方法的讲解已经结束,谢谢您的阅读,如果想了解更多关于CentOS7 Rsync 服务搭建 - Rsync+Inotify 架构实现实时同步、Centos7 rsync+crontab 定时备份、Centos7 rsync+inotify实现实时同步更新、CentOS7 rsync+inotify数据同步的相关知识,请在本站搜索。
本文标签:


![[转帖]Ubuntu 安装 Wine方法(ubuntu如何安装wine)](https://www.gvkun.com/zb_users/cache/thumbs/4c83df0e2303284d68480d1b1378581d-180-120-1.jpg)

