在本文中,我们将给您介绍关于Spring在使用JUnit的单元测试中无法自动装配的详细内容,并且为您解答spring单元测试无法注入bean的相关问题,此外,我们还将为您提供关于ant+Junit的单
在本文中,我们将给您介绍关于Spring在使用JUnit的单元测试中无法自动装配的详细内容,并且为您解答spring单元测试无法注入bean的相关问题,此外,我们还将为您提供关于ant+Junit的单元测试无法启动spring容器、idea spring boot 1.x junit单元测试、idea-SpringJUnit4单元测试、Intellij IDEA使用junit单元测试及其junit与spring版本不兼容问题的知识。
本文目录一览:- Spring在使用JUnit的单元测试中无法自动装配(spring单元测试无法注入bean)
- ant+Junit的单元测试无法启动spring容器
- idea spring boot 1.x junit单元测试
- idea-SpringJUnit4单元测试
- Intellij IDEA使用junit单元测试及其junit与spring版本不兼容问题
")
Spring在使用JUnit的单元测试中无法自动装配(spring单元测试无法注入bean)
我使用JUnit测试以下DAO:
@Repositorypublic class MyDao { @Autowired private SessionFactory sessionFactory; // Other stuff here}如你所见,sessionFactory是使用Spring自动接线的。当我运行测试时,sessionFactory保持为空,并且出现空指针异常。
这是Spring中的sessionFactory配置:
<bean id="sessionFactory"> <property name="dataSource" ref="dataSource" /> <property name="configLocation"> <value>classpath:hibernate.cfg.xml</value> </property> <property name="configurationClass"> <value>org.hibernate.cfg.AnnotationConfiguration</value> </property> <property name="hibernateProperties"> <props> <prop key="hibernate.dialect">${jdbc.dialect}</prop> <prop key="hibernate.show_sql">true</prop> </props> </property></bean>怎么了?我如何也可以为单元测试启用自动装配?
更新:我不知道这是否是运行JUnit测试的唯一方法,但是请注意,我正在Eclipse中运行,右键单击测试文件,然后选择“运行方式”->“ JUnit测试”
答案1
小编典典在根单元测试类中添加以下内容:
@RunWith( SpringJUnit4ClassRunner.class )@ContextConfiguration这将在你的默认路径中使用XML。如果需要指定非默认路径,则可以为ContextConfiguration批注提供locations属性。

ant+Junit的单元测试无法启动spring容器
以下junit的单元测试启动了Spring容器,在eclipse运行正常
@Test
	public void add(){
        System.out.println("Spring begin");
		ApplicationContext ac = new ClassPathXmlApplicationContext(
        "applicationContext.xml");
		final ISpiderService jdtuhu = (ISpiderService) ac.getBean("JdTuhuService");
		System.out.println(jdtuhu.toString());
		jdtuhu.work();
	}
<?xml version="1.0" encoding="UTF-8"?>
<project name="project" default="junit">
	<property name="src.dir" location="src" />
	<property name="result.dir" location="target" />
	<property name="result.classes.dir" location="${result.dir}/classes" />
	<path id="classpath">
		<fileset dir="lib" includes="**/*.jar" />
	</path>

	<target name="junit">
			<junit fork="true" printsummary="yes" forkmode="once" jvm="F:\Java\jdk1.6\bin\java.exe">
				<classpath>
					<pathelement path="bin" />
					<fileset dir="lib">
						<include name="**/*.jar" />
					</fileset>
				</classpath>
				<batchtest fork="yes">
					<fileset dir="src">
						<include name="**/*JunitTest.java" />
					</fileset>
				</batchtest>
			</junit>
	</target>

</project>

idea spring boot 1.x junit单元测试
目前最主流的单元测试框架是junit,其中spring boot 1.x系列主要使用junit 4,spring boot 2.x主要使用junit 5;mock类和打桩的主要框架是mockito,主要有1.x(spring boot 1.x依赖),2.x(spring boot 2.0, 2.1依赖),3.x(spring boot 2.2依赖)三个版本。
0、关于单元测试首先需要理解的是的,单元测试不能代替接口测试,前者是开发的事情,后者是开发为辅、测试为主。其目的是为了验证某个方法自身的逻辑没有问题、而没有职责验证其依赖的服务是否存在问题。因此,单元测试应该是很轻量的,甚至都不应该依赖spring环境,不需要启动servlet容器,否则就成了自动化半集成测试,所以简单的增删改查不适合作为单元测试的对象。
1、参考https://www.cnblogs.com/Maoscn/p/10313660.html,安装Junit4插件。
2、复习下junit中的注解。
@BeforeClass:针对所有测试,只执行一次,且必须为static void
@Before:初始化方法,执行当前测试类的每个测试方法前执行。
@SpringBootTest:获取启动类、加载配置,确定装载Spring Boot,如果找不到@SpringBootConfiguration启动类将运行出错;
@Test:测试方法,在这里可以测试期望异常和超时时间
@After:释放资源,执行当前测试类的每个测试方法后执行
@AfterClass:针对所有测试,只执行一次,且必须为static void
@Ignore:忽略的测试方法(只在测试类的时候生效,单独执行该测试方法无效)
@RunWith:标识为JUnit的运行环境 ,缺省值 org.junit.runner.Runner,也可以是JUnit4.class。
一个单元测试类执行顺序为:
@BeforeClass –> @Before –> @Test –> @After –> @AfterClass
每一个测试方法的调用顺序为:
@Before –> @Test –> @After
断言测试
断言测试也就是期望值测试,是单元测试的核心之一也就是决定测试结果的表达式,Assert对象中的断言方法:
- Assert.assertEquals 对比两个值相等
- Assert.assertNotEquals 对比两个值不相等
- Assert.assertSame 对比两个对象的引用相等
- Assert.assertArrayEquals 对比两个数组相等
- Assert.assertTrue 验证返回是否为真
- Assert.assertFlase 验证返回是否为假
- Assert.assertNull 验证null
- Assert.assertNotNull 验证非null
除了常规的测试外,JUnit还通过其它特性的测试。
超时测试
如果一个测试用例比起指定的毫秒数花费了更多的时间,那么 Junit 将自动将它标记为失败。timeout 参数和 @Test注释一起使用。现在让我们看看活动中的 @test(timeout)。
@Test(timeout = 1000)
public void testTimeout() throws InterruptedException {
    TimeUnit.SECONDS.sleep(2);
    System.out.println("Complete");
}
上面测试会失败,在一秒后会抛出异常 org.junit.runners.model.TestTimedOutException: test timed out after 1000 milliseconds
异常测试
你可以测试代码是否它抛出了想要得到的异常。expected 参数和 @Test 注释一起使用。现在让我们看看活动中的 @Test(expected)。
@Test(expected = NullPointerException.class)
public void testNullException() {
    throw new NullPointerException();
}
上面代码会测试成功。
套件测试
public class TaskOneTest {
    @Test
    public void test() {
        System.out.println("Task one do.");
    }
}

public class TaskTwoTest {
    @Test
    public void test() {
        System.out.println("Task two do.");
    }
}

public class TaskThreeTest {
    @Test
    public void test() {
        System.out.println("Task Three.");
    }
}

@RunWith(Suite.class) // 1. 更改测试运行方式为 Suite
// 2. 将测试类传入进来
@Suite.SuiteClasses({TaskOneTest.class, TaskTwoTest.class, TaskThreeTest.class})
public class SuitTest {
    /**
     * 测试套件的入口类只是组织测试类一起进行测试,无任何测试方法,
     */
}
3、Spring Boot 中使用 JUnit
Spring 框架提供了一个专门的测试模块(spring-test),用于应用程序的集成测试。 在 Spring Boot 中,你可以通过spring-boot-starter-test启动器快速开启和使用它,其中包含了junit、hamcrest、mockito及asset相关类。
<dependency>
    <groupId>org.springframework.boot</groupId>
    <artifactId>spring-boot-starter-test</artifactId>
    <scope>test</scope>
</dependency>
// 获取启动类,加载配置,确定装载 Spring 程序的装载方法,它回去寻找 主配置启动类(被 @SpringBootApplication 注解的)
@SpringBootTest
// 让 JUnit 运行 Spring 的测试环境, 获得 Spring 环境的上下文的支持
@RunWith(SpringRunner.class)
public class EmployeeServiceImplTest {
// do
}在微服务架构中,一般来说前后端是分离的,后端一般controller层会极其弱化,或者rpc服务自动暴露为REST API接口。所以webmvc层的单元测试在设计合理的架构中是不必要的,虽然Spring Boot Test提供了相当完备的功能供单元测试(具体可见https://blog.csdn.net/qq_35915384/article/details/80227297的前半部分。),但是在微服务架构中,它太重了。在一个典型的服务中,它的调用是这样的:

为了测试A类,必须把B-E类全部服务都构建好,如果其中有其它微服务提供的接口,则不得不依赖挡板或集成测试环境,这样测试成本就会很高。所以,更好的做法是为B、C做mock类(对于每个被测类来说,Mock是类级别的,跟分支数无关),为B、C类的方法做stub(stub是根据B/C类对应方法有多少不同出入参对来决定的,一一对应。注:单元测试几乎所有被测类依赖的有状态类都需要Mock,接口测试则只需要Mock其他微服务的接口),这样就可以不用依赖spring环境完成测试。如下:

但是事情通常要比这更复杂,有些非业务服务类可能需要依赖spring的配置信息,有一些利用了spring ioc的各种特性比如ApplicationContext.getBean()、多数据源切换、AOP拦截器、复杂逻辑生成文件等,对于这些特殊场景,仍然是需要仔细设计单元测试。正常情况下单元测试仅仅是为了测试逻辑,通常不包括事务,否则清理和准备通常也要花费不低的成本。如果一定要测试数据库,在单元测试上方法上增加@Transactional(加上会使得最后所有事务被回滚)注解反而不一定合适了,因为既然要测试数据库,则起码ACID应该测试。
其次,对于桩而言,通常都是为了返回某个结果,对于一些包含很多字段的pojo和List,每次造这些数据也是比较耗时的,因此建议在json文件中维护相关的dto和pojo实例化数据及其配套工具类,进行统一的注入,这样单元测试的重复代码就可以大大减少。
对于一个方法来说,单元测试的最低要求是100%的代码覆盖率,至少已知的通过、不通过、抛出的Exception得测到。除了简单的业务查询外,几乎不可能只有一个test case,如果一个方法只有一个单元测试,几乎可以肯定单元测试是为了应付,所以对每个方法,在javadoc上维护好场景清单,至少应包括:场景说明,入参(线程上下文变量),返回值/XXXException很重要,只有这样单测才会有效果。
4、要实践好单元测试,首先得掌握事半功倍的技巧,不然很容易事倍功半,对单元测试总结得最好的一篇文章之一可以参见https://www.jianshu.com/p/afb04b925db3、https://www.jdon.com/53146也可以参考。

idea-SpringJUnit4单元测试
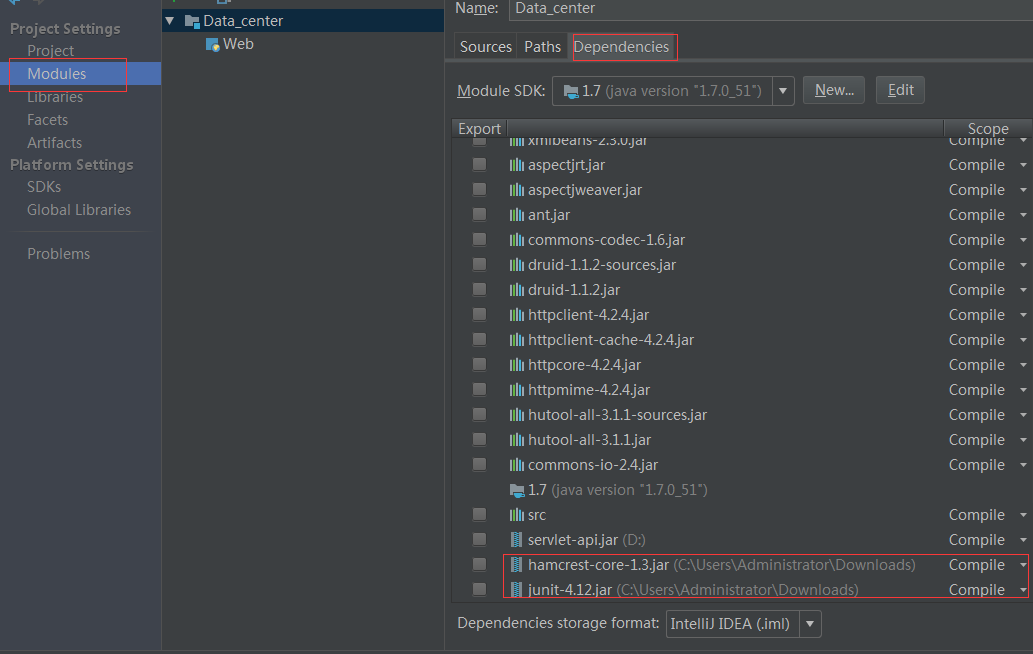
1引入 junit-4.12.jar hamcrest-core-1.3.jar
2打开settings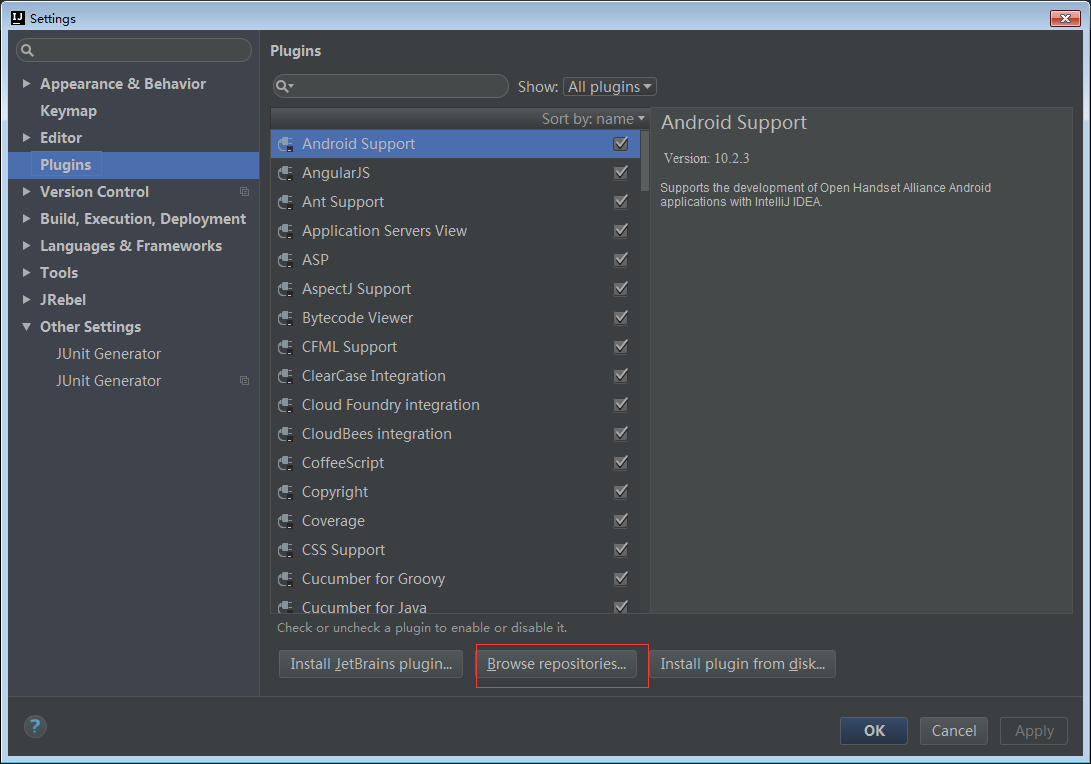
3查找JUnitGenerator V2.0插件安装
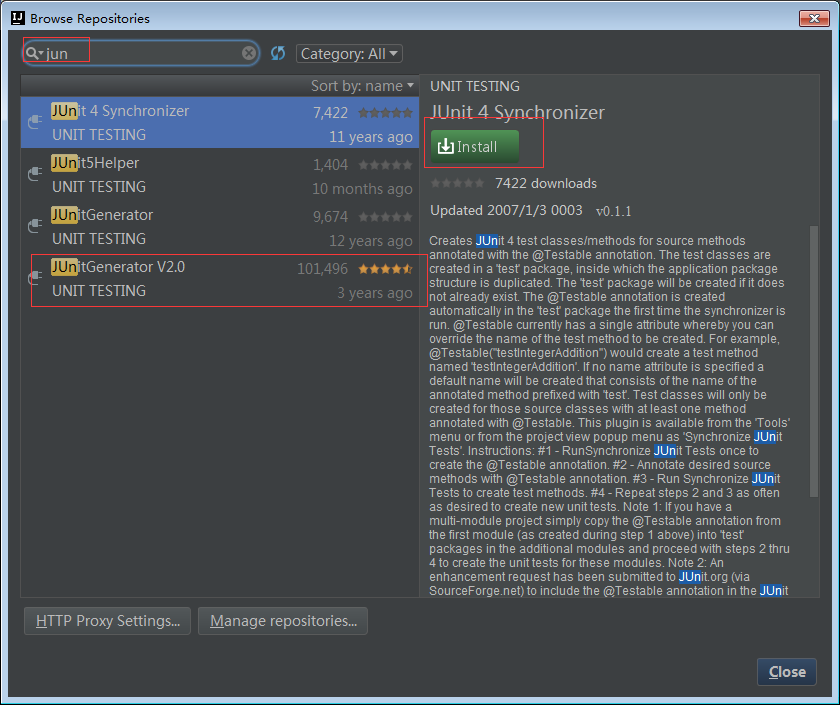
4安装完后重启idea
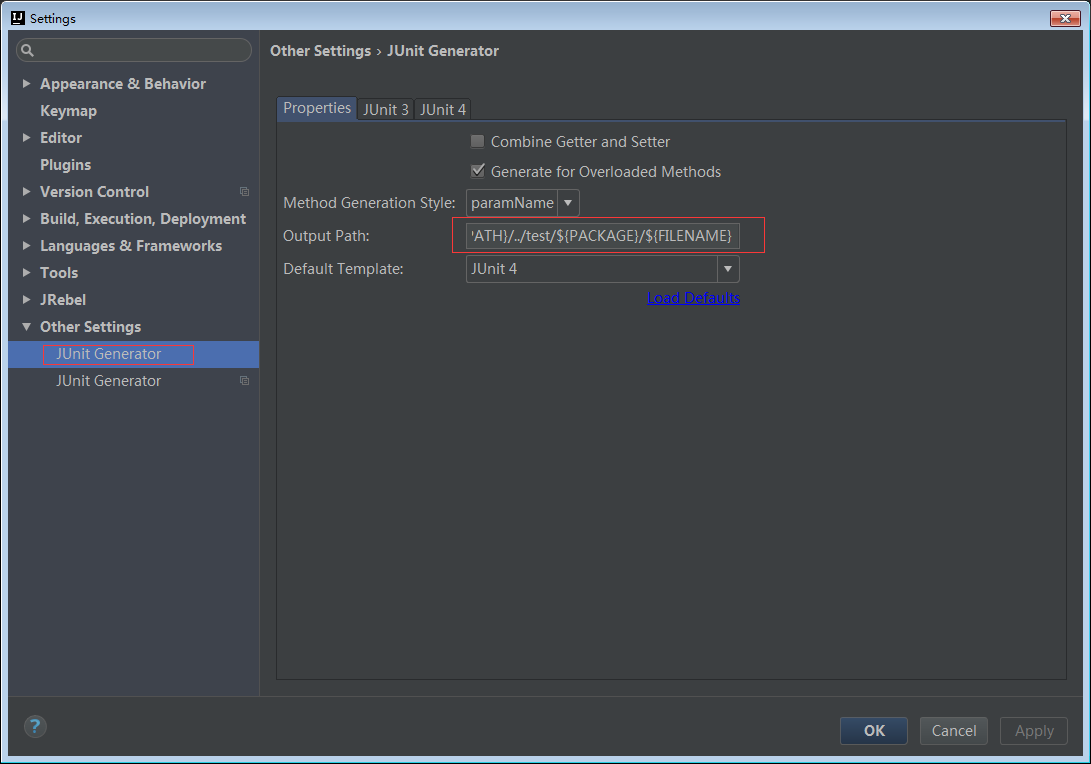
设置output Path
${SOURCEPATH}/../test/${PACKAGE}/${FILENAME}
5去掉test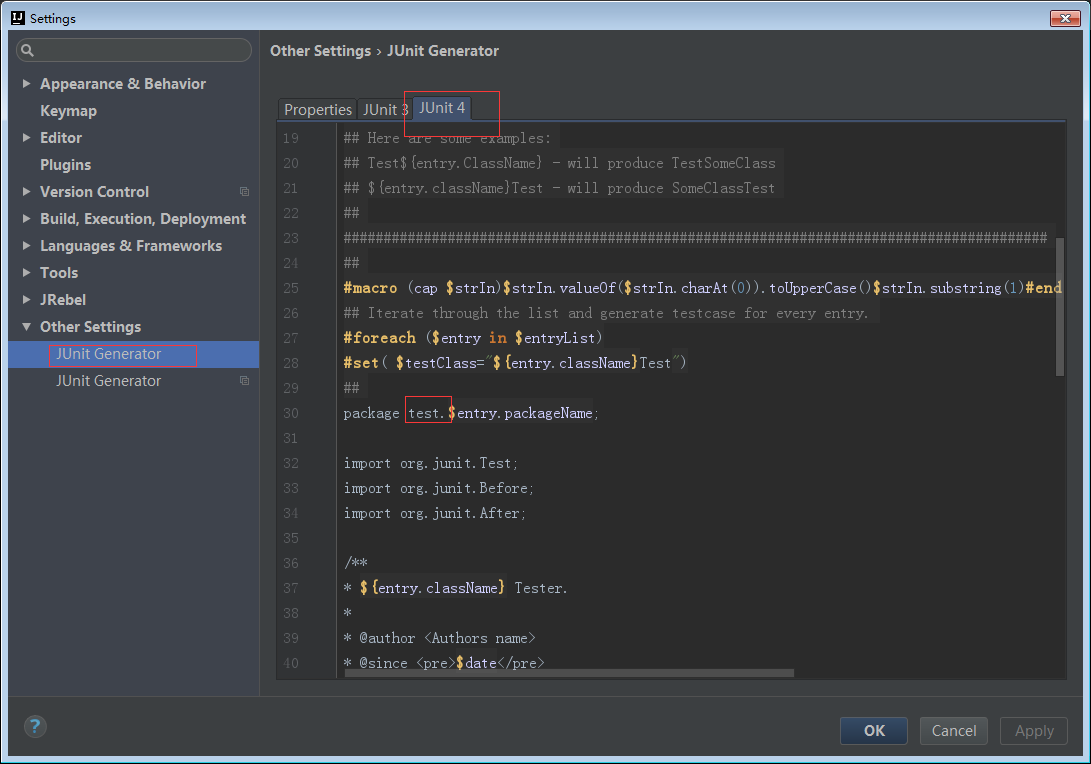
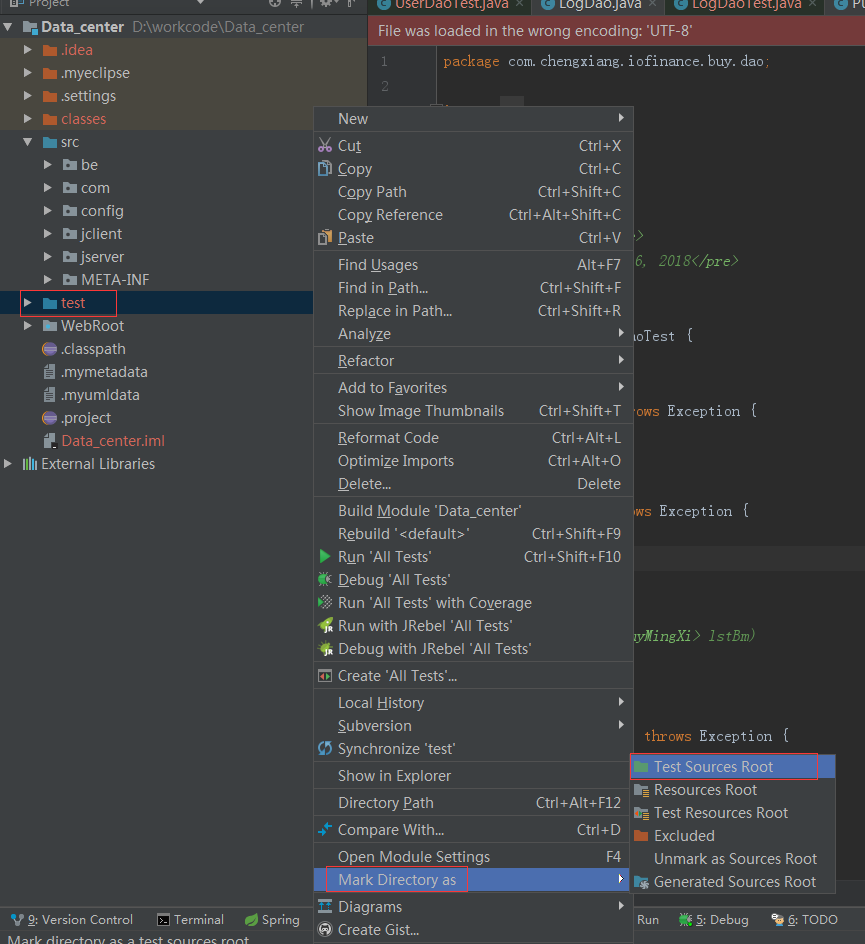
6新建src同级目录test,并将其标为test sources root
7打开想要建立测试的文件,alt+insert 设置junit4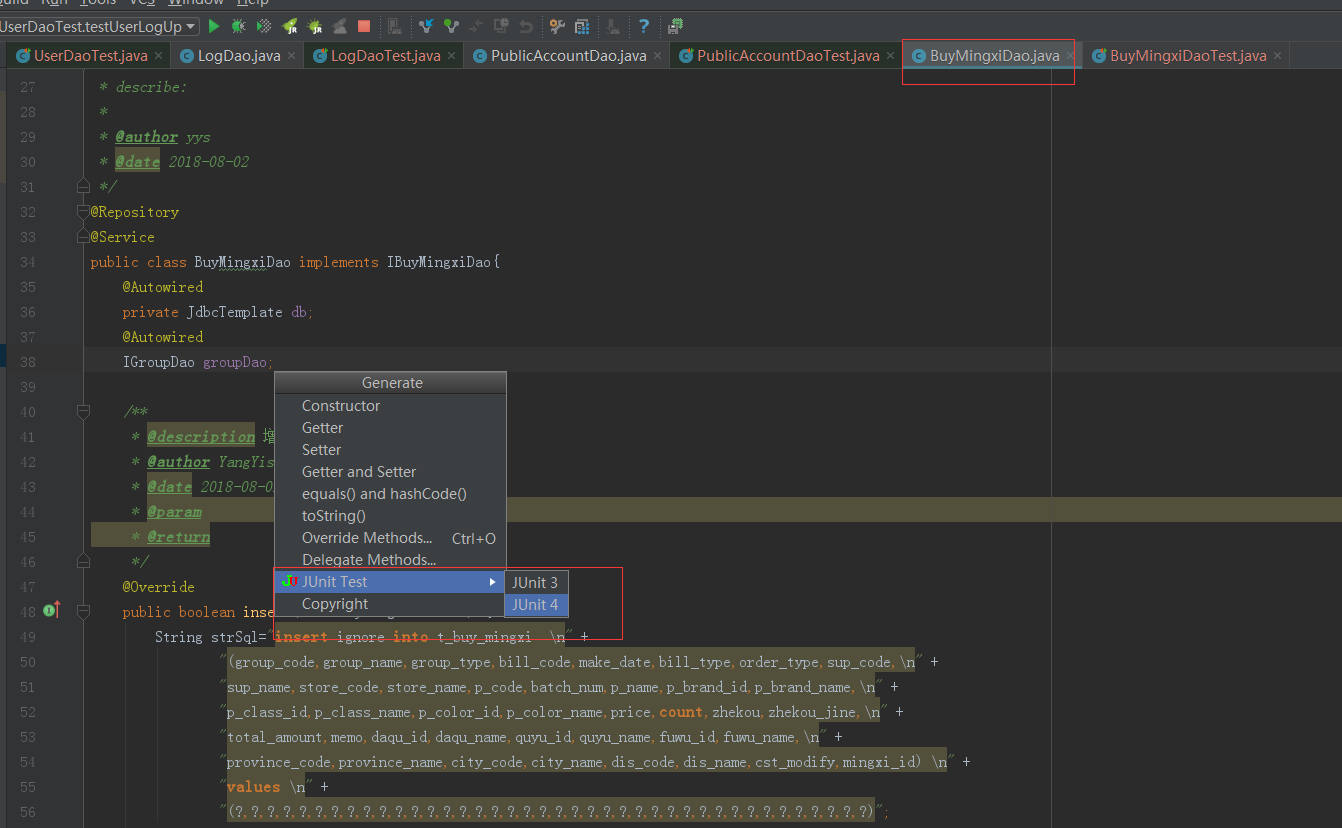
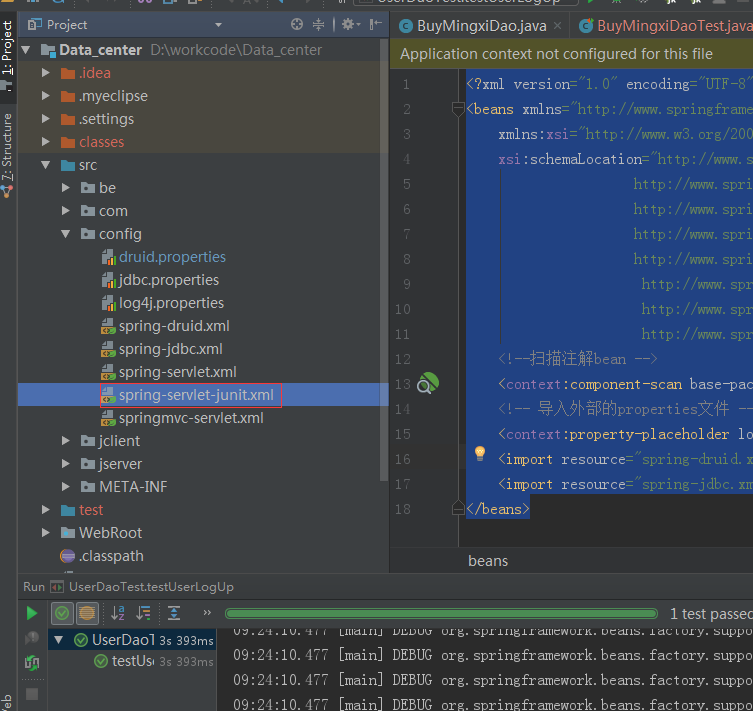
8添加spring配置文件
<?xml version="1.0" encoding="UTF-8"?>
<beans xmlns="http://www.springframework.org/schema/beans"
xmlns:xsi="http://www.w3.org/2001/XMLSchema-instance" xmlns:context="http://www.springframework.org/schema/context"
xsi:schemaLocation="http://www.springframework.org/schema/beans
http://www.springframework.org/schema/beans/spring-beans-3.0.xsd
http://www.springframework.org/schema/context
http://www.springframework.org/schema/context/spring-context-3.0.xsd
http://www.springframework.org/schema/beans
http://www.springframework.org/schema/beans/spring-beans-3.0.xsd
http://www.springframework.org/schema/context
http://www.springframework.org/schema/context/spring-context.xsd">
<!--扫描注解bean -->
<context:component-scan base-package="com.chengxiang"/>
<!-- 导入外部的properties文件 -->
<context:property-placeholder location="classpath:config/druid.properties"/>
<import resource="spring-druid.xml" />
<import resource="spring-jdbc.xml" />
</beans>
9.引入spring配置文件,加入接口的类的注解
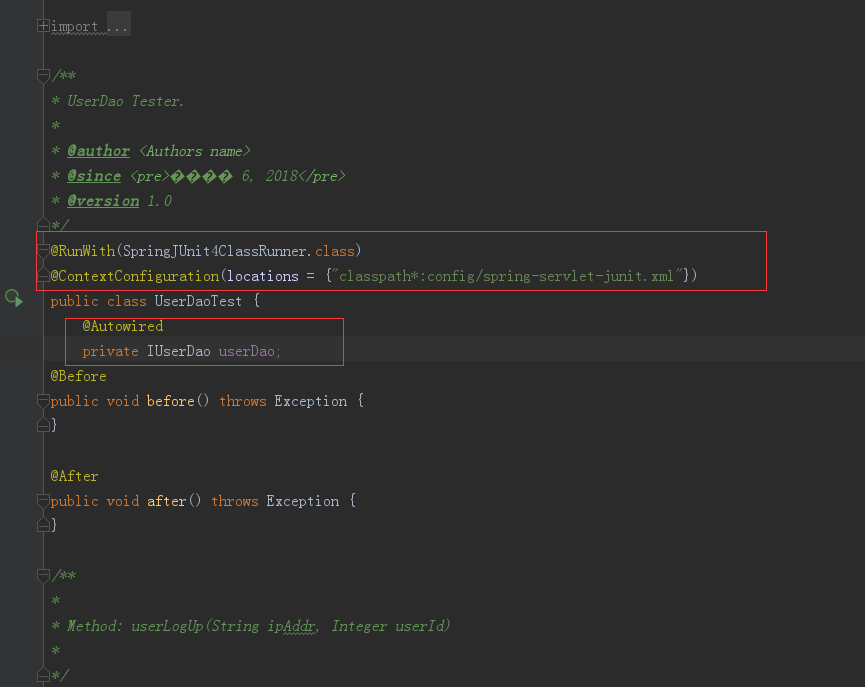
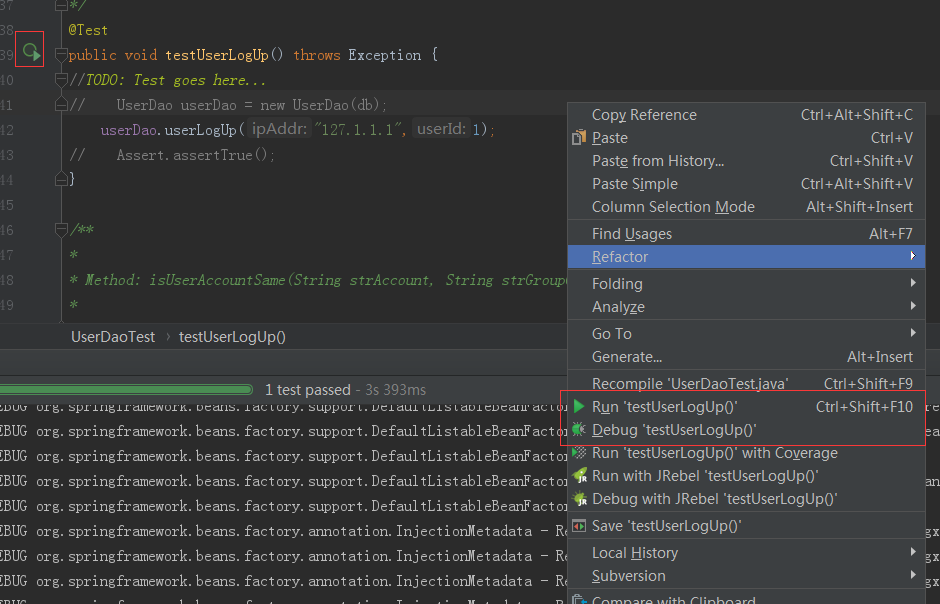
10调用方法
11 JUnit断言
断言核心方法
| assertArrayEquals(expecteds, actuals) |
查看两个数组是否相等。 |
| assertEquals(expected, actual) |
查看两个对象是否相等。类似于字符串比较使用的equals()方法 |
| assertNotEquals(first, second) |
查看两个对象是否不相等。 |
| assertNull(object) |
查看对象是否为空。 |
| assertNotNull(object) |
查看对象是否不为空。 |
| assertSame(expected, actual) |
查看两个对象的引用是否相等。类似于使用“==”比较两个对象 |
| assertNotSame(unexpected, actual) |
查看两个对象的引用是否不相等。类似于使用“!=”比较两个对象 |
| assertTrue(condition) |
查看运行结果是否为true。 |
| assertFalse(condition) |
查看运行结果是否为false。 |
| assertThat(actual, matcher) |
查看实际值是否满足指定的条件 |
| fail() |
让测试失败 |
成功passed 失败 failed

Intellij IDEA使用junit单元测试及其junit与spring版本不兼容问题
Intellij IDEA自动创建单元测试,这在我之前的博客已有介绍 IntelliJ IDEA中用快捷键自动创建测试类
下面是我在创建springboot测试类中的说明和遇到的问题
创建好了测试类后
1.测试service层测试类需要加上注解:@Runwith,@SpringBootTest
2.测试Controller层测试类需要加上注解:@Runwith,@SpringBootTest,@AutoConfigureMoceMvc
例如我的service测试:
import com.oldbig.domain.Girl;import org.junit.Assert;
import org.junit.Test;
import org.junit.runner.RunWith;
import org.springframework.beans.factory.annotation.Autowired;
import org.springframework.boot.test.context.SpringBootTest;
import org.springframework.test.context.junit4.SpringRunner;
@RunWith(SpringRunner.class)
@SpringBootTest
public class GirlServiceTest {
@Autowired
private GirlService girlService;
@Test
public void getAge() throws Exception {
Girl girl = girlService.getAge(5);
Assert.assertEquals(new Integer(15),girl.getAge());
}
}如果测试成功的话并且数据对应的话则无异常显示,但是我在运行时出现:
java.lang.IllegalStateException: SpringJUnit4ClassRunner requires JUnit 4.12 or higher.错误
表示我的junit版本太低了需要4.12以上,我换了4.12后,发现项目都运行不了(本来用4.10项目可以运行只是测试错误):显示程序包org.junit不存在 错误
这时候我换了更高版本4.4,4.5之类的都不行,百度了以下,发现了 4.12-beta-3(烈火汉化版),添加入依赖
:
<dependency>
	<groupId>junit</groupId>
	<artifactId>junit</artifactId>
	<version>4.12-beta-3</version>
</dependency>今天关于Spring在使用JUnit的单元测试中无法自动装配和spring单元测试无法注入bean的讲解已经结束,谢谢您的阅读,如果想了解更多关于ant+Junit的单元测试无法启动spring容器、idea spring boot 1.x junit单元测试、idea-SpringJUnit4单元测试、Intellij IDEA使用junit单元测试及其junit与spring版本不兼容问题的相关知识,请在本站搜索。
本文标签:


![[转帖]Ubuntu 安装 Wine方法(ubuntu如何安装wine)](https://www.gvkun.com/zb_users/cache/thumbs/4c83df0e2303284d68480d1b1378581d-180-120-1.jpg)

