本文将带您了解关于MacOSXLeopard与目录服务(AD/OD)集成宝典(6)的新内容,同时我们还将为您解释macapplicationsupport目录的相关知识,另外,我们还将为您提供关于Bu
本文将带您了解关于Mac OS X Leopard与目录服务(AD/OD)集成宝典(6)的新内容,同时我们还将为您解释mac application support 目录的相关知识,另外,我们还将为您提供关于Build and Install cx_Oracle on Mac Leopard Intel、iPad 和 iPhone Simulator Mac.OS.X.Leopard、Mac OS 10.6.2 Snow Leopard上的Django + MySQL、Mac OS X 10.5 Leopard: Direcory Utility, The end of Netinfo的实用信息。
本文目录一览:- Mac OS X Leopard与目录服务(AD/OD)集成宝典(6)(mac application support 目录)
- Build and Install cx_Oracle on Mac Leopard Intel
- iPad 和 iPhone Simulator Mac.OS.X.Leopard
- Mac OS 10.6.2 Snow Leopard上的Django + MySQL
- Mac OS X 10.5 Leopard: Direcory Utility, The end of Netinfo
集成宝典(6)(mac application support 目录)")
Mac OS X Leopard与目录服务(AD/OD)集成宝典(6)(mac application support 目录)
6. AD集成
活动目录AD是一种定制的LDAP目录服务, Mac OS X可以使用LDAPv3插件(plugins)或者AD插件来利用AD进行认证. 不象主OD, 客户端OS X并不能预先了解每一个AD服务的架构的实施情况, 因此, 使用LDAPv3插件要求更多的设置, 而且也需要(管理员)更多了解AD的属性(和LDAPv3属性之间)对应关系. 另一方面, AD插件就如同Windows客户端一样, 可以在特定的域森林中自动发现域控制器(Domain Controllers)并对AD和Mac OS X客户端信息匹配.
这一节主要介绍利用配置AD插件来匹配AD服务器. 这一节的最后一页有一个检查列表, 用于检查跟踪AD的设置.
A. 感受AD
在进入AD绑定之前, 最好是检查你可以连接和找到目录服务. 我们使用"LDapper"来浏览可用目录服务.
1. 启动LDapper应用(你可以到versiontracker.com下载)(译者注:为了方便国内用户,我上传了最新版LDapper Ver2.0.4到CSDN的资源里面, http://download.csdn.net/source/1038331)
2. 在LDapper菜单中选择"Preferences",点击"+"按钮添加一个新的目录服务. 按照你的AD环境配置目录.
3. AD默认不允许匿名绑定,所以点击"Authentication", 输入一个有加入计算机到域("Join a computer to the domain")权限的用户和密码. 你可能需要特殊的AD用户账户, 象:
| cn=Bind Account,cn=Users,dc=apple,dc=edu |
4. 点击OK, 在"Default Search Options"里,选择获取"All Attributes",取消"Discard responses without email"和"Search for people only"选项. 点击OK,关闭preferences窗口.
5. 从File菜单选择"New Browse Window",在你的AD旁边点击展开三角来浏览用户记录. 点击其中一个记录来查看其中内容.
用户记录显示,都有那些可用的用户记录存在于AD服务器. 这个工具对于映射LDAPv3插件时非常有用,而且当你希望检查那个特殊的名字可以用来进行计算机账号绑定.
6. 在LDapper的Preferences里面设置你的计算机所属OU作为搜索基础. 打开一个新的浏览窗口,来浏览计算记录.
B. 配置AD插件
因为AD插件利用DNS来定位AD资源, 所以要进行一个小配置. 使用你的AD管理员提供的设置,或者参见本文最后一页的说明。
1. 启动Directory Utility应用.
2. 为了显示更多的AD插件的配置选项,需要使用高级选项. 点击"Show Advanced Settings"按钮, 然后点击"Services"按钮.
3. 如果需要就登录,打开Active Directory服务, 并点击下面的铅笔按钮.
4. 填入域名和计算机ID, 然后点击"Bind"按钮,输入AD账号和密码(由AD管理员提供). 谨慎考虑你的计算机所属OU, 默认的OU可能不存在, 或者不合适,或者没有权限. 绑定会失败,如果你的账号在该OU中没有写权限, 所以向AD管理员询问哪个OU合适. 而且计算机名不能长于19个字符. 一般来说, 最好取DNS主机名的前面部分. 如果你是用双启动, 那么记住Mac OS X和Windows要使用各自唯一的ID.
5. 点击"Show Advanced Options"按钮. 考虑下面在User Experiences标签的选项:
- "Create mobile account": 因为客户机将缓存登录的用户证书在本地,所以这有利于在家中使用的用户.
- "Force local home": 如果你的AD没有指定用户的Home目录,或者你不希望用户使用网络Home目录, 那么这项应该选中。
- "Use UNC path from Active Directory to derive home location": 如果你的AD账号设置了Home目录, 那么这个选项将准许把这个值,转化为一个URL以便在用户登录的时候安装这个共享. 如果协议没有被正确设置,那么当用户登录的时候会产生错误.
6. 考虑在Administrative标签下的选项:
- "Prefer this fomain server": 如果有一个优选的服务器,在这里设置。如果这个服务器无法连通,AD插件会自动选找另一个在域森林中的服务器. 默认的,AD插件会自动连接最近的一个AD域服务器.
- "Allow administration by": 这个选项准许设定哪个AD组的成员可以获得这个机器本地的管理员权限.
- "Allow authentication from any doamin within the forest": 如果域森林包括多个域, 它准许AD插件在域森林中扩展搜索用户记录,以使其它域的用户可以在本机登录.
7. 当绑定结束后, 返回LDapper程序,在计算机容器中找到你的计算机记录.
8. 返回Directory Utility,点击OK来关闭AD插件窗口.
9. 点击"Directory Servers"按钮, 如果你的机器按照前面的练习配置了,那么在服务器列表中删除它. 应用之后,关闭Directory Utility.
C. 检查目录连接性
1. 在Terminal中, 使用dscl命令来便览AD节点和用户记录。不要键入提示符:
| client:~ admin# dscl localhost / > cd Active/ Directory/All/ Domains/ /Active Directory/All Domains > cd Users/ /Active Directory/All Domains/Users > ls administrator binder guest krbtgt labadmin student /Active Directory/All Domains/Users > read student ... |
2. 或者,可以输入参数来读取比如student用户信息:
| % dscl /Active/ Directory/All/ Domains -read /Users/student ADDomain: apple.edu cn: Student Account displayName: Student Account distinguishedName: CN=Student Account,CN=Users,DC=apple,DC=ed u givenName: Student homeDirectory: homeDrive: name: Student Account primaryGroupID: 513 sAMAccountName: student sAMAccountType: 805306368 sn: Account userPrincipalName: student@apple.edu AppleMetaNodeLocation: /Active Directory/apple.edu AuthenticationAuthority: 1.0;Kerberosv5;86C47B88-6506-4F64- 8E1D-73A74071A391;student@APPLE.EDU;APPLE.EDU; FirstName: Student GeneratedUID: 86C47B88-6506-4F64-8E1D-73A74071A391 NFSHomeDirectory: /Users/student LastName: Account PasswordPlus: ******** PrimaryGroupID: 20 RealName: Student Account RecordName: student student@apple.edu APPLE/student SMBAccountFlags: 805306368 SMBGroupRID: 513 SMBHome: SMBHomeDrive: SMBLogoffTime: 0 SMBLogonTime: 127515826632546368 SMBPasswordLastSet: 127515390413065200 UniqueID: 113539976 |
3. 使用上面的dscl命令读AD插件产生的AD用户信息,并用LDapper显示的内容来对比. AD插件根据其它的用户信息产生一些动态属性. 比如: "NFSHomeDirectory", "UniqueID"和"PrimaryGroupID"等.
D. Home目录和AD插件
默 认的, Ad插件会在本地的/Users目录里面产生一个用户Home目录并且在Desktop上通过SMB产生Windows网络共享. 你可以在AD插件的"Advanced Options->User Expereice"里面配置这个操作, 同样可以使用命令行工具dsconfigad. 详细的关于dsconfigad的说明见知识库文章"Using network homes with the Active Directory plug-in for Mac OS X 10.3.3 or later" (http://docs.info.apple.com/article.html?artnum=107943)
到 目前为止,我们该思考一下"Using a Network Home Directory"和"Mounting network home at login"的区别了. 看上去它们类似, 而主要区别在于,是把用户Home目录安装到网络共享,还是用户Home目录在本地然后再在Desktop上安装网络共享. 对于网络Home目录, 用户所有的文档和配置信息,都直接存放在服务器上. 而对于安装的网络Home,配置信息自动存放本地,用户必须手动把文档保存在网络Home里,否则可能丢失.
网络Home目录对于学生来 说很好用,但是管理时可能头痛. 好多程序在启动时生成缓存文件. 如果好多学生同时登录并运行好多程序, 你的服务器(负载)和网络流量会大增. 如果使用无线或者低速连接, 或者使用如iLife的多媒体程序,那么强烈建议避免使用网络Home目录而是把Home目录安装在Desktop上(译者注:用户手动复制文档到服务器 上).
移动的Home(Portable home Directory, PHD)目录是混合上面两者的方案. 一个PHD会在本地产生一个网络Home目录的副本,然后在登录和登出时同步改变. 当用户找好由AD管理, 且AD架构是扩展的, 那么PHD可以通过用户管理来配置,或者通过组或计算机管理配置. 参见第7章的组和计算机管理和第8章的用户管理部分和Apple官方文档:http://www.apple.com/server/macosx /resources/
另外一个可以考虑的方案是考虑AD插件在AD用户记录保存的属性, 一般地不会被各个部门修改的. 在一个大型的大学校园, 对于管理员来说很难为各个部门提供存储空间. 在第9章中的"增长的记录"会考虑这个方案.
E. AD绑定自动化
当 把计算机绑定到AD, 随着在AD插件提供的唯一的计算机ID,一个计算机账号会被生成. 由于这个计算机和域建立了互信关系,每个绑定到AD域的计算机必须右唯一的账号. 对于一个管理大型实验室或者数百计算机的管理员来说是一个挑战. 为了解决它,Mac OS X提供了一个自动绑定的工具. "dsconfigad"可以绑定计算机到AD并配置所有AD插件的行为.
提 醒, 自动绑定过程需要你把账户密码保存在shell脚本中, 这明显预示着安全问题. 为了降低危险, 1)使用一个受限的账号仅用来添加计算机, 2) 经常改变密码, 3)限制可以解除shell脚本的人, 4)删除shell历史文件. 下面的命令假设你使用前置"sudo"引导,或者在一个shell脚本中用root权限.
1. 阅读dsconfigad的man帮助。
2. 使用下面命令查看当前状态:
| dsconfigad -show |
3. 如果已经绑定了AD, 销毁它.
| dsconfigad -r -u binder -p ''password'' |
4. 使用下面的语法来绑定AD
| dsconfigad -f -a "computerid" -domain "apple.edu" -u "binder" -p ''password'' -ou "CN=computers, DC=apple,DC=edu" |
5. 使用下面语句来配置高级选项:
| dsconfigad -alldomain enable -localhome enable / -protocol afp -mobile disable -mobileconfirm disable / -useuncpath enable -shell "/bin/bash" -nopreferred / -groups ''APPLE/Lab Administratores'' |
6. 添加Ad节点到搜索路径使用dscl命令:
| dscl /Search -create / SearchPolicy CSPSearchPath dscl /Search -append / CSPSearchPath “/Active Directory/All Domains” dscl /Search/Contacts -create / SearchPolicy CSPSearchPath dscl /Search/Contacts -append / CSPSearchPath “/Active Directory/All Domains” |
目 录绑定必须在OS启动时产生,也就是说, 目录绑定不能在部署系统镜象的后期动作中完成--绑定过程会变更在启动卷(译者注:原文是,boot drive.)的/Library/Preferences/DirectoryServices文件. 右两种方式来做到在系统镜象部署后自动绑定. 一个是生成一个强迫延迟运行的启动项(startup item)绑定脚本(它将有一段时间来使DirectoryServices建立, 而loginwindow不会等待它完成). 另外一个方法是把绑定脚本作为login hook. 两个方法都产生同样效果, 而login hook方法会更强壮,因为你可以迫使loginwindow直到DirectoryServices准备好后再显示. 一个实例脚本在后面的参考一节中列出,它会完成绑定, 配置AD插件, 添加AD节点到搜索路径, 禁止自动登录(auto-login)和安全地自我删除(和绑定密码)
要实施login hook:
1. 安装绑定脚本
2. 设置绑定脚本为login hook:
| sudo defaults write /var/root/Library/Preferences/com.apple.loginwindow / LoginHook /path/to/bind_script.sh |
3. 在Accounts的配置面板里的Login options,设置自动登录到任意一个用户.
F. AD插件排错
除了所有在前面的OD的排错都可以应用到AD上,另外还有一些其它的事情考虑:
绑定问题:
- 确定客户机和服务器的时钟误差不超过5分钟. Kerberos认证严格要求时间,建议所有机器都和同一个时间服务器同步时间.
- 确认使用的网络管理员账户在指定的计算机OU中有写权限.
- 确认使用的网络管理员账户正确(使用sAMAccountName和密码)
- 确认客户机使用和AD同样的DNS服务器.AD管理员可以确认这个.
- 确认你可以和服务器的53,88,137,389和445端口通信.
"You are unable o login to the user account "Student" at this time..."
- 使用dsconfigad -show命令来看用户的home目录应该被绑定.
- 然后使用dscl命令读取用户记录:
dscl /Active/ Directory/All/ Doamins -read /Users/student - 确认用户的home目录在哪里("HomeDirectory"属性), 并检查你可以使用指定的协议安装这个共享.
- 如果需要,使用"dsconfigad -mountstyle AFP|SMB"来改变安装协议.
其它的错误:
- 使用adcheck工具产看是否有其它错误。
原文链接: http://blog.csdn.net/afatgoat/article/details/3941434

Build and Install cx_Oracle on Mac Leopard Intel
http://www.cs.utexas.edu/~mitra/csSpring2011/cs327/cx_mac.html
Build and Install cx_Oracle on Mac Leopard Intel
I finally succeeded in building and installing cx_Oracle on a Mac. I will outline the steps that I took. There are many redundant steps that I may later take out. But there are checks that I made on the way that really helped.
The first Mac that I installed cx_Oracle was a 2.4 GHz Intel Core 2 Duo running Mac OSX 10.6.6. It had 4 GB of Memory. Most of my work was done on a terminal window.
Check Python Installation
The OSX comes with a Python interpreter. I ran a check to find the version number.
$ python -V
Python 2.6.1
This was sufficient for my needs. I decided not to upgrade to Python version 2.7.1
Xcode from Apple
The Xcode package is available from Apple Developer. You will need a login account but that is free. Now you do not need Xcode 4. Xcode 3 is sufficient because all we are interested in is the gcc compiler. After you login look for a link that says Looking for Xcode 3? I downloaded X code 3.2.6 and iOS SDK 4.3. It was 4.1 GB in size and is best done when you know you will not be using your Mac.
After the download, the installation went off smoothly. I restarted the Mac and on a terminal window checked that the gcc compiler was installed correctly.
$ which gcc
/usr/bin/gcc
$ gcc -v
gcc version 4.2.1
You can also do man gcc to get the online manual for gcc.
Install Oracle Instant Client
The cx_Oracle has a dependency. It needs Oracle Instant Client from Oracle. Click on the link Instant Client for Mac OS X (Intel x86). Accept the license agreement and download Version 10.2.0.4 (64-bit). I tried the 32-bit and it does NOT work. You will need your Oracle account to download the following packages:
instantclient-basic-10.2.0.4.0-macosx-x64.zip
instantclient-sdk-10.2.0.4.0-macosx-x64.zip
I created a directory called oracle to unpack the packages. The pathname on my machine was /Users/utcs/oracle. On your machine, it will be your user name instead of utcs. I moved both the basic and sdk packages into the oracle directory and unzipped them. After unzipping the basic package I got a folder instantclient_10_2.
After unzipping the sdk package, I got a folder called instantclient_10_2-1. Inside that folder was another folder called sdk. I moved the folder named sdk inside the folder instantclient_10_2.
From a terminal window I changed directory to sdk. On my machine, the full path name was /Users/utcs/oracle/instantclient_10_2/sdk. There is another .zip file called ottclasses.zip. I unzipped that as follows:
$ unzip ottclasses.zip
It produced a folder called oracle. I changed directory to /Users/utcs/oracle/instantclient_10_2. I ran the following command to copy all the files in the sdk folder.
$ cp -R ./sdk/* .
$ cp -R ./sdk/include/* .
The last two commands may not have been necessary. But it makes it easier to locate the header files.
Setting up the Environment Variables
In my home directory /Users/utcs I created a .profile file. Its content was as follows:
export ORACLE_HOME=/Users/utcs/oracle/instantclient_10_2
export DYLD_LIBRARY_PATH=$ORACLE_HOME
export LD_LIBRARY_PATH=$ORACLE_HOME
Restart the machine. Open another terminal window and run the following commands to check that the environment variables have been set properly:
$ source .profile
$ echo $ORACLE_HOME
$ echo $DYLD_LIBRARY_PATH
$ echo $LD_LIBRARY_PATH
You should see the path names printed out correctly. I created two symbolic links in the $ORACLE_HOME directory (/Users/utcs/oracle/instantclient_10_2) as follows:
ln -s libclntsh.dylib.10.1 libclntsh.dylib
ln -s libocci.dylib.10.1 libocci.dylib
If you run the command ls -l in that directory you should see the symbolic links.
Building and Installing cx_Oracle
Download from SourceForge cx_Oracle version 5.0.4. You need to get the package that says Source Code only. In your Download folder you will find cx_Oracle-5.0.4.tar. I moved it to /Users/utcs/oracle. To untar, I used the following command:
tar -xvf cx_Oracle-5.0.4.tar
After untarring I had a subdirectory called cx_Oracle-5.0.4. In a terminal window I changed directory to /Users/utcs/oracle/cx_Oracle-5.0.4. I checked in that window that all the environment variables were set properly by doing
echo $ORACLE_HOME
echo $LD_LIBRARY_PATH
echo $DYLD_LIBRARY_PATH
which python
which gcc
I did not have administrative privileges on this Mac so to build I did
python setup.py build
I checked to output. There were many warning messages that I ignored. Even a single error message would have indicated that the build process did not succeed. I next installed cx_Oracle by
python setup.py install
The install also finished without any error messages.
Test the cx_Oracle installation
On a terminal window type python. It should bring up Python in interactive mode. Then type import cx_Oracle. It should add the package to your path without any errors. Get out of the interactive mode using Control-D.
Now copy and paste this script into a file called Check.py. Change the user name and run it on the command line.
import cx_Oracle, string, getpass
def main():
# Get password
pswd = getpass.getpass()
# Build connection string
user = "CS327_jdoe"
host = "oracle.microlab.cs.utexas.edu"
port = "1521"
sid = "orcl"
dsn = cx_Oracle.makedsn (host, port, sid)
# Connect to Oracle and test
con = cx_Oracle.connect (user, pswd, dsn)
if (con):
print "Connection successful"
print con.version
else:
print "Connection not successful"
con.close()
main()
You should see Connection successful if all the other tests were successful.

iPad 和 iPhone Simulator Mac.OS.X.Leopard
这两天玩了玩
XP 系统 通过vmware 装个 Mac.OS.X.Leopard系统。
然后 在下个 iphone 的 SDK
装起来 很卡很卡。。但是 很兴奋
所以 下面是网上的 解说。
拿来分享
首先,默认安装好 SDK 之后,iPhone Simulator 可以在 /Developer/Platforms/iPhonesimulator.platform/Developer/Applications/iPhone Simulator.app 这个地方找到。没错,的确就是 iPhone Simulator,不是 iPad Simulator。我们双击启动它。

没错,我们现在得到的依然是一个 iPhone 的 Simulator,但是不用担心,我们只需要点击 Hardware -> Device -> iPad 就可以切换到 iPad 模式了。

如下图,这就是我们的 iPad Simulator 启动之后的界面了。这张图是 Portrait 模式下的,并且由于我屏幕大小的关系,它只能按照 50% 的比例显示出来。

同时,我们可以在 Hardware -> Version 里可以看到,iPad 使用的系统是 iPhone OS 3.2 (7B298g),呵呵,不知道什么时候 iPhone 上的系统也可以升级呢?(当然了,分辨率不同,UI 肯定不一样了~)

让我们来看看这个版本的系统,在这个模拟器里面,都有哪些组件:
1、Spotlight:

2、Settings:

3、 Contacts:

再让我们看看 Landscape 下的效果,点击 Hardware -> Rotate Left,或者使用快捷键 Command - Left 可以切换到横屏模式:

下面再来看看横屏下都是如何显示的(由于屏幕大小等原因,标题栏被切掉了一点,请各位莫怪):
1、Spotlight,在 Landscape 下自动会打开键盘:

2、点击键盘右下角的图标,键盘可以暂时隐藏掉:

3、Landscape 状态的第一屏

4、第二屏,与想象的一样,和 Portrait 相比只是方向和背景图片稍有不同

我们回到 Portrait 模式,开始看一下相关的界面。
首先是设置部分,这个版本的 Simulator 里的选项不多,但相信真机里的肯定有不少的。设置页面的 UI 已经重新设计了,个人感觉比较好用的。
第一张图是设置的主界面:

接下来是 About 页面。(Ummm。。。这个 Capacity 当然不是说真机有这么大容量啦。。这是我硬盘的容量。。)

Keyboard 选项,和 iPhone 相比变化不大:

默认只有英文键盘:

目前共可以使用 12 种输入语言,很欣慰的有中文。

选择好了之后会更新到这里来:

下面是 Contacts。这个组件的 UI 也是完全重新设计了,由于屏幕分辨率提高了,可以利用的空间变大了,所以这个界面显得非常好看。
全新的 Simulator 里面没有任何 Contact,这里的列表是空的:

我们新建一个 Contact 吧。点击加号按钮之后,可以进入 New Contact 的页面,像打开一本书一样的界面很是优美。我们点击一下图片,看看发现了什么?哈,说不定下一代产品,甚至上市的时候,就有可能有摄像头哦!

这是手写输入的页面了(鼠标画的字。。很丑。。),可惜好像暂时还没法使用…

没办法,我们点击小地球切换到拼音输入吧:

Oops。。。拼音也暂时没法用,好吧,直接英文输入得了:

点击右上角的 Done 按钮,这名 Contact 就存下来了:

如果需要删除此 Contact,和 iPhone 一样,也要先点到编辑状态,然后才能删除。在这个 Simulator 里,我没有找到和删除别的条目一样的快捷删除方法(一划一点),小鄙视一个。。(恩,也许是为了防止误删吧~)

(忘了给大家看看 Landscape 下的模样了,好吧,我再新建回来刚才的 Contact……画圈圈。。。)恩,看看 Landscape 是不是更像一本书,一本真正的名片夹了~

恩,再小试一下搜索,给大家看看搜索界面以及清楚的带有地球图标的键盘:

其实吧,我对 Xcode 挺不熟悉的,不过为了让大家更好的了解,我还是试着做一个小东西给大家看一下吧:
在 Xcode 的 New Project 窗口,我们可以发现,依然只有 iPhone OS 和 Mac OS X 两个大类,但是仔细看看可以发现,iPhone 分类里面出现了一个新种类的 Project ── Split View-based Application,这个种类只可用在 iPad 上,那我首先就以这个类型的工程做个测试吧~当然了,除了这种类型,别的类型也有专门给 iPhone 的和 可选 iPhone 或 iPad 的。当然了,这个也不用担心,反正 iPhone 软件也可以 Seamless 的用在 iPad 上的嘛~

创建了 New Project 之后,我们直接点 Build and Run(嘿嘿~版权信息当然是要改一下的啦~),看看这种类型的工程是什么界面:
Portrait:

Landscape:

看完了专为 iPad 设计的程序,也看看传统程序是如何运行的。这回我新建了一个 iPhone 的 Window-based Application,然后随便拽了几个 Object 进来看看效果,没有做屏幕的自动旋转~
首先要注意的是,Active SDK 和 Active Executable 要选对,否则程序是无法正常运行在 Simulator 上的:

编辑好界面 Object 之后,点击 Build and Run 启动这个程序,我们可以看到默认显示为 Portrait 居中模式:

点击右下角的 2X 按钮,可以切换到全屏模式:

旋转成 Landscape:

Landscape 2X:

Landscape下没有自动旋转,是因为我随手写的测试程序本身就不支持自动旋转。给各位朋友看这个图,只是想让大家看一下放大之后的显示效果。当然了,我也不清楚实体机上的显示效果如何,但 Simulator 上的效果还是令我满意的。恩,再提醒一下,Portrait 显示模式是 50% 真机大小的,Landscape 是 100%,但是标题栏被切掉一点的,所以大家对清晰度的参考,应该注意看 Landscape 的截图,并且记得点击之后在新窗口打开没有被压缩过的图。
写了两个小时的文章,总算到了尾声,最后给大家一个小小的 Trick 吧,就是 iPad Simulator 中也可以模拟出一个正在通话的标记,就像 iPhone 上正在打电话一样:
点这里可以打开它:

Portrait:

Landscape:


Mac OS 10.6.2 Snow Leopard上的Django + MySQL
对于这个问题已经有了一些很好的答案,但是现在它们已经过时了。
我已经能够安装模块,但是“ python manage.py runserver”失败,
 iMac:myproject drhoden$ python manage.py runserver
 Validating models...
 Unhandled exception in thread started by <function inner_run at 0x10496f0>
 Traceback (most recent call last):
   File "/Library/Frameworks/Python.framework/Versions/2.6/lib/python2.6/site-packages/django/core/management/commands/runserver.py",line 48,in inner_run
     self.validate(display_num_errors=True)
   File "/Library/Frameworks/Python.framework/Versions/2.6/lib/python2.6/site-packages/django/core/management/base.py",line 249,in validate
     num_errors = get_validation_errors(s,app)
   File "/Library/Frameworks/Python.framework/Versions/2.6/lib/python2.6/site-packages/django/core/management/validation.py",line 22,in get_validation_errors
     from django.db import models,connection
   File "/Library/Frameworks/Python.framework/Versions/2.6/lib/python2.6/site-packages/django/db/__init__.py",line 41,in <module>
     backend = load_backend(settings.DATABASE_ENGINE)
   File "/Library/Frameworks/Python.framework/Versions/2.6/lib/python2.6/site-packages/django/db/__init__.py",line 17,in load_backend
     return import_module('.base','django.db.backends.%s' % backend_name)
   File "/Library/Frameworks/Python.framework/Versions/2.6/lib/python2.6/site-packages/django/utils/importlib.py",line 35,in import_module
     __import__(name)
   File "/Library/Frameworks/Python.framework/Versions/2.6/lib/python2.6/site-packages/django/db/backends/mysql/base.py",line 13,in <module>
     raise ImproperlyConfigured("Error loading MySQLdb module: %s" % e)
 django.core.exceptions.ImproperlyConfigured: Error loading MySQLdb module: dynamic module does not define init function (init_mysql)

 ^CiMac:segisys drhoden$
同样,从python shell:
iMac:myproject drhoden$ python
Python 2.6.4 (r264:75821M,Oct 27 2009,19:48:32)
[GCC 4.0.1 (Apple Inc. build 5493)] on darwin
Type "help","copyright","credits" or "license" for more information.
>>> import MySQLdb
Traceback (most recent call last):
  File "<stdin>",line 1,in <module>
  File "build/bdist.macosx-10.3-fat/egg/MySQLdb/__init__.py",line 19,in <module>

  File "build/bdist.macosx-10.3-fat/egg/_mysql.py",line 7,in <module>
  File "build/bdist.macosx-10.3-fat/egg/_mysql.py",line 6,in __bootstrap__
ImportError: dynamic module does not define init function (init_mysql)
>>>
使用MySQL-python-1.2.3c1和setuptools-0.6c11-py2.6.egg
任何帮助,将不胜感激。

Mac OS X 10.5 Leopard: Direcory Utility, The end of Netinfo
这是一篇很好的简单叙述Leopard的核心的一个重大变化,它彻底放弃使用NetInfo数据库的方法来管理用户用户组和资源,而是采用更为好管理、直观明了的XML方式,在给出一个具体例子后,也给出了相应命令行的改变。其实,在OS X Tiger 10.4中,原来有两个应用程序一个叫NetInfo,一个是Directory Access一个主要用于管理本地用户的,另一个用来设置绑定网络Directory服务的,这次的Directory Utility是把这两个的功能合并了。
还有其他的一些相关文章和具体命令使用的文章,相继贴过来,以备查用。
用户要 注意的是,虽然从本文介绍的来说Leopard绑定AD要比Tiger容易了很多,但是其实依然还有好多问题目前还有待解决,用户很可能需要作一些workaround的工作。
注:其中的图片和两行代码显示是我加入的。
by John C. Welch, MacCentral
While the general Mac user community is ooh-ing and ahh-ing over Mac OS X 10.5 features like Time Machine, or opining about the new Dock, Stacks, et al, those of us who support Mac users are deep into learning about one of the biggest below-the-hood changes to happen in any version of Mac OS X: The end of Netinfo.
When I say “end,” I mean it in the most “end-ish” sense. In Mac OS X 10.5, Netinfo is gone. Not “deprecated,” not “hidden away for only the most advanced users.” It’s gone. Deleted. It does not exist. No more Netinfo database, no more Netinfo Utilities such as nicl, no more Netinfo Manager. The entire structure for managing local users, groups, and other such things has been completely replaced by local Directory Services, and the Netinfo Database is now a series of XML files living in /var/db/dslocal/.
Netinfo is—well, was —a directory service used for user and computer management. Originally created for NeXTStep, Netinfo was able to
Why is the end of Netinfo such an important change? Because when it came to managing local users and groups—that is users you created on your Mac, or network accounts that were mapped to local accounts (a.k.a. mobile accounts)—Netinfo handled all that. When you created a new user in System Preferences, that was all just a nicer interface into Netinfo. When you enabled sharing on your Mac, managing access to shares was handled by Netinfo. Now, it’s all done by Directory Services.
This may seem like a sudden change to some, but the truth is, Apple’s been actively easing Netinfo out of the picture since Mac OS X 10.2. Starting with that release, and continuing into Mac OS X 10.4, Netinfo was reduced from the primary mechanism for managing not just local users and groups, but entire network directories, ala Microsoft’s Active Directory or Novell’s eDirectory, to being only used for local user management. With Mac OS X 10.5, that easing out is complete.
So what does this mean? Well to the average user—whatever that means anymore—not much. The things you used to manage users, file sharing, and so forth are all still there—they just talk to different plumbing. There are some new features in those areas in Mac OS X 10.5, such as the “Advanced Options” in Accounts in System Preferences that allow you to configure a user’s home directory, login shell, add/remove login aliases, and so forth; you used to have to go to Netinfo Manager for these. There’s also the new ability to share any folder on your hard drive, but that could have been done with Netinfo too. The real changes here are in other areas
The most obvious change for most is the death of the Netinfo database. With Mac OS X 10.5, all the Netinfo database information are in a series of plist files in /var/db/dslocal/ under nodes/Default/. Within there, you see a set of directories:
	bash-3.2# ls -l Default/
	total 0
	drwx------  10 root  wheel   340 Oct 11 19:30 aliases
	drwx------   2 root  wheel    68 Nov  3 10:15 computers
	drwx------  10 root  wheel   340 Nov 13 14:56 config
	drwx------  72 root  wheel  2448 Nov 13 08:49 groups
	drwx------   4 root  wheel   136 Oct 11 19:30 machines
	drwx------   3 root  wheel   102 Oct 11 19:30 networks
	drwx------  44 root  wheel  1496 Nov 13 14:11 users


        bash-3.2# pwd
        /private/var/db/dslocal/nodes/Default
        Note: the above two lines is added by Tony Liu, Nov 18, 2008
Within each of these is a set of plist files where the data for that directory is kept, so in users/, there’s one plist per user, in groups/, one plist per group, and so on. Looking at the entry for the “staff’ group in staff.plist, (staff is the default group for all local users you create in Mac OS X), we see the following:
        bash-3.2# cat staff.plist


        <?xml version="1.0" encoding="UTF-8"?>


        <!DOCTYPE plist PUBLIC "-//Apple//DTD PLIST 1.0//EN"


        "http://www.apple.com/DTDs/PropertyList-1.0.dtd">


        <plist version="1.0">


        <dict>


        <key>generateduid</key>


        <array>


        <string>ABCDEFAB-CDEF-ABCD-EFAB-CDEF00000014</string>


        </array>


        <key>gid</key>


        <array>


        <string>20</string>


        </array>


        <key>name</key>


        <array>


        <string>staff</string>


        </array>


        <key>passwd</key>


        <array>


        <string>*</string>


        </array>


        <key>realname</key>


        <array>


        <string>Users</string>


        </array>


        <key>smb_sid</key>


        <array>


        <string>S-1-5-32-545</string>


        </array>


        <key>users</key>


        <array>


        <string>root</string>


        <string>tempadmin</string>


        <string>jwelch</string>


        </array>


        </dict>


        </plist>
It’s pretty easy to decipher. You have a UUID, or Universally Unique Identifier, a unique number that identifies the group outside of conventional Unix group IDs. You have the GID (or Group ID), the Unix group identifier number, the name of the group, the password for the group, (in this case, there isn''t one), the realname (or the more human friendly name), a sid number used for windows file sharing, and then a list of users in this group, including my own, jwelch. If you go looking through all the other plists, they all look like this, more or less.
But so what? Why does anyone care about this stuff? Well, for one, these are all text xml files. You can view or edit them in anything that can handle text files, from Apple’s own Text Edit and Property List Editor, to BBEdit, to Emacs or vi. You don’t need a special database 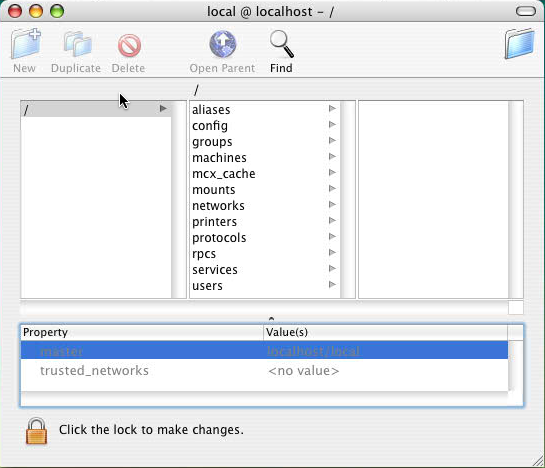 application to view or work with these files. This makes them more easily maintainable and fixable. It also makes it easier for network administrators to manage local-only accounts on their network. The XML structure of these files makes it easier to integrate the data they contain into various kinds of user management tools, since almost everything out there, commercial and home-built can handle XML data.
Network administrators trying to manage Mac laptops on directories also benefit from the elimination of Netinfo. Prior to Mac OS X 10.5, binding a laptop to a directory was a painful process. Because of the way directory services worked in Mac OS X 10.4 and earlier, if your laptop was bound, or attached to a directory service, and you had to boot up or log in when you couldn’t see the network that directory service was on, you were in a world of pain, and would probably never actually log in, or get anything done. There were a few workarounds, but it was all very wonky, due to how Netinfo and its associated processes—in particular, lookupd—worked. With Mac OS X 10.5, all that is fixed, and now you can have a laptop bound to a directory, and it just works.
For those of you wondering what command line utilities you use, now that all the ni* utilities and lookupd are gone, it’s pretty simple. For general needs, you use dscl. If you want to see what group a user or another group are a member of, or check user/group UUIDs, you use dsmemberutil. To edit, create, manipulate, or delete groups, you use dseditgroup. To work with various Directory Service caches, including LDAP and DNS, you use dscacheutil. Finally, to enable root, you use dsenableroot.
The removal of Netinfo from Mac OS X is a major change from both the operational and historical perspectives. But in end, I think it’s one that was long in coming, and it will make Mac OS X much nicer to deal with from the administrator point of view—something that will aid Apple as it continues to establish a greater presence in the business world.
[ John C. Welch is a Unix/Open Systems Administrator for Kansas City Life Insurance and a long-time Mac IT pundit. ]
原文链接: http://blog.csdn.net/afatgoat/article/details/3332017
关于Mac OS X Leopard与目录服务(AD/OD)集成宝典(6)和mac application support 目录的介绍现已完结,谢谢您的耐心阅读,如果想了解更多关于Build and Install cx_Oracle on Mac Leopard Intel、iPad 和 iPhone Simulator Mac.OS.X.Leopard、Mac OS 10.6.2 Snow Leopard上的Django + MySQL、Mac OS X 10.5 Leopard: Direcory Utility, The end of Netinfo的相关知识,请在本站寻找。
本文标签:


![[转帖]Ubuntu 安装 Wine方法(ubuntu如何安装wine)](https://www.gvkun.com/zb_users/cache/thumbs/4c83df0e2303284d68480d1b1378581d-180-120-1.jpg)

