这篇文章主要围绕Docker整合Prometheus、Grafana监控Redis和prometheus监控docker容器展开,旨在为您提供一份详细的参考资料。我们将全面介绍Docker整合Prom
这篇文章主要围绕Docker 整合 Prometheus、Grafana 监控 Redis和prometheus监控docker 容器展开,旨在为您提供一份详细的参考资料。我们将全面介绍Docker 整合 Prometheus、Grafana 监控 Redis的优缺点,解答prometheus监控docker 容器的相关问题,同时也会为您带来cAdvisor+Prometheus+Grafana监控docker、CentOS-Docker监控minio集群(grafana+prometheus)、docker stack部署prometheus + grafana、Docker 下 Prometheus 和 Grafana 三部曲之一:极速体验的实用方法。
本文目录一览:- Docker 整合 Prometheus、Grafana 监控 Redis(prometheus监控docker 容器)
- cAdvisor+Prometheus+Grafana监控docker
- CentOS-Docker监控minio集群(grafana+prometheus)
- docker stack部署prometheus + grafana
- Docker 下 Prometheus 和 Grafana 三部曲之一:极速体验
")
Docker 整合 Prometheus、Grafana 监控 Redis(prometheus监控docker 容器)
前沿:Docker 环境下整合 Prometheus 和 Grafana 监控 Redis 性能
环境:Centos、Docker
一、下载镜像版本

docker pull prom/node-exporter
ocker run -d -p 9100:9100 prom/node-exporter
docker pull grafana/grafana
docker run -d --name=grafana -p 3000:3000 grafana/grafana
docker pull prom/prometheus
1、在 /usr/local/src 新建 touch prometheus.yml 文件,文件夹可自定义
2、编辑 vim prometheus.yml
global:
scrape_interval: 15s
evaluation_interval: 15s
alerting:
alertmanagers:
- static_configs:
- targets:
rule_files:
scrape_configs:
- job_name: ''prometheus''
static_configs:
- targets: [''localhost:9090'']
- job_name: ''redis''
static_configs:
- targets: ['' 服务器 IP:9121'']
labels:
instance: redis
- job_name: ''linux''
static_configs:
- targets: ['' 服务器 IP:9100'']
labels:
instance: node
3、启动容器
sudo docker run -d -p 9090:9090 -v /usr/local/src/prometheus.yml:/usr/local/src/prometheus.yml prom/prometheus --config.file=/usr/local/src/prometheus.yml
docker pull redis
docker run -d --name=redis -p 6379:6379 redis
docker pull redis_exporter
docker run -d --name redis_exporter -p 9121:9121 redis_exporter --redis.addr redis://redis 连接 IP:6379
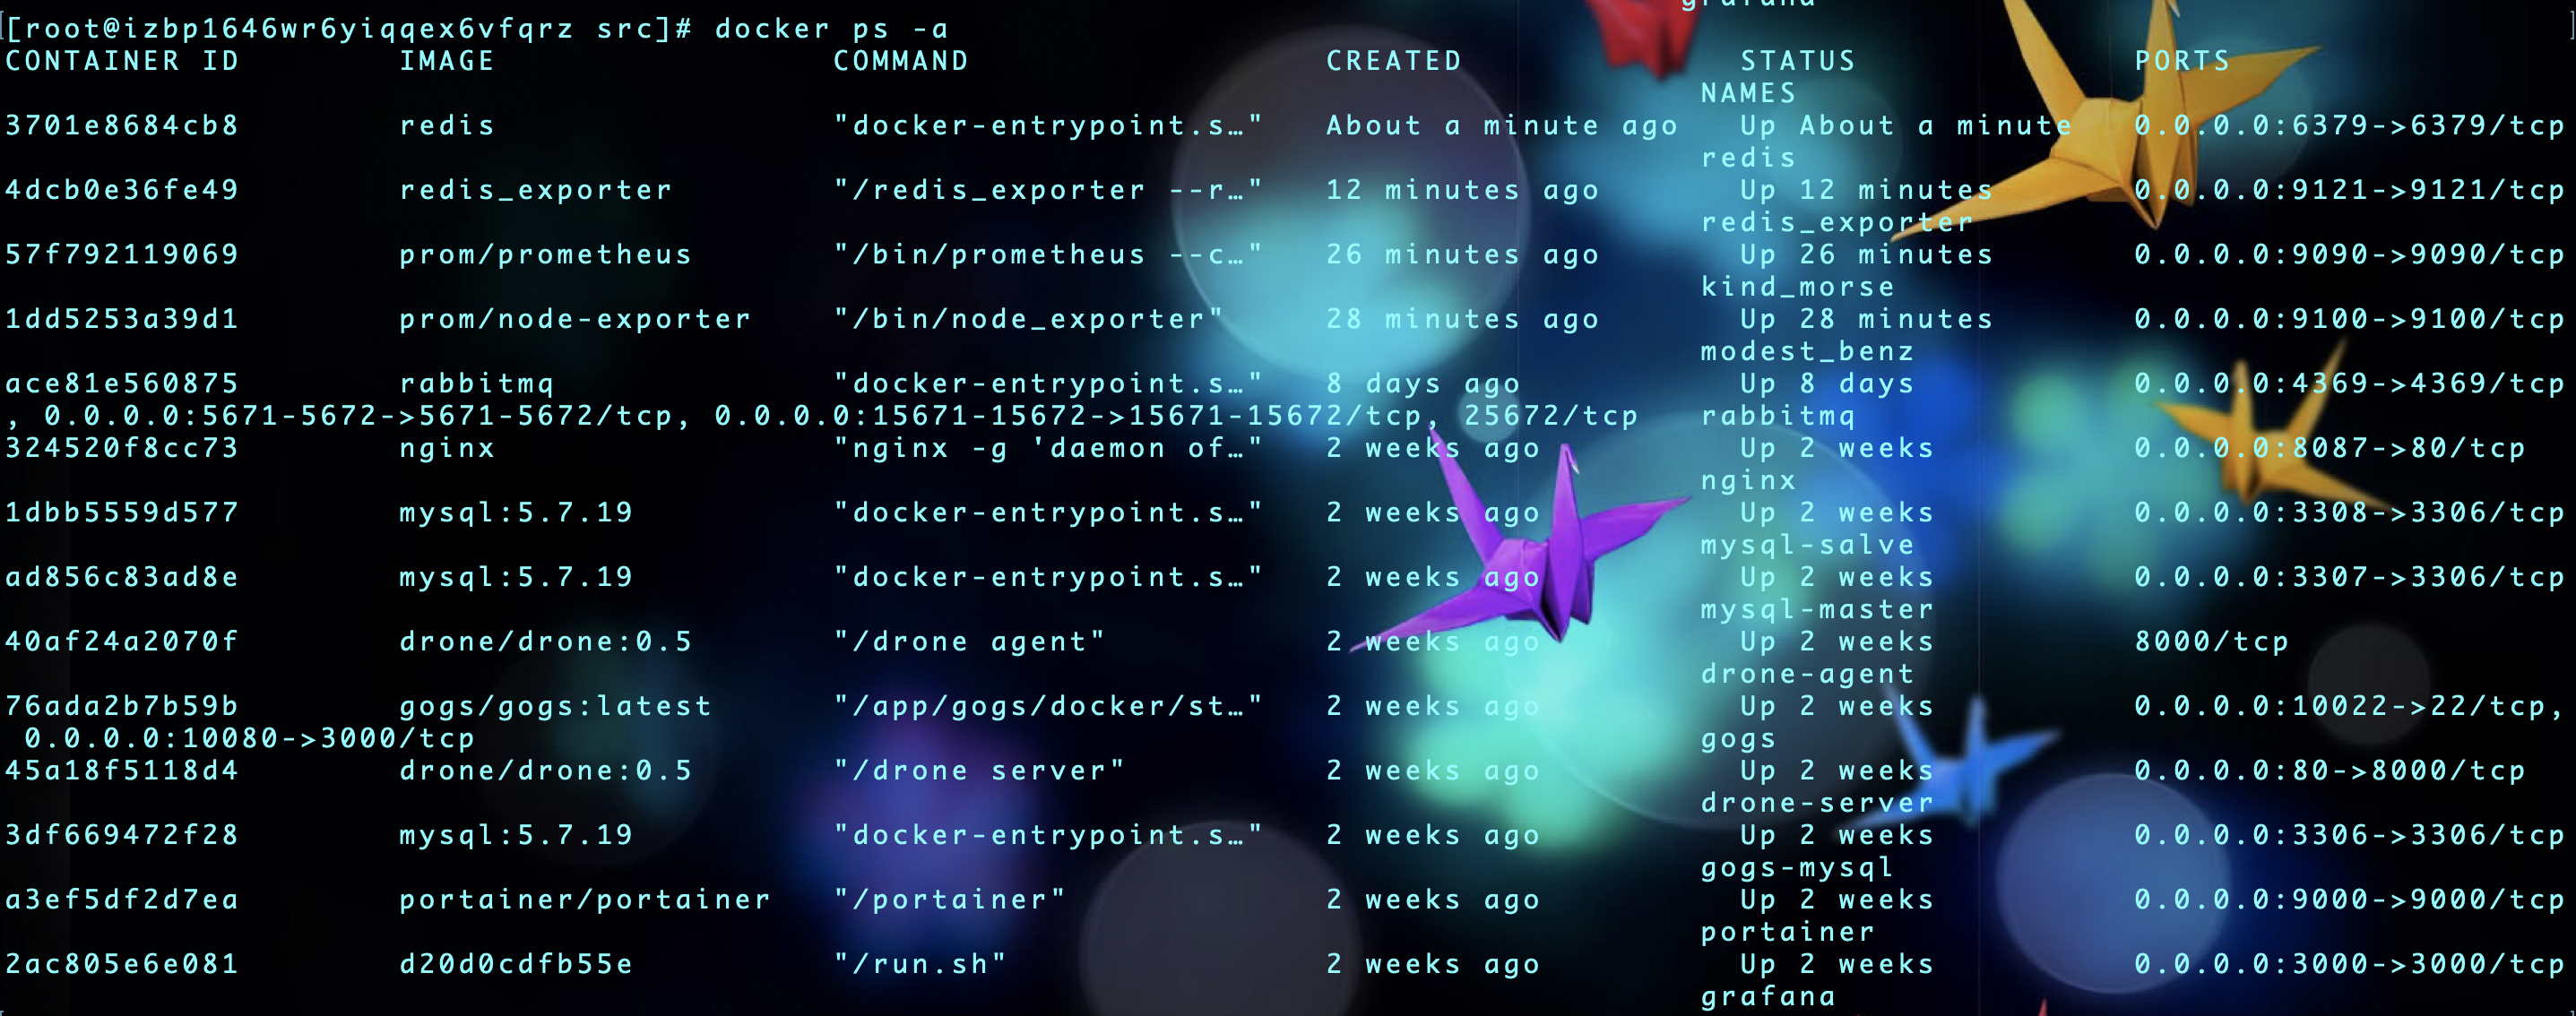
二、查看镜像容器是否启动成功
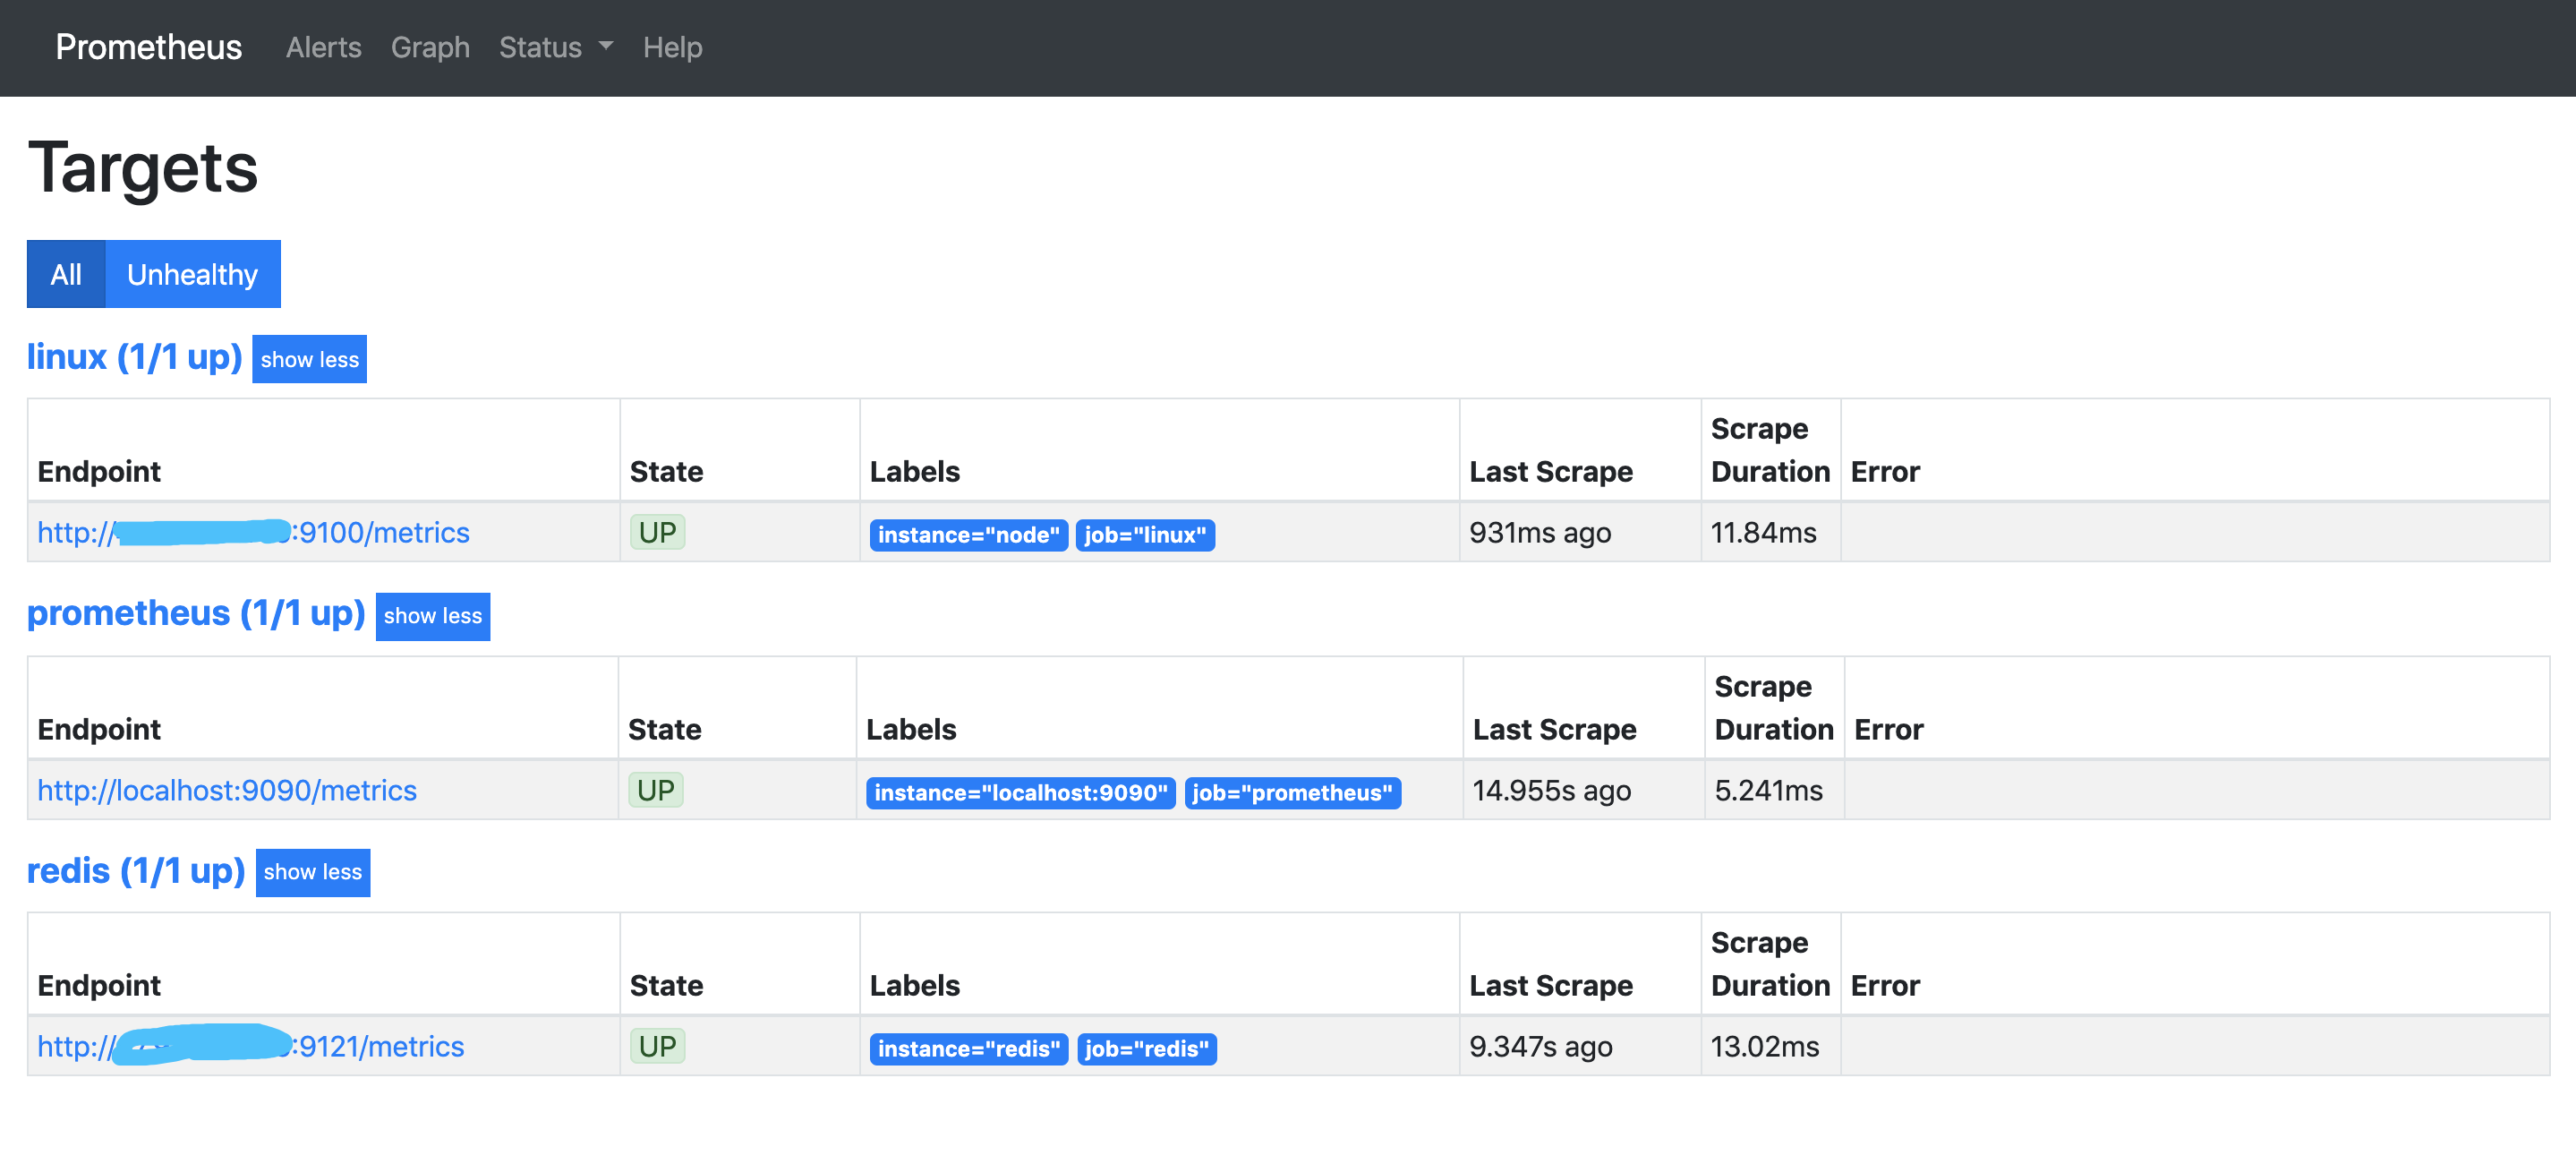
三、查看 Prometheus 是否创建完成
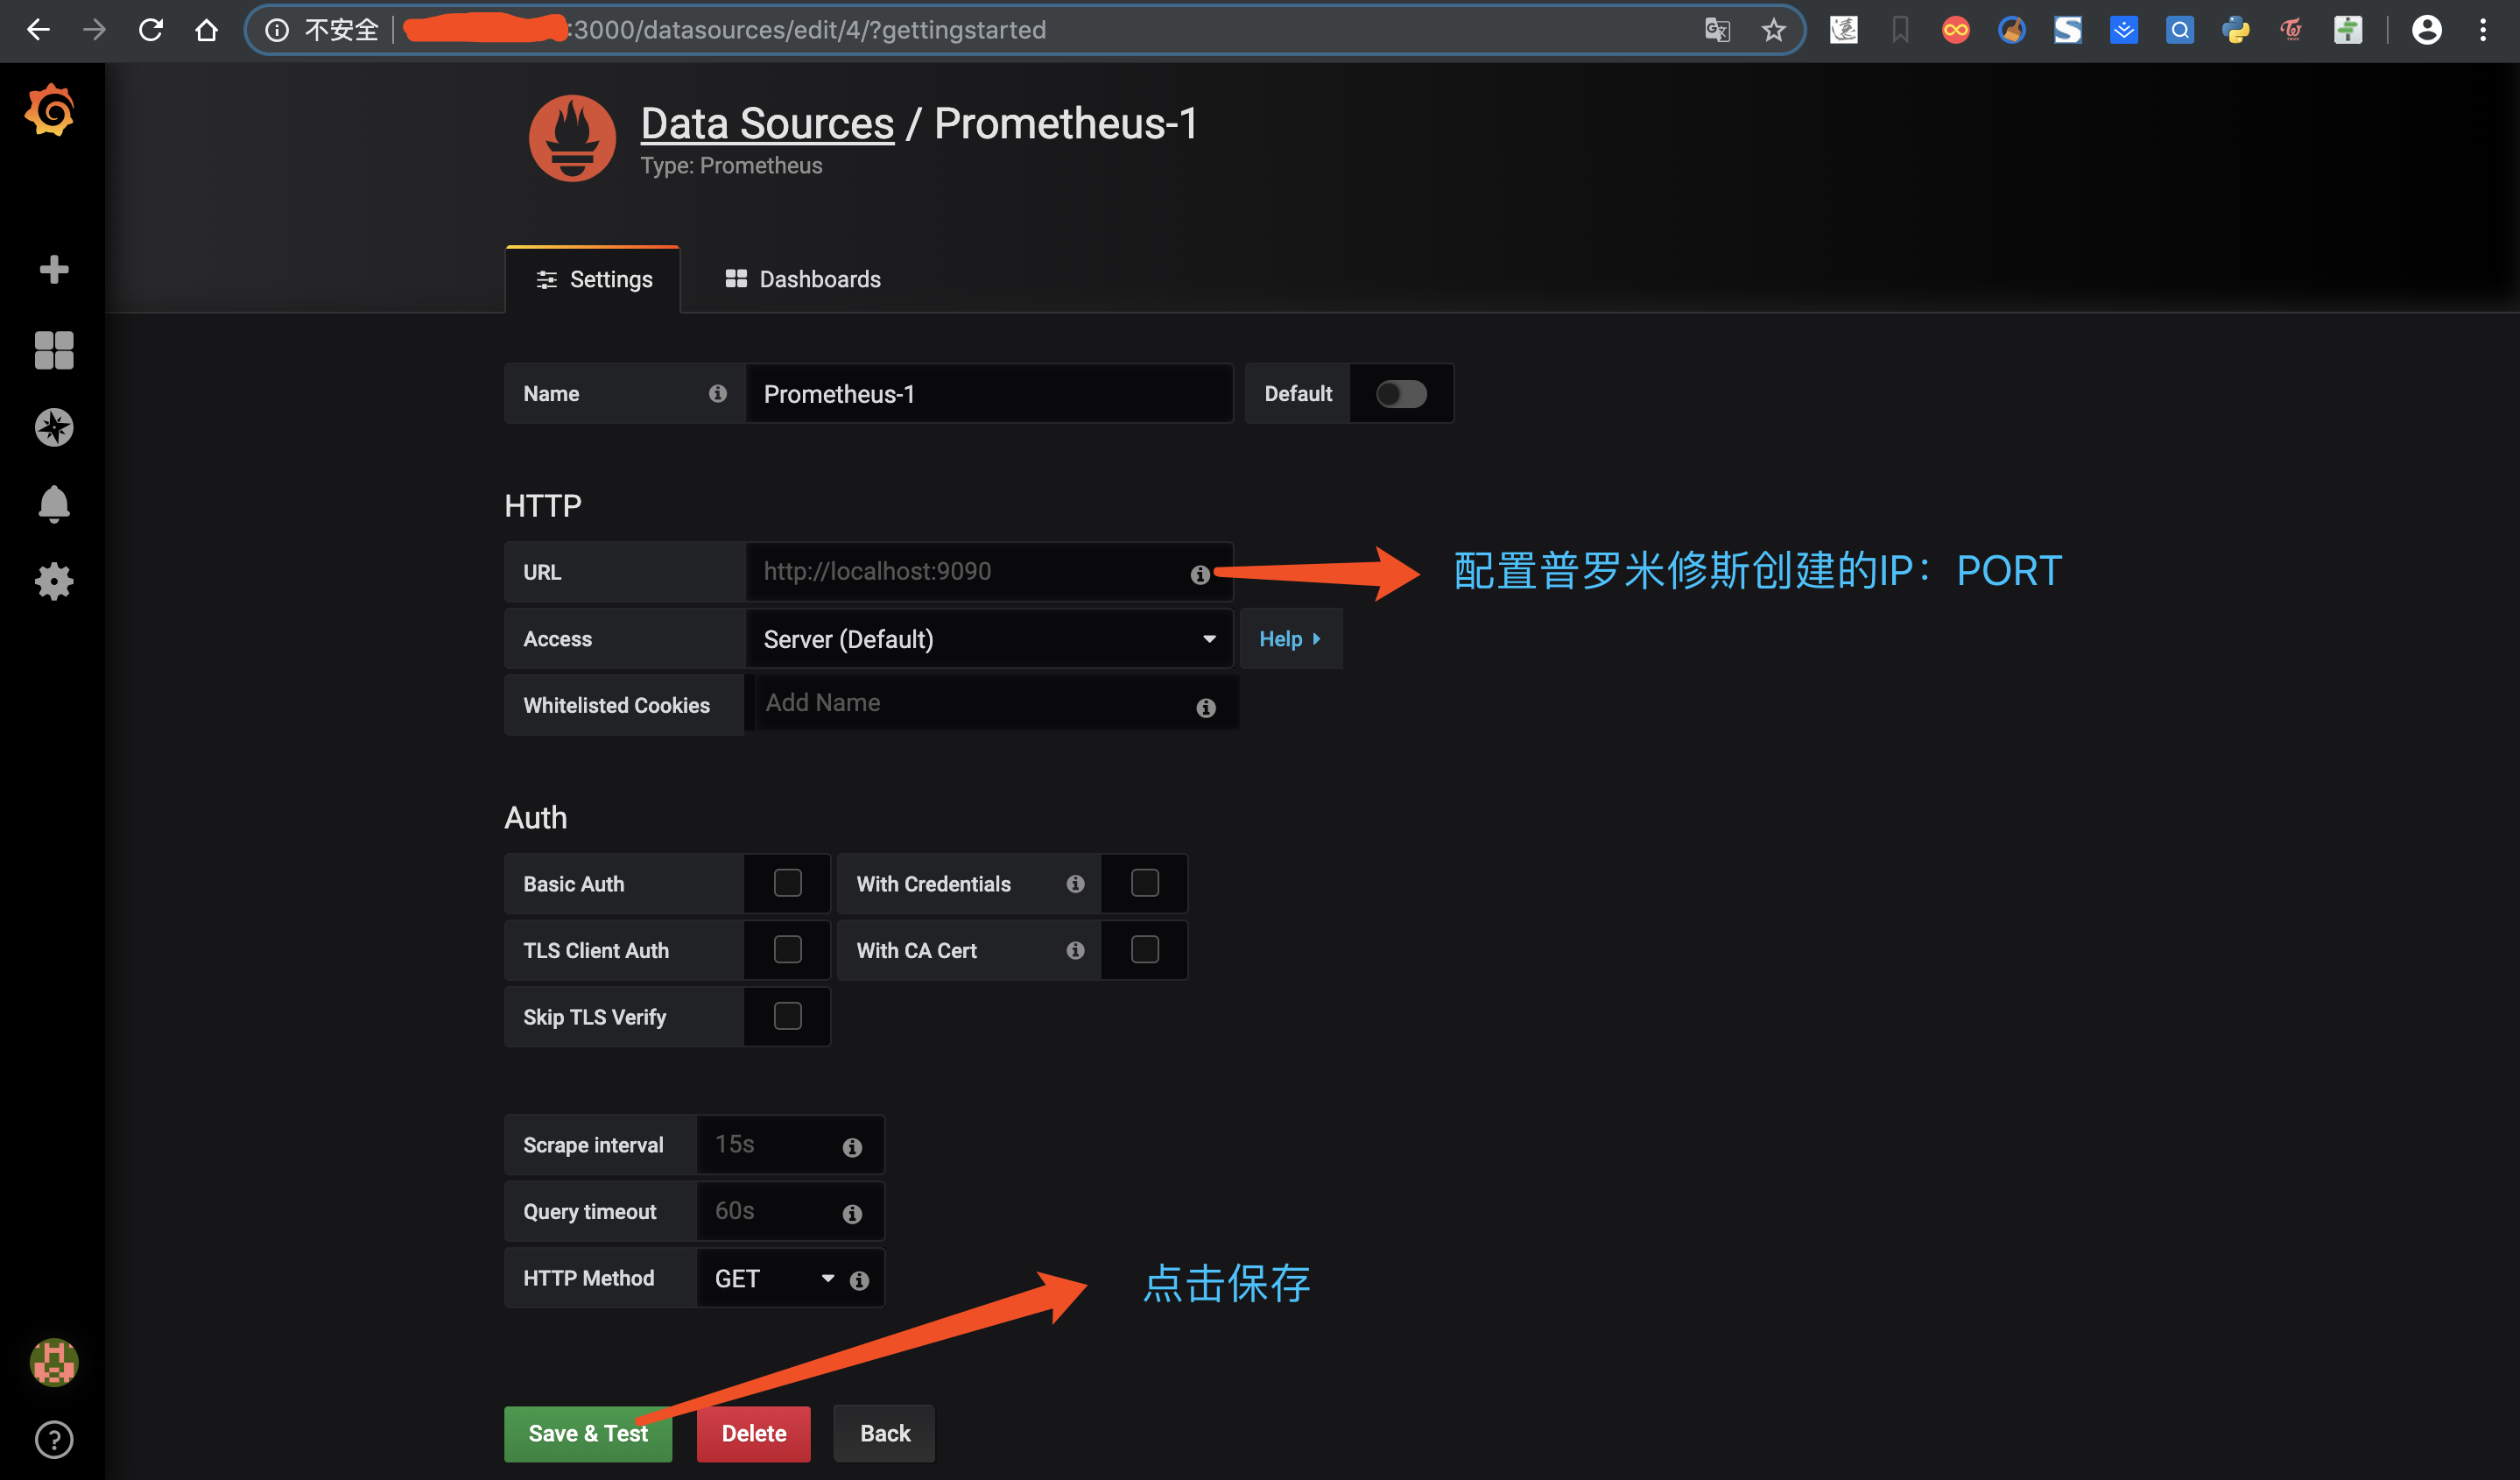
四、登陆 Grafana 创建数据源,登陆初始账号密码:admin/admin


cAdvisor+Prometheus+Grafana监控docker
cAdvisor+Prometheus+Grafana监控docker
一、cAdvisor(需要监控的主机都要安装)
官方地址:https://github.com/google/cadvisor
CAdvisor是谷歌开发的用于分析运行中容器的资源占用和性能指标的开源工具。CAdvisor是一个运行时的守护进程,负责收集、聚合、处理和输出运行中容器的信息。
注意在查找相关资料后发现这是最新版cAdvisor的bug,换成版本为google/cadvisor:v0.24.1 就ok了,映射主机端口默认是8080,可以修改。
sudo docker run \
  --volume=/:/rootfs:ro \
  --volume=/var/run:/var/run:ro \
  --volume=/sys:/sys:ro \
  --volume=/var/lib/docker/:/var/lib/docker:ro \
  --volume=/dev/disk/:/dev/disk:ro \
  --publish=8090:8080 \
  --detach=true \
  --name=cadvisor \
  google/cadvisor:v0.24.1
cAdvisor exposes a web UI at its port:
http://<hostname>:<port>/
下图为cAdvisor的web界面,数据实时刷新但是不能存储。

查看json格式
http://192.168.247.212:8090/metrics

二、Prometheus
官方地址:https://prometheus.io/
随着容器技术的迅速发展,Kubernetes 已然成为大家追捧的容器集群管理系统。Prometheus 作为生态圈 Cloud Native Computing Foundation(简称:CNCF)中的重要一员,其活跃度仅次于 Kubernetes, 现已广泛用于 Kubernetes 集群的监控系统中。本文将简要介绍 Prometheus 的组成和相关概念,并实例演示 Prometheus 的安装,配置及使用,以便开发人员和云平台运维人员可以快速的掌握 Prometheus。
Prometheus 简介
Prometheus 是一套开源的系统监控报警框架。它启发于 Google 的 borgmon 监控系统,由工作在 SoundCloud 的 google 前员工在 2012 年创建,作为社区开源项目进行开发,并于 2015 年正式发布。2016 年,Prometheus 正式加入 Cloud Native Computing Foundation,成为受欢迎度仅次于 Kubernetes 的项目。
作为新一代的监控框架,Prometheus 具有以下特点:
强大的多维度数据模型:
- 时间序列数据通过 metric 名和键值对来区分。
- 所有的 metrics 都可以设置任意的多维标签。
- 数据模型更随意,不需要刻意设置为以点分隔的字符串。
- 可以对数据模型进行聚合,切割和切片操作。
- 支持双精度浮点类型,标签可以设为全 unicode。
灵活而强大的查询语句(PromQL):在同一个查询语句,可以对多个 metrics 进行乘法、加法、连接、取分数位等操作。
易于管理: Prometheus server 是一个单独的二进制文件,可直接在本地工作,不依赖于分布式存储。
高效:平均每个采样点仅占 3.5 bytes,且一个 Prometheus server 可以处理数百万的 metrics。
使用 pull 模式采集时间序列数据,这样不仅有利于本机测试而且可以避免有问题的服务器推送坏的 metrics。
可以采用 push gateway 的方式把时间序列数据推送至 Prometheus server 端。
可以通过服务发现或者静态配置去获取监控的 targets。
有多种可视化图形界面。
易于伸缩。
需要指出的是,由于数据采集可能会有丢失,所以 Prometheus 不适用对采集数据要 100% 准确的情形。但如果用于记录时间序列数据,Prometheus 具有很大的查询优势,此外,Prometheus 适用于微服务的体系架构
Prometheus 组成及架构
Prometheus 生态圈中包含了多个组件,其中许多组件是可选的:
- Prometheus Server: 用于收集和存储时间序列数据。
- Client Library: 客户端库,为需要监控的服务生成相应的 metrics 并暴露给 Prometheus server。当 Prometheus server 来 pull 时,直接返回实时状态的 metrics。
- Push Gateway: 主要用于短期的 jobs。由于这类 jobs 存在时间较短,可能在 Prometheus 来 pull 之前就消失了。为此,这次 jobs 可以直接向 Prometheus server 端推送它们的 metrics。这种方式主要用于服务层面的 metrics,对于机器层面的 metrices,需要使用 node exporter。
- Exporters: 用于暴露已有的第三方服务的 metrics 给 Prometheus。
- Alertmanager: 从 Prometheus server 端接收到 alerts 后,会进行去除重复数据,分组,并路由到对收的接受方式,发出报警。常见的接收方式有:电子邮件,pagerduty,OpsGenie, webhook 等。一些其他的工具。
Prometheus 架构图

安装步骤:
wget https://github.com/prometheus/prometheus/releases/download/v2.8.0/prometheus-2.8.0.linux-amd64.tar.gz
tar -xf prometheus-2.8.0.linux-amd64.tar.gz
cd prometheus-2.8.0.linux-amd64
修改配置文件prometheus.yml,添加以下内容
    static_configs:
    - targets: ['192.168.247.211:9090']
  - job_name: 'docker'
    static_configs:
    - targets:
      - "192.168.247.211:8090"
      - "192.168.247.212:8090"

cp prometheus promtool /usr/local/bin/

启动:
nohup prometheus --config.file=./prometheus.yml &
我的完整简单prometheus.yml配置文件:
# my global config
global:
  scrape_interval:     15s # Set the scrape interval to every 15 seconds. Default is every 1 minute.
  evaluation_interval: 15s # Evaluate rules every 15 seconds. The default is every 1 minute.
  # scrape_timeout is set to the global default (10s).

# Alertmanager configuration
alerting:
  alertmanagers:
  - static_configs:
    - targets:
      # - alertmanager:9093

# Load rules once and periodically evaluate them according to the global 'evaluation_interval'.
rule_files:
  # - "first_rules.yml"
  # - "second_rules.yml"

# A scrape configuration containing exactly one endpoint to scrape:
# Here it's Prometheus itself.
scrape_configs:
  # The job name is added as a label `job=<job_name>` to any timeseries scraped from this config.
  - job_name: 'prometheus'

    # metrics_path defaults to '/metrics'
    # scheme defaults to 'http'.

    static_configs:
    - targets: ['192.168.247.211:9090']
  - job_name: 'docker'
    static_configs:
    - targets:
      - "192.168.247.211:8090"
      - "192.168.247.212:8090"
访问:http://192.168.247.211:9090

三、Grafana
官方地址:https://grafana.com/
安装步骤:
wget https://dl.grafana.com/oss/release/grafana-6.0.1-1.x86_64.rpm
sudo yum localinstall grafana-6.0.1-1.x86_64.rpm -y
systemctl daemon-reload
systemctl start grafana-server
systemctl status grafana-server
#设置开机自启动
Enable the systemd service so that Grafana starts at boot.
sudo systemctl enable grafana-server.service
1.访问:http://192.168.247.211:3000/login
默认密码:admin/admin

2.配置Prometheus数据源

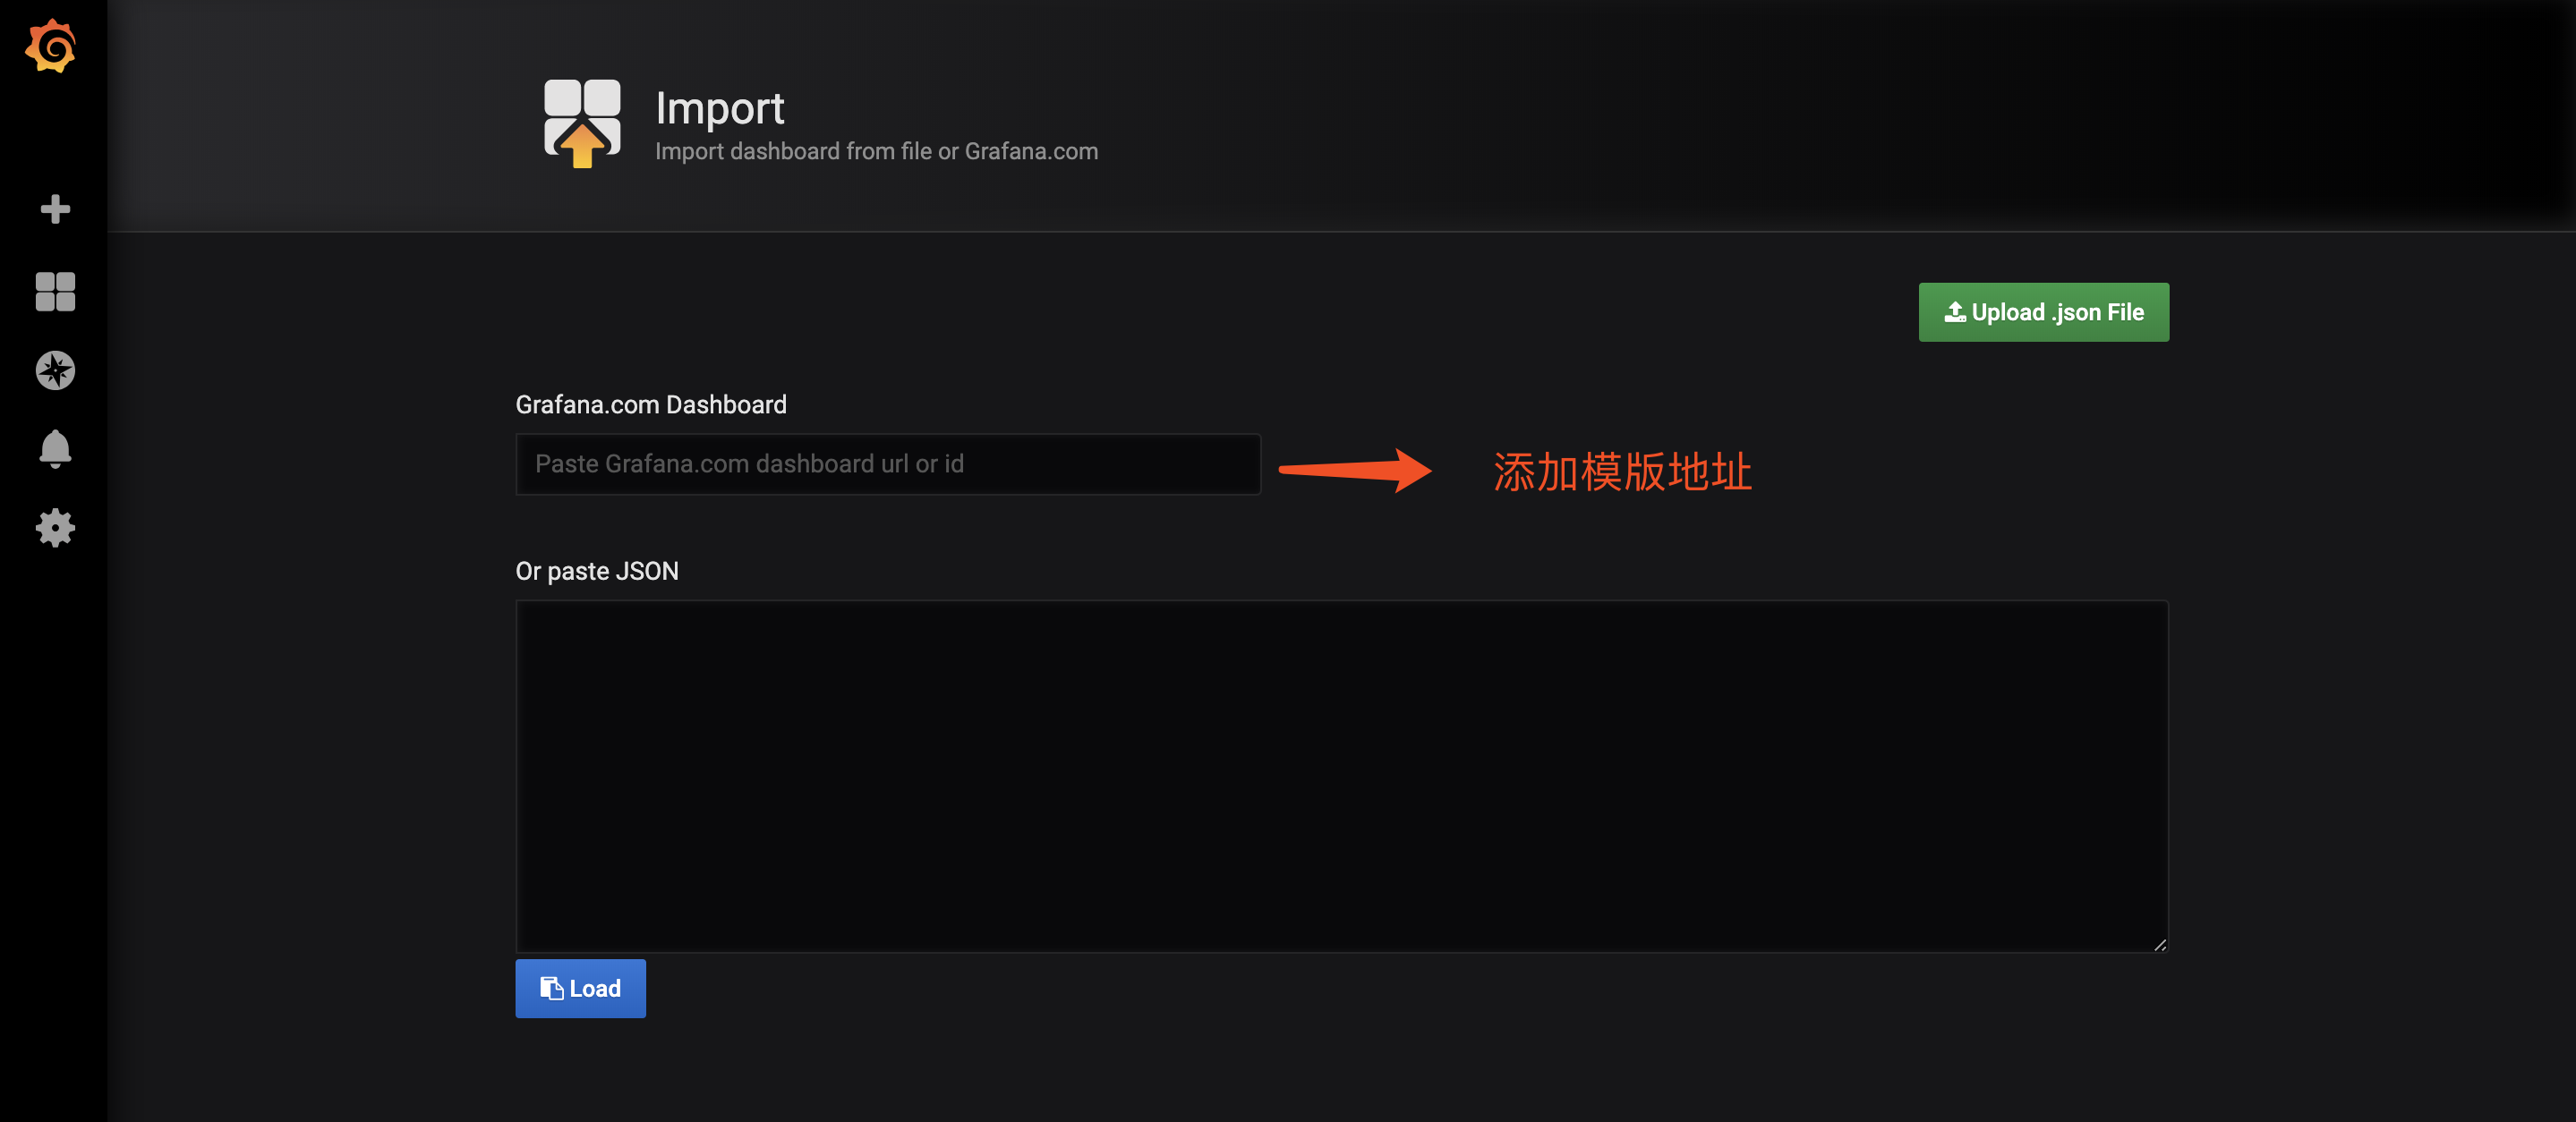
3.下载模板模板地址:https://grafana.com/dashboards

4.导入模板

5.成品

")
CentOS-Docker监控minio集群(grafana+prometheus)
一、开启minio监控数据
传送门>>minio集群搭建
每台调整minio集群启动启动命令(增加标红内容)
export MINIO_ACCESS_KEY=minio
export MINIO_SECRET_KEY=minio123
export MINIO_PROMETHEUS_AUTH_TYPE="public"/minio/bin/minio server --address :9000 --config-dir /etc/minio \
http://192.168.1.101/minio/data1 http://192.168.1.102/minio/data2 \
http://192.168.1.103/minio/data3 http://192.168.1.104/minio/data4 > minio.log
启动后验证是否可以获取监控信息(浏览器不可见)
$ curl http://192.168.1.101:9000/minio/prometheus/metrics
$ curl http://192.168.1.102:9000/minio/prometheus/metrics
$ curl http://192.168.1.103:9000/minio/prometheus/metrics
$ curl http://192.168.1.104:9000/minio/prometheus/metrics
二、配置prometheus + grafana监控
传送门>> 监控环境搭建可参考
1.创建配置文件
$ vim /minio/prometheus.yml
global:
scrape_interval: 15s
evaluation_interval: 15salerting:
alertmanagers:
- static_configs:
- targets:
# - alertmanager:9093rule_files:
# - "first_rules.yml"
# - "second_rules.yml"scrape_configs:
- job_name: minio-job
metrics_path: /minio/prometheus/metrics
scheme: http
static_configs:
- targets: [''192.168.1.101:19000'']
labels:
group: minio
instance: minio-101
- targets: [''192.168.1.102:19000'']
labels:
group: minio
instance: minio-102
- targets: [''192.168.1.103:19000'']
labels:
group: minio
instance: minio-103
- targets: [''192.168.1.104:19000'']
labels:
group: minio
instance: minio-104
2.数据源prometheus服务
$ docker run --restart=unless-stopped -d --name=prometheus-minio -p 9090:9090 -v /minio/prometheus.yml:/etc/prometheus/prometheus.yml prom/prometheus
3.可视化展示grafana服务( 默认用户名/密码:admin/admin )
$ docker run --restart=unless-stopped -d --name=grafana -p 3000:3000 grafana/grafana
3.1.添加数据源
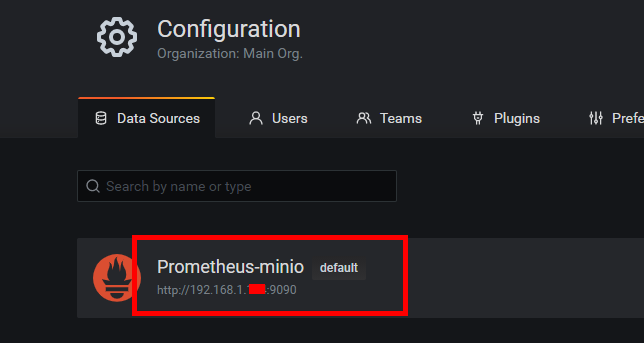
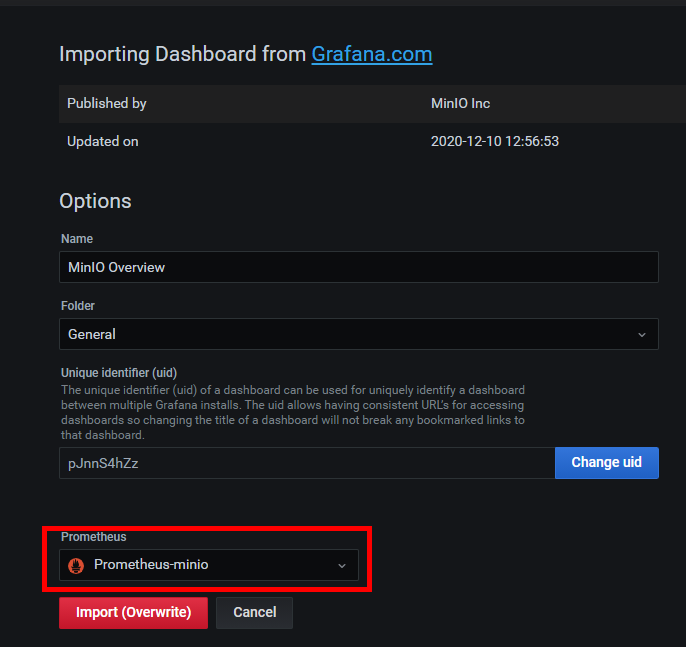
3.2.导入监控dashboard
目前:https://grafana.com/grafana/dashboards/13502
如果url更新请参考github获取最新地址>>仪表盘参考minio配置监控说明

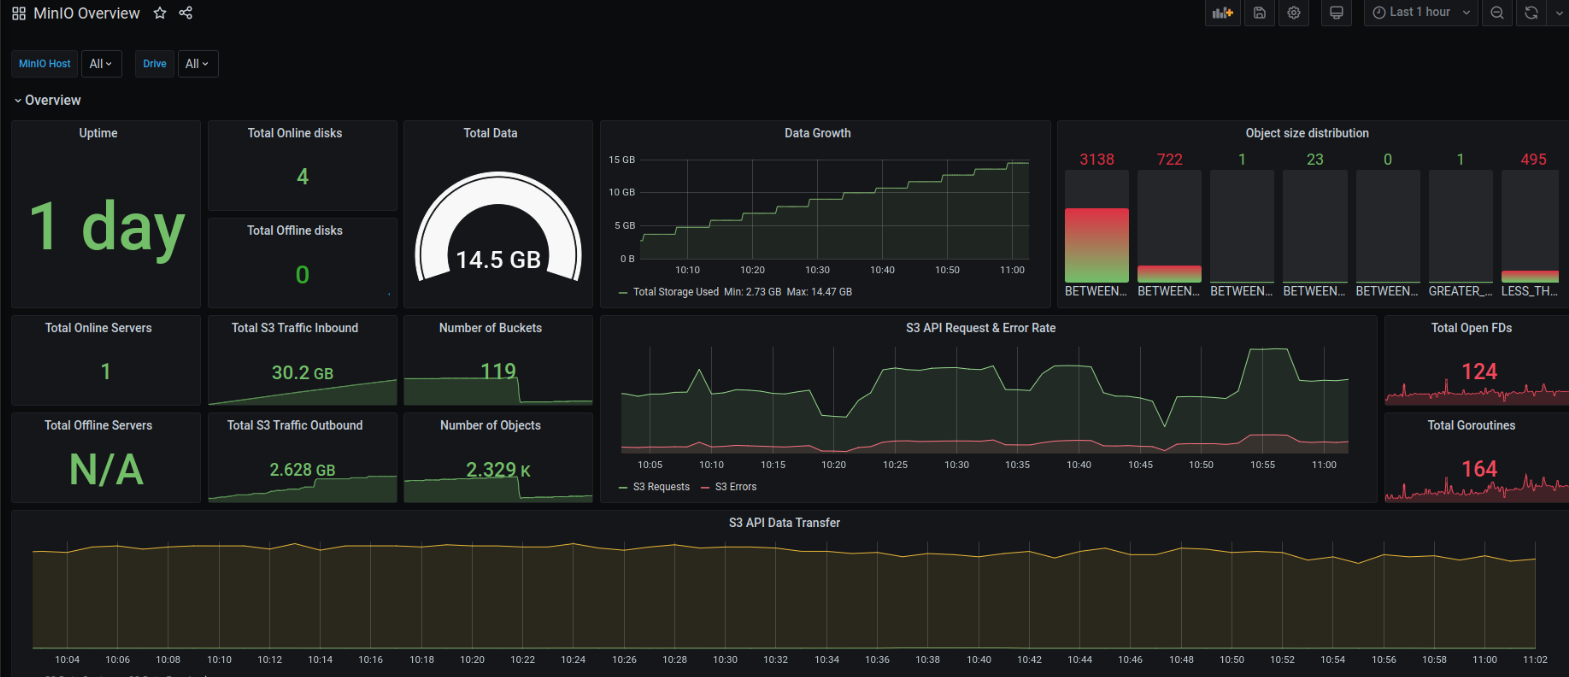
三、查看监控

docker stack部署prometheus + grafana
通过docker stack部署prometheus、node-exporter、alertmanager和grafana。prometheus最新版本:2.19.2
swarm集群(一个节点):
manager 192.168.30.135
mkdir -p /home/prom/{prometheus,prometheus/data,alertmanager,grafana}chmod 777 /home/prom/{prometheus/data,grafana}cd /home/promtree ..├── alertmanager │ ├── alertmanager.yml │ └── config.yml ├── docker-stack.yml ├── grafana └── prometheus ├── alert-rules.yml ├── data └── prometheus.yml 4 directories, 5 files
Prometheus
vim /home/prom/prometheus/alert-rules.yml
groups:
  - name: node-alert    rules:
    - alert: NodeDown      expr: up{job="node"} == 0      for: 5m      labels:
        severity: critical        instance: "{{ $labels.instance }}"
      annotations:
        summary: "instance: {{ $labels.instance }} down"        description: "Instance: {{ $labels.instance }} 已经宕机 5分钟"        value: "{{ $value }}"

    - alert: NodecpuHigh      expr: (1 - avg by (instance) (irate(node_cpu_seconds_total{job="node",mode="idle"}[5m]))) * 100 > 80      for: 5m      labels:
        severity: warning        instance: "{{ $labels.instance }}"
      annotations:
        summary: "instance: {{ $labels.instance }} cpu使用率过高"        description: "cpu 使用率超过 80%"
        value: "{{ $value }}"

    - alert: NodecpuIowaitHigh      expr: avg by (instance) (irate(node_cpu_seconds_total{job="node",mode="iowait"}[5m])) * 100 > 50      for: 5m      labels:
        severity: warning        instance: "{{ $labels.instance }}"
      annotations:
        summary: "instance: {{ $labels.instance }} cpu iowait 使用率过高"        description: "cpu iowait 使用率超过 50%"
        value: "{{ $value }}"

    - alert: NodeLoad5High      expr: node_load5 > (count by (instance) (node_cpu_seconds_total{job="node",mode='system'})) * 1.2      for: 5m      labels:
        severity: warning        instance: "{{ $labels.instance }}"
      annotations:
        summary: "instance: {{ $labels.instance }} load(5m) 过高"        description: "Load(5m) 过高,超出cpu核数 1.2倍"
        value: "{{ $value }}"

    - alert: NodeMemoryHigh      expr: (1 - node_memory_MemAvailable_bytes{job="node"} / node_memory_MemTotal_bytes{job="node"}) * 100 > 90      for: 5m      labels:
        severity: warning        instance: "{{ $labels.instance }}"
      annotations:
        summary: "instance: {{ $labels.instance }} memory 使用率过高"        description: "Memory 使用率超过 90%"
        value: "{{ $value }}"

    - alert: NodediskRootHigh      expr: (1 - node_filesystem_avail_bytes{job="node",fstype=~"ext.*|xfs",mountpoint ="/"} / node_filesystem_size_bytes{job="node",fstype=~"ext.*|xfs",mountpoint ="/"}) * 100 > 90      for: 10m      labels:
        severity: warning        instance: "{{ $labels.instance }}"
      annotations:
        summary: "instance: {{ $labels.instance }} disk(/ 分区) 使用率过高"        description: "disk(/ 分区) 使用率超过 90%"
        value: "{{ $value }}"

    - alert: NodediskBootHigh      expr: (1 - node_filesystem_avail_bytes{job="node",fstype=~"ext.*|xfs",mountpoint ="/boot"} / node_filesystem_size_bytes{job="node",fstype=~"ext.*|xfs",mountpoint ="/boot"}) * 100 > 80      for: 10m      labels:
        severity: warning        instance: "{{ $labels.instance }}"
      annotations:
        summary: "instance: {{ $labels.instance }} disk(/boot 分区) 使用率过高"        description: "disk(/boot 分区) 使用率超过 80%"
        value: "{{ $value }}"

    - alert: NodediskReadHigh      expr: irate(node_disk_read_bytes_total{job="node"}[5m]) > 20 * (1024 ^ 2)      for: 5m      labels:
        severity: warning        instance: "{{ $labels.instance }}"
      annotations:
        summary: "instance: {{ $labels.instance }} disk 读取字节数 速率过高"        description: "disk 读取字节数 速率超过 20 MB/s"
        value: "{{ $value }}"

    - alert: NodediskWriteHigh      expr: irate(node_disk_written_bytes_total{job="node"}[5m]) > 20 * (1024 ^ 2)      for: 5m      labels:
        severity: warning        instance: "{{ $labels.instance }}"
      annotations:
        summary: "instance: {{ $labels.instance }} disk 写入字节数 速率过高"        description: "disk 写入字节数 速率超过 20 MB/s"
        value: "{{ $value }}"

    - alert: NodediskReadrateCountHigh      expr: irate(node_disk_reads_completed_total{job="node"}[5m]) > 3000      for: 5m      labels:
        severity: warning        instance: "{{ $labels.instance }}"
      annotations:
        summary: "instance: {{ $labels.instance }} disk iops 每秒读取速率过高"        description: "disk iops 每秒读取速率超过 3000 iops"
        value: "{{ $value }}"

    - alert: NodediskWriterateCountHigh      expr: irate(node_disk_writes_completed_total{job="node"}[5m]) > 3000      for: 5m      labels:
        severity: warning        instance: "{{ $labels.instance }}"
      annotations:
        summary: "instance: {{ $labels.instance }} disk iops 每秒写入速率过高"        description: "disk iops 每秒写入速率超过 3000 iops"
        value: "{{ $value }}"

    - alert: NodeInodeRootUsedPercentHigh      expr: (1 - node_filesystem_files_free{job="node",fstype=~"ext4|xfs",mountpoint="/"} / node_filesystem_files{job="node",fstype=~"ext4|xfs",mountpoint="/"}) * 100 > 80      for: 10m      labels:
        severity: warning        instance: "{{ $labels.instance }}"
      annotations:
        summary: "instance: {{ $labels.instance }} disk(/ 分区) inode 使用率过高"        description: "disk (/ 分区) inode 使用率超过 80%"
        value: "{{ $value }}"

    - alert: NodeInodeBootUsedPercentHigh      expr: (1 - node_filesystem_files_free{job="node",fstype=~"ext4|xfs",mountpoint="/boot"} / node_filesystem_files{job="node",fstype=~"ext4|xfs",mountpoint="/boot"}) * 100 > 80      for: 10m      labels:
        severity: warning        instance: "{{ $labels.instance }}"
      annotations:
        summary: "instance: {{ $labels.instance }} disk(/boot 分区) inode 使用率过高"        description: "disk (/boot 分区) inode 使用率超过 80%"
        value: "{{ $value }}"

    - alert: NodeFilefdAllocatedPercentHigh      expr: node_filefd_allocated{job="node"} / node_filefd_maximum{job="node"} * 100 > 80      for: 10m      labels:
        severity: warning        instance: "{{ $labels.instance }}"
      annotations:
        summary: "instance: {{ $labels.instance }} filefd 打开百分比过高"        description: "Filefd 打开百分比 超过 80%"
        value: "{{ $value }}"

    - alert: NodeNetworkNetinBitRateHigh      expr: avg by (instance) (irate(node_network_receive_bytes_total{device=~"eth0|eth1|ens33|ens37"}[1m]) * 8) > 20 * (1024 ^ 2) * 8      for: 3m      labels:
        severity: warning        instance: "{{ $labels.instance }}"
      annotations:
        summary: "instance: {{ $labels.instance }} network 接收比特数 速率过高"        description: "Network 接收比特数 速率超过 20MB/s"
        value: "{{ $value }}"

    - alert: NodeNetworkNetoutBitRateHigh      expr: avg by (instance) (irate(node_network_transmit_bytes_total{device=~"eth0|eth1|ens33|ens37"}[1m]) * 8) > 20 * (1024 ^ 2) * 8      for: 3m      labels:
        severity: warning        instance: "{{ $labels.instance }}"
      annotations:
        summary: "instance: {{ $labels.instance }} network 发送比特数 速率过高"        description: "Network 发送比特数 速率超过 20MB/s"
        value: "{{ $value }}"

    - alert: NodeNetworkNetinPacketErrorRateHigh      expr: avg by (instance) (irate(node_network_receive_errs_total{device=~"eth0|eth1|ens33|ens37"}[1m])) > 15      for: 3m      labels:
        severity: warning        instance: "{{ $labels.instance }}"
      annotations:
        summary: "instance: {{ $labels.instance }} 接收错误包 速率过高"        description: "Network 接收错误包 速率超过 15个/秒"
        value: "{{ $value }}"

    - alert: NodeNetworkNetoutPacketErrorRateHigh      expr: avg by (instance) (irate(node_network_transmit_packets_total{device=~"eth0|eth1|ens33|ens37"}[1m])) > 15      for: 3m      labels:
        severity: warning        instance: "{{ $labels.instance }}"
      annotations:
        summary: "instance: {{ $labels.instance }} 发送错误包 速率过高"        description: "Network 发送错误包 速率超过 15个/秒"
        value: "{{ $value }}"

    - alert: NodeProcessBlockedHigh      expr: node_procs_blocked{job="node"} > 10      for: 10m      labels:
        severity: warning        instance: "{{ $labels.instance }}"
      annotations:
        summary: "instance: {{ $labels.instance }} 当前被阻塞的任务的数量过多"        description: "Process 当前被阻塞的任务的数量超过 10个"
        value: "{{ $value }}"

    - alert: NodeTimeOffsetHigh      expr: abs(node_timex_offset_seconds{job="node"}) > 3 * 60      for: 2m      labels:
        severity: info        instance: "{{ $labels.instance }}"
      annotations:
        summary: "instance: {{ $labels.instance }} 时间偏差过大"        description: "Time 节点的时间偏差超过 3m"
        value: "{{ $value }}"
vim /home/prom/prometheus/prometheus.yml
global:
  scrape_interval:     15s  evaluation_interval: 15salerting:
  alertmanagers:
  - static_configs:
    - targets:
      - alertmanager:9093rule_files:
  - "*rules.yml"
  scrape_configs:
  - job_name: 'prometheus'
    static_configs:
    - targets: ['prometheus:9090']

  - job_name: 'node'
    static_configs:
    - targets: ['192.168.30.135:9100']

  - job_name: 'alertmanager'
    static_configs:
    - targets: ['alertmanager:9093']
Alertmanager
vim /home/prom/alertmanager/config.yml
targets:
  webhook:
    url: https://oapi.dingtalk.com/robot/send?access_token=xxxxxxxxxxxx             #修改为钉钉机器人的webhook
    mention:
      all: true
vim /home/prom/alertmanager/alertmanager.yml
global:
  resolve_timeout: 5m  smtp_smarthost: 'smtp.163.com:465'             #邮箱smtp服务器代理,启用SSL发信, 端口一般是465
  smtp_from: 'alert@163.com'              #发送邮箱名称
  smtp_auth_username: 'alert@163.com'              #邮箱名称
  smtp_auth_password: 'password'                #邮箱密码或授权码
  smtp_require_tls: falseroute:
  receiver: 'default'
  group_wait: 10s  group_interval: 1m  repeat_interval: 1h  group_by: ['alertname']inhibit_rules:- source_match:
    severity: 'critical'
  target_match:
    severity: 'warning'
  equal: ['alertname', 'instance']
  receivers:- name: 'default'
  email_configs:
  - to: 'receiver@163.com'
    send_resolved: true
  webhook_configs:
  - url: 'http://dingtalk:8060/dingtalk/webhook/send'
    send_resolved: true
docker-stack.yml
vim /home/prom/docker-stack.yml
version: '3.7'services:
  dingtalk:
    image: timonwong/prometheus-webhook-dingtalk:latest    ports:
      - "8060:8060"
    configs:
      - source: dingtalk_config        target: /etc/prometheus-webhook-dingtalk/config.yml    networks:
      - prom    deploy:
      mode: replicated      replicas: 1

  alertmanager:
    image: prom/alertmanager:latest    ports:
      - "9093:9093"
      - "9094:9094"
    configs:
      - source: alertmanager_config        target: /etc/alertmanager/alertmanager.yml    networks:
      - prom    deploy:
      mode: replicated      replicas: 1

  prometheus:
    image: prom/prometheus:latest    ports:
      - "9090:9090"
    configs:
      - source: prometheus_config        target: /etc/prometheus/prometheus.yml      - source: alert_rules        target: /etc/prometheus/alert-rules.yml    networks:
      - prom    deploy:
      mode: replicated      replicas: 1
      placement:
        constraints:
          - node.role == manager  grafana:
    image: grafana/grafana:latest    ports:
      - "3000:3000"
    volumes:
      - type: volume        source: grafana        target: /var/lib/grafana    networks:
      - prom    deploy:
      mode: replicated      replicas: 1
      configs:
  dingtalk_config:
    file: ./alertmanager/config.yml
  alertmanager_config:
    file: ./alertmanager/alertmanager.yml
  prometheus_config:
    file: ./prometheus/prometheus.yml
  alert_rules:
    file: ./prometheus/alert-rules.yml
volumes:
  prometheus:
    driver: local    driver_opts:
      type: none      o: bind      device: /home/prom/prometheus/data  grafana:
    driver: local    driver_opts:
      type: none      o: bind      device: /home/prom/grafana
networks:
  prom:
    driver: overlay
version: '3.7'services:
  node-exporter:
    image: prom/node-exporter:latest    ports:
      - "9100:9100"
    networks:
      - prom  dingtalk:
    image: timonwong/prometheus-webhook-dingtalk:latest    volumes:
      - type: bind        source: ./alertmanager/config.yml        target: /etc/prometheus-webhook-dingtalk/config.yml        read_only: true
    ports:
      - "8060:8060"
    networks:
      - prom  alertmanager:
    depends_on:
      - dingtalk    image: prom/alertmanager:latest    volumes:
      - type: bind        source: ./alertmanager/alertmanager.yml        target: /etc/alertmanager/alertmanager.yml        read_only: true
    ports:
      - "9093:9093"
      - "9094:9094"
    networks:
      - prom  prometheus:
    depends_on:
      - alertmanager    image: prom/prometheus:latest    volumes:
      - type: bind        source: ./prometheus/prometheus.yml        target: /etc/prometheus/prometheus.yml        read_only: true
      - type: bind        source: ./prometheus/alert-rules.yml        target: /etc/prometheus/alert-rules.yml        read_only: true
      - type: volume        source: prometheus        target: /prometheus    ports:
      - "9090:9090"
    networks:
      - prom  grafana:
    depends_on:
      - prometheus    image: grafana/grafana:latest    volumes:
      - type: volume        source: grafana        target: /var/lib/grafana    ports:
      - "3000:3000"
    networks:
      - promvolumes:
  prometheus:
    driver: local    driver_opts:
      type: none      o: bind      device: /home/prom/prometheus/data  grafana:
    driver: local    driver_opts:
      type: none      o: bind      device: /home/prom/grafana
networks:
  prom:
    driver: bridge
docker stack deploy prom --compose-file docker-stack.yml

docker stack lsNAME                SERVICES            orchestraTOR
prom                4                   Swarm

docker service lsID                  NAME                MODE                REPLICAS            IMAGE                                          PORTS
f72uewsvc8os        prom_alertmanager   replicated          1/1                 prom/alertmanager:latest                       *:9093-9094->9093-9094/tcp
qonjcrm8pf8o        prom_dingtalk       replicated          1/1                 timonwong/prometheus-webhook-dingtalk:latest   *:8060->8060/tcp
u376krlzd9o6        prom_grafana        replicated          1/1                 grafana/grafana:latest                         *:3000->3000/tcp
kjj909up7ptd        prom_prometheus     replicated          1/1                 prom/prometheus:latest                         *:9090->9090/tcp

docker psCONTAINER ID        IMAGE                                          COMMAND                  CREATED              STATUS              PORTS               NAMES
daf3f972ceea        timonwong/prometheus-webhook-dingtalk:latest   "/bin/prometheus-web…"   About a minute ago   Up About a minute   8060/tcp            prom_dingtalk.1.76ick5qr2fquysl6noztepypa
bcd8f36c78dc        grafana/grafana:latest                         "/run.sh"                About a minute ago   Up About a minute   3000/tcp            prom_grafana.1.ybv3yqburoc6olwys0xh2pqlk
160b53a9f51e        prom/prometheus:latest                         "/bin/prometheus --c…"   About a minute ago   Up About a minute   9090/tcp            prom_prometheus.1.wo8gjnlqlup2nd0ejb88pca85
709ee8176696        prom/alertmanager:latest                       "/bin/alertmanager -…"   About a minute ago   Up About a minute   9093/tcp            prom_alertmanager.1.5beu8aeyt1towanyj9wixtggr
容器启动正常,访问ip:9090,

因为docker-stack.yml不包含node-exporter,所以状态是DOWN。访问ip:3000,

可以看到,prometheus各组件状态正常。
node-exporter
通过docker单独启动node-exporter:
docker pull prom/node-exporter:latest

docker run -d -p 9100:9100 --name node-exporter prom/node-exporter:latest


增加监控主机时,修改prometheus.yml,然后更新prometheus:
docker service update prom_prometheus
测试告警
docker stop node-exporter

docker psCONTAINER ID        IMAGE                                          COMMAND                  CREATED             STATUS              PORTS                    NAMES
daf3f972ceea        timonwong/prometheus-webhook-dingtalk:latest   "/bin/prometheus-web…"   17 minutes ago      Up 17 minutes       8060/tcp                 prom_dingtalk.1.76ick5qr2fquysl6noztepypa
bcd8f36c78dc        grafana/grafana:latest                         "/run.sh"                17 minutes ago      Up 17 minutes       3000/tcp                 prom_grafana.1.ybv3yqburoc6olwys0xh2pqlk
160b53a9f51e        prom/prometheus:latest                         "/bin/prometheus --c…"   17 minutes ago      Up 17 minutes       9090/tcp                 prom_prometheus.1.wo8gjnlqlup2nd0ejb88pca85
709ee8176696        prom/alertmanager:latest                       "/bin/alertmanager -…"   17 minutes ago      Up 17 minutes       9093/tcp                 prom_alertmanager.1.5beu8aeyt1towanyj9wixtggr
收到钉钉和邮件故障告警,


docker start node-exporter

docker psCONTAINER ID        IMAGE                                          COMMAND                  CREATED             STATUS              PORTS                    NAMES
daf3f972ceea        timonwong/prometheus-webhook-dingtalk:latest   "/bin/prometheus-web…"   17 minutes ago      Up 17 minutes       8060/tcp                 prom_dingtalk.1.76ick5qr2fquysl6noztepypa
bcd8f36c78dc        grafana/grafana:latest                         "/run.sh"                17 minutes ago      Up 17 minutes       3000/tcp                 prom_grafana.1.ybv3yqburoc6olwys0xh2pqlk
160b53a9f51e        prom/prometheus:latest                         "/bin/prometheus --c…"   17 minutes ago      Up 17 minutes       9090/tcp                 prom_prometheus.1.wo8gjnlqlup2nd0ejb88pca85
709ee8176696        prom/alertmanager:latest                       "/bin/alertmanager -…"   17 minutes ago      Up 17 minutes       9093/tcp                 prom_alertmanager.1.5beu8aeyt1towanyj9wixtggr
95252704e558        prom/node-exporter:latest                      "/bin/node_exporter"     24 hours ago        Up 7 minutes        0.0.0.0:9100->9100/tcp   node-exporter
收到钉钉和邮件恢复告警,


测试宕机完成,告警没有问题。
docker stack部署 prometheus + grafana 完成,整个部署过程在swarm集群中进行。与docker-compose类似,相比传统部署方式要简便很多。

Docker 下 Prometheus 和 Grafana 三部曲之一:极速体验
开源监控工具 Prometheus 目前广为使用,配合 Grafana 即可直观展现监控数据,但对于初学者来说搭建这样一个系统要花费些时间,或者有时也想要快速搭好系统使用其功能,今天的实战中,我们在 Docker 环境下快速搭建和体验一个典型的业务监控系统,包括 prometheus、node-exporter、cadvisor、grafana、业务后台服务 (springboot);
本文是《Docker 下 Prometheus 和 Grafana 三部曲》系列的第一篇,整个系列包含以下内容:
- 极速体验,也就是本文;
- 细说 Docker 相关开发,介绍在 Docker 环境搭建整个环境的细节;
- 自定义监控项的开发和展示配置;
三部曲所有文章链接
- 《Docker 下 Prometheus 和 Grafana 三部曲之一:极速体验》;
- 《Docker 下 Prometheus 和 Grafana 三部曲之二:细说 Docker 编排》;
- 《Docker 下 Prometheus 和 Grafana 三部曲之三:自定义监控项开发和配置》;
环境信息
本次实战的环境信息如下:
- 操作系统:CentOS 7.6.1810
- Docker:17.03.2-ce
- node-exporter:0.17.0 (docker 容器,不需要您准备)
- prometheus:2.8.0 (docker 容器,不需要您准备)
- cadvisor:0.28.0 (docker 容器,不需要您准备)
- grafana:5.4.2 (docker 容器,不需要您准备)
- springboot:1.5.19.RELEASE (docker 容器,不需要您准备)
本次实战的电脑是 CentOS 系统,IP 地址为 192.168.1.101
操作步骤简介
实战由以下几步组成:
- 一行命令创建所有容器;
- 取得 Grafana 的 API KEY,创建图表时要用到;
- 一行命令创建所有图表;
- 体验监控系统;
接下来开始实战吧。
创建容器
登录 CentOS 服务器,新建一个文件夹,在里面执行以下命令就能将所有容器创建好:
wget https://raw.githubusercontent.com/zq2599/blog_demos/master/prometheusdemo/files/prometheus.yml && \
wget https://raw.githubusercontent.com/zq2599/blog_demos/master/prometheusdemo/files/docker-compose.yml && \
docker-compose up -d
上述命令会下载容器编排脚本和 prometheus 的配置文件,然后创建容器,控制台输出如下信息(如果本地没有相关的镜像还会显示下载镜像的信息):
[root@hedy prometheus_blog]# wget https://raw.githubusercontent.com/zq2599/blog_demos/master/prometheusdemo/files/prometheus.yml && \
> wget https://raw.githubusercontent.com/zq2599/blog_demos/master/prometheusdemo/files/docker-compose.yml && \
> docker-compose up -d
--2019-03-09 23:05:28--  https://raw.githubusercontent.com/zq2599/blog_demos/master/prometheusdemo/files/prometheus.yml
正在解析主机 raw.githubusercontent.com (raw.githubusercontent.com)... 151.101.228.133
正在连接 raw.githubusercontent.com (raw.githubusercontent.com)|151.101.228.133|:443... 已连接。
已发出 HTTP 请求,正在等待回应... 200 OK
长度:1173 (1.1K) [text/plain]
正在保存至: “prometheus.yml”

100%[==================================================================================================================================================================>] 1,173       --.-K/s 用时 0s

2019-03-09 23:05:28 (162 MB/s) - 已保存 “prometheus.yml” [1173/1173])

--2019-03-09 23:05:28--  https://raw.githubusercontent.com/zq2599/blog_demos/master/prometheusdemo/files/docker-compose.yml
正在解析主机 raw.githubusercontent.com (raw.githubusercontent.com)... 151.101.228.133
正在连接 raw.githubusercontent.com (raw.githubusercontent.com)|151.101.228.133|:443... 已连接。
已发出 HTTP 请求,正在等待回应... 200 OK
长度:1727 (1.7K) [text/plain]
正在保存至: “docker-compose.yml”

100%[==================================================================================================================================================================>] 1,727       --.-K/s 用时 0s

2019-03-09 23:05:29 (108 MB/s) - 已保存 “docker-compose.yml” [1727/1727])

Creating network "prometheus_blog_default" with the default driver
Creating node-exporter  ... done
Creating prometheusdemo ... done
Creating cadvisor       ... done
Creating prometheus     ... done
Creating grafana        ... done
取得 Grafana 的 API KEY
现在要取得 Grafana 的授权 KEY,有了这个 KEY 就能通过脚本快速创建数据源和各种监控报表了,具体操作如下:
- 浏览器访问 Grafana 页面:http://192.168.1.101:3000
- 用户名 admin,密码 secret;
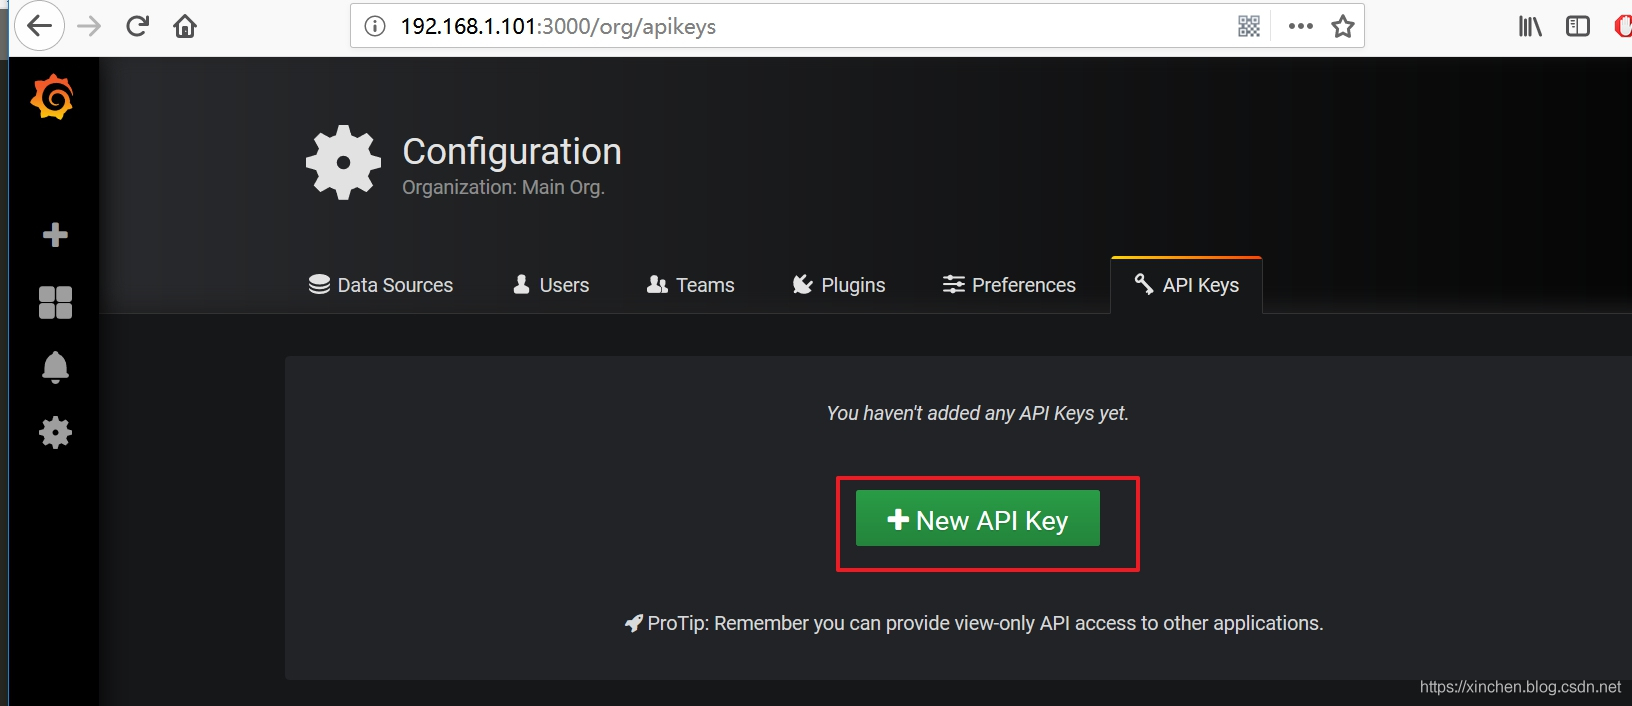
- 在左侧的设置菜单中,点击 "API keys",如下图:
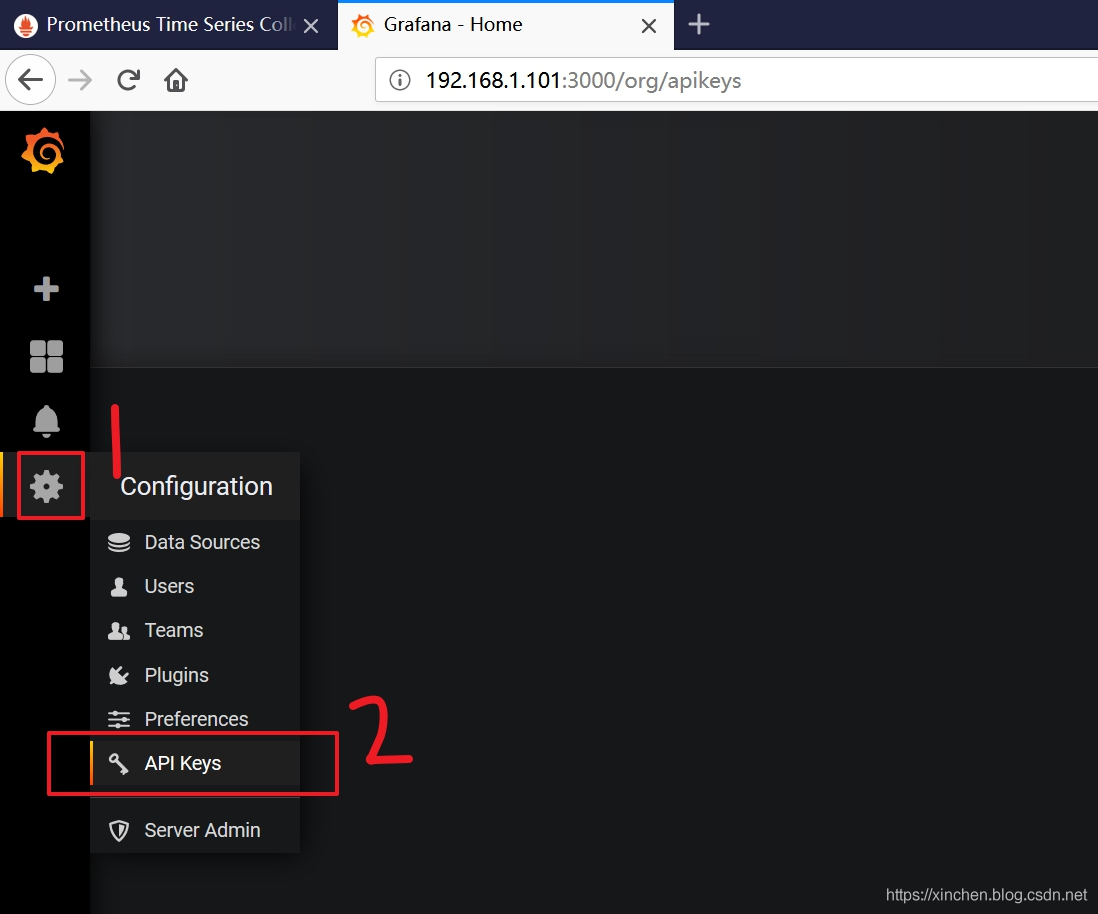
- 如下图,点击按钮 "+New API Key":
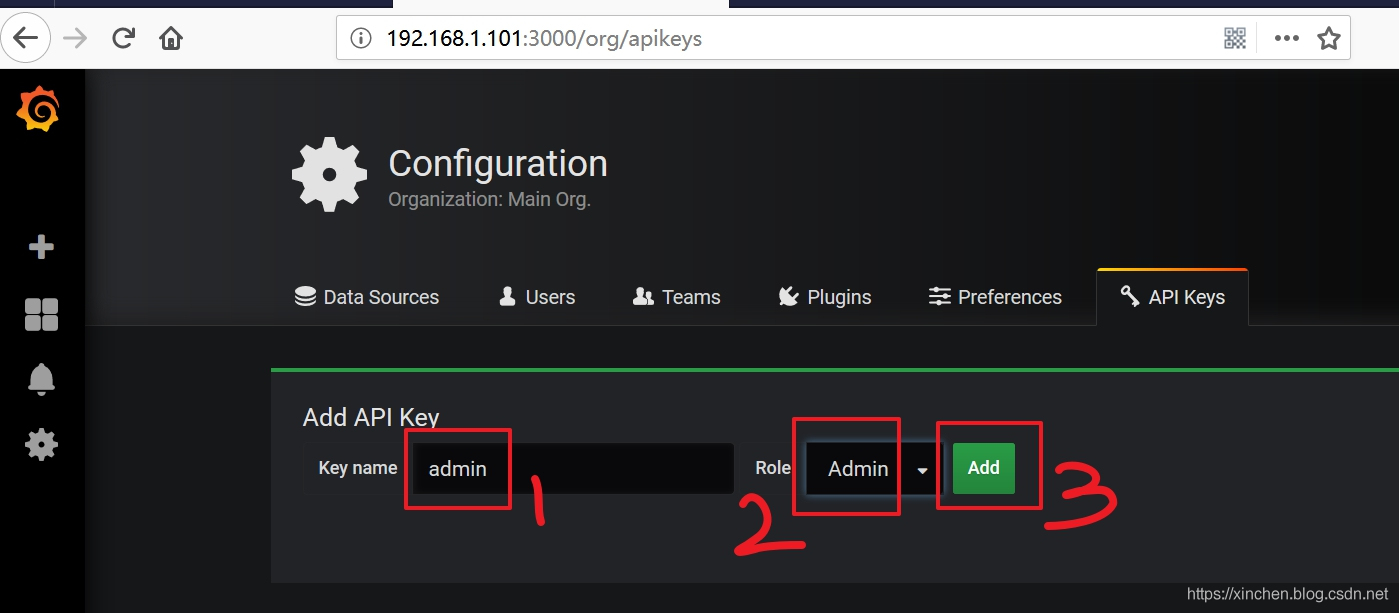
- 在创建 API key 的页面,输入 key 名称 admin,Role 选择 Admin,然后点击 "Add" 按钮,如下图:
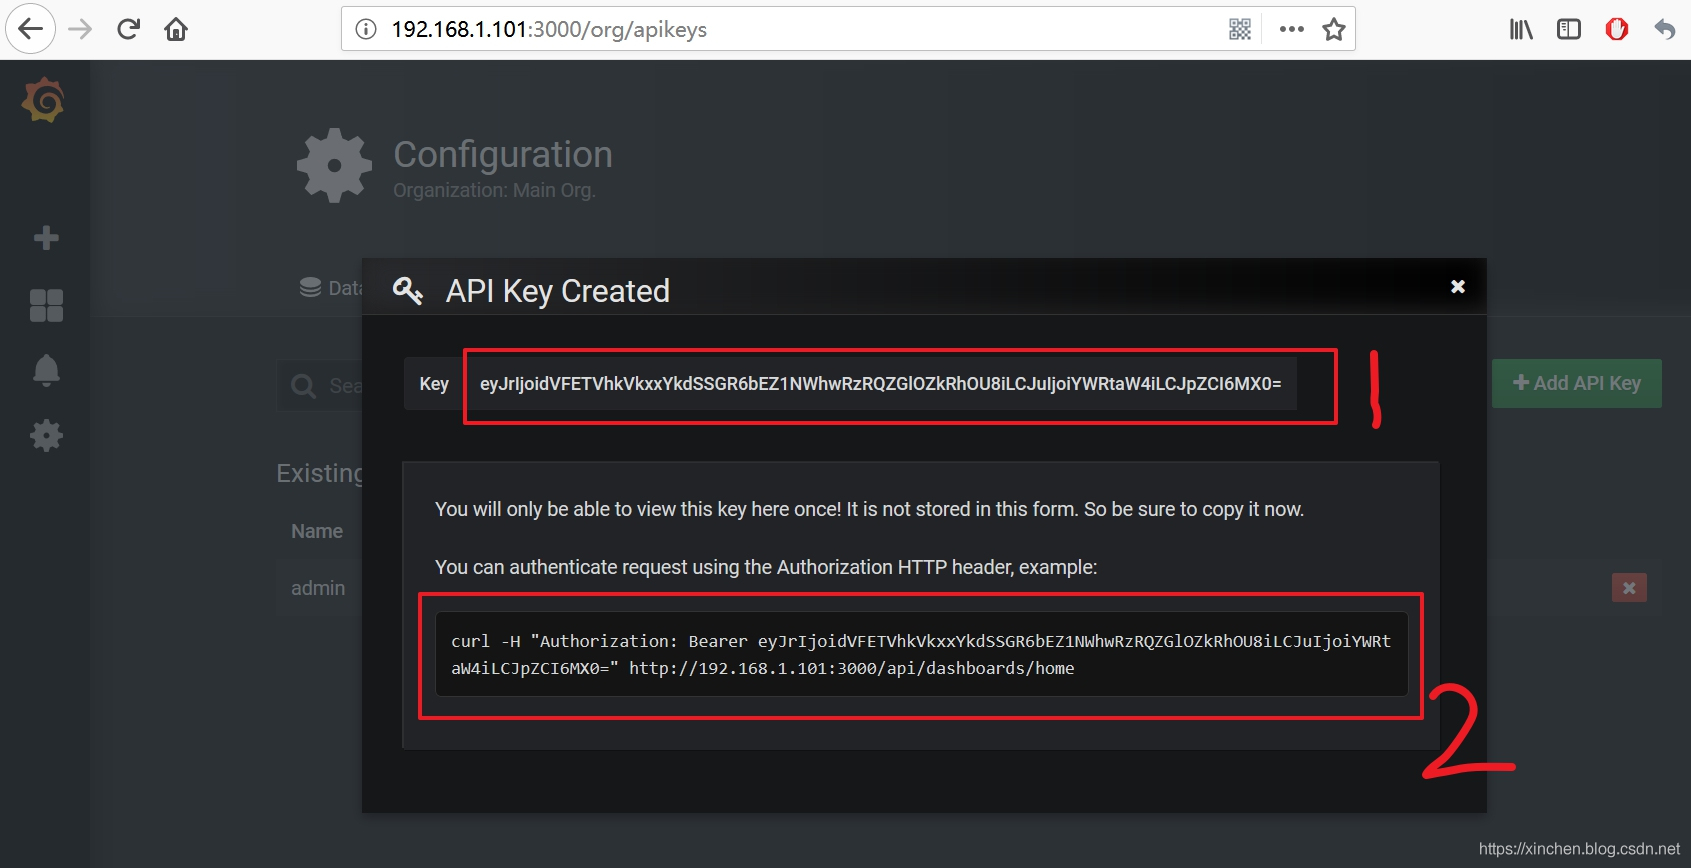
- 弹出的窗口会显示新建的 API Key,下图红框 1 中的内容就是我们后面会用到的 API Key,请保存下来,红框 2 中的命令是获取首页信息的,可以执行一下试试,成功了表示这个 API Key 是有效的:
创建监控图表
执行以下命令即可创建监控图表,注意把 192.168.1.101 替换为您的 CentOS 机器的 IP 地址,如果是在当前机器上操作就用 127.0.0.1,把 xxxxxxxxx 替换为前面步骤中取得的 API Key,例如我的是 eyJrIjoieHpHeUVoODFiMDNiZE13TDdqUGxNS1NoN0dhVGVVc04iLCJuIjoiYWRtaW4iLCJpZCI6MX0=:
wget https://raw.githubusercontent.com/zq2599/blog_demos/master/prometheusdemo/files/import_dashboard.sh && \
./import_dashboard.sh 192.168.1.101 xxxxxxxxx
控制台会输出如下类似信息,表示数据源和图表都创建成功:
[root@hedy 10]# wget https://raw.githubusercontent.com/zq2599/blog_demos/master/prometheusdemo/files/import_dashboard.sh && \
> chmod a+x import_dashboard.sh && \
> ./import_dashboard.sh 192.168.1.101 eyJrIjoiSEduM2g1clFpaVZRNjRXTTBSek50aUp3OFM3bXUzVUciLCJuIjoiYWRtaW4iLCJpZCI6MX0=
--2019-03-09 23:46:27--  https://raw.githubusercontent.com/zq2599/blog_demos/master/prometheusdemo/files/import_dashboard.sh
正在解析主机 raw.githubusercontent.com (raw.githubusercontent.com)... 151.101.108.133
正在连接 raw.githubusercontent.com (raw.githubusercontent.com)|151.101.108.133|:443... 已连接。
已发出 HTTP 请求,正在等待回应... 200 OK
长度:113606 (111K) [text/plain]
正在保存至: “import_dashboard.sh”

100%[==================================================================================================================================================================>] 113,606      468KB/s 用时 0.2s

2019-03-09 23:46:28 (468 KB/s) - 已保存 “import_dashboard.sh” [113606/113606])

grafana host [192.168.1.101]
api key [eyJrIjoiSEduM2g1clFpaVZRNjRXTTBSek50aUp3OFM3bXUzVUciLCJuIjoiYWRtaW4iLCJpZCI6MX0=]
start create datasource
{


   "datasource":{


   "id":2,"orgId":1,"name":"Prometheus","type":"prometheus","typeLogoUrl":"","access":"proxy","url":"http://prometheus:9090","password":"","user":"","database":"","basicAuth":false,"basicAuthUser":"","basicAuthPassword":"","withCredentials":false,"isDefault":false,"secureJsonFields":{


   },"version":1,"readOnly":false},"id":2,"message":"Datasource added","name":"Prometheus"}
start create host dashboard
{


   "id":3,"slug":"1-zhu-ji-ji-chu-jian-kong-cpu-nei-cun-ci-pan-wang-luo","status":"success","uid":"h1qcOBjmz","url":"/d/h1qcOBjmz/1-zhu-ji-ji-chu-jian-kong-cpu-nei-cun-ci-pan-wang-luo","version":1}
start create jvm dashboard
{


   "id":4,"slug":"spring-boot-1-x","status":"success","uid":"MP3cOBjmz","url":"/d/MP3cOBjmz/spring-boot-1-x","version":1}
start create customize dashboard
{


   "id":5,"slug":"ye-wu-zi-ding-yi-jian-kong","status":"success","uid":"Hl3cOBCmk","url":"/d/Hl3cOBCmk/ye-wu-zi-ding-yi-jian-kong","version":1}
至此,整个环境已经 OK,一起来体验一下吧;
体验环境
-
查看 prometheus 的 web 页面,看配置的监控数据源是否有效,如下图,地址是:http://192.168.1.101:9090/targets
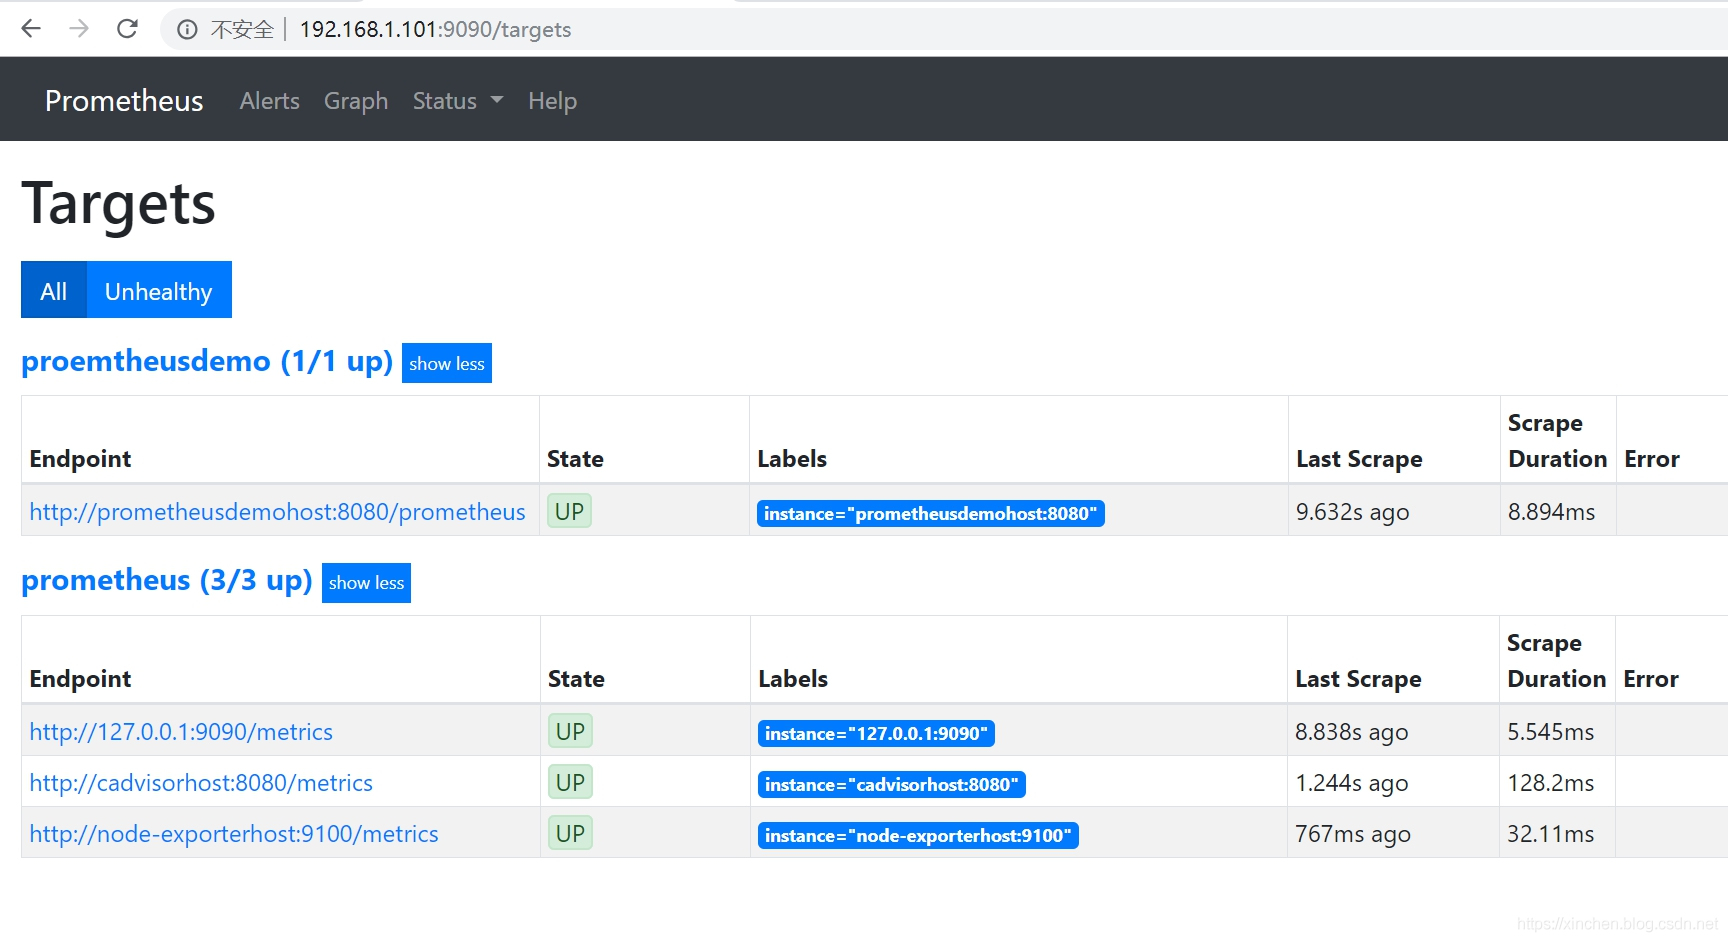
上图一共展示了四个数据源:
a. http://prometheusdemohost:8080/prometheus 是个 springboot 框架的 web 应用;
b. http://127.0.0.1:9090/metrics 是 prometheus 自身的数据;
c. http://cadvisorhost:8080/metrics 是 cadvisor 的数据,用来监控 docker 容器的;
d. http://node-exporterhost:9100/metrics 是当前宿主机的环境信息; -
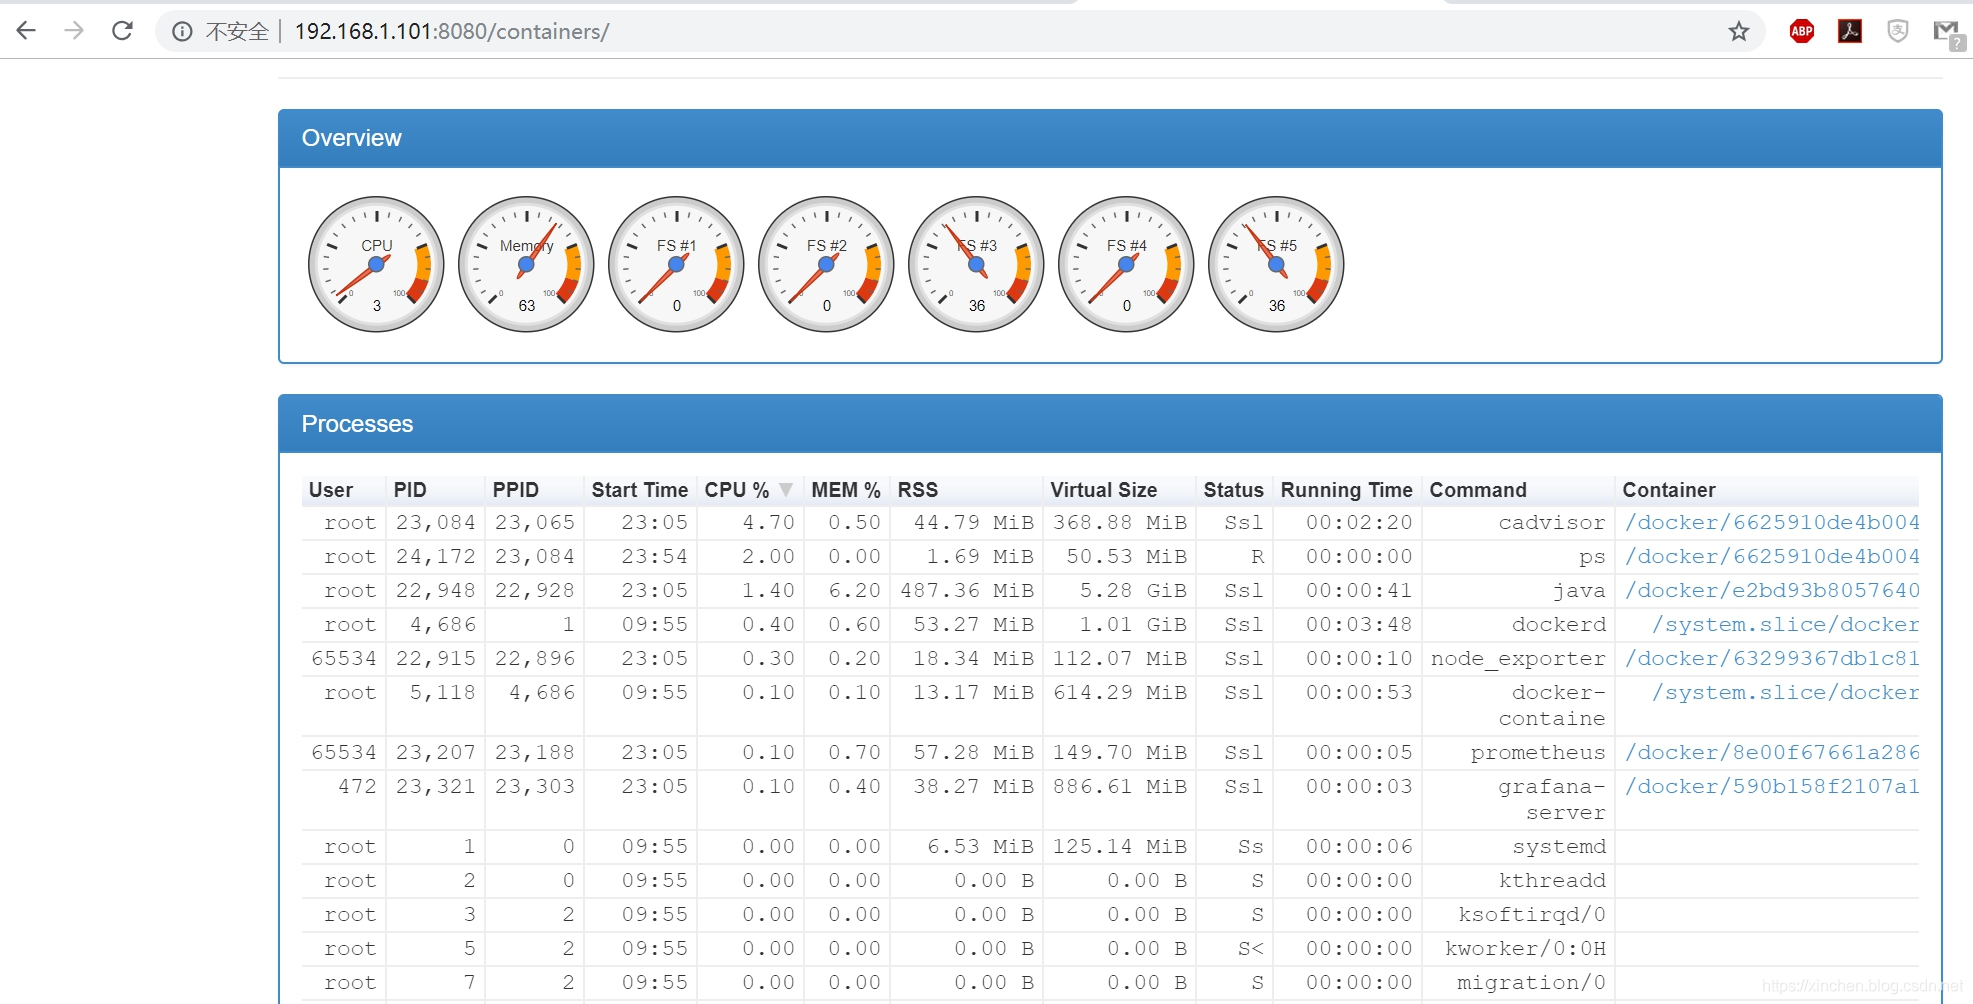
查看 cAdvisor 的 web 页面,可以看到 docker 的基本情况,如下图,地址是:http://192.168.1.101:8080
-
访问业务 web 服务,这是个 springboot 框架的 web 应用,提供了一个 web 接口,返回一个带了时间的字符串,地址是:http://192.168.1.101:8081/greet
-
注意:每访问一次上述业务 web 接口,web 应用都会上报一条记录到 prometheus,所以建议您多访问几次改接口,后面可以再 Grafana 上看到改接口的请求量曲线图;
-
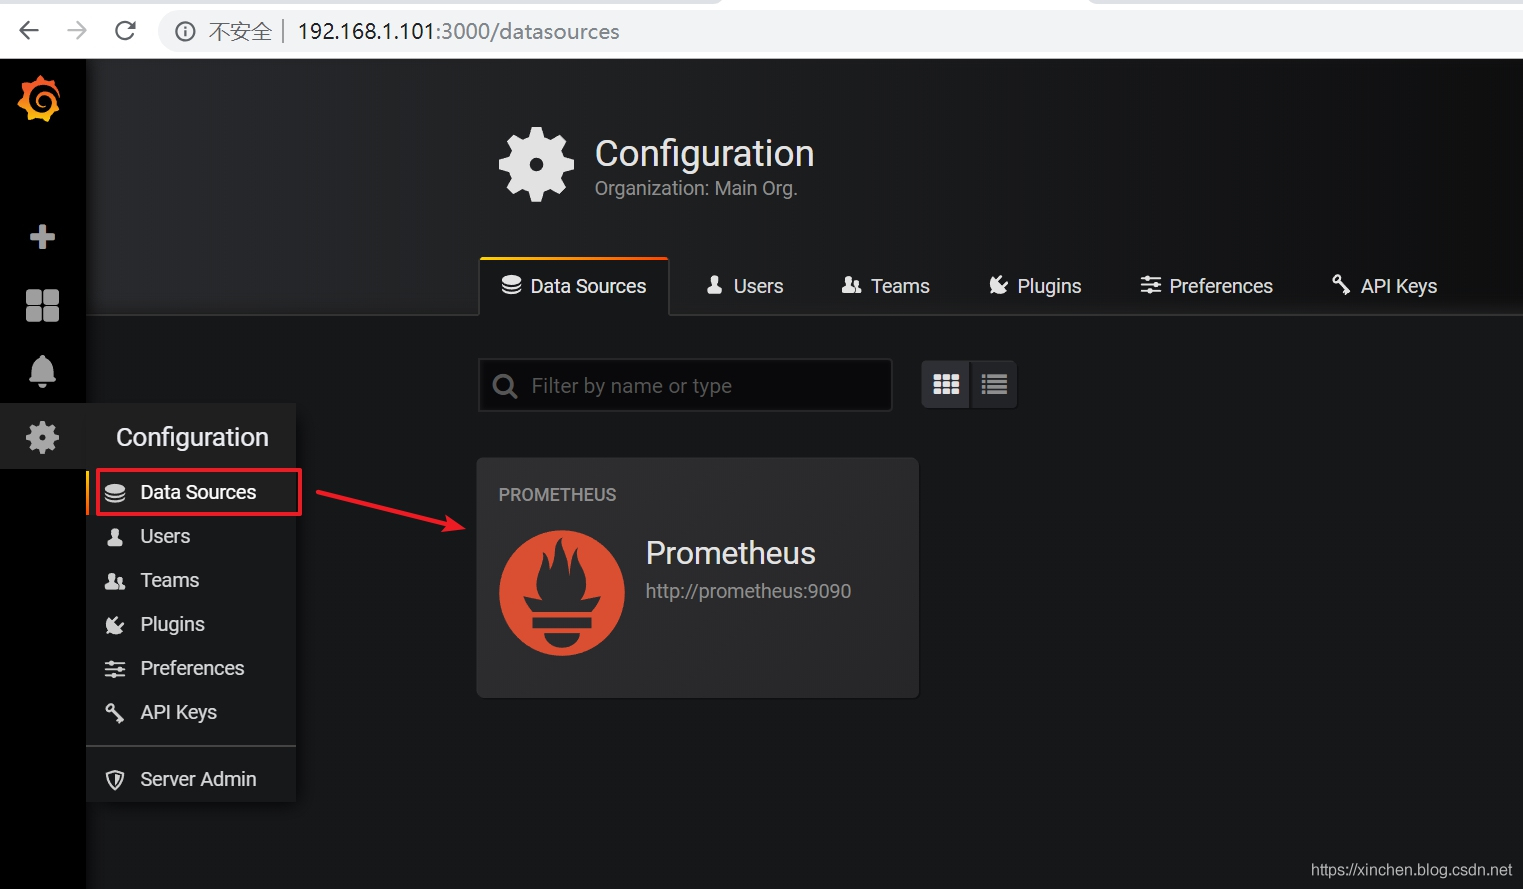
查看 Grafana 的监控图表,地址是:http://192.168.1.101:3000 ,如下图,可见数据源已经配置成了 prometheus (前面的 shell 脚本中执行的):
-
如下图,点击红框 1 中的 "manage",即可见到右侧监控列表中出现了三项:
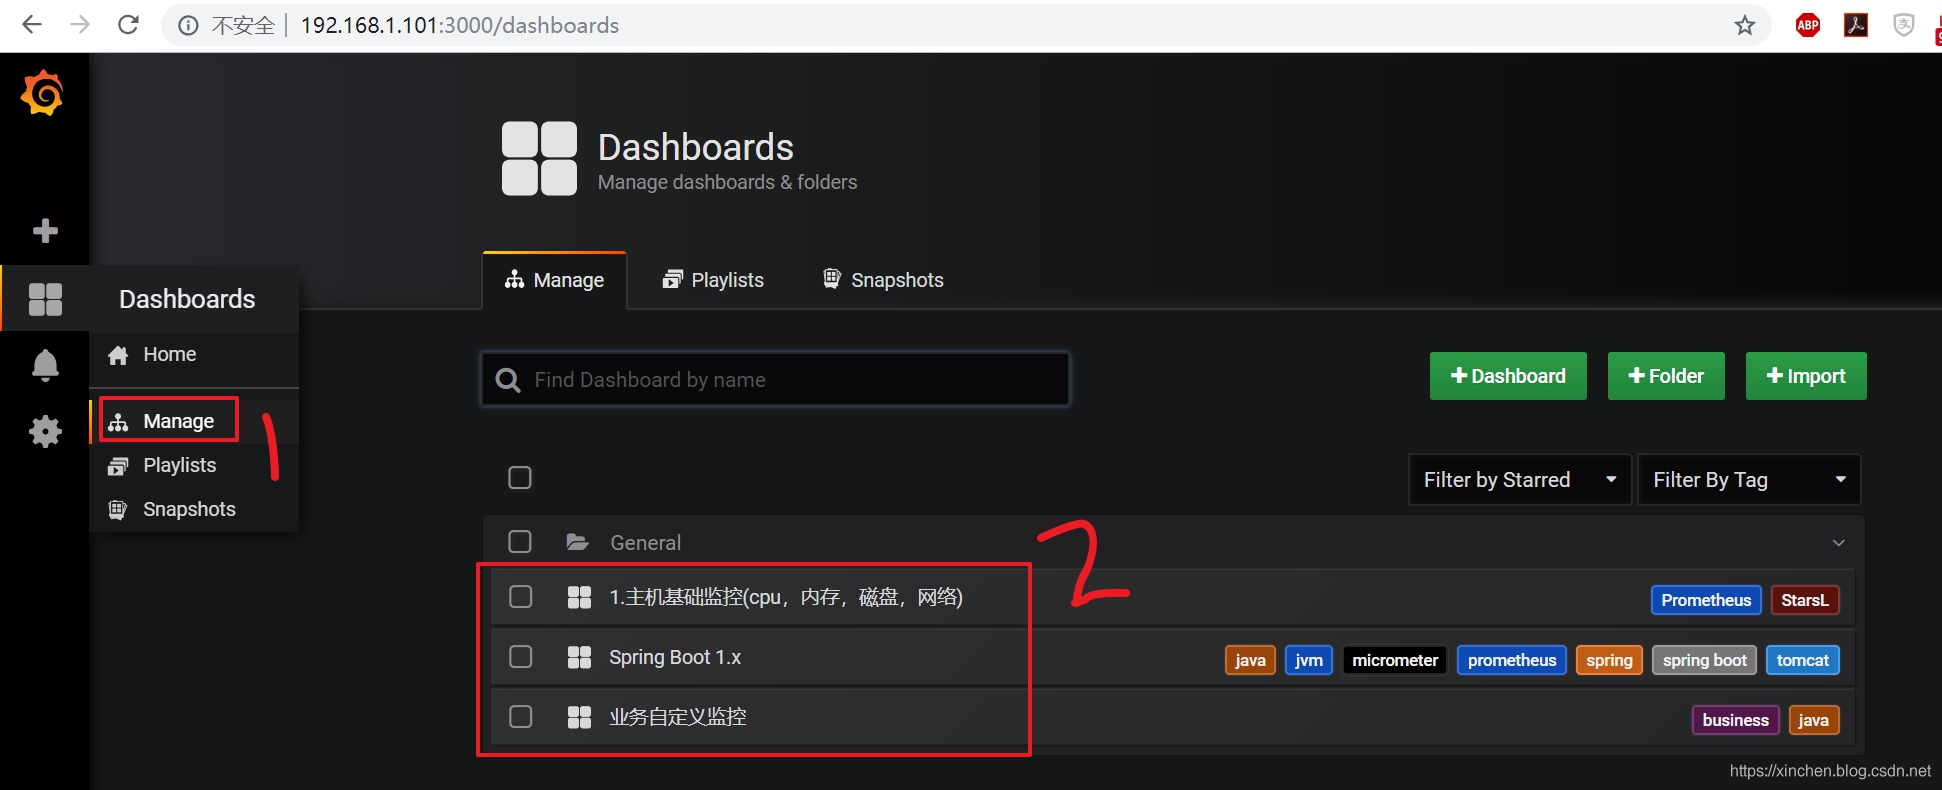
-
从第一个 "1. 主机基础监控 (cpu,内存,磁盘,网络)" 看起,如下图,服务器的各项信息都能展示出来,注意红框中的内容要选择准确,可以截图一致即可:
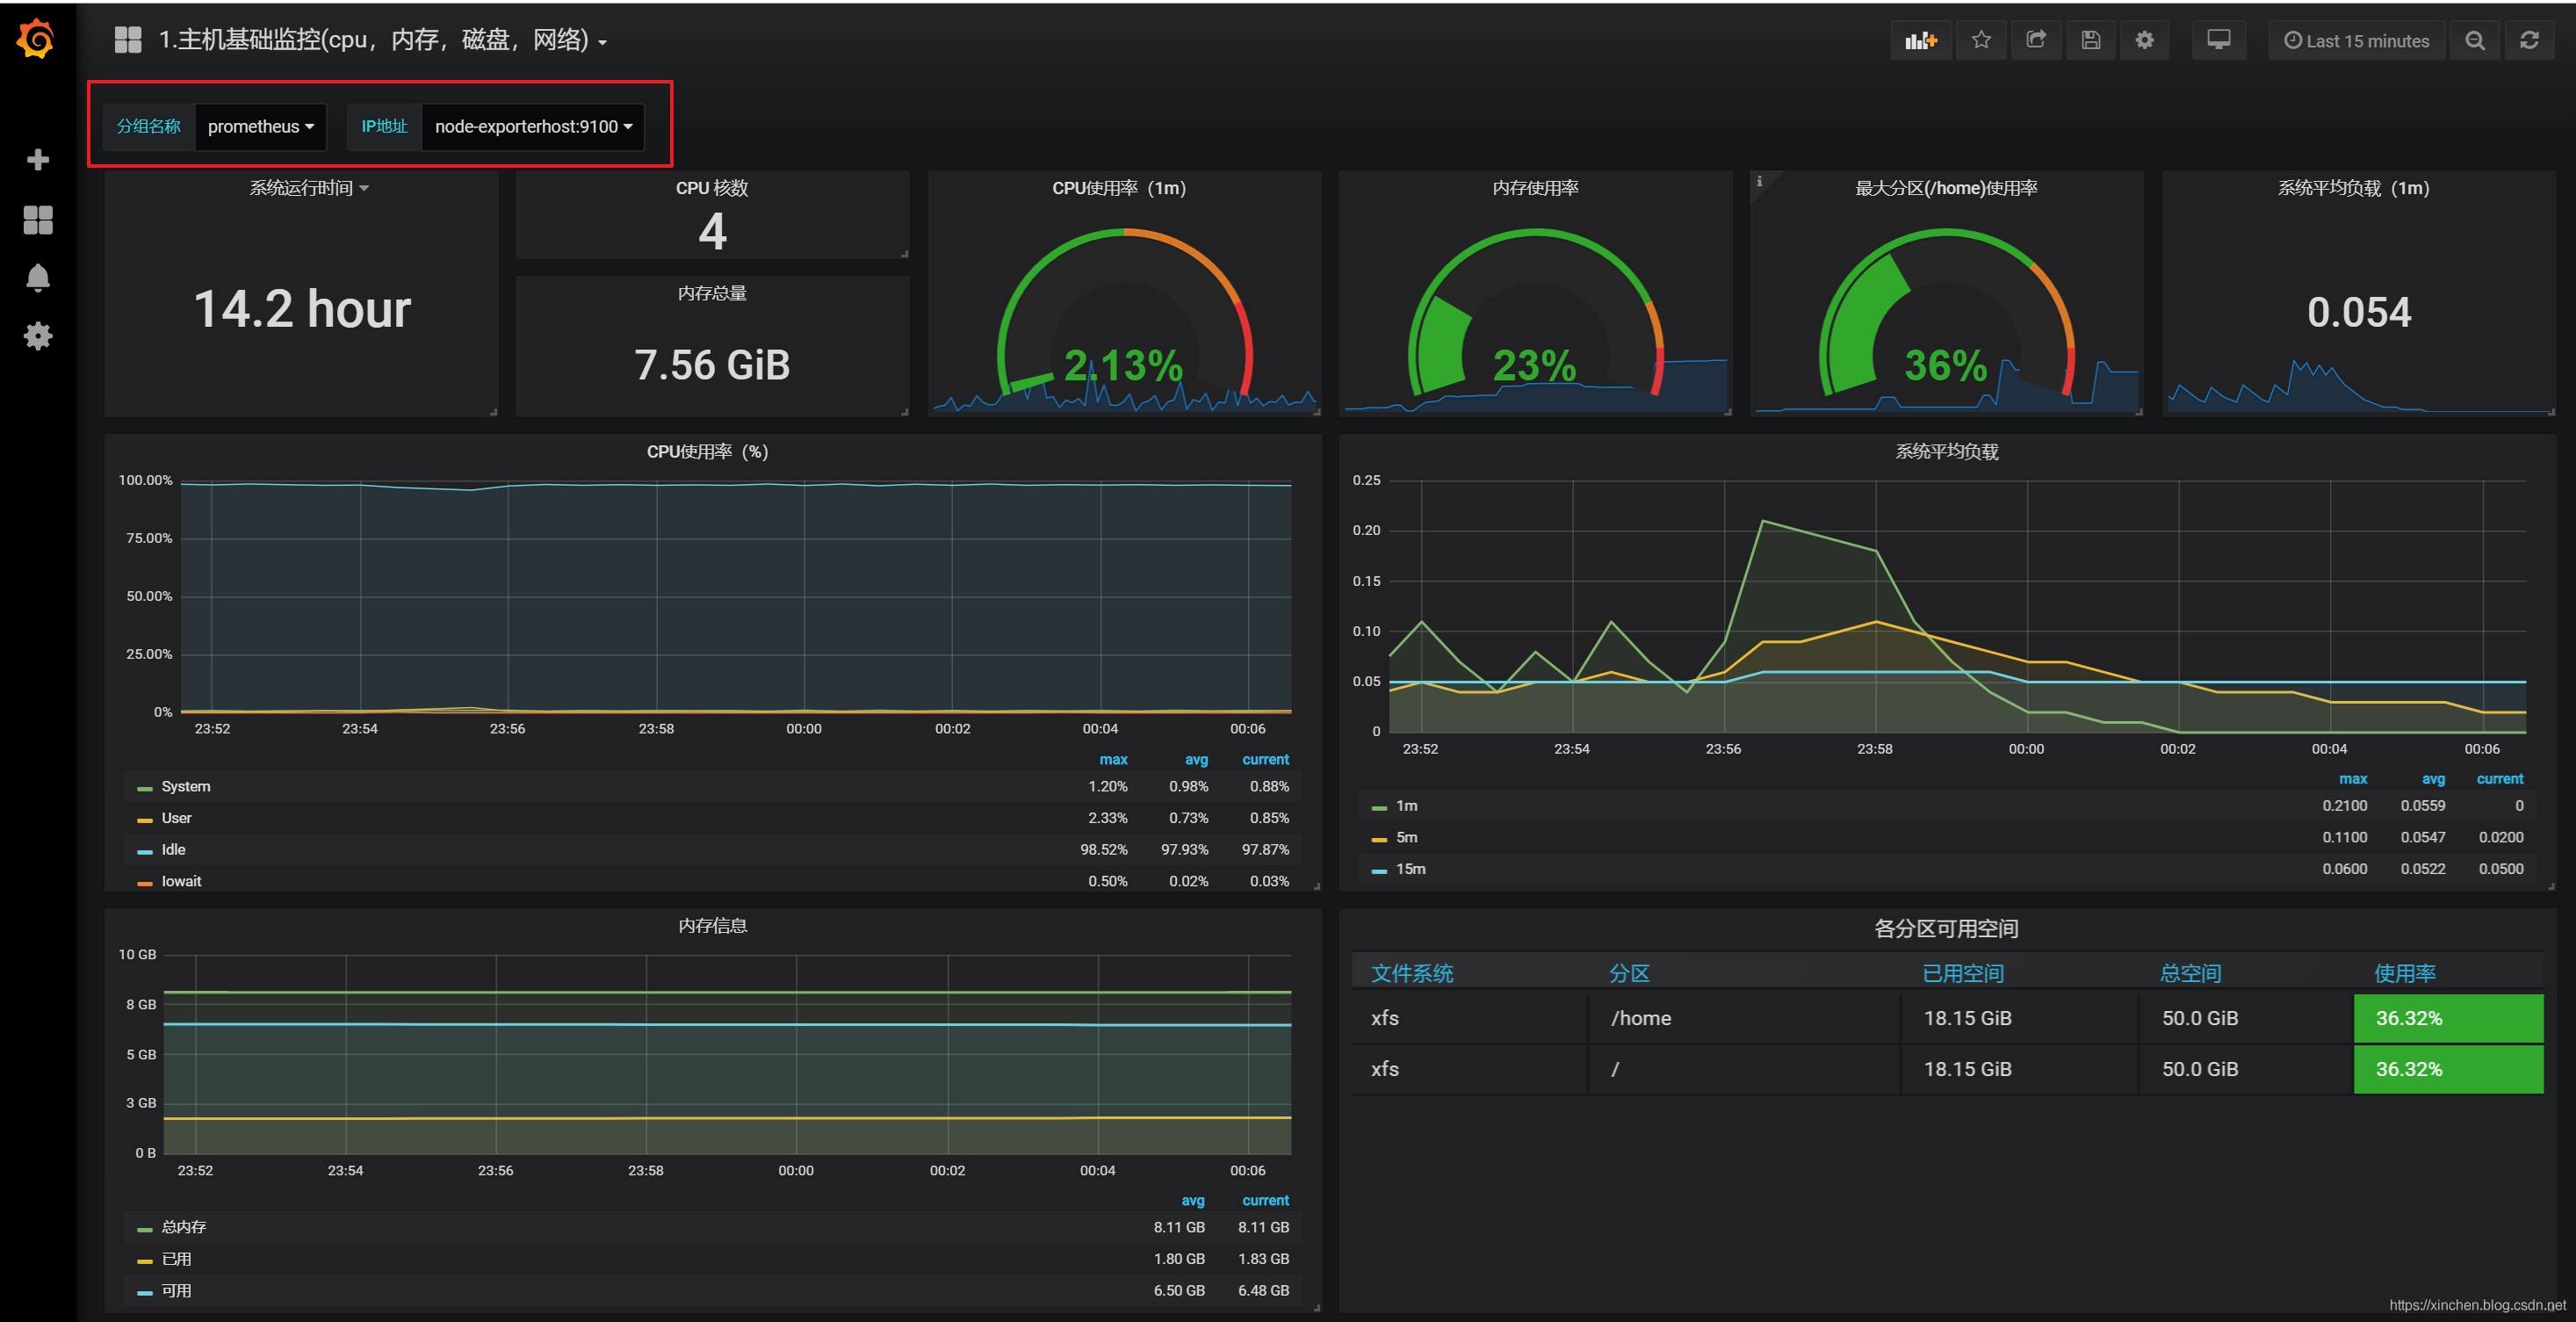
-
第二项 "Spring Boot 1.x" 主要是 JVM 和 Spring Boot 环境的相关信息,如下:
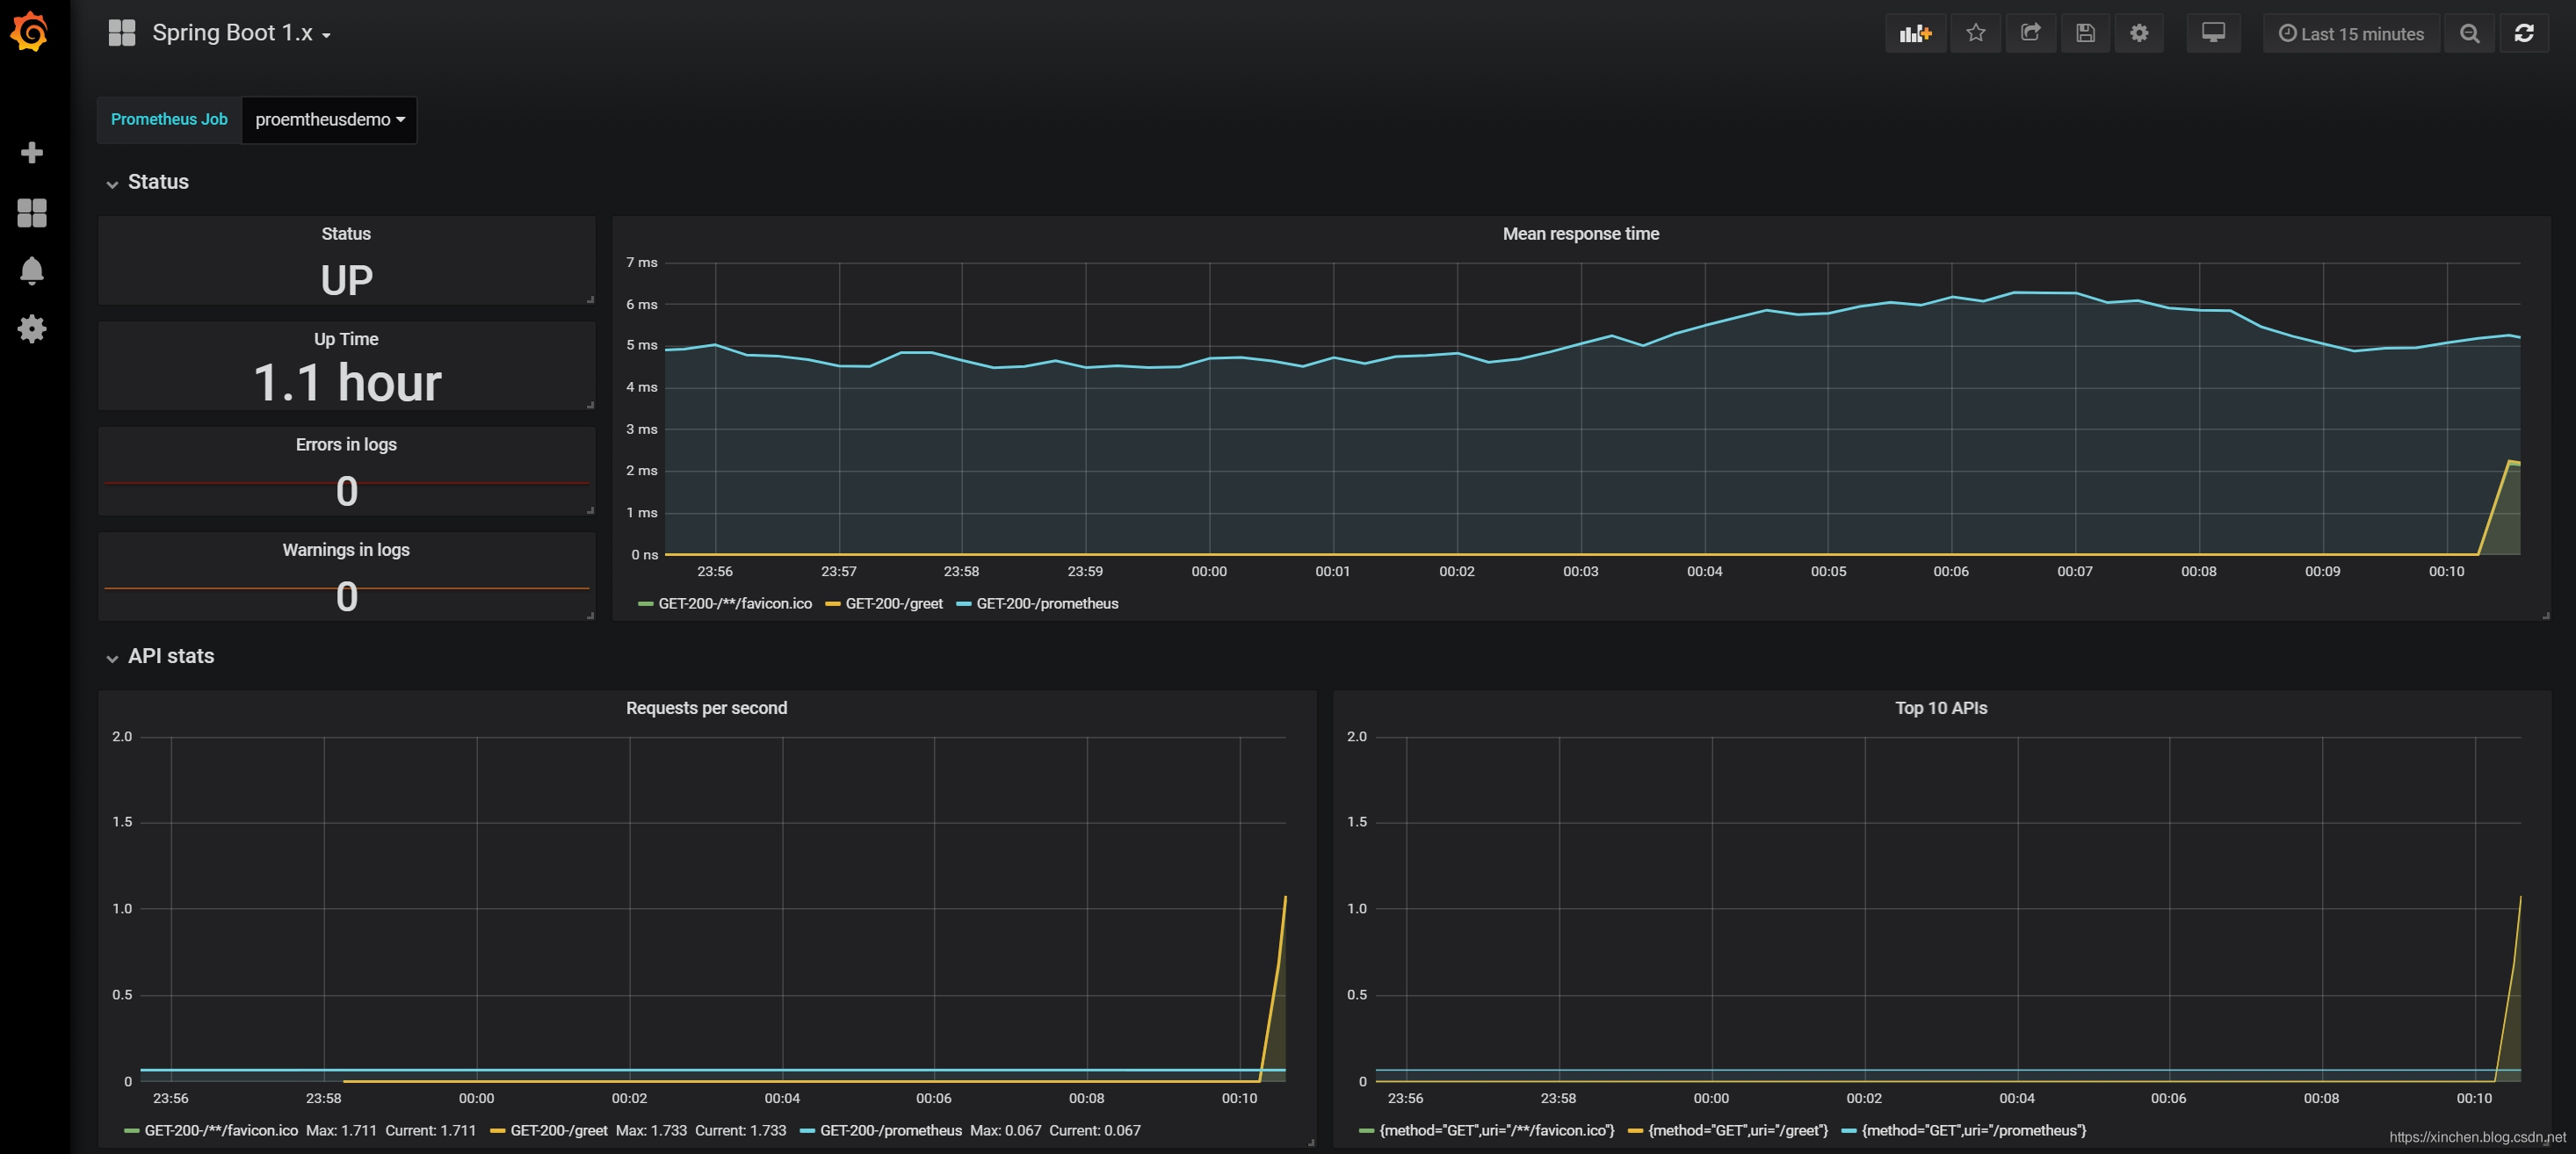
-
第三项是业务代码中自己上报到 prometheus 的数据,这些可以和具体业务做绑定,做出更多定制化的内容(具体的开发细节后面的文章会讲到),如下图:
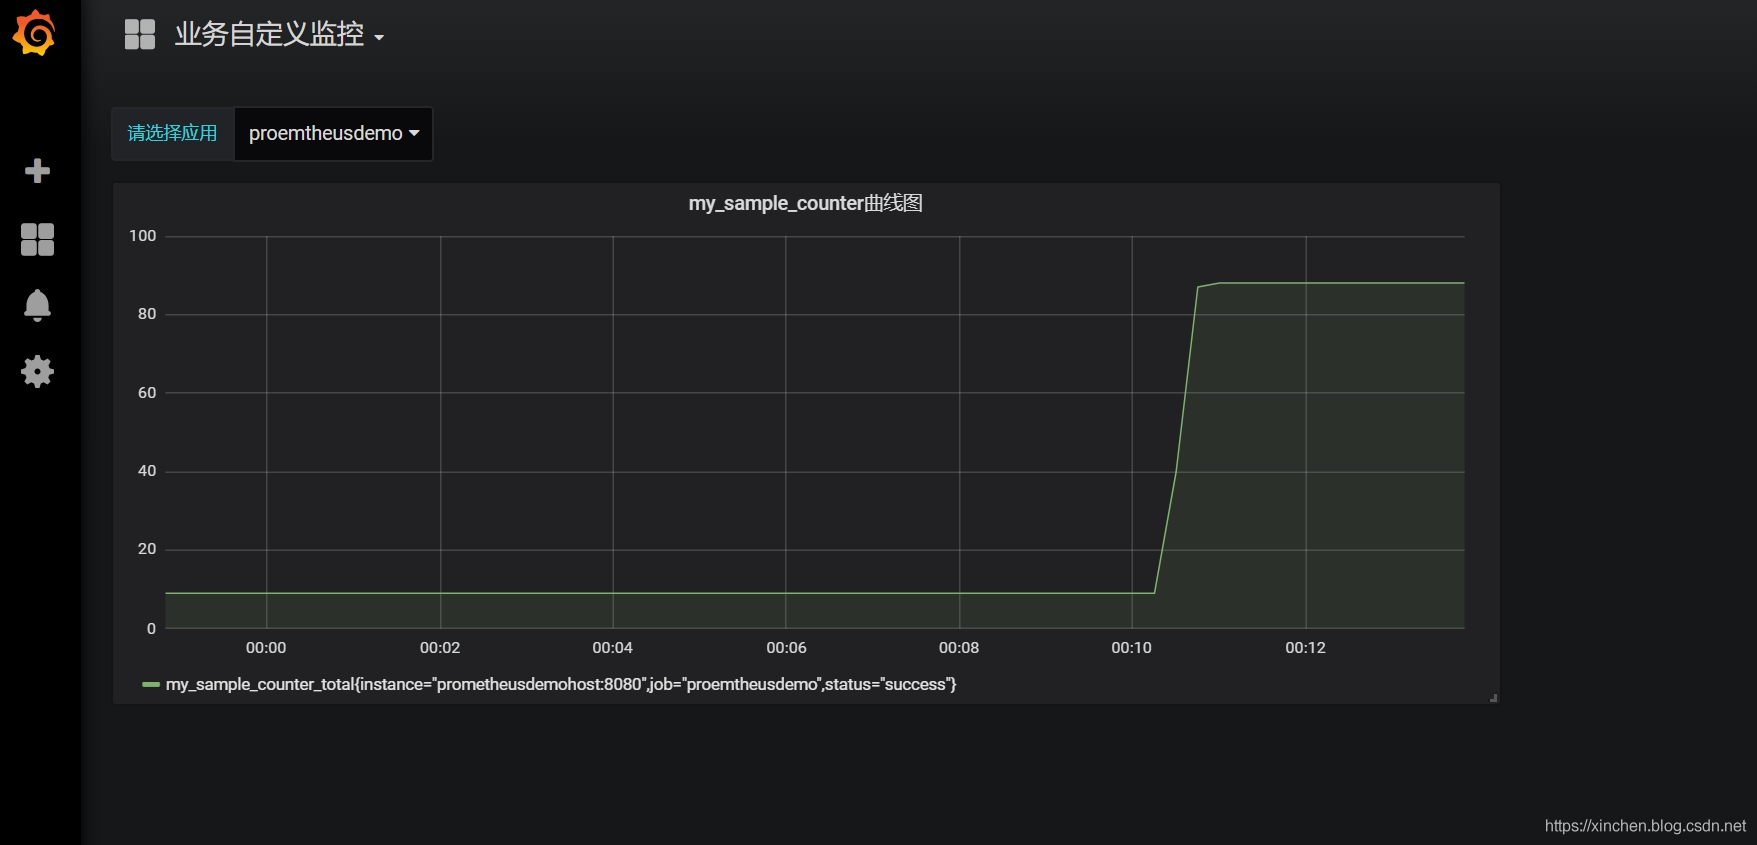
至此,基于 Prometheus 和 Grafana 的监控系统我们已经体验完毕了,希望能帮助您在短时间内对整个系统有个初步了解,接下来的章节将会解释如此简化的步骤是怎样做到的,请看《Docker 下 Prometheus 和 Grafana 三部曲之二:细说 Docker 编排》;
欢迎关注我的公众号:程序员欣宸

本文分享 CSDN - 程序员欣宸。
如有侵权,请联系 support@oschina.cn 删除。
本文参与 “OSC 源创计划”,欢迎正在阅读的你也加入,一起分享。
关于Docker 整合 Prometheus、Grafana 监控 Redis和prometheus监控docker 容器的介绍已经告一段落,感谢您的耐心阅读,如果想了解更多关于cAdvisor+Prometheus+Grafana监控docker、CentOS-Docker监控minio集群(grafana+prometheus)、docker stack部署prometheus + grafana、Docker 下 Prometheus 和 Grafana 三部曲之一:极速体验的相关信息,请在本站寻找。
本文标签:


![[转帖]Ubuntu 安装 Wine方法(ubuntu如何安装wine)](https://www.gvkun.com/zb_users/cache/thumbs/4c83df0e2303284d68480d1b1378581d-180-120-1.jpg)

