在这篇文章中,我们将带领您了解Spring整合JPA的全貌,包括spring整合jpa和mybatis的相关情况。同时,我们还将为您介绍有关(二)在一的基础上集成spring4.0.3并整合JPA以及
在这篇文章中,我们将带领您了解Spring整合JPA的全貌,包括spring整合jpa和mybatis的相关情况。同时,我们还将为您介绍有关(二)在一的基础上集成spring 4.0.3 并整合JPA以及spring的单元测试、228. springboot整合jpa、JAVA springboot微服务b2b2c电子商务系统(四)SpringBoot 整合JPA、Spring Boot整合JPA使用多个数据源的方法步骤的知识,以帮助您更好地理解这个主题。
本文目录一览:- Spring整合JPA(spring整合jpa和mybatis)
- (二)在一的基础上集成spring 4.0.3 并整合JPA以及spring的单元测试
- 228. springboot整合jpa
- JAVA springboot微服务b2b2c电子商务系统(四)SpringBoot 整合JPA
- Spring Boot整合JPA使用多个数据源的方法步骤
")
Spring整合JPA(spring整合jpa和mybatis)
我于2015-11-03 15:36在 iteye 中写的博客,现导入!
<?xml version="1.0" encoding="UTF-8"?>
<beans xmlns="http://www.springframework.org/schema/beans" xmlns:xsi="http://www.w3.org/2001/XMLSchema-instance"
       xmlns:aop="http://www.springframework.org/schema/aop" xmlns:tx="http://www.springframework.org/schema/tx"
       xmlns:context="http://www.springframework.org/schema/context"
       xsi:schemaLocation="http://www.springframework.org/schema/beans http://www.springframework.org/schema/beans/spring-beans-3.2.xsd
                           http://www.springframework.org/schema/aop  http://www.springframework.org/schema/aop/spring-aop-3.2.xsd
                           http://www.springframework.org/schema/tx http://www.springframework.org/schema/tx/spring-tx-3.2.xsd
                           http://www.springframework.org/schema/context http://www.springframework.org/schema/context/spring-context-3.2.xsd">
    <!--组件扫描(扫描除了@Controller和@ControllerAdvice以外的其它的类)-->
    <context:component-scan base-package="com.test.shop">
        <context:exclude-filter type="annotation" expression="org.springframework.stereotype.Controller"/>
        <context:exclude-filter type="annotation" expression="org.springframework.web.bind.annotation.ControllerAdvice"/>
    </context:component-scan>
    <!--配置分散配置的属性文件-->
    <context:property-placeholder location="classpath:jdbc.properties"/>
    <!--配置开发环境C3P0数据源-->
    <bean id="dataSource"destroy-method="close">
        <property name="driverClass" value="${jdbc.driverClass}"/>
        <property name="jdbcUrl" value="${jdbc.url}"/>
        <property name="user" value="${jdbc.username}"/>
        <property name="password" value="${jdbc.password}"/>
        <property name="minPoolSize" value="${jdbc.minPoolSize}"/>
        <property name="maxPoolSize" value="${jdbc.maxPoolSize}"/>
        <property name="maxIdleTime" value="${jdbc.maxIdleTime}"/>
        <property name="acquireIncrement" value="${jdbc.acquireIncrement}"/>
        <property name="maxStatements" value="${jdbc.maxStatements}"/>
        <property name="initialPoolSize" value="${jdbc.initialPoolSize}"/>
        <property name="idleConnectionTestPeriod" value="${jdbc.idleConnectionTestPeriod}"/>
        <property name="acquireRetryAttempts" value="${jdbc.acquireRetryAttempts}"/>
        <property name="breakAfterAcquireFailure" value="${jdbc.breakAfterAcquireFailure}"/>
        <property name="testConnectionOnCheckout" value="${jdbc.testConnectionOnCheckout}"/>
    </bean>
    <!--JPA实体管理器工厂 Spring整合JPA的核心入口-->
    <bean id="entityManagerFactory">
        <property name="dataSource" ref="dataSource"/>
        <!--指定持久化实现厂商类-->
        <property name="persistenceProvider">
            <bean/>
        </property>
        <!--设置JPA实现厂商的特定属性-->
        <property name="jpaVendorAdapter">
            <bean>
                <property name="generateDdl" value="false"/>
                <property name="database" value="MYSQL"/>
            </bean>
        </property>
        <!--指定一些高级特性-->
        <property name="jpaDialect">
            <bean/>
        </property>
        <!--扫描的包-->
        <property name="packagesToScan" value="com.test.shop.domain"/>
        <!--JPA实现厂商类的特有属性-->
        <property name="jpaProperties">
            <props>
                <prop key="hibernate.dialect">${hibernate.dialect}</prop>
                <prop key="hibernate.hbm2ddl.auto">${hibernate.hbm2ddl.auto}</prop>
                <prop key="hibernate.show_sql">${hibernate.show_sql}</prop>
                <prop key="hibernate.format_sql">${hibernate.format_sql}</prop>
            </props>
        </property>
    </bean>
    <!-- 事务管理器 -->
    <bean id="txManager">
        <property name="entityManagerFactory" ref="entityManagerFactory"/>
    </bean>
    <!--事务通知-->
    <tx:advice id="txAdvice" transaction-manager="txManager">
        <tx:attributes>
            <tx:method name="add*" isolation="DEFAULT" propagation="REQUIRED" rollback-for="java.lang.Exception"/>
            <tx:method name="save*" isolation="DEFAULT" propagation="REQUIRED" rollback-for="java.lang.Exception"/>
            <tx:method name="insert*" isolation="DEFAULT" propagation="REQUIRED" rollback-for="java.lang.Exception"/>
            <tx:method name="delete*" isolation="DEFAULT" propagation="REQUIRED" rollback-for="java.lang.Exception"/>
            <tx:method name="remove*" isolation="DEFAULT" propagation="REQUIRED" rollback-for="java.lang.Exception"/>
            <tx:method name="edit*" isolation="DEFAULT" propagation="REQUIRED" rollback-for="java.lang.Exception"/>
            <tx:method name="update*" isolation="DEFAULT" propagation="REQUIRED" rollback-for="java.lang.Exception"/>
            <tx:method name="modify*" isolation="DEFAULT" propagation="REQUIRED" rollback-for="java.lang.Exception"/>
            <tx:method name="batch*" isolation="DEFAULT" propagation="REQUIRED" rollback-for="java.lang.Exception"/>

            <tx:method name="load*" isolation="DEFAULT" propagation="REQUIRED" read-only="true"/>
            <tx:method name="get*" isolation="DEFAULT" propagation="REQUIRED" read-only="true"/>
            <tx:method name="find*" isolation="DEFAULT" propagation="REQUIRED" read-only="true"/>
            <tx:method name="list*" isolation="DEFAULT" propagation="REQUIRED" read-only="true"/>

            <tx:method name="*" isolation="DEFAULT" propagation="REQUIRED"/>
        </tx:attributes>
    </tx:advice>
    <!--配置AspectJ AOP配置-->
    <aop:config proxy-target->
        <aop:pointcut id="serviceMethod" expression="execution(* *..*Service.*(..))"/>
        <aop:advisor advice-ref="txAdvice" pointcut-ref="serviceMethod"/>
    </aop:config>
</beans>
在一的基础上集成spring 4.0.3 并整合JPA以及spring的单元测试")
(二)在一的基础上集成spring 4.0.3 并整合JPA以及spring的单元测试
1)加上sping的依赖包,并在base模块进行引用。
<!-- spring包依赖-->
		<dependency>
		  <groupId>org.springframework</groupId>
		  <artifactId>spring-core</artifactId>
		  <version>${spring.version}</version>
		</dependency>
		<dependency>
		  <groupId>org.springframework</groupId>
		  <artifactId>spring-context</artifactId>
		  <version>${spring.version}</version>
		</dependency>
		<dependency>
		  <groupId>org.springframework</groupId>
		  <artifactId>spring-beans</artifactId>
		   <version>${spring.version}</version>
		</dependency>
			<dependency>
		  <groupId>org.springframework</groupId>
		  <artifactId>spring-test</artifactId>
		   <version>${spring.version}</version>
		</dependency>
		<dependency>
		  <groupId>org.springframework</groupId>
		  <artifactId>spring-web</artifactId>
		  <version>${spring.version}</version>
		</dependency>
		<dependency>
		  <groupId>org.springframework</groupId>
		  <artifactId>spring-aop</artifactId>
		   <version>${spring.version}</version>
		</dependency>
		<dependency>
		  <groupId>org.springframework</groupId>
		  <artifactId>spring-orm</artifactId>
		  <version>${spring.version}</version>
		</dependency>
2)创建spring_base.xml,在spring配置文件中整合jpa
<?xml version="1.0" encoding="UTF-8"?>
<beans xmlns="http://www.springframework.org/schema/beans"
	xmlns:context="http://www.springframework.org/schema/context"
	xmlns:aop="http://www.springframework.org/schema/aop" xmlns:tx="http://www.springframework.org/schema/tx"
	xmlns:xsi="http://www.w3.org/2001/XMLSchema-instance"
	xsi:schemaLocation="http://www.springframework.org/schema/beans
		                    http://www.springframework.org/schema/beans/spring-beans-3.0.xsd
		                    http://www.springframework.org/schema/context
		                    http://www.springframework.org/schema/context/spring-context-3.0.xsd
		                    http://www.springframework.org/schema/tx
		                    http://www.springframework.org/schema/tx/spring-tx-3.0.xsd
		                    http://www.springframework.org/schema/aop
		                    http://www.springframework.org/schema/aop/spring-aop-3.0.xsd">
	<!-- 1
	    1)开启注解自动配置组件的自动扫描 (@Component是所有受Spring管理组件的通用形式)
	      @Repository、@Service和 @Controller则是@Component的细化,
	      用来表示更具体的用例(例如,分别对应了持久化层、服务层和表现层)
	    2)把use-default-filters属性設為false,意即在base-package所有被宣告為@Component和@Configuration等target Class
	      不予註冊為bean,由filter子標籤代勞。
	      Use-dafault-filters=”false”的情况下: <context:exclude-filter>指定的不扫描,
	                                            <context:include-filter>指定的扫描
	 -->
	<context:component-scan base-package="org.smd" use-default-filters="true">
	    <!-- 只扫描Repository标注的类 -->
     	<!-- <context:include-filter type="annotation" expression="org.springframework.stereotype.Service" />
	    <context:include-filter type="annotation" expression="org.springframework.stereotype.Repository" /> -->
	</context:component-scan>
	<!--2配置数据源 -->
  	<bean id="dataSource"destroy-method="close">
		<property name="driverClassName" value="${jdbc.driverClassName}" />
		<property name="url" value="${jdbc.url}" />
		<property name="username" value="${jdbc.username}" />
		<property name="password" value="${jdbc.password}" />
		<!-- 配置连接池的初始值 -->
		<property name="initialSize" value="${initialSize}" />
		<!-- 连接池的最大值 -->
		<!-- <property name="maxActive" value="500"/> -->
		<!-- 最大空闲时,当经过一个高峰之后,连接池可以将一些用不到的连接释放,一直减少到maxIdle为止 -->
		<!-- <property name="maxIdle" value="2"/> -->
		<!-- 当最小空闲时,当连接少于minIdle时会自动去申请一些连接 -->
		<property name="minIdle" value="${minIdle}" />
		<property name="maxActive" value="${maxActive}" />
		<property name="maxIdle" value="${maxIdle}" />
		<property name="maxWait" value="${maxWait}" />
	</bean>

	<context:property-placeholder location="classpath:jdbc.properties" />

   <!--3 Spring整合jpa -->
   <bean id="entityManagerFactory">
		<property name="dataSource" ref="dataSource" />
		<property name="persistenceXmlLocation" value="classpath:META-INF/persistence.xml" />
			<property name="loadTimeWeaver">
	          <bean/>
	       </property>
	</bean>
  <!--4 事务管理器 -->
   <bean id="transactionManager">
        <property name="entityManagerFactory" ref="entityManagerFactory"/>
   </bean>
  <!--5 采用注释的方式管理事务-->
  <tx:annotation-driven transaction-manager="transactionManager"/>
</beans>
3)在base模块创建 dao包,service等包,因为现在是集成阶段,具体搭建,等整合结束,再接着搭建

4)创建操作POJO类 的 productType的服务类ProductServiceImpl
public interface IProductService extends ICommonService {


	/*****
	 * 保存productType
	 * @param productType
	 */
	public abstract void saveProductType(ProductType productType);

}


@Service
@Transactional
public class ProductServiceImpl implements IProductService {


	@PersistenceContext
	EntityManager  entityManager;

	/* (non-Javadoc)
	 * @see org.smd.base.service.IProductService#saveProductType(org.smd.base.model.ProductType)
	 */
	public void saveProductType(ProductType productType){

		entityManager.persist(productType);
	}
}
import org.junit.Test;
import org.junit.runner.RunWith;
import org.smd.base.model.ProductType;
import org.smd.base.service.IProductService;
import org.springframework.test.context.ContextConfiguration;
import org.springframework.test.context.junit4.SpringJUnit4ClassRunner;
@RunWith(SpringJUnit4ClassRunner.class)
@ContextConfiguration("/spring_base.xml")
public class ProductTypeSpringTest {

	@Inject
	IProductService productService;

	@Test
	public void Test01(){

		ProductType productType=new ProductType();
		productType.setName("aa");
		productService.saveProductType(productType);
	}

}运行单元测试,spring整合jpa,成功


228. springboot整合jpa
1.目的
jpa优势:
JPA简单易用,集成方便
2.整合springboot
2.1 项目搭建 及根据id查询
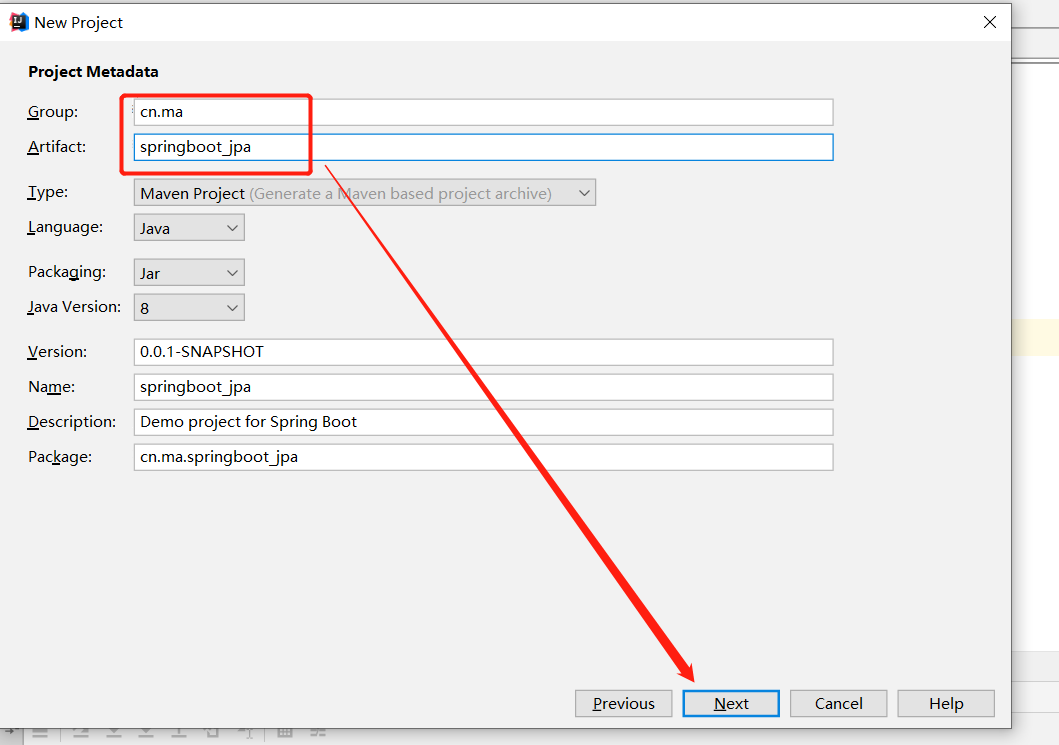
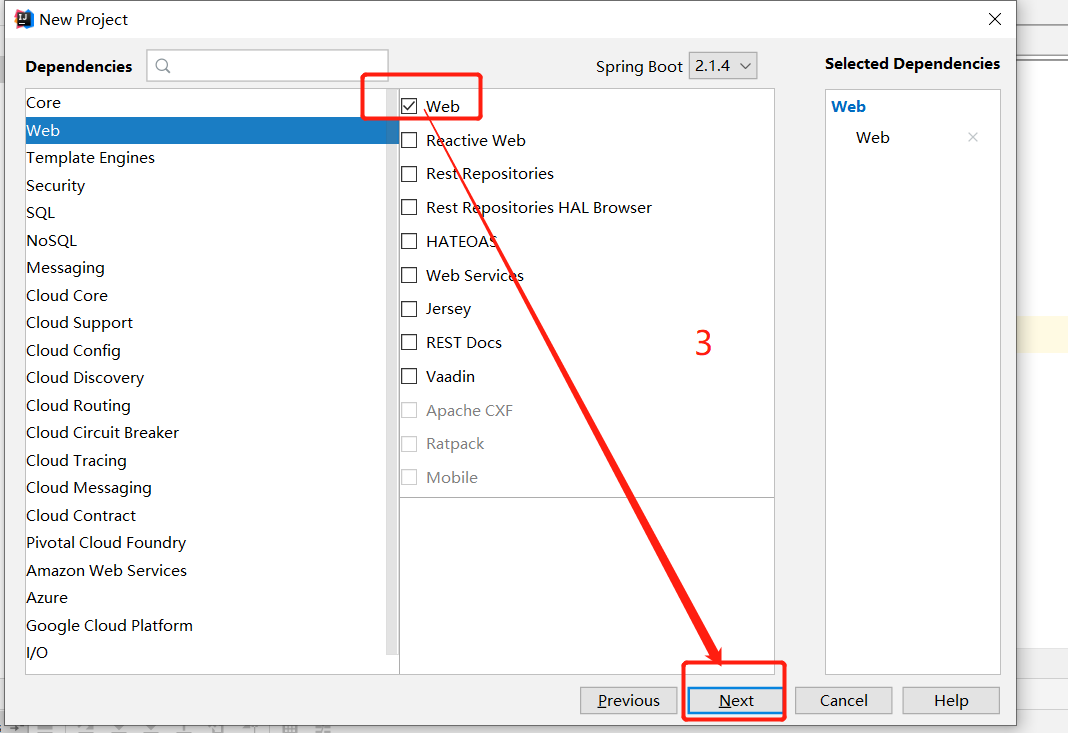
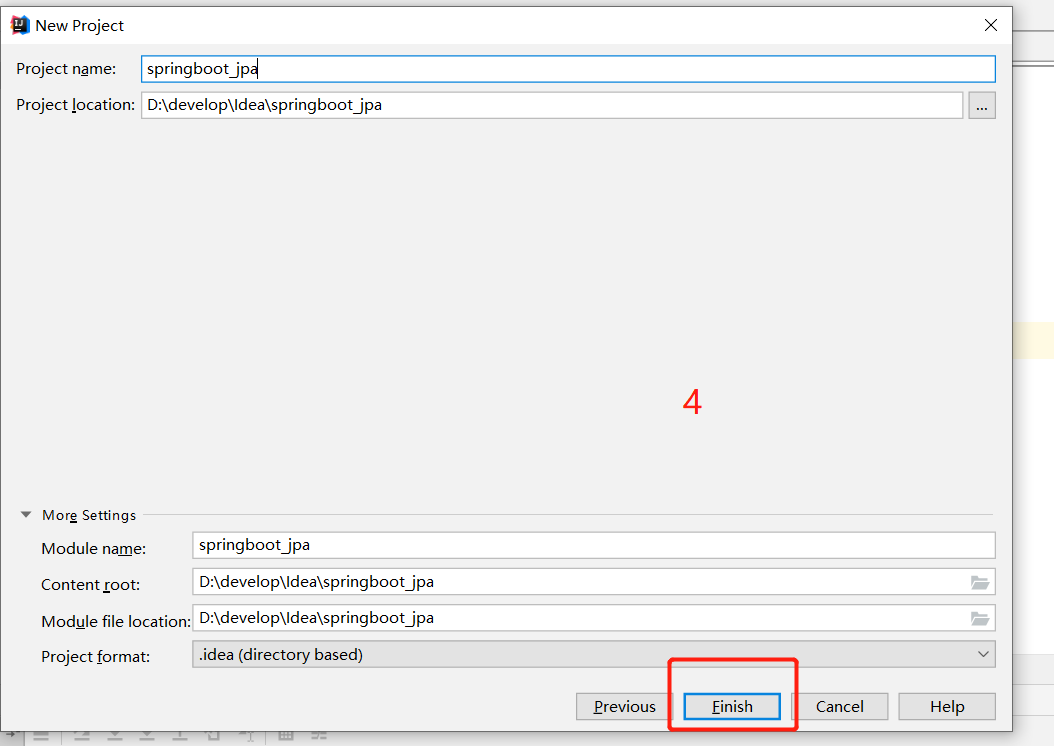
(1)新建spring boot项目

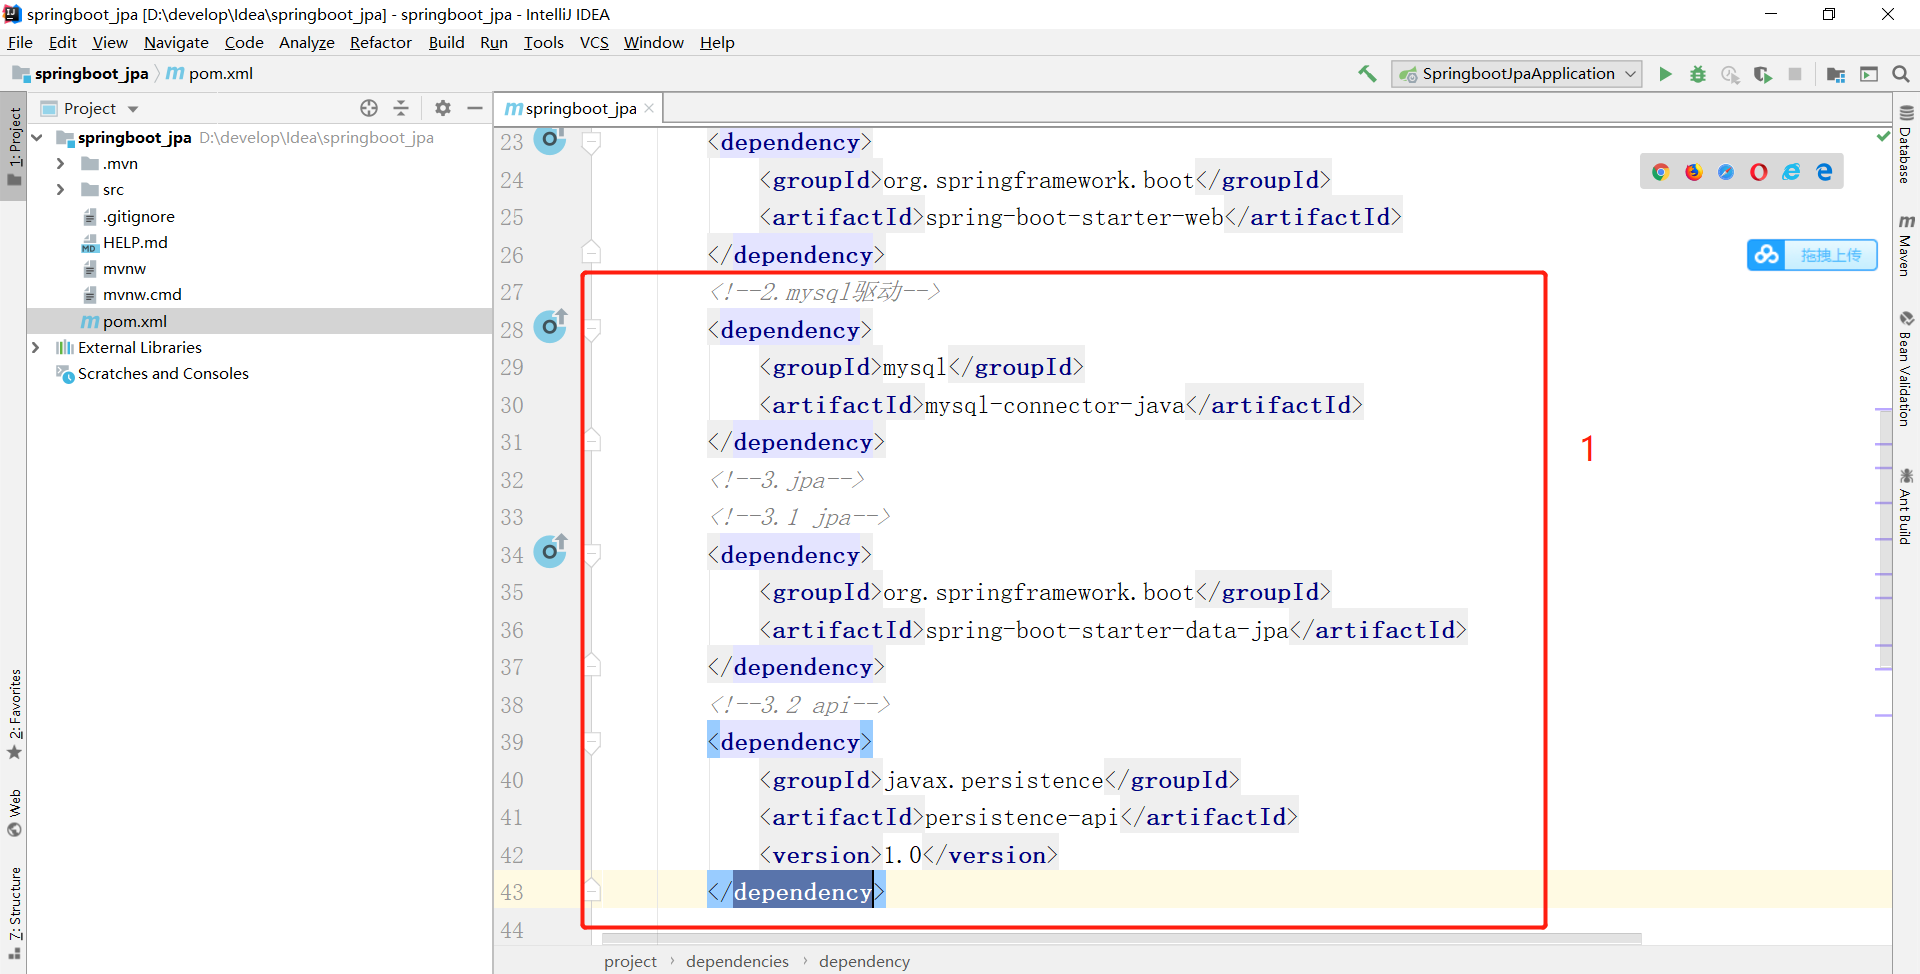
(2)pom中配置jar
<!--2.mysql驱动-->
<dependency>
    <groupId>mysql</groupId>
    <artifactId>mysql-connector-java</artifactId>
</dependency>
<!--3.jpa-->
<!--3.1 jpa-->
<dependency>
    <groupId>org.springframework.boot</groupId>
    <artifactId>spring-boot-starter-data-jpa</artifactId>
</dependency>
<!--3.2 api-->
<dependency>
    <groupId>javax.persistence</groupId>
    <artifactId>persistence-api</artifactId>
    <version>1.0</version>
</dependency>
(3)编写配置文件
#.配置端口
server.port=8000
#1.配置数据源
spring.datasource.driverClassName=com.mysql.jdbc.Driver
spring.datasource.url=jdbc:mysql://localhost:3306/springboot
spring.datasource.username=root
spring.datasource.password=root
spring.jpa.database=mysql
spring.jpa.show-sql=true

(4) 编写实体类(******)
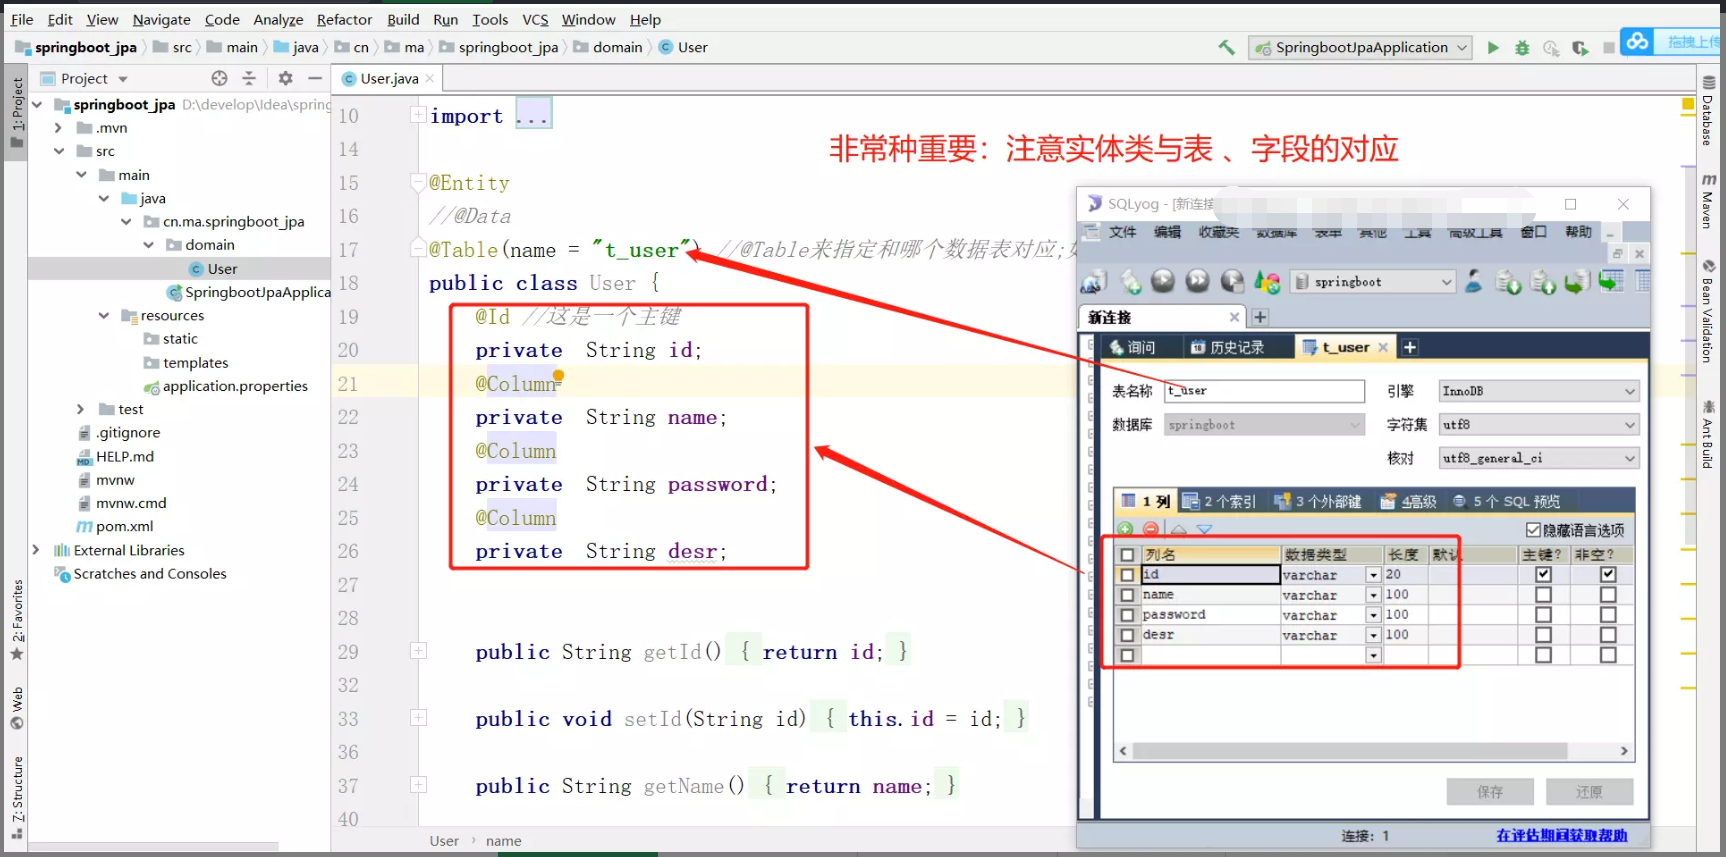
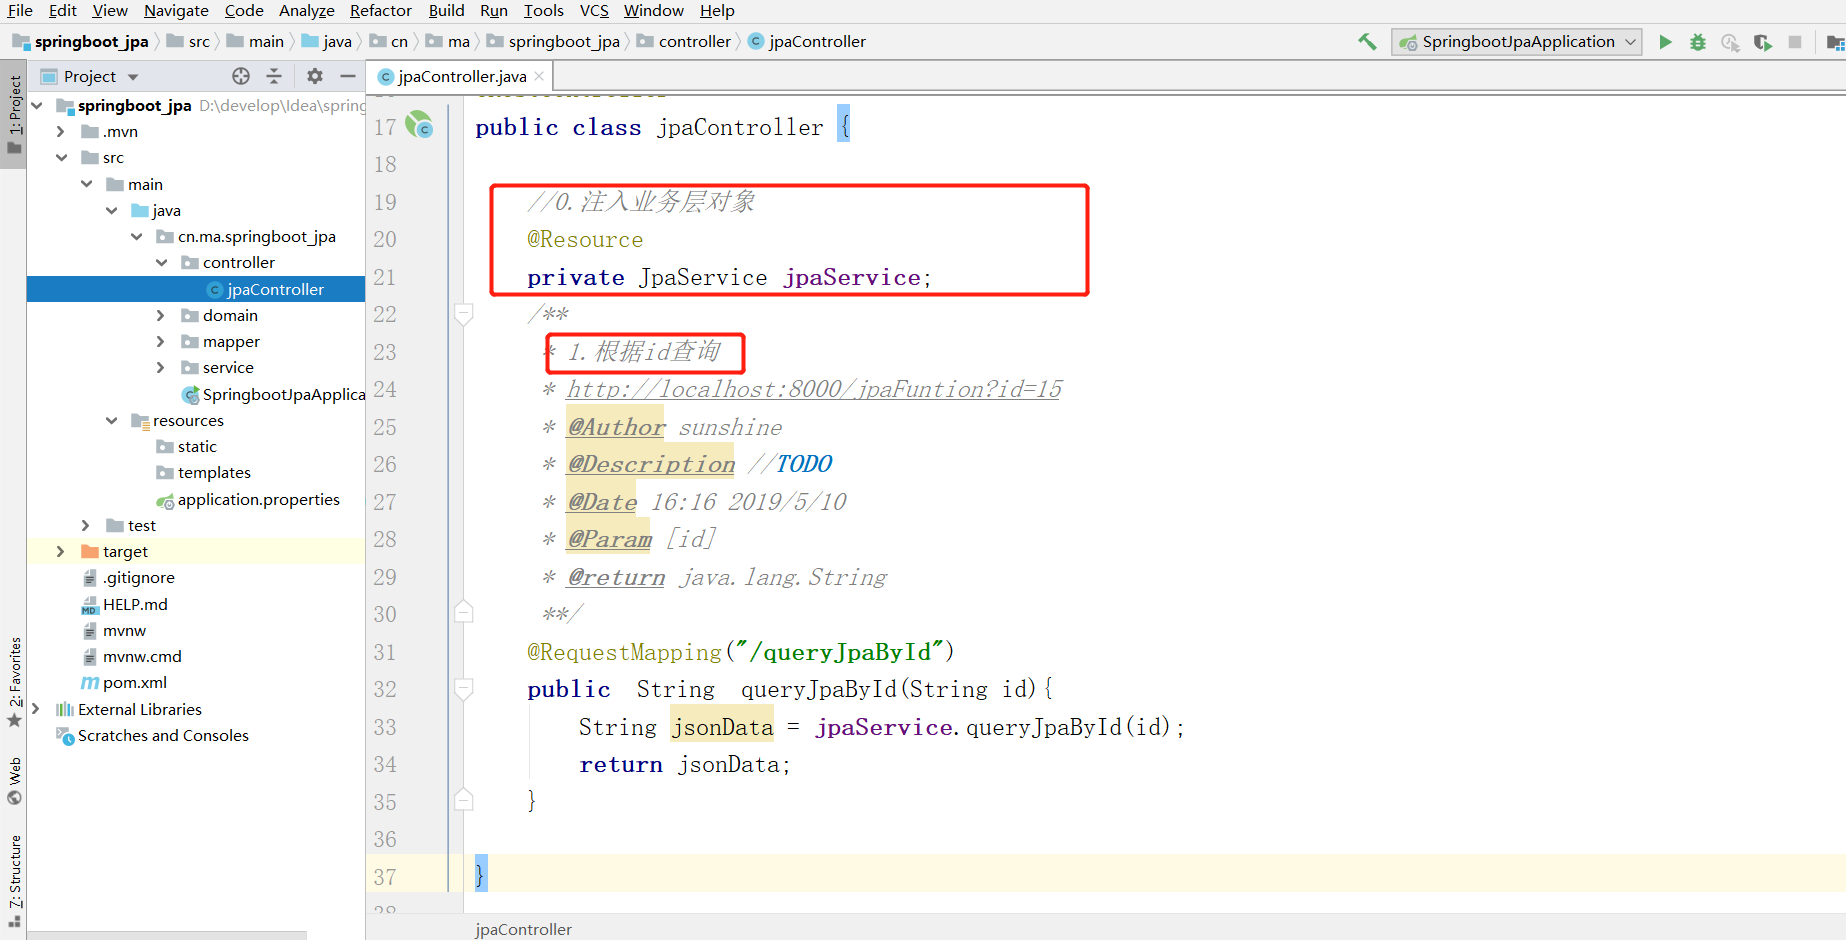
(5) conroller层
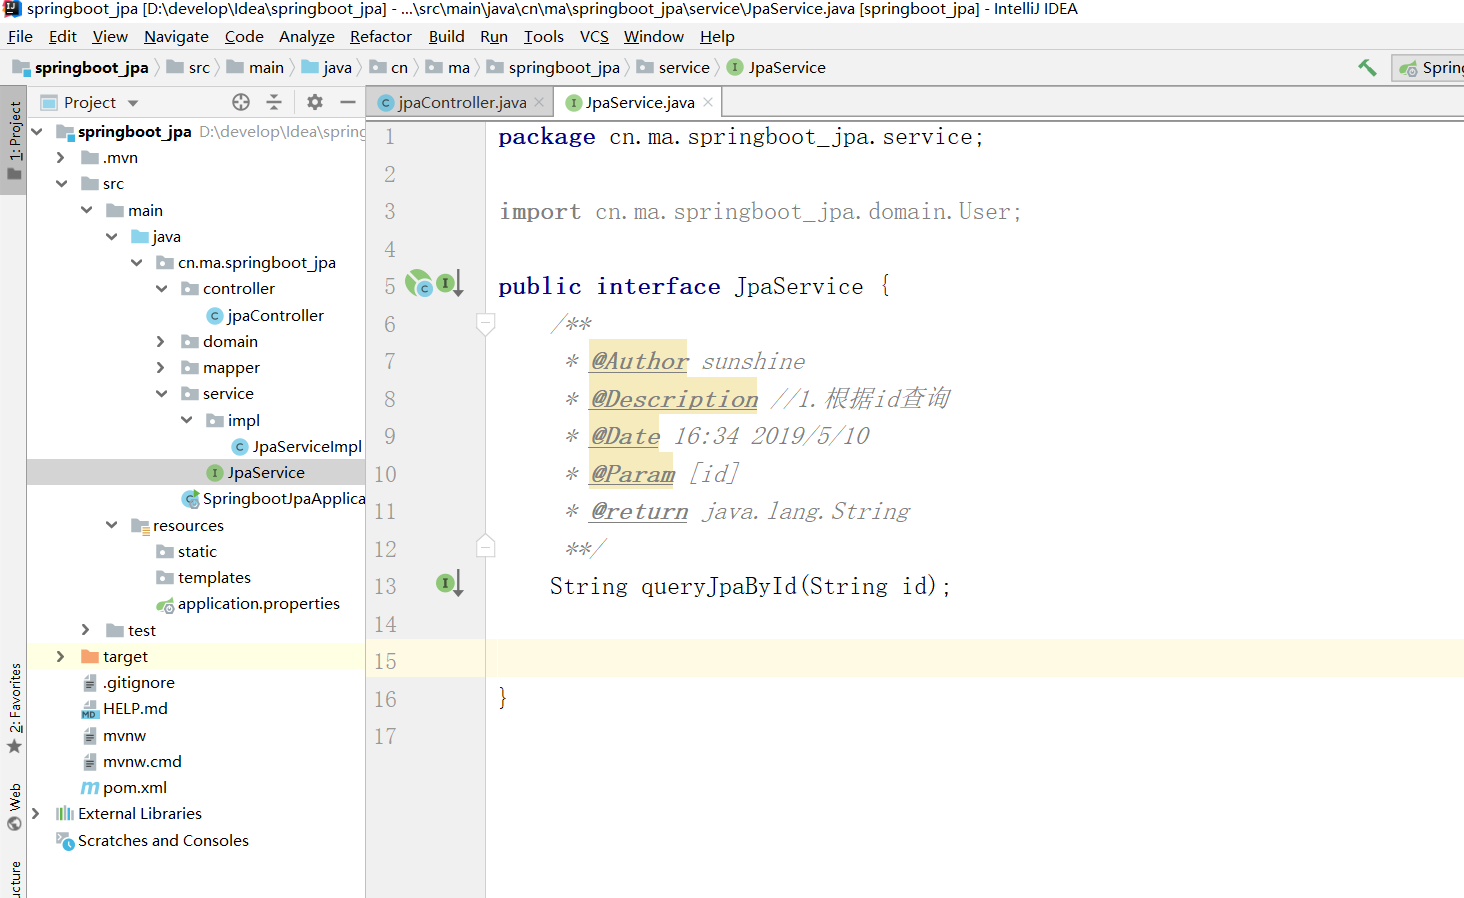
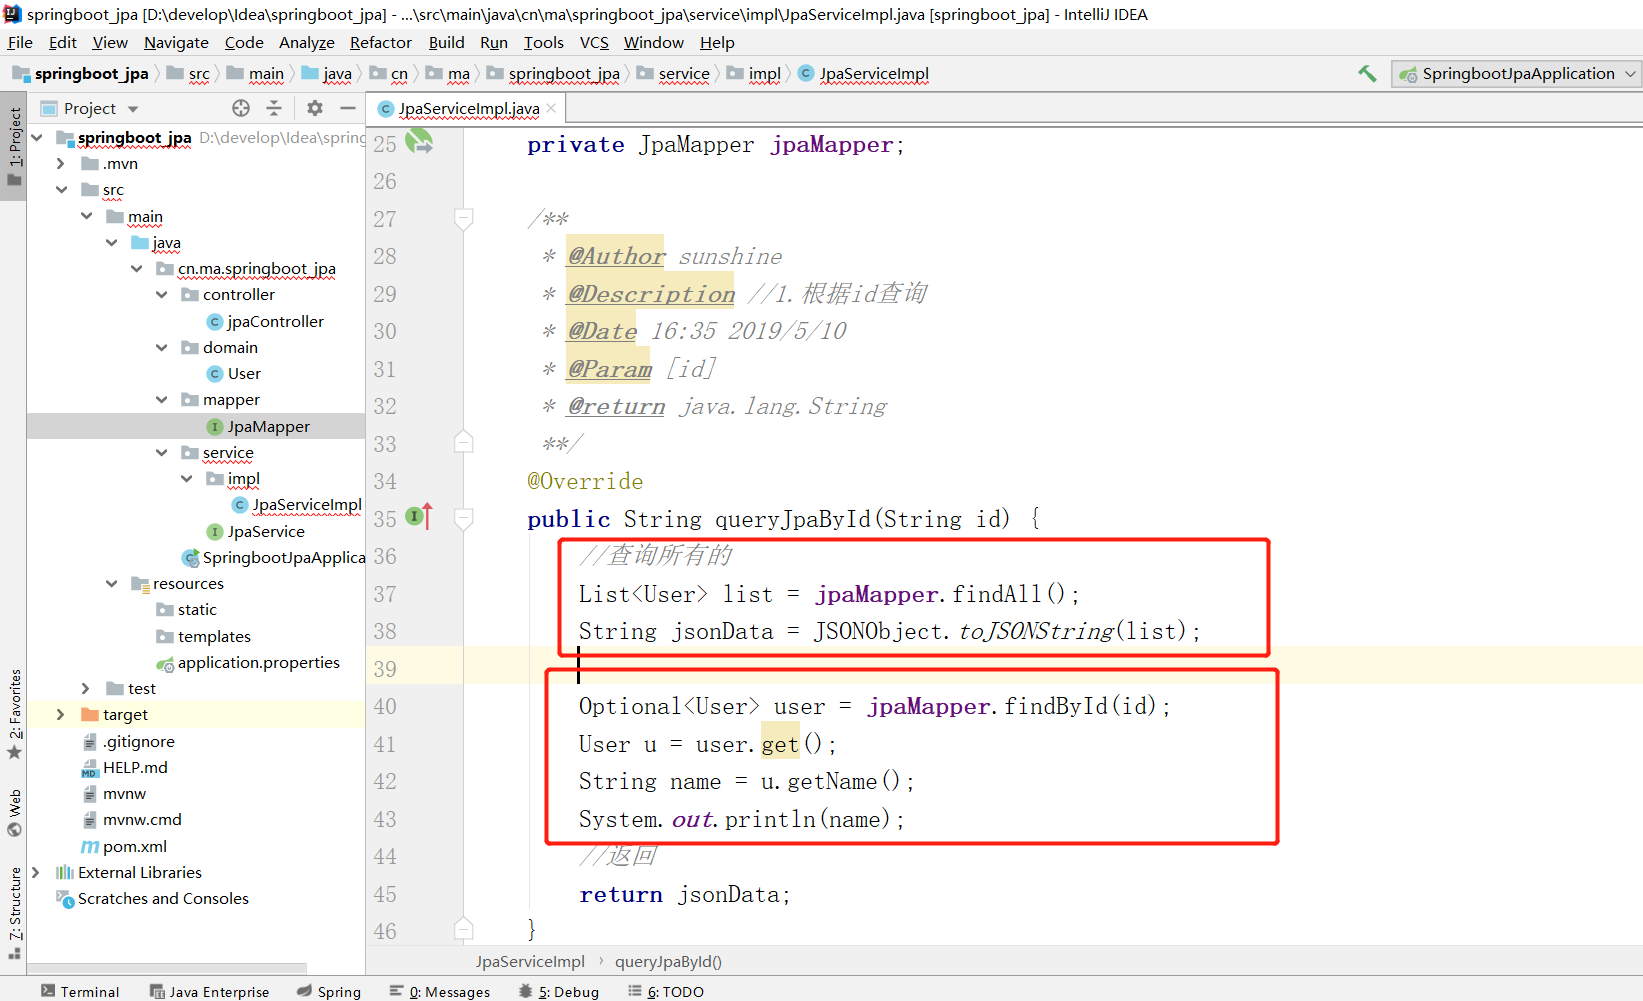
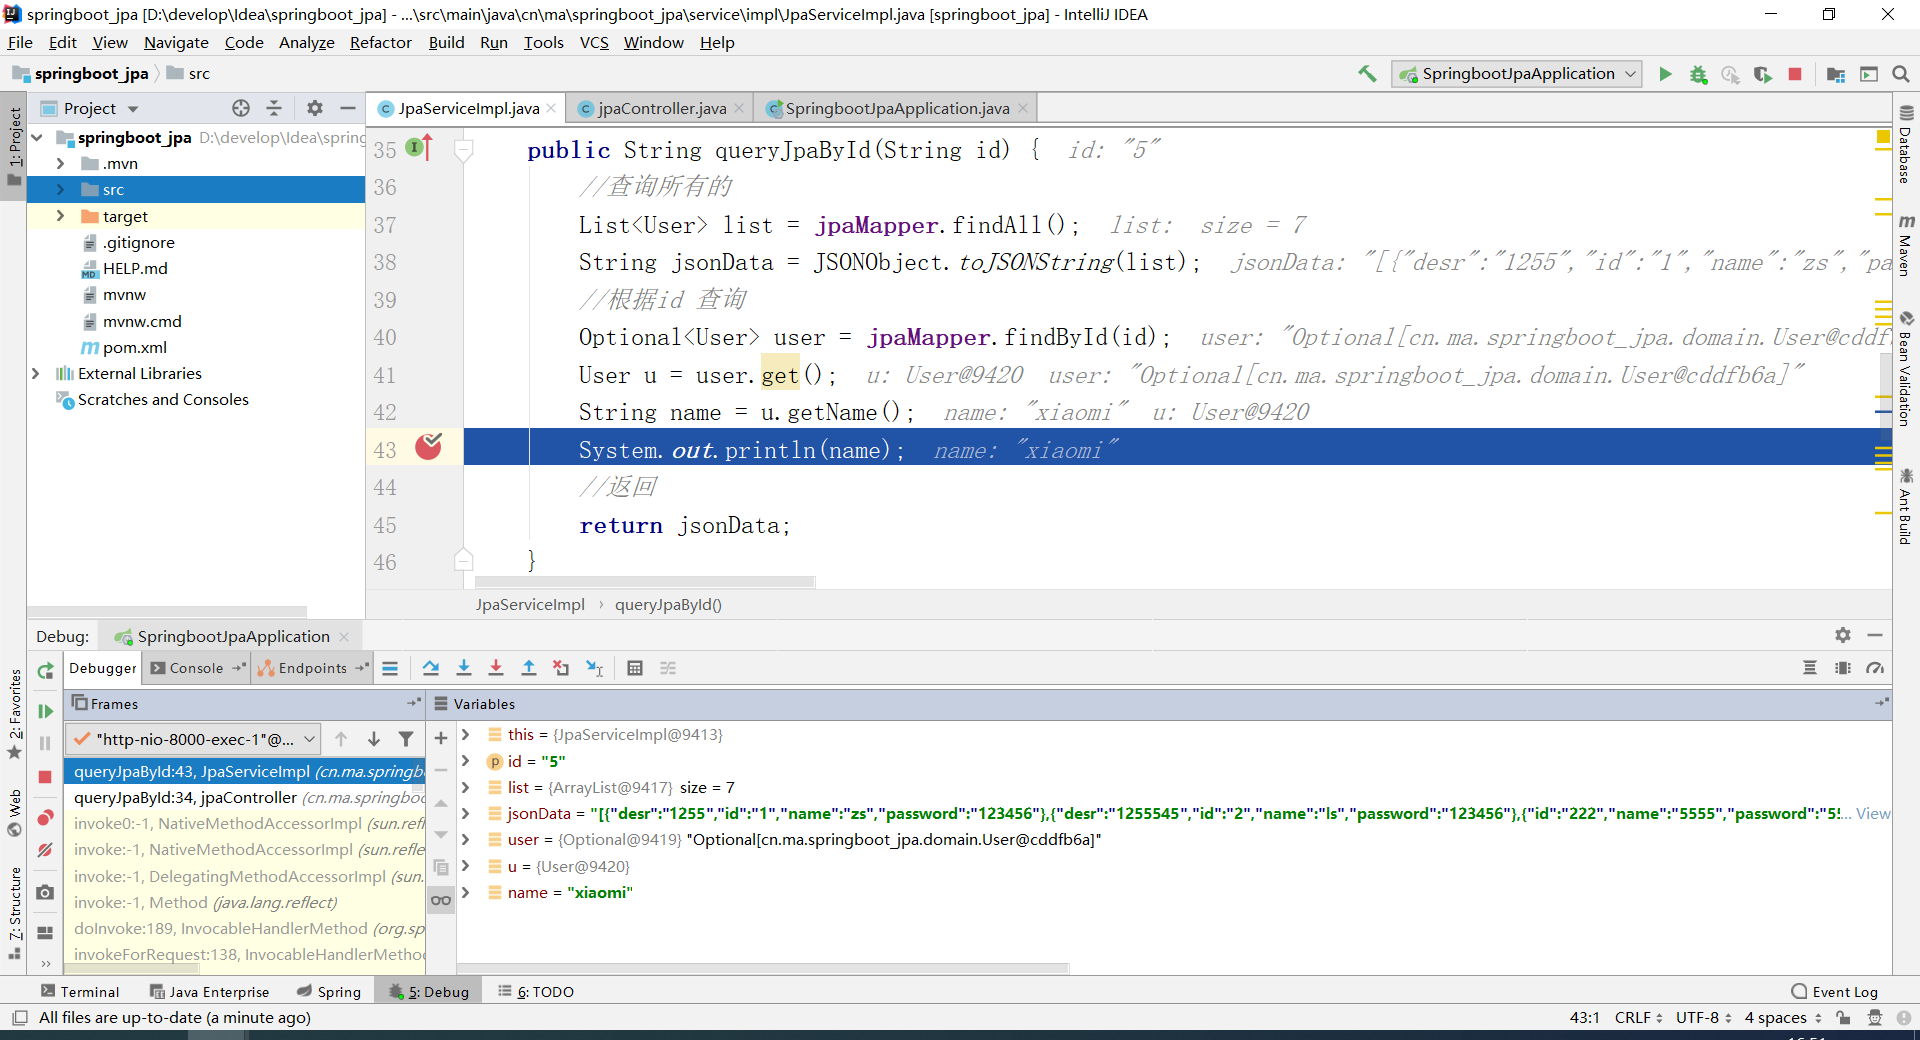
(6) service层
接口
实现类
查询的效果:
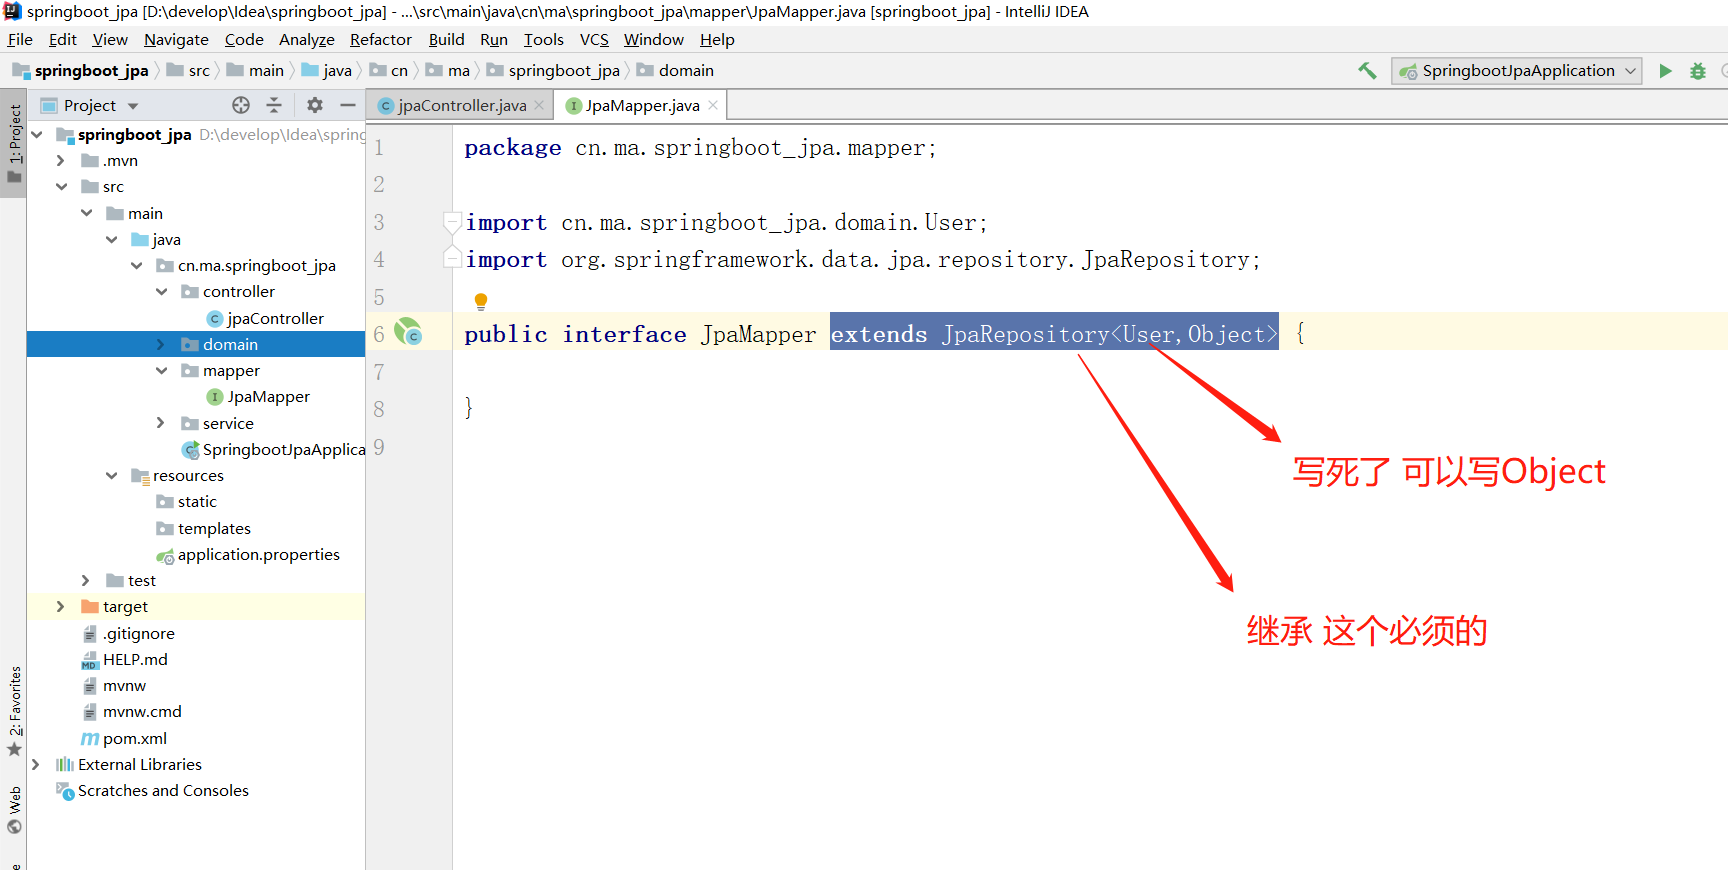
(7) mapper层
extends JpaRepository<User,Object>
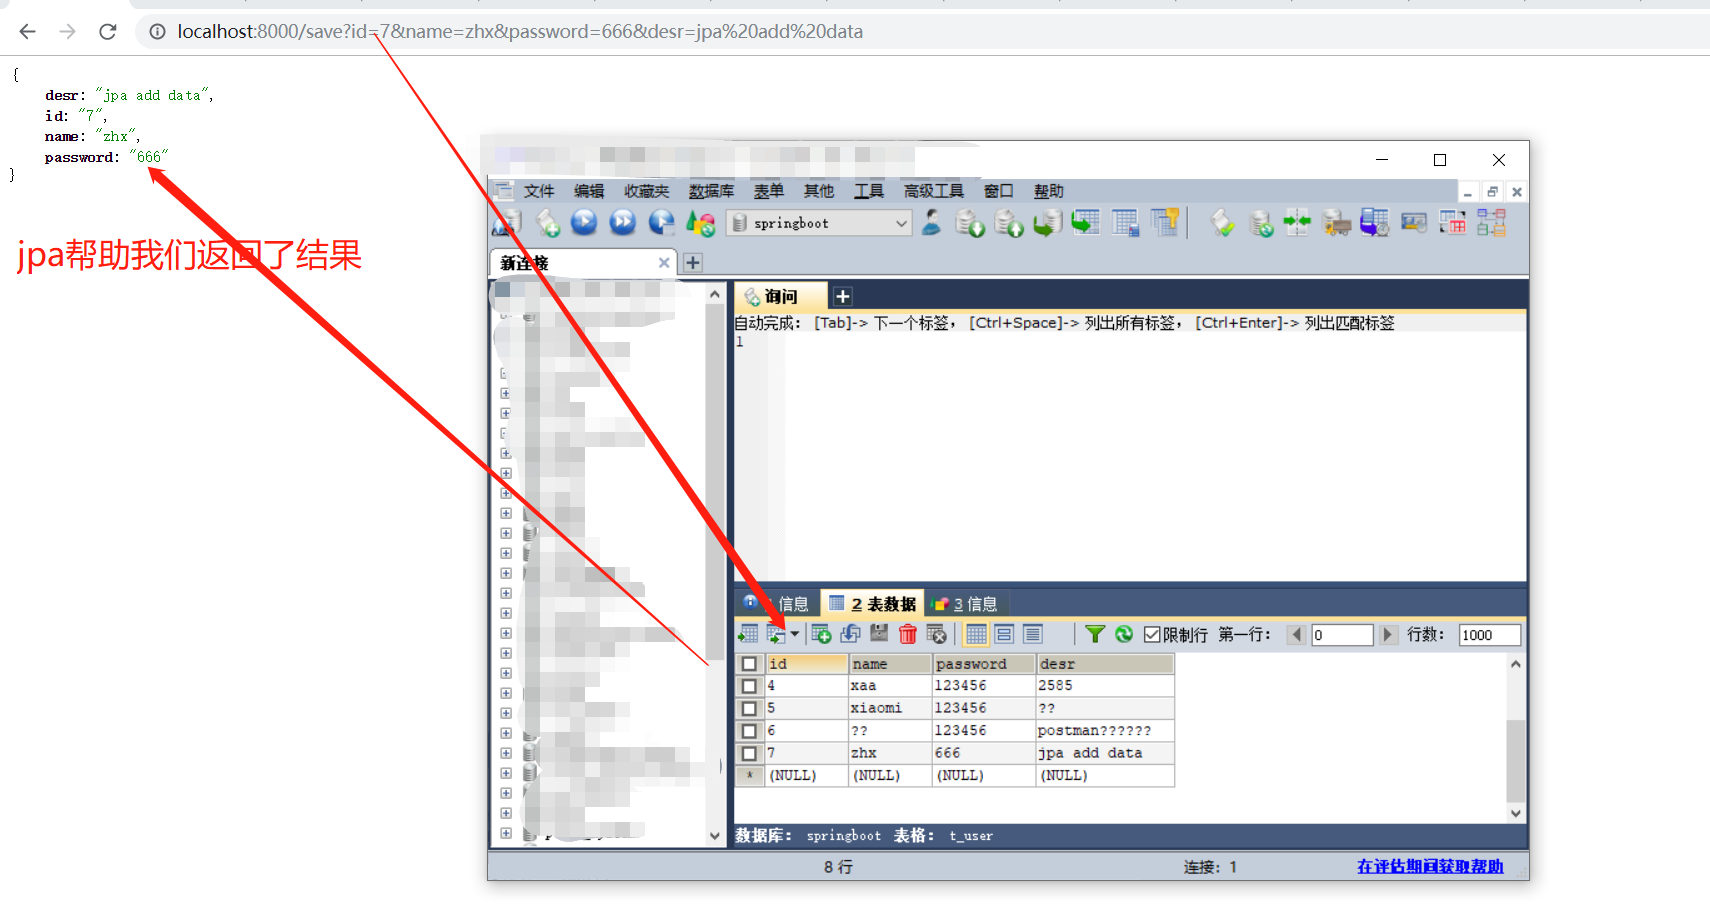
2.2 使用jpa增加一条数据
2.2.1 效果
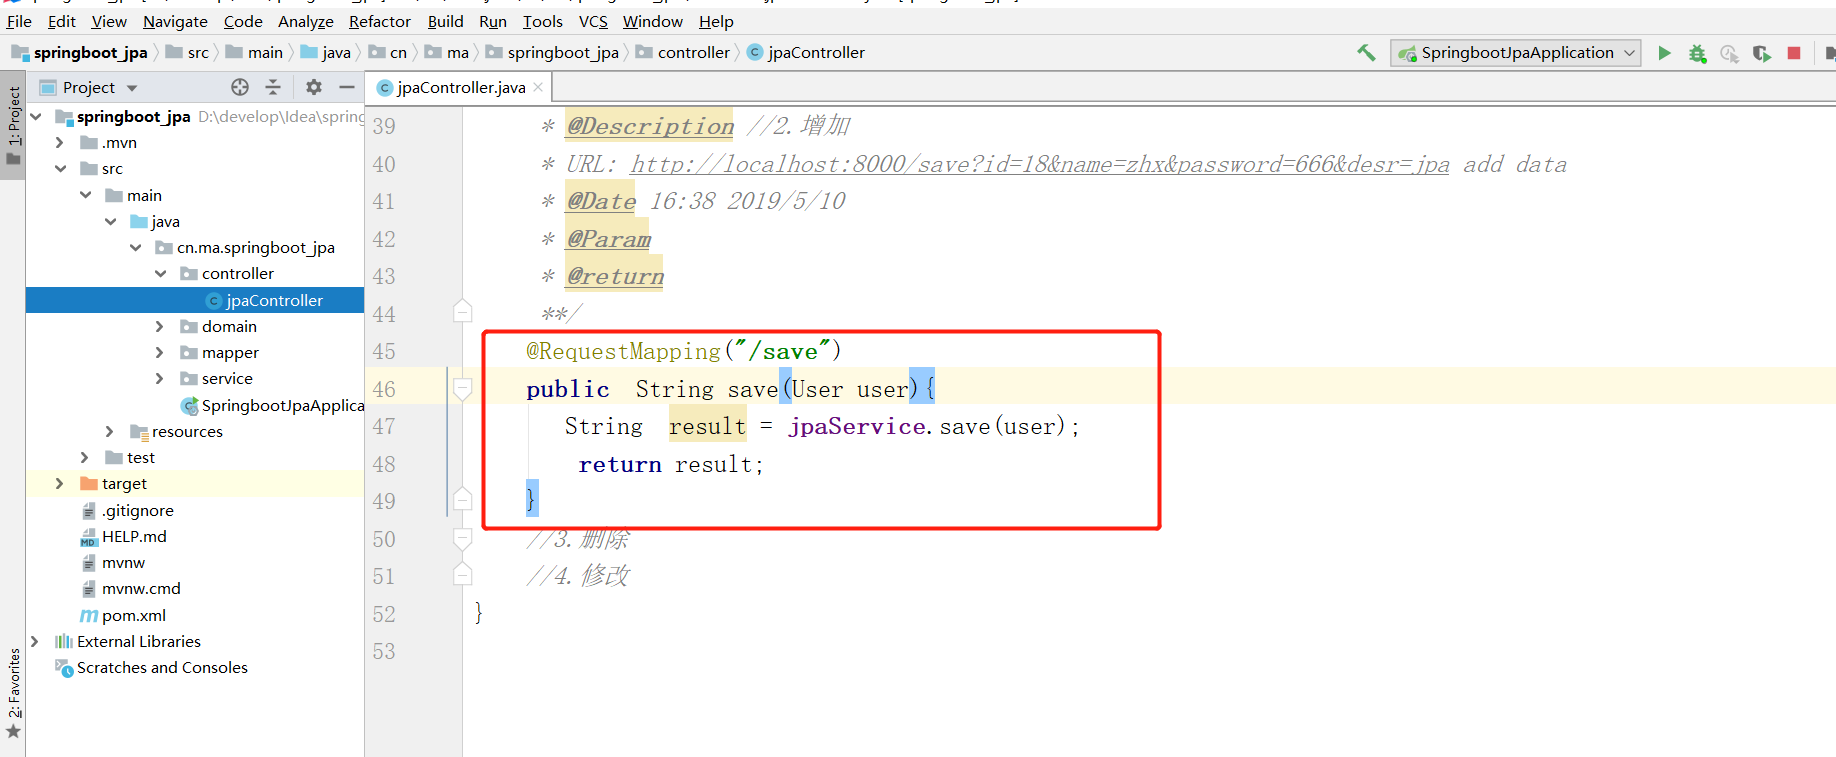
2.2.2 controller层
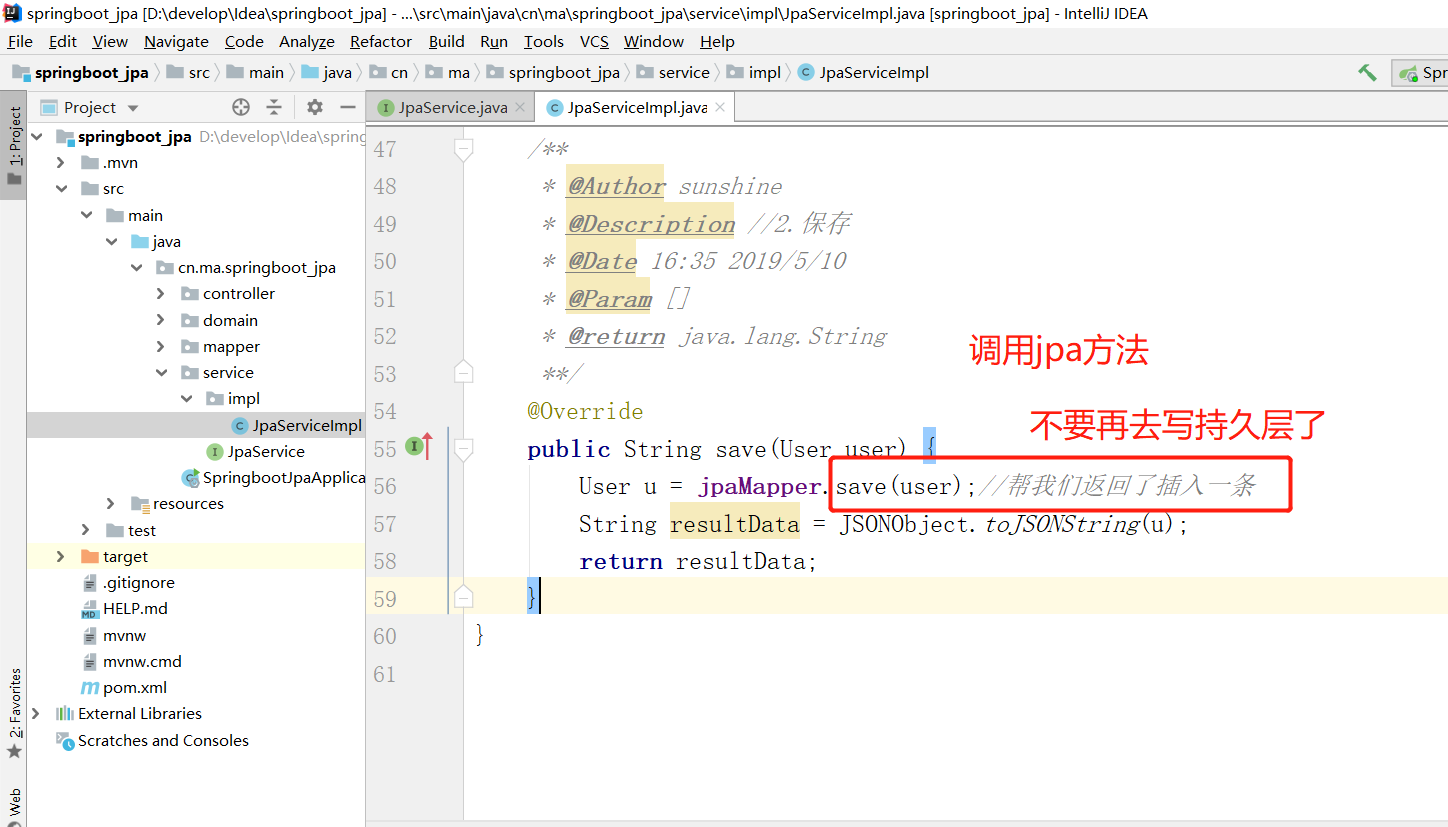
2.2.3 业务层
接口:
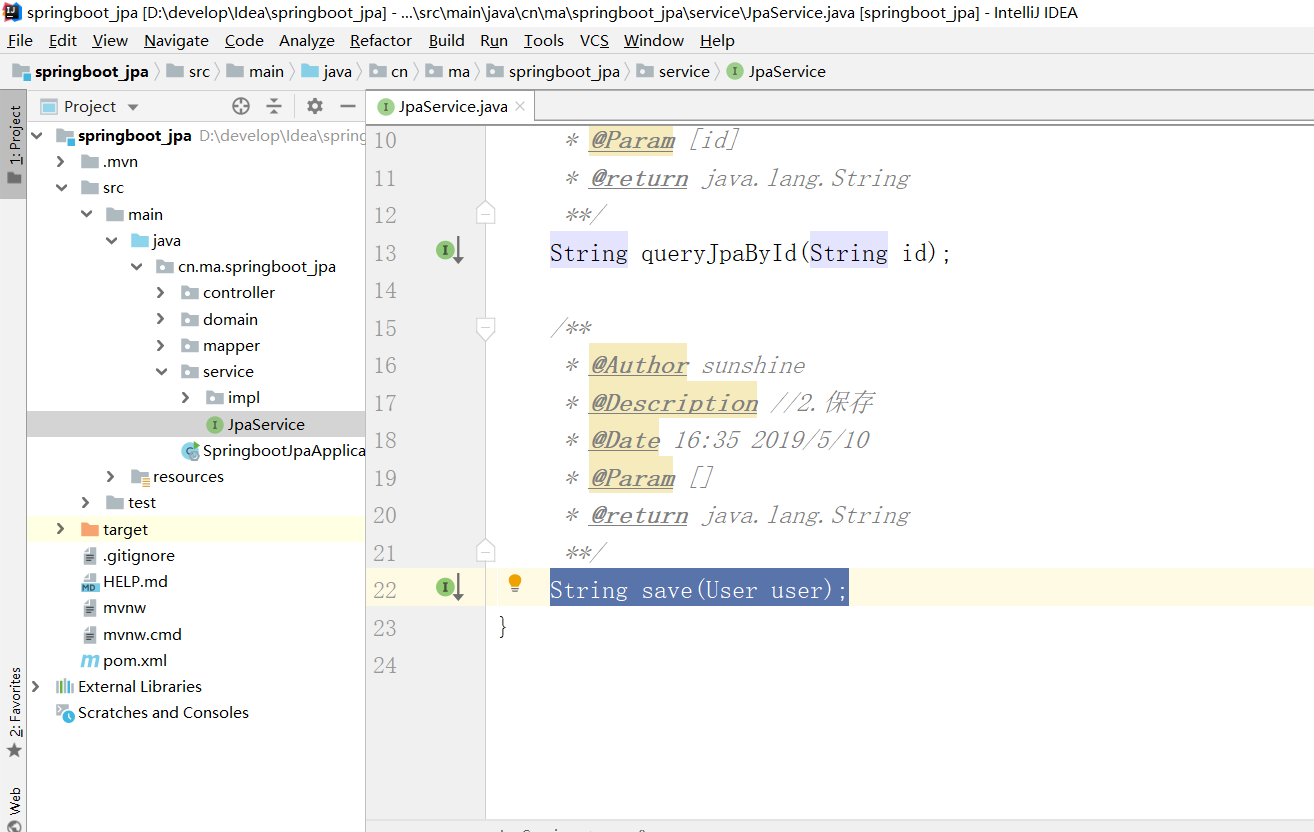
实现类
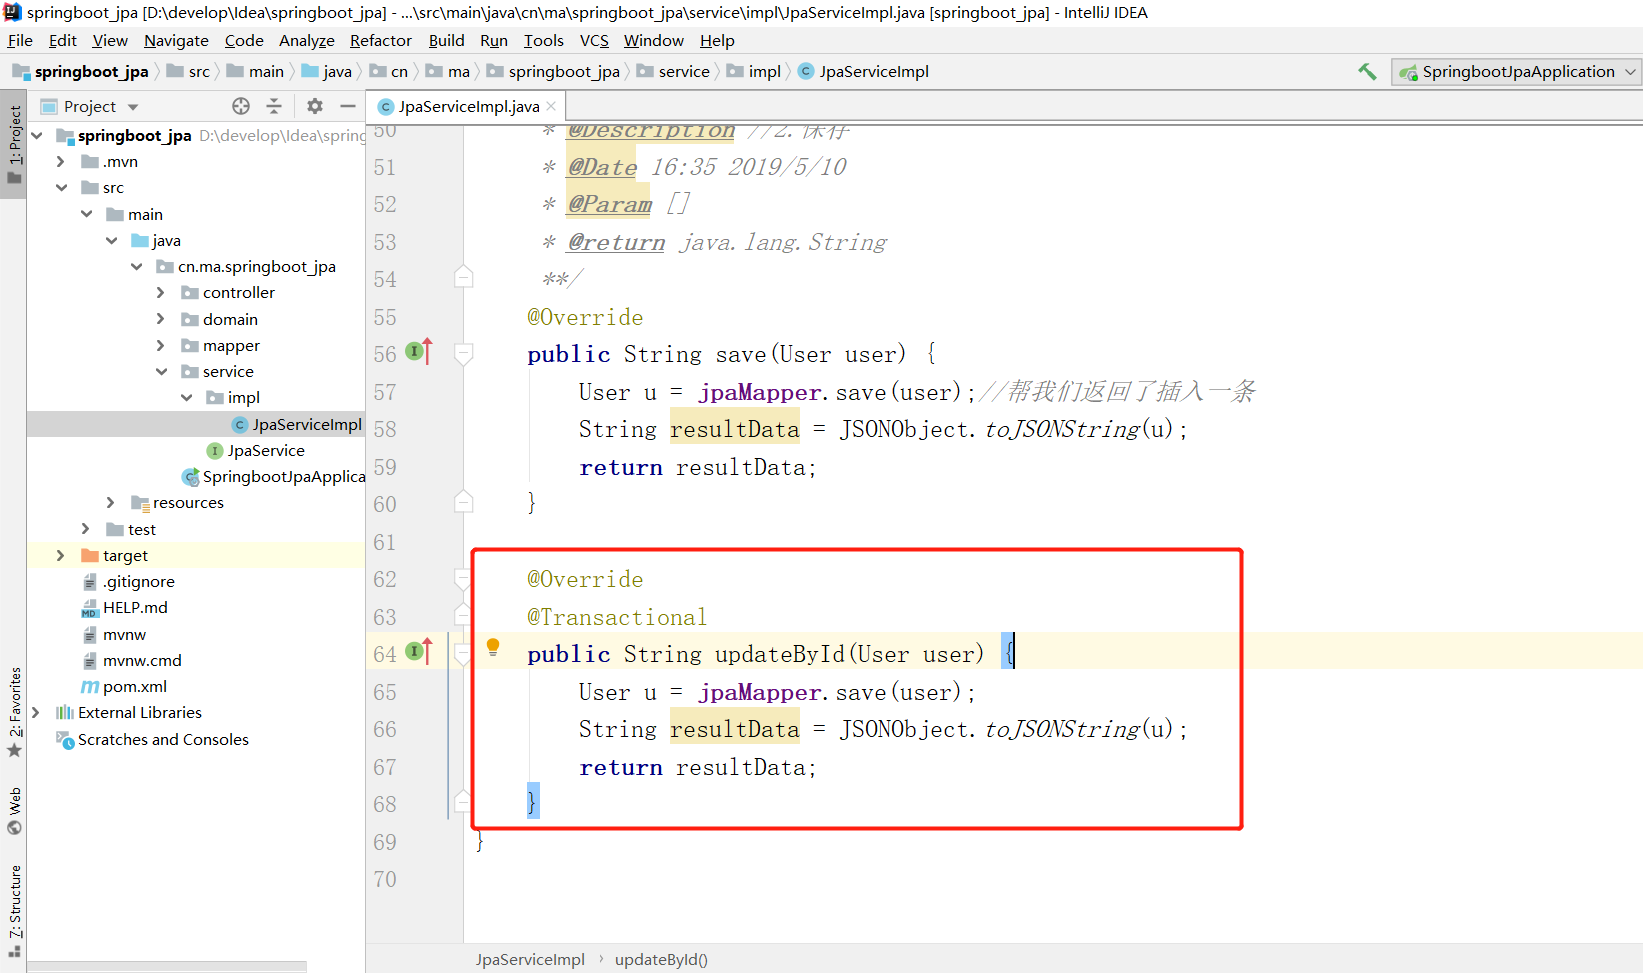
2.3 使用jpa 更新数据
2.3.1 效果

2.3.2 controller 层
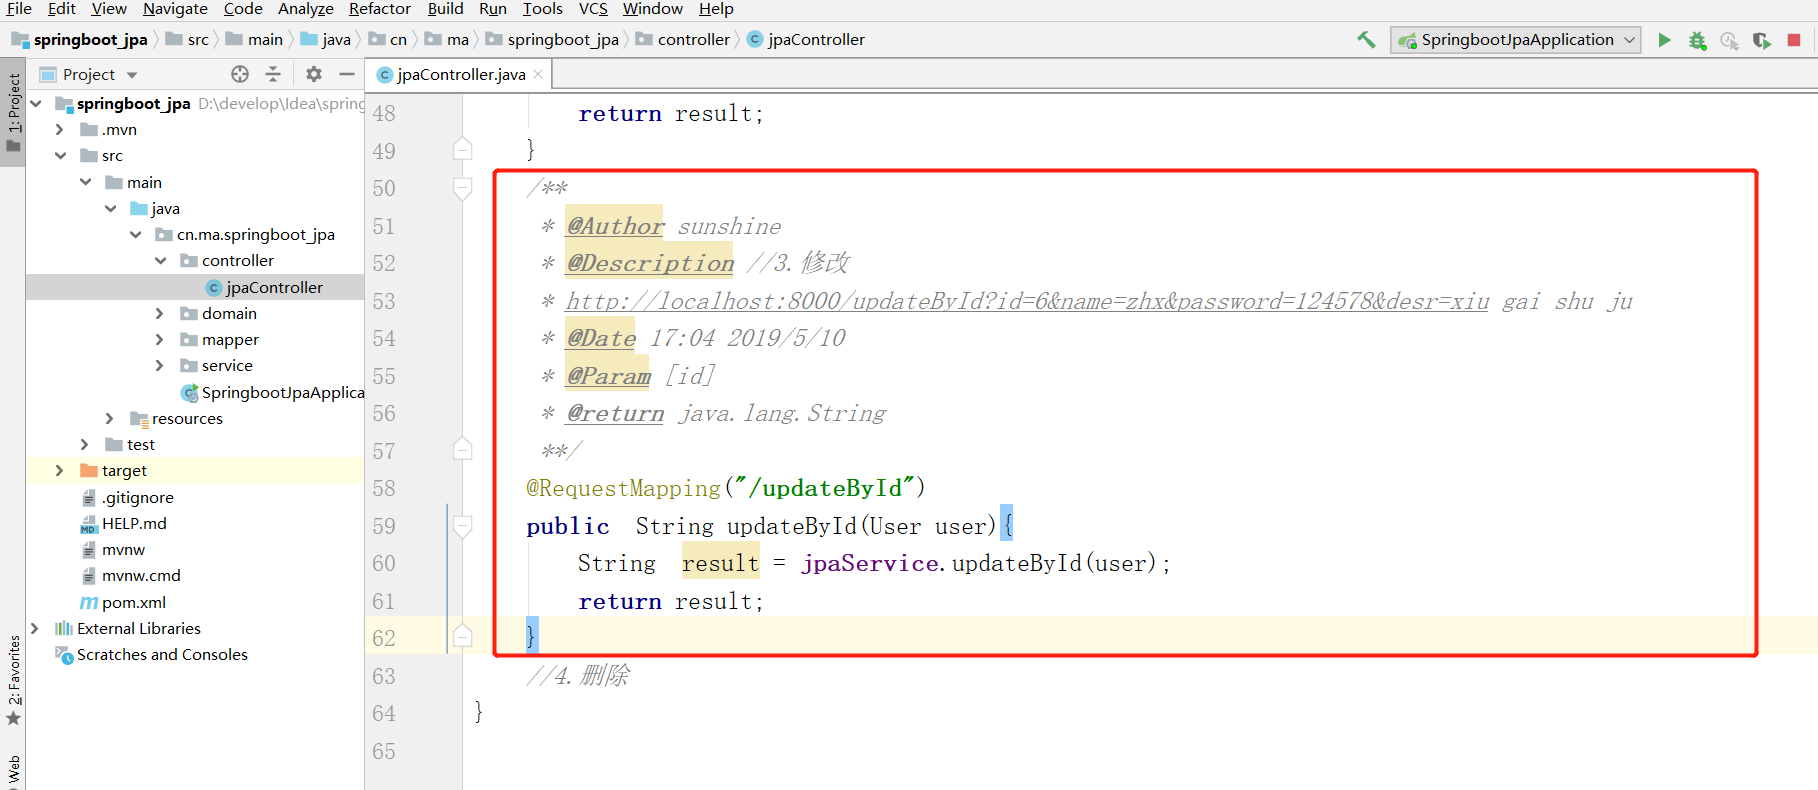
2.3.3 业务层
接口
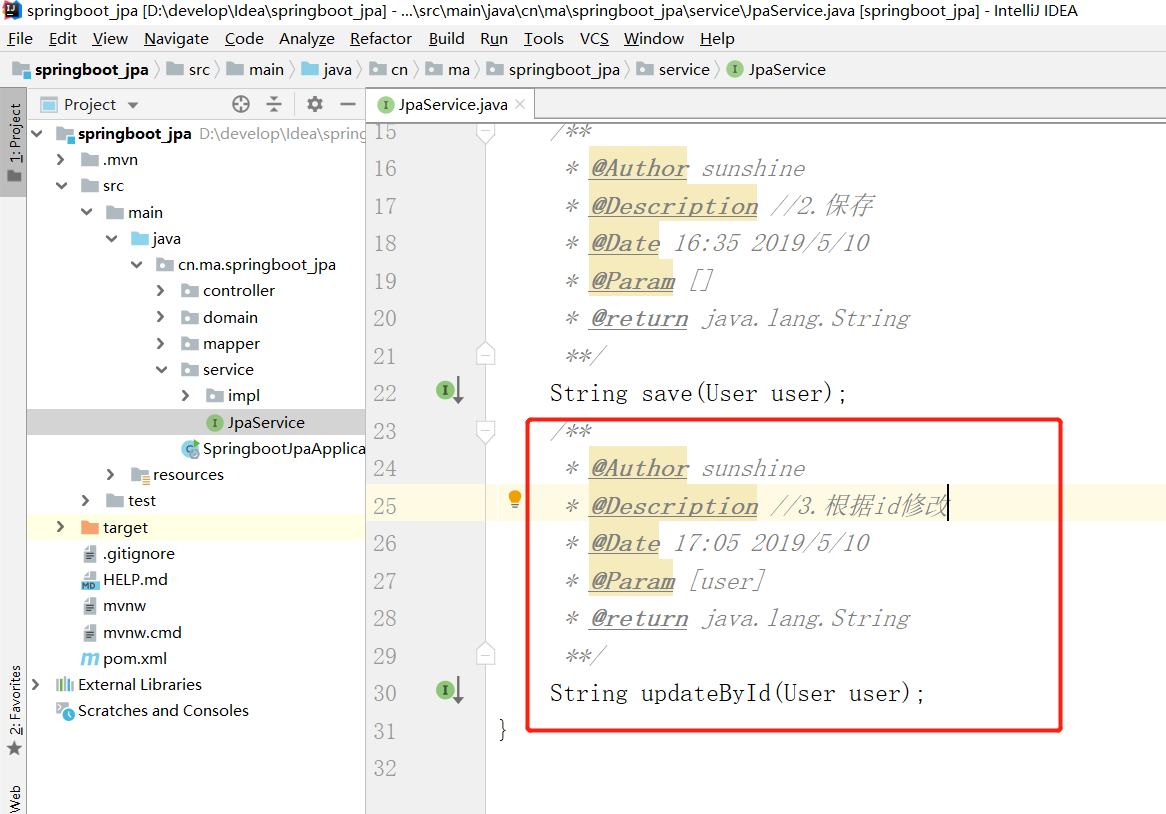
实现类
特别注意:jpa的save方法是:id存在就更新 不存在就新增
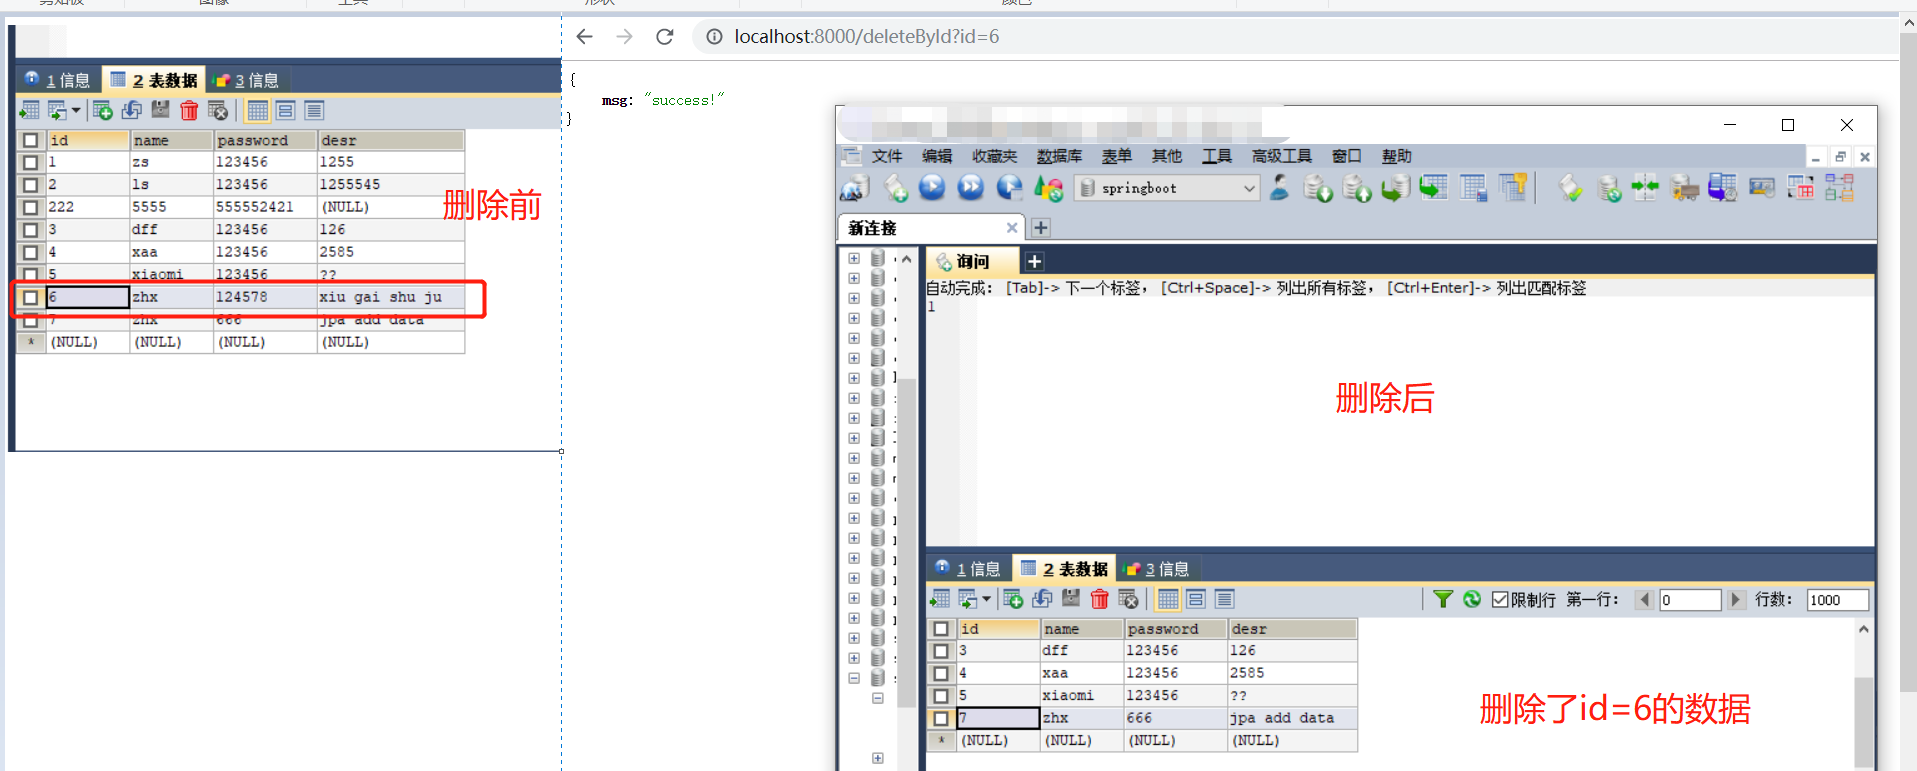
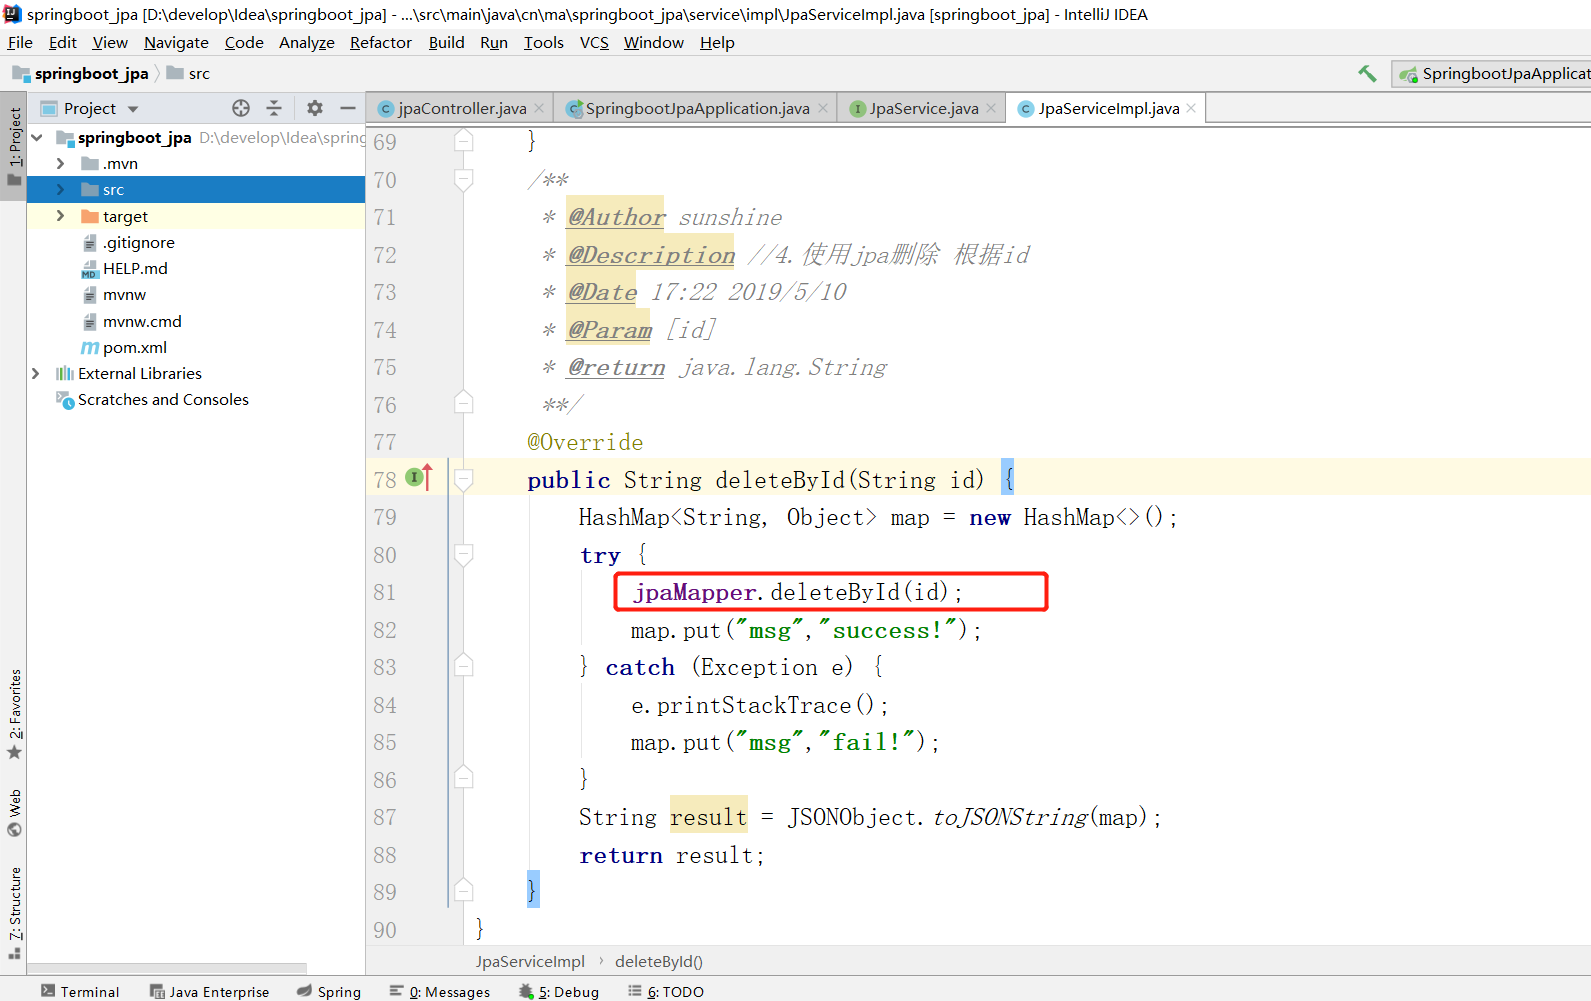
2.4 jpa 根据id删除
2.4.1 效果
2.4.2 conrtoller层
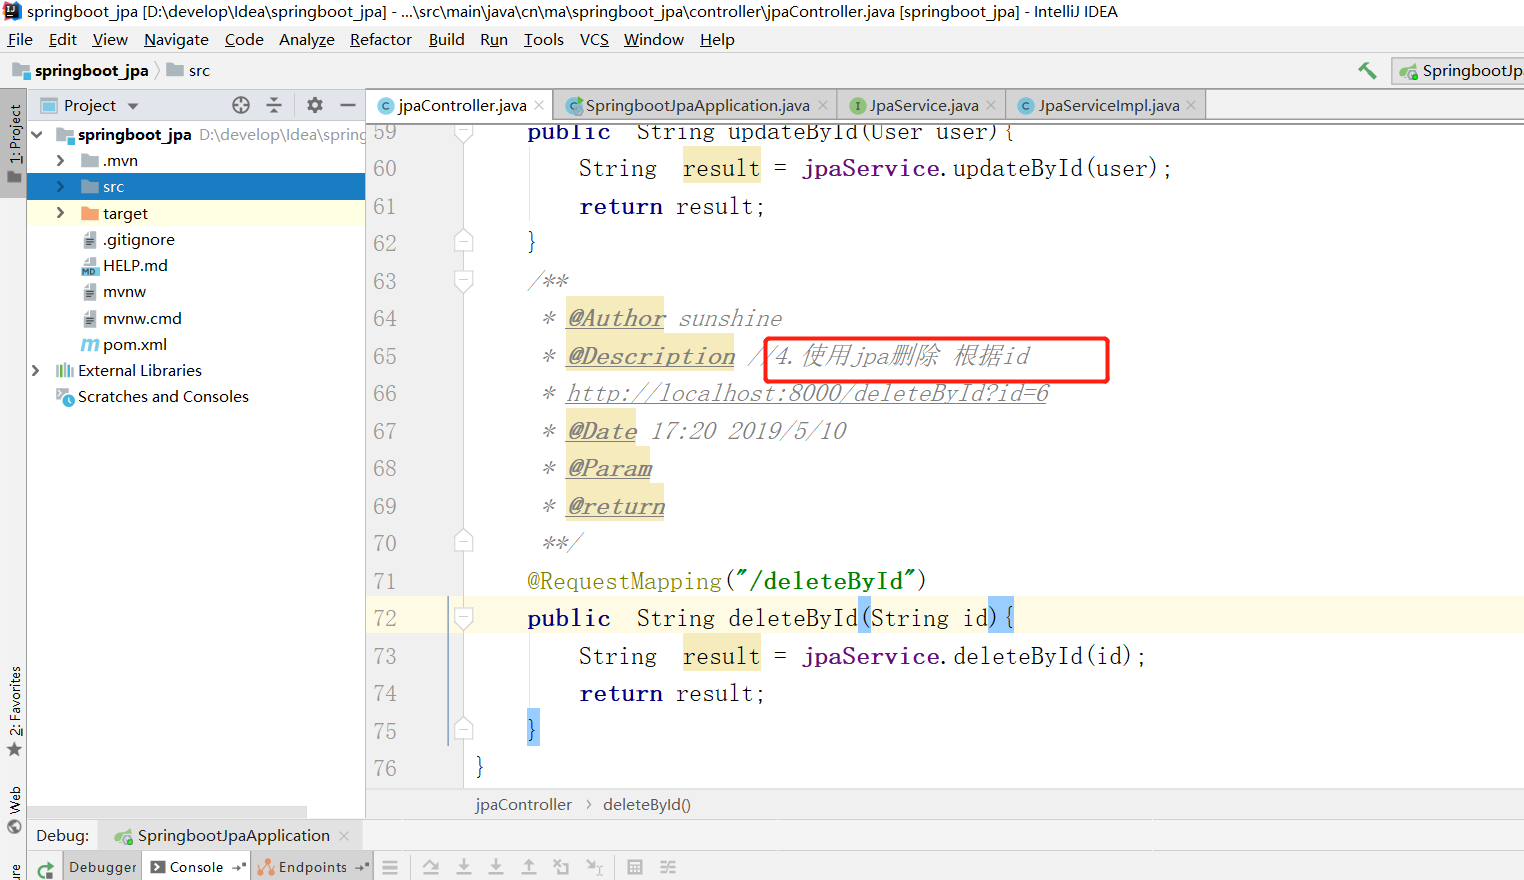
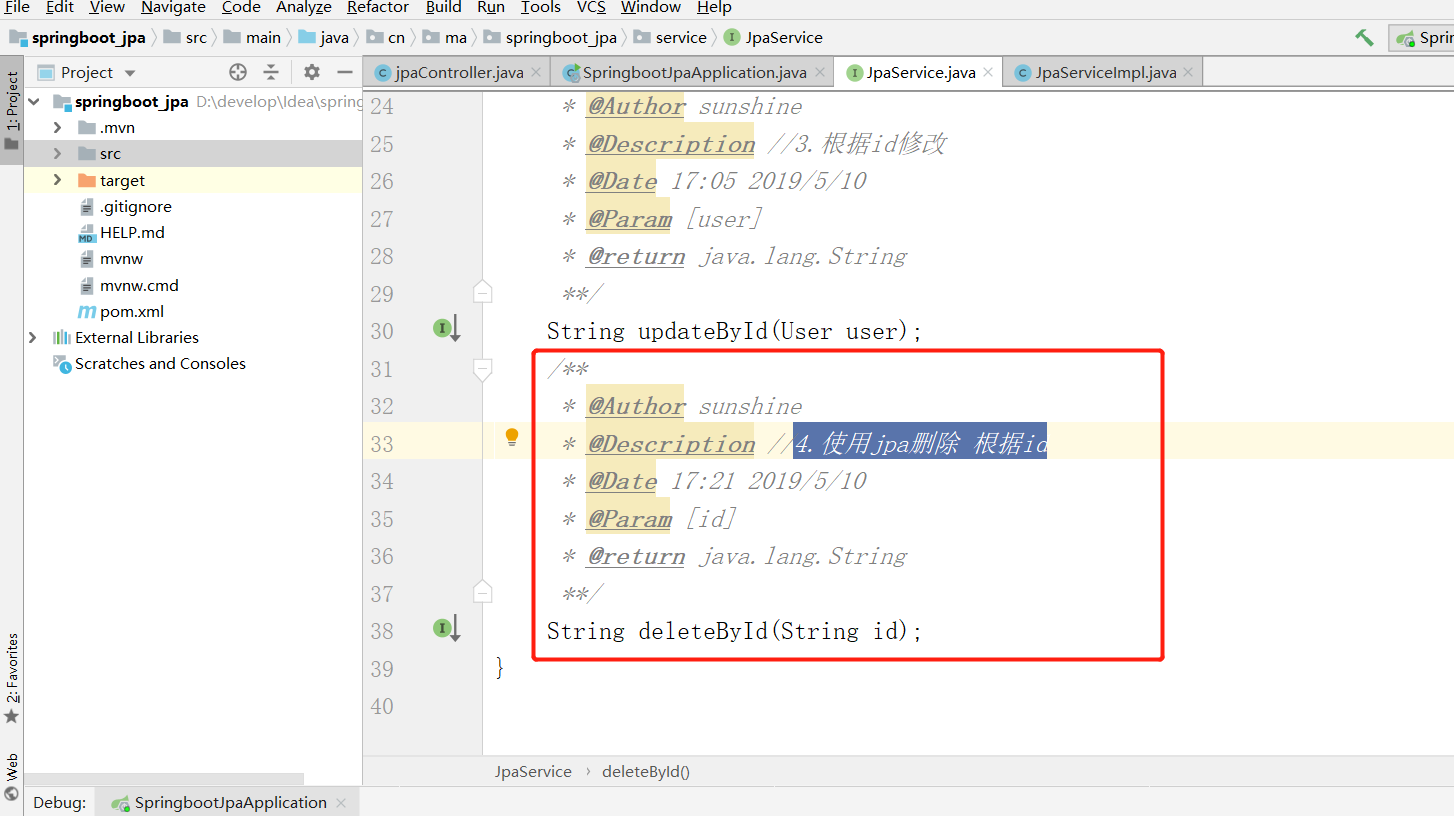
2.4.3 业务层
接口
实现类
3.附代码
码云:
https://gitee.com/Luck_Me/springboot_integrates_jpa/tree/master
百度云:
链接:https://pan.baidu.com/s/1Xvc1ZWqVwQYIOd-I87soCQ
提取码:zrrg
SpringBoot 整合JPA")
JAVA springboot微服务b2b2c电子商务系统(四)SpringBoot 整合JPA
JPA全称Java Persistence API.JPA通过JDK 5.0注解或XML描述对象-关系表的映射关系,并将运行期的实体对象持久化到数据库中。
JPA 的目标之一是制定一个可以由很多供应商实现的API,并且开发人员可以编码来实现该API,而不是使用私有供应商特有的API。
JPA是需要Provider来实现其功能的,Hibernate就是JPA Provider中很强的一个,应该说无人能出其右。从功能上来说,JPA就是Hibernate功能的一个子集。
添加相关依赖
添加spring-boot-starter-jdbc依赖:
<dependency>
            <groupId>org.springframework.boot</groupId>
            <artifactId>spring-boot-starter-data-jpa
            </artifactId>
        </dependency>
添加mysql连接类和连接池类:
<dependency>
     <groupId>mysql</groupId>
     <artifactId>mysql-connector-java</artifactId>
     <scope>runtime</scope>
 </dependency>
配置数据源,在application.properties文件配置:
spring:
  datasource:
    driver-class-name: com.mysql.jdbc.Driver
    url: jdbc:mysql://localhost:3306/test?useUnicode=true&characterEncoding=utf8&characterSetResults=utf8
    username: root
    password: 123456

  jpa:
    hibernate:
      ddl-auto: update  # 第一次简表create  后面用update
    show-sql: true
注意,如果通过jpa在数据库中建表,将jpa.hibernate,ddl-auto改为create,建完表之后,要改为update,要不然每次重启工程会删除表并新建。
创建实体类
通过@Entity 表明是一个映射的实体类, @Id表明id, @GeneratedValue 字段自动生成
@Entity
public class Account {
    @Id
    @GeneratedValue
    private int id ;
    private String name ;
    private double money;

...  省略getter setter
}
Dao层
数据访问层,通过编写一个继承自 JpaRepository 的接口就能完成数据访问,其中包含了几本的单表查询的方法,非常的方便。值得注意的是,这个Account 对象名,而不是具体的表名,另外Interger是主键的类型,一般为Integer或者Long
public interface AccountDao  extends JpaRepository<Account,Integer> {
}
Spring Cloud大型企业分布式微服务云构建的B2B2C电子商务平台源码请加企鹅求求: 一零叁八七七四六贰六

Spring Boot整合JPA使用多个数据源的方法步骤
这篇文章主要给大家介绍了关于Spring Boot整合JPA使用多个数据源的方法步骤,文中通过示例代码介绍的非常详细,对大家学习或者使用Spring Boot具有一定的参考学习价值,需要的朋友们下面来一起学习学习吧
介绍
JPA(Java Persistence API)Java 持久化 API,是 Java 持久化的标准规范,Hibernate 是持久化规范的技术实现,而 Spring Data JPA 是在 Hibernate 基础上封装的一款框架。
第一次使用 Spring JPA 的时候,感觉这东西简直就是神器,几乎不需要写什么关于数据库访问的代码一个基本的 CURD 的功能就出来了。在这篇文章中,我们将介绍 Spring Boot 整合 JPA 使用多个数据源的方法。
开发环境:
Spring Boot 2.0.5
Spring Data JPA 2.0.5
MysqL 5.6
JDK 8
IDEA 2018.3
Windows 10
引入依赖
首先我们要 Spring Boot 引入 spring-boot-starter-data-jpa 依赖。
Maven 配置:
org.springframework.bootspring-boot-starter-data-jpaorg.springframework.bootspring-boot-starter-weborg.springframework.bootspring-boot-devtoolsruntimeMysqLmysql-connector-javaruntime
Gradle 配置:
compile group: 'org.springframework.boot', name: 'spring-boot-starter-data-jpa', version: '2.0.5.RELEASE' compile group: 'org.springframework.boot', name: 'spring-boot-starter-web', version: '2.0.5.RELEASE' compile group: 'org.springframework.boot', name: 'spring-boot-devtools', version: '2.0.5.RELEASE' compile group: 'MysqL', name: 'mysql-connector-java', version: '6.0.6'
配置数据源
Spring Boot 提供了使用 application.properties 或 application.yml 文件配置项目属性的方法。我比较习惯使用 application.yml 文件,所以这里我只列出 application.yml 文件的写法。
spring: datasource: product: driver-class-name: com.MysqL.jdbc.Driver jdbc-url: jdbc:MysqL://127.0.0.1:3306/product?useUnicode=true&characterEncoding=utf-8&serverTimezone=UTC&autoReconnect=true&useSSL=false&zeroDateTimeBehavior=convertToNull username: root password: test123$ customer: driver-class-name: com.MysqL.jdbc.Driver jdbc-url: jdbc:MysqL://127.0.0.1:3306/customer?useUnicode=true&characterEncoding=utf-8&serverTimezone=UTC&autoReconnect=true&useSSL=false&zeroDateTimeBehavior=convertToNull username: root password: test123$ jpa: generate-ddl: true
配置好 application.yml 文件后分别在数据库创建 customer 和 product 数据库。
添加实体(Entity)类
客户实体:
package com.springboot.jpa.customer.models; import javax.persistence.*; @Entity public class Customer { @Id @GeneratedValue(strategy = GenerationType.IDENTITY) private Integer id; @Column(unique = true, nullable = false) private String email; private String firstName; private String lastName; protected Customer() { } public Customer(String email, String firstName, String lastName) { this.email = email; this.firstName = firstName; this.lastName = lastName; } @Override public String toString() { return String.format("Customer[id=%d, firstName='%s', lastName='%s',email='%s']", id, firstName, lastName, email); } public Integer getId() { return id; } public String getEmail() { return email; } public String getFirstName() { return firstName; } public String getLastName() { return lastName; } }
产品实体:
package com.springboot.jpa.product.models; import javax.persistence.*; @Entity public class Product { @Id @GeneratedValue(strategy = GenerationType.IDENTITY) private int id; @Column(nullable = false) private String code; private String name; private double price; protected Product() { } public Product(String code, String name, double price) { this.code = code; this.name = name; this.price = price; } @Override public String toString() { return String.format("Product[id=%d, code='%s', name='%s', price='%s']", id, code, name, price); } public int getId() { return id; } public String getCode() { return code; } public String getName() { return name; } public double getPrice() { return price; } }
添加数据仓库(Repository)类
客户 Repository:
package com.springboot.jpa.customer.repository; import com.springboot.jpa.customer.models.Customer; import org.springframework.data.jpa.repository.JpaRepository; import org.springframework.stereotype.Repository; @Repository public interface CustomerRepository extends JpaRepository { }
产品 Repository:
package com.springboot.jpa.product.repository; import com.springboot.jpa.product.models.Product; import org.springframework.data.jpa.repository.JpaRepository; import org.springframework.stereotype.Repository; @Repository public interface ProductRepository extends JpaRepository { }
添加配置(Config)类
客户配置:
package com.springboot.jpa.customer.config; import org.springframework.beans.factory.annotation.Qualifier; import org.springframework.boot.context.properties.ConfigurationProperties; import org.springframework.boot.jdbc.DataSourceBuilder; import org.springframework.boot.orm.jpa.EntityManagerFactoryBuilder; import org.springframework.context.annotation.Bean; import org.springframework.context.annotation.Configuration; import org.springframework.context.annotation.Primary; import org.springframework.data.jpa.repository.config.EnableJpaRepositories; import org.springframework.orm.jpa.JpaTransactionManager; import org.springframework.orm.jpa.LocalContainerEntityManagerfactorybean; import org.springframework.transaction.PlatformTransactionManager; import org.springframework.transaction.annotation.EnableTransactionManagement; import javax.persistence.EntityManagerFactory; import javax.sql.DataSource; @Configuration @EnableTransactionManagement @EnableJpaRepositories(entityManagerFactoryRef = "customerEntityManagerFactory", transactionManagerRef = "customerTransactionManager", basePackages = {"com.springboot.jpa.customer.repository"}) public class CustomerConfig { @Primary @Bean(name = "customerDataSource") @ConfigurationProperties(prefix = "spring.datasource.customer") public DataSource customerDataSource() { return DataSourceBuilder.create().build(); } @Primary @Bean(name = "customerEntityManagerFactory") public LocalContainerEntityManagerfactorybean entityManagerFactory(EntityManagerFactoryBuilder builder, @Qualifier("customerDataSource") DataSource dataSource) { return builder.dataSource(dataSource).packages("com.springboot.jpa.customer.models").persistenceUnit("customer").build(); } @Primary @Bean(name = "customerTransactionManager") public PlatformTransactionManager customerTransactionManager(@Qualifier("customerEntityManagerFactory") EntityManagerFactory customerEntityManagerFactory) { return new JpaTransactionManager(customerEntityManagerFactory); } }
产品配置:
package com.springboot.jpa.product.config; import org.springframework.beans.factory.annotation.Qualifier; import org.springframework.boot.context.properties.ConfigurationProperties; import org.springframework.boot.jdbc.DataSourceBuilder; import org.springframework.boot.orm.jpa.EntityManagerFactoryBuilder; import org.springframework.context.annotation.Bean; import org.springframework.context.annotation.Configuration; import org.springframework.data.jpa.repository.config.EnableJpaRepositories; import org.springframework.orm.jpa.JpaTransactionManager; import org.springframework.orm.jpa.LocalContainerEntityManagerfactorybean; import org.springframework.transaction.PlatformTransactionManager; import org.springframework.transaction.annotation.EnableTransactionManagement; import javax.persistence.EntityManagerFactory; import javax.sql.DataSource; @Configuration @EnableTransactionManagement @EnableJpaRepositories(entityManagerFactoryRef = "productEntityManagerFactory", transactionManagerRef = "productTransactionManager", basePackages = {"com.springboot.jpa.product.repository"} ) public class ProductConfig { @Bean(name = "productDataSource") @ConfigurationProperties(prefix = "spring.datasource.product") public DataSource dataSource() { return DataSourceBuilder.create().build(); } @Bean(name = "productEntityManagerFactory") public LocalContainerEntityManagerfactorybean barEntityManagerFactory(EntityManagerFactoryBuilder builder, @Qualifier("productDataSource") DataSource dataSource) { return builder.dataSource(dataSource).packages("com.springboot.jpa.product.models").persistenceUnit("product").build(); } @Bean(name = "productTransactionManager") public PlatformTransactionManager productTransactionManager(@Qualifier("productEntityManagerFactory") EntityManagerFactory productEntityManagerFactory) { return new JpaTransactionManager(productEntityManagerFactory); } }
项目结构:
src/main/java
- com.springboot.jpa
- product
- config
- models
- repository
- customer
- config
- models
- repository
添加测试类
客户测试类 CustomerDataSourcesTests:
package com.springboot.jpa; import com.springboot.jpa.customer.repository.CustomerRepository; import com.springboot.jpa.customer.models.Customer; import org.junit.runner.RunWith; import org.springframework.beans.factory.annotation.Autowired; import org.springframework.boot.test.context.SpringBoottest; import org.springframework.test.context.junit4.springrunner; import org.springframework.transaction.annotation.Transactional; import org.junit.Test; import static org.junit.Assert.assertEquals; import static org.junit.Assert.assertNotNull; @RunWith(springrunner.class) @SpringBoottest public class CustomerDataSourcesTests { @Autowired private CustomerRepository customerRepository; @Test @Transactional("customerTransactionManager") public void createCustomer() { Customer customer = new Customer("master@weilog.net", "Charles", "Zhang"); customer = customerRepository.save(customer); assertNotNull(customerRepository.findById(customer.getId())); assertEquals(customerRepository.findById(customer.getId()).get().getEmail(), "master@weilog.net"); } }
产品测试类 ProductDataSourcesTests:
package com.springboot.jpa; import com.springboot.jpa.product.models.Product; import com.springboot.jpa.product.repository.ProductRepository; import org.junit.runner.RunWith; import org.springframework.beans.factory.annotation.Autowired; import org.springframework.boot.test.context.SpringBoottest; import org.springframework.test.context.junit4.springrunner; import org.springframework.transaction.annotation.Transactional; import org.junit.Test; import static org.junit.Assert.assertNotNull; @RunWith(springrunner.class) @SpringBoottest public class ProductDataSourcesTests { @Autowired private ProductRepository productRepository; @Test @Transactional("productTransactionManager") public void createProduct() { Product product = new Product("10000", "Book", 80.0); product = productRepository.save(product); assertNotNull(productRepository.findById(product.getId())); } }
测试
分别运行两个测试类通过后,查询数据库。
客户表:
MysqL> SELECT * FROM customer; +----+-------------------+-----------+----------+ | id | email | firstName | lastName | +----+-------------------+-----------+----------+ | 1 | master@weilog.net | Charles | Zhang | +----+-------------------+-----------+----------+ 1 row in set
产品表:
MysqL> SELECT * FROM product; +----+-------+------+-------+ | id | code | name | price | +----+-------+------+-------+ | 1 | 10000 | Book | 80 | +----+-------+------+-------+ 1 row in set
本文地址:Spring Boot 整合 JPA 使用多个数据源
项目地址:spring-boot-jpa
总结
以上就是这篇文章的全部内容了,希望本文的内容对大家的学习或者工作具有一定的参考学习价值,谢谢大家对小编的支持。
今天关于Spring整合JPA和spring整合jpa和mybatis的介绍到此结束,谢谢您的阅读,有关(二)在一的基础上集成spring 4.0.3 并整合JPA以及spring的单元测试、228. springboot整合jpa、JAVA springboot微服务b2b2c电子商务系统(四)SpringBoot 整合JPA、Spring Boot整合JPA使用多个数据源的方法步骤等更多相关知识的信息可以在本站进行查询。
本文标签:


![[转帖]Ubuntu 安装 Wine方法(ubuntu如何安装wine)](https://www.gvkun.com/zb_users/cache/thumbs/4c83df0e2303284d68480d1b1378581d-180-120-1.jpg)

