本文的目的是介绍springtx事务核心流程源码分析的详细情况,特别关注spring事务源码深度解析的相关信息。我们将通过专业的研究、有关数据的分析等多种方式,为您呈现一个全面的了解springtx事
本文的目的是介绍spring tx 事务核心流程源码分析的详细情况,特别关注spring事务源码深度解析的相关信息。我们将通过专业的研究、有关数据的分析等多种方式,为您呈现一个全面的了解spring tx 事务核心流程源码分析的机会,同时也不会遗漏关于Java 架构师之源码分析专题 SpringBoot2.x、Spring5、SpringMVC、Mybatis 源码分析、Mybatis 核心流程源码分析、spring aop 源码核心流程分析、Spring Boot 与 Spring MVC 集成启动过程源码分析的知识。
本文目录一览:- spring tx 事务核心流程源码分析(spring事务源码深度解析)
- Java 架构师之源码分析专题 SpringBoot2.x、Spring5、SpringMVC、Mybatis 源码分析
- Mybatis 核心流程源码分析
- spring aop 源码核心流程分析
- Spring Boot 与 Spring MVC 集成启动过程源码分析
")
spring tx 事务核心流程源码分析(spring事务源码深度解析)
今天我们来看下 spring 的 tx 模块的核心流程。
1. 实例
配置一个启动事务管理类,配置一个数据源事务管理器:
	@Configuration
	@EnableTransactionManagement
	static class DefaultTxManagerNameConfig {

		@Bean
		PlatformTransactionManager transactionManager(DataSource dataSource) {
			return new DataSourceTransactionManager(dataSource);
		}
	}
配置一个数据源、JdbcFooRepository 类
	@Configuration
	static class Config {

		@Bean
		FooRepository fooRepository() {
			JdbcFooRepository repos = new JdbcFooRepository();
			repos.setDataSource(dataSource());
			return repos;
		}

		@Bean
		DataSource dataSource() {
			return new EmbeddedDatabaseBuilder()
				.setType(EmbeddedDatabaseType.HSQL)
				.build();
		}
	}
基础的 DAO 类,在 findAll () 方法上标注 @Transactional 注解
	interface FooRepository {

		List<Object> findAll();
	}

	static class JdbcFooRepository implements FooRepository {

		public void setDataSource(DataSource dataSource) {
		}

		@Override
		@Transactional
		public List<Object> findAll() {
			ArrayList<Object> result = new ArrayList<>();
			for (int i1 = 0; i1 < 10; i1++) {
				int random = (int) (Math.random() * 100);
				result.add(random);
			}
			return result;
		}
	}
最后配置一个测试类:
public class EnableTransactionManagementIntegrationTests {

  @Test
	void repositoryIsTxProxy_withDefaultTxManagerName() {
		AnnotationConfigApplicationContext ctx = new AnnotationConfigApplicationContext(Config.class, DefaultTxManagerNameConfig.class);
		FooRepository repo = ctx.getBean(FooRepository.class);
		List<Object> all = repo.findAll();
		System.out.println("all = " + all);
	}

}
这样就配置了一个使用事务注解支持事务的方法的例子了。
2. 分析
我们从 DefaultTxManagerNameConfig 上的 @EnableTransactionManagement 开始看:
@Target(ElementType.TYPE)
@Retention(RetentionPolicy.RUNTIME)
@Documented
@Import(TransactionManagementConfigurationSelector.class)
public @interface EnableTransactionManagement {

	/**
	 * 指定使用什么代理模式(true 为 cglib 代理,false 为 jdk 代理)
	 *
	 * Indicate whether subclass-based (CGLIB) proxies are to be created ({@code true}) as
	 * opposed to standard Java interface-based proxies ({@code false}). The default is
	 * {@code false}. <strong>Applicable only if {@link #mode()} is set to
	 * {@link AdviceMode#PROXY}</strong>.
	 * <p>Note that setting this attribute to {@code true} will affect <em>all</em>
	 * Spring-managed beans requiring proxying, not just those marked with
	 * {@code @Transactional}. For example, other beans marked with Spring''s
	 * {@code @Async} annotation will be upgraded to subclass proxying at the same
	 * time. This approach has no negative impact in practice unless one is explicitly
	 * expecting one type of proxy vs another, e.g. in tests.
	 */
	boolean proxyTargetClass() default false;

	/**
	 * 通知的模式,代理模式或者 aspectj,一般是使用代理模式。
	 * 注意代理模式只允许调用拦截,通过在本类中的本地调用不能被拦截;
	 * 一个 Transactional 注解在一个本地调用的方法上将会被 spring 的拦截器忽略,甚至不会再这种场景中出现。
	 * 对于拦截更多高级
	 *
	 * Indicate how transactional advice should be applied.
	 * <p><b>The default is {@link AdviceMode#PROXY}.</b>
	 * Please note that proxy mode allows for interception of calls through the proxy
	 * only. Local calls within the same class cannot get intercepted that way; an
	 * {@link Transactional} annotation on such a method within a local call will be
	 * ignored since Spring''s interceptor does not even kick in for such a runtime
	 * scenario. For a more advanced mode of interception, consider switching this to
	 * {@link AdviceMode#ASPECTJ}.
	 */
	AdviceMode mode() default AdviceMode.PROXY;

	/**
	 * Indicate the ordering of the execution of the transaction advisor
	 * when multiple advices are applied at a specific joinpoint.
	 * <p>The default is {@link Ordered#LOWEST_PRECEDENCE}.
	 */
	int order() default Ordered.LOWEST_PRECEDENCE;

}
这个类有三个属性,proxyTargetClass、mode、order,分别表示:是否使用 cglib 代理、通知的模式(PROXY 或者 ASPECTJ)、排序。
它还使用了 @Import (TransactionManagementConfigurationSelector.class) 注解,导入了 TransactionManagementConfigurationSelector 类:
/**
 * 在导入 @Configuration 注解类时候,根据选择 EnableTransactionManagement 的 mode,来选择
 * AbstractTransactionManagementConfiguration 类合适的子类,
 *
 * Selects which implementation of {@link AbstractTransactionManagementConfiguration}
 * should be used based on the value of {@link EnableTransactionManagement#mode} on the
 * importing {@code @Configuration} class.
 *
 * @author Chris Beams
 * @author Juergen Hoeller
 * @since 3.1
 * @see EnableTransactionManagement
 * @see ProxyTransactionManagementConfiguration
 * @see TransactionManagementConfigUtils#TRANSACTION_ASPECT_CONFIGURATION_CLASS_NAME
 * @see TransactionManagementConfigUtils#JTA_TRANSACTION_ASPECT_CONFIGURATION_CLASS_NAME
 */
public class TransactionManagementConfigurationSelector extends AdviceModeImportSelector<EnableTransactionManagement> {

	/**
	 * Returns {@link ProxyTransactionManagementConfiguration} or
	 * {@code AspectJ(Jta)TransactionManagementConfiguration} for {@code PROXY}
	 * and {@code ASPECTJ} values of {@link EnableTransactionManagement#mode()},
	 * respectively.
	 */
	@Override
	protected String[] selectImports(AdviceMode adviceMode) {
		switch (adviceMode) {
			case PROXY:
				return new String[] {AutoProxyRegistrar.class.getName(),
						ProxyTransactionManagementConfiguration.class.getName()};
			case ASPECTJ:
				return new String[] {determineTransactionAspectClass()};
			default:
				return null;
		}
	}

	private String determineTransactionAspectClass() {
		return (ClassUtils.isPresent("javax.transaction.Transactional", getClass().getClassLoader()) ?
				TransactionManagementConfigUtils.JTA_TRANSACTION_ASPECT_CONFIGURATION_CLASS_NAME :
				TransactionManagementConfigUtils.TRANSACTION_ASPECT_CONFIGURATION_CLASS_NAME);
	}

}
看下它的类图结构:

这个类继承了 AdviceModeImportSelector 类,它是一个 ImportSelector 导入选择器,重写了 selectImports () 方法,通过 adviceMode 来返回一组类的名称,我们一般使用 AdviceMode.PROXY,可以看到它会返回 AutoProxyRegistrar.classs 和 ProxyTransactionManagementConfiguration.class 这两个类的名称。
我们回顾下 ImportSelector 类,它的 selectImports () 方法是在 org.springframework.context.annotation.ConfigurationClassParser#processImports 中进行调用的。它是在 spring 容器启动时,执行 bean 工厂注册器后置处理器时,调用了 ConfigurationClassParser 配置类解析器的解析扫描 @Configuration 注解的类的 bean 定义流程中执行的。
2.1 AutoProxyRegistrar
接着继续看 AutoProxyRegistrar.classs 这个类,它的类图:

它实现为:
/**
 * 针对当前的 BeanDefinitionRegistry 作为一个合适的基于 @Enable* 注解标有 mode 和 proxyTargetClass 的属性,
 * 设置到正确的值。
 *
 * Registers an auto proxy creator against the current {@link BeanDefinitionRegistry}
 * as appropriate based on an {@code @Enable*} annotation having {@code mode} and
 * {@code proxyTargetClass} attributes set to the correct values.
 *
 * @author Chris Beams
 * @since 3.1
 * @see org.springframework.cache.annotation.EnableCaching
 * @see org.springframework.transaction.annotation.EnableTransactionManagement
 */
public class AutoProxyRegistrar implements ImportBeanDefinitionRegistrar {

	private final Log logger = LogFactory.getLog(getClass());

	/**
	 * 注册bean 定义
	 *
	 * Register, escalate, and configure the standard auto proxy creator (APC) against the
	 * given registry. Works by finding the nearest annotation declared on the importing
	 * {@code @Configuration} class that has both {@code mode} and {@code proxyTargetClass}
	 * attributes. If {@code mode} is set to {@code PROXY}, the APC is registered; if
	 * {@code proxyTargetClass} is set to {@code true}, then the APC is forced to use
	 * subclass (CGLIB) proxying.
	 * <p>Several {@code @Enable*} annotations expose both {@code mode} and
	 * {@code proxyTargetClass} attributes. It is important to note that most of these
	 * capabilities end up sharing a {@linkplain AopConfigUtils#AUTO_PROXY_CREATOR_BEAN_NAME
	 * single APC}. For this reason, this implementation doesn''t "care" exactly which
	 * annotation it finds -- as long as it exposes the right {@code mode} and
	 * {@code proxyTargetClass} attributes, the APC can be registered and configured all
	 * the same.
	 */
	@Override
	public void registerBeanDefinitions(AnnotationMetadata importingClassMetadata, BeanDefinitionRegistry registry) {
		boolean candidateFound = false;
		Set<String> annTypes = importingClassMetadata.getAnnotationTypes();
		for (String annType : annTypes) {
			AnnotationAttributes candidate = AnnotationConfigUtils.attributesFor(importingClassMetadata, annType);
			if (candidate == null) {
				continue;
			}
			// 获取模式
			Object mode = candidate.get("mode");
			// 获取代理目标类
			Object proxyTargetClass = candidate.get("proxyTargetClass");
			if (mode != null && proxyTargetClass != null && AdviceMode.class == mode.getClass() &&
					Boolean.class == proxyTargetClass.getClass()) {
				candidateFound = true;
				// 使用代理模式
				if (mode == AdviceMode.PROXY) {
					AopConfigUtils.registerAutoProxyCreatorIfNecessary(registry);
					if ((Boolean) proxyTargetClass) {
						// 强制自动代理创建器使用类代理,proxyTargetClass
						AopConfigUtils.forceAutoProxyCreatorToUseClassProxying(registry);
						return;
					}
				}
			}
		}
		if (!candidateFound && logger.isInfoEnabled()) {
			String name = getClass().getSimpleName();
			logger.info(String.format("%s was imported but no annotations were found " +
					"having both ''mode'' and ''proxyTargetClass'' attributes of type " +
					"AdviceMode and boolean respectively. This means that auto proxy " +
					"creator registration and configuration may not have occurred as " +
					"intended, and components may not be proxied as expected. Check to " +
					"ensure that %s has been @Import''ed on the same class where these " +
					"annotations are declared; otherwise remove the import of %s " +
					"altogether.", name, name, name));
		}
	}

}
它是一个 ImportBeanDefinitionRegistrar 类型,导入 bean 定义注册器,实现了 registerBeanDefinitions () 方法,这个方法做的事情:
- 获取导入类的注解元数据;
- 获取 mode 注解属性、proxyTargetClass 注解属性;
- 根据它们的值,注册一个名称为 org.springframework.aop.config.internalAutoProxyCreator,值为 InfrastructureAdvisorAutoProxyCreator 类型的 bean 定义;
- 以及 bean 定义的 proxyTargetClass 属性。
它的这个方法是在 org.springframework.context.annotation.ConfigurationClassBeanDefinitionReader#loadBeanDefinitionsFromRegistrars 处调用的,也是属于配置类后置处理器注册已经将 bean 定义解析为配置类的流程中。
2.2 InfrastructureAdvisorAutoProxyCreator
看下 InfrastructureAdvisorAutoProxyCreator 类,它的类图:

它的实现:
/**
 * 自动代理创建器,仅仅考虑基础的增强器 beans,忽略其他应用程序定义的增强器
 *
 * Auto-proxy creator that considers infrastructure Advisor beans only,
 * ignoring any application-defined Advisors.
 *
 * @author Juergen Hoeller
 * @since 2.0.7
 */
@SuppressWarnings("serial")
public class InfrastructureAdvisorAutoProxyCreator extends AbstractAdvisorAutoProxyCreator {

	@Nullable
	private ConfigurableListableBeanFactory beanFactory;


	@Override
	protected void initBeanFactory(ConfigurableListableBeanFactory beanFactory) {
		super.initBeanFactory(beanFactory);
		this.beanFactory = beanFactory;
	}

	@Override
	protected boolean isEligibleAdvisorBean(String beanName) {
		// 判断是否是一个合格的增强器,@Role(BeanDefinition.ROLE_INFRASTRUCTURE) bean 定义的角色是基础类
		return (this.beanFactory != null && this.beanFactory.containsBeanDefinition(beanName) &&
				this.beanFactory.getBeanDefinition(beanName).getRole() == BeanDefinition.ROLE_INFRASTRUCTURE);
	}

}
这个类它和 spring aop 中的 AnnotationAwareAspectJAutoProxyCreator 类很像,没错!它们都是共同继承了 AbstractAdvisorAutoProxyCreator 类型,间接的实现了 BeanPostProcessor 的 postProcessBeforeInstantiation () 方法和 postProcessAfterInitialization () 方法。这两个方法主要是对代理对象进行检查以及初始化,并且进行创建其代理。
2.3 ProxyTransactionManagementConfiguration
再看下 ProxyTransactionManagementConfiguration 类:
/**
 * 这是一个 @Configuration 类,它注册了 spring 基础类,这些类时启动基于代理的注解驱动的事务管理器的必要类。
 *
 * {@code @Configuration} class that registers the Spring infrastructure beans
 * necessary to enable proxy-based annotation-driven transaction management.
 *
 * @author Chris Beams
 * @author Sebastien Deleuze
 * @since 3.1
 * @see EnableTransactionManagement
 * @see TransactionManagementConfigurationSelector
 */
@Configuration(proxyBeanMethods = false)
@Role(BeanDefinition.ROLE_INFRASTRUCTURE)
public class ProxyTransactionManagementConfiguration extends AbstractTransactionManagementConfiguration {

	/**
	 * 注册一个内部的事务增强器 org.springframework.transaction.config.internalTransactionAdvisor
	 *
	 * @param transactionAttributeSource
	 * @param transactionInterceptor
	 * @return
	 */
	@Bean(name = TransactionManagementConfigUtils.TRANSACTION_ADVISOR_BEAN_NAME)
	@Role(BeanDefinition.ROLE_INFRASTRUCTURE)
	public BeanFactoryTransactionAttributeSourceAdvisor transactionAdvisor(
			TransactionAttributeSource transactionAttributeSource, TransactionInterceptor transactionInterceptor) {

		BeanFactoryTransactionAttributeSourceAdvisor advisor = new BeanFactoryTransactionAttributeSourceAdvisor();
		// 设置事务属性源
		advisor.setTransactionAttributeSource(transactionAttributeSource);
		// 设置通知事务拦截器
		advisor.setAdvice(transactionInterceptor);
		if (this.enableTx != null) {
			advisor.setOrder(this.enableTx.<Integer>getNumber("order"));
		}
		return advisor;
	}

	/**
	 * 定义一个注解事务属性源
	 *
	 * @return
	 */
	@Bean
	@Role(BeanDefinition.ROLE_INFRASTRUCTURE)
	public TransactionAttributeSource transactionAttributeSource() {
		// 注解的事务属性源
		return new AnnotationTransactionAttributeSource();
	}

	/**
	 * 定义一个事务拦截器
	 *
	 * @param transactionAttributeSource
	 * @return
	 */
	@Bean
	@Role(BeanDefinition.ROLE_INFRASTRUCTURE)
	public TransactionInterceptor transactionInterceptor(TransactionAttributeSource transactionAttributeSource) {
		TransactionInterceptor interceptor = new TransactionInterceptor();
		// 设置事务属性源
		interceptor.setTransactionAttributeSource(transactionAttributeSource);
		if (this.txManager != null) {
			// 设置事务管理器
			interceptor.setTransactionManager(this.txManager);
		}
		return interceptor;
	}

}
这个类引入了三个 bean:AnnotationTransactionAttributeSource、TransactionInterceptor、BeanFactoryTransactionAttributeSourceAdvisor。
2.4 AnnotationTransactionAttributeSource
它是一个注解事务属性源,看下它的类图:

它的实现:
/**
 * Implementation of the
 * {@link org.springframework.transaction.interceptor.TransactionAttributeSource}
 * interface for working with transaction metadata in JDK 1.5+ annotation format.
 *
 * <p>This class reads Spring''s JDK 1.5+ {@link Transactional} annotation and
 * exposes corresponding transaction attributes to Spring''s transaction infrastructure.
 * Also supports JTA 1.2''s {@link javax.transaction.Transactional} and EJB3''s
 * {@link javax.ejb.TransactionAttribute} annotation (if present).
 * This class may also serve as base class for a custom TransactionAttributeSource,
 * or get customized through {@link TransactionAnnotationParser} strategies.
 *
 * @author Colin Sampaleanu
 * @author Juergen Hoeller
 * @since 1.2
 * @see Transactional
 * @see TransactionAnnotationParser
 * @see SpringTransactionAnnotationParser
 * @see Ejb3TransactionAnnotationParser
 * @see org.springframework.transaction.interceptor.TransactionInterceptor#setTransactionAttributeSource
 * @see org.springframework.transaction.interceptor.TransactionProxyFactoryBean#setTransactionAttributeSource
 */
@SuppressWarnings("serial")
public class AnnotationTransactionAttributeSource extends AbstractFallbackTransactionAttributeSource
		implements Serializable {

	private static final boolean jta12Present;

	private static final boolean ejb3Present;

	static {
		ClassLoader classLoader = AnnotationTransactionAttributeSource.class.getClassLoader();
		jta12Present = ClassUtils.isPresent("javax.transaction.Transactional", classLoader);
		ejb3Present = ClassUtils.isPresent("javax.ejb.TransactionAttribute", classLoader);
	}

	private final boolean publicMethodsOnly;

	private final Set<TransactionAnnotationParser> annotationParsers;


	/**
	 * Create a default AnnotationTransactionAttributeSource, supporting
	 * public methods that carry the {@code Transactional} annotation
	 * or the EJB3 {@link javax.ejb.TransactionAttribute} annotation.
	 */
	public AnnotationTransactionAttributeSource() {
		this(true);
	}

	/**
	 * Create a custom AnnotationTransactionAttributeSource, supporting
	 * public methods that carry the {@code Transactional} annotation
	 * or the EJB3 {@link javax.ejb.TransactionAttribute} annotation.
	 * @param publicMethodsOnly whether to support public methods that carry
	 * the {@code Transactional} annotation only (typically for use
	 * with proxy-based AOP), or protected/private methods as well
	 * (typically used with AspectJ class weaving)
	 */
	public AnnotationTransactionAttributeSource(boolean publicMethodsOnly) {
		this.publicMethodsOnly = publicMethodsOnly;
		if (jta12Present || ejb3Present) {
			this.annotationParsers = new LinkedHashSet<>(4);
			this.annotationParsers.add(new SpringTransactionAnnotationParser());
			if (jta12Present) {
				this.annotationParsers.add(new JtaTransactionAnnotationParser());
			}
			if (ejb3Present) {
				this.annotationParsers.add(new Ejb3TransactionAnnotationParser());
			}
		}
		else {
			this.annotationParsers = Collections.singleton(new SpringTransactionAnnotationParser());
		}
	}

	/**
	 * Create a custom AnnotationTransactionAttributeSource.
	 * @param annotationParser the TransactionAnnotationParser to use
	 */
	public AnnotationTransactionAttributeSource(TransactionAnnotationParser annotationParser) {
		this.publicMethodsOnly = true;
		Assert.notNull(annotationParser, "TransactionAnnotationParser must not be null");
		this.annotationParsers = Collections.singleton(annotationParser);
	}

	/**
	 * Create a custom AnnotationTransactionAttributeSource.
	 * @param annotationParsers the TransactionAnnotationParsers to use
	 */
	public AnnotationTransactionAttributeSource(TransactionAnnotationParser... annotationParsers) {
		this.publicMethodsOnly = true;
		Assert.notEmpty(annotationParsers, "At least one TransactionAnnotationParser needs to be specified");
		this.annotationParsers = new LinkedHashSet<>(Arrays.asList(annotationParsers));
	}

	/**
	 * Create a custom AnnotationTransactionAttributeSource.
	 * @param annotationParsers the TransactionAnnotationParsers to use
	 */
	public AnnotationTransactionAttributeSource(Set<TransactionAnnotationParser> annotationParsers) {
		this.publicMethodsOnly = true;
		Assert.notEmpty(annotationParsers, "At least one TransactionAnnotationParser needs to be specified");
		this.annotationParsers = annotationParsers;
	}


	@Override
	public boolean isCandidateClass(Class<?> targetClass) {
		for (TransactionAnnotationParser parser : this.annotationParsers) {
			if (parser.isCandidateClass(targetClass)) {
				return true;
			}
		}
		return false;
	}

	@Override
	@Nullable
	protected TransactionAttribute findTransactionAttribute(Class<?> clazz) {
		// 从类上找事务属性
		return determineTransactionAttribute(clazz);
	}

	@Override
	@Nullable
	protected TransactionAttribute findTransactionAttribute(Method method) {
		// 从方法上找事务属性
		return determineTransactionAttribute(method);
	}

	/**
	 * Determine the transaction attribute for the given method or class.
	 * <p>This implementation delegates to configured
	 * {@link TransactionAnnotationParser TransactionAnnotationParsers}
	 * for parsing known annotations into Spring''s metadata attribute class.
	 * Returns {@code null} if it''s not transactional.
	 * <p>Can be overridden to support custom annotations that carry transaction metadata.
	 * @param element the annotated method or class
	 * @return the configured transaction attribute, or {@code null} if none was found
	 */
	@Nullable
	protected TransactionAttribute determineTransactionAttribute(AnnotatedElement element) {
		// 遍历所有的注解解析器
		for (TransactionAnnotationParser parser : this.annotationParsers) {
			// 从事务注解解析器上解析
			TransactionAttribute attr = parser.parseTransactionAnnotation(element);
			if (attr != null) {
				return attr;
			}
		}
		return null;
	}

	/**
	 * By default, only public methods can be made transactional.
	 */
	@Override
	protected boolean allowPublicMethodsOnly() {
		return this.publicMethodsOnly;
	}


	@Override
	public boolean equals(@Nullable Object other) {
		if (this == other) {
			return true;
		}
		if (!(other instanceof AnnotationTransactionAttributeSource)) {
			return false;
		}
		AnnotationTransactionAttributeSource otherTas = (AnnotationTransactionAttributeSource) other;
		return (this.annotationParsers.equals(otherTas.annotationParsers) &&
				this.publicMethodsOnly == otherTas.publicMethodsOnly);
	}

	@Override
	public int hashCode() {
		return this.annotationParsers.hashCode();
	}

}
这个类间接的实现了 TransactionAttributeSource 接口,间接的实现了它的 org.springframework.transaction.interceptor.TransactionAttributeSource#isCandidateClass 和 org.springframework.transaction.interceptor.TransactionAttributeSource#getTransactionAttribute 方法,这两个方法都是在 org.springframework.aop.support.AopUtils#canApply 这个方法中被调用的,AopUtils#canApply 方法又是在上面提到的实现了 BeanPostProcessor 接口的 postProcessAfterInitialization () 方法的 InfrastructureAdvisorAutoProxyCreator 类所实现。
2.4.1 判断是否候选类 isCandidateClass ()
isCandidateClass () 方法:它在 bean 初始化之后,在获取通知和增强器的方法逻辑 getAdvicesAndAdvisorsForBean () 中调用 findAdvisorsThatCanApply (),再调用 canApply () 方法,根据 BeanFactoryTransactionAttributeSourceAdvisor 增强器,获取事务属性源切点 BeanFactoryTransactionAttributeSourceAdvisor#pointcut TransactionAttributeSourcePointcut 类型,获取切点 AnnotationTransactionAttributeSource 类,间接的调用它的 isCandidateClass () 方法,最后调用 SpringTransactionAnnotationParser 的 isCandidateClass () 方法,由 AnnotationUtils 工具类判断目标类是否有 @Transactional 来判断是否符合合格的类;
2.4.2 获取事务属性 TransactionAttribute 类型 getTransactionAttribute ()
它实现 org.springframework.transaction.interceptor.AbstractFallbackTransactionAttributeSource#getTransactionAttribute:
	/**
	 * 为这个方法执行获取事务属性。如果方法属性没有找到,默认是为类的事务属性。
	 *
	 * Determine the transaction attribute for this method invocation.
	 * <p>Defaults to the class''s transaction attribute if no method attribute is found.
	 * @param method the method for the current invocation (never {@code null})
	 * @param targetClass the target class for this invocation (may be {@code null})
	 * @return a TransactionAttribute for this method, or {@code null} if the method
	 * is not transactional
	 */
	@Override
	@Nullable
	public TransactionAttribute getTransactionAttribute(Method method, @Nullable Class<?> targetClass) {
		if (method.getDeclaringClass() == Object.class) {
			return null;
		}

		// 首先,从缓存中找
		// First, see if we have a cached value.
		Object cacheKey = getCacheKey(method, targetClass);
		TransactionAttribute cached = this.attributeCache.get(cacheKey);
		if (cached != null) {
			// Value will either be canonical value indicating there is no transaction attribute,
			// or an actual transaction attribute.
			if (cached == NULL_TRANSACTION_ATTRIBUTE) {
				return null;
			}
			else {
				return cached;
			}
		}
		else {
			// 计算事务属性
			// We need to work it out.
			TransactionAttribute txAttr = computeTransactionAttribute(method, targetClass);
			// Put it in the cache.
			if (txAttr == null) {
				// 在缓存中标识事务属性为空
				this.attributeCache.put(cacheKey, NULL_TRANSACTION_ATTRIBUTE);
			}
			else {
				// 为事务属性设置方法描述符
				String methodIdentification = ClassUtils.getQualifiedMethodName(method, targetClass);
				if (txAttr instanceof DefaultTransactionAttribute) {
					DefaultTransactionAttribute dta = (DefaultTransactionAttribute) txAttr;
					dta.setDescriptor(methodIdentification);
					dta.resolveAttributeStrings(this.embeddedValueResolver);
				}
				if (logger.isTraceEnabled()) {
					logger.trace("Adding transactional method ''" + methodIdentification + "'' with attribute: " + txAttr);
				}
				// 加入到缓存
				this.attributeCache.put(cacheKey, txAttr);
			}
			return txAttr;
		}
	}


	/**
	 * Determine a cache key for the given method and target class.
	 * <p>Must not produce same key for overloaded methods.
	 * Must produce same key for different instances of the same method.
	 * @param method the method (never {@code null})
	 * @param targetClass the target class (may be {@code null})
	 * @return the cache key (never {@code null})
	 */
	protected Object getCacheKey(Method method, @Nullable Class<?> targetClass) {
		return new MethodClassKey(method, targetClass);
	}

	/**
	 * 计算属性源
	 *
	 * Same signature as {@link #getTransactionAttribute}, but doesn''t cache the result.
	 * {@link #getTransactionAttribute} is effectively a caching decorator for this method.
	 * <p>As of 4.1.8, this method can be overridden.
	 * @since 4.1.8
	 * @see #getTransactionAttribute
	 */
	@Nullable
	protected TransactionAttribute computeTransactionAttribute(Method method, @Nullable Class<?> targetClass) {
		// 不允许非 public 修饰的方法
		// Don''t allow no-public methods as required.
		if (allowPublicMethodsOnly() && !Modifier.isPublic(method.getModifiers())) {
			return null;
		}

		// 方法可能在接口上,但是我们需要从目标类上获取属性。
		// 如果目标类是空,该方法将保持不变
		// The method may be on an interface, but we need attributes from the target class.
		// If the target class is null, the method will be unchanged.
		Method specificMethod = AopUtils.getMostSpecificMethod(method, targetClass);

		// 首先尝试的是目标类上的方法
		// First try is the method in the target class.
		TransactionAttribute txAttr = findTransactionAttribute(specificMethod);
		if (txAttr != null) {
			return txAttr;
		}

		// 然后尝试的是在方法所在的类上
		// Second try is the transaction attribute on the target class.
		txAttr = findTransactionAttribute(specificMethod.getDeclaringClass());
		if (txAttr != null && ClassUtils.isUserLevelMethod(method)) {
			return txAttr;
		}

		if (specificMethod != method) {
			// 从方法上找
			// Fallback is to look at the original method.
			txAttr = findTransactionAttribute(method);
			if (txAttr != null) {
				return txAttr;
			}
			// 最后在方法所在的接口上找
			// Last fallback is the class of the original method.
			txAttr = findTransactionAttribute(method.getDeclaringClass());
			if (txAttr != null && ClassUtils.isUserLevelMethod(method)) {
				return txAttr;
			}
		}

		return null;
	}
getTransactionAttribute () 方法:也是在上述 isCandidateClass () 方法调用逻辑中的 org.springframework.aop.support.AopUtils#canApply 方法中,通过 TransactionAttributeSourcePointcut 类调用 matches () 方法,再调用 getTransactionAttributeSource () 方法获取事务属性源,最后获取事务属性 TransactionAttribute。它主要是在 org.springframework.transaction.interceptor.AbstractFallbackTransactionAttributeSource#getTransactionAttribute 这个方法中实现的逻辑:
- 先从缓存中查找事务属性;
- 计算事务属性 computeTransactionAttribute ();
- 判断方法是否是 public 修饰的;
- 获取目标方法;
- 先从目标类上的方法查找 @Transcation 注解;
- 然后尝试从目标方法所在类上查找 @Transcation 注解;
- 在从接口的方法上查找 @Transcation 注解;
- 最后再从接口类上的查找 @Transcation 注解;
- 保存到缓存。
2.4.3 查找事务属性 findTransactionAttribute ()
这个方法是一个重载方法,org.springframework.transaction.annotation.AnnotationTransactionAttributeSource#findTransactionAttribute(java.lang.Class<?>) 和 org.springframework.transaction.annotation.AnnotationTransactionAttributeSource#findTransactionAttribute(java.lang.reflect.Method),最终都调用到了 org.springframework.transaction.annotation.AnnotationTransactionAttributeSource#determineTransactionAttribute 方法:
	protected TransactionAttribute determineTransactionAttribute(AnnotatedElement element) {
		// 遍历所有的注解解析器
		for (TransactionAnnotationParser parser : this.annotationParsers) {
			// 从事务注解解析器上解析
			TransactionAttribute attr = parser.parseTransactionAnnotation(element);
			if (attr != null) {
				return attr;
			}
		}
		return null;
	}
它通过事务注解解析器来解析:org.springframework.transaction.annotation.SpringTransactionAnnotationParser#parseTransactionAnnotation (java.lang.reflect.AnnotatedElement)
	@Override
	@Nullable
	public TransactionAttribute parseTransactionAnnotation(AnnotatedElement element) {
		// 解析 @Transactional 注解
		AnnotationAttributes attributes = AnnotatedElementUtils.findMergedAnnotationAttributes(
				element, Transactional.class, false, false);
		if (attributes != null) {
			// 真正的开始解析
			return parseTransactionAnnotation(attributes);
		}
		else {
			return null;
		}
	}

	/**
	 * 开始解析事务注解
	 *
	 * @param attributes
	 * @return
	 */
	protected TransactionAttribute parseTransactionAnnotation(AnnotationAttributes attributes) {
		// 规则的事务属性
		RuleBasedTransactionAttribute rbta = new RuleBasedTransactionAttribute();

		// 传播行为
		Propagation propagation = attributes.getEnum("propagation");
		rbta.setPropagationBehavior(propagation.value());
		// 隔离级别
		Isolation isolation = attributes.getEnum("isolation");
		rbta.setIsolationLevel(isolation.value());

		// 超时时间
		rbta.setTimeout(attributes.getNumber("timeout").intValue());
		String timeoutString = attributes.getString("timeoutString");
		Assert.isTrue(!StringUtils.hasText(timeoutString) || rbta.getTimeout() < 0,
				"Specify ''timeout'' or ''timeoutString'', not both");
		rbta.setTimeoutString(timeoutString);

		// 是否只读
		rbta.setReadOnly(attributes.getBoolean("readOnly"));
		// 事务名称
		rbta.setQualifier(attributes.getString("value"));
		rbta.setLabels(Arrays.asList(attributes.getStringArray("label")));

		// 回滚规则
		List<RollbackRuleAttribute> rollbackRules = new ArrayList<>();
		for (Class<?> rbRule : attributes.getClassArray("rollbackFor")) {
			rollbackRules.add(new RollbackRuleAttribute(rbRule));
		}
		// 对哪个类进行回滚
		for (String rbRule : attributes.getStringArray("rollbackForClassName")) {
			rollbackRules.add(new RollbackRuleAttribute(rbRule));
		}
		// 对哪些异常不回滚
		for (Class<?> rbRule : attributes.getClassArray("noRollbackFor")) {
			rollbackRules.add(new NoRollbackRuleAttribute(rbRule));
		}
		// 对哪些类不回滚
		for (String rbRule : attributes.getStringArray("noRollbackForClassName")) {
			rollbackRules.add(new NoRollbackRuleAttribute(rbRule));
		}
		rbta.setRollbackRules(rollbackRules);

		return rbta;
	}
可以看到它最终会返回一个 RuleBasedTransactionAttribute 类型的事务属性。
2.4.4 事务定义 RuleBasedTransactionAttribute
它的类图:

这个类实现了 TransactionDefinition 接口,我们看下这个接口类图是:

这个类主要定义了事务的一些基本属性信息,有事务名称、事务传播行为、事务隔离级别、超时时间、是否只读。
2.5 BeanFactoryTransactionAttributeSourceAdvisor
这个类的类图:

它的实现:
/**
 * bean 工厂事务属性源增强器
 *
 * Advisor driven by a {@link TransactionAttributeSource}, used to include
 * a transaction advice bean for methods that are transactional.
 *
 * @author Juergen Hoeller
 * @since 2.5.5
 * @see #setAdviceBeanName
 * @see TransactionInterceptor
 * @see TransactionAttributeSourceAdvisor
 */
@SuppressWarnings("serial")
public class BeanFactoryTransactionAttributeSourceAdvisor extends AbstractBeanFactoryPointcutAdvisor {

	@Nullable
	private TransactionAttributeSource transactionAttributeSource;

	/**
	 * 事务属性源切点
	 */
	private final TransactionAttributeSourcePointcut pointcut = new TransactionAttributeSourcePointcut() {
		@Override
		@Nullable
		protected TransactionAttributeSource getTransactionAttributeSource() {
			// 获取事务属性源 AnnotationTransactionAttributeSource 类型
			return transactionAttributeSource;
		}
	};


	/**
	 * 通过注入
	 * Set the transaction attribute source which is used to find transaction
	 * attributes. This should usually be identical to the source reference
	 * set on the transaction interceptor itself.
	 * @see TransactionInterceptor#setTransactionAttributeSource
	 */
	public void setTransactionAttributeSource(TransactionAttributeSource transactionAttributeSource) {
		this.transactionAttributeSource = transactionAttributeSource;
	}

	/**
	 * Set the {@link ClassFilter} to use for this pointcut.
	 * Default is {@link ClassFilter#TRUE}.
	 */
	public void setClassFilter(ClassFilter classFilter) {
		this.pointcut.setClassFilter(classFilter);
	}

	@Override
	public Pointcut getPointcut() {
		return this.pointcut;
	}

}
它是一个 PointcutAdvisor 类型实现类,切点增强器,它也是实现 getPointcut () 方法,返回一个 TransactionAttributeSourcePointcut 类,这个类在上面的 canApply () 方法中用到了。
2.6 TransactionInterceptor
这个类的类图:

再看下它的实现:
@SuppressWarnings("serial")
public class TransactionInterceptor extends TransactionAspectSupport implements MethodInterceptor, Serializable {

	/**
	 * Create a new TransactionInterceptor.
	 * <p>Transaction manager and transaction attributes still need to be set.
	 * @see #setTransactionManager
	 * @see #setTransactionAttributes(java.util.Properties)
	 * @see #setTransactionAttributeSource(TransactionAttributeSource)
	 */
	public TransactionInterceptor() {
	}

	/**
	 * Create a new TransactionInterceptor.
	 * @param ptm the default transaction manager to perform the actual transaction management
	 * @param tas the attribute source to be used to find transaction attributes
	 * @since 5.2.5
	 * @see #setTransactionManager
	 * @see #setTransactionAttributeSource
	 */
	public TransactionInterceptor(TransactionManager ptm, TransactionAttributeSource tas) {
		setTransactionManager(ptm);
		setTransactionAttributeSource(tas);
	}

	/**
	 * Create a new TransactionInterceptor.
	 * @param ptm the default transaction manager to perform the actual transaction management
	 * @param tas the attribute source to be used to find transaction attributes
	 * @see #setTransactionManager
	 * @see #setTransactionAttributeSource
	 * @deprecated as of 5.2.5, in favor of
	 * {@link #TransactionInterceptor(TransactionManager, TransactionAttributeSource)}
	 */
	@Deprecated
	public TransactionInterceptor(PlatformTransactionManager ptm, TransactionAttributeSource tas) {
		setTransactionManager(ptm);
		setTransactionAttributeSource(tas);
	}

	/**
	 * Create a new TransactionInterceptor.
	 * @param ptm the default transaction manager to perform the actual transaction management
	 * @param attributes the transaction attributes in properties format
	 * @see #setTransactionManager
	 * @see #setTransactionAttributes(java.util.Properties)
	 * @deprecated as of 5.2.5, in favor of {@link #setTransactionAttributes(Properties)}
	 */
	@Deprecated
	public TransactionInterceptor(PlatformTransactionManager ptm, Properties attributes) {
		setTransactionManager(ptm);
		setTransactionAttributes(attributes);
	}

	/**
	 * 事务拦截器进行拦截调用
	 *
	 * @param invocation the method invocation joinpoint
	 * @return
	 * @throws Throwable
	 */
	@Override
	@Nullable
	public Object invoke(MethodInvocation invocation) throws Throwable {
		// Work out the target class: may be {@code null}.
		// The TransactionAttributeSource should be passed the target class
		// as well as the method, which may be from an interface.
		Class<?> targetClass = (invocation.getThis() != null ? AopUtils.getTargetClass(invocation.getThis()) : null);

		// 用事务去执行方法
		// Adapt to TransactionAspectSupport''s invokeWithinTransaction...
		return invokeWithinTransaction(invocation.getMethod(), targetClass, invocation::proceed);
	}


	//---------------------------------------------------------------------
	// Serialization support
	//---------------------------------------------------------------------

	private void writeObject(ObjectOutputStream oos) throws IOException {
		// Rely on default serialization, although this class itself doesn''t carry state anyway...
		oos.defaultWriteObject();

		// Deserialize superclass fields.
		oos.writeObject(getTransactionManagerBeanName());
		oos.writeObject(getTransactionManager());
		oos.writeObject(getTransactionAttributeSource());
		oos.writeObject(getBeanFactory());
	}

	private void readObject(ObjectInputStream ois) throws IOException, ClassNotFoundException {
		// Rely on default serialization, although this class itself doesn''t carry state anyway...
		ois.defaultReadObject();

		// Serialize all relevant superclass fields.
		// Superclass can''t implement Serializable because it also serves as base class
		// for AspectJ aspects (which are not allowed to implement Serializable)!
		setTransactionManagerBeanName((String) ois.readObject());
		setTransactionManager((PlatformTransactionManager) ois.readObject());
		setTransactionAttributeSource((TransactionAttributeSource) ois.readObject());
		setBeanFactory((BeanFactory) ois.readObject());
	}

}
TransactionInterceptor 是一个实现了 MethodInterceptor 接口的 invoke () 方法,对方法执行进行拦截,间接调用了 org.springframework.transaction.interceptor.TransactionAspectSupport#invokeWithinTransaction 方法:
	/**
	 * 用于基于环绕通知子类的总代表,委派到该类的其他几个模板方法。能够处理 CallbackPreferringPlatformTransactionManager
	 * 和常规的 PlatformTransactionManager 实现类以及 ReactiveTransactionManager 实现类,对于无返回类型。
	 *
	 * General delegate for around-advice-based subclasses, delegating to several other template
	 * methods on this class. Able to handle {@link CallbackPreferringPlatformTransactionManager}
	 * as well as regular {@link PlatformTransactionManager} implementations and
	 * {@link ReactiveTransactionManager} implementations for reactive return types.
	 * @param method the Method being invoked
	 * @param targetClass the target class that we''re invoking the method on
	 * @param invocation the callback to use for proceeding with the target invocation
	 * @return the return value of the method, if any
	 * @throws Throwable propagated from the target invocation
	 */
	@Nullable
	protected Object invokeWithinTransaction(Method method, @Nullable Class<?> targetClass,
			final InvocationCallback invocation) throws Throwable {

		// 如果事务属性为空,那么这个方法就是非事务方法
		// If the transaction attribute is null, the method is non-transactional.
		// 获取事务属性源
		TransactionAttributeSource tas = getTransactionAttributeSource();
		// 获取事务属性
		final TransactionAttribute txAttr = (tas != null ? tas.getTransactionAttribute(method, targetClass) : null);
		// 获取项目中事务管理器,一般是 DataSourceTransactionManager 类
		final TransactionManager tm = determineTransactionManager(txAttr);

		if (this.reactiveAdapterRegistry != null && tm instanceof ReactiveTransactionManager) {
			ReactiveTransactionSupport txSupport = this.transactionSupportCache.computeIfAbsent(method, key -> {
				if (KotlinDetector.isKotlinType(method.getDeclaringClass()) && KotlinDelegate.isSuspend(method)) {
					throw new TransactionUsageException(
							"Unsupported annotated transaction on suspending function detected: " + method +
							". Use TransactionalOperator.transactional extensions instead.");
				}
				ReactiveAdapter adapter = this.reactiveAdapterRegistry.getAdapter(method.getReturnType());
				if (adapter == null) {
					throw new IllegalStateException("Cannot apply reactive transaction to non-reactive return type: " +
							method.getReturnType());
				}
				return new ReactiveTransactionSupport(adapter);
			});
			return txSupport.invokeWithinTransaction(
					method, targetClass, invocation, txAttr, (ReactiveTransactionManager) tm);
		}

		PlatformTransactionManager ptm = asPlatformTransactionManager(tm);
		// 获取我们需要切入的方法(也就是我们标识了 @Transactional 注解的方法)
		final String joinpointIdentification = methodIdentification(method, targetClass, txAttr);

		if (txAttr == null || !(ptm instanceof CallbackPreferringPlatformTransactionManager)) {
			// 事务信息
			// Standard transaction demarcation with getTransaction and commit/rollback calls.
			TransactionInfo txInfo = createTransactionIfNecessary(ptm, txAttr, joinpointIdentification);

			Object retVal;
			try {
				// 这是一个环绕通知:调用链中的下一个拦截器
				// This is an around advice: Invoke the next interceptor in the chain.
				// 这将会导致目标类被调用返回
				// This will normally result in a target object being invoked.
				retVal = invocation.proceedWithInvocation();
			}
			catch (Throwable ex) {
				// 抛出异常进行回滚
				// target invocation exception
				completeTransactionAfterThrowing(txInfo, ex);
				throw ex;
			}
			finally {
				// 清理事务信息
				cleanupTransactionInfo(txInfo);
			}

			if (retVal != null && vavrPresent && VavrDelegate.isVavrTry(retVal)) {
				// Set rollback-only in case of Vavr failure matching our rollback rules...
				TransactionStatus status = txInfo.getTransactionStatus();
				if (status != null && txAttr != null) {
					retVal = VavrDelegate.evaluateTryFailure(retVal, txAttr, status);
				}
			}

			// 提交事务
			commitTransactionAfterReturning(txInfo);
			return retVal;
		}

		else {
			Object result;
			final ThrowableHolder throwableHolder = new ThrowableHolder();

			// It''s a CallbackPreferringPlatformTransactionManager: pass a TransactionCallback in.
			try {
				result = ((CallbackPreferringPlatformTransactionManager) ptm).execute(txAttr, status -> {
					TransactionInfo txInfo = prepareTransactionInfo(ptm, txAttr, joinpointIdentification, status);
					try {
						Object retVal = invocation.proceedWithInvocation();
						if (retVal != null && vavrPresent && VavrDelegate.isVavrTry(retVal)) {
							// Set rollback-only in case of Vavr failure matching our rollback rules...
							retVal = VavrDelegate.evaluateTryFailure(retVal, txAttr, status);
						}
						return retVal;
					}
					catch (Throwable ex) {
						if (txAttr.rollbackOn(ex)) {
							// A RuntimeException: will lead to a rollback.
							if (ex instanceof RuntimeException) {
								throw (RuntimeException) ex;
							}
							else {
								throw new ThrowableHolderException(ex);
							}
						}
						else {
							// A normal return value: will lead to a commit.
							throwableHolder.throwable = ex;
							return null;
						}
					}
					finally {
						cleanupTransactionInfo(txInfo);
					}
				});
			}
			catch (ThrowableHolderException ex) {
				throw ex.getCause();
			}
			catch (TransactionSystemException ex2) {
				if (throwableHolder.throwable != null) {
					logger.error("Application exception overridden by commit exception", throwableHolder.throwable);
					ex2.initApplicationException(throwableHolder.throwable);
				}
				throw ex2;
			}
			catch (Throwable ex2) {
				if (throwableHolder.throwable != null) {
					logger.error("Application exception overridden by commit exception", throwableHolder.throwable);
				}
				throw ex2;
			}

			// Check result state: It might indicate a Throwable to rethrow.
			if (throwableHolder.throwable != null) {
				throw throwableHolder.throwable;
			}
			return result;
		}
	}
梳理下这个方法的核心流程:
- 获取事务属性源 TransactionAttributeSource;
- 获取事务属性 TransactionAttribute,这里会返回 RuleBasedTransactionAttribute 类型;
- 获取事务管理器 TransactionManager;
- 获取方法描述器 joinpointIdentification;
- 执行 createTransactionIfNecessary () 方法,创建事务信息 TransactionInfo;
- 执行 invocation.proceedWithInvocation () 执行器方法,这将会执行调用链中下一个拦截器,如果没有拦截,则执行目标方法;
- 遇到异常之后执行 completeTransactionAfterThrowing () 方法,进行回滚或提交操作,然后抛出异常;
- 执行 cleanupTransactionInfo () 方法,清除事务信息;
- 没有异常的情况,执行 commitTransactionAfterReturning () 提交事务;
- 返回执行结果。
2.6.1 创建事务信息 createTransactionIfNecessary ()
看下 org.springframework.transaction.interceptor.TransactionAspectSupport#createTransactionIfNecessary 这个创建事务信息方法:
	/**
	 * 根据给定的事务属性来创建一个事务。
	 *
	 * Create a transaction if necessary based on the given TransactionAttribute.
	 * <p>Allows callers to perform custom TransactionAttribute lookups through
	 * the TransactionAttributeSource.
	 * @param txAttr the TransactionAttribute (may be {@code null})
	 * @param joinpointIdentification the fully qualified method name
	 * (used for monitoring and logging purposes)
	 * @return a TransactionInfo object, whether or not a transaction was created.
	 * The {@code hasTransaction()} method on TransactionInfo can be used to
	 * tell if there was a transaction created.
	 * @see #getTransactionAttributeSource()
	 */
	@SuppressWarnings("serial")
	protected TransactionInfo createTransactionIfNecessary(@Nullable PlatformTransactionManager tm,
			@Nullable TransactionAttribute txAttr, final String joinpointIdentification) {

		// 包装事务属性,名称为方法描述符
		// If no name specified, apply method identification as transaction name.
		if (txAttr != null && txAttr.getName() == null) {
			txAttr = new DelegatingTransactionAttribute(txAttr) {
				@Override
				public String getName() {
					return joinpointIdentification;
				}
			};
		}

		// 获取一个事务状态
		TransactionStatus status = null;
		if (txAttr != null) {
			if (tm != null) {
				// 获取事务,返回事务状态
				status = tm.getTransaction(txAttr);
			}
			else {
				if (logger.isDebugEnabled()) {
					logger.debug("Skipping transactional joinpoint [" + joinpointIdentification +
							"] because no transaction manager has been configured");
				}
			}
		}
		// 准备事务信息
		return prepareTransactionInfo(tm, txAttr, joinpointIdentification, status);
	}
它的逻辑:
- 通过事务管理器获取事务状态 getTransaction ();
- 准备事务信息 prepareTransactionInfo (),创建事务信息 TransactionInfo 类;
2.6.1.1 获取事务状态 getTransaction ()
看下如何获取事务状态信息:org.springframework.transaction.support.AbstractPlatformTransactionManager#getTransaction
	/**
	 * 实现处理传播行为的方法,委派到 doGetTransaction、isExistingTransaction、doBegin 方法
	 *
	 * This implementation handles propagation behavior. Delegates to
	 * {@code doGetTransaction}, {@code isExistingTransaction}
	 * and {@code doBegin}.
	 * @see #doGetTransaction
	 * @see #isExistingTransaction
	 * @see #doBegin
	 */
	@Override
	public final TransactionStatus getTransaction(@Nullable TransactionDefinition definition)
			throws TransactionException {

		// 获取事务定义
		// Use defaults if no transaction definition given.
		TransactionDefinition def = (definition != null ? definition : TransactionDefinition.withDefaults());

		// 获取事务对象
		Object transaction = doGetTransaction();
		boolean debugEnabled = logger.isDebugEnabled();

		// 判断是否存在事务
		if (isExistingTransaction(transaction)) {
			// Existing transaction found -> check propagation behavior to find out how to behave.
			// 处理已存在的事务
			return handleExistingTransaction(def, transaction, debugEnabled);
		}

		// 判断事务超时
		// Check definition settings for new transaction.
		if (def.getTimeout() < TransactionDefinition.TIMEOUT_DEFAULT) {
			throw new InvalidTimeoutException("Invalid transaction timeout", def.getTimeout());
		}

		// 判断事务传播行为 MANDATORY 必须的
		// No existing transaction found -> check propagation behavior to find out how to proceed.
		if (def.getPropagationBehavior() == TransactionDefinition.PROPAGATION_MANDATORY) {
			throw new IllegalTransactionStateException(
					"No existing transaction found for transaction marked with propagation ''mandatory''");
		}
		else if (def.getPropagationBehavior() == TransactionDefinition.PROPAGATION_REQUIRED ||
				def.getPropagationBehavior() == TransactionDefinition.PROPAGATION_REQUIRES_NEW ||
				def.getPropagationBehavior() == TransactionDefinition.PROPAGATION_NESTED) {
			// 挂起事务,但是当前没有事务
			SuspendedResourcesHolder suspendedResources = suspend(null);
			if (debugEnabled) {
				logger.debug("Creating new transaction with name [" + def.getName() + "]: " + def);
			}
			try {
				// 开始一个新的事务
				return startTransaction(def, transaction, debugEnabled, suspendedResources);
			}
			catch (RuntimeException | Error ex) {
				// 重新使用资源
				resume(null, suspendedResources);
				throw ex;
			}
		}
		else {
			// 创建一个空的事务,但是它会潜在的同步
			// Create "empty" transaction: no actual transaction, but potentially synchronization.
			if (def.getIsolationLevel() != TransactionDefinition.ISOLATION_DEFAULT && logger.isWarnEnabled()) {
				logger.warn("Custom isolation level specified but no actual transaction initiated; " +
						"isolation level will effectively be ignored: " + def);
			}
			boolean newSynchronization = (getTransactionSynchronization() == SYNCHRONIZATION_ALWAYS);
			return prepareTransactionStatus(def, null, true, newSynchronization, debugEnabled, null);
		}
	}
它的逻辑:
- 执行 doGetTransaction () 方法,获取事务对象,返回一个 DataSourceTransactionObject 类型对象;
- 判断是否存在事务 isExistingTransaction ();
- 如果存在事务,执行 handleExistingTransaction () 方法,处理已存在的事务,结束;
- 判断事务是否超时,判断正确的传播行为;
- 判断传播行为如果是支持当前事务的(REQUIRED、REQUIRED_NEW、NESTED),先执行 suspend () 方法,挂起当前事务,然后执行 startTransaction () 开启一个新事物,结束;
- 否则执行 prepareTransactionStatus () 方法,创建一个空的事务,结束。
2.6.1.2 获取 DataSourceTransactionObject 事务对象 doGetTransaction ()
看下它的实现 org.springframework.jdbc.datasource.DataSourceTransactionManager#doGetTransaction:
	/**
	 * 获取事务对象
	 *
	 * @return
	 */
	@Override
	protected Object doGetTransaction() {
		// 创建一个数据源事务对象
		DataSourceTransactionObject txObject = new DataSourceTransactionObject();
		// 设置允许嵌套事务(保存点)
		txObject.setSavepointAllowed(isNestedTransactionAllowed());
		// 获取连接持有器
		ConnectionHolder conHolder =
				(ConnectionHolder) TransactionSynchronizationManager.getResource(obtainDataSource());
		// 为数据源事务对象设置连接持有器(首次获取为空)
		txObject.setConnectionHolder(conHolder, false);
		return txObject;
	}
可以看到事务对象是一个 DataSourceTransactionObject 类型的对象,它的类图结构:

它拥有的属性有:连接持有器、是否允许保存点、是否只读、前一个事务隔离级别、是否新的连接持有器、是否仅支持回滚、是否必须还原自动提交属性等等。
上面的 doGetTransaction () 方法逻辑:
- 创建一个 DataSourceTransactionObject 类型对象;
- 设置是否允许保存点(即是否允许嵌套事务);
- 获取连接持有器(这里是从线程本地化中获取的,首次获取为 null);
- 为事务对象设置连接持有器。
2.6.1.3 判断是否存在事务 isExistingTransaction ()
我们先看下它是如何判断事务是否存在的:org.springframework.jdbc.datasource.DataSourceTransactionManager#isExistingTransaction
	/**
	 * 判断是否存在事务
	 *
	 * @param transaction the transaction object returned by doGetTransaction
	 * @return
	 */
	@Override
	protected boolean isExistingTransaction(Object transaction) {
		DataSourceTransactionObject txObject = (DataSourceTransactionObject) transaction;
		// 事务有连接持有器 && 连接持有器中的事务是活跃的
		return (txObject.hasConnectionHolder() && txObject.getConnectionHolder().isTransactionActive());
	}
- 事务对象是否有连接持有器;
- 连接持有器中的事务是否是活跃的。
2.6.1.4 处理已存在的事务 handleExistingTransaction ()
接着看处理已经存在的事务 org.springframework.transaction.support.AbstractPlatformTransactionManager#handleExistingTransaction 方法:
	/**
	 * 为一个已经存在的事务,创建一个事务状态
	 *
	 * Create a TransactionStatus for an existing transaction.
	 */
	private TransactionStatus handleExistingTransaction(
			TransactionDefinition definition, Object transaction, boolean debugEnabled)
			throws TransactionException {

		// 判断传播行为:never 抛出异常
		if (definition.getPropagationBehavior() == TransactionDefinition.PROPAGATION_NEVER) {
			throw new IllegalTransactionStateException(
					"Existing transaction found for transaction marked with propagation ''never''");
		}

		// 传播行为是 NOT_SUPPORTED 不执行事务
		if (definition.getPropagationBehavior() == TransactionDefinition.PROPAGATION_NOT_SUPPORTED) {
			if (debugEnabled) {
				logger.debug("Suspending current transaction");
			}
			// 挂起当前事务
			Object suspendedResources = suspend(transaction);
			boolean newSynchronization = (getTransactionSynchronization() == SYNCHRONIZATION_ALWAYS);
			// 准备事务状态
			return prepareTransactionStatus(
					definition, null, false, newSynchronization, debugEnabled, suspendedResources);
		}

		// 传播行为:REQUIRES_NEW 开启一个新的事务
		if (definition.getPropagationBehavior() == TransactionDefinition.PROPAGATION_REQUIRES_NEW) {
			if (debugEnabled) {
				logger.debug("Suspending current transaction, creating new transaction with name [" +
						definition.getName() + "]");
			}
			// 挂起当前事务
			SuspendedResourcesHolder suspendedResources = suspend(transaction);
			try {
				// 开启一个新的事务
				return startTransaction(definition, transaction, debugEnabled, suspendedResources);
			}
			catch (RuntimeException | Error beginEx) {
				resumeAfterBeginException(transaction, suspendedResources, beginEx);
				throw beginEx;
			}
		}

		// 传播行为:NESTED 嵌套事务
		if (definition.getPropagationBehavior() == TransactionDefinition.PROPAGATION_NESTED) {
			if (!isNestedTransactionAllowed()) {
				throw new NestedTransactionNotSupportedException(
						"Transaction manager does not allow nested transactions by default - " +
						"specify ''nestedTransactionAllowed'' property with value ''true''");
			}
			if (debugEnabled) {
				logger.debug("Creating nested transaction with name [" + definition.getName() + "]");
			}
			// 是否为嵌套事务保存点
			if (useSavepointForNestedTransaction()) {
				// Create savepoint within existing Spring-managed transaction,
				// through the SavepointManager API implemented by TransactionStatus.
				// Usually uses JDBC 3.0 savepoints. Never activates Spring synchronization.
				// 创建一个新的事务状态
				DefaultTransactionStatus status =
						prepareTransactionStatus(definition, transaction, false, false, debugEnabled, null);
				// 创建和持有保存点
				status.createAndHoldSavepoint();
				return status;
			}
			else {
				// Nested transaction through nested begin and commit/rollback calls.
				// Usually only for JTA: Spring synchronization might get activated here
				// in case of a pre-existing JTA transaction.
				// 开启事务
				return startTransaction(definition, transaction, debugEnabled, null);
			}
		}

		// Assumably PROPAGATION_SUPPORTS or PROPAGATION_REQUIRED.
		if (debugEnabled) {
			logger.debug("Participating in existing transaction");
		}

		// 验证现有的事务
		if (isValidateExistingTransaction()) {
			if (definition.getIsolationLevel() != TransactionDefinition.ISOLATION_DEFAULT) {
				Integer currentIsolationLevel = TransactionSynchronizationManager.getCurrentTransactionIsolationLevel();
				if (currentIsolationLevel == null || currentIsolationLevel != definition.getIsolationLevel()) {
					Constants isoConstants = DefaultTransactionDefinition.constants;
					throw new IllegalTransactionStateException("Participating transaction with definition [" +
							definition + "] specifies isolation level which is incompatible with existing transaction: " +
							(currentIsolationLevel != null ?
									isoConstants.toCode(currentIsolationLevel, DefaultTransactionDefinition.PREFIX_ISOLATION) :
									"(unknown)"));
				}
			}
			if (!definition.isReadOnly()) {
				if (TransactionSynchronizationManager.isCurrentTransactionReadOnly()) {
					throw new IllegalTransactionStateException("Participating transaction with definition [" +
							definition + "] is not marked as read-only but existing transaction is");
				}
			}
		}
		// 传播行为:不是 NEVER,准备事务状态
		boolean newSynchronization = (getTransactionSynchronization() != SYNCHRONIZATION_NEVER);
		return prepareTransactionStatus(definition, transaction, false, newSynchronization, debugEnabled, null);
	}
逻辑:
- 判断传播行为,不同的传播行为执行不同的逻辑;
- 传播行为是 NOT_SUPPORTED 不执行事务;
- 先执行 suspend () 挂起当前事务;
- 执行 prepareTransactionStatus () 准备事务。
- 传播行为是 REQUIRES_NEW 开启新事物;
- 先执行 suspend () 挂起当前事务;
- 执行 startTransaction () 开启一个新事物。
- 传播行为是 NESTED 嵌套事务;
- 判断是否为嵌套事务使用保存点;
- 如果不是,则执行 startTransaction () 方法,开启一个新事物;
- 如果是,则先执行 prepareTransactionStatus () 创建一个新的事务状态 DefaultTransactionStatus,然后执行事务状态的 createAndHoldSavepoint () 创建保存点,返回。
- 验证现有的事务;
- 其他的传播行为,执行 prepareTransactionStatus () 方法,准备事务状态。
2.6.1.5 挂起事务 suspend ()
挂起事务是 org.springframework.transaction.support.AbstractPlatformTransactionManager#suspend 方法中实现的:
	/**
	 * 挂起给定的事务。首先挂起事务同步,然后委派 doSuspend 模板方法。
	 *
	 * Suspend the given transaction. Suspends transaction synchronization first,
	 * then delegates to the {@code doSuspend} template method.
	 * @param transaction the current transaction object
	 * (or {@code null} to just suspend active synchronizations, if any)
	 * @return an object that holds suspended resources
	 * (or {@code null} if neither transaction nor synchronization active)
	 * @see #doSuspend
	 * @see #resume
	 */
	@Nullable
	protected final SuspendedResourcesHolder suspend(@Nullable Object transaction) throws TransactionException {
		// 判断是否同步是活跃的
		if (TransactionSynchronizationManager.isSynchronizationActive()) {
			// 执行挂起同步
			List<TransactionSynchronization> suspendedSynchronizations = doSuspendSynchronization();
			try {
				Object suspendedResources = null;
				if (transaction != null) {
					// 对给定的事务进行挂起,返回一个当前连接资源
					suspendedResources = doSuspend(transaction);
				}
				// 清除当前事务信息
				// 当前事务名称
				String name = TransactionSynchronizationManager.getCurrentTransactionName();
				TransactionSynchronizationManager.setCurrentTransactionName(null);
				// 是否只读
				boolean readOnly = TransactionSynchronizationManager.isCurrentTransactionReadOnly();
				TransactionSynchronizationManager.setCurrentTransactionReadOnly(false);
				// 隔离级别
				Integer isolationLevel = TransactionSynchronizationManager.getCurrentTransactionIsolationLevel();
				TransactionSynchronizationManager.setCurrentTransactionIsolationLevel(null);
				// 是哦福活跃
				boolean wasActive = TransactionSynchronizationManager.isActualTransactionActive();
				TransactionSynchronizationManager.setActualTransactionActive(false);
				// 创建新一个挂起资源持有器,把当前事务信息都保存起来
				return new SuspendedResourcesHolder(
						suspendedResources, suspendedSynchronizations, name, readOnly, isolationLevel, wasActive);
			}
			catch (RuntimeException | Error ex) {
				// doSuspend failed - original transaction is still active...
				doResumeSynchronization(suspendedSynchronizations);
				throw ex;
			}
		}
		else if (transaction != null) {
			// Transaction active but no synchronization active.
			Object suspendedResources = doSuspend(transaction);
			return new SuspendedResourcesHolder(suspendedResources);
		}
		else {
			// Neither transaction nor synchronization active.
			return null;
		}
	}

	/**
	 * 挂起所有的当前同步,并且取消激活当前线程的事务同步
	 * Suspend all current synchronizations and deactivate transaction
	 * synchronization for the current thread.
	 * @return the List of suspended TransactionSynchronization objects
	 */
	private List<TransactionSynchronization> doSuspendSynchronization() {
		// 获取当前线程中全部的事务同步
		List<TransactionSynchronization> suspendedSynchronizations =
				TransactionSynchronizationManager.getSynchronizations();
		// 遍历同步,使其依次挂起
		for (TransactionSynchronization synchronization : suspendedSynchronizations) {
			// 就是释放数据库连接资源
			synchronization.suspend();
		}
		// 清理同步
		TransactionSynchronizationManager.clearSynchronization();
		// 返回同步
		return suspendedSynchronizations;
	}

======================================= org.springframework.jdbc.datasource.DataSourceTransactionManager#doSuspend =======================================

	/**
	 * 执行挂起事务
	 *
	 * @param transaction the transaction object returned by {@code doGetTransaction}
	 * @return
	 */
	@Override
	protected Object doSuspend(Object transaction) {
		DataSourceTransactionObject txObject = (DataSourceTransactionObject) transaction;
		txObject.setConnectionHolder(null);
		// 释放资源
		return TransactionSynchronizationManager.unbindResource(obtainDataSource());
	}
它的逻辑是:
- 执行挂起同步 doSuspendSynchronization () 方法,这里边主要是从线程本地化中获取所有的事务同步 TransactionSynchronization,然后执行挂起(就是释放数据库连接资源);
- 然后执行 doSuspend () 方法,挂起给定的事务,返回一个当前连接资源;
- 清除线程本地化中当前的事务信息,有线程名称、线程只读属性、线程隔离级别、事务是否活跃标识;
- 创建一个挂起的资源持有器 SuspendedResourcesHolder,返回。
- 遇到异常执行 doResumeSynchronization () 方法,重新使用同步。
2.6.1.6 准备事务状态 prepareTransactionStatus ()
接着看准备事务状态方法 org.springframework.transaction.support.AbstractPlatformTransactionManager#prepareTransactionStatus :
	/**
	 * 创建一个新的事务状态,同时初始化事务同步。
	 *
	 * Create a new TransactionStatus for the given arguments,
	 * also initializing transaction synchronization as appropriate.
	 * @see #newTransactionStatus
	 * @see #prepareTransactionStatus
	 */
	protected final DefaultTransactionStatus prepareTransactionStatus(
			TransactionDefinition definition, @Nullable Object transaction, boolean newTransaction,
			boolean newSynchronization, boolean debug, @Nullable Object suspendedResources) {
		// 创建一个新的事务状态
		DefaultTransactionStatus status = newTransactionStatus(
				definition, transaction, newTransaction, newSynchronization, debug, suspendedResources);
		// 预同步事务
		prepareSynchronization(status, definition);
		return status;
	}

	/**
	 * Create a TransactionStatus instance for the given arguments.
	 */
	protected DefaultTransactionStatus newTransactionStatus(
			TransactionDefinition definition, @Nullable Object transaction, boolean newTransaction,
			boolean newSynchronization, boolean debug, @Nullable Object suspendedResources) {

		boolean actualNewSynchronization = newSynchronization &&
				!TransactionSynchronizationManager.isSynchronizationActive();
		// 创建一个默认的事务状态
		return new DefaultTransactionStatus(
				transaction, newTransaction, actualNewSynchronization,
				definition.isReadOnly(), debug, suspendedResources);
	}

	/**
	 * Initialize transaction synchronization as appropriate.
	 */
	protected void prepareSynchronization(DefaultTransactionStatus status, TransactionDefinition definition) {
		// 判断是否为新的同步
		if (status.isNewSynchronization()) {
			// 设置实际事务活跃
			TransactionSynchronizationManager.setActualTransactionActive(status.hasTransaction());
			// 设置当前事务隔离级别
			TransactionSynchronizationManager.setCurrentTransactionIsolationLevel(
					definition.getIsolationLevel() != TransactionDefinition.ISOLATION_DEFAULT ?
							definition.getIsolationLevel() : null);
			// 设置当前事务是否为只读
			TransactionSynchronizationManager.setCurrentTransactionReadOnly(definition.isReadOnly());
			// 设置当前事务的名称
			TransactionSynchronizationManager.setCurrentTransactionName(definition.getName());
			// 初始化同步
			TransactionSynchronizationManager.initSynchronization();
		}
	}
逻辑:
- 执行 newTransactionStatus () 方法,创建一个事务状态 DefaultTransactionStatus 对象;
- 执行 prepareSynchronization () 方法,准备同步。
- 判断事务状态如果是新的同步,则执行以下逻辑;
- 设置线程本地化的实际事务活跃;
- 设置线程本地化的当前事务隔离级别;
- 设置线程本地化的当前事务是否为只读标识;
- 设置当前事务的名称;
- 初始化线程本地化同步集合。
2.6.1.7 事务状态 DefaultTransactionStatus
我们看下 DefaultTransactionStatus 对象的类图:

这个类有持有了一些事务的属性,表示当前事务的一个状态。
2.6.1.8 开启一个新事物 startTransaction ()
开始看开启新事物方法 org.springframework.transaction.support.AbstractPlatformTransactionManager#startTransaction :
	/**
	 * 开启一个新的事务
	 *
	 * Start a new transaction.
	 */
	private TransactionStatus startTransaction(TransactionDefinition definition, Object transaction,
			boolean debugEnabled, @Nullable SuspendedResourcesHolder suspendedResources) {

		boolean newSynchronization = (getTransactionSynchronization() != SYNCHRONIZATION_NEVER);
		// 创建一个事务状态
		DefaultTransactionStatus status = newTransactionStatus(
				definition, transaction, true, newSynchronization, debugEnabled, suspendedResources);
		// 开启事务
		doBegin(transaction, definition);
		// 准备同步事务
		prepareSynchronization(status, definition);
		return status;
	}

================================ org.springframework.jdbc.datasource.DataSourceTransactionManager#doBegin ================================
	/**
	 * 开启一个新的事务
	 *
	 * @param transaction the transaction object returned by {@code doGetTransaction}
	 * @param definition  a TransactionDefinition instance, describing propagation
	 *                    behavior, isolation level, read-only flag, timeout, and transaction name
	 */
	@Override
	protected void doBegin(Object transaction, TransactionDefinition definition) {
		DataSourceTransactionObject txObject = (DataSourceTransactionObject) transaction;
		Connection con = null;

		try {
			// 判断是否有连接持有器
			if (!txObject.hasConnectionHolder() ||
					txObject.getConnectionHolder().isSynchronizedWithTransaction()) {
				// 获取一个新的连接
				Connection newCon = obtainDataSource().getConnection();
				if (logger.isDebugEnabled()) {
					logger.debug("Acquired Connection [" + newCon + "] for JDBC transaction");
				}
				// 创建一个新的连接持有器,设置到事务对象中
				txObject.setConnectionHolder(new ConnectionHolder(newCon), true);
			}

			// 设置连接持有器的事务同步属性
			txObject.getConnectionHolder().setSynchronizedWithTransaction(true);
			// 获取连接对象
			con = txObject.getConnectionHolder().getConnection();

			// 预设值连接属性,返回隔离级别
			Integer previousIsolationLevel = DataSourceUtils.prepareConnectionForTransaction(con, definition);
			// 为事务对象设置隔离级别
			txObject.setPreviousIsolationLevel(previousIsolationLevel);
			// 设置只读属性
			txObject.setReadOnly(definition.isReadOnly());

			// 获取自定提交的属性,设置为 false
			// Switch to manual commit if necessary. This is very expensive in some JDBC drivers,
			// so we don''t want to do it unnecessarily (for example if we''ve explicitly
			// configured the connection pool to set it already).
			if (con.getAutoCommit()) {
				txObject.setMustRestoreAutoCommit(true);
				if (logger.isDebugEnabled()) {
					logger.debug("Switching JDBC Connection [" + con + "] to manual commit");
				}
				con.setAutoCommit(false);
			}

			// 预处理事务连接
			prepareTransactionalConnection(con, definition);
			// 设置事务对象的连接持有器的活跃属性
			txObject.getConnectionHolder().setTransactionActive(true);

			// 超时时间
			int timeout = determineTimeout(definition);
			if (timeout != TransactionDefinition.TIMEOUT_DEFAULT) {
				txObject.getConnectionHolder().setTimeoutInSeconds(timeout);
			}

			// 绑定一个资源
			// Bind the connection holder to the thread.
			if (txObject.isNewConnectionHolder()) {
				TransactionSynchronizationManager.bindResource(obtainDataSource(), txObject.getConnectionHolder());
			}
		}

		catch (Throwable ex) {
			// 遇到异常,释放资源
			if (txObject.isNewConnectionHolder()) {
				DataSourceUtils.releaseConnection(con, obtainDataSource());
				// 清空连接持有器
				txObject.setConnectionHolder(null, false);
			}
			throw new CannotCreateTransactionException("Could not open JDBC Connection for transaction", ex);
		}
	}
它的逻辑:
- 执行 newTransactionStatus () 方法,创建一个事务状态 DefaultTransactionStatus 对象;
- 执行 doBegin () 方法,开启事务;
- 判断事务对象 DataSourceTransactionObject 是否有连接持有器;
- 如果没有,创建一个新的连接 Connection、连接持有器 ConnectionHolder,并设置到事务对象中;
- 设置连接持有器的同步标识;
- 获取连接,为事务准备连接,
- 设置事务对象只读标识属性、隔离级别属性;
- 关闭连接的自动提交;
- 准备事务连接;
- 设置连接持有器的事务激活标识为 true;
- 设置事务对象的超时时间;
- 持有器是新的话,就绑定一个连接资源,到线程本地化中。
- 遇到异常,持有器是新的话,就释放资源,清空事务对象的连接持有器。
- 执行 prepareSynchronization () 方法,准备同步。
2.6.1.9 准备事务信息 prepareTransactionInfo ()
获取了一个事务状态之后,接着到了准备事务信息方法了,org.springframework.transaction.interceptor.TransactionAspectSupport#prepareTransactionInfo:
	/**
	 * 准备一个事务信息。
	 *
	 * Prepare a TransactionInfo for the given attribute and status object.
	 * @param txAttr the TransactionAttribute (may be {@code null})
	 * @param joinpointIdentification the fully qualified method name
	 * (used for monitoring and logging purposes)
	 * @param status the TransactionStatus for the current transaction
	 * @return the prepared TransactionInfo object
	 */
	protected TransactionInfo prepareTransactionInfo(@Nullable PlatformTransactionManager tm,
			@Nullable TransactionAttribute txAttr, String joinpointIdentification,
			@Nullable TransactionStatus status) {

		// 创建一个事务信息
		TransactionInfo txInfo = new TransactionInfo(tm, txAttr, joinpointIdentification);
		if (txAttr != null) {
			// We need a transaction for this method...
			if (logger.isTraceEnabled()) {
				logger.trace("Getting transaction for [" + txInfo.getJoinpointIdentification() + "]");
			}
			// 设置事务状态
			// The transaction manager will flag an error if an incompatible tx already exists.
			txInfo.newTransactionStatus(status);
		}
		else {
			// The TransactionInfo.hasTransaction() method will return false. We created it only
			// to preserve the integrity of the ThreadLocal stack maintained in this class.
			if (logger.isTraceEnabled()) {
				logger.trace("No need to create transaction for [" + joinpointIdentification +
						"]: This method is not transactional.");
			}
		}

		// We always bind the TransactionInfo to the thread, even if we didn''t create
		// a new transaction here. This guarantees that the TransactionInfo stack
		// will be managed correctly even if no transaction was created by this aspect.
		// 绑定线程
		txInfo.bindToThread();
		return txInfo;
	}
逻辑:
- 创建一个事务信息 TransactionInfo 对象;
- 设置事务信息的事务状态属性;
- 把事务信息绑定到绑定线程,保存旧的事务信息,把当前事务信息绑定到线程本地化中;
- 返回事务信息。
我们看下这个 TransactionInfo 类信息:

它持有一个事务状态、事务管理器、事务属性、方法切点。
2.6.2 处理异常 completeTransactionAfterThrowing ()
在执行器执行过程中遇到异常时,会执行 org.springframework.transaction.interceptor.TransactionAspectSupport#completeTransactionAfterThrowing 方法:
	/**
	 * Handle a throwable, completing the transaction.
	 * We may commit or roll back, depending on the configuration.
	 * @param txInfo information about the current transaction
	 * @param ex throwable encountered
	 */
	protected void completeTransactionAfterThrowing(@Nullable TransactionInfo txInfo, Throwable ex) {
		if (txInfo != null && txInfo.getTransactionStatus() != null) {
			if (logger.isTraceEnabled()) {
				logger.trace("Completing transaction for [" + txInfo.getJoinpointIdentification() +
						"] after exception: " + ex);
			}
			// 判断是否对该异常进行回滚
			if (txInfo.transactionAttribute != null && txInfo.transactionAttribute.rollbackOn(ex)) {
				try {
					// 进行回滚
					txInfo.getTransactionManager().rollback(txInfo.getTransactionStatus());
				}
				catch (TransactionSystemException ex2) {
					logger.error("Application exception overridden by rollback exception", ex);
					ex2.initApplicationException(ex);
					throw ex2;
				}
				catch (RuntimeException | Error ex2) {
					logger.error("Application exception overridden by rollback exception", ex);
					throw ex2;
				}
			}
			else {
				// 我们不会回滚这个异常。
				// 如果 TransactionStatus.isRollbackOnly() 是 true,则任然回滚
				// We don''t roll back on this exception.
				// Will still roll back if TransactionStatus.isRollbackOnly() is true.
				try {
					txInfo.getTransactionManager().commit(txInfo.getTransactionStatus());
				}
				catch (TransactionSystemException ex2) {
					logger.error("Application exception overridden by commit exception", ex);
					ex2.initApplicationException(ex);
					throw ex2;
				}
				catch (RuntimeException | Error ex2) {
					logger.error("Application exception overridden by commit exception", ex);
					throw ex2;
				}
			}
		}
	}
逻辑为:
- 判断是否对该异常进行回滚;
- 如果需要,则进行回滚;
- 如果不需要则执行提交事务。
2.6.3 清理事务信息 cleanupTransactionInfo ()
当目标方法都处理完毕之后,不论有没有异常抛出,都进行清除事务信息 org.springframework.transaction.interceptor.TransactionAspectSupport#cleanupTransactionInfo:
	/**
	 * Reset the TransactionInfo ThreadLocal.
	 * <p>Call this in all cases: exception or normal return!
	 * @param txInfo information about the current transaction (may be {@code null})
	 */
	protected void cleanupTransactionInfo(@Nullable TransactionInfo txInfo) {
		if (txInfo != null) {
			// 恢复线程本地化状态
			txInfo.restoreThreadLocalStatus();
		}
	}

		private void restoreThreadLocalStatus() {
			// Use stack to restore old transaction TransactionInfo.
			// Will be null if none was set.
			// 还原上一个事务信息
			transactionInfoHolder.set(this.oldTransactionInfo);
		}
主要是还原上一个事务信息到线程本地中。
2.6.4 提交事务 commitTransactionAfterReturning ()
最后,当方法执行完毕,没有异常的情况下,会执行提交事务操作 org.springframework.transaction.interceptor.TransactionAspectSupport#commitTransactionAfterReturning:
	/**
	 * Execute after successful completion of call, but not after an exception was handled.
	 * Do nothing if we didn''t create a transaction.
	 * @param txInfo information about the current transaction
	 */
	protected void commitTransactionAfterReturning(@Nullable TransactionInfo txInfo) {
		if (txInfo != null && txInfo.getTransactionStatus() != null) {
			if (logger.isTraceEnabled()) {
				logger.trace("Completing transaction for [" + txInfo.getJoinpointIdentification() + "]");
			}
			// 提交事务
			txInfo.getTransactionManager().commit(txInfo.getTransactionStatus());
		}
	}


======================== org.springframework.transaction.support.AbstractPlatformTransactionManager#commit ====================
	/**
	 * This implementation of commit handles participating in existing
	 * transactions and programmatic rollback requests.
	 * Delegates to {@code isRollbackOnly}, {@code doCommit}
	 * and {@code rollback}.
	 * @see org.springframework.transaction.TransactionStatus#isRollbackOnly()
	 * @see #doCommit
	 * @see #rollback
	 */
	@Override
	public final void commit(TransactionStatus status) throws TransactionException {
		if (status.isCompleted()) {
			throw new IllegalTransactionStateException(
					"Transaction is already completed - do not call commit or rollback more than once per transaction");
		}

		DefaultTransactionStatus defStatus = (DefaultTransactionStatus) status;
		// 事务状态是仅回滚的,执行回滚
		if (defStatus.isLocalRollbackOnly()) {
			if (defStatus.isDebug()) {
				logger.debug("Transactional code has requested rollback");
			}
			processRollback(defStatus, false);
			return;
		}

		if (!shouldCommitOnGlobalRollbackOnly() && defStatus.isGlobalRollbackOnly()) {
			if (defStatus.isDebug()) {
				logger.debug("Global transaction is marked as rollback-only but transactional code requested commit");
			}
			processRollback(defStatus, true);
			return;
		}

		// 执行提交
		processCommit(defStatus);
	}

	/**
	 * 处理实际的回滚。已经检查了完成标记。
	 *
	 * Process an actual rollback.
	 * The completed flag has already been checked.
	 * @param status object representing the transaction
	 * @throws TransactionException in case of rollback failure
	 */
	private void processRollback(DefaultTransactionStatus status, boolean unexpected) {
		try {
			boolean unexpectedRollback = unexpected;

			try {
				// 触发前置完成事件
				triggerBeforeCompletion(status);

				// 判断保存点
				if (status.hasSavepoint()) {
					if (status.isDebug()) {
						logger.debug("Rolling back transaction to savepoint");
					}
					// 回滚到保存点
					status.rollbackToHeldSavepoint();
				}
				else if (status.isNewTransaction()) {
					if (status.isDebug()) {
						logger.debug("Initiating transaction rollback");
					}
					// 新的事务,进行回滚
					doRollback(status);
				}
				else {
					// Participating in larger transaction
					// 判断是否有事务
					if (status.hasTransaction()) {
						if (status.isLocalRollbackOnly() || isGlobalRollbackOnParticipationFailure()) {
							if (status.isDebug()) {
								logger.debug("Participating transaction failed - marking existing transaction as rollback-only");
							}
							// 设置仅回滚属性
							doSetRollbackOnly(status);
						}
						else {
							if (status.isDebug()) {
								logger.debug("Participating transaction failed - letting transaction originator decide on rollback");
							}
						}
					}
					else {
						logger.debug("Should roll back transaction but cannot - no transaction available");
					}
					// Unexpected rollback only matters here if we''re asked to fail early
					if (!isFailEarlyOnGlobalRollbackOnly()) {
						unexpectedRollback = false;
					}
				}
			}
			catch (RuntimeException | Error ex) {
				// 触发完成之后事件
				triggerAfterCompletion(status, TransactionSynchronization.STATUS_UNKNOWN);
				throw ex;
			}
			// 触发完成之后事件
			triggerAfterCompletion(status, TransactionSynchronization.STATUS_ROLLED_BACK);

			// Raise UnexpectedRollbackException if we had a global rollback-only marker
			if (unexpectedRollback) {
				throw new UnexpectedRollbackException(
						"Transaction rolled back because it has been marked as rollback-only");
			}
		}
		finally {
			// 完成之后的清理事件
			cleanupAfterCompletion(status);
		}
	}

	/**
	 * Process an actual commit.
	 * Rollback-only flags have already been checked and applied.
	 * @param status object representing the transaction
	 * @throws TransactionException in case of commit failure
	 */
	private void processCommit(DefaultTransactionStatus status) throws TransactionException {
		try {
			boolean beforeCompletionInvoked = false;

			try {
				boolean unexpectedRollback = false;
				prepareForCommit(status);
				triggerBeforeCommit(status);
				triggerBeforeCompletion(status);
				beforeCompletionInvoked = true;

				if (status.hasSavepoint()) {
					if (status.isDebug()) {
						logger.debug("Releasing transaction savepoint");
					}
					unexpectedRollback = status.isGlobalRollbackOnly();
					// 释放保存点
					status.releaseHeldSavepoint();
				}
				else if (status.isNewTransaction()) {
					if (status.isDebug()) {
						logger.debug("Initiating transaction commit");
					}
					unexpectedRollback = status.isGlobalRollbackOnly();
					// 执行提交
					doCommit(status);
				}
				else if (isFailEarlyOnGlobalRollbackOnly()) {
					unexpectedRollback = status.isGlobalRollbackOnly();
				}

				// Throw UnexpectedRollbackException if we have a global rollback-only
				// marker but still didn''t get a corresponding exception from commit.
				if (unexpectedRollback) {
					throw new UnexpectedRollbackException(
							"Transaction silently rolled back because it has been marked as rollback-only");
				}
			}
			catch (UnexpectedRollbackException ex) {
				// can only be caused by doCommit
				triggerAfterCompletion(status, TransactionSynchronization.STATUS_ROLLED_BACK);
				throw ex;
			}
			catch (TransactionException ex) {
				// can only be caused by doCommit
				if (isRollbackOnCommitFailure()) {
					doRollbackOnCommitException(status, ex);
				}
				else {
					triggerAfterCompletion(status, TransactionSynchronization.STATUS_UNKNOWN);
				}
				throw ex;
			}
			catch (RuntimeException | Error ex) {
				if (!beforeCompletionInvoked) {
					triggerBeforeCompletion(status);
				}
				doRollbackOnCommitException(status, ex);
				throw ex;
			}

			// Trigger afterCommit callbacks, with an exception thrown there
			// propagated to callers but the transaction still considered as committed.
			try {
				triggerAfterCommit(status);
			}
			finally {
				triggerAfterCompletion(status, TransactionSynchronization.STATUS_COMMITTED);
			}

		}
		finally {
			cleanupAfterCompletion(status);
		}
	}
这里的逻辑稍微复杂点:
- 判断事务状态是否是仅回滚的,如果是那就执行 processRollback () 方法,执行回滚;
- 执行 triggerBeforeCompletion () 方法,触发前置完成事件,底层调用事务同步 TransactionSynchronization 的 beforeCompletion () 方法;
- 判断一下条件,执行各自的逻辑
- 如果有保存点,那就执行事务状态的 rollbackToHeldSavepoint () 方法,回滚到保存点;
- 如果是新事物,执行 doRollback () 方法,进行回滚;
- 都不是,则执行 doSetRollbackOnly () 方法,给事务对象设置回滚标识,让上层事务进行回滚。
- 执行 triggerAfterCompletion () 方法,执行完成操作,底层调用事务同步 TransactionSynchronization 的 afterCompletion () 方法;
- 最后执行 cleanupAfterCompletion () 方法,进行清除操作。
- 新的同步则执行清理线程本地化操作;
- 新的事务,则执行释放连接操作;
- 如果有挂起的资源,恢复挂起的资源。
- 不是的话,就执行 processCommit () 方法,进行提交。
- 执行 triggerBeforeCommit () 方法,执行提交前的操作,底层调用事务同步 TransactionSynchronization 的 beforeCommit () 方法;
- 执行 triggerBeforeCompletion () 方法,执行完成前的操作,底层调用事务同步 TransactionSynchronization 的 beforeCompletion () 方法;
- 判断一下条件,执行各自的逻辑;
- 如果有保存点,则执行事务状态的 releaseHeldSavepoint () 方法,释放保存点;
- 如果是新的事务,则执行 doCommit () 方法,进行提交;
- 全局回滚时提前失败检查。
- 执行 triggerAfterCompletion () 方法,执行完成之后的操作,底层调用事务同步 TransactionSynchronization 的 afterCompletion () 方法;
- 遇到异常时,执行 doRollbackOnCommitException () 方法,进行回滚;
- 没有遇到异常,执行 triggerAfterCommit () 方法,执行完成之后的操作;
- 最后执行 cleanupAfterCompletion () 方法,进行清理操作。
- 新的同步则执行清理线程本地化操作;
- 新的事务,则执行释放连接操作;
- 如果有挂起的资源,恢复挂起的资源。
总结
上面就是 spring tx 模板的核心流程了。回顾下:
- 通过 @EnableTransactionManagement 注解,导入了 TransactionManagementConfigurationSelector 类;
- TransactionManagementConfigurationSelector 类,它导入了 AutoProxyRegistrar 和 ProxyTransactionManagementConfiguration 类;
- AutoProxyRegistrar 类负责注册一个 InfrastructureAdvisorAutoProxyCreator 类,它是一个创建代理对象的后置处理器;
- ProxyTransactionManagementConfiguration 类是创建了负责处理事务的增强器 BeanFactoryTransactionAttributeSourceAdvisor、还有处理事务属性的事务属性源 AnnotationTransactionAttributeSource、以及对目标方法进行事务处理拦截的事务拦截器 TransactionInterceptor,这三个 bean;
- 其中在调用目标方法时,通过事务拦截器 TransactionInterceptor 对目标方法进行拦截;
- 拦截有创建以及初始化事务相关信息(事务状态、事务对象、事务同步等信息)、执行目标方法、提交或者回滚事务、清理事务等流程。

Java 架构师之源码分析专题 SpringBoot2.x、Spring5、SpringMVC、Mybatis 源码分析
Java 架构师之源码分析专题 SpringBoot2.x、Spring5、SpringMVC、Mybatis 源码分析 48 套 Java 项目架构视频教程 - 高并发,微服务,分布式,需求分析,业务选型,项目部署,架构设计,架构师,源码分析,设计模式,数据结构,数据库,业务选型,中间件,并发编程,需求分析,需求设计,项目部署,云原生,企业架构,架构设计,大型项目实战视频课程
JAVA 高级架构师技术包含:SpringBoot3.0,SpringCloudAlibaba,JDK11~19,Spring6,IOC,AOP,JavaWeb,SpringMVC,Mybatis,Docker,k8s,Devops,Vue3.0,Nginx,Redis7,MongoDB,JDBC,ShardingJDBC,Zookeeper,Dubbo,Activiti7,ES8,RabbitMQ,Redisson,Shiro,Paas,Neo4j,Kafka,Mycat,Tcp,ELK,SpringData,Tcp,JWT, POI,JVM 项目实战,电商项目,金融项目,商业代驾项目,网约车项目,在线教育项目,头条项目,12306 售票系统,医疗云平台项目,数字货币交易项目,自媒体项目实战,游戏开发项目,Es 搜索项目,支付项目,外卖项目,防抖音短频项目,云尚办公系统,租房网项目,交友项目,房产项目,人力资源管理系统,餐掌柜项目,基础框架,源码分析,设计模式,数据结构,数据库,业务选型,中间件,并发编程,高并发,分布式,微服务,性能优化,分库分表,日志开发,需求分析,需求设计,项目部署,云原生,企业架构,架构设计,高级架构等视频教程……
下载链接:https://www.soft1188.com/javajg/6252.html
总目录:2023 年 48 套 Java 项目架构视频教程 - 高并发,微服务,分布式,需求分析,业务选型,项目部署,架构设计,架构师,源码分析,设计模式,数据结构,数据库,业务选型,中间件,并发编程,需求分析,需求设计,项目部署,云原生,企业架构,架构设计,大型项目实战视频课程
第 01 套:SpringBoot3.0 最新深入浅出从入门到项目实战,突出 Web 应用痛点解决方案视频教程

第 02 套:新一代微服务全家桶 AlibabaCloud+Docker+JDK11 阿里云容器部署零基础到项目实战课程

第 03 套:Spring6 深入 IoC 和 AOP 底层实现,手写框架实现 IoC,老鸟可以进一步掌握 Spring 底层
第 04 套:Vue3.0 前端全套视频教程(Kerwin 精通,Vue.js 零基础,Vue3 入门到精通到项目实战)

第 05 套:最新 Java 23 种设计模式详解教程(图解 + 框架源码剖析)内容全面通俗易通视频教程

第 06 套:Java 算法突击训练营,6 周彻底攻克数据结构与算法,40 道高频真题大厂算法面试视频教程

第 07 套:Java 架构师之源码分析专题 SpringBoot2.x、Spring5、SpringMVC、Mybatis 源码分析课程

第 08 套:深入浅出 JDK 安装及 Java9 到 Java19 新版本特性深度剖析视频课程,多版本讲解 一套拿捏

第 09 套:JavaWeb 课程精华版 Springmvc+Nginx+Redis+Docker+Mybatis+Mysql+JDBC+Zookeeper

第 10 套:Docker 企业级实战从入门到高阶(7 个深度 3 个全面)- 基础篇 + 提升篇 + 高级篇视频教程

第 11 套:K8S+Docker (安全网络存储监控)+Devops+GitOPS+Istio+Containerd 容器大师进阶之旅
第 12 套:新版 ShardingJDBC 分库分表 mysql 数据库实战,深入浅出核心知识点 + 高级 超多案例实战

第 13 套:构建 JVM 知识体系 解决 Java 工程师必会的工作面试难点,关于 JVM 的问题通通解决教程

第 14 套:全网最强 Redis7 十大专题分类讲解,20 年老司机高薪 & 实战一把过视频教程

第 15 套:Java 进阶 Activiti7 工作流系统精讲教程 Activiti 和 Spring 及 Springboot 框架项目整合视频课程

第 16 套:ES8 搜索引擎从入门到深度原理,实现综合运用实战 - 音乐 App 搜索项目 + 本地生活类 App 搜索项目

第 17 套:云原生架构进阶:基于工业级 PaaS 云平台的 Spring Cloud Alibaba 和 JDK 11 综合项目实战

第 18 套:6 大数据库,挖掘 7 种业务场景的数据库解决方案 MySQL、Redis、Neo4j、HBASE、MongoDB、ES 选型与开发

第 19 套:最新 Java 日志框架教程由浅入深全面精讲多种日志框架视频课程(log4j slf4j logback jul juc springboot )

第 20 套:Java 微服务体系 自媒体实战视频课程 SpringCloudAlibaba+Nginx+Zuul+Mysql+RabbitMQ+ES+Vue

第 21 套:多端全栈项目实战:大型商业级代驾业务全流程落地 SpringCloudAlibaba+Mysql+Redis+Docker+Uniapp+Vue3

第 22 套:Java 网约车实战 - 以网约车为例,切入分布式项目,互联网高并发项目需求分析(乘客端、司机端、车机端、大屏端)

第 23 套:Java 企业级实战开发《学成在线》微服务项目 SpringBoot+SpringCloud+MyBatis-Plus+Nginx+MQ+Redis+ES

第 24 套:亿级流量 Java 电商秒杀项目架构企业级视频课程 SpringCloud+Redis+Mycat+DDD+Docker+K8s+ShardingSphere

第 25 套:Java 企业级项目《尚上优选》SpringCloudAlibaba+Mybatis-Plus+Redisson+MQ+ES+Kibana+OSS+Knife4j+Nginx

第 26 套:Java 大型企业级 头条项目实战 Springboot+SpringCloudAlibaba+Docker+Vue+Mysql+Redis+Kafka+ES+MongoDB

第 27 套:体系化掌握 Java 分布式架构设计与开发实战,打通后端进阶关键一环,高性能、高并发、高可用的分布式架构

第 28 套:Java 零基础实训项目(东宝商城)课程 - 商品需求分析 + 商品中心设计 + 代码生成 + 验证码 + 代码安全 + 接口防篡改

第 29 套:Java 前后端分离分布式高并发医疗云平台 SpringCloudAlibaba+Shiro+RocketMQ+Docker+Mycat+Redis+Nginx

第 30 套:新版 Springboot3.0 打造能落地的高并发仿 12306 售票系统,带你学习各种高并发场景的解决方案视频课程

第 31 套:Java 企业级前后端分离 - 数字货币交易所项目 SpringCloud+MongoDB+Mysql+Redis+Kafka+MybatisPlus

第 32 套:Java 企业级瑞吉外卖项目实战 SpringBoot+Nginx+Mysql+Mybatis-Plus+Redis+VUE+H5+Git+Linux

第 33 套:P8 商城 - 大型互联网架构进行设计 - 三大部分:需求分析、软件设计开发、软件实施自动化部署架构视频课程

第 34 套:云尚办公系统 Java 企业级项目实战 SpringBoot+Vue+MybatisPlus+SpringSecurity+Redis+Activiti+Mysql

第 35 套:SpringBoot+Uniapp 实战开发仿抖音 App, 抓住短视频 Mybatis+MinIO+Nacos+MQ+MongoBD+redis+Nginx

第 36 套:SpringCloud+Vertx+Disruptor 证券金融业撮合交易系统实战,做金蝶动技领域的 IT 工程师视频课程

第 37 套:Java 前后端分离电商商城项目 SpringCloudAlibaba+RabbitMQ+Mysql+Solr+Redis+VSFTPD+Vue

第 38 套:Java 前后端分离企业级租房网项目 SpringBoot+Spring Cloud+SpringData+ES+MongoDB+Redis

第 39 套:Java 前后端分离探花交友项目 VUE+Dubbo+RabbitMQ+Redis+Mysql+MongoDB+SparkMllib+SpringCache

第 40 套:Java 尚好房项目 + 高薪提升课 SPringBoot+SpringCloud+Redis+Nginx+RabbitMQ+Docker+ES+Dubbo+Docker

第 41 套:Java 在线支付开发教程支付宝支付 & 微信支付项目实战视频课程,梳理流程关系,手把手的编写代码

第 42 套:SaaS-iHRM 人力资源管理系统 SpringBoot+SpringCloud+SpringData+Vue+Shiro+JWT+Activiti7+POI
第 43 套:MSB-Java 游戏开发真实项目 — 英雄传说 高并发游戏后端真实项目视频课程
第 44 套:多端基于 SaaS 的餐掌柜项目实战 - SpringCloudAlibaba+Vue+MQ+Redis+ES+TCP+Mysql+ELK+Docker

第 45 套:2023 版 Java 面试宝典 Java 面试 200 题(含美团 字节 阿里大厂真题及面试答题技巧)

第 46 套:资深 CTO & 架构师讲 Java 亿级项目架构设计与落地应用 - 需求分析 + 高层架构设计 + 系统架构设计 + 架构落地课程

第 47 套:MY-Java 架构师精英学习实战营 - 微服务 分布式 高并发 性能优化 企业架构 源码分析 运维部署 项目实战 设计框架

第 48 套:狂野架构师 - Java 架构师起步篇 + 进阶篇 + 深入篇 + 云原生篇 + 架构百宝箱篇 + 源码分析篇 + 架构设计篇 + 项目实战篇课程

![]()
Java 架构师之源码分析专题 SpringBoot2.x、Spring5、SpringMVC、Mybatis 源码分析 Java 架构师之源码分析专题 SpringBoot2.x、Spring5、SpringMVC、Mybatis 源码分析 Java 架构师之源码分析专题 SpringBoot2.x、Spring5、SpringMVC、Mybatis 源码分析 Java 架构师之源码分析专题 SpringBoot2.x、Spring5、SpringMVC、Mybatis 源码分析

Mybatis 核心流程源码分析
[toc]
0. 目录
1. 例子
2. 源码分析
2.1 解析 mybatis-config.xml 构建 Configuration 配置类流程
2.2 解析 mapper.xml 构建映射声明、缓存等流程
2.2.1 XMLMapperBuilder 解析流程
2.2.2 cacheElement() 构建二级缓存
2.2.2.1 Cache 接口
2.2.2.2 PerpetualCache 缓存
2.2.2.3 LruCache 缓存装饰器
2.2.2.4 ScheduledCache 缓存装饰器
2.2.2.5 SerializedCache 缓存装饰器
2.2.2.6 LoggingCache 缓存装饰器
2.2.2.7 SynchronizedCache 缓存装饰器
2.2.2.8 BlockingCache 缓存装饰器
2.2.2.9 缓存小结
2.2.3 buildStatementFromContext() 构建 SQLStatement 流程
2.2.4 bindMapperForNamespace() 从命令空间构建映射
2.2.4.1 MapperProxyFactory 映射代理工厂
2.2.4.2 MapperProxy 映射代理
2.2.4.3 MapperMethod 映射方法
2.3 创建 SqlSession 流程
2.3.1 获取事务工厂 TransactionFactory
2.3.2 获取事务 Transaction
2.3.3 创建执行器 Executor
2.3.3.1 BaseExecutor 执行器
2.3.3.2 SimpleExecutor 执行器
2.3.3.2.1 StatementHandler 处理器
2.3.3.2.2 PreparedStatementHandler
2.3.4 CachingExecutor 缓存执行器
2.3.4.1 TransactionalCacheManager 事务缓存管理器
2.3.4.2 TransactionalCache 事务缓存
2.3.5 应用插件 interceptorChain.pluginAll()
2.3.5 创建 DefaultSqlSession
2.4 通过 SqlSession 获取映射接口执行目标方法
2.4.1 查询非缓存数据流程
2.4.2 二级缓存调用流程
3. 总结回顾
今天我们来学习下 mybatis 核心流程源码分析。
1. 例子
我们先写个例子。首先要配置一个资源文件 app.properties,配置一些属性,比如环境变量。
# 环境配置
env=local
再配置 mybatis-config.xml,这是 mybatis 的配置文件,是配置 mybatis 的各种配置信息,主要有:属性 properties、全局设置 settings、别名 typeAliases、环境 environments、映射 mappers:
<?xml version="1.0" encoding="UTF-8" ?>
<!DOCTYPE configuration
  PUBLIC "-//mybatis.org//DTD Config 3.0//EN"
  "http://mybatis.org/dtd/mybatis-3-config.dtd">

<configuration>

  <!-- autoMappingBehavior should be set in each test case -->

  <!-- 读取资源文件-->
  <properties resource="org/apache/ibatis/autoconstructor/app.properties"/>

  <settings>
    <!-- 开启二级缓存-->
    <setting name="cacheEnabled" value="true"/>
    <!-- 开启驼峰式命名-->
    <setting name="mapUnderscoreToCamelCase" value="true"/>
  </settings>

  <!-- 别名配置 -->
  <typeAliases>
    <package name="org.apache.ibatis.autoconstructor"/>
  </typeAliases>

  <!-- 环境配置 -->
  <environments default="${env}">

    <environment id="local">
      <transactionManager type="JDBC">
        <property name="" value=""/>
      </transactionManager>
      <dataSource type="UNPOOLED">
        <property name="driver" value="org.hsqldb.jdbcDriver"/>
        <!-- 此配置是基于内存连接的-->
        <property name="url" value="jdbc:hsqldb:mem:automapping"/>
        <property name="username" value="sa"/>
      </dataSource>
    </environment>

    <environment id="dev">
      <transactionManager type="JDBC">
        <property name="" value=""/>
      </transactionManager>
      <dataSource type="UNPOOLED">
        <property name="driver" value="org.hsqldb.jdbcDriver"/>
        <!-- 此配置是基于内存连接的-->
        <property name="url" value="jdbc:hsqldb:mem:automapping"/>
        <property name="username" value="sa"/>
      </dataSource>
    </environment>
  </environments>

  <mappers>
    <!-- 扫描指定的映射文件 -->
    <mapper resource="org/apache/ibatis/autoconstructor/AutoConstructorMapper.xml"/>
  </mappers>

</configuration>
接着配置映射文件 AutoConstructorMapper.xml,它就是写 SQL 的地方:
<?xml version="1.0" encoding="UTF-8"?>
<!DOCTYPE mapper
    PUBLIC "-//mybatis.org//DTD Mapper 3.0//EN"
    "http://mybatis.org/dtd/mybatis-3-mapper.dtd">
<mapper namespace="org.apache.ibatis.autoconstructor.AutoConstructorMapper">
  <!--开启二级缓存-->
  <cache/>
  <!--<select id="selectOneById" resultType="org.apache.ibatis.autoconstructor.PrimitiveSubject">-->
  <select id="selectOneById" resultType="primitiveSubject">
    SELECT * FROM subject WHERE id = #{id}
  </select>
</mapper>
然后给出基本的 POJO 和 mapper 接口:
public class PrimitiveSubject implements Serializable {
  private final int id;
  private final String name;
  private final int age;
  private final int height;
  private final int weight;
  private final boolean active;
  private final Date dt;

  public PrimitiveSubject(final int id, final String name, final int age, final int height, final int weight, final boolean active, final Date dt) {
    this.id = id;
    this.name = name;
    this.age = age;
    this.height = height;
    this.weight = weight;
    this.active = active;
    this.dt = dt;
  }

  @Override
  public String toString() {
    return "PrimitiveSubject{ hashcode="+ this.hashCode() + ", id=" + id + ", name=''" + name + ''\'''' + ", age=" + age
      + ", height=" + height + ", weight=" + weight + ", active=" + active + ", dt=" + dt + ''}'';
  }

}

/**
 * mapper 接口
 */
public interface AutoConstructorMapper {
  PrimitiveSubject selectOneById(int id);
}
初始化 SQL 数据 CreateDB.sql
DROP TABLE subject
IF EXISTS;

DROP TABLE extensive_subject
IF EXISTS;

CREATE TABLE subject (
  id     INT NOT NULL,
  name   VARCHAR(20),
  age    INT NOT NULL,
  height INT,
  weight INT,
  active BIT,
  dt     TIMESTAMP
);

INSERT INTO subject VALUES
  (1, ''a'', 10, 100, 45, 1, CURRENT_TIMESTAMP),
  (2, ''b'', 10, NULL, 45, 1, CURRENT_TIMESTAMP),
  (2, ''c'', 10, NULL, NULL, 0, CURRENT_TIMESTAMP);
最后编写测试类,这个测试类中初始化了 SqlSessionFactory,同时装配了内存数据库;它通过 sqlSessionFactory 开启了一个 SqlSession,然后获取 AutoConstructorMapper 对象,执行了它的 selectOneById 方法:
class AutoConstructorTest {

  private static SqlSessionFactory sqlSessionFactory;

  @BeforeAll
  static void setUp() throws Exception {
    // create a SqlSessionFactory
    try (
      Reader reader = Resources
        .getResourceAsReader("org/apache/ibatis/autoconstructor/mybatis-config.xml")
    ) {
      sqlSessionFactory = new SqlSessionFactoryBuilder().build(reader);
    }

    // populate in-memory database
    BaseDataTest.runScript(sqlSessionFactory.getConfiguration().getEnvironment().getDataSource(),
                           "org/apache/ibatis/autoconstructor/CreateDB.sql");
  }

@Test
  void selectOneById() {
    try (SqlSession sqlSession = sqlSessionFactory.openSession()) {
      // 测试环境
      Environment environment = sqlSessionFactory.getConfiguration().getEnvironment();
      System.out.println("environment = " + environment.getId());

      final AutoConstructorMapper mapper = sqlSession.getMapper(AutoConstructorMapper.class);
      PrimitiveSubject ps1 = mapper.selectOneById(1);
      System.out.println("ps1 = " + ps1);
    }
  }
}
这样,一个简单的例子就编写完毕了。下面我们开始进入 mybatis 的源码中,探索下它的内部流程机制。
2. 源码分析
我们将它的源码分析分为以下几个流程:
- 解析 mybatis-config.xml 文件,构建 Configuration 配置类信息流程;
- 解析 mapper.xml 进行构建缓存、映射声明等流程;
- 创建 SqlSession 流程;
- 通过 SqlSession 获取 mapper 接口执行目标方法流程;
下面我们正式开始解析源码。
2.1 解析 mybatis-config.xml 构建 Configuration 配置类流程
这个流程在上面的例子中的单元测试类代码中有体现,具体的相关代码如下:
SqlSessionFactory sqlSessionFactory;
// ...省略...
      try (
      Reader reader = Resources
        .getResourceAsReader("org/apache/ibatis/autoconstructor/mybatis-config.xml")
    ) {
      sqlSessionFactory = new SqlSessionFactoryBuilder().build(reader);
    }
// ...省略...
上面的逻辑是,加载 mybatis-config.xml 文件到一个输入流中,然后创建一个 SqlSessionFactoryBuilder 对象,进行构建出一个 SqlSessionFactory 实例,这个实例的生命周期非常长,它是随着应用程序的关闭而关闭的。
我们看下它的源码:
public class SqlSessionFactoryBuilder {

  public SqlSessionFactory build(Reader reader) {
    return build(reader, null, null);
  }

// ...省略无关方法...

  public SqlSessionFactory build(Reader reader, String environment, Properties properties) {
    try {
      // 创建一个 XMLConfigBuilder 进行解析流,解析为一个 Configuration 实例
      XMLConfigBuilder parser = new XMLConfigBuilder(reader, environment, properties);
      return build(parser.parse());
    } catch (Exception e) {
      throw ExceptionFactory.wrapException("Error building SqlSession.", e);
    } finally {
      ErrorContext.instance().reset();
      try {
        reader.close();
      } catch (IOException e) {
        // Intentionally ignore. Prefer previous error.
      }
    }
  }

// ...省略无关方法...

  /**
   * 构建一个 SQLsession 工厂
   * @param config
   * @return
   */
  public SqlSessionFactory build(Configuration config) {
    // 创建一个默认的 SQLsession 工厂
    return new DefaultSqlSessionFactory(config);
  }

}
可以看到,上面的代码逻辑,主要是创建一个 XMLConfigBuilder 类型的对象,我们看下它的构造器
  public XMLConfigBuilder(Reader reader, String environment, Properties props) {
    this(new XPathParser(reader, true, props, new XMLMapperEntityResolver()), environment, props);
  }

  private XMLConfigBuilder(XPathParser parser, String environment, Properties props) {
    super(new Configuration());
    ErrorContext.instance().resource("SQL Mapper Configuration");
    this.configuration.setVariables(props);
    this.parsed = false;
    this.environment = environment;
    this.parser = parser;
  }
发现它会创建一个 Configuration 对象,关联到父类中。看下 Configuration 的构造器:
public Configuration() {
        // 配置各种基础类的别名
    // 事务管理器
    typeAliasRegistry.registerAlias("JDBC", JdbcTransactionFactory.class);
    typeAliasRegistry.registerAlias("MANAGED", ManagedTransactionFactory.class);

    // 数据源工厂
    typeAliasRegistry.registerAlias("JNDI", JndiDataSourceFactory.class);
    typeAliasRegistry.registerAlias("POOLED", PooledDataSourceFactory.class);
    typeAliasRegistry.registerAlias("UNPOOLED", UnpooledDataSourceFactory.class);

    // 缓存类别名
    typeAliasRegistry.registerAlias("PERPETUAL", PerpetualCache.class);
    typeAliasRegistry.registerAlias("FIFO", FifoCache.class);
    typeAliasRegistry.registerAlias("LRU", LruCache.class);
    typeAliasRegistry.registerAlias("SOFT", SoftCache.class);
    typeAliasRegistry.registerAlias("WEAK", WeakCache.class);

    typeAliasRegistry.registerAlias("DB_VENDOR", VendorDatabaseIdProvider.class);

    typeAliasRegistry.registerAlias("XML", XMLLanguageDriver.class);
    typeAliasRegistry.registerAlias("RAW", RawLanguageDriver.class);

    // 日志类别名
    typeAliasRegistry.registerAlias("SLF4J", Slf4jImpl.class);
    typeAliasRegistry.registerAlias("COMMONS_LOGGING", JakartaCommonsLoggingImpl.class);
    typeAliasRegistry.registerAlias("LOG4J", Log4jImpl.class);
    typeAliasRegistry.registerAlias("LOG4J2", Log4j2Impl.class);
    typeAliasRegistry.registerAlias("JDK_LOGGING", Jdk14LoggingImpl.class);
    typeAliasRegistry.registerAlias("STDOUT_LOGGING", StdOutImpl.class);
    typeAliasRegistry.registerAlias("NO_LOGGING", NoLoggingImpl.class);

    // 动态代理别名
    typeAliasRegistry.registerAlias("CGLIB", CglibProxyFactory.class);
    typeAliasRegistry.registerAlias("JAVASSIST", JavassistProxyFactory.class);

    // xml 脚本解析器
    languageRegistry.setDefaultDriverClass(XMLLanguageDriver.class);
    languageRegistry.register(RawLanguageDriver.class);

  }
可以看到,它的构造器方法中会注册一些基础配置的类的别名,这些别名一般是用在 xml 配置文件中的属性值,后续会根据别名来解析出对应的实际类型。
回过头来继续看 XMLConfigBuilder 的解析方法 parse() 方法,这个方法是把 mybatis 的 xml 文件解析成为一个 Configuration 类型,最后再创建一个 DefaultSqlSessionFactory 类型返回。org.apache.ibatis.builder.xml.XMLConfigBuilder#parse :
  public Configuration parse() {
    if (parsed) {
      throw new BuilderException("Each XMLConfigBuilder can only be used once.");
    }
    parsed = true;
    // 进行解析
    parseConfiguration(parser.evalNode("/configuration"));
    return configuration;
  }

  private void parseConfiguration(XNode root) {
    try {
      // 解析 properties 属性
      // issue #117 read properties first
      propertiesElement(root.evalNode("properties"));
      // 解析设置 setting
      Properties settings = settingsAsProperties(root.evalNode("settings"));
      loadCustomVfs(settings);
      // 解析自定义日志
      loadCustomLogImpl(settings);
      // 解析类型别名
      typeAliasesElement(root.evalNode("typeAliases"));
      // 解析插件
      pluginElement(root.evalNode("plugins"));
      // 解析对象工厂
      objectFactoryElement(root.evalNode("objectFactory"));
      // 解析对象包装工厂
      objectWrapperFactoryElement(root.evalNode("objectWrapperFactory"));
      // 解析反射器工厂
      reflectorFactoryElement(root.evalNode("reflectorFactory"));
      // 设置配置元素
      settingsElement(settings);
      // read it after objectFactory and objectWrapperFactory issue #631
      // 解析环境
      environmentsElement(root.evalNode("environments"));
      // 解析数据库 ID 提供者
      databaseIdProviderElement(root.evalNode("databaseIdProvider"));
      // 解析类型处理器
      typeHandlerElement(root.evalNode("typeHandlers"));
      // 解析映射文件
      mapperElement(root.evalNode("mappers"));
    } catch (Exception e) {
      throw new BuilderException("Error parsing SQL Mapper Configuration. Cause: " + e, e);
    }
  }
上面的代码也很好理解,主要是针对 mybatis-config.xml 文件中的各个标签元素进行解析:
- 解析 properties 属性配置;
- 解析 setting 属性配置;
- 解析 typeAliases 类型别名配置;
- 解析插件 plugins 配置;
- 解析 objectFactory 对象工厂配置;
- 解析 objectWrapperFactory 对象包装工厂配置;
- 解析 reflectorFactory 反射工厂配置;
- 解析 environments 环境配置;
- 解析 databaseIdProvider 数据库 ID 提供者配置;
- 解析 typeHandlers 类型处理器配置;
- 解析 mappers 映射文件配置。

这些解析内容中,mappers 解析最为重要,我们详细看下它的解析过程。
2.2 解析 mapper.xml 构建映射声明、缓存等流程
解析 mappers 的逻辑在 org.apache.ibatis.builder.xml.XMLConfigBuilder#mapperElement 方法中:
private void mapperElement(XNode parent) throws Exception {
    if (parent != null) {
      for (XNode child : parent.getChildren()) {
        if ("package".equals(child.getName())) {
          // 解析 package 属性
          String mapperPackage = child.getStringAttribute("name");
          configuration.addMappers(mapperPackage);
        } else {
          // 解析 resource 属性
          String resource = child.getStringAttribute("resource");
          // URL 属性
          String url = child.getStringAttribute("url");
          // class 属性
          String mapperClass = child.getStringAttribute("class");
          if (resource != null && url == null && mapperClass == null) {
            // resource 不为空,URL 和 class 为空
            ErrorContext.instance().resource(resource);
            InputStream inputStream = Resources.getResourceAsStream(resource);
            XMLMapperBuilder mapperParser = new XMLMapperBuilder(inputStream, configuration, resource, configuration.getSqlFragments());
            mapperParser.parse();
          } else if (resource == null && url != null && mapperClass == null) {
            // URL 不为空,resource 和 class 为空
            ErrorContext.instance().resource(url);
            InputStream inputStream = Resources.getUrlAsStream(url);
            XMLMapperBuilder mapperParser = new XMLMapperBuilder(inputStream, configuration, url, configuration.getSqlFragments());
            mapperParser.parse();
          } else if (resource == null && url == null && mapperClass != null) {
            // class 不为空,resource 和 URL 为空
            Class<?> mapperInterface = Resources.classForName(mapperClass);
            configuration.addMapper(mapperInterface);
          } else {
            // 否则就抛异常
            throw new BuilderException("A mapper element may only specify a url, resource or class, but not more than one.");
          }
        }
      }
    }
  }
可以看到这里的逻辑是获取了 mappers 标签中子标签 package 和 mapper,获取它们的 name、url、class、resource 属性,进行加载解析对应的 mapper.xml 文件。
流程为:
- 如果 package 标签存在,就获取其 name 属性值,即包名,将它放入 configuration 配置中保存起来, 通过 MapperAnnotationBuilder 类进行解析;
- 如果 package 不存在,就获取 mapper 标签。
- 获取它们的 resource、url、class 属性,这里进行了判断,这三个属性只能存在一个;
- 其中 resource 和 url 是通过 XMLMapperBuilder 实例进行解析的;
- class 属性的值也是会放入到 configuration 配置中进行解析并且保存起来,随后通过 MapperAnnotationBuilder 类进行解析。
2.2.1 XMLMapperBuilder 解析流程
我们这里主要看下 XMLMapperBuilder 类的解析流程。看下它的 parse() 方法,这个方法就是开始了对 mapper.xml 文件进行解析。org.apache.ibatis.builder.xml.XMLMapperBuilder#parse:
  /**
   * 执行解析 mapper.xml 文件
   */
  public void parse() {
    if (!configuration.isResourceLoaded(resource)) {
      // 配置 mapper 根元素
      configurationElement(parser.evalNode("/mapper"));
      // 保存资源路径
      configuration.addLoadedResource(resource);
      // 构建命令空间映射
      bindMapperForNamespace();
    }

    // 解析待定的结果集映射
    parsePendingResultMaps();
    // 解析待定的缓存引用
    parsePendingCacheRefs();
    // 解析待定的 SQL 声明
    parsePendingStatements();
  }
这里执行了以下几个解析逻辑:
- 执行 configurationElement() 方法,解析 mapper 根元素;
- 保存资源路径到 configuration 实例中;
- 执行 bindMapperForNamespace() 方法,根据命名空间加载对应的映射接口;
- 执行 parsePendingResultMaps() 方法,解析待定的 ResultMap 结果集映射;
- 执行 parsePendingCacheRefs() 方法,解析待定的 CacheRef 缓存引用;
- 执行 parsePendingStatements(),解析待定的 Statement SQL 声明。
这主要的方法是 configurationElement(),我们看下它的逻辑 org.apache.ibatis.builder.xml.XMLMapperBuilder#configurationElement:
private void configurationElement(XNode context) {
    try {
      // 构建命名空间
      String namespace = context.getStringAttribute("namespace");
      if (namespace == null || namespace.isEmpty()) {
        throw new BuilderException("Mapper''s namespace cannot be empty");
      }
      builderAssistant.setCurrentNamespace(namespace);
      // 构建缓存引用 cache-ref
      cacheRefElement(context.evalNode("cache-ref"));
      // 构建二级缓存 cache
      cacheElement(context.evalNode("cache"));
      // 构建 parameterMap
      parameterMapElement(context.evalNodes("/mapper/parameterMap"));
      // 构建 resultMap
      resultMapElements(context.evalNodes("/mapper/resultMap"));
      // 构建 SQL 语句
      sqlElement(context.evalNodes("/mapper/sql"));
      // 构建 SQL 语句声明
      buildStatementFromContext(context.evalNodes("select|insert|update|delete"));
    } catch (Exception e) {
      throw new BuilderException("Error parsing Mapper XML. The XML location is ''" + resource + "''. Cause: " + e, e);
    }
  }
它主要执行的逻辑是:
- 构建缓存引用 cache-ref 元素;
- 构建二级缓存 cache 元素;
- 构建 parameterMap 元素;
- 构建 resultMap 元素;
- 构建 SQL 元素;
- 构建 SQL 语句声明(解析 select|insert|update|delete 标签,这一步最为重要);

2.2.2 cacheElement() 构建二级缓存
接着我们看下它的构建二级缓存的流程。它是在 org.apache.ibatis.builder.xml.XMLMapperBuilder#cacheElement 方法中实现的:
  /**
   * 构建二级缓存 cache 元素
   *
   * @param context
   */
  private void cacheElement(XNode context) {
    if (context != null) {
      // 配置默认的 cache 类型
      String type = context.getStringAttribute("type", "PERPETUAL");
      Class<? extends Cache> typeClass = typeAliasRegistry.resolveAlias(type);
      // 过期策略
      String eviction = context.getStringAttribute("eviction", "LRU");
      Class<? extends Cache> evictionClass = typeAliasRegistry.resolveAlias(eviction);
      // 刷新时间
      Long flushInterval = context.getLongAttribute("flushInterval");
      // 缓存大小
      Integer size = context.getIntAttribute("size");
      // 是否只读,默认是 false,即
      boolean readWrite = !context.getBooleanAttribute("readOnly", false);
      // 是否阻塞,为了解决缓存击穿问题(同一时刻出现大量的访问同一个数据的请求)
      boolean blocking = context.getBooleanAttribute("blocking", false);
      // 其他属性
      Properties props = context.getChildrenAsProperties();
      // 构建缓存
      builderAssistant.useNewCache(typeClass, evictionClass, flushInterval, size, readWrite, blocking, props);
    }
  }
注意这里的 cache 标签,是在 mapper.xml 文件中声明的。它的逻辑:
- 获取 cache 标签的类型 type 属性值,默认为 PERPETUAL,它对应 PerpetualCache 类型;
- 获取过期策略 eviction 属性值,默认为 LRU 最近最少过期策略,它对应 LruCache 类型;
- 获取刷新时间 flushInterval 属性值;
- 获取缓存大小 size 属性值;
- 获取是否只读 readOnly 属性值,默认是 false,如果设置了 true,那么就需要 POJO 实现 Serializable 接口;
- 获取是否阻塞 blocking 属性值,这是用来解决缓存击穿问题的,稍后将构建缓存时会具体讲解;
- 获取以及其他属性;
- 通过调用 MapperBuilderAssistant 映射构建器辅助器的 useNewCache() 方法来构建缓存。
我们看下 MapperBuilderAssistant 映射构建器辅助器的 useNewCache() 方法,org.apache.ibatis.builder.MapperBuilderAssistant#useNewCache:
  public Cache useNewCache(Class<? extends Cache> typeClass,
      Class<? extends Cache> evictionClass,
      Long flushInterval,
      Integer size,
      boolean readWrite,
      boolean blocking,
      Properties props) {
    // 缓存构建器
    Cache cache = new CacheBuilder(currentNamespace)
        // 这里默认使用 PerpetualCache 缓存类型实现,具体的缓存实现类
        .implementation(valueOrDefault(typeClass, PerpetualCache.class))
        // 添加 LruCache 缓存装饰器
        .addDecorator(valueOrDefault(evictionClass, LruCache.class))
        .clearInterval(flushInterval)
        .size(size)
        .readWrite(readWrite)
        .blocking(blocking)
        .properties(props)
        // 开始构建缓存
        .build();
    // 把缓存放入配置类中
    configuration.addCache(cache);
    currentCache = cache;
    return cache;
  }
这里又用到了 CacheBuilder 缓存构建器来构建缓存,,可以看到缓存使用 PerpetualCache 类型实现,并且添加了一个 添加 LruCache 缓存装饰器来装饰缓存,看下它的 build 方法 org.apache.ibatis.mapping.CacheBuilder#build:
  /**
   * 构建一个缓存
   *
   * @return
   */
  public Cache build() {
    // 设置默认实现类,和初始化的装饰器 LruCache
    setDefaultImplementations();
    // 通过反射创建一个 PerpetualCache 对象
    Cache cache = newBaseCacheInstance(implementation, id);
    // 设置缓存属性
    setCacheProperties(cache);
    // 不要为自定义的缓存应用装饰器
    // issue #352, do not apply decorators to custom caches
    if (PerpetualCache.class.equals(cache.getClass())) {
      // 如果是 PerpetualCache 类型的缓存,那么就给它设置装饰器
      for (Class<? extends Cache> decorator : decorators) {
        // 创建一个缓存装饰器实例
        cache = newCacheDecoratorInstance(decorator, cache);
        setCacheProperties(cache);
      }
      // 设置其他标准的装饰器
      cache = setStandardDecorators(cache);
    } else if (!LoggingCache.class.isAssignableFrom(cache.getClass())) {
      cache = new LoggingCache(cache);
    }
    return cache;
  }

  /**
   * 设置缓存的默认实现
   */
  private void setDefaultImplementations() {
    if (implementation == null) {
      implementation = PerpetualCache.class;
      if (decorators.isEmpty()) {
        decorators.add(LruCache.class);
      }
    }
  }

  /**
   * 设置标准的缓存装饰器
   *
   * @param cache
   * @return
   */
  private Cache setStandardDecorators(Cache cache) {
    try {
      // 获取缓存的元对象
      MetaObject metaCache = SystemMetaObject.forObject(cache);
      // 设置元数据的信息
      if (size != null && metaCache.hasSetter("size")) {
        metaCache.setValue("size", size);
      }
      if (clearInterval != null) {
        // 根据清除间隔属性,设置定时刷新缓存的装饰器缓存 ScheduledCache
        cache = new ScheduledCache(cache);
        ((ScheduledCache) cache).setClearInterval(clearInterval);
      }
      if (readWrite) {
        // 根据是否可读写属性,设置序列化缓存装饰器 SerializedCache
        cache = new SerializedCache(cache);
      }
      // 设置日志缓存装饰器 LoggingCache
      cache = new LoggingCache(cache);
      // 设置同步缓存装饰器 SynchronizedCache
      cache = new SynchronizedCache(cache);
      if (blocking) {
        // 根据是否阻塞,设置阻塞缓存装饰器
        cache = new BlockingCache(cache);
      }
      return cache;
    } catch (Exception e) {
      throw new CacheException("Error building standard cache decorators.  Cause: " + e, e);
    }
  }
梳理下这里的逻辑:
- 执行 setDefaultImplementations() 方法,如果没有实现类,那就设置默认的实现类 PerpetualCache,添加装饰器 LruCache;
- 通过反射创建一个 Cache 实现类的实例;
- 如果缓存实例是 PerpetualCache 类型的,则遍历装饰器集合,通过反射创建装饰器实例,并且执行 setStandardDecorators() 方法为缓存实例设置其他标准的装饰器;这里的逻辑有:
- 获取缓存的元对象,这是 size 属性;
- 根据 flushInterval 刷新间隔属性,设置 ScheduledCache 定时刷新缓存的装饰器对缓存进行装饰;
- 根据 readWrite 是否可读写属性,设置 SerializedCache 序列化缓存装饰器对缓存进行装饰;
- 设置 LoggingCache 日志缓存装饰器对缓存进行装饰;
- 设置 SynchronizedCache 同步缓存装饰器对缓存进行装饰;
- 根据 blocking 是否阻塞属性,设置 BlockingCache 阻塞缓存装饰器对缓存进行装饰;
- 如果缓存实例不是 LoggingCache 类型,那就设置 LoggingCache 日志缓存装饰器对缓存进行装饰;
- 返回缓存实例。
可以看到这里是创建了二级缓存 Cache 接口实例,这里有很多 Cache 装饰器,下面我们深入其中研究下。
2.2.2.1 Cache 接口
我们先看下 Cache 接口的类图:

可以看到 Cache 接口有多个实现。
2.2.2.2 PerpetualCache 缓存
上面构建缓存的流程中,我们看到了它首先会创建具体的真正存数据的缓存实例 PerpetualCache,看下它的实现:
/**
 * 永久缓存,用于一级缓存
 *
 * @author Clinton Begin
 */
public class PerpetualCache implements Cache {

  private final String id;

  /**
   * 使用一个 hashmap 作为缓存
   */
  private final Map<Object, Object> cache = new HashMap<>();

  public PerpetualCache(String id) {
    this.id = id;
  }

  @Override
  public String getId() {
    return id;
  }

  @Override
  public int getSize() {
    return cache.size();
  }

  @Override
  public void putObject(Object key, Object value) {
    cache.put(key, value);
  }

  @Override
  public Object getObject(Object key) {
    return cache.get(key);
  }

  @Override
  public Object removeObject(Object key) {
    return cache.remove(key);
  }

  @Override
  public void clear() {
    cache.clear();
  }

  @Override
  public boolean equals(Object o) {
    if (getId() == null) {
      throw new CacheException("Cache instances require an ID.");
    }
    if (this == o) {
      return true;
    }
    if (!(o instanceof Cache)) {
      return false;
    }

    Cache otherCache = (Cache) o;
    return getId().equals(otherCache.getId());
  }

  @Override
  public int hashCode() {
    if (getId() == null) {
      throw new CacheException("Cache instances require an ID.");
    }
    return getId().hashCode();
  }

}
它有两个属性,String 类型的 id 属性、和一个 HashMap 类型的 cache 属性,可以看到查询的数据会存储到这个 cache 属性中。
2.2.2.3 LruCache 缓存装饰器
接着它会创建一个 LruCache 缓存对 PerpetualCache 实例进行包装,LruCache 的实现如下:
/**
 * Lru (least recently used) cache decorator.
 *
 * @author Clinton Begin
 */
public class LruCache implements Cache {

  private final Cache delegate;
  private Map<Object, Object> keyMap;
  private Object eldestKey;

  public LruCache(Cache delegate) {
    this.delegate = delegate;
    setSize(1024);
  }

  @Override
  public String getId() {
    return delegate.getId();
  }

  @Override
  public int getSize() {
    return delegate.getSize();
  }

  public void setSize(final int size) {
    // 重写 LinkedHashMap 的 removeEldestEntry() 方法,实现 LRU 算法
    keyMap = new LinkedHashMap<Object, Object>(size, .75F, true) {
      private static final long serialVersionUID = 4267176411845948333L;

      @Override
      protected boolean removeEldestEntry(Map.Entry<Object, Object> eldest) {
        boolean tooBig = size() > size;
        if (tooBig) {
          eldestKey = eldest.getKey();
        }
        return tooBig;
      }
    };
  }

  @Override
  public void putObject(Object key, Object value) {
    delegate.putObject(key, value);
    cycleKeyList(key);
  }

  @Override
  public Object getObject(Object key) {
    // 这里获取 key 是为了让 key 保持最新,不至于被 LRU 清除掉
    keyMap.get(key); // touch
    return delegate.getObject(key);
  }

  @Override
  public Object removeObject(Object key) {
    return delegate.removeObject(key);
  }

  @Override
  public void clear() {
    delegate.clear();
    keyMap.clear();
  }

  private void cycleKeyList(Object key) {
    keyMap.put(key, key);
    if (eldestKey != null) {
      delegate.removeObject(eldestKey);
      eldestKey = null;
    }
  }

}
可以看到,它持有一个缓存实例 Cache 类型的 delegate 属性,这是一个委派的缓存实例;还有持有一个重写了 LinkedHashMap 类的 keyMap 属性,它重写了 removeEldestEntry() 方法,实现了 LRU 最近最少使用算法;同时还持有一个年级最长的 Object 类型的 key。
当有新的数据要放入缓存时,并且 keyMap 中的数据已经满了的时候,会把年级最长的缓存 key 删除掉,再存入新的数据。
2.2.2.4 ScheduledCache 缓存装饰器
接着看 ScheduledCache 定时刷新缓存装饰器:
public class ScheduledCache implements Cache {

  private final Cache delegate;
  protected long clearInterval;
  protected long lastClear;

  public ScheduledCache(Cache delegate) {
    this.delegate = delegate;
    this.clearInterval = TimeUnit.HOURS.toMillis(1);
    this.lastClear = System.currentTimeMillis();
  }

  public void setClearInterval(long clearInterval) {
    this.clearInterval = clearInterval;
  }

  @Override
  public String getId() {
    return delegate.getId();
  }

  @Override
  public int getSize() {
    clearWhenStale();
    return delegate.getSize();
  }

  @Override
  public void putObject(Object key, Object object) {
    clearWhenStale();
    delegate.putObject(key, object);
  }

  @Override
  public Object getObject(Object key) {
    return clearWhenStale() ? null : delegate.getObject(key);
  }

  @Override
  public Object removeObject(Object key) {
    clearWhenStale();
    return delegate.removeObject(key);
  }

  @Override
  public void clear() {
    lastClear = System.currentTimeMillis();
    delegate.clear();
  }

  @Override
  public int hashCode() {
    return delegate.hashCode();
  }

  @Override
  public boolean equals(Object obj) {
    return delegate.equals(obj);
  }

  private boolean clearWhenStale() {
    if (System.currentTimeMillis() - lastClear > clearInterval) {
      clear();
      return true;
    }
    return false;
  }

}
这个类同样也是持有一个委派的 Cache 实例,并且它提供了一个 clearWhenStale() 方法。这个方法会根据当前时间、上次清理的时间,与配置的刷新的间隔时间进行判断,是否需要清理缓存。与当前时间,在获取缓存数据、保存缓存数据、移除缓存数据、查询缓存数据数量的时候进行调用。
2.2.2.5 SerializedCache 缓存装饰器
接着看 SerializedCache 类:
public class SerializedCache implements Cache {

  private final Cache delegate;

  public SerializedCache(Cache delegate) {
    this.delegate = delegate;
  }

  @Override
  public String getId() {
    return delegate.getId();
  }

  @Override
  public int getSize() {
    return delegate.getSize();
  }

  @Override
  public void putObject(Object key, Object object) {
    if (object == null || object instanceof Serializable) {
      delegate.putObject(key, serialize((Serializable) object));
    } else {
      throw new CacheException("SharedCache failed to make a copy of a non-serializable object: " + object);
    }
  }

  @Override
  public Object getObject(Object key) {
    Object object = delegate.getObject(key);
    return object == null ? null : deserialize((byte[]) object);
  }

  @Override
  public Object removeObject(Object key) {
    return delegate.removeObject(key);
  }

  @Override
  public void clear() {
    delegate.clear();
  }

  @Override
  public int hashCode() {
    return delegate.hashCode();
  }

  @Override
  public boolean equals(Object obj) {
    return delegate.equals(obj);
  }

  private byte[] serialize(Serializable value) {
    try (ByteArrayOutputStream bos = new ByteArrayOutputStream();
        ObjectOutputStream oos = new ObjectOutputStream(bos)) {
      oos.writeObject(value);
      oos.flush();
      return bos.toByteArray();
    } catch (Exception e) {
      throw new CacheException("Error serializing object.  Cause: " + e, e);
    }
  }

  private Serializable deserialize(byte[] value) {
    Serializable result;
    try (ByteArrayInputStream bis = new ByteArrayInputStream(value);
        ObjectInputStream ois = new CustomObjectInputStream(bis)) {
      result = (Serializable) ois.readObject();
    } catch (Exception e) {
      throw new CacheException("Error deserializing object.  Cause: " + e, e);
    }
    return result;
  }

  public static class CustomObjectInputStream extends ObjectInputStream {

    public CustomObjectInputStream(InputStream in) throws IOException {
      super(in);
    }

    @Override
    protected Class<?> resolveClass(ObjectStreamClass desc) throws ClassNotFoundException {
      return Resources.classForName(desc.getName());
    }

  }

}
它是一个序列化缓存装饰器,用于在保存数据时,把数据序列化成 byte[] 数组,然后把 byte[] 数组保存到委派的缓存实例中去,在查询数据时,再把查询出来的数据反序列化为对应的对象。这里要求保存的数据类要实现 Serializable 接口。
2.2.2.6 LoggingCache 缓存装饰器
接着看 LoggingCache 类型:
public class LoggingCache implements Cache {

  private final Log log;
  private final Cache delegate;
  protected int requests = 0;
  protected int hits = 0;

  public LoggingCache(Cache delegate) {
    this.delegate = delegate;
    this.log = LogFactory.getLog(getId());
  }

  @Override
  public String getId() {
    return delegate.getId();
  }

  @Override
  public int getSize() {
    return delegate.getSize();
  }

  @Override
  public void putObject(Object key, Object object) {
    delegate.putObject(key, object);
  }

  @Override
  public Object getObject(Object key) {
    requests++;
    final Object value = delegate.getObject(key);
    if (value != null) {
      hits++;
    }
    if (log.isDebugEnabled()) {
      log.debug("Cache Hit Ratio [" + getId() + "]: " + getHitRatio());
    }
    return value;
  }

  @Override
  public Object removeObject(Object key) {
    return delegate.removeObject(key);
  }

  @Override
  public void clear() {
    delegate.clear();
  }

  @Override
  public int hashCode() {
    return delegate.hashCode();
  }

  @Override
  public boolean equals(Object obj) {
    return delegate.equals(obj);
  }

  private double getHitRatio() {
    return (double) hits / (double) requests;
  }

}
这个缓存装饰器的功能就是在查询缓存的时候打印日志,会根据缓存的请求次数与实际命中的次数计算出的命中率,并且打印出来。
2.2.2.7 SynchronizedCache 缓存装饰器
接着看 SynchronizedCache 类:
public class SynchronizedCache implements Cache {

  private final Cache delegate;

  public SynchronizedCache(Cache delegate) {
    this.delegate = delegate;
  }

  @Override
  public String getId() {
    return delegate.getId();
  }

  @Override
  public synchronized int getSize() {
    return delegate.getSize();
  }

  @Override
  public synchronized void putObject(Object key, Object object) {
    delegate.putObject(key, object);
  }

  @Override
  public synchronized Object getObject(Object key) {
    return delegate.getObject(key);
  }

  @Override
  public synchronized Object removeObject(Object key) {
    return delegate.removeObject(key);
  }

  @Override
  public synchronized void clear() {
    delegate.clear();
  }

  @Override
  public int hashCode() {
    return delegate.hashCode();
  }

  @Override
  public boolean equals(Object obj) {
    return delegate.equals(obj);
  }

}
它是一个实现同步功能的缓存装饰器,在调用查询缓存、保存缓存、删除缓存、清空缓存方法时进行同步,防止多线程同时操作。
2.2.2.8 BlockingCache 缓存装饰器
我们看最后一个缓存装饰器 BlockingCache:
/**
 * 一个简单的阻塞装饰器。
 * 一个简单的低效的 EhCache''s BlockingCache 装饰器。当元素不存在缓存中的时候,它设置一个锁。
 * 这样其他线程将会等待,直到元素被填充,而不是直接访问数据库。
 * 本质上,如果使用不当,它将会造成死锁。
 *
 * <p>Simple blocking decorator
 *
 * <p>Simple and inefficient version of EhCache''s BlockingCache decorator.
 * It sets a lock over a cache key when the element is not found in cache.
 * This way, other threads will wait until this element is filled instead of hitting the database.
 *
 * <p>By its nature, this implementation can cause deadlock when used incorrecly.
 *
 * @author Eduardo Macarron
 *
 */
public class BlockingCache implements Cache {

  private long timeout;
  private final Cache delegate;
  private final ConcurrentHashMap<Object, CountDownLatch> locks;

  public BlockingCache(Cache delegate) {
    this.delegate = delegate;
    this.locks = new ConcurrentHashMap<>();
  }

  @Override
  public String getId() {
    return delegate.getId();
  }

  @Override
  public int getSize() {
    return delegate.getSize();
  }

  @Override
  public void putObject(Object key, Object value) {
    try {
      delegate.putObject(key, value);
    } finally {
      releaseLock(key);
    }
  }

  @Override
  public Object getObject(Object key) {
    // 获取锁
    acquireLock(key);
    // 获取对象
    Object value = delegate.getObject(key);
    if (value != null) {
      // 获取的数据不为空,释放锁
      releaseLock(key);
    }
    // 如果 value 为空,则一直不释放锁,让其他查询此 key 的线程永久阻塞,直到该 key 对应的 value 被添加到缓存中,或者调用删除 key 操作,才会释放锁。
    // 这样的操作是用于解决缓存穿透问题,防止大量请求访问一个目前不存在的数据
    return value;
  }

  @Override
  public Object removeObject(Object key) {
    // despite of its name, this method is called only to release locks
    releaseLock(key);
    return null;
  }

  @Override
  public void clear() {
    delegate.clear();
  }

  private void acquireLock(Object key) {
    // 创建一个倒计时闭锁
    CountDownLatch newLatch = new CountDownLatch(1);
    while (true) {
      // 根据给定的 key,放入对应的闭锁
      // 如果 key 对应的闭锁不存在,则放入闭锁,如果存在则不放入,返回以前的值
      CountDownLatch latch = locks.putIfAbsent(key, newLatch);
      if (latch == null) {
        // latch 为 null 说明放入成功,则退出
        break;
      }
      // latch 不为空,说已经有线程放入了 key 对应的闭锁,那就让闭锁阻塞 await,直到闭锁被放入它的线程解锁
      try {
        if (timeout > 0) {
          boolean acquired = latch.await(timeout, TimeUnit.MILLISECONDS);
          if (!acquired) {
            throw new CacheException(
                "Couldn''t get a lock in " + timeout + " for the key " + key + " at the cache " + delegate.getId());
          }
        } else {
          latch.await();
        }
      } catch (InterruptedException e) {
        throw new CacheException("Got interrupted while trying to acquire lock for key " + key, e);
      }
    }
  }

  /**
   * 释放锁,它会在保存对象、查询到对象、移除对象时进行调用
   *
   * @param key
   */
  private void releaseLock(Object key) {
    // 释放一个锁
    CountDownLatch latch = locks.remove(key);
    if (latch == null) {
      throw new IllegalStateException("Detected an attempt at releasing unacquired lock. This should never happen.");
    }
    // 倒计时
    latch.countDown();
  }

  public long getTimeout() {
    return timeout;
  }

  public void setTimeout(long timeout) {
    this.timeout = timeout;
  }
}
这个类是借助了 CountDownLatch 闭锁实现了先阻塞操作。当一个线程尝试获取缓存数据时,会创建一个 CountDownLatch,然后再去获取数据,当获取的数据不为空,就把这个 CountDownLatch 删除,否则不删除闭锁,返回空数据。
这样其他线程获取相同 key 对应的缓存时,会拿到这个 CountDownLatch,然后调用它的 await() 方法,该线程就会被阻塞起来,直到这个 CountDownLatch 执行了 countDown() 方法。
当 key 对应的数据被获取到、被删除、被重新填入时,会调用到 CountDownLatch 的 countDown() 方法,唤醒其他被该闭锁阻塞的线程。
这样做的目的是为了防止缓存击穿。在一个 session 当访问一个数据库中一直不存在的数据时,会触发一次数据库查询,此时当 session 还没有提交事务时,此时出现了大量的 session 也是查询该 key 对应的数据,这样就会导致它们都会查询数据库,可想而知,后来这些 session 的查询数据库行为是无效的,而且如果此时 session 过多,可能会打死数据库。
为了避免这样的情况,为一个 key 增加一个闭锁,阻塞那些获取该数据的线程,直到数据被填充或释放锁才能被唤醒。
这样的做是比较低效的,容易引发死锁,比如一个线程如果一直访问缓存中不存在,并且数据库中也不存在的数据时,会创建一个闭锁,查询数据结束也不会释放锁。其他获取该 key 数据的线程访问时将会永久的阻塞,严重的消耗的系统资源。
这个类一般是不用的,cache 元素中的 block 属性默认是 false。
2.2.2.9 缓存小结
上述就是缓存装饰器的全部的介绍了,上面的这些缓存装饰器是使用了适配器模式,如下图:

这样设计的好处是,根据各个功能设计出各个装饰器,让它们各司其职。
2.2.3 buildStatementFromContext() 构建 SQLStatement 流程
接着看构建 SQLStatement 逻辑,它通过调用 buildStatementFromContext(context.evalNodes("select|insert|update|delete")) 方法来执行。
org.apache.ibatis.builder.xml.XMLMapperBuilder#buildStatementFromContext(java.util.List<org.apache.ibatis.parsing.XNode>)
 /**
   * 从上下文构建状态
   *
   * @param list
   */
  private void buildStatementFromContext(List<XNode> list) {
    if (configuration.getDatabaseId() != null) {
      buildStatementFromContext(list, configuration.getDatabaseId());
    }
    buildStatementFromContext(list, null);
  }

  private void buildStatementFromContext(List<XNode> list, String requiredDatabaseId) {
    // 遍历所有的 select、insert、update、delete 的语句
    for (XNode context : list) {
      final XMLStatementBuilder statementParser = new XMLStatementBuilder(configuration, builderAssistant, context, requiredDatabaseId);
      try {
        // 解析 SQL 语句
        statementParser.parseStatementNode();
      } catch (IncompleteElementException e) {
        // 添加不完整的声明
        configuration.addIncompleteStatement(statementParser);
      }
    }
  }
可以看到,这里获取了 select|insert|update|delete 这些元素,然后遍历,通过创建一个 XMLStatementBuilder 类,调用了它的 parseStatementNode() 方法来进行解析,说明一个 select|insert|update|delete 语句对应着一个 XMLStatement,org.apache.ibatis.builder.xml.XMLStatementBuilder#parseStatementNode:
  /**
   * 解析增删改查 SQL 语句声明,一个增删改查 SQL 语句就对应一个 MappedStatement
   */
  public void parseStatementNode() {
    // SQL 的 ID 属性
    String id = context.getStringAttribute("id");
    // 数据库 ID
    String databaseId = context.getStringAttribute("databaseId");

    if (!databaseIdMatchesCurrent(id, databaseId, this.requiredDatabaseId)) {
      return;
    }

    // 节点名称
    String nodeName = context.getNode().getNodeName();
    // 根据节点名称解析 SQL 的类型:增删改查
    SqlCommandType sqlCommandType = SqlCommandType.valueOf(nodeName.toUpperCase(Locale.ENGLISH));
    // 是否为查询类型
    boolean isSelect = sqlCommandType == SqlCommandType.SELECT;
    // 是否刷新缓存,除了 select 类型的 SQL 预计,执行的时候都会刷新缓存
    boolean flushCache = context.getBooleanAttribute("flushCache", !isSelect);
    // 是否使用缓存,默认不填写时是使用缓存的,如果是 select 类型,则默认是启用缓存
    boolean useCache = context.getBooleanAttribute("useCache", isSelect);
    // 结果排序,false
    boolean resultOrdered = context.getBooleanAttribute("resultOrdered", false);

    // 解析 includes
    // Include Fragments before parsing
    XMLIncludeTransformer includeParser = new XMLIncludeTransformer(configuration, builderAssistant);
    includeParser.applyIncludes(context.getNode());

    // 解析参数类型
    String parameterType = context.getStringAttribute("parameterType");
    Class<?> parameterTypeClass = resolveClass(parameterType);

    // 解析语言驱动
    String lang = context.getStringAttribute("lang");
    LanguageDriver langDriver = getLanguageDriver(lang);

    // 解析查询寻的 key
    // Parse selectKey after includes and remove them.
    processSelectKeyNodes(id, parameterTypeClass, langDriver);

    // 解析 selectKey
    // Parse the SQL (pre: <selectKey> and <include> were parsed and removed)
    KeyGenerator keyGenerator;
    String keyStatementId = id + SelectKeyGenerator.SELECT_KEY_SUFFIX;
    keyStatementId = builderAssistant.applyCurrentNamespace(keyStatementId, true);
    if (configuration.hasKeyGenerator(keyStatementId)) {
      keyGenerator = configuration.getKeyGenerator(keyStatementId);
    } else {
      keyGenerator = context.getBooleanAttribute("useGeneratedKeys",
          configuration.isUseGeneratedKeys() && SqlCommandType.INSERT.equals(sqlCommandType))
          ? Jdbc3KeyGenerator.INSTANCE : NoKeyGenerator.INSTANCE;
    }

    // 创建数据源
    SqlSource sqlSource = langDriver.createSqlSource(configuration, context, parameterTypeClass);
    // 声明类型,默认是 PREPARED 类型,预装配模式
    StatementType statementType = StatementType.valueOf(context.getStringAttribute("statementType", StatementType.PREPARED.toString()));
    // fetchSize
    Integer fetchSize = context.getIntAttribute("fetchSize");
    // 超时属性
    Integer timeout = context.getIntAttribute("timeout");
    // 参数映射
    String parameterMap = context.getStringAttribute("parameterMap");
    // 结果类型
    String resultType = context.getStringAttribute("resultType");
    Class<?> resultTypeClass = resolveClass(resultType);
    // 结果映射
    String resultMap = context.getStringAttribute("resultMap");
    // 结果集类型
    String resultSetType = context.getStringAttribute("resultSetType");
    ResultSetType resultSetTypeEnum = resolveResultSetType(resultSetType);
    if (resultSetTypeEnum == null) {
      resultSetTypeEnum = configuration.getDefaultResultSetType();
    }
    // key 属性
    String keyProperty = context.getStringAttribute("keyProperty");
    // key 列
    String keyColumn = context.getStringAttribute("keyColumn");
    // 结果集
    String resultSets = context.getStringAttribute("resultSets");

    // 构建映射声明对象
    builderAssistant.addMappedStatement(id, sqlSource, statementType, sqlCommandType,
        fetchSize, timeout, parameterMap, parameterTypeClass, resultMap, resultTypeClass,
        resultSetTypeEnum, flushCache, useCache, resultOrdered,
        keyGenerator, keyProperty, keyColumn, databaseId, langDriver, resultSets);
  }
可以看到它的逻辑:
- 获取元素的 id 属性、 databaseId 属性;
- 根据节点名称解析 SQL 命令类型(UNKNOWN, INSERT, UPDATE, DELETE, SELECT, FLUSH);
- 获取元素的是否查询类型 isSelect、是否刷新缓存 isSelect、是否使用缓存 isSelect、是否对结果排序 resultOrdered;
- 解析 include 元素节点;
- 解析元素的 parameterType 属性、解析语言驱动 lang 属性、解析 selectKey;
- 创建 keyGenerator;
- 创建数据源 sqlSource;
- 解析 StatementType 类型,默认是 PREPARED 类型;
- 获取 fetchSize、timeout 超时属性、parameterMap 参数映射、resultType 结果类型、resultMap 结果集、resultSetType 结果集类型、
- 获取元素的 keyProperty 属性、keyColumn、resultSets
- 通过 MapperBuilderAssistant 映射构建器辅助器调用 addMappedStatement() 方法,创建并添加映射 Statement。
我们看下 org.apache.ibatis.builder.MapperBuilderAssistant#addMappedStatement() 方法:
  public MappedStatement addMappedStatement(
      String id,
      SqlSource sqlSource,
      StatementType statementType,
      SqlCommandType sqlCommandType,
      Integer fetchSize,
      Integer timeout,
      String parameterMap,
      Class<?> parameterType,
      String resultMap,
      Class<?> resultType,
      ResultSetType resultSetType,
      boolean flushCache,
      boolean useCache,
      boolean resultOrdered,
      KeyGenerator keyGenerator,
      String keyProperty,
      String keyColumn,
      String databaseId,
      LanguageDriver lang,
      String resultSets) {

    if (unresolvedCacheRef) {
      throw new IncompleteElementException("Cache-ref not yet resolved");
    }

    // 解析声明 ID
    id = applyCurrentNamespace(id, false);
    boolean isSelect = sqlCommandType == SqlCommandType.SELECT;

    // 开始构建一个映射声明
    MappedStatement.Builder statementBuilder = new MappedStatement.Builder(configuration, id, sqlSource, sqlCommandType)
        .resource(resource)
        .fetchSize(fetchSize)
        .timeout(timeout)
        .statementType(statementType)
        .keyGenerator(keyGenerator)
        .keyProperty(keyProperty)
        .keyColumn(keyColumn)
        .databaseId(databaseId)
        .lang(lang)
        .resultOrdered(resultOrdered)
        .resultSets(resultSets)
        .resultMaps(getStatementResultMaps(resultMap, resultType, id))
        .resultSetType(resultSetType)
        .flushCacheRequired(valueOrDefault(flushCache, !isSelect))
        .useCache(valueOrDefault(useCache, isSelect))
        .cache(currentCache);

    // 获取声明参数映射
    ParameterMap statementParameterMap = getStatementParameterMap(parameterMap, parameterType, id);
    if (statementParameterMap != null) {
      statementBuilder.parameterMap(statementParameterMap);
    }

    MappedStatement statement = statementBuilder.build();
    // 把声明对象放入 configuration 中
    configuration.addMappedStatement(statement);
    return statement;
  }

  public String applyCurrentNamespace(String base, boolean isReference) {
    if (base == null) {
      return null;
    }
    if (isReference) {
      // is it qualified with any namespace yet?
      if (base.contains(".")) {
        return base;
      }
    } else {
      // is it qualified with this namespace yet?
      if (base.startsWith(currentNamespace + ".")) {
        return base;
      }
      if (base.contains(".")) {
        throw new BuilderException("Dots are not allowed in element names, please remove it from " + base);
      }
    }
    // 格式为:命令空间 + "." + base
    return currentNamespace + "." + base;
  }
这里的逻辑:
- 根据命令空间以及元素 ID 生成一个 MappedStatement 的 ID 属性;
- 创建一个 MappedStatement.Builder 实例构建 MappedStatement 实例;
- 添加到 configuration 实例中,返回 MappedStatement 实例。
这个 MappedStatement 的生命周期是和 configuration 一样,也是和应用程序的生命周期一样。
2.2.4 bindMapperForNamespace() 从命令空间构建映射
这个方法是根据 mapper.xml 中的命名空间来注册对应的 Mapper 接口类,org.apache.ibatis.builder.xml.XMLMapperBuilder#bindMapperForNamespace:
private void bindMapperForNamespace() {
    // 当前命令空间
    String namespace = builderAssistant.getCurrentNamespace();
    if (namespace != null) {
      Class<?> boundType = null;
      try {
        // 绑定类型就是命名空间对应的接口类
        boundType = Resources.classForName(namespace);
      } catch (ClassNotFoundException e) {
        // ignore, bound type is not required
      }
      if (boundType != null && !configuration.hasMapper(boundType)) {
        // Spring may not know the real resource name so we set a flag
        // to prevent loading again this resource from the mapper interface
        // look at MapperAnnotationBuilder#loadXmlResource
        // 保存命令空间
        configuration.addLoadedResource("namespace:" + namespace);
        // 保存映射,这里进行了注册
        configuration.addMapper(boundType);
      }
    }
  }
逻辑:
- 首先获取了命令空间值,然后加载这个类型,得到的就是对应的声明的 Mapper 接口;
- 保存命令空间到 Configuration 配置中;
- 把 Mapper 接口注册到 Configuration 中。
我们再看下 configuration.addMapper(boundType); 这个逻辑,org.apache.ibatis.session.Configuration#addMapper:
// org.apache.ibatis.session.Configuration#addMapper:
public <T> void addMapper(Class<T> type) {
    // mapperRegistry 是 MapperRegistry 类型
    mapperRegistry.addMapper(type);
  }
里边又调用了 org.apache.ibatis.binding.MapperRegistry#addMapper() 方法:
public <T> void addMapper(Class<T> type) {
    if (type.isInterface()) {
      if (hasMapper(type)) {
        throw new BindingException("Type " + type + " is already known to the MapperRegistry.");
      }
      boolean loadCompleted = false;
      try {
        // 添加一个映射器代理工厂
        knownMappers.put(type, new MapperProxyFactory<>(type));
        // It''s important that the type is added before the parser is run
        // otherwise the binding may automatically be attempted by the
        // mapper parser. If the type is already known, it won''t try.
        // 映射注解构建器
        MapperAnnotationBuilder parser = new MapperAnnotationBuilder(config, type);
        parser.parse();
        loadCompleted = true;
      } finally {
        if (!loadCompleted) {
          knownMappers.remove(type);
        }
      }
    }
  }
我们看到了这里的逻辑:
- 把要注册的类保存到
Map<Class<?>, MapperProxyFactory<?>> 类型的 knownMappers属性中,它的 key 为注册的类型,value 为 MapperProxyFactory 映射代理工厂类型实例; - 创建一个 MapperAnnotationBuilder 映射注解解析器,对目标类型进行解析。
2.2.4.1 MapperProxyFactory 映射代理工厂
我们看下这个类:
public class MapperProxyFactory<T> {

  private final Class<T> mapperInterface;
  private final Map<Method, MapperMethodInvoker> methodCache = new ConcurrentHashMap<>();

  public MapperProxyFactory(Class<T> mapperInterface) {
    this.mapperInterface = mapperInterface;
  }

  public Class<T> getMapperInterface() {
    return mapperInterface;
  }

  public Map<Method, MapperMethodInvoker> getMethodCache() {
    return methodCache;
  }

  @SuppressWarnings("unchecked")
  protected T newInstance(MapperProxy<T> mapperProxy) {
    return (T) Proxy.newProxyInstance(mapperInterface.getClassLoader(), new Class[] { mapperInterface }, mapperProxy);
  }

  public T newInstance(SqlSession sqlSession) {
    final MapperProxy<T> mapperProxy = new MapperProxy<>(sqlSession, mapperInterface, methodCache);
    return newInstance(mapperProxy);
  }

}
- 这个类中维护目标接口类型信息、方法与映射方法执行器属性。
- 它提供了创建实例方法 newInstance(),通过 JDK 的动态代理对象创建一个目标接口的代理对象。
2.2.4.2 MapperProxy 映射代理
上面 JDK 动态代理对象时候,传入了一个 MapperProxy 类型的参数,它的实现为:
/**
 * 方法代理器,实现了 JDK 动态代理的执行处理器 InvocationHandler 接口
 *
 * @author Clinton Begin
 * @author Eduardo Macarron
 */
public class MapperProxy<T> implements InvocationHandler, Serializable {

  private static final long serialVersionUID = -4724728412955527868L;
  private static final int ALLOWED_MODES = MethodHandles.Lookup.PRIVATE | MethodHandles.Lookup.PROTECTED
      | MethodHandles.Lookup.PACKAGE | MethodHandles.Lookup.PUBLIC;
  private static final Constructor<Lookup> lookupConstructor;
  private static final Method privateLookupInMethod;
  private final SqlSession sqlSession;
  private final Class<T> mapperInterface;
  private final Map<Method, MapperMethodInvoker> methodCache;

  public MapperProxy(SqlSession sqlSession, Class<T> mapperInterface, Map<Method, MapperMethodInvoker> methodCache) {
    this.sqlSession = sqlSession;
    this.mapperInterface = mapperInterface;
    this.methodCache = methodCache;
  }

  static {
    Method privateLookupIn;
    try {
      privateLookupIn = MethodHandles.class.getMethod("privateLookupIn", Class.class, MethodHandles.Lookup.class);
    } catch (NoSuchMethodException e) {
      privateLookupIn = null;
    }
    privateLookupInMethod = privateLookupIn;

    Constructor<Lookup> lookup = null;
    if (privateLookupInMethod == null) {
      // JDK 1.8
      try {
        lookup = MethodHandles.Lookup.class.getDeclaredConstructor(Class.class, int.class);
        lookup.setAccessible(true);
      } catch (NoSuchMethodException e) {
        throw new IllegalStateException(
            "There is neither ''privateLookupIn(Class, Lookup)'' nor ''Lookup(Class, int)'' method in java.lang.invoke.MethodHandles.",
            e);
      } catch (Exception e) {
        lookup = null;
      }
    }
    lookupConstructor = lookup;
  }

  /**
   * 动态代理执行器的 invoke 方法
   *
   * @param proxy
   * @param method
   * @param args
   * @return
   * @throws Throwable
   */
  @Override
  public Object invoke(Object proxy, Method method, Object[] args) throws Throwable {
    try {
      if (Object.class.equals(method.getDeclaringClass())) {
        return method.invoke(this, args);
      } else {
        // 调用 MapperMethodInvoker 映射方法执行器
        return cachedInvoker(method).invoke(proxy, method, args, sqlSession);
      }
    } catch (Throwable t) {
      throw ExceptionUtil.unwrapThrowable(t);
    }
  }

  private MapperMethodInvoker cachedInvoker(Method method) throws Throwable {
    try {
      // A workaround for https://bugs.openjdk.java.net/browse/JDK-8161372
      // It should be removed once the fix is backported to Java 8 or
      // MyBatis drops Java 8 support. See gh-1929
      // 从方法缓存中获取映射方法执行器
      MapperMethodInvoker invoker = methodCache.get(method);
      if (invoker != null) {
        return invoker;
      }

      // 创建一个新的方法执行器,并放入 methodCache 缓存中
      return methodCache.computeIfAbsent(method, m -> {
        if (m.isDefault()) {
          // 如果方法是一个接口的 default 方法,那就创建一个 DefaultMethodInvoker 类型
          try {
            if (privateLookupInMethod == null) {
              return new DefaultMethodInvoker(getMethodHandleJava8(method));
            } else {
              return new DefaultMethodInvoker(getMethodHandleJava9(method));
            }
          } catch (IllegalAccessException | InstantiationException | InvocationTargetException
              | NoSuchMethodException e) {
            throw new RuntimeException(e);
          }
        } else {
          // 否则就创建普通的 PlainMethodInvoker 类型执行器
          return new PlainMethodInvoker(new MapperMethod(mapperInterface, method, sqlSession.getConfiguration()));
        }
      });
    } catch (RuntimeException re) {
      Throwable cause = re.getCause();
      throw cause == null ? re : cause;
    }
  }

  private MethodHandle getMethodHandleJava9(Method method)
      throws NoSuchMethodException, IllegalAccessException, InvocationTargetException {
    final Class<?> declaringClass = method.getDeclaringClass();
    return ((Lookup) privateLookupInMethod.invoke(null, declaringClass, MethodHandles.lookup())).findSpecial(
        declaringClass, method.getName(), MethodType.methodType(method.getReturnType(), method.getParameterTypes()),
        declaringClass);
  }

  private MethodHandle getMethodHandleJava8(Method method)
      throws IllegalAccessException, InstantiationException, InvocationTargetException {
    final Class<?> declaringClass = method.getDeclaringClass();
    return lookupConstructor.newInstance(declaringClass, ALLOWED_MODES).unreflectSpecial(method, declaringClass);
  }

  interface MapperMethodInvoker {
    Object invoke(Object proxy, Method method, Object[] args, SqlSession sqlSession) throws Throwable;
  }

  private static class PlainMethodInvoker implements MapperMethodInvoker {
    private final MapperMethod mapperMethod;

    public PlainMethodInvoker(MapperMethod mapperMethod) {
      super();
      this.mapperMethod = mapperMethod;
    }

    /**
     * JDK 动态代理对象的的处理器方法
     *
     * @param proxy
     * @param method
     * @param args
     * @param sqlSession
     * @return
     * @throws Throwable
     */
    @Override
    public Object invoke(Object proxy, Method method, Object[] args, SqlSession sqlSession) throws Throwable {
      // 执行目标方法
      return mapperMethod.execute(sqlSession, args);
    }
  }

  private static class DefaultMethodInvoker implements MapperMethodInvoker {
    private final MethodHandle methodHandle;

    public DefaultMethodInvoker(MethodHandle methodHandle) {
      super();
      this.methodHandle = methodHandle;
    }

    @Override
    public Object invoke(Object proxy, Method method, Object[] args, SqlSession sqlSession) throws Throwable {
      // 通过 MethodHandle 方法处理器,绑定代理对象,执行方法
      return methodHandle.bindTo(proxy).invokeWithArguments(args);
    }
  }
再看下它的类图:

它实现了 InvocationHandler 接口的 invoke() 方法,里边主要的逻辑是:
- 调用 cachedInvoker() 方法,创建一个 MapperMethodInvoker;
- 先从 methodCache 缓存中获取,有的话直接返回;
- methodCache 缓存没有的话,则创建一个 PlainMethodInvoker 类型的执行器,这个构造器会被传入一个 org.apache.ibatis.binding.MapperMethod 类型对象。
- 调用 MapperMethodInvoker 实例的 invoke() 执行目标方法,实际最终会执行 MapperMethod 实例的 execute() 方法。
2.2.4.3 MapperMethod 映射方法
我们看下 MapperMethod 类:
/**
 * 映射方法
 *
 * @author Clinton Begin
 * @author Eduardo Macarron
 * @author Lasse Voss
 * @author Kazuki Shimizu
 */
public class MapperMethod {

  private final SqlCommand command;
  private final MethodSignature method;

  public MapperMethod(Class<?> mapperInterface, Method method, Configuration config) {
    // SQL 命令
    this.command = new SqlCommand(config, mapperInterface, method);
    // 方法签名
    this.method = new MethodSignature(config, mapperInterface, method);
  }

  /**
   * 执行方法
   *
   * @param sqlSession
   * @param args
   * @return
   */
  public Object execute(SqlSession sqlSession, Object[] args) {
    Object result;
    switch (command.getType()) {
      case INSERT: {
        // 新增类型
        Object param = method.convertArgsToSqlCommandParam(args);
        result = rowCountResult(sqlSession.insert(command.getName(), param));
        break;
      }
      case UPDATE: {
        // 修改
        Object param = method.convertArgsToSqlCommandParam(args);
        result = rowCountResult(sqlSession.update(command.getName(), param));
        break;
      }
      case DELETE: {
        // 删除
        Object param = method.convertArgsToSqlCommandParam(args);
        result = rowCountResult(sqlSession.delete(command.getName(), param));
        break;
      }
      case SELECT:
        // 查询
        if (method.returnsVoid() && method.hasResultHandler()) {
          executeWithResultHandler(sqlSession, args);
          result = null;
        } else if (method.returnsMany()) {
          // 返回多条
          result = executeForMany(sqlSession, args);
        } else if (method.returnsMap()) {
          // 返回 map
          result = executeForMap(sqlSession, args);
        } else if (method.returnsCursor()) {
          // 返回游标
          result = executeForCursor(sqlSession, args);
        } else {
          Object param = method.convertArgsToSqlCommandParam(args);
          result = sqlSession.selectOne(command.getName(), param);
          if (method.returnsOptional()
              && (result == null || !method.getReturnType().equals(result.getClass()))) {
            result = Optional.ofNullable(result);
          }
        }
        break;
      case FLUSH:
        // 刷新
        result = sqlSession.flushStatements();
        break;
      default:
        throw new BindingException("Unknown execution method for: " + command.getName());
    }
    if (result == null && method.getReturnType().isPrimitive() && !method.returnsVoid()) {
      throw new BindingException("Mapper method ''" + command.getName()
          + " attempted to return null from a method with a primitive return type (" + method.getReturnType() + ").");
    }
    return result;
  }

  private void executeWithResultHandler(SqlSession sqlSession, Object[] args) {
    MappedStatement ms = sqlSession.getConfiguration().getMappedStatement(command.getName());
    if (!StatementType.CALLABLE.equals(ms.getStatementType())
        && void.class.equals(ms.getResultMaps().get(0).getType())) {
      throw new BindingException("method " + command.getName()
          + " needs either a @ResultMap annotation, a @ResultType annotation,"
          + " or a resultType attribute in XML so a ResultHandler can be used as a parameter.");
    }
    Object param = method.convertArgsToSqlCommandParam(args);
    if (method.hasRowBounds()) {
      RowBounds rowBounds = method.extractRowBounds(args);
      sqlSession.select(command.getName(), param, rowBounds, method.extractResultHandler(args));
    } else {
      sqlSession.select(command.getName(), param, method.extractResultHandler(args));
    }
  }

  /**
   * 查询多条记录
   *
   * @param sqlSession
   * @param args
   * @param <E>
   * @return
   */
  private <E> Object executeForMany(SqlSession sqlSession, Object[] args) {
    List<E> result;
    // 转换参数
    Object param = method.convertArgsToSqlCommandParam(args);
    if (method.hasRowBounds()) {
      // 有行绑定
      RowBounds rowBounds = method.extractRowBounds(args);
      result = sqlSession.selectList(command.getName(), param, rowBounds);
    } else {
      result = sqlSession.selectList(command.getName(), param);
    }
    // issue #510 Collections & arrays support
    if (!method.getReturnType().isAssignableFrom(result.getClass())) {
      if (method.getReturnType().isArray()) {
        return convertToArray(result);
      } else {
        return convertToDeclaredCollection(sqlSession.getConfiguration(), result);
      }
    }
    return result;
  }

  private <T> Cursor<T> executeForCursor(SqlSession sqlSession, Object[] args) {
    Cursor<T> result;
    Object param = method.convertArgsToSqlCommandParam(args);
    if (method.hasRowBounds()) {
      RowBounds rowBounds = method.extractRowBounds(args);
      result = sqlSession.selectCursor(command.getName(), param, rowBounds);
    } else {
      result = sqlSession.selectCursor(command.getName(), param);
    }
    return result;
  }

  private <K, V> Map<K, V> executeForMap(SqlSession sqlSession, Object[] args) {
    Map<K, V> result;
    Object param = method.convertArgsToSqlCommandParam(args);
    if (method.hasRowBounds()) {
      RowBounds rowBounds = method.extractRowBounds(args);
      result = sqlSession.selectMap(command.getName(), param, method.getMapKey(), rowBounds);
    } else {
      result = sqlSession.selectMap(command.getName(), param, method.getMapKey());
    }
    return result;
  }

  // ...省略无关方法...
重点看下它 execute() 方法逻辑:
- 判断 SQL 执行类型:insert、update、delete、select;
- 根据执行类型最终都会调用 SqlSession 的对应方法,而 SqlSession 的对应方法内部最终会调用 Executor 的对应方法。
2.3 创建 SqlSession 流程
上面我们讲了解析 mybatis-config.xml 以及 mapper.xml 的流程,现在我们来看下获取一个 SqlSession 的流程。
从 1. 例子的单元测类中可以看到,它是通过 SqlSession sqlSession = sqlSessionFactory.openSession() 来获取一个 SqlSession,sqlSessionFactory.openSession 是 DefaultSqlSessionFactory 类型的,我们看下它的 openSession() 方法,org.apache.ibatis.session.defaults.DefaultSqlSessionFactory#openSession():
  @Override
  public SqlSession openSession() {
    return openSessionFromDataSource(configuration.getDefaultExecutorType(), null, false);
  }

  /**
   * 打开一个 session
   *
   * @param execType
   * @param level
   * @param autoCommit
   * @return
   */
  private SqlSession openSessionFromDataSource(ExecutorType execType, TransactionIsolationLevel level, boolean autoCommit) {
    Transaction tx = null;
    try {
      // 获取环境信息
      final Environment environment = configuration.getEnvironment();
      // 获取事务工厂
      final TransactionFactory transactionFactory = getTransactionFactoryFromEnvironment(environment);
      // 获取一个事务
      tx = transactionFactory.newTransaction(environment.getDataSource(), level, autoCommit);
      // 创建一个执行器
      final Executor executor = configuration.newExecutor(tx, execType);
      // 创建一个默认的 DefaultSqlSession
      return new DefaultSqlSession(configuration, executor, autoCommit);
    } catch (Exception e) {
      // 遇到异常关闭事务
      closeTransaction(tx); // may have fetched a connection so lets call close()
      throw ExceptionFactory.wrapException("Error opening session.  Cause: " + e, e);
    } finally {
      ErrorContext.instance().reset();
    }
  }

 /**
   * 从环境信息中创建一个事务工厂
   *
   * @param environment
   * @return
   */
  private TransactionFactory getTransactionFactoryFromEnvironment(Environment environment) {
    if (environment == null || environment.getTransactionFactory() == null) {
      // 创建默认的管理的事务工厂
      return new ManagedTransactionFactory();
    }
    // 从环境中获取事务工厂
    return environment.getTransactionFactory();
  }

  /**
   * 关闭事务
   *
   * @param tx
   */
  private void closeTransaction(Transaction tx) {
    if (tx != null) {
      try {
        tx.close();
      } catch (SQLException ignore) {
        // Intentionally ignore. Prefer previous error.
      }
    }
  }
可以看到,它的主要流程为:
- 获取环境 Environment 信息;
- 获取一个 TransactionFactory 事务工厂实例;
- 通过事务工厂创建一个事务 Transaction 实例;
- 通过配置类创建一个 Executor 执行器;
- 创建一个 DefaultSqlSession 对象返回;
- 遇到异常关闭事务。
2.3.1 获取事务工厂 TransactionFactory
因为我们在 mybatis-config.xml 中配置了环境信息 environment,其中 transactionManager 元素的 type 为 JDBC ,所以 它会获取到的事务工厂为 JdbcTransactionFactory 类型。
然后通过它来创建了一个事务,org.apache.ibatis.transaction.TransactionFactory#newTransaction(javax.sql.DataSource, org.apache.ibatis.session.TransactionIsolationLevel, boolean):
/**
 * Creates {@link JdbcTransaction} instances.
 *
 * @author Clinton Begin
 *
 * @see JdbcTransaction
 */
public class JdbcTransactionFactory implements TransactionFactory {

  @Override
  public Transaction newTransaction(Connection conn) {
    return new JdbcTransaction(conn);
  }

  @Override
  public Transaction newTransaction(DataSource ds, TransactionIsolationLevel level, boolean autoCommit) {
    return new JdbcTransaction(ds, level, autoCommit);
  }
}
2.3.2 获取事务 Transaction
我们看下 newTransaction() 方法返回的 JdbcTransaction 类型:

它的实现:
/**
 * {@link Transaction} that makes use of the JDBC commit and rollback facilities directly.
 * It relies on the connection retrieved from the dataSource to manage the scope of the transaction.
 * Delays connection retrieval until getConnection() is called.
 * Ignores commit or rollback requests when autocommit is on.
 *
 * @author Clinton Begin
 *
 * @see JdbcTransactionFactory
 */
public class JdbcTransaction implements Transaction {

  private static final Log log = LogFactory.getLog(JdbcTransaction.class);

  protected Connection connection;
  protected DataSource dataSource;
  protected TransactionIsolationLevel level;
  protected boolean autoCommit;

  public JdbcTransaction(DataSource ds, TransactionIsolationLevel desiredLevel, boolean desiredAutoCommit) {
    dataSource = ds;
    level = desiredLevel;
    autoCommit = desiredAutoCommit;
  }

  public JdbcTransaction(Connection connection) {
    this.connection = connection;
  }

  @Override
  public Connection getConnection() throws SQLException {
    if (connection == null) {
      openConnection();
    }
    return connection;
  }

  @Override
  public void commit() throws SQLException {
    if (connection != null && !connection.getAutoCommit()) {
      if (log.isDebugEnabled()) {
        log.debug("Committing JDBC Connection [" + connection + "]");
      }
      connection.commit();
    }
  }

  @Override
  public void rollback() throws SQLException {
    if (connection != null && !connection.getAutoCommit()) {
      if (log.isDebugEnabled()) {
        log.debug("Rolling back JDBC Connection [" + connection + "]");
      }
      connection.rollback();
    }
  }

  @Override
  public void close() throws SQLException {
    if (connection != null) {
      resetAutoCommit();
      if (log.isDebugEnabled()) {
        log.debug("Closing JDBC Connection [" + connection + "]");
      }
      connection.close();
    }
  }

  protected void setDesiredAutoCommit(boolean desiredAutoCommit) {
    try {
      if (connection.getAutoCommit() != desiredAutoCommit) {
        if (log.isDebugEnabled()) {
          log.debug("Setting autocommit to " + desiredAutoCommit + " on JDBC Connection [" + connection + "]");
        }
        connection.setAutoCommit(desiredAutoCommit);
      }
    } catch (SQLException e) {
      // Only a very poorly implemented driver would fail here,
      // and there''s not much we can do about that.
      throw new TransactionException("Error configuring AutoCommit.  "
          + "Your driver may not support getAutoCommit() or setAutoCommit(). "
          + "Requested setting: " + desiredAutoCommit + ".  Cause: " + e, e);
    }
  }

  protected void resetAutoCommit() {
    try {
      if (!connection.getAutoCommit()) {
        // MyBatis does not call commit/rollback on a connection if just selects were performed.
        // Some databases start transactions with select statements
        // and they mandate a commit/rollback before closing the connection.
        // A workaround is setting the autocommit to true before closing the connection.
        // Sybase throws an exception here.
        if (log.isDebugEnabled()) {
          log.debug("Resetting autocommit to true on JDBC Connection [" + connection + "]");
        }
        connection.setAutoCommit(true);
      }
    } catch (SQLException e) {
      if (log.isDebugEnabled()) {
        log.debug("Error resetting autocommit to true "
            + "before closing the connection.  Cause: " + e);
      }
    }
  }

  protected void openConnection() throws SQLException {
    if (log.isDebugEnabled()) {
      log.debug("Opening JDBC Connection");
    }
    connection = dataSource.getConnection();
    if (level != null) {
      connection.setTransactionIsolation(level.getLevel());
    }
    setDesiredAutoCommit(autoCommit);
  }

  @Override
  public Integer getTimeout() throws SQLException {
    return null;
  }

}
这是一个jdbc 事务,里边提供了一些获取数据库连接、提交事务、回滚、关闭事务操作。
2.3.3 创建执行器 Executor
接着通过 configuration 创建一个执行器 Executor,org.apache.ibatis.session.Configuration#newExecutor(org.apache.ibatis.transaction.Transaction, org.apache.ibatis.session.ExecutorType):
public Executor newExecutor(Transaction transaction, ExecutorType executorType) {
    executorType = executorType == null ? defaultExecutorType : executorType;
    executorType = executorType == null ? ExecutorType.SIMPLE : executorType;
    Executor executor;
    if (ExecutorType.BATCH == executorType) {
      // 批量执行器
      executor = new BatchExecutor(this, transaction);
    } else if (ExecutorType.REUSE == executorType) {
      // 重用执行器
      executor = new ReuseExecutor(this, transaction);
    } else {
      // 简单执行器
      executor = new SimpleExecutor(this, transaction);
    }
    // 如果启用二级缓存
    if (cacheEnabled) {
      // 创建一个 CachingExecutor 类型,使用装饰器模式
      executor = new CachingExecutor(executor);
    }
    // 添加拦截器,这里用户可以实现自定义的拦截器
    executor = (Executor) interceptorChain.pluginAll(executor);
    return executor;
  }
这里的逻辑:
- 判断参数 ExecutorType 的类型,根据它的类型来创建不同的执行器,默认是 SIMPLE 类型;
- ExecutorType.BATCH 类型,则创建 BatchExecutor 执行器;
- ExecutorType.REUSE 类型,则创建 ReuseExecutor 执行器;
- 否则创建 SimpleExecutor 执行器;
- 如果启用了二级缓存,则创建 CachingExecutor 缓存执行器来包装上述执行器。默认是启用二级缓存;
- 为添加拦截器,这里用户可以实现自定义的拦截器;
- 返回执行器。
我们看下执行器 Executor 的类图:

可以看到,Executor 的继承类图,CachingExecutor 是一个装饰器,里边维护了一个真正的执行器,它默认实现的 SimpleExecutor 类型。
2.3.3.1 BaseExecutor 执行器
我们先看下 BaseExecutor 类的实现如下:
public abstract class BaseExecutor implements Executor {

  private static final Log log = LogFactory.getLog(BaseExecutor.class);

  protected Transaction transaction;
  protected Executor wrapper;

  protected ConcurrentLinkedQueue<DeferredLoad> deferredLoads;

  /**
   * 本地缓存,一级缓存
   */
  protected PerpetualCache localCache;

  /**
   * 本地输出参数缓存
   */
  protected PerpetualCache localOutputParameterCache;
  protected Configuration configuration;

  protected int queryStack;
  private boolean closed;

  protected BaseExecutor(Configuration configuration, Transaction transaction) {
    this.transaction = transaction;
    // 这是干啥的?
    this.deferredLoads = new ConcurrentLinkedQueue<>();
    // 本地
    this.localCache = new PerpetualCache("LocalCache");
    this.localOutputParameterCache = new PerpetualCache("LocalOutputParameterCache");
    this.closed = false;
    this.configuration = configuration;
    this.wrapper = this;
  }

  @Override
  public Transaction getTransaction() {
    if (closed) {
      throw new ExecutorException("Executor was closed.");
    }
    return transaction;
  }

  @Override
  public void close(boolean forceRollback) {
    try {
      try {
        rollback(forceRollback);
      } finally {
        if (transaction != null) {
          transaction.close();
        }
      }
    } catch (SQLException e) {
      // Ignore. There''s nothing that can be done at this point.
      log.warn("Unexpected exception on closing transaction.  Cause: " + e);
    } finally {
      transaction = null;
      deferredLoads = null;
      localCache = null;
      localOutputParameterCache = null;
      closed = true;
    }
  }

  @Override
  public boolean isClosed() {
    return closed;
  }

  @Override
  public int update(MappedStatement ms, Object parameter) throws SQLException {
    ErrorContext.instance().resource(ms.getResource()).activity("executing an update").object(ms.getId());
    if (closed) {
      throw new ExecutorException("Executor was closed.");
    }
    clearLocalCache();
    return doUpdate(ms, parameter);
  }

  @Override
  public List<BatchResult> flushStatements() throws SQLException {
    return flushStatements(false);
  }

  public List<BatchResult> flushStatements(boolean isRollBack) throws SQLException {
    if (closed) {
      throw new ExecutorException("Executor was closed.");
    }
    // 执行刷新声明
    return doFlushStatements(isRollBack);
  }

  @Override
  public <E> List<E> query(MappedStatement ms, Object parameter, RowBounds rowBounds, ResultHandler resultHandler) throws SQLException {
    // 绑定一个 SQL
    BoundSql boundSql = ms.getBoundSql(parameter);
    // 构建一个一级缓存 key
    CacheKey key = createCacheKey(ms, parameter, rowBounds, boundSql);
    return query(ms, parameter, rowBounds, resultHandler, key, boundSql);
  }

  @SuppressWarnings("unchecked")
  @Override
  public <E> List<E> query(MappedStatement ms, Object parameter, RowBounds rowBounds, ResultHandler resultHandler, CacheKey key, BoundSql boundSql) throws SQLException {
    ErrorContext.instance().resource(ms.getResource()).activity("executing a query").object(ms.getId());
    if (closed) {
      throw new ExecutorException("Executor was closed.");
    }
    if (queryStack == 0 && ms.isFlushCacheRequired()) {
      // 清除本地缓存
      clearLocalCache();
    }
    List<E> list;
    try {
      queryStack++;
      // 从一级缓存中获取
      list = resultHandler == null ? (List<E>) localCache.getObject(key) : null;
      if (list != null) {
        handleLocallyCachedOutputParameters(ms, key, parameter, boundSql);
      } else {
        // 查询数据库
        list = queryFromDatabase(ms, parameter, rowBounds, resultHandler, key, boundSql);
      }
    } finally {
      queryStack--;
    }
    if (queryStack == 0) {
      // TODO: 2020/9/18 引用队列?
      for (DeferredLoad deferredLoad : deferredLoads) {
        deferredLoad.load();
      }
      // issue #601
      deferredLoads.clear();
      if (configuration.getLocalCacheScope() == LocalCacheScope.STATEMENT) {
        // issue #482
        clearLocalCache();
      }
    }
    return list;
  }

  @Override
  public <E> Cursor<E> queryCursor(MappedStatement ms, Object parameter, RowBounds rowBounds) throws SQLException {
    BoundSql boundSql = ms.getBoundSql(parameter);
    return doQueryCursor(ms, parameter, rowBounds, boundSql);
  }

  @Override
  public void deferLoad(MappedStatement ms, MetaObject resultObject, String property, CacheKey key, Class<?> targetType) {
    if (closed) {
      throw new ExecutorException("Executor was closed.");
    }
    DeferredLoad deferredLoad = new DeferredLoad(resultObject, property, key, localCache, configuration, targetType);
    if (deferredLoad.canLoad()) {
      deferredLoad.load();
    } else {
      // 这是干甚的?
      deferredLoads.add(new DeferredLoad(resultObject, property, key, localCache, configuration, targetType));
    }
  }

  /**
   * 创建二级缓存 key
   *
   * @param ms
   * @param parameterObject
   * @param rowBounds
   * @param boundSql
   * @return
   */
  @Override
  public CacheKey createCacheKey(MappedStatement ms, Object parameterObject, RowBounds rowBounds, BoundSql boundSql) {
    if (closed) {
      throw new ExecutorException("Executor was closed.");
    }
    CacheKey cacheKey = new CacheKey();
    cacheKey.update(ms.getId());
    cacheKey.update(rowBounds.getOffset());
    cacheKey.update(rowBounds.getLimit());
    cacheKey.update(boundSql.getSql());
    List<ParameterMapping> parameterMappings = boundSql.getParameterMappings();
    TypeHandlerRegistry typeHandlerRegistry = ms.getConfiguration().getTypeHandlerRegistry();
    // mimic DefaultParameterHandler logic
    for (ParameterMapping parameterMapping : parameterMappings) {
      if (parameterMapping.getMode() != ParameterMode.OUT) {
        Object value;
        String propertyName = parameterMapping.getProperty();
        if (boundSql.hasAdditionalParameter(propertyName)) {
          value = boundSql.getAdditionalParameter(propertyName);
        } else if (parameterObject == null) {
          value = null;
        } else if (typeHandlerRegistry.hasTypeHandler(parameterObject.getClass())) {
          value = parameterObject;
        } else {
          MetaObject metaObject = configuration.newMetaObject(parameterObject);
          value = metaObject.getValue(propertyName);
        }
        cacheKey.update(value);
      }
    }
    if (configuration.getEnvironment() != null) {
      // issue #176
      cacheKey.update(configuration.getEnvironment().getId());
    }
    return cacheKey;
  }

  @Override
  public boolean isCached(MappedStatement ms, CacheKey key) {
    return localCache.getObject(key) != null;
  }

  @Override
  public void commit(boolean required) throws SQLException {
    if (closed) {
      throw new ExecutorException("Cannot commit, transaction is already closed");
    }
    // 清除本地缓存
    clearLocalCache();
    // 刷新声明
    flushStatements();
    if (required) {
      // 事务提交
      transaction.commit();
    }
  }

  @Override
  public void rollback(boolean required) throws SQLException {
    if (!closed) {
      try {
        clearLocalCache();
        flushStatements(true);
      } finally {
        if (required) {
          transaction.rollback();
        }
      }
    }
  }

  @Override
  public void clearLocalCache() {
    if (!closed) {
      localCache.clear();
      localOutputParameterCache.clear();
    }
  }

  protected abstract int doUpdate(MappedStatement ms, Object parameter) throws SQLException;

  protected abstract List<BatchResult> doFlushStatements(boolean isRollback) throws SQLException;

  protected abstract <E> List<E> doQuery(MappedStatement ms, Object parameter, RowBounds rowBounds, ResultHandler resultHandler, BoundSql boundSql)
      throws SQLException;

  protected abstract <E> Cursor<E> doQueryCursor(MappedStatement ms, Object parameter, RowBounds rowBounds, BoundSql boundSql)
      throws SQLException;

  protected void closeStatement(Statement statement) {
    if (statement != null) {
      try {
        statement.close();
      } catch (SQLException e) {
        // ignore
      }
    }
  }

  /**
   * Apply a transaction timeout.
   *
   * @param statement
   *          a current statement
   * @throws SQLException
   *           if a database access error occurs, this method is called on a closed <code>Statement</code>
   * @since 3.4.0
   * @see StatementUtil#applyTransactionTimeout(Statement, Integer, Integer)
   */
  protected void applyTransactionTimeout(Statement statement) throws SQLException {
    StatementUtil.applyTransactionTimeout(statement, statement.getQueryTimeout(), transaction.getTimeout());
  }

  /**
   * 处理本地缓存输出参数
   *
   * @param ms
   * @param key
   * @param parameter
   * @param boundSql
   */
  private void handleLocallyCachedOutputParameters(MappedStatement ms, CacheKey key, Object parameter, BoundSql boundSql) {
    // 处理 callable 类型,存储过程、存储函数
    if (ms.getStatementType() == StatementType.CALLABLE) {
      final Object cachedParameter = localOutputParameterCache.getObject(key);
      if (cachedParameter != null && parameter != null) {
        final MetaObject metaCachedParameter = configuration.newMetaObject(cachedParameter);
        final MetaObject metaParameter = configuration.newMetaObject(parameter);
        for (ParameterMapping parameterMapping : boundSql.getParameterMappings()) {
          if (parameterMapping.getMode() != ParameterMode.IN) {
            final String parameterName = parameterMapping.getProperty();
            final Object cachedValue = metaCachedParameter.getValue(parameterName);
            metaParameter.setValue(parameterName, cachedValue);
          }
        }
      }
    }
  }

  /**
   * 从数据库获取
   *
   * @param ms
   * @param parameter
   * @param rowBounds
   * @param resultHandler
   * @param key
   * @param boundSql
   * @param <E>
   * @return
   * @throws SQLException
   */
  private <E> List<E> queryFromDatabase(MappedStatement ms, Object parameter, RowBounds rowBounds, ResultHandler resultHandler, CacheKey key, BoundSql boundSql) throws SQLException {
    List<E> list;
    // 放入占位符
    localCache.putObject(key, EXECUTION_PLACEHOLDER);
    try {
      // 开始真正的查询数据
      list = doQuery(ms, parameter, rowBounds, resultHandler, boundSql);
    } finally {
      // 清除本地缓存
      localCache.removeObject(key);
    }
    // 放入本地缓存
    localCache.putObject(key, list);
    if (ms.getStatementType() == StatementType.CALLABLE) {
      // 如果是调用存储过程、存储函数,则把参数放入缓存中
      localOutputParameterCache.putObject(key, parameter);
    }
    return list;
  }

  protected Connection getConnection(Log statementLog) throws SQLException {
    Connection connection = transaction.getConnection();
    if (statementLog.isDebugEnabled()) {
      return ConnectionLogger.newInstance(connection, statementLog, queryStack);
    } else {
      return connection;
    }
  }

  @Override
  public void setExecutorWrapper(Executor wrapper) {
    this.wrapper = wrapper;
  }

  private static class DeferredLoad {

    private final MetaObject resultObject;
    private final String property;
    private final Class<?> targetType;
    private final CacheKey key;
    private final PerpetualCache localCache;
    private final ObjectFactory objectFactory;
    private final ResultExtractor resultExtractor;

    // issue #781
    public DeferredLoad(MetaObject resultObject,
                        String property,
                        CacheKey key,
                        PerpetualCache localCache,
                        Configuration configuration,
                        Class<?> targetType) {
      this.resultObject = resultObject;
      this.property = property;
      this.key = key;
      this.localCache = localCache;
      this.objectFactory = configuration.getObjectFactory();
      this.resultExtractor = new ResultExtractor(configuration, objectFactory);
      this.targetType = targetType;
    }

    public boolean canLoad() {
      return localCache.getObject(key) != null && localCache.getObject(key) != EXECUTION_PLACEHOLDER;
    }

    public void load() {
      @SuppressWarnings("unchecked")
      // we suppose we get back a List
      List<Object> list = (List<Object>) localCache.getObject(key);
      Object value = resultExtractor.extractObjectFromList(list, targetType);
      resultObject.setValue(property, value);
    }

  }

}
这个类是抽象类,它实现了 Executor 接口的核心方法,留下一些抽象方法和模板方法交给了子类实现。这个类主要提供几个主要的属性:
- PerpetualCache 类型的 localCache 属性,这是一个一级缓存,在同一个 sqlSession 查询相同接口数据时,提供缓存数据,避免查询相同查询语句和参数再次查询数据库。在查询时会从缓存中查找,以及保存缓存,在更新、删除都会清空缓存;
- 持有事务 Transaction 属性,用于在执行完一些事务提交、回滚、操作操作时,委派事务执行对应的逻辑;
2.3.3.2 SimpleExecutor 执行器
默认的实际执行器是 SimpleExecutor 类型,看下它的实现:
public class SimpleExecutor extends BaseExecutor {

  public SimpleExecutor(Configuration configuration, Transaction transaction) {
    super(configuration, transaction);
  }

  @Override
  public int doUpdate(MappedStatement ms, Object parameter) throws SQLException {
    Statement stmt = null;
    try {
      // 获取配置类型
      Configuration configuration = ms.getConfiguration();
      // 获取 StatementHandler 处理器
      StatementHandler handler = configuration.newStatementHandler(this, ms, parameter, RowBounds.DEFAULT, null, null);
      // 创建 Statement
      stmt = prepareStatement(handler, ms.getStatementLog());
      return handler.update(stmt);
    } finally {
      closeStatement(stmt);
    }
  }

  @Override
  public <E> List<E> doQuery(MappedStatement ms, Object parameter, RowBounds rowBounds, ResultHandler resultHandler, BoundSql boundSql) throws SQLException {
    Statement stmt = null;
    try {
      // 获取配置类型
      Configuration configuration = ms.getConfiguration();
      // 获取 StatementHandler 处理器
      StatementHandler handler = configuration.newStatementHandler(wrapper, ms, parameter, rowBounds, resultHandler, boundSql);
      // 创建 Statement
      stmt = prepareStatement(handler, ms.getStatementLog());
      return handler.query(stmt, resultHandler);
    } finally {
      closeStatement(stmt);
    }
  }

  @Override
  protected <E> Cursor<E> doQueryCursor(MappedStatement ms, Object parameter, RowBounds rowBounds, BoundSql boundSql) throws SQLException {
    // 获取配置类型
    Configuration configuration = ms.getConfiguration();
    // 获取 StatementHandler 处理器
    StatementHandler handler = configuration.newStatementHandler(wrapper, ms, parameter, rowBounds, null, boundSql);
    // 创建 Statement
    Statement stmt = prepareStatement(handler, ms.getStatementLog());
    Cursor<E> cursor = handler.queryCursor(stmt);
    stmt.closeOnCompletion();
    return cursor;
  }

  @Override
  public List<BatchResult> doFlushStatements(boolean isRollback) {
    return Collections.emptyList();
  }

  /**
   * 准备一个 Statement
   *
   * @param handler
   * @param statementLog
   * @return
   * @throws SQLException
   */
  private Statement prepareStatement(StatementHandler handler, Log statementLog) throws SQLException {
    Statement stmt;
    // 获取连接
    Connection connection = getConnection(statementLog);
    // 通过 StatementHandler 创建一个 Statement
    stmt = handler.prepare(connection, transaction.getTimeout());
    // 初始化参数
    handler.parameterize(stmt);
    return stmt;
  }

}
这个类主要实现了 BaseExecutor 抽象的类的抽象的模板方法:doUpdate()、doQuery()、doQueryCursor()、doFlushStatements() 方法,这些方法主要的逻辑为:
- 获取 Configuration 配置类;
- 通过配置类 Configuration 的 newStatementHandler() 方法来创建 StatementHandler 类;
- 调用 prepareStatement() 方法,通过 StatementHandler 创建 Statement;
- 再通过 StatementHandler 执行对应的查询、更新相关方法。
2.3.3.2.1 StatementHandler 处理器
在上述的 SimpleExecutor 类中,通过配置类 Configuration 的 newStatementHandler() 方法获取 StatementHandler 实例,我们先看下 StatementHandler 的类图:

我们看下它的实现,org.apache.ibatis.session.Configuration#newStatementHandler:
  public StatementHandler newStatementHandler(Executor executor, MappedStatement mappedStatement, Object parameterObject, RowBounds rowBounds, ResultHandler resultHandler, BoundSql boundSql) {
    // 创建一个 RoutingStatementHandler 路由的声明处理器
    StatementHandler statementHandler = new RoutingStatementHandler(executor, mappedStatement, parameterObject, rowBounds, resultHandler, boundSql);
    // 对 StatementHandler 应用插件
    statementHandler = (StatementHandler) interceptorChain.pluginAll(statementHandler);
    return statementHandler;
  }
它的逻辑:
- 创建一个 RoutingStatementHandler 路由的声明处理器;
- 对 StatementHandler 应用插件;
- 返回 statementHandler。
继续看下 RoutingStatementHandler 这个类:
public class RoutingStatementHandler implements StatementHandler {

  /**
   * 关联一个真正的 RoutingStatementHandler
   */
  private final StatementHandler delegate;

  public RoutingStatementHandler(Executor executor, MappedStatement ms, Object parameter, RowBounds rowBounds, ResultHandler resultHandler, BoundSql boundSql) {

    switch (ms.getStatementType()) {
      case STATEMENT:
        delegate = new SimpleStatementHandler(executor, ms, parameter, rowBounds, resultHandler, boundSql);
        break;
      case PREPARED:
        delegate = new PreparedStatementHandler(executor, ms, parameter, rowBounds, resultHandler, boundSql);
        break;
      case CALLABLE:
        delegate = new CallableStatementHandler(executor, ms, parameter, rowBounds, resultHandler, boundSql);
        break;
      default:
        throw new ExecutorException("Unknown statement type: " + ms.getStatementType());
    }

  }

  @Override
  public Statement prepare(Connection connection, Integer transactionTimeout) throws SQLException {
    return delegate.prepare(connection, transactionTimeout);
  }

  @Override
  public void parameterize(Statement statement) throws SQLException {
    delegate.parameterize(statement);
  }

  @Override
  public void batch(Statement statement) throws SQLException {
    delegate.batch(statement);
  }

  @Override
  public int update(Statement statement) throws SQLException {
    return delegate.update(statement);
  }

  @Override
  public <E> List<E> query(Statement statement, ResultHandler resultHandler) throws SQLException {
    return delegate.query(statement, resultHandler);
  }

  @Override
  public <E> Cursor<E> queryCursor(Statement statement) throws SQLException {
    return delegate.queryCursor(statement);
  }

  @Override
  public BoundSql getBoundSql() {
    return delegate.getBoundSql();
  }

  @Override
  public ParameterHandler getParameterHandler() {
    return delegate.getParameterHandler();
  }
}
可以看到,这个类实现了 StatementHandler 接口,并且根据 MappedStatement 获取 StatementType,创建对应的 StatementHandler,有:SimpleStatementHandler、PreparedStatementHandler、CallableStatementHandler。默认是会创建 PreparedStatementHandler 实例。
它的其他方法都是使用委派的 StatementHandler 实例去执行,比如 prepare()、parameterize()、batch()、update()、query()、queryCursor()、getBoundSql()、getParameterHandler() 方法。
2.3.3.2.2 PreparedStatementHandler
我们看下实际的 PreparedStatementHandler 类:
public class PreparedStatementHandler extends BaseStatementHandler {

  public PreparedStatementHandler(Executor executor, MappedStatement mappedStatement, Object parameter, RowBounds rowBounds, ResultHandler resultHandler, BoundSql boundSql) {
    super(executor, mappedStatement, parameter, rowBounds, resultHandler, boundSql);
  }

  @Override
  public int update(Statement statement) throws SQLException {
    PreparedStatement ps = (PreparedStatement) statement;
    // 执行更新
    ps.execute();
    // 获取更新的行数
    int rows = ps.getUpdateCount();
    // 获取参数对象
    Object parameterObject = boundSql.getParameterObject();
    // 获取键生成器
    KeyGenerator keyGenerator = mappedStatement.getKeyGenerator();
    // 后置处理器键,比如这里会针对 insert 语句,会设置插入之后的主键到参数对象上。
    keyGenerator.processAfter(executor, mappedStatement, ps, parameterObject);
    return rows;
  }

  @Override
  public void batch(Statement statement) throws SQLException {
    PreparedStatement ps = (PreparedStatement) statement;
    // 批量查询
    ps.addBatch();
  }

  @Override
  public <E> List<E> query(Statement statement, ResultHandler resultHandler) throws SQLException {
    PreparedStatement ps = (PreparedStatement) statement;
    // 执行查询
    ps.execute();
    // 通过结果集处理器处理结果
    return resultSetHandler.handleResultSets(ps);
  }

  @Override
  public <E> Cursor<E> queryCursor(Statement statement) throws SQLException {
    PreparedStatement ps = (PreparedStatement) statement;
    // 执行查询
    ps.execute();
    // 结果集处理器处理数据
    return resultSetHandler.handleCursorResultSets(ps);
  }

  /**
   * 初始化一个 Statement
   *
   * @param connection
   * @return
   * @throws SQLException
   */
  @Override
  protected Statement instantiateStatement(Connection connection) throws SQLException {
    String sql = boundSql.getSql();
    if (mappedStatement.getKeyGenerator() instanceof Jdbc3KeyGenerator) {
      String[] keyColumnNames = mappedStatement.getKeyColumns();
      if (keyColumnNames == null) {
        return connection.prepareStatement(sql, PreparedStatement.RETURN_GENERATED_KEYS);
      } else {
        return connection.prepareStatement(sql, keyColumnNames);
      }
    } else if (mappedStatement.getResultSetType() == ResultSetType.DEFAULT) {
      //
      return connection.prepareStatement(sql);
    } else {
      return connection.prepareStatement(sql, mappedStatement.getResultSetType().getValue(), ResultSet.CONCUR_READ_ONLY);
    }
  }

  @Override
  public void parameterize(Statement statement) throws SQLException {
    // 使用参数化对象进行设置参数
    parameterHandler.setParameters((PreparedStatement) statement);
  }

}
这个类就是实际真正执行目标 SQL 逻辑的类,它的一些方法逻辑:
- update() 方法中,会通过 PreparedStatement 执行 SQL,然后获取参数对象、键生成器,对参数进行后置处理;
- query()、queryCursor() 方法中,会通过 PreparedStatement 执行 SQL,然后通过结果集处理器对结果进行处理;
2.3.4 CachingExecutor 缓存执行器
接着该看 CachingExecutor 类了:
/**
 * 缓存执行器,装饰器模式,声明周期是一个 session
 *
 * @author Clinton Begin
 * @author Eduardo Macarron
 */
public class CachingExecutor implements Executor {

  /**
   * 委派的执行器
   */
  private final Executor delegate;

  /**
   * 事务缓存管理器
   */
  private final TransactionalCacheManager tcm = new TransactionalCacheManager();

  public CachingExecutor(Executor delegate) {
    this.delegate = delegate;
    delegate.setExecutorWrapper(this);
  }

  @Override
  public Transaction getTransaction() {
    return delegate.getTransaction();
  }

  @Override
  public void close(boolean forceRollback) {
    try {
      // issues #499, #524 and #573
      if (forceRollback) {
        tcm.rollback();
      } else {
        tcm.commit();
      }
    } finally {
      delegate.close(forceRollback);
    }
  }

  @Override
  public boolean isClosed() {
    return delegate.isClosed();
  }

  @Override
  public int update(MappedStatement ms, Object parameterObject) throws SQLException {
    flushCacheIfRequired(ms);
    return delegate.update(ms, parameterObject);
  }

  @Override
  public <E> Cursor<E> queryCursor(MappedStatement ms, Object parameter, RowBounds rowBounds) throws SQLException {
    flushCacheIfRequired(ms);
    return delegate.queryCursor(ms, parameter, rowBounds);
  }

  @Override
  public <E> List<E> query(MappedStatement ms, Object parameterObject, RowBounds rowBounds, ResultHandler resultHandler) throws SQLException {
    // 绑定 SQL
    BoundSql boundSql = ms.getBoundSql(parameterObject);
    // 构建缓存key
    CacheKey key = createCacheKey(ms, parameterObject, rowBounds, boundSql);
    return query(ms, parameterObject, rowBounds, resultHandler, key, boundSql);
  }

  @Override
  public <E> List<E> query(MappedStatement ms, Object parameterObject, RowBounds rowBounds, ResultHandler resultHandler, CacheKey key, BoundSql boundSql)
      throws SQLException {
    // 获取二级缓存配置,它是从解析 mapper.xml 和 mapper 接口的 @CacheNamespace 注解得出来的
    Cache cache = ms.getCache();
    if (cache != null) {
      // 是否需要刷新缓存
      flushCacheIfRequired(ms);
      if (ms.isUseCache() && resultHandler == null) {
        ensureNoOutParams(ms, boundSql);
        @SuppressWarnings("unchecked")
        List<E> list = (List<E>) tcm.getObject(cache, key);
        if (list == null) {
          list = delegate.query(ms, parameterObject, rowBounds, resultHandler, key, boundSql);
          // 缓存管理器,把缓存
          tcm.putObject(cache, key, list); // issue #578 and #116
        }
        return list;
      }
    }
    // 委派实际的 BaseExecutor 类型的查询
    return delegate.query(ms, parameterObject, rowBounds, resultHandler, key, boundSql);
  }

  @Override
  public List<BatchResult> flushStatements() throws SQLException {
    return delegate.flushStatements();
  }

  @Override
  public void commit(boolean required) throws SQLException {
    // 提交事务
    delegate.commit(required);
    // 事务缓存管理器提交
    tcm.commit();
  }

  @Override
  public void rollback(boolean required) throws SQLException {
    try {
      delegate.rollback(required);
    } finally {
      if (required) {
        tcm.rollback();
      }
    }
  }

  private void ensureNoOutParams(MappedStatement ms, BoundSql boundSql) {
    if (ms.getStatementType() == StatementType.CALLABLE) {
      for (ParameterMapping parameterMapping : boundSql.getParameterMappings()) {
        if (parameterMapping.getMode() != ParameterMode.IN) {
          throw new ExecutorException("Caching stored procedures with OUT params is not supported.  Please configure useCache=false in " + ms.getId() + " statement.");
        }
      }
    }
  }

  @Override
  public CacheKey createCacheKey(MappedStatement ms, Object parameterObject, RowBounds rowBounds, BoundSql boundSql) {
    return delegate.createCacheKey(ms, parameterObject, rowBounds, boundSql);
  }

  @Override
  public boolean isCached(MappedStatement ms, CacheKey key) {
    return delegate.isCached(ms, key);
  }

  @Override
  public void deferLoad(MappedStatement ms, MetaObject resultObject, String property, CacheKey key, Class<?> targetType) {
    delegate.deferLoad(ms, resultObject, property, key, targetType);
  }

  @Override
  public void clearLocalCache() {
    delegate.clearLocalCache();
  }

  private void flushCacheIfRequired(MappedStatement ms) {
    Cache cache = ms.getCache();
    if (cache != null && ms.isFlushCacheRequired()) {
      // 查询之前,先清空二级缓存
      tcm.clear(cache);
    }
  }

  @Override
  public void setExecutorWrapper(Executor executor) {
    throw new UnsupportedOperationException("This method should not be called");
  }

}
这个类是一个 Executor 的装饰器类,主要提供了二级缓存功能。它在查询数据、更新数据、提交、回滚操作时,会对二级缓存进行处理。
它的查询数据逻辑:
- 构建一个 CacheKey 类型的缓存 key;
- 从 MappedStatement 中获取二级缓存 Cache;
- 如果 cache 为空,则执行实际的委派执行器执行查询数据;
- 如果 cache 不为空,则先判断是否需要刷新缓存,如果需要刷新则通过 TransactionalCacheManager 清除缓存;然后从 TransactionalCacheManager 对象中获取 key 对应的二级缓存数据,缓存数据不为空直接返回,否则就继续执行实际委派执行器查询数据,然后把数据缓存到二级缓存中。
- 最后返回数据。
2.3.4.1 TransactionalCacheManager 事务缓存管理器
看下 TransactionalCacheManager 的实现:
public class TransactionalCacheManager {

  private final Map<Cache, TransactionalCache> transactionalCaches = new HashMap<>();

  public void clear(Cache cache) {
    getTransactionalCache(cache).clear();
  }

  public Object getObject(Cache cache, CacheKey key) {
    return getTransactionalCache(cache).getObject(key);
  }

  public void putObject(Cache cache, CacheKey key, Object value) {
    // 获取 cache 对应的 TransactionalCache,然后把 key 和 value 存入
    getTransactionalCache(cache).putObject(key, value);
  }

  public void commit() {
    // 遍历事务缓存
    for (TransactionalCache txCache : transactionalCaches.values()) {
      // 提交事务
      txCache.commit();
    }
  }

  public void rollback() {
    for (TransactionalCache txCache : transactionalCaches.values()) {
      txCache.rollback();
    }
  }

  private TransactionalCache getTransactionalCache(Cache cache) {
    // 如果 transactionalCaches 中的 cache 键没有对应的数据,则创建 TransactionalCache 对象
    // 把 cache 对象当做 TransactionalCache 构造器的参数传入
    return transactionalCaches.computeIfAbsent(cache, TransactionalCache::new);
  }

}
这个类持有一个 key 是 Cache 类型,value 为 TransactionalCache 类型的 HashMap 类型属性 transactionalCaches,来保存事务缓存数据。
它的 getTransactionalCache() 方法中,参数 cache 是外部传入的二级缓存,当 transactionalCaches 没有这个 cache 对应的 value 时,就创建一个 TransactionalCache 类,并且把 cache 作为参数传入它的构造器中,保存起来。
它的结构为:

TransactionalCacheManager 这个个在保存缓存数据时,会调用 TransactionalCache 的 putObject() 方法,在提交事务、回滚事务的时候,会调用 TransactionalCache 的 commit() 和 rollback() 方法。
2.3.4.2 TransactionalCache 事务缓存
我们详细看下这个类。还记得上面 2.2.2 中我们讲过的缓存装饰器吗?没错这里又看见了一个缓存装饰器 TransactionalCache,它是实现如下:
/**
 * The 2nd level cache transactional buffer.
 * <p>
 * This class holds all cache entries that are to be added to the 2nd level cache during a Session.
 * Entries are sent to the cache when commit is called or discarded if the Session is rolled back.
 * Blocking cache support has been added. Therefore any get() that returns a cache miss
 * will be followed by a put() so any lock associated with the key can be released.
 *
 * @author Clinton Begin
 * @author Eduardo Macarron
 */
public class TransactionalCache implements Cache {

  private static final Log log = LogFactory.getLog(TransactionalCache.class);

  private final Cache delegate;
  private boolean clearOnCommit;

  /**
   * 事务未提交前的保存的缓存数据
   */
  private final Map<Object, Object> entriesToAddOnCommit;

  /**
   * 事务未提交前未命中的缓存数据
   */
  private final Set<Object> entriesMissedInCache;

  public TransactionalCache(Cache delegate) {
    this.delegate = delegate;
    this.clearOnCommit = false;
    this.entriesToAddOnCommit = new HashMap<>();
    this.entriesMissedInCache = new HashSet<>();
  }

  @Override
  public String getId() {
    return delegate.getId();
  }

  @Override
  public int getSize() {
    return delegate.getSize();
  }

  @Override
  public Object getObject(Object key) {
    // issue #116
    Object object = delegate.getObject(key);
    if (object == null) {
      entriesMissedInCache.add(key);
    }
    // issue #146
    if (clearOnCommit) {
      return null;
    } else {
      return object;
    }
  }

  @Override
  public void putObject(Object key, Object object) {
    // 把数据先临时保存起来
    entriesToAddOnCommit.put(key, object);
  }

  @Override
  public Object removeObject(Object key) {
    return null;
  }

  @Override
  public void clear() {
    clearOnCommit = true;
    entriesToAddOnCommit.clear();
  }

  public void commit() {
    if (clearOnCommit) {
      // 提交的时候清理二级缓存
      delegate.clear();
    }
    // 提交的时候,刷新查询的数据,用于保存到二级缓存中
    flushPendingEntries();
    reset();
  }

  public void rollback() {
    // 回滚时解析未命中的数据
    unlockMissedEntries();
    reset();
  }

  private void reset() {
    clearOnCommit = false;
    entriesToAddOnCommit.clear();
    entriesMissedInCache.clear();
  }

  private void flushPendingEntries() {
    // 提交的时候,把临时保存的数据,真正放入二级缓存中
    for (Map.Entry<Object, Object> entry : entriesToAddOnCommit.entrySet()) {
      delegate.putObject(entry.getKey(), entry.getValue());
    }
    for (Object entry : entriesMissedInCache) {
      if (!entriesToAddOnCommit.containsKey(entry)) {
        delegate.putObject(entry, null);
      }
    }
  }

  private void unlockMissedEntries() {
    // 移除未命中的数据
    for (Object entry : entriesMissedInCache) {
      try {
        delegate.removeObject(entry);
      } catch (Exception e) {
        log.warn("Unexpected exception while notifiying a rollback to the cache adapter. "
            + "Consider upgrading your cache adapter to the latest version. Cause: " + e);
      }
    }
  }

}
这个类它也是有持有一个实际的委派的缓存,它默认是我们在 2.2.2 节中讲到的 SynchronizedCache 装饰过的二级缓存。
这个类还有个两个属性:Map<Object, Object> entriesToAddOnCommit 和 Set<Object> entriesMissedInCache,它们的作用是在 session 事务没有提交之前,临时保存缓存数据,等待真正的事务提交 commit() 时才会把缓存同步到二级缓存中,在回滚 rollback() 等时会清除未命中的缓存。
我们通过在它的 getObject() 方法中打断点,可以得到如下所示的结论。它是一个缓存装饰器,一层层的包装。

注意了 TransactionalCache 的声明周期不与委派的二级缓存一样,它是和一个 SqlSession 的声明一样的。而委派的二级缓存是和应用程序的生命周期一样的。
2.3.5 应用插件 interceptorChain.pluginAll()
我们再看下为执行器应用插件的逻辑 interceptorChain.pluginAll(executor):
public class InterceptorChain {

  private final List<Interceptor> interceptors = new ArrayList<>();

  public Object pluginAll(Object target) {
    for (Interceptor interceptor : interceptors) {
      target = interceptor.plugin(target);
    }
    return target;
  }

  public void addInterceptor(Interceptor interceptor) {
    interceptors.add(interceptor);
  }

  public List<Interceptor> getInterceptors() {
    return Collections.unmodifiableList(interceptors);
  }

}
这里会遍历所有的实现了 Interceptor 接口的拦截器类,调用它们的 plugin() 方法,对目标类进行拦截。实际上拦截器的调用一共有四个地方:

分别是:
- 创建 ParameterHandler 参数处理器时的拦截;
- 创建 ResultSetHandler 结果集处理器的拦截;
- 创建 StatementHandler 的拦截;
- 创建 Executor 的拦截。
我们可以实现自己的拦截器,根据自己的需求针对这四种类型进行拦截调用。比如可以针对 ParameterHandler 类型进行拦截,实现自动查询增加分页 SQL 的功能等等。
2.3.5 创建 DefaultSqlSession
最后一步是根据已经创建好的 Executor 和 Configuration 来创建一个 DefaultSqlSession 实例。
public class DefaultSqlSession implements SqlSession {

  private final Configuration configuration;
  private final Executor executor;

  private final boolean autoCommit;
  private boolean dirty;
  private List<Cursor<?>> cursorList;

  public DefaultSqlSession(Configuration configuration, Executor executor, boolean autoCommit) {
    this.configuration = configuration;
    this.executor = executor;
    this.dirty = false;
    this.autoCommit = autoCommit;
  }

  public DefaultSqlSession(Configuration configuration, Executor executor) {
    this(configuration, executor, false);
  }

  @Override
  public <T> T selectOne(String statement) {
    return this.selectOne(statement, null);
  }

  @Override
  public <T> T selectOne(String statement, Object parameter) {
    // Popular vote was to return null on 0 results and throw exception on too many.
    List<T> list = this.selectList(statement, parameter);
    if (list.size() == 1) {
      return list.get(0);
    } else if (list.size() > 1) {
      throw new TooManyResultsException("Expected one result (or null) to be returned by selectOne(), but found: " + list.size());
    } else {
      return null;
    }
  }

  @Override
  public <K, V> Map<K, V> selectMap(String statement, String mapKey) {
    return this.selectMap(statement, null, mapKey, RowBounds.DEFAULT);
  }

  @Override
  public <K, V> Map<K, V> selectMap(String statement, Object parameter, String mapKey) {
    return this.selectMap(statement, parameter, mapKey, RowBounds.DEFAULT);
  }

  @Override
  public <K, V> Map<K, V> selectMap(String statement, Object parameter, String mapKey, RowBounds rowBounds) {
    final List<? extends V> list = selectList(statement, parameter, rowBounds);
    final DefaultMapResultHandler<K, V> mapResultHandler = new DefaultMapResultHandler<>(mapKey,
            configuration.getObjectFactory(), configuration.getObjectWrapperFactory(), configuration.getReflectorFactory());
    final DefaultResultContext<V> context = new DefaultResultContext<>();
    for (V o : list) {
      context.nextResultObject(o);
      mapResultHandler.handleResult(context);
    }
    return mapResultHandler.getMappedResults();
  }

  @Override
  public <T> Cursor<T> selectCursor(String statement) {
    return selectCursor(statement, null);
  }

  @Override
  public <T> Cursor<T> selectCursor(String statement, Object parameter) {
    return selectCursor(statement, parameter, RowBounds.DEFAULT);
  }

  @Override
  public <T> Cursor<T> selectCursor(String statement, Object parameter, RowBounds rowBounds) {
    try {
      MappedStatement ms = configuration.getMappedStatement(statement);
      Cursor<T> cursor = executor.queryCursor(ms, wrapCollection(parameter), rowBounds);
      registerCursor(cursor);
      return cursor;
    } catch (Exception e) {
      throw ExceptionFactory.wrapException("Error querying database.  Cause: " + e, e);
    } finally {
      ErrorContext.instance().reset();
    }
  }

  @Override
  public <E> List<E> selectList(String statement) {
    return this.selectList(statement, null);
  }

  @Override
  public <E> List<E> selectList(String statement, Object parameter) {
    return this.selectList(statement, parameter, RowBounds.DEFAULT);
  }

  @Override
  public <E> List<E> selectList(String statement, Object parameter, RowBounds rowBounds) {
    try {
      // 从配置类中获取映射声明对象
      // MappedStatement 声明周期很长,随着容器的关闭而关闭
      MappedStatement ms = configuration.getMappedStatement(statement);
      // 查询数据
      return executor.query(ms, wrapCollection(parameter), rowBounds, Executor.NO_RESULT_HANDLER);
    } catch (Exception e) {
      throw ExceptionFactory.wrapException("Error querying database.  Cause: " + e, e);
    } finally {
      ErrorContext.instance().reset();
    }
  }

  @Override
  public void select(String statement, Object parameter, ResultHandler handler) {
    select(statement, parameter, RowBounds.DEFAULT, handler);
  }

  @Override
  public void select(String statement, ResultHandler handler) {
    select(statement, null, RowBounds.DEFAULT, handler);
  }

  @Override
  public void select(String statement, Object parameter, RowBounds rowBounds, ResultHandler handler) {
    try {
      MappedStatement ms = configuration.getMappedStatement(statement);
      executor.query(ms, wrapCollection(parameter), rowBounds, handler);
    } catch (Exception e) {
      throw ExceptionFactory.wrapException("Error querying database.  Cause: " + e, e);
    } finally {
      ErrorContext.instance().reset();
    }
  }

  @Override
  public int insert(String statement) {
    return insert(statement, null);
  }

  @Override
  public int insert(String statement, Object parameter) {
    return update(statement, parameter);
  }

  @Override
  public int update(String statement) {
    return update(statement, null);
  }

  @Override
  public int update(String statement, Object parameter) {
    try {
      dirty = true;
      MappedStatement ms = configuration.getMappedStatement(statement);
      return executor.update(ms, wrapCollection(parameter));
    } catch (Exception e) {
      throw ExceptionFactory.wrapException("Error updating database.  Cause: " + e, e);
    } finally {
      ErrorContext.instance().reset();
    }
  }

  @Override
  public int delete(String statement) {
    return update(statement, null);
  }

  @Override
  public int delete(String statement, Object parameter) {
    return update(statement, parameter);
  }

  @Override
  public void commit() {
    commit(false);
  }

  @Override
  public void commit(boolean force) {
    try {
      executor.commit(isCommitOrRollbackRequired(force));
      dirty = false;
    } catch (Exception e) {
      throw ExceptionFactory.wrapException("Error committing transaction.  Cause: " + e, e);
    } finally {
      ErrorContext.instance().reset();
    }
  }

  @Override
  public void rollback() {
    rollback(false);
  }

  @Override
  public void rollback(boolean force) {
    try {
      executor.rollback(isCommitOrRollbackRequired(force));
      dirty = false;
    } catch (Exception e) {
      throw ExceptionFactory.wrapException("Error rolling back transaction.  Cause: " + e, e);
    } finally {
      ErrorContext.instance().reset();
    }
  }

  @Override
  public List<BatchResult> flushStatements() {
    try {
      return executor.flushStatements();
    } catch (Exception e) {
      throw ExceptionFactory.wrapException("Error flushing statements.  Cause: " + e, e);
    } finally {
      ErrorContext.instance().reset();
    }
  }

  @Override
  public void close() {
    try {
      executor.close(isCommitOrRollbackRequired(false));
      closeCursors();
      dirty = false;
    } finally {
      ErrorContext.instance().reset();
    }
  }

  private void closeCursors() {
    if (cursorList != null && !cursorList.isEmpty()) {
      for (Cursor<?> cursor : cursorList) {
        try {
          cursor.close();
        } catch (IOException e) {
          throw ExceptionFactory.wrapException("Error closing cursor.  Cause: " + e, e);
        }
      }
      cursorList.clear();
    }
  }

  @Override
  public Configuration getConfiguration() {
    return configuration;
  }

  @Override
  public <T> T getMapper(Class<T> type) {
    return configuration.getMapper(type, this);
  }

  @Override
  public Connection getConnection() {
    try {
      return executor.getTransaction().getConnection();
    } catch (SQLException e) {
      throw ExceptionFactory.wrapException("Error getting a new connection.  Cause: " + e, e);
    }
  }

  @Override
  public void clearCache() {
    executor.clearLocalCache();
  }

  private <T> void registerCursor(Cursor<T> cursor) {
    if (cursorList == null) {
      cursorList = new ArrayList<>();
    }
    cursorList.add(cursor);
  }

  private boolean isCommitOrRollbackRequired(boolean force) {
    return (!autoCommit && dirty) || force;
  }

  private Object wrapCollection(final Object object) {
    return ParamNameResolver.wrapToMapIfCollection(object, null);
  }

  /**
   * @deprecated Since 3.5.5
   */
  @Deprecated
  public static class StrictMap<V> extends HashMap<String, V> {

    private static final long serialVersionUID = -5741767162221585340L;

    @Override
    public V get(Object key) {
      if (!super.containsKey(key)) {
        throw new BindingException("Parameter ''" + key + "'' not found. Available parameters are " + this.keySet());
      }
      return super.get(key);
    }

  }

}
这个类实现了 SqlSession 接口的增删改查方法,最终还是委派 Executor 去执行。
2.4 通过 SqlSession 获取映射接口执行目标方法
接下来,该看通过创建好的 SqlSession 来获取映射接口执行目标方法的流程了。
// 通过 SqlSession 获取映射接口
AutoConstructorMapper mapper = sqlSession.getMapper(AutoConstructorMapper.class);
// 执行目标方法
PrimitiveSubject ps1 = mapper.selectOneById(999);
从上面的分析,我们知道了 sqlSession 是 DefaultSqlSession 类型,它的 getMapper() 方法,我们在 2.3.5 中看到了它的实现,org.apache.ibatis.session.defaults.DefaultSqlSession#getMapper:
  @Override
  public <T> T getMapper(Class<T> type) {
    return configuration.getMapper(type, this);
  }
它会通过配置类 Configuration 根据类型获取对应的 Mapper 类型,org.apache.ibatis.session.Configuration#getMapper:
  public <T> T getMapper(Class<T> type, SqlSession sqlSession) {
    return mapperRegistry.getMapper(type, sqlSession);
  }
最后再调用 MapperRegistry 实例的 getMapper() 方法,org.apache.ibatis.binding.MapperRegistry#getMapper:
  /**
   * 获取映射器
   *
   * @param type
   * @param sqlSession
   * @param <T>
   * @return
   */
  @SuppressWarnings("unchecked")
  public <T> T getMapper(Class<T> type, SqlSession sqlSession) {
    final MapperProxyFactory<T> mapperProxyFactory = (MapperProxyFactory<T>) knownMappers.get(type);
    if (mapperProxyFactory == null) {
      throw new BindingException("Type " + type + " is not known to the MapperRegistry.");
    }
    try {
      // 映射器代理工厂获取代理对象
      return mapperProxyFactory.newInstance(sqlSession);
    } catch (Exception e) {
      throw new BindingException("Error getting mapper instance. Cause: " + e, e);
    }
  }
看到这里,我们就就比较熟悉了,在 2.2.4 节中讲了解析 mapper.xml 文件时,会根据 xml 中的命名空间来注册对应的 mapper 接口,会以一个 key 为目标接口类型,value 为 MapperProxyFactory 实例的形式保存到一个 HashMap 实例中。
这里就是获取除了目标类型对应的 MapperProxyFactory 类型,然后调用它的 newInstance() 方法,通过 JDK 动态代理创建代理实例类。
最后,用这个代理对象来执行目标方法。
2.4.1 查询非缓存数据流程
我们在 org.apache.ibatis.executor.statement.PreparedStatementHandler#query 方法处,打个端点看下它的方法调用栈信息:
// 调用 PreparedStatementHandler 的 query 方法
query(Statement, ResultHandler):71, PreparedStatementHandler (org.apache.ibatis.executor.statement), PreparedStatementHandler.java

// 调用 RoutingStatementHandler 的 query 方法
query(Statement, ResultHandler):82, RoutingStatementHandler (org.apache.ibatis.executor.statement), RoutingStatementHandler.java

// 调用 SimpleExecutor 的 doQuery() 方法
doQuery(MappedStatement, Object, RowBounds, ResultHandler, BoundSql):69, SimpleExecutor (org.apache.ibatis.executor), SimpleExecutor.java

// 调用 BaseExecutor 的 queryFromDatabase() 方法
queryFromDatabase(MappedStatement, Object, RowBounds, ResultHandler, CacheKey, BoundSql):381, BaseExecutor (org.apache.ibatis.executor), BaseExecutor.java

// 调用 CachingExecutor 的 query() 方法
query(MappedStatement, Object, RowBounds, ResultHandler, CacheKey, BoundSql):173, BaseExecutor (org.apache.ibatis.executor), BaseExecutor.java
query(MappedStatement, Object, RowBounds, ResultHandler, CacheKey, BoundSql):116, CachingExecutor (org.apache.ibatis.executor), CachingExecutor.java
query(MappedStatement, Object, RowBounds, ResultHandler):100, CachingExecutor (org.apache.ibatis.executor), CachingExecutor.java

// 调用 DefaultSqlSession 的 select() 方法
selectList(String, Object, RowBounds):151, DefaultSqlSession (org.apache.ibatis.session.defaults), DefaultSqlSession.java
selectList(String, Object):141, DefaultSqlSession (org.apache.ibatis.session.defaults), DefaultSqlSession.java
selectOne(String, Object):77, DefaultSqlSession (org.apache.ibatis.session.defaults), DefaultSqlSession.java

// 调用 MapperMethod 类的 execute() 方法
execute(SqlSession, Object[]):105, MapperMethod (org.apache.ibatis.binding), MapperMethod.java

// 调用 MapperProxy 类的 invoke() 方法
invoke(Object, Method, Object[], SqlSession):183, MapperProxy$PlainMethodInvoker (org.apache.ibatis.binding), MapperProxy.java
invoke(Object, Method, Object[]):101, MapperProxy (org.apache.ibatis.binding), MapperProxy.java

// 调用 JDK 动态代理类的 selectOneById() 方法
selectOneById(int):-1, $Proxy15 (com.sun.proxy), Unknown Source

// 单元测试类的查询方法
testSelectOneById():129, AutoConstructorTest (org.apache.ibatis.autoconstructor), AutoConstructorTest.java
...省略无关栈信息...
它的时序图:

sequenceDiagram
# 单元测试入口
AutoConstructorTest->>AutoConstructorTest:testSelectOneById() 单元测试方法
AutoConstructorTest->>$Proxy15:selectOneById()
# JDK代理对象
$Proxy15->>MapperProxy:invoke() 执行
# 代理查询
MapperProxy->>PlainMethodInvoker:invoke()
PlainMethodInvoker->>MapperMethod:execute()
# 委派 DefaultSqlSession
MapperMethod->>DefaultSqlSession:selectOne()
DefaultSqlSession->>DefaultSqlSession:selectList()
# 委派 CachingExecutor
DefaultSqlSession->>CachingExecutor:query()
CachingExecutor->>CachingExecutor:query()
# BaseExecutor
CachingExecutor->>BaseExecutor:query()
BaseExecutor->>BaseExecutor:queryFromDatabase()
BaseExecutor->>SimpleExecutor:doQuery()
# RoutingStatementHandler
SimpleExecutor->>RoutingStatementHandler:query()
RoutingStatementHandler->>PreparedStatementHandler:query()
2.4.2 二级缓存调用流程
我们再在查询二级缓逻辑处打断点,看下它的调用栈信息:
// 调用 PerpetualCache 的 getObject() 方法
getObject(Object):59, PerpetualCache (org.apache.ibatis.cache.impl), PerpetualCache.java

// 调用 LruCache 的 getObject() 方法
getObject(Object):75, LruCache (org.apache.ibatis.cache.decorators), LruCache.java

// 调用 SerializedCache 的 getObject() 方法
getObject(Object):63, SerializedCache (org.apache.ibatis.cache.decorators), SerializedCache.java

// 调用 LoggingCache 的 getObject() 方法
getObject(Object):55, LoggingCache (org.apache.ibatis.cache.decorators), LoggingCache.java

// 调用 SynchronizedCache 的 getObject() 方法
getObject(Object):48, SynchronizedCache (org.apache.ibatis.cache.decorators), SynchronizedCache.java

// 调用 TransactionalCache 的 getObject() 方法
getObject(Object):75, TransactionalCache (org.apache.ibatis.cache.decorators), TransactionalCache.java

// 调用 TransactionalCacheManager 的 getObject() 方法
getObject(Cache, CacheKey):35, TransactionalCacheManager (org.apache.ibatis.cache), TransactionalCacheManager.java

// 调用 CachingExecutor 的 query() 方法
query(MappedStatement, Object, RowBounds, ResultHandler, CacheKey, BoundSql):114, CachingExecutor (org.apache.ibatis.executor), CachingExecutor.java
query(MappedStatement, Object, RowBounds, ResultHandler):100, CachingExecutor (org.apache.ibatis.executor), CachingExecutor.java

// 调用 DefaultSqlSession 的 selectList() 方法
selectList(String, Object, RowBounds):151, DefaultSqlSession (org.apache.ibatis.session.defaults), DefaultSqlSession.java
selectList(String, Object):141, DefaultSqlSession (org.apache.ibatis.session.defaults), DefaultSqlSession.java

// 调用 DefaultSqlSession 的 selectOne() 方法
selectOne(String, Object):77, DefaultSqlSession (org.apache.ibatis.session.defaults), DefaultSqlSession.java

// 调用 MapperMethod 的 execute() 方法
execute(SqlSession, Object[]):105, MapperMethod (org.apache.ibatis.binding), MapperMethod.java

// 调用 PlainMethodInvoker 的 invoke() 方法
invoke(Object, Method, Object[], SqlSession):183, MapperProxy$PlainMethodInvoker (org.apache.ibatis.binding), MapperProxy.java

// 调用 MapperProxy 的 invoke() 方法
invoke(Object, Method, Object[]):101, MapperProxy (org.apache.ibatis.binding), MapperProxy.java

// 调用代理对象的 selectOneById() 方法
selectOneById(int):-1, $Proxy15 (com.sun.proxy), Unknown Source

// 单元测试类的方法
testSelectOneById():129, AutoConstructorTest (org.apache.ibatis.autoconstructor), AutoConstructorTest.java
...省略无关栈信息...
画出二级缓存调用的时序图:

sequenceDiagram
# 单元测试入口
AutoConstructorTest->>AutoConstructorTest:testSelectOneById() 单元测试方法
AutoConstructorTest->>$Proxy15:selectOneById()

# JDK代理对象
$Proxy15->>MapperProxy:invoke() 执行

# 代理查询
MapperProxy->>PlainMethodInvoker:invoke()
PlainMethodInvoker->>MapperMethod:execute()

# 委派 DefaultSqlSession
MapperMethod->>DefaultSqlSession:selectOne()
DefaultSqlSession->>DefaultSqlSession:selectList()

# 委派 CachingExecutor
DefaultSqlSession->>CachingExecutor:query()
CachingExecutor->>CachingExecutor:query()

# 事务缓存管理器
CachingExecutor->>TransactionalCacheManager:getObject()
# 事务缓存装饰器
TransactionalCacheManager->>TransactionalCache:getObject()
# 同步缓存装饰器
TransactionalCache->>SynchronizedCache:getObject()
# 日志缓存装饰器
SynchronizedCache->>LoggingCache:getObject()
# 序列化装饰器
LoggingCache->>SerializedCache:getObject()
# Lru 缓存装饰器
SerializedCache->>LruCache:getObject()
# 实际的缓存
LruCache->>PerpetualCache:getObject()
这里的调用逻辑中,二级缓存的调用链可以配合着 2.2.2.9 的缓存小结图来阅读。
3. 总结回顾
现在我们已经把 mybatis 的主要的核心流程源码分析完了,这里会发现它的源码要比 spring 的源码结构更加结构化,层次分明,更容易阅读。
总结下上面的主要内容,我们主要从以下几个方面对源码进行了分析:
- 解析 mybatis-config.xml 文件,构建 Configuration 配置类信息流程;
- 解析 mapper.xml 进行构建缓存、映射声明等流程;
- 创建 SqlSession 流程;
- 通过 SqlSession 获取 mapper 接口执行目标方法流程。
mybatis 的项目翻译代码已经上传到我的 GitHub 上了。

spring aop 源码核心流程分析
今天我们来看下 spring aop 模块的核心流程。
1. 简单的 spring aop 例子
先看一个 aop 例子。如下代码,先定义一个切面
package example.scannable;

import org.aspectj.lang.JoinPoint;
import org.aspectj.lang.annotation.*;
import org.springframework.stereotype.Component;

import java.util.Arrays;

/**
 * 打印日志的切面
 */
@Component
@Aspect
public class MyLogAspect {

	@Pointcut("execution(* example.scannable.MyLogService.*(..))")
	public void pointCut() {
	}

	/**
	 * 方法前置通知
	 *
	 * @param joinPoint
	 */
	@Before(value = "pointCut()")
	public void methodBefore(JoinPoint joinPoint) {
		String methodName = joinPoint.getSignature().getName();
		System.out.println(
				"执行目标方法【" + methodName + "】之前执行<前置通知>,入参" + Arrays.asList(joinPoint.getArgs()));
	}

	/**
	 * 方法后置通知
	 *
	 * @param joinPoint
	 */
	@After(value = "pointCut()")
	public void methodAfter(JoinPoint joinPoint) {
		String methodName = joinPoint.getSignature().getName();
		System.out.println(
				"执行目标方法【" + methodName + "】之前执行<后置通知>,入参" + Arrays.asList(joinPoint.getArgs()));
	}

	/**
	 * 方法返回通知
	 *
	 * @param joinPoint
	 */
	@AfterReturning(value = "pointCut()")
	public void methodReturning(JoinPoint joinPoint) {
		String methodName = joinPoint.getSignature().getName();
		System.out.println(
				"执行目标方法【" + methodName + "】之前执行<返回通知>,入参" + Arrays.asList(joinPoint.getArgs()));
	}

	/**
	 * 方法异常通知
	 *
	 * @param joinPoint
	 */
	@AfterThrowing(value = "pointCut()")
	public void methodAfterThrowing(JoinPoint joinPoint) {
		String methodName = joinPoint.getSignature().getName();
		System.out.println(
				"执行目标方法【" + methodName + "】之前执行<异常通知>,入参" + Arrays.asList(joinPoint.getArgs()));

	}

}
这是一个自定义的切面,创建了方法切点、方法前置通知、方法后置通知、方法返回通知、方法异常通知。
我们再创建一个基础的 service:
package example.scannable;

import org.springframework.stereotype.Service;

public interface MyLogService {

	String sayHello(String name);

}
package example.scannable;

import org.springframework.stereotype.Service;

@Service
public class MyLogServiceImpl implements MyLogService {

	@Override
	public String sayHello(String name) {
		String result = "hello " + name + "!";
		System.out.println(result);
		return result;
	}

}
这是一个基础的类,它有一个方法,打印一个字符串,并返回参数。
我们再创建单元测试启动类:
public class EnableAspectJAutoProxyTests {

  @Test
	public void withJdkProxy() {
		ApplicationContext ctx = new AnnotationConfigApplicationContext(ConfigWithJdkProxy.class);

		MyLogService fooService = ctx.getBean(MyLogService.class);

		fooService.sayHello("spring");

	}

	@ComponentScan("example.scannable")
	@EnableAspectJAutoProxy
	static class ConfigWithJdkProxy {
	}


}
执行结果如下:
执行目标方法【sayHello】之前执行<前置通知>,入参[spring]
hello spring!
执行目标方法【sayHello】之前执行<返回通知>,入参[spring]
执行目标方法【sayHello】之前执行<后置通知>,入参[spring]
可以看到在执行 MyLogService 类的 sayHello 方法的前后,执行了切面类中的各个方法。
这个是一个 spring aop 切面的基本用法。
那它是如何做到的呢?下面我们进入 spring aop 模块的源代码中一探究竟!
2. EnableAspectJAutoProxy 注解
可以看到我们的配置类上使用了 @EnableAspectJAutoProxy 注解,它目就启动了 aop 的切面功能。它是怎么做到呢?我看看它的源代码:
@Target(ElementType.TYPE)
@Retention(RetentionPolicy.RUNTIME)
@Documented
@Import(AspectJAutoProxyRegistrar.class)
public @interface EnableAspectJAutoProxy {

	/**
	 * 指示是否基于标准 Java 接口代理相反的,创建基于子类的 CGLIB 代理。默认是 false
	 *
	 * Indicate whether subclass-based (CGLIB) proxies are to be created as opposed
	 * to standard Java interface-based proxies. The default is {@code false}.
	 */
	boolean proxyTargetClass() default false;

	/**
	 * 表明代理对象应该通过 AOP 框架以一个从线程本地化来恢复 AopContext 类变量的方式被暴露出来。
	 * 默认情况下是关闭的,即,不保证 AopContext 访问能正常工作。
	 *
	 * Indicate that the proxy should be exposed by the AOP framework as a {@code ThreadLocal}
	 * for retrieval via the {@link org.springframework.aop.framework.AopContext} class.
	 * Off by default, i.e. no guarantees that {@code AopContext} access will work.
	 * @since 4.3.1
	 */
	boolean exposeProxy() default false;

}
这个类上边又使用了 @Import (AspectJAutoProxyRegistrar.class) ,它是把 AspectJAutoProxyRegistrar 类导入到了 spring 容器中。继续看它的源代码:
package org.springframework.context.annotation;

import org.springframework.aop.config.AopConfigUtils;
import org.springframework.beans.factory.support.BeanDefinitionRegistry;
import org.springframework.core.annotation.AnnotationAttributes;
import org.springframework.core.type.AnnotationMetadata;

/**
 * Registers an {@link org.springframework.aop.aspectj.annotation.AnnotationAwareAspectJAutoProxyCreator
 * AnnotationAwareAspectJAutoProxyCreator} against the current {@link BeanDefinitionRegistry}
 * as appropriate based on a given @{@link EnableAspectJAutoProxy} annotation.
 *
 * @author Chris Beams
 * @author Juergen Hoeller
 * @since 3.1
 * @see EnableAspectJAutoProxy
 */
class AspectJAutoProxyRegistrar implements ImportBeanDefinitionRegistrar {

	/**
	 * Register, escalate, and configure the AspectJ auto proxy creator based on the value
	 * of the @{@link EnableAspectJAutoProxy#proxyTargetClass()} attribute on the importing
	 * {@code @Configuration} class.
	 */
	@Override
	public void registerBeanDefinitions(
			AnnotationMetadata importingClassMetadata, BeanDefinitionRegistry registry) {

		// 注册一个 AnnotationAwareAspectJAutoProxyCreator 类到 bean 工厂
		AopConfigUtils.registerAspectJAnnotationAutoProxyCreatorIfNecessary(registry);

		// 解析 EnableAspectJAutoProxy 类注解
		AnnotationAttributes enableAspectJAutoProxy =
				AnnotationConfigUtils.attributesFor(importingClassMetadata, EnableAspectJAutoProxy.class);
		if (enableAspectJAutoProxy != null) {
			if (enableAspectJAutoProxy.getBoolean("proxyTargetClass")) {
				// 强制使用 CGLIB 代理
				AopConfigUtils.forceAutoProxyCreatorToUseClassProxying(registry);
			}
			if (enableAspectJAutoProxy.getBoolean("exposeProxy")) {
				// 强制暴露代理对象
				AopConfigUtils.forceAutoProxyCreatorToExposeProxy(registry);
			}
		}
	}

}
我们发现,这个类是 ImportBeanDefinitionRegistrar 类型,即导入 bean 定义注册器,看下它的类图:
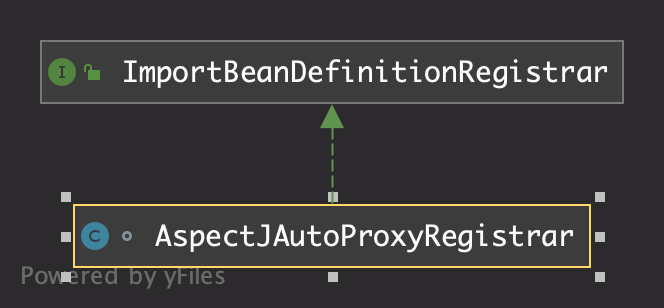
我在上一篇文章 spring ioc 容器核心流程分析中,讲过这个类型,它是在 spring 容器 的 refresh () 刷新方法中的 invokeBeanFactoryPostProcessors () 方法中执行的,它是通过调用 org.springframework.context.annotation.ConfigurationClassPostProcessor 的 postProcessBeanDefinitionRegistry () 方法执行处理 bean 定义注册器,最后调用到 org.springframework.context.annotation.ConfigurationClassPostProcessor 类的 postProcessBeanDefinitionRegistry () 方法中,接着,通过创建 ConfigurationClassParser 类,解析 @Configuration 类,最终处理 @Import 注解时,判断 bean 的类型是否为 ImportBeanDefinitionRegistrar 类型(即 AspectJAutoProxyRegistrar 类),然后实例化它并且保存到配置类 ConfigurationClass 上,最后再通过 ConfigurationClassBeanDefinitionReader 类型,配置类 bean 定义读取器,去执行配置类中的导入 bean 注册器的 registerBeanDefinitions () 方法。
这个方法中最主要的是 AopConfigUtils.registerAspectJAnnotationAutoProxyCreatorIfNecessary (registry); 方法,看它的名字应该可以猜测到,它是往容器中注册一个切面注解自动代理创建器。
	@Nullable
	public static BeanDefinition registerAspectJAnnotationAutoProxyCreatorIfNecessary(BeanDefinitionRegistry registry) {
		// 创建一个切面注解自动代理创建器
		return registerAspectJAnnotationAutoProxyCreatorIfNecessary(registry, null);
	}

	@Nullable
	public static BeanDefinition registerAspectJAnnotationAutoProxyCreatorIfNecessary(
			BeanDefinitionRegistry registry, @Nullable Object source) {
		// 注册一个 AnnotationAwareAspectJAutoProxyCreator 类
		return registerOrEscalateApcAsRequired(AnnotationAwareAspectJAutoProxyCreator.class, registry, source);
	}
果然,就是注册了一个 AnnotationAwareAspectJAutoProxyCreator 类到容器中。同样看下它的类图:
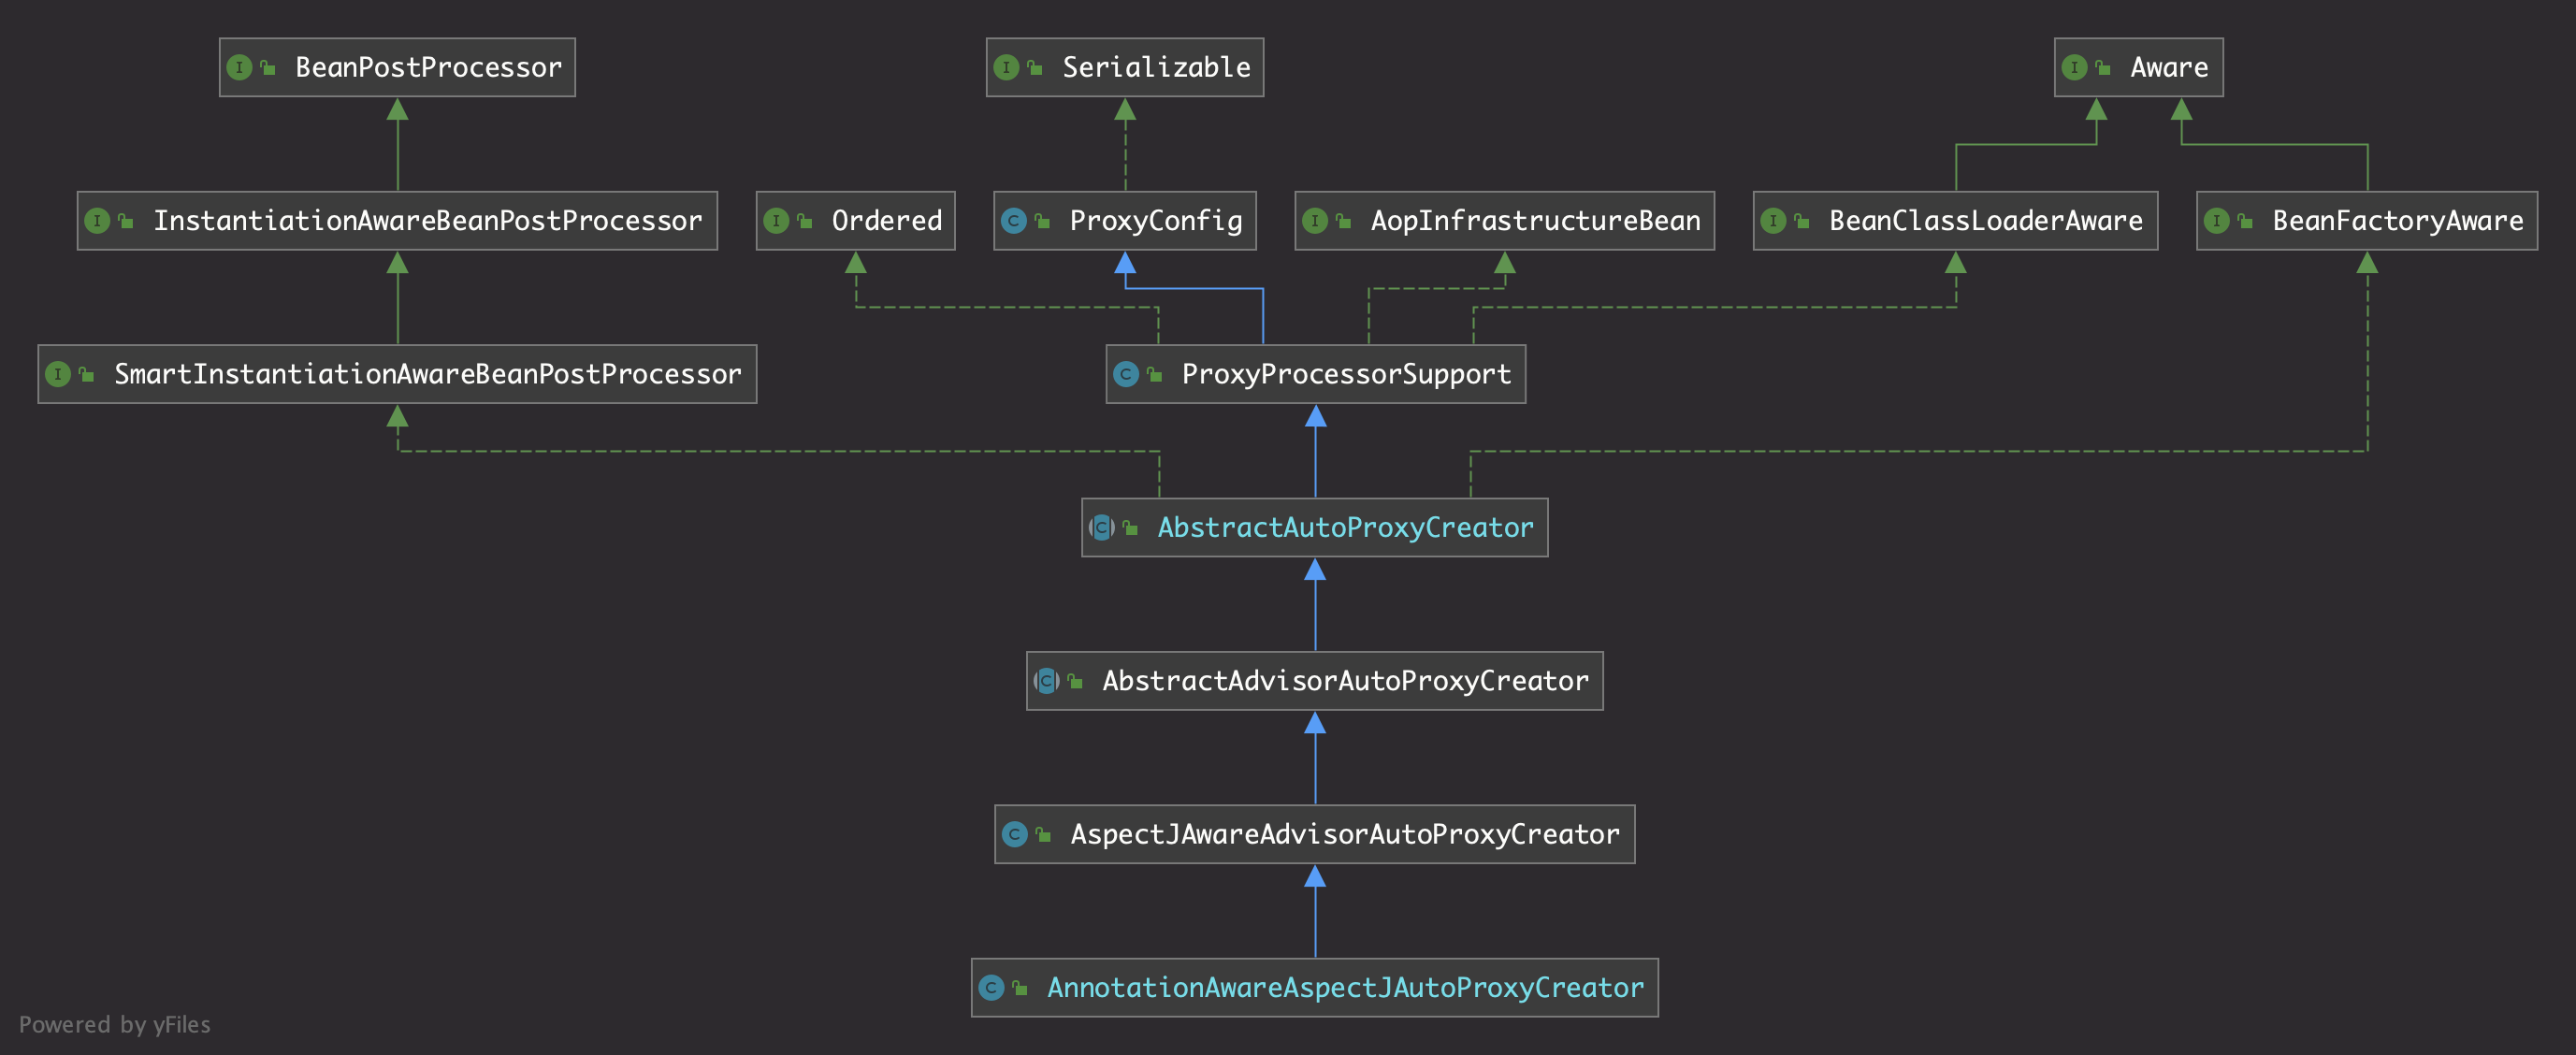
可以看到它实现了 BeanPostProcessor、InstantiationAwareBeanPostProcessor 接口。
其中它实现了 BeanPostProcessor 的 postProcessAfterInitialization () 方法,这个方法是在 createBean 创建 bean 方法中执行的,如下面的方法调用栈。
# 执行 AbstractAutoProxyCreator 类的实例化之前的后置处理方法
postProcessBeforeInstantiation(Class, String):257, AbstractAutoProxyCreator (org.springframework.aop.framework.autoproxy), AbstractAutoProxyCreator.java
# 在实例化之前应用 bean 后置处理器
applyBeanPostProcessorsBeforeInstantiation(Class, String):1202, AbstractAutowireCapableBeanFactory (org.springframework.beans.factory.support), AbstractAutowireCapableBeanFactory.java
# bean 实例化之前的解析
resolveBeforeInstantiation(String, RootBeanDefinition):1175, AbstractAutowireCapableBeanFactory (org.springframework.beans.factory.support), AbstractAutowireCapableBeanFactory.java
# 委派到 createBean 方法
createBean(String, RootBeanDefinition, Object[]):550, AbstractAutowireCapableBeanFactory (org.springframework.beans.factory.support), AbstractAutowireCapableBeanFactory.java
lambda$doGetBean$0(String, RootBeanDefinition, Object[]):364, AbstractBeanFactory (org.springframework.beans.factory.support), AbstractBeanFactory.java
# 调用 ObjectFactory 个 getObject() 方法
getObject():-1, 424732838 (org.springframework.beans.factory.support.AbstractBeanFactory$$Lambda$384), Unknown Source
# 获取单例
getSingleton(String, ObjectFactory):262, DefaultSingletonBeanRegistry (org.springframework.beans.factory.support), DefaultSingletonBeanRegistry.java
# 获取 bean
doGetBean(String, Class, Object[], boolean):361, AbstractBeanFactory (org.springframework.beans.factory.support), AbstractBeanFactory.java
# 获取 bean
getBean(String):218, AbstractBeanFactory (org.springframework.beans.factory.support), AbstractBeanFactory.java
# 预处理单例实例
preInstantiateSingletons():957, DefaultListableBeanFactory (org.springframework.beans.factory.support), DefaultListableBeanFactory.java
# 实例化剩余单例
finishBeanFactoryInitialization(ConfigurableListableBeanFactory):982, AbstractApplicationContext (org.springframework.context.support), AbstractApplicationContext.java
# 刷新方法
refresh():613, AbstractApplicationContext (org.springframework.context.support), AbstractApplicationContext.java
...省略
它的方法具体流程,我们稍后详细再看。
还有,它实现了 InstantiationAwareBeanPostProcessor 接口的 postProcessBeforeInstantiation () 方法,对 bean 实例化之前执行处理操作。它是在创建 bean 之后,对 bean 进行初始化的时候调用的,如下方法的调用栈:
# 执行 AbstractAutoProxyCreator 的 postProcessAfterInitialization 方法
postProcessAfterInitialization(Object, String):305, AbstractAutoProxyCreator (org.springframework.aop.framework.autoproxy), AbstractAutoProxyCreator.java
# 应用 bean 初始化后的后置处理
applyBeanPostProcessorsAfterInitialization(Object, String):468, AbstractAutowireCapableBeanFactory (org.springframework.beans.factory.support), AbstractAutowireCapableBeanFactory.java
# 初始化 bean
initializeBean(String, Object, RootBeanDefinition):1923, AbstractAutowireCapableBeanFactory (org.springframework.beans.factory.support), AbstractAutowireCapableBeanFactory.java
# 创建 bean
doCreateBean(String, RootBeanDefinition, Object[]):654, AbstractAutowireCapableBeanFactory (org.springframework.beans.factory.support), AbstractAutowireCapableBeanFactory.java
# 委派到 createBean 方法
createBean(String, RootBeanDefinition, Object[]):562, AbstractAutowireCapableBeanFactory (org.springframework.beans.factory.support),
...同上...
doGetBean(String, Class, Object[], boolean):361, AbstractBeanFactory (org.springframework.beans.factory.support), AbstractBeanFactory.java
getBean(String):218, AbstractBeanFactory (org.springframework.beans.factory.support), AbstractBeanFactory.java
preInstantiateSingletons():957, DefaultListableBeanFactory (org.springframework.beans.factory.support), DefaultListableBeanFactory.java
finishBeanFactoryInitialization(ConfigurableListableBeanFactory):982, AbstractApplicationContext (org.springframework.context.support), AbstractApplicationContext.java
refresh():613, AbstractApplicationContext (org.springframework.context.support), AbstractApplicationContext.java
...省略无关的调用
我们重点看下这两个方法。
3. bean 实例化之前的后置处理
下面,我们开始着重看 AbstractAutoProxyCreator#postProcessBeforeInstantiation 这个方法,源码附上:
	/**
	 * 实例化之前的后置处理,创建代理对象
	 *
	 * @param beanClass the class of the bean to be instantiated
	 * @param beanName  the name of the bean
	 * @return
	 */
	@Override
	public Object postProcessBeforeInstantiation(Class<?> beanClass, String beanName) {
		Object cacheKey = getCacheKey(beanClass, beanName);

		if (!StringUtils.hasLength(beanName) || !this.targetSourcedBeans.contains(beanName)) {
			if (this.advisedBeans.containsKey(cacheKey)) {
				return null;
			}
			// 判断是否基础类,是否应该跳过,这里进行创建增强器,并放入缓存中
			if (isInfrastructureClass(beanClass) || shouldSkip(beanClass, beanName)) {
				this.advisedBeans.put(cacheKey, Boolean.FALSE);
				return null;
			}
		}

		// 如果我们一个自定义的目标源,那就创建代理对象。
		// 禁止目标 bean 不必要的初始化。
		// 这个目标源将会以自定义的方式处理目标实例。
		// Create proxy here if we have a custom TargetSource.
		// Suppresses unnecessary default instantiation of the target bean:
		// The TargetSource will handle target instances in a custom fashion.
		TargetSource targetSource = getCustomTargetSource(beanClass, beanName);
		if (targetSource != null) {
			if (StringUtils.hasLength(beanName)) {
				this.targetSourcedBeans.add(beanName);
			}
			// 获取类的增强器
			Object[] specificInterceptors = getAdvicesAndAdvisorsForBean(beanClass, beanName, targetSource);
			// 创建代理对象,这里决定创建 jdk 代理或者是 cglib 代理对象
			Object proxy = createProxy(beanClass, beanName, specificInterceptors, targetSource);
			// 放入缓存
			this.proxyTypes.put(cacheKey, proxy.getClass());
			return proxy;
		}

		return null;
	}
postProcessBeforeInstantiation 这个方法的主要的逻辑是:
- 判断 bean 是否为基础的类;
- 通过获取容器中所有的增强器,并且加入到缓存中,判断增强器是否应该被跳过;
- 如果有自定义的目标源,那就创建代理对象并返回对象,没有的话则返回 null;
我们看下 isInfrastructureClass () 方法,判断是否为基础类,我们看下它的实现:org.springframework.aop.framework.autoproxy.AbstractAutoProxyCreator#isInfrastructureClass
  // 判断是否为基础类
  protected boolean isInfrastructureClass(Class<?> beanClass) {
		boolean retVal = Advice.class.isAssignableFrom(beanClass) ||
				Pointcut.class.isAssignableFrom(beanClass) ||
				Advisor.class.isAssignableFrom(beanClass) ||
				AopInfrastructureBean.class.isAssignableFrom(beanClass);
		if (retVal && logger.isTraceEnabled()) {
			logger.trace("Did not attempt to auto-proxy infrastructure class [" + beanClass.getName() + "]");
		}
		return retVal;
	}
这个方法的逻辑是,判断这个类是不是一个 Advice、Pointcut、Advisor、AopInfrastructureBean 类型;
3.1 shouldSkip 是否需要跳过
下面看重点的 shouldSkip 方法:org.springframework.aop.aspectj.autoproxy.AspectJAwareAdvisorAutoProxyCreator#shouldSkip
	/**
	 * 判断是否跳过指定的类型和 bean
	 *
	 * @param beanClass the class of the bean
	 * @param beanName  the name of the bean
	 * @return
	 */
	@Override
	protected boolean shouldSkip(Class<?> beanClass, String beanName) {
		// TODO: Consider optimization by caching the list of the aspect names
		// 找到候选的增强器,创建的时候也把它们放入缓存中
		List<Advisor> candidateAdvisors = findCandidateAdvisors();
		for (Advisor advisor : candidateAdvisors) {
			if (advisor instanceof AspectJPointcutAdvisor &&
					((AspectJPointcutAdvisor) advisor).getAspectName().equals(beanName)) {
				return true;
			}
		}
		return super.shouldSkip(beanClass, beanName);
	}
3.1.1 findCandidateAdvisors 查找候选的增强器
这里边是先找候选的增强器,继续看看它的逻辑:org.springframework.aop.aspectj.annotation.AnnotationAwareAspectJAutoProxyCreator#findCandidateAdvisors
	@Override
	protected List<Advisor> findCandidateAdvisors() {
		// spring tx 事务模块实现了 Advisor 接口
		// 从 bean 工厂中找 Advisor 类型的候选 bean
		// Add all the Spring advisors found according to superclass rules.
		List<Advisor> advisors = super.findCandidateAdvisors();
		// Build Advisors for all AspectJ aspects in the bean factory.
		if (this.aspectJAdvisorsBuilder != null) {
			// 使用切面增强器构建器,进行构建增强器
			advisors.addAll(this.aspectJAdvisorsBuilder.buildAspectJAdvisors());
		}
		return advisors;
	}
先调用父类的方法,然后在调用自己的构建切面增强器。看看父类的方法是什么样的逻辑:
	/**
	 * 找使用了自动代理的候选增强器
	 * Find all candidate Advisors to use in auto-proxying.
	 * @return the List of candidate Advisors
	 */
	protected List<Advisor> findCandidateAdvisors() {
		Assert.state(this.advisorRetrievalHelper != null, "No BeanFactoryAdvisorRetrievalHelper available");
		// 使用增强器恢复工具类去找增强器
		return this.advisorRetrievalHelper.findAdvisorBeans();
	}


org.springframework.aop.framework.autoproxy.BeanFactoryAdvisorRetrievalHelper#findAdvisorBeans

  	/**
	 * 从当前 bean 工厂中查找合格的增强器 beans,忽略工厂 bean 和当前正被创建的 bean
	 *
	 * Find all eligible Advisor beans in the current bean factory,
	 * ignoring FactoryBeans and excluding beans that are currently in creation.
	 * @return the list of {@link org.springframework.aop.Advisor} beans
	 * @see #isEligibleBean
	 */
	public List<Advisor> findAdvisorBeans() {
		// 找增强器的 bean 名称
		// Determine list of advisor bean names, if not cached already.
		String[] advisorNames = this.cachedAdvisorBeanNames;
		if (advisorNames == null) {
			// Do not initialize FactoryBeans here: We need to leave all regular beans
			// uninitialized to let the auto-proxy creator apply to them!
			advisorNames = BeanFactoryUtils.beanNamesForTypeIncludingAncestors(
					this.beanFactory, Advisor.class, true, false);
			this.cachedAdvisorBeanNames = advisorNames;
		}
		if (advisorNames.length == 0) {
			return new ArrayList<>();
		}

		List<Advisor> advisors = new ArrayList<>();
		for (String name : advisorNames) {
			// 是否一个合格的 bean
			if (isEligibleBean(name)) {
				// 顾虑当前被创建的 bean
				if (this.beanFactory.isCurrentlyInCreation(name)) {
					if (logger.isTraceEnabled()) {
						logger.trace("Skipping currently created advisor ''" + name + "''");
					}
				}
				else {
					try {
						// 从 bean 工厂中查找 Advisor 类型的 bean
						advisors.add(this.beanFactory.getBean(name, Advisor.class));
					}
					catch (BeanCreationException ex) {
						Throwable rootCause = ex.getMostSpecificCause();
						if (rootCause instanceof BeanCurrentlyInCreationException) {
							BeanCreationException bce = (BeanCreationException) rootCause;
							String bceBeanName = bce.getBeanName();
							if (bceBeanName != null && this.beanFactory.isCurrentlyInCreation(bceBeanName)) {
								if (logger.isTraceEnabled()) {
									logger.trace("Skipping advisor ''" + name +
											"'' with dependency on currently created bean: " + ex.getMessage());
								}
								// Ignore: indicates a reference back to the bean we''re trying to advise.
								// We want to find advisors other than the currently created bean itself.
								continue;
							}
						}
						throw ex;
					}
				}
			}
		}
		return advisors;
	}
这里的主要做的事情就是从 bean 工厂中获取 Advisor 类型的 beans 返回。spring tx 模块的源码,就是在这里进行查找的。
3.1.2 buildAspectJAdvisors 构建切面增强器
接着回来看下 this.aspectJAdvisorsBuilder.buildAspectJAdvisors () 这个方法,它实际上是 org.springframework.aop.aspectj.annotation.BeanFactoryAspectJAdvisorsBuilder#buildAspectJAdvisors 的方法:
	/**
	 * 从当前 bean 工厂中查找 AspectJ 注解的切面,返回一个 spring aop 增强器的列表。
	 * 为每个切面的 advice 方法创建一个 spring 增强器
	 *
	 * Look for AspectJ-annotated aspect beans in the current bean factory,
	 * and return to a list of Spring AOP Advisors representing them.
	 * <p>Creates a Spring Advisor for each AspectJ advice method.
	 * @return the list of {@link org.springframework.aop.Advisor} beans
	 * @see #isEligibleBean
	 */
	public List<Advisor> buildAspectJAdvisors() {
		List<String> aspectNames = this.aspectBeanNames;

		if (aspectNames == null) {
			synchronized (this) {
				aspectNames = this.aspectBeanNames;
				if (aspectNames == null) {
					List<Advisor> advisors = new ArrayList<>();
					aspectNames = new ArrayList<>();
					// 从 bean 工厂中找出全部的 bean 名称
					String[] beanNames = BeanFactoryUtils.beanNamesForTypeIncludingAncestors(
							this.beanFactory, Object.class, true, false);
					for (String beanName : beanNames) {
						if (!isEligibleBean(beanName)) {
							continue;
						}
						// 我们需要小心不要让这些 bean 过早的实例化,这种情况下它们将会被 spring 容器缓存,但不会被编织。
						// We must be careful not to instantiate beans eagerly as in this case they
						// would be cached by the Spring container but would not have been weaved.
						// 根据 bean 名称获取类型
						Class<?> beanType = this.beanFactory.getType(beanName, false);
						if (beanType == null) {
							continue;
						}
						// 判断是否有 @Aspect 注解
						if (this.advisorFactory.isAspect(beanType)) {
							aspectNames.add(beanName);
							// 切面元数据
							AspectMetadata amd = new AspectMetadata(beanType, beanName);
							if (amd.getAjType().getPerClause().getKind() == PerClauseKind.SINGLETON) {
								// 必须是单例的才能创建切面
								MetadataAwareAspectInstanceFactory factory =
										new BeanFactoryAspectInstanceFactory(this.beanFactory, beanName);
								// 获取全部的增强器,重要的方法
								List<Advisor> classAdvisors = this.advisorFactory.getAdvisors(factory);
								if (this.beanFactory.isSingleton(beanName)) {
									// 放入缓存中
									this.advisorsCache.put(beanName, classAdvisors);
								}
								else {
									this.aspectFactoryCache.put(beanName, factory);
								}
								advisors.addAll(classAdvisors);
							}
							else {
								// Per target or per this.
								if (this.beanFactory.isSingleton(beanName)) {
									throw new IllegalArgumentException("Bean with name ''" + beanName +
											"'' is a singleton, but aspect instantiation model is not singleton");
								}
								MetadataAwareAspectInstanceFactory factory =
										new PrototypeAspectInstanceFactory(this.beanFactory, beanName);
								this.aspectFactoryCache.put(beanName, factory);
								// 获取原型对象的增强器
								advisors.addAll(this.advisorFactory.getAdvisors(factory));
							}
						}
					}
					this.aspectBeanNames = aspectNames;
					return advisors;
				}
			}
		}

		if (aspectNames.isEmpty()) {
			return Collections.emptyList();
		}
		List<Advisor> advisors = new ArrayList<>();
		for (String aspectName : aspectNames) {
			List<Advisor> cachedAdvisors = this.advisorsCache.get(aspectName);
			if (cachedAdvisors != null) {
				advisors.addAll(cachedAdvisors);
			}
			else {
				MetadataAwareAspectInstanceFactory factory = this.aspectFactoryCache.get(aspectName);
				advisors.addAll(this.advisorFactory.getAdvisors(factory));
			}
		}
		return advisors;
	}

	@Override
	public boolean isAspect(Class<?> clazz) {
		return (hasAspectAnnotation(clazz) && !compiledByAjc(clazz));
	}

	private boolean hasAspectAnnotation(Class<?> clazz) {
		return (AnnotationUtils.findAnnotation(clazz, Aspect.class) != null);
	}

	/**
	 * We need to detect this as "code-style" AspectJ aspects should not be
	 * interpreted by Spring AOP.
	 */
	private boolean compiledByAjc(Class<?> clazz) {
		// The AJTypeSystem goes to great lengths to provide a uniform appearance between code-style and
		// annotation-style aspects. Therefore there is no ''clean'' way to tell them apart. Here we rely on
		// an implementation detail of the AspectJ compiler.
		for (Field field : clazz.getDeclaredFields()) {
			if (field.getName().startsWith(AJC_MAGIC)) {
				return true;
			}
		}
		return false;
	}
这里主要做了几件事情:
- 遍历所有的 bean;
- 通过 org.springframework.aop.aspectj.annotation.AbstractAspectJAdvisorFactory#isAspect 方法判断类是否一个切面,使用 @Aspect 注解标记的类;
- 根据 bean 的 scope 类型创建对应的切面实例工厂,通过工厂获取增强器。单例类型对应的工厂是 BeanFactoryAspectInstanceFactory,否则使用 PrototypeAspectInstanceFactory 工厂;
- 收集把所有的增强器,并且将它们添加到缓存中,最后返回增强器集合。
其中第 3 步中,两个切面实例工厂都是继承了 org.springframework.aop.aspectj.annotation.ReflectiveAspectJAdvisorFactory 类,它的 getAdvisors 如下:
	/**
	 * 获取增强器
	 *
	 * @param aspectInstanceFactory the aspect instance factory
	 *                              (not the aspect instance itself in order to avoid eager instantiation)
	 * @return
	 */
	@Override
	public List<Advisor> getAdvisors(MetadataAwareAspectInstanceFactory aspectInstanceFactory) {
		// 切面类型
		Class<?> aspectClass = aspectInstanceFactory.getAspectMetadata().getAspectClass();
		// 切面名称
		String aspectName = aspectInstanceFactory.getAspectMetadata().getAspectName();
		// 校验
		validate(aspectClass);

		// We need to wrap the MetadataAwareAspectInstanceFactory with a decorator
		// so that it will only instantiate once.
		MetadataAwareAspectInstanceFactory lazySingletonAspectInstanceFactory =
				new LazySingletonAspectInstanceFactoryDecorator(aspectInstanceFactory);

		List<Advisor> advisors = new ArrayList<>();
		// 获取类上的所有增强器方法
		for (Method method : getAdvisorMethods(aspectClass)) {
			// Prior to Spring Framework 5.2.7, advisors.size() was supplied as the declarationOrderInAspect
			// to getAdvisor(...) to represent the "current position" in the declared methods list.
			// However, since Java 7 the "current position" is not valid since the JDK no longer
			// returns declared methods in the order in which they are declared in the source code.
			// Thus, we now hard code the declarationOrderInAspect to 0 for all advice methods
			// discovered via reflection in order to support reliable advice ordering across JVM launches.
			// Specifically, a value of 0 aligns with the default value used in
			// AspectJPrecedenceComparator.getAspectDeclarationOrder(Advisor).
			// 开始获取增强器,增强器实现了方法拦截器接口,用于执行时进行调用
			Advisor advisor = getAdvisor(method, lazySingletonAspectInstanceFactory, 0, aspectName);
			if (advisor != null) {
				advisors.add(advisor);
			}
		}

		// If it''s a per target aspect, emit the dummy instantiating aspect.
		if (!advisors.isEmpty() && lazySingletonAspectInstanceFactory.getAspectMetadata().isLazilyInstantiated()) {
			Advisor instantiationAdvisor = new SyntheticInstantiationAdvisor(lazySingletonAspectInstanceFactory);
			advisors.add(0, instantiationAdvisor);
		}

		// 查找介绍的字段
		// Find introduction fields.
		for (Field field : aspectClass.getDeclaredFields()) {
			Advisor advisor = getDeclareParentsAdvisor(field);
			if (advisor != null) {
				advisors.add(advisor);
			}
		}

		return advisors;
	}
主要的逻辑为:
- 获取切面的类型、名称,进行校验;
- 获取切面类的所有的除了 @Pointcut 注解标记的所有方法,并进行排序;
- 根据方法获取切面注解(Pointcut.class, Around.class, Before.class, After.class, AfterReturning.class, AfterThrowing.class),然后创建切点表达式端点类 AspectJExpressionPointcut,最后创建一个实例化模型切点增强器实例 InstantiationModelAwarePointcutAdvisorImpl 返回
- 获取切面类上声明的字段,过滤出标记有 @DeclareParents 注解的字段,创建 DeclareParentsAdvisor 类返回。
4. bean 初始化之后的后置处理
接着,该看 org.springframework.aop.framework.autoproxy.AbstractAutoProxyCreator#postProcessAfterInitialization 类方法了:
	/**
	 * 初始化之后的后置处理,如果 bean 被标识为被子类代理的类,那就用配置的拦截器创建一个代理对象。
	 *
	 * Create a proxy with the configured interceptors if the bean is
	 * identified as one to proxy by the subclass.
	 * @see #getAdvicesAndAdvisorsForBean
	 */
	@Override
	public Object postProcessAfterInitialization(@Nullable Object bean, String beanName) {
		if (bean != null) {
			Object cacheKey = getCacheKey(bean.getClass(), beanName);
			if (this.earlyProxyReferences.remove(cacheKey) != bean) {
				// 进行包装实例化
				return wrapIfNecessary(bean, beanName, cacheKey);
			}
		}
		return bean;
	}
它又去调用了 wrapIfNecessary 方法:
	/**
	 * 必要的时候包装给定的 bean,比如是否需要被代理。
	 *
	 * Wrap the given bean if necessary, i.e. if it is eligible for being proxied.
	 * @param bean the raw bean instance
	 * @param beanName the name of the bean
	 * @param cacheKey the cache key for metadata access
	 * @return a proxy wrapping the bean, or the raw bean instance as-is
	 */
	protected Object wrapIfNecessary(Object bean, String beanName, Object cacheKey) {
		if (StringUtils.hasLength(beanName) && this.targetSourcedBeans.contains(beanName)) {
			return bean;
		}
		if (Boolean.FALSE.equals(this.advisedBeans.get(cacheKey))) {
			return bean;
		}
		// 判断是否基础对象,或者允许跳过
		if (isInfrastructureClass(bean.getClass()) || shouldSkip(bean.getClass(), beanName)) {
			this.advisedBeans.put(cacheKey, Boolean.FALSE);
			return bean;
		}

		// 创建代理对象,如果有增强器
		// Create proxy if we have advice.
		Object[] specificInterceptors = getAdvicesAndAdvisorsForBean(bean.getClass(), beanName, null);
		if (specificInterceptors != DO_NOT_PROXY) {
			this.advisedBeans.put(cacheKey, Boolean.TRUE);
			// 代理对象
			Object proxy = createProxy(
					bean.getClass(), beanName, specificInterceptors, new SingletonTargetSource(bean));
			this.proxyTypes.put(cacheKey, proxy.getClass());
			return proxy;
		}

		this.advisedBeans.put(cacheKey, Boolean.FALSE);
		return bean;
	}
它的主要流程:
- 判断 bean 是否基础类,是否应该跳过(这一步已经在上面的 postProcessBeforeInstantiation 方法执行过了);
- 执行 getAdvicesAndAdvisorsForBean () 方法,为目标 bean 获取的通知和增强器;
- 增强器不为空,则代理创建代理对象;
- 返回创建的代理对象;
我们重点看下 getAdvicesAndAdvisorsForBean 获取通知和增强器逻辑和创建代理对象逻辑。
4.1 getAdvicesAndAdvisorsForBean 获取通知和增强器
它是实现在 org.springframework.aop.framework.autoproxy.AbstractAdvisorAutoProxyCreator#getAdvicesAndAdvisorsForBean:
	@Override
	@Nullable
	protected Object[] getAdvicesAndAdvisorsForBean(
			Class<?> beanClass, String beanName, @Nullable TargetSource targetSource) {

		// 又是获取合格的增强器
		List<Advisor> advisors = findEligibleAdvisors(beanClass, beanName);
		if (advisors.isEmpty()) {
			return DO_NOT_PROXY;
		}
		return advisors.toArray();
	}
又调用了方法 findEligibleAdvisors () 方法:
	/**
	 * Find all eligible Advisors for auto-proxying this class.
	 * @param beanClass the clazz to find advisors for
	 * @param beanName the name of the currently proxied bean
	 * @return the empty List, not {@code null},
	 * if there are no pointcuts or interceptors
	 * @see #findCandidateAdvisors
	 * @see #sortAdvisors
	 * @see #extendAdvisors
	 */
	protected List<Advisor> findEligibleAdvisors(Class<?> beanClass, String beanName) {
		// 找候选增强器
		List<Advisor> candidateAdvisors = findCandidateAdvisors();
		// 找合格的增强器
		List<Advisor> eligibleAdvisors = findAdvisorsThatCanApply(candidateAdvisors, beanClass, beanName);
		// 扩展增强器
		extendAdvisors(eligibleAdvisors);
		if (!eligibleAdvisors.isEmpty()) {
			eligibleAdvisors = sortAdvisors(eligibleAdvisors);
		}
		return eligibleAdvisors;
	}
做了三件事:
- 执行 findCandidateAdvisors () 查找候选增强器(这一步同样也是在上面的 3.1.1 节讲过了);
- 执行 findAdvisorsThatCanApply () 继续查找能应用的增强器;
- 执行 extendAdvisors () 扩展增强器;
- 返回可以用的增强器。
4.1.1 findAdvisorsThatCanApply 查找可以应用的增强器
我们看下 org.springframework.aop.support.AopUtils#findAdvisorsThatCanApply 方法:
	/**
	 * 从给定的类中选择一个候选增强器,这个列表要适用于给定的类
	 *
	 * Determine the sublist of the {@code candidateAdvisors} list
	 * that is applicable to the given class.
	 * @param candidateAdvisors the Advisors to evaluate
	 * @param clazz the target class
	 * @return sublist of Advisors that can apply to an object of the given class
	 * (may be the incoming List as-is)
	 */
	public static List<Advisor> findAdvisorsThatCanApply(List<Advisor> candidateAdvisors, Class<?> clazz) {
		if (candidateAdvisors.isEmpty()) {
			return candidateAdvisors;
		}
		List<Advisor> eligibleAdvisors = new ArrayList<>();
		for (Advisor candidate : candidateAdvisors) {
			// 判断是否可以应用
			if (candidate instanceof IntroductionAdvisor && canApply(candidate, clazz)) {
				eligibleAdvisors.add(candidate);
			}
		}
		boolean hasIntroductions = !eligibleAdvisors.isEmpty();
		for (Advisor candidate : candidateAdvisors) {
			if (candidate instanceof IntroductionAdvisor) {
				// already processed
				continue;
			}
			if (canApply(candidate, clazz, hasIntroductions)) {
				eligibleAdvisors.add(candidate);
			}
		}
		return eligibleAdvisors;
	}
这里主要执行了 canApply (Advisor advisor, Class<?> targetClass, boolean hasIntroductions) 方法:
public static boolean canApply(Advisor advisor, Class<?> targetClass, boolean hasIntroductions) {
   if (advisor instanceof IntroductionAdvisor) {
      // 介绍类的增强器
      return ((IntroductionAdvisor) advisor).getClassFilter().matches(targetClass);
   }
   else if (advisor instanceof PointcutAdvisor) {
      // 切点增强器
      PointcutAdvisor pca = (PointcutAdvisor) advisor;
      return canApply(pca.getPointcut(), targetClass, hasIntroductions);
   }
   else {
      // It doesn''t have a pointcut so we assume it applies.
      return true;
   }
}
这里判断增强器的类型,一般是 InstantiationModelAwarePointcutAdvisorImpl 类型,它实现了 PointcutAdvisor 接口,执行 canApply (pca.getPointcut (), targetClass, hasIntroductions) 方法:
	/**
	 * 给定的切点可以全部应用到这个类上吗?这是一个非常重要的测试,因为它用于优化一个类的切点。
。	 *
	 * Can the given pointcut apply at all on the given class?
	 * <p>This is an important test as it can be used to optimize
	 * out a pointcut for a class.
	 * @param pc the static or dynamic pointcut to check
	 * @param targetClass the class to test
	 * @param hasIntroductions whether or not the advisor chain
	 * for this bean includes any introductions
	 * @return whether the pointcut can apply on any method
	 */
	public static boolean canApply(Pointcut pc, Class<?> targetClass, boolean hasIntroductions) {
		Assert.notNull(pc, "Pointcut must not be null");
		if (!pc.getClassFilter().matches(targetClass)) {
			return false;
		}

		// 方法匹配器
		MethodMatcher methodMatcher = pc.getMethodMatcher();
		if (methodMatcher == MethodMatcher.TRUE) {
			// No need to iterate the methods if we''re matching any method anyway...
			return true;
		}

		IntroductionAwareMethodMatcher introductionAwareMethodMatcher = null;
		if (methodMatcher instanceof IntroductionAwareMethodMatcher) {
			introductionAwareMethodMatcher = (IntroductionAwareMethodMatcher) methodMatcher;
		}

		// 获取目标类的 Class 类型
		Set<Class<?>> classes = new LinkedHashSet<>();
		if (!Proxy.isProxyClass(targetClass)) {
      // 获取原始类
			classes.add(ClassUtils.getUserClass(targetClass));
		}
    // 获取类的所有接口
		classes.addAll(ClassUtils.getAllInterfacesForClassAsSet(targetClass));

		for (Class<?> clazz : classes) {
			// 获取类上声明的方法
			Method[] methods = ReflectionUtils.getAllDeclaredMethods(clazz);
			for (Method method : methods) {
				// 遍历每个方法,判断是否匹配
				if (introductionAwareMethodMatcher != null ?
						introductionAwareMethodMatcher.matches(method, targetClass, hasIntroductions) :
						methodMatcher.matches(method, targetClass)) {
					return true;
				}
			}
		}

		return false;
	}
这里主要做了一下几件事情:
- 获取增强器中的切点的方法匹配器;
- 获取目标类的原始类、所有的接口信息;
- 遍历类和接口,获取其上的声明的方法;
- 根据匹配与方法机型匹配;
- 返回匹配结果。
4.1.2 extendAdvisors 扩展增强器
对应的是 org.springframework.aop.aspectj.autoproxy.AspectJAwareAdvisorAutoProxyCreator#extendAdvisors 方法:
	/**
	 * Add an {@link ExposeInvocationInterceptor} to the beginning of the advice chain.
	 * <p>This additional advice is needed when using AspectJ pointcut expressions
	 * and when using AspectJ-style advice.
	 */
	@Override
	protected void extendAdvisors(List<Advisor> candidateAdvisors) {
		// 如果需要的话,设置增强器调用器链,添加一个暴露方法执行器的执行拦截器
		AspectJProxyUtils.makeAdvisorChainAspectJCapableIfNecessary(candidateAdvisors);
	}
继续看它的实现:
	/**
	 * Add special advisors if necessary to work with a proxy chain that contains AspectJ advisors:
	 * concretely, {@link ExposeInvocationInterceptor} at the beginning of the list.
	 * <p>This will expose the current Spring AOP invocation (necessary for some AspectJ pointcut
	 * matching) and make available the current AspectJ JoinPoint. The call will have no effect
	 * if there are no AspectJ advisors in the advisor chain.
	 * @param advisors the advisors available
	 * @return {@code true} if an {@link ExposeInvocationInterceptor} was added to the list,
	 * otherwise {@code false}
	 */
	public static boolean makeAdvisorChainAspectJCapableIfNecessary(List<Advisor> advisors) {
		// Don''t add advisors to an empty list; may indicate that proxying is just not required
		if (!advisors.isEmpty()) {
			boolean foundAspectJAdvice = false;
			for (Advisor advisor : advisors) {
				// Be careful not to get the Advice without a guard, as this might eagerly
				// instantiate a non-singleton AspectJ aspect...
				if (isAspectJAdvice(advisor)) {
					foundAspectJAdvice = true;
					break;
				}
			}
			if (foundAspectJAdvice && !advisors.contains(ExposeInvocationInterceptor.ADVISOR)) {
				// 添加一个暴露执行的拦截器
				advisors.add(0, ExposeInvocationInterceptor.ADVISOR);
				return true;
			}
		}
		return false;
	}
这个方法的逻辑是:
- 先从所有的增强器中一个切面通知;
- 判断是否找到,并且这些增强器其中不包含 ExposeInvocationInterceptor.ADVISOR 常量;
- 如果符合条件,那么添加 ExposeInvocationInterceptor.ADVISOR 常量,并且把它放入这些增强器的首尾。
4.2 createProxy 创建代理对象
接着看 org.springframework.aop.framework.autoproxy.AbstractAutoProxyCreator#createProxy 创建代理对象方法:
	/**
	 * 为给定的 bean 创建一个代理对象
	 *
	 * Create an AOP proxy for the given bean.
	 * @param beanClass the class of the bean
	 * @param beanName the name of the bean
	 * @param specificInterceptors the set of interceptors that is
	 * specific to this bean (may be empty, but not null)
	 * @param targetSource the TargetSource for the proxy,
	 * already pre-configured to access the bean
	 * @return the AOP proxy for the bean
	 * @see #buildAdvisors
	 */
	protected Object createProxy(Class<?> beanClass, @Nullable String beanName,
			@Nullable Object[] specificInterceptors, TargetSource targetSource) {

		if (this.beanFactory instanceof ConfigurableListableBeanFactory) {
			AutoProxyUtils.exposeTargetClass((ConfigurableListableBeanFactory) this.beanFactory, beanName, beanClass);
		}

		// 创建代理工厂
		ProxyFactory proxyFactory = new ProxyFactory();
		proxyFactory.copyFrom(this);

		if (!proxyFactory.isProxyTargetClass()) {
			if (shouldProxyTargetClass(beanClass, beanName)) {
				proxyFactory.setProxyTargetClass(true);
			}
			else {
				evaluateProxyInterfaces(beanClass, proxyFactory);
			}
		}

		// 绑定增强器
		Advisor[] advisors = buildAdvisors(beanName, specificInterceptors);
		proxyFactory.addAdvisors(advisors);
		proxyFactory.setTargetSource(targetSource);
		// 自定义配置代理工厂,由用户自己实现其方法
		customizeProxyFactory(proxyFactory);

		proxyFactory.setFrozen(this.freezeProxy);
		if (advisorsPreFiltered()) {
			proxyFactory.setPreFiltered(true);
		}

		// 创建代理对象
		return proxyFactory.getProxy(getProxyClassLoader());
	}
这里主要进行的逻辑:
- 创建一个代理工厂 ProxyFactory;
- 设置代理工厂属性,绑定增强器;
- 通过代理工厂来创建代理对象。
4.2.1 创建 AOP 代理对象
代理工厂创建代理对象 org.springframework.aop.framework.ProxyFactory#getProxy (java.lang.ClassLoader):
	public Object getProxy(@Nullable ClassLoader classLoader) {
		// 创建一个 Aop 代理,通过 DefaultAopProxyFactory 来创建一个 aop 代理,来获取代理对象
		return createAopProxy().getProxy(classLoader);
	}
它会创建一个 aop 代理:
/**
 * 子类应该调用这个来返回一个新的 AOP 代理,不应该用 this 作为参数来创建一个 AOP 代理对象
 *
 * Subclasses should call this to get a new AOP proxy. They should <b>not</b>
 * create an AOP proxy with {@code this} as an argument.
 */
protected final synchronized AopProxy createAopProxy() {
   if (!this.active) {
      activate();
   }
   // 通过代理工厂创建代理类
   return getAopProxyFactory().createAopProxy(this);
}
然后会获取一个 aop 代理工厂来创建 aop 代理:org.springframework.aop.framework.DefaultAopProxyFactory#createAopProxy
	/**
	 * 创建代理对象
	 *
	 * @param config the AOP configuration in the form of an
	 *               AdvisedSupport object
	 * @return
	 * @throws AopConfigException
	 */
	@Override
	public AopProxy createAopProxy(AdvisedSupport config) throws AopConfigException {
		if (!IN_NATIVE_IMAGE &&
				(config.isOptimize() || config.isProxyTargetClass() || hasNoUserSuppliedProxyInterfaces(config))) {
			Class<?> targetClass = config.getTargetClass();
			if (targetClass == null) {
				throw new AopConfigException("TargetSource cannot determine target class: " +
						"Either an interface or a target is required for proxy creation.");
			}
			if (targetClass.isInterface() || Proxy.isProxyClass(targetClass)) {
				// 代理对象是一个接口,或者它是一个 jdk 自带的 Proxy 类,那就创建 jdk 的动态代理对象
				return new JdkDynamicAopProxy(config);
			}
			// 否则就创建一个 cglib 代理对象
			return new ObjenesisCglibAopProxy(config);
		}
		else {
			return new JdkDynamicAopProxy(config);
		}
	}
这里可以看到它会根据条件创建 jdk 代理或者 cglib 代理:
- 目标类是一个接口或者目标类已经是一个 jdk 原生的代理对象(Proxy.class 之类),那么就创建 JdkDynamicAopProxy 类对象;
- 否则创建一个 ObjenesisCglibAopProxy 类型对象返回。
4.3 JdkDynamicAopProxy 创建代理对象
我们重点看下 JdkDynamicAopProxy 代理对象的实现。它的 getProxy 方法如下:
	@Override
	public Object getProxy(@Nullable ClassLoader classLoader) {
		if (logger.isTraceEnabled()) {
			logger.trace("Creating JDK dynamic proxy: " + this.advised.getTargetSource());
		}
    // 使用 JDK 自带的动态代理对象进行代理
		return Proxy.newProxyInstance(classLoader, this.proxiedInterfaces, this);
	}
看到这个,是不是感觉非常熟悉,用的就是 jdk 自身的动态代理 API。通过调用 Proxy 的 newProxyInstance () 方法,来创建一个动态代理对象,其中这个方法的第三个参数类型是一个 InvocationHandler 类型,传递的实例就是 JdkDynamicAopProxy 类实例本身。
Proxy 动态代理对象创建代理对象的时候,实际上是使用到了 java.lang.reflect.ProxyGenerator#generateClassFile 方法来生成目标类实例,它是在内存中通过直接写入字节码对应的数据。
我们来看看 JdkDynamicAopProxy 它实现的 InvocationHandler 接口的 invoke () 方法:
	/**
	 * 执行代理
	 *
	 * Implementation of {@code InvocationHandler.invoke}.
	 * <p>Callers will see exactly the exception thrown by the target,
	 * unless a hook method throws an exception.
	 */
	@Override
	@Nullable
	public Object invoke(Object proxy, Method method, Object[] args) throws Throwable {
		Object oldProxy = null;
		boolean setProxyContext = false;

		TargetSource targetSource = this.advised.targetSource;
		Object target = null;

		try {
			if (!this.equalsDefined && AopUtils.isEqualsMethod(method)) {
				// equals 方法
				// The target does not implement the equals(Object) method itself.
				return equals(args[0]);
			}
			else if (!this.hashCodeDefined && AopUtils.isHashCodeMethod(method)) {
				// The target does not implement the hashCode() method itself.
				return hashCode();
			}
			else if (method.getDeclaringClass() == DecoratingProxy.class) {
				// There is only getDecoratedClass() declared -> dispatch to proxy config.
				return AopProxyUtils.ultimateTargetClass(this.advised);
			}
			else if (!this.advised.opaque && method.getDeclaringClass().isInterface() &&
					method.getDeclaringClass().isAssignableFrom(Advised.class)) {
				// Service invocations on ProxyConfig with the proxy config...
				return AopUtils.invokeJoinpointUsingReflection(this.advised, method, args);
			}

			Object retVal;

			// 如果设置了暴露代理对象,就将其放入当前线程本地化中
			if (this.advised.exposeProxy) {
				// Make invocation available if necessary.
				oldProxy = AopContext.setCurrentProxy(proxy);
				setProxyContext = true;
			}

			// Get as late as possible to minimize the time we "own" the target,
			// in case it comes from a pool.
			target = targetSource.getTarget();
			Class<?> targetClass = (target != null ? target.getClass() : null);

			// 获取拦截器和动态拦截器通知
			// Get the interception chain for this method.
			List<Object> chain = this.advised.getInterceptorsAndDynamicInterceptionAdvice(method, targetClass);

			// Check whether we have any advice. If we don''t, we can fallback on direct
			// reflective invocation of the target, and avoid creating a MethodInvocation.
			if (chain.isEmpty()) {
				// We can skip creating a MethodInvocation: just invoke the target directly
				// Note that the final invoker must be an InvokerInterceptor so we know it does
				// nothing but a reflective operation on the target, and no hot swapping or fancy proxying.
				Object[] argsToUse = AopProxyUtils.adaptArgumentsIfNecessary(method, args);
				retVal = AopUtils.invokeJoinpointUsingReflection(target, method, argsToUse);
			}
			else {
				// 创建一个方法执行器
				// We need to create a method invocation...
				MethodInvocation invocation =
						new ReflectiveMethodInvocation(proxy, target, method, args, targetClass, chain);
				// Proceed to the joinpoint through the interceptor chain.
				// 执行方法,重点方法,使用了责任链调用模式
				retVal = invocation.proceed();
			}

			// Massage return value if necessary.
			Class<?> returnType = method.getReturnType();
			if (retVal != null && retVal == target &&
					returnType != Object.class && returnType.isInstance(proxy) &&
					!RawTargetAccess.class.isAssignableFrom(method.getDeclaringClass())) {
				// Special case: it returned "this" and the return type of the method
				// is type-compatible. Note that we can''t help if the target sets
				// a reference to itself in another returned object.
				retVal = proxy;
			}
			else if (retVal == null && returnType != Void.TYPE && returnType.isPrimitive()) {
				throw new AopInvocationException(
						"Null return value from advice does not match primitive return type for: " + method);
			}
			return retVal;
		}
		finally {
			if (target != null && !targetSource.isStatic()) {
				// Must have come from TargetSource.
				targetSource.releaseTarget(target);
			}
			if (setProxyContext) {
				// Restore old proxy.
				AopContext.setCurrentProxy(oldProxy);
			}
		}
	}
我们梳理下它的流程:
- 对一些基础方法和 DecoratingProxy 类型、Advised 类型直接返回,比如 equals、hashCode 等;
- 如果设置了暴露代理对象,就将其放入当前线程本地化中;
- 获取拦截器和动态拦截器通知(非常重要的方法);org.springframework.aop.framework.AdvisedSupport#getInterceptorsAndDynamicInterceptionAdvice
- 创建一个方法执行器 ReflectiveMethodInvocation,执行方法(非常重要的方法,内部使用了责任链调用模式);
- 返回生成的代理对象。
4.3.1 获取拦截器和动态拦截通知
这个逻辑对应上面 invoke 流程中的第 3 步,是非常重要的方法。先看下它的源码:org.springframework.aop.framework.AdvisedSupport#getInterceptorsAndDynamicInterceptionAdvice
	/**
	 * 从给定的方法和目标类中,根据增强器的通知来创建对应的拦截器和冬天拦截器通知。
	 *
	 * Determine a list of {@link org.aopalliance.intercept.MethodInterceptor} objects
	 * for the given method, based on this configuration.
	 * @param method the proxied method
	 * @param targetClass the target class
	 * @return a List of MethodInterceptors (may also include InterceptorAndDynamicMethodMatchers)
	 */
	public List<Object> getInterceptorsAndDynamicInterceptionAdvice(Method method, @Nullable Class<?> targetClass) {
		MethodCacheKey cacheKey = new MethodCacheKey(method);
		List<Object> cached = this.methodCache.get(cacheKey);
		if (cached == null) {
			// 从增强器链工厂中获取方法拦截器
			cached = this.advisorChainFactory.getInterceptorsAndDynamicInterceptionAdvice(
					this, method, targetClass);
			this.methodCache.put(cacheKey, cached);
		}
		return cached;
	}
它又继续调用了增强器链工厂的方法:org.springframework.aop.framework.DefaultAdvisorChainFactory#getInterceptorsAndDynamicInterceptionAdvice
	/**
	 * 获取增强器的通知,并且将它转成方法拦截器
	 *
	 * @param config      the AOP configuration in the form of an Advised object
	 * @param method      the proxied method
	 * @param targetClass the target class (may be {@code null} to indicate a proxy without
	 *                    target object, in which case the method''s declaring class is the next best option)
	 * @return
	 */
	@Override
	public List<Object> getInterceptorsAndDynamicInterceptionAdvice(
			Advised config, Method method, @Nullable Class<?> targetClass) {

		// 增强器适配器注册器
		// This is somewhat tricky... We have to process introductions first,
		// but we need to preserve order in the ultimate list.
		AdvisorAdapterRegistry registry = GlobalAdvisorAdapterRegistry.getInstance();
		// 获取所有增强器
		Advisor[] advisors = config.getAdvisors();
		List<Object> interceptorList = new ArrayList<>(advisors.length);
		Class<?> actualClass = (targetClass != null ? targetClass : method.getDeclaringClass());
		Boolean hasIntroductions = null;

		// 遍历所有的增强器
		for (Advisor advisor : advisors) {
			if (advisor instanceof PointcutAdvisor) {
				// 基本上属于 InstantiationModelAwarePointcutAdvisorImpl 这个类
				// Add it conditionally.
				PointcutAdvisor pointcutAdvisor = (PointcutAdvisor) advisor;
				if (config.isPreFiltered() || pointcutAdvisor.getPointcut().getClassFilter().matches(actualClass)) {
					// 获取方法匹配器
					MethodMatcher mm = pointcutAdvisor.getPointcut().getMethodMatcher();
					boolean match;
					if (mm instanceof IntroductionAwareMethodMatcher) {
						if (hasIntroductions == null) {
							hasIntroductions = hasMatchingIntroductions(advisors, actualClass);
						}
						match = ((IntroductionAwareMethodMatcher) mm).matches(method, actualClass, hasIntroductions);
					}
					else {
						match = mm.matches(method, actualClass);
					}
					// 判断方法和切点是否匹配
					if (match) {
						// 从注册器中获取增强的方法拦截器
						MethodInterceptor[] interceptors = registry.getInterceptors(advisor);
						if (mm.isRuntime()) {
							// Creating a new object instance in the getInterceptors() method
							// isn''t a problem as we normally cache created chains.
							for (MethodInterceptor interceptor : interceptors) {
								// 拦截器和动态方法匹配器
								interceptorList.add(new InterceptorAndDynamicMethodMatcher(interceptor, mm));
							}
						}
						else {
							interceptorList.addAll(Arrays.asList(interceptors));
						}
					}
				}
			}
			else if (advisor instanceof IntroductionAdvisor) {
				IntroductionAdvisor ia = (IntroductionAdvisor) advisor;
				if (config.isPreFiltered() || ia.getClassFilter().matches(actualClass)) {
					Interceptor[] interceptors = registry.getInterceptors(advisor);
					interceptorList.addAll(Arrays.asList(interceptors));
				}
			}
			else {
				Interceptor[] interceptors = registry.getInterceptors(advisor);
				interceptorList.addAll(Arrays.asList(interceptors));
			}
		}

		return interceptorList;
	}
这个可是最核心的方法了,梳理下它的调用流程:
- 获取一个增强器适配器注册表对象 AdvisorAdapterRegistry,实际上是一个 DefaultAdvisorAdapterRegistry 类型的对象;
- 获取所有的增强器进行遍历;
- 根据增强器所属类型(主要是 PointcutAdvisor 类型),进行判断是否匹配目标(获取切点上的方法匹配器与目标方法进行匹配);
- 从增强器适配器注册表 DefaultAdvisorAdapterRegistry 中,根据增强器来获取拦截器;
- 返回拦截器集合。
4.3.1.1 从增强器适配器注册表中获取拦截器
我们看下第 4 步,从增强器适配器注册表中获取拦截器:org.springframework.aop.framework.adapter.DefaultAdvisorAdapterRegistry#getInterceptors
	/**
	 * 从给定的增强器中获取方法拦截器
	 *
	 * @param advisor the Advisor to find an interceptor for
	 * @return
	 * @throws UnknownAdviceTypeException
	 */
	@Override
	public MethodInterceptor[] getInterceptors(Advisor advisor) throws UnknownAdviceTypeException {
		List<MethodInterceptor> interceptors = new ArrayList<>(3);
		// 获取增强器上的通知
		Advice advice = advisor.getAdvice();
		if (advice instanceof MethodInterceptor) {
			// 方法拦截器接口,环绕通知、后置通知、异常通知
			interceptors.add((MethodInterceptor) advice);
		}
		for (AdvisorAdapter adapter : this.adapters) {
			// 三个适配器:前置通知、返回通知、异常通知(一般不创建这个异常通知)
			if (adapter.supportsAdvice(advice)) {
				interceptors.add(adapter.getInterceptor(advisor));
			}
		}
		if (interceptors.isEmpty()) {
			throw new UnknownAdviceTypeException(advisor.getAdvice());
		}
		return interceptors.toArray(new MethodInterceptor[0]);
	}


	// 增强器适配器
	private final List<AdvisorAdapter> adapters = new ArrayList<>(3);


	/**
	 * 创建一个增强器适配器注册器,注册已知的适配器。
	 *
	 * Create a new DefaultAdvisorAdapterRegistry, registering well-known adapters.
	 */
	public DefaultAdvisorAdapterRegistry() {
		// 注册前置通知适配器
		registerAdvisorAdapter(new MethodBeforeAdviceAdapter());
		// 注册返回通知适配器
		registerAdvisorAdapter(new AfterReturningAdviceAdapter());
		// 注册异常通知适配器
		registerAdvisorAdapter(new ThrowsAdviceAdapter());
	}

	@Override
	public void registerAdvisorAdapter(AdvisorAdapter adapter) {
		this.adapters.add(adapter);
	}
那么它的流程是:
- 获取增强器上的通知;
- 判断通知是否属于 MethodInterceptor 类型,属于就直接放入集合保存起来;
- 遍历注册表中的所有的适配器(MethodBeforeAdviceAdapter 前置通知适配器、AfterReturningAdviceAdapter 返回通知适配器、ThrowsAdviceAdapter 异常通知适配器),判断通知是否支持,支持的话就从对应的适配器中获取拦截器(分别对应 MethodBeforeAdviceInterceptor 前置通知拦截器、AfterReturningAdviceInterceptor 后置通知拦截器、ThrowsAdviceInterceptor 异常通知拦截器)保存到集合;
- 返回保存的拦截器集合。
4.3.2 ReflectiveMethodInvocation 方法执行器
下面,我们该看执行方法的逻辑了。它是通过创建一个方法执行器 ReflectiveMethodInvocation 对象,看它的 proceed () 方法:
	/**
	 * 执行方法调用
	 *
	 * @return
	 * @throws Throwable
	 */
	@Override
	@Nullable
	public Object proceed() throws Throwable {
		// 从索引为 -1 开始调用
		// We start with an index of -1 and increment early.
		if (this.currentInterceptorIndex == this.interceptorsAndDynamicMethodMatchers.size() - 1) {
			// 当前索引 == 拦截器集合中最后一个拦截器时,才会进行执行真正的方法调用
			return invokeJoinpoint();
		}

		// 根据索引递增的顺序获取拦截器
		Object interceptorOrInterceptionAdvice =
				this.interceptorsAndDynamicMethodMatchers.get(++this.currentInterceptorIndex);
		if (interceptorOrInterceptionAdvice instanceof InterceptorAndDynamicMethodMatcher) {
			// Evaluate dynamic method matcher here: static part will already have
			// been evaluated and found to match.
			InterceptorAndDynamicMethodMatcher dm =
					(InterceptorAndDynamicMethodMatcher) interceptorOrInterceptionAdvice;
			Class<?> targetClass = (this.targetClass != null ? this.targetClass : this.method.getDeclaringClass());
			// 再一次匹配
			if (dm.methodMatcher.matches(this.method, targetClass, this.arguments)) {
				// 匹配成功,进行拦截调用,把当前对象作为参数,传入拦截器方法,作为方法执行器
				// 依次执行:异常通知拦截器 --> 前置通知拦截器 --> 后置通知拦截器 --> 返回通知拦截器 --> 代理对象的目标方法
				return dm.interceptor.invoke(this);
			}
			else {
				// 动态匹配失败,跳过这个拦截器。进入下一个链
				// Dynamic matching failed.
				// Skip this interceptor and invoke the next in the chain.
				return proceed();
			}
		}
		else {
			// It''s an interceptor, so we just invoke it: The pointcut will have
			// been evaluated statically before this object was constructed.
			return ((MethodInterceptor) interceptorOrInterceptionAdvice).invoke(this);
		}
	}
它的逻辑是:
- 判断当前 currentInterceptorIndex 变量(从 -1 开始)是否等于拦截器链长度减一的值,如果符合,则执行 invokeJoinpoint () 方法,真正执行目标方法调用(通过反反射调用);
- 使用 currentInterceptorIndex 变量递增,从拦截器链中获取拦截器;
- 执行拦截器的 invoke 方法,并传入当前对象(拦截器中会根据它的类型来决定)。
先看下 MethodInterceptor 拦截器接口的实现图:
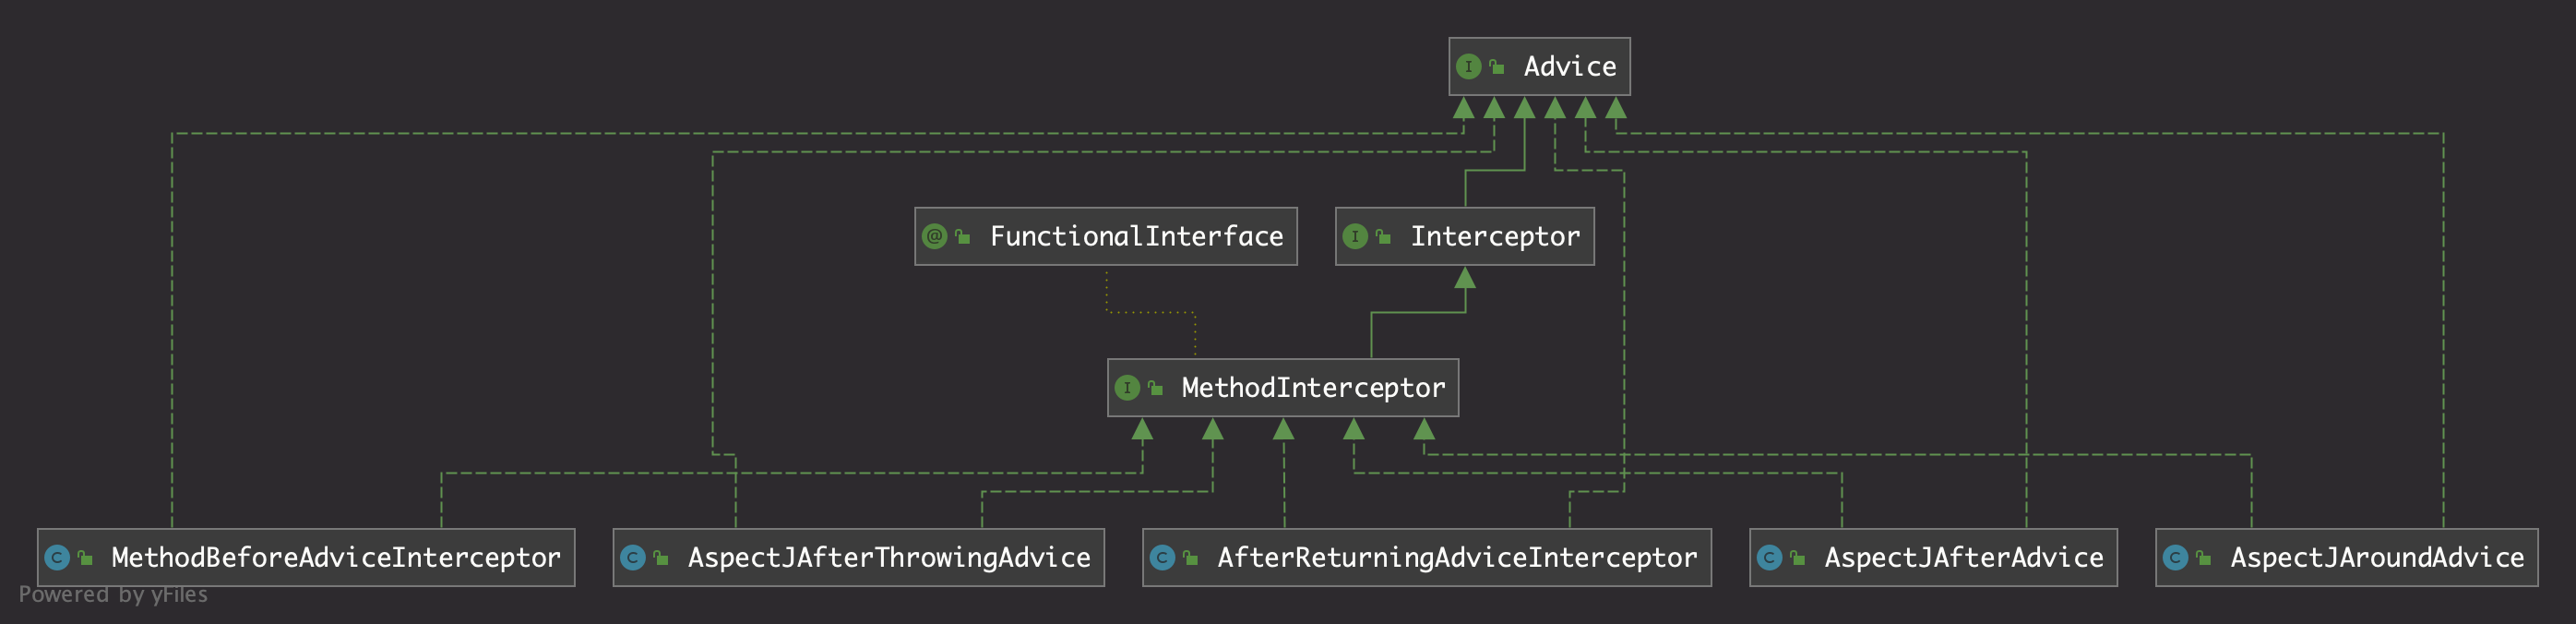
上面的方法拦截器实现依次是:前置通知、异常通知、返回通知、后置通知、环绕通知拦截器。
这里的调用流程非常有必要打断点走一遍,在目标方法 example.scannable.MyLogService#sayHello 上打断点,看下它的方法调用栈:
# 最后执行目标方法 MyLogServiceImpl 的 sayHello 方法
sayHello(String):11, MyLogServiceImpl (example.scannable), MyLogServiceImpl.java
invoke0(Method, Object, Object[]):-1, NativeMethodAccessorImpl (jdk.internal.reflect), NativeMethodAccessorImpl.java
invoke(Object, Object[]):62, NativeMethodAccessorImpl (jdk.internal.reflect), NativeMethodAccessorImpl.java
invoke(Object, Object[]):43, DelegatingMethodAccessorImpl (jdk.internal.reflect), DelegatingMethodAccessorImpl.java
# 执行 Method 的的 invoke 方法,反射
invoke(Object, Object[]):566, Method (java.lang.reflect), Method.java
# 最后执行 AopUtils类的 invokeJoinpointUsingReflection 方法
invokeJoinpointUsingReflection(Object, Method, Object[]):359, AopUtils (org.springframework.aop.support), AopUtils.java
# 最后执行 ReflectiveMethodInvocation 类的 invokeJoinpoint 方法
invokeJoinpoint():217, ReflectiveMethodInvocation (org.springframework.aop.framework), ReflectiveMethodInvocation.java
# 再执行 ReflectiveMethodInvocation 类的 proceed 方法
proceed():177, ReflectiveMethodInvocation (org.springframework.aop.framework), ReflectiveMethodInvocation.java
# 执行第三个拦截器 AspectJAfterThrowingAdvice 异常通知拦截器的 invoke 方法
invoke(MethodInvocation):67, AspectJAfterThrowingAdvice (org.springframework.aop.aspectj), AspectJAfterThrowingAdvice.java
# 再执行 ReflectiveMethodInvocation 类的 proceed 方法
proceed():205, ReflectiveMethodInvocation (org.springframework.aop.framework), ReflectiveMethodInvocation.java
# 执行第三个拦截器 AfterReturningAdviceInterceptor 返回通知拦截器的 invoke 方法
invoke(MethodInvocation):58, AfterReturningAdviceInterceptor (org.springframework.aop.framework.adapter), AfterReturningAdviceInterceptor.java
# 再执行 ReflectiveMethodInvocation 类的 proceed 方法
proceed():205, ReflectiveMethodInvocation (org.springframework.aop.framework), ReflectiveMethodInvocation.java
# 执行第二个拦截器 AspectJAfterAdvice 后置通知拦截器的 invoke 方法
invoke(MethodInvocation):52, AspectJAfterAdvice (org.springframework.aop.aspectj), AspectJAfterAdvice.java
# 再执行 ReflectiveMethodInvocation 类的 proceed 方法
proceed():205, ReflectiveMethodInvocation (org.springframework.aop.framework), ReflectiveMethodInvocation.java
# 执行第二个拦截器 MethodBeforeAdviceInterceptor 前置通知拦截器的 invoke 方法
invoke(MethodInvocation):60, MethodBeforeAdviceInterceptor (org.springframework.aop.framework.adapter), MethodBeforeAdviceInterceptor.java
# 再执行 ReflectiveMethodInvocation 类的 proceed 方法
proceed():205, ReflectiveMethodInvocation (org.springframework.aop.framework), ReflectiveMethodInvocation.java
# 执行第一个拦截器 ExposeInvocationInterceptor 的 invoke 方法
invoke(MethodInvocation):99, ExposeInvocationInterceptor (org.springframework.aop.interceptor), ExposeInvocationInterceptor.java
# 执行 ReflectiveMethodInvocation 类的 proceed 方法
proceed():205, ReflectiveMethodInvocation (org.springframework.aop.framework), ReflectiveMethodInvocation.java
# 执行 JdkDynamicAopProxy 的 invoke 方法
invoke(Object, Method, Object[]):222, JdkDynamicAopProxy (org.springframework.aop.framework), JdkDynamicAopProxy.java
# 执行代理对象 Proxy 的 sayHello 方法
sayHello(String):-1, $Proxy50 (com.sun.proxy), Unknown Source
aspectIsApplied1(ApplicationContext):67, EnableAspectJAutoProxyTests (org.springframework.context.annotation), EnableAspectJAutoProxyTests.java
# 调用 EnableAspectJAutoProxyTests 测试类的 withJdkProxy 方法
withJdkProxy():44, EnableAspectJAutoProxyTests (org.springframework.context.annotation), EnableAspectJAutoProxyTests.java
...省略无关调用栈
从上面的方法执行调用链以及方法执行源代码看,它是使用了责任链模式 + 递归的方式进行调用,先从拦截器链中一个个的执行拦截器,最后再调用目标方法,形成一个拦截器调用链栈,最后执行完目标方法之后,依次返回拦截器执行剩余的方法逻辑,最后结束。
这个过程在很多地方都用到了,比如 Java web 中的 filter 过滤器链,和 spring mvc 中的方法拦截器链,都是同一个套路。web 服务器 Tomcat 中每次接收处理一个请求时,也是会创建了一个 org.apache.catalina.core.ApplicationFilterChain 过滤器链,这过滤器链中也是持有一组过滤器,然后通过一个变量从 0 开始,递增的获取过滤器,然后进行执行目标方法。
5. 总结
以上就是 spring aop 的源码核心流程,我们来稍微的回顾下:
- 通过在类上使用 @EnableAspectJAutoProxy 注解,开启 spring aop 功能;
- 这个注解引入了 AnnotationAwareAspectJAutoProxyCreator 类,它是一个 bean 后置处理器,分别主要是负责在创建 bean 时进行解析其类上的切面、通知信息,以及通过使用 jdk 动态代理或者 cglib 动态代理来创建目标;
- 然后在执行一个动态代理的 bean 的方法时,通过将解析出来的切面、切点来创建对应的方法拦截器链,以递归 + 责任链的方式执行拦截器和目标方法。

Spring Boot 与 Spring MVC 集成启动过程源码分析
开源项目推荐
Pepper Metrics 是我与同事开发的一个开源工具 (https://github.com/zrbcool/pepper-metrics),其通过收集 jedis/mybatis/httpservlet/dubbo/motan 的运行性能统计,并暴露成 prometheus 等主流时序数据库兼容数据,通过 grafana 展示趋势。其插件化的架构也非常方便使用者扩展并集成其他开源组件。
请大家给个 star,同时欢迎大家成为开发者提交 PR 一起完善项目。
从一个最简单的 Spring Boot Web 项目聊起
我们知道,用 spring-boot 写一个 web 项目非常容易,pom 继承 spring-boot-parent 然后引入依赖 spring-boot-starter-web,再写一个这样的主启动类,然后就可以去写 Controller 了,十分简单,就像这样:
@SpringBootApplication
public class SampleApplication {
    public static void main(String[] args) {
        SpringApplication.run(SampleApplication.class, args);
    }
}
// 然后再写一个Controller声明一个Rest服务
@RestController
@RequestMapping("/perf")
public class PerfController {
    @RequestMapping("/trace")
    public Object trace() {
        Object result = yourLogic();
        return result;
    }
}
聊聊 SpringApplication.run
可是我们思考过,这背后 spring-boot 到底做了什么使我们的工作如此简单,它如何将 spring、spring-mvc、tomcat 整合到一起的呢?接下来我们以项目启动角度来分析整个初始化过程。
PS:下面代码分析过程中,着重于流程的串接,调用到某个变量时,作者会直接给出这个变量的具体实现,读者也许会产生困惑,但是不要停下来,先想当然的按照作者的思路把流程捋完,后面会针对各个主要的变量初始化及选择实现的过程进行逐个解释。
从 SpringApplication.run 说起: 方法定义如下
public static ConfigurableApplicationContext run(Class<?>[] primarySources, String[] args) {
    return new SpringApplication(primarySources).run(args);
}
public ConfigurableApplicationContext run(String... args) {
    StopWatch stopWatch = new StopWatch();
    stopWatch.start();
    ConfigurableApplicationContext context = null;
    Collection<SpringBootExceptionReporter> exceptionReporters = new ArrayList<>();
    configureHeadlessProperty();
    SpringApplicationRunListeners listeners = getRunListeners(args);
    listeners.starting();
    try {
        ApplicationArguments applicationArguments = new DefaultApplicationArguments(args);
        ConfigurableEnvironment environment = prepareEnvironment(listeners, applicationArguments);
        configureIgnoreBeanInfo(environment);
        Banner printedBanner = printBanner(environment);
        context = createApplicationContext();//1)
        exceptionReporters = getSpringFactoriesInstances(SpringBootExceptionReporter.class,
                new Class[] { ConfigurableApplicationContext.class }, context);
        prepareContext(context, environment, listeners, applicationArguments, printedBanner);
        refreshContext(context);//2)
        afterRefresh(context, applicationArguments);
        stopWatch.stop();
        if (this.logStartupInfo) {
            new StartupInfoLogger(this.mainApplicationClass).logStarted(getApplicationLog(), stopWatch);
        }
        listeners.started(context);
        callRunners(context, applicationArguments);
    }
    catch (Throwable ex) {
        handleRunFailure(context, ex, exceptionReporters, listeners);
        throw new IllegalStateException(ex);
    }

    try {
        listeners.running(context);
    }
    catch (Throwable ex) {
        handleRunFailure(context, ex, exceptionReporters, null);
        throw new IllegalStateException(ex);
    }
    return context;
}
我们来分解下这个 run 方法
先看 1) context = createApplicationContext ()
负责创建 spring 主容器,这个方法内部是根据具体项目运行时依赖的类来动态选择实现的,如果是 web 项目则会选择 AnnotationConfigServletWebServerApplicationContext,至于选择的规则及原因,这里先忽略,后面会专门介绍(时空门:ServletWebServerApplicationContext)。
接下来我们重点看 2) refreshContext (context) 方法
其方法内部最终调用了 ((AbstractApplicationContext) applicationContext).refresh () 方法,我们把这个方法展开
@Override
public void refresh() throws BeansException, IllegalStateException {
    synchronized (this.startupShutdownMonitor) {
        prepareRefresh();
        ConfigurableListableBeanFactory beanFactory = obtainFreshBeanFactory();
        prepareBeanFactory(beanFactory);
        try {
            postProcessBeanFactory(beanFactory);
            invokeBeanFactoryPostProcessors(beanFactory);
            registerBeanPostProcessors(beanFactory);
            initMessageSource();
            initApplicationEventMulticaster();
            onRefresh();//3)
            registerListeners();
            finishBeanFactoryInitialization(beanFactory);
            finishRefresh();
        }
        catch (BeansException ex) {
            if (logger.isWarnEnabled()) {
                logger.warn("Exception encountered during context initialization - " +
                        "cancelling refresh attempt: " + ex);
            }
            destroyBeans();
            cancelRefresh(ex);
            throw ex;
        }
        finally {
            resetCommonCaches();
        }
    }
}
实际上,这里我们的调用已经到了 spring-context 包,其实跟 spring-boot 已经没啥关系了,这其实就是一个标准的 SpringApplicationContext 的标准启动过程中 refresh () 部分,我们不是对 spring 启动过程分解,所以我们只关注与 tomcat,spring-mvc 结合的部分。
直接看 3) onRefresh () 方法,因为 AnnotationConfigServletWebServerApplicationContext 是 ServletWebServerApplicationContext 的子类,所以流程进入 ServletWebServerApplicationContext 的 onRefresh () 方法
@Override
protected void onRefresh() {
    super.onRefresh();
    try {
        createWebServer();//4)
    }
    catch (Throwable ex) {
        throw new ApplicationContextException("Unable to start web server", ex);
    }
}
可以看到这个 4) createWebServer (),是我们的关键
private void createWebServer() {
    WebServer webServer = this.webServer;
    ServletContext servletContext = getServletContext();
    if (webServer == null && servletContext == null) {
        ServletWebServerFactory factory = getWebServerFactory();//5)
        this.webServer = factory.getWebServer(getSelfInitializer());//6)
    }
    else if (servletContext != null) {
        try {
            getSelfInitializer().onStartup(servletContext);
        }
        catch (ServletException ex) {
            throw new ApplicationContextException("Cannot initialize servlet context", ex);
        }
    }
    initPropertySources();
}
其中:
5)ServletWebServerFactory factory = getWebServerFactory();
上面这句获取到的具体实现是 TomcatServletWebServerFactory(时空门:TomcatServletWebServerFactory) 6)this.webServer = factory.getWebServer(getSelfInitializer());
先看 6) 中的 getSelfInitializer () 方法:
private org.springframework.boot.web.servlet.ServletContextInitializer getSelfInitializer() {
    return this::selfInitialize;
}
private void selfInitialize(ServletContext servletContext) throws ServletException {
    prepareWebApplicationContext(servletContext);
    registerApplicationScope(servletContext);
    WebApplicationContextUtils.registerEnvironmentBeans(getBeanFactory(), servletContext);
    for (ServletContextInitializer beans : getServletContextInitializerBeans()) {
        beans.onStartup(servletContext);
    }
}
这块有点意思,返回的是一个 this::selfInitialize,方法定义是返回 org.springframework.boot.web.servlet.ServletContextInitializer,我们看下它是什么定义
@FunctionalInterface
public interface ServletContextInitializer {
	void onStartup(ServletContext servletContext) throws ServletException;
}
@FunctionalInterface 是 java8 中 lambda 支持的一种函数式接口 selfInitialize 这段逻辑在后面过程当中会被调用。
继续看 6) 中 this.webServer = factory.getWebServer (...),我们看下实现:
@Override
public WebServer getWebServer(ServletContextInitializer... initializers) {
    Tomcat tomcat = new Tomcat();
    File baseDir = (this.baseDirectory != null) ? this.baseDirectory : createTempDir("tomcat");
    tomcat.setBaseDir(baseDir.getAbsolutePath());
    Connector connector = new Connector(this.protocol);
    tomcat.getService().addConnector(connector);
    customizeConnector(connector);
    tomcat.setConnector(connector);
    tomcat.getHost().setAutoDeploy(false);
    configureEngine(tomcat.getEngine());
    for (Connector additionalConnector : this.additionalTomcatConnectors) {
        tomcat.getService().addConnector(additionalConnector);
    }
    prepareContext(tomcat.getHost(), initializers);//7)
    return getTomcatWebServer(tomcat);
}
可以看到在里面创建了 Tomcat 实例作为 webServer 的内部实现,然后向 Tomcat 的 Service 容器注入 Connector,然后设置默认 Host 容器的 AutoDeploy 属性及其他的 Tomcat 初始化工作,最重要的一行是 7)
我们来看一下:
protected void prepareContext(Host host, ServletContextInitializer[] initializers) {
    File documentRoot = getValidDocumentRoot();
    TomcatEmbeddedContext context = new TomcatEmbeddedContext();
    if (documentRoot != null) {
        context.setResources(new LoaderHidingResourceRoot(context));
    }
    ...//省略我们不关注的部分代码
    ServletContextInitializer[] initializersToUse = mergeInitializers(initializers);//8)
    host.addChild(context);//将context加入host作为host的子容器
    configureContext(context, initializersToUse);//9)
    postProcessContext(context);
}
我们可以看到其调用 host.addChild (context) 将 context 加入 host 作为 host 的子容器,然后 其中 8) 查找所有 ServletContextInitializer 实现并合并为一个数组,然后调用 9) configureContext 方法,我们来看一下:
protected void configureContext(Context context, ServletContextInitializer[] initializers) {
    TomcatStarter starter = new TomcatStarter(initializers);//10)
    if (context instanceof TomcatEmbeddedContext) {
        TomcatEmbeddedContext embeddedContext = (TomcatEmbeddedContext) context;
        embeddedContext.setStarter(starter);
        embeddedContext.setFailCtxIfServletStartFails(true);
    }
    context.addServletContainerInitializer(starter, NO_CLASSES);//11)
    ...//忽略
}
10) 创建了 TomcatStarter 对象,并将 starter 加入 context 的 conainerInitializer 列表,见 11),这样在 tomcat 的容器启动过程中就会调用到这个 TomcatStarter 实例。
我们来看下 TomcatStarter 做了什么
class TomcatStarter implements ServletContainerInitializer {
    ...
	private final ServletContextInitializer[] initializers;
	...
	TomcatStarter(ServletContextInitializer[] initializers) {
		this.initializers = initializers;
	}
    ...
	@Override
	public void onStartup(Set<Class<?>> classes, ServletContext servletContext) throws ServletException {
		try {
			for (ServletContextInitializer initializer : this.initializers) {
				initializer.onStartup(servletContext);
			}
		}
		catch (Exception ex) {
			this.startUpException = ex;
			if (logger.isErrorEnabled()) {
				logger.error("Error starting Tomcat context. Exception: " + ex.getClass().getName() + ". Message: "
						+ ex.getMessage());
			}
		}
	}
    ...
}
可以看到 TomcatStarter 相当于 hook 了 context 启动的事件,然后调用所有注入的 initializers 的 onStartup 方法,似曾相识是吗?这就是前面说的 @FunctionalInterface 函数接口,接下来我们就深入看下前面提到的那个 initializer 的 onStartup 的具体内容
//ServletWebServerApplicationContext类当中
private org.springframework.boot.web.servlet.ServletContextInitializer getSelfInitializer() {
    return this::selfInitialize;
}
private void selfInitialize(ServletContext servletContext) throws ServletException {
    prepareWebApplicationContext(servletContext);
    registerApplicationScope(servletContext);
    WebApplicationContextUtils.registerEnvironmentBeans(getBeanFactory(), servletContext);
    for (ServletContextInitializer beans : getServletContextInitializerBeans()) {
        beans.onStartup(servletContext);
    }
}
可以看到其对 getServletContextInitializerBeans () 的每个 ServletContextInitializer 均调用了 onStartup 方法
protected Collection<ServletContextInitializer> getServletContextInitializerBeans() {
    return new ServletContextInitializerBeans(getBeanFactory());
}
看看 new ServletContextInitializerBeans (getBeanFactory ()) 做了什么
@SafeVarargs
public ServletContextInitializerBeans(ListableBeanFactory beanFactory,
        Class<? extends ServletContextInitializer>... initializerTypes) {
    this.initializers = new LinkedMultiValueMap<>();
    this.initializerTypes = (initializerTypes.length != 0) ? Arrays.asList(initializerTypes)
            : Collections.singletonList(ServletContextInitializer.class);
    addServletContextInitializerBeans(beanFactory);
    addAdaptableBeans(beanFactory);
    List<ServletContextInitializer> sortedInitializers = this.initializers.values().stream()
            .flatMap((value) -> value.stream().sorted(AnnotationAwareOrderComparator.INSTANCE))
            .collect(Collectors.toList());
    this.sortedList = Collections.unmodifiableList(sortedInitializers);
    logMappings(this.initializers);
}
可以看到其从 beanFactory 中获取 spring 容器中所有的 ServletContextInitializer 实现,这里关于集成的部分在 ServletRegistrationBean 中,ServletRegistrationBean 的注入过程参考:时空门:Dispatcherservletregistrationbean
private void addServletContextInitializerBeans(ListableBeanFactory beanFactory) {
    for (Class<? extends ServletContextInitializer> initializerType : this.initializerTypes) {
        for (Entry<String, ? extends ServletContextInitializer> initializerBean : getOrderedBeansOfType(beanFactory,
                initializerType)) {
            addServletContextInitializerBean(initializerBean.getKey(), initializerBean.getValue(), beanFactory);
        }
    }
}
private void addServletContextInitializerBean(String beanName, ServletContextInitializer initializer,
        ListableBeanFactory beanFactory) {
    if (initializer instanceof ServletRegistrationBean) {
        Servlet source = ((ServletRegistrationBean<?>) initializer).getServlet();
        addServletContextInitializerBean(Servlet.class, beanName, initializer, beanFactory, source);
    }
    else if (initializer instanceof FilterRegistrationBean) {
        Filter source = ((FilterRegistrationBean<?>) initializer).getFilter();
        addServletContextInitializerBean(Filter.class, beanName, initializer, beanFactory, source);
    }
    else if (initializer instanceof DelegatingFilterProxyRegistrationBean) {
        String source = ((DelegatingFilterProxyRegistrationBean) initializer).getTargetBeanName();
        addServletContextInitializerBean(Filter.class, beanName, initializer, beanFactory, source);
    }
    else if (initializer instanceof ServletListenerRegistrationBean) {
        EventListener source = ((ServletListenerRegistrationBean<?>) initializer).getListener();
        addServletContextInitializerBean(EventListener.class, beanName, initializer, beanFactory, source);
    }
    else {
        addServletContextInitializerBean(ServletContextInitializer.class, beanName, initializer, beanFactory,
                initializer);
    }
}
然后流程就顺了,我们会调用到 ServletRegistrationBean 的 onStartup 方法,最终会调用到 servletContext.addServlet 的 Servlet3.0 的标准将 DispatchServlet 注入到 servlet 容器中拦截所有的请求。
见下面代码:
//RegistrationBean
@Override
public final void onStartup(ServletContext servletContext) throws ServletException {
    String description = getDescription();
    if (!isEnabled()) {
        logger.info(StringUtils.capitalize(description) + " was not registered (disabled)");
        return;
    }
    register(description, servletContext);
}
//DynamicRegistrationBean
@Override
protected final void register(String description, ServletContext servletContext) {
    D registration = addRegistration(description, servletContext);
    if (registration == null) {
        logger.info(
                StringUtils.capitalize(description) + " was not registered " + "(possibly already registered?)");
        return;
    }
    configure(registration);
}
//ServletRegistrationBean
@Override
protected ServletRegistration.Dynamic addRegistration(String description, ServletContext servletContext) {
    String name = getServletName();
    return servletContext.addServlet(name, this.servlet);
}
至此所有集成完毕,启动过程交给 tomcat 完成。
没讲完的故事:各个依赖的组件是如何初始化的
TomcatServletWebServerFactory
spring-boot-autoconfigure/META-INF/spring.factories 中有一段配置:
...
# Auto Configure
org.springframework.boot.autoconfigure.EnableAutoConfiguration=\
org.springframework.boot.autoconfigure.web.servlet.ServletWebServerFactoryAutoConfiguration,\
...
然后我们来看下 ServletWebServerFactoryAutoConfiguration 类
@Configuration
@AutoConfigureOrder(Ordered.HIGHEST_PRECEDENCE)
@ConditionalOnClass(ServletRequest.class)
@ConditionalOnWebApplication(type = Type.SERVLET)
@EnableConfigurationProperties(ServerProperties.class)
@Import({ ServletWebServerFactoryAutoConfiguration.BeanPostProcessorsRegistrar.class,
		ServletWebServerFactoryConfiguration.EmbeddedTomcat.class,
		ServletWebServerFactoryConfiguration.EmbeddedJetty.class,
		ServletWebServerFactoryConfiguration.EmbeddedUndertow.class })
public class ServletWebServerFactoryAutoConfiguration {
    ...
}
其中 @Import 部分引入了 ServletWebServerFactoryConfiguration.EmbeddedTomcat.class,深入看一下
@Configuration
class ServletWebServerFactoryConfiguration {
	@Configuration
	@ConditionalOnClass({ Servlet.class, Tomcat.class, UpgradeProtocol.class })
	@ConditionalOnMissingBean(value = ServletWebServerFactory.class, search = SearchStrategy.CURRENT)
	public static class EmbeddedTomcat {
		@Bean
		public TomcatServletWebServerFactory tomcatServletWebServerFactory() {
			return new TomcatServletWebServerFactory();
		}
	}
	...
}
这块 Spring Boot 根据 @ConditionalOnClass 判断当前运行时环境是否符合条件,即包含了 tomcat 的 jar 包,如果满足则创建 TomcatServletWebServerFactory 的 Bean 实例加入 spring 容器管理,后面有用。
ServletWebServerApplicationContext
实际启动时,启动的是其子类 AnnotationConfigServletWebServerApplicationContext,我们来看下 SpringApplication 类,实际上 SpringApplication 在运行时根据情况决定使用哪种 ApplicationContext 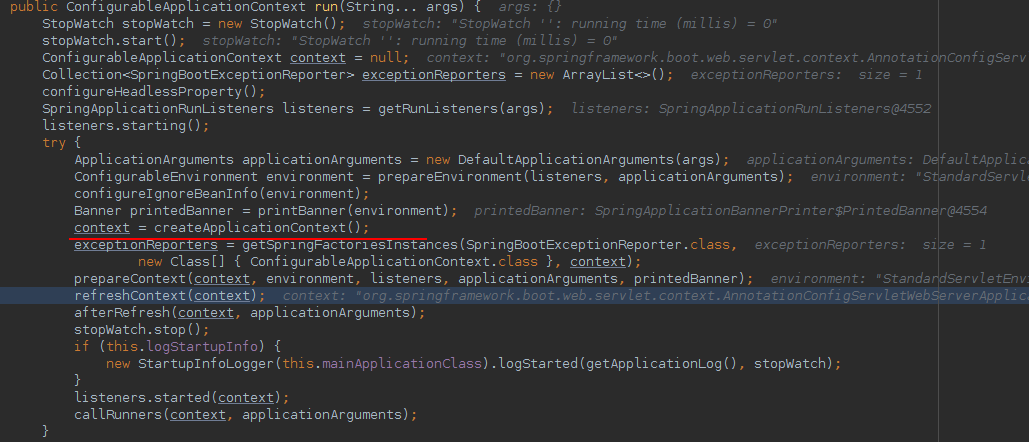 查看 createApplicationContext () 方法
 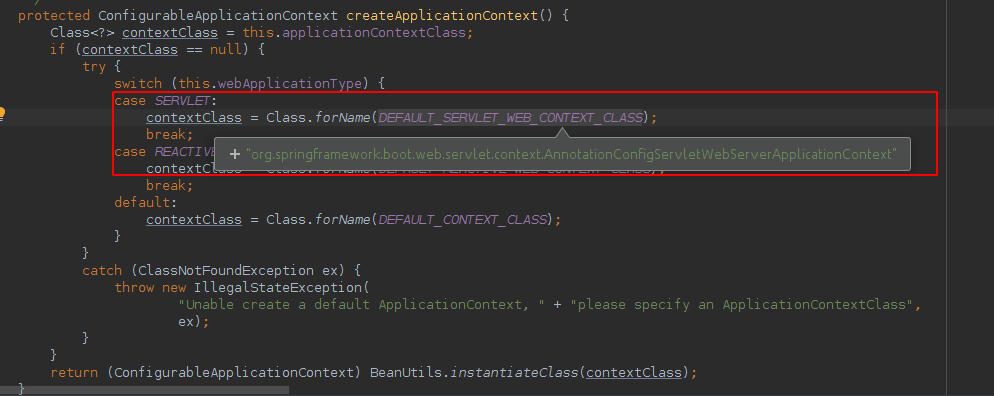 那么这个 this.webApplicationType 又是哪来的值呢? 我们看下这个构造方法
public SpringApplication(ResourceLoader resourceLoader, Class<?>... primarySources) {
    this.resourceLoader = resourceLoader;
    Assert.notNull(primarySources, "PrimarySources must not be null");
    this.primarySources = new LinkedHashSet<>(Arrays.asList(primarySources));
    this.webApplicationType = WebApplicationType.deduceFromClasspath();
    setInitializers((Collection) getSpringFactoriesInstances(ApplicationContextInitializer.class));
    setListeners((Collection) getSpringFactoriesInstances(ApplicationListener.class));
    this.mainApplicationClass = deduceMainApplicationClass();
}
WebApplicationType.deduceFromClasspath () 用来自动识别这个值,看下实现:
static WebApplicationType deduceFromClasspath() {
    if (ClassUtils.isPresent(WEBFLUX_INDICATOR_CLASS, null) && !ClassUtils.isPresent(WEBMVC_INDICATOR_CLASS, null)
            && !ClassUtils.isPresent(JERSEY_INDICATOR_CLASS, null)) {
        return WebApplicationType.REACTIVE;
    }
    for (String className : SERVLET_INDICATOR_CLASSES) {
        if (!ClassUtils.isPresent(className, null)) {
            return WebApplicationType.NONE;
        }
    }
    return WebApplicationType.SERVLET;
}
可以看到它是通过判断 classloader 中是否有 Servlet 相关的 class 来判断的,所以是运行时判断的。
DispatcherServletRegistrationBean
DispatcherServletRegistrationBean 是保证我们的 DispatcherServlet 被注入到 Servlet 容器并生效的关键,我们来看下它是如何初始化的
spring-boot-autoconfigure/META-INF/spring.factories 中有一段配置:
# Auto Configure
org.springframework.boot.autoconfigure.EnableAutoConfiguration=\
org.springframework.boot.autoconfigure.web.servlet.DispatcherServletAutoConfiguration,\
看看实现
@AutoConfigureOrder(Ordered.HIGHEST_PRECEDENCE)
@Configuration
@ConditionalOnWebApplication(type = Type.SERVLET)
@ConditionalOnClass(DispatcherServlet.class)
@AutoConfigureAfter(ServletWebServerFactoryAutoConfiguration.class)
public class DispatcherServletAutoConfiguration {
	@Configuration
	@Conditional(DispatcherServletRegistrationCondition.class)
	@ConditionalOnClass(ServletRegistration.class)
	@EnableConfigurationProperties(WebMvcProperties.class)
	@Import(DispatcherServletConfiguration.class)
	protected static class DispatcherServletRegistrationConfiguration {

		private final WebMvcProperties webMvcProperties;

		private final MultipartConfigElement multipartConfig;

		public DispatcherServletRegistrationConfiguration(WebMvcProperties webMvcProperties,
				ObjectProvider<MultipartConfigElement> multipartConfigProvider) {
			this.webMvcProperties = webMvcProperties;
			this.multipartConfig = multipartConfigProvider.getIfAvailable();
		}

		@Bean(name = DEFAULT_DISPATCHER_SERVLET_REGISTRATION_BEAN_NAME)
		@ConditionalOnBean(value = DispatcherServlet.class, name = DEFAULT_DISPATCHER_SERVLET_BEAN_NAME)
		public DispatcherServletRegistrationBean dispatcherServletRegistration(DispatcherServlet dispatcherServlet) {
			DispatcherServletRegistrationBean registration = new DispatcherServletRegistrationBean(dispatcherServlet,
					this.webMvcProperties.getServlet().getPath());
			registration.setName(DEFAULT_DISPATCHER_SERVLET_BEAN_NAME);
			registration.setLoadOnStartup(this.webMvcProperties.getServlet().getLoadOnStartup());
			if (this.multipartConfig != null) {
				registration.setMultipartConfig(this.multipartConfig);
			}
			return registration;
		}

	}
}
可以看到,其像 spring 容器注册了 DispatcherServletRegistrationBean 的 Bean 实例,看一下它的继承关系: 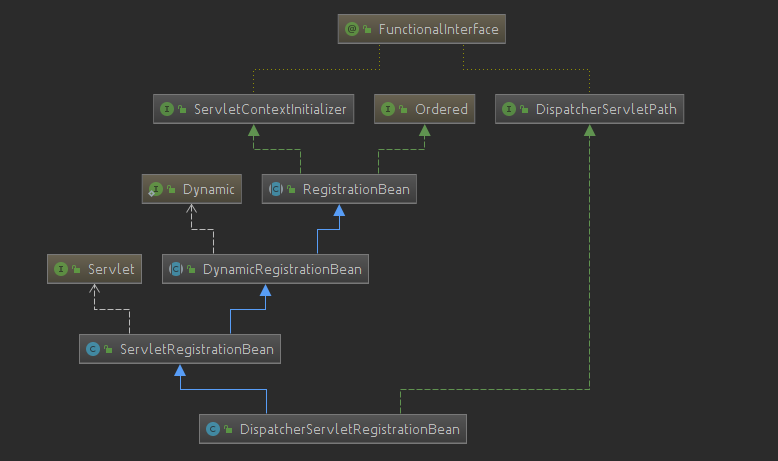
其父类 ServletRegistrationBean 类有如下方法:
@Override
protected ServletRegistration.Dynamic addRegistration(String description, ServletContext servletContext) {
    String name = getServletName();
    return servletContext.addServlet(name, this.servlet);
}
其调用了 ServletContext.addServlet 方法将 DispatchServlet 加入到 Servlet 容器,这是 Servlet3.0 中注册 servlet 的方法。
那么你也许会问,addRegistration 又是什么时机调用的呢? 根据继承关系,查看其父类的父类 RegistrationBean,其有一个
@Override
public final void onStartup(ServletContext servletContext) throws ServletException {
    String description = getDescription();
    if (!isEnabled()) {
        logger.info(StringUtils.capitalize(description) + " was not registered (disabled)");
        return;
    }
    register(description, servletContext);
}
register 方法是一个模板方法,调用子类 DynamicRegistrationBean 的实现
@Override
protected final void register(String description, ServletContext servletContext) {
    D registration = addRegistration(description, servletContext);
    if (registration == null) {
        logger.info(StringUtils.capitalize(description) + " was not registered " + "(possibly already registered?)");
        return;
    }
    configure(registration);
}
addRegistration 方法又是一个模板方法,实现就是前面 ServletRegistrationBean 的 addRegistration 实现,而 onStartup 方法会在 SpringApplication.run () 方法的流程中被调用到,讲主流程的时候已经讲到,这里不再赘述
这样就将 DispatchServlet 与 Tomcat 进行了集成,DispatchServlet 使用模板方法设计模式,将具体的请求分配给不同的 handler 处理,这个后面会讲到,本篇就主要专注在 Spring Boot 与 Spring MVC 及 Tomcat 的集成原理部分。
今天关于spring tx 事务核心流程源码分析和spring事务源码深度解析的分享就到这里,希望大家有所收获,若想了解更多关于Java 架构师之源码分析专题 SpringBoot2.x、Spring5、SpringMVC、Mybatis 源码分析、Mybatis 核心流程源码分析、spring aop 源码核心流程分析、Spring Boot 与 Spring MVC 集成启动过程源码分析等相关知识,可以在本站进行查询。
本文标签:


![[转帖]Ubuntu 安装 Wine方法(ubuntu如何安装wine)](https://www.gvkun.com/zb_users/cache/thumbs/4c83df0e2303284d68480d1b1378581d-180-120-1.jpg)

