在本文中,我们将带你了解Are-introductiontoJavaScript(JStutorial)在这篇文章中,同时我们还将给您一些技巧,以帮助您实现更有效的AnIntroductiontoMa
在本文中,我们将带你了解A re-introduction to JavaScript (JS tutorial)在这篇文章中,同时我们还将给您一些技巧,以帮助您实现更有效的An Introduction to Material Design、An Introduction to Mutual SSL Authentication、Axure RP Pro - 翻译 - 5.5 Tutorial教程 - AXURE 101 Article 4: Introduction介绍 - Masters共用区块、Azure DevOps React Container Production Build JavaScript heap out of memory 错误。
本文目录一览:- A re-introduction to JavaScript (JS tutorial)
- An Introduction to Material Design
- An Introduction to Mutual SSL Authentication
- Axure RP Pro - 翻译 - 5.5 Tutorial教程 - AXURE 101 Article 4: Introduction介绍 - Masters共用区块
- Azure DevOps React Container Production Build JavaScript heap out of memory 错误
")
A re-introduction to JavaScript (JS tutorial)
Why a re-introduction? Because JavaScript is notorious for being the world''s most misunderstood programming language. It is often derided as being a toy, but beneath its layer of deceptive simplicity, powerful language features await. JavaScript is now used by an incredible number of high-profile applications, showing that deeper knowledge of this technology is an important skill for any web or mobile developer.
It''s useful to start with an overview of the language''s history. JavaScript was created in 1995 by Brendan Eich while he was an engineer at Netscape. JavaScript was first released with Netscape 2 early in 1996. It was originally going to be called LiveScript, but it was renamed in an ill-fated marketing decision that attempted to capitalize on the popularity of Sun Microsystem''s Java language — despite the two having very little in common. This has been a source of confusion ever since.
Several months later, Microsoft released JScript with Internet Explorer 3. It was a mostly-compatible JavaScript work-alike. Several months after that, Netscape submitted JavaScript to Ecma International, a European standards organization, which resulted in the first edition of the ECMAScript standard that year. The standard received a significant update as ECMAScript edition 3 in 1999, and it has stayed pretty much stable ever since. The fourth edition was abandoned, due to political differences concerning language complexity. Many parts of the fourth edition formed the basis for ECMAScript edition 5, published in December of 2009, and for the 6th major edition of the standard, published in June of 2015.
Because it is more familiar, we will refer to ECMAScript as "JavaScript" from this point on.
Unlike most programming languages, the JavaScript language has no concept of input or output. It is designed to run as a scripting language in a host environment, and it is up to the host environment to provide mechanisms for communicating with the outside world. The most common host environment is the browser, but JavaScript interpreters can also be found in a huge list of other places, including Adobe Acrobat, Adobe Photoshop, SVG images, Yahoo''s Widget engine, server-side environments such as Node.js, NoSQL databases like the open source Apache CouchDB, embedded computers, complete desktop environments like GNOME (one of the most popular GUIs for GNU/Linux operating systems), and others.
Overview
JavaScript is a multi-paradigm, dynamic language with types and operators, standard built-in objects, and methods. Its syntax is based on the Java and C languages — many structures from those languages apply to JavaScript as well. JavaScript supports object-oriented programming with object prototypes, instead of classes (see more about prototypical inheritance and ES2015 classes). JavaScript also supports functional programming — functions are objects, giving functions the capacity to hold executable code and be passed around like any other object.
Let''s start off by looking at the building blocks of any language: the types. JavaScript programs manipulate values, and those values all belong to a type. JavaScript''s types are:
NumberStringBooleanFunctionObjectSymbol(new in ES2015)
... oh, and undefined and null, which are ... slightly odd. And Array, which is a special kind of object. And Date and RegExp, which are objects that you get for free. And to be technically accurate, functions are just a special type of object. So the type diagram looks more like this:
NumberStringBooleanSymbol(new in ES2015)ObjectFunctionArrayDateRegExp
nullundefined
And there are some built-in Error types as well. Things are a lot easier if we stick with the first diagram, however, so we''ll discuss the types listed there for now.
Numbers
Numbers in JavaScript are "double-precision 64-bit format IEEE 754 values", according to the spec. This has some interesting consequences. There''s no such thing as an integer in JavaScript, so you have to be a little careful with your arithmetic if you''re used to math in C or Java.
Also, watch out for stuff like:
0.1 + 0.2 == 0.30000000000000004;
In practice, integer values are treated as 32-bit ints, and some implementations even store it that way until they are asked to perform an instruction that''s valid on a Number but not on a 32-bit integer. This can be important for bit-wise operations.
The standard arithmetic operators are supported, including addition, subtraction, modulus (or remainder) arithmetic, and so forth. There''s also a built-in object that we forgot to mention earlier called Math that provides advanced mathematical functions and constants:
Math.sin(3.5);
var circumference = 2 * Math.PI * r;
You can convert a string to an integer using the built-in parseInt() function. This takes the base for the conversion as an optional second argument, which you should always provide:
parseInt(''123'', 10); // 123
parseInt(''010'', 10); // 10
In older browsers, strings beginning with a "0" are assumed to be in octal (radix 8), but this hasn''t been the case since 2013 or so. Unless you''re certain of your string format, you can get surprising results on those older browsers:
parseInt(''010'');  //  8
parseInt(''0x10''); // 16
Here, we see the parseInt() function treat the first string as octal due to the leading 0, and the second string as hexadecimal due to the leading "0x". The hexadecimal notation is still in place; only octal has been removed.
If you want to convert a binary number to an integer, just change the base:
parseInt(''11'', 2); // 3
Similarly, you can parse floating point numbers using the built-in parseFloat() function. Unlike its parseInt() cousin, parseFloat() always uses base 10.
You can also use the unary + operator to convert values to numbers:
+ ''42'';   // 42
+ ''010'';  // 10
+ ''0x10''; // 16
A special value called NaN (short for "Not a Number") is returned if the string is non-numeric:
parseInt(''hello'', 10); // NaN
NaN is toxic: if you provide it as an operand to any mathematical operation the result will also be NaN:
NaN + 5; // NaN
You can test for NaN using the built-in isNaN() function:
isNaN(NaN); // true
JavaScript also has the special values Infinity and -Infinity:
1 / 0; //  Infinity
-1 / 0; // -Infinity
You can test for Infinity, -Infinity and NaN values using the built-in isFinite() function:
isFinite(1 / 0); // false
isFinite(-Infinity); // false
isFinite(NaN); // false
The parseInt() and parseFloat() functions parse a string until they reach a character that isn''t valid for the specified number format, then return the number parsed up to that point. However the "+" operator simply converts the string to NaN if there is an invalid character contained within it. Just try parsing the string "10.2abc" with each method by yourself in the console and you''ll understand the differences better.
Strings
Strings in JavaScript are sequences of Unicode characters. This should be welcome news to anyone who has had to deal with internationalization. More accurately, they are sequences of UTF-16 code units; each code unit is represented by a 16-bit number. Each Unicode character is represented by either 1 or 2 code units.
If you want to represent a single character, you just use a string consisting of that single character.
To find the length of a string (in code units), access its length property:
''hello''.length; // 5
There''s our first brush with JavaScript objects! Did we mention that you can use strings like objects too? They have methods as well that allow you to manipulate the string and access information about the string:
''hello''.charAt(0); // "h"
''hello, world''.replace(''hello'', ''goodbye''); // "goodbye, world"
''hello''.toUpperCase(); // "HELLO"
Other types
JavaScript distinguishes between null, which is a value that indicates a deliberate non-value (and is only accessible through the null keyword), and undefined, which is a value of type undefined that indicates an uninitialized value — that is, a value hasn''t even been assigned yet. We''ll talk about variables later, but in JavaScript it is possible to declare a variable without assigning a value to it. If you do this, the variable''s type is undefined. undefined is actually a constant.
JavaScript has a boolean type, with possible values true and false (both of which are keywords.) Any value can be converted to a boolean according to the following rules:
false,0, empty strings (""),NaN,null, andundefinedall becomefalse.- All other values become
true.
You can perform this conversion explicitly using the Boolean() function:
Boolean('''');  // false
Boolean(234); // true
However, this is rarely necessary, as JavaScript will silently perform this conversion when it expects a boolean, such as in an if statement (see below). For this reason, we sometimes speak simply of "true values" and "false values," meaning values that become true and false, respectively, when converted to booleans. Alternatively, such values can be called "truthy" and "falsy", respectively.
Boolean operations such as && (logical and), || (logical or), and ! (logical not) are supported; see below.
Variables
New variables in JavaScript are declared using one of three keywords: let, const, or var.
let allows you to declare block-level variables. The declared variable is available from the block it is enclosed in.
let a;
let name = ''Simon'';
The following is an example of scope with a variable declared with let:
// myLetVariable is *not* visible out here

for (let myLetVariable = 0; myLetVariable < 5; myLetVariable++) {
  // myLetVariable is only visible in here
}

// myLetVariable is *not* visible out here
const allows you to declare variables whose values are never intended to change. The variable is available from the block it is declared in.
const Pi = 3.14; // variable Pi is set
Pi = 1; // will throw an error because you cannot change a constant variable.
var is the most common declarative keyword. It does not have the restrictions that the other two keywords have. This is because it was traditionally the only way to declare a variable in JavaScript. A variable declared with the var keyword is available from the function it is declared in.
var a;
var name = ''Simon'';
An example of scope with a variable declared with var:
// myVarVariable *is* visible out here

for (var myVarVariable = 0; myVarVariable < 5; myVarVariable++) {
  // myVarVariable is visible to the whole function
}

// myVarVariable *is* visible out here
If you declare a variable without assigning any value to it, its type is undefined.
An important difference between JavaScript and other languages like Java is that in JavaScript, blocks do not have scope; only functions have a scope. So if a variable is defined using var in a compound statement (for example inside an if control structure), it will be visible to the entire function. However, starting with ECMAScript 2015, let and const declarations allow you to create block-scoped variables.
Operators
JavaScript''s numeric operators are +, -, *, / and % which is the remainder operator (which is not the same as modulo.) Values are assigned using =, and there are also compound assignment statements such as += and -=. These extend out to x = x operator y.
x += 5;
x = x + 5;
You can use ++ and -- to increment and decrement respectively. These can be used as a prefix or postfix operators.
The + operator also does string concatenation:
''hello'' + '' world''; // "hello world"
If you add a string to a number (or other value) everything is converted in to a string first. This might catch you up:
''3'' + 4 + 5;  // "345"
 3 + 4 + ''5''; // "75"
Adding an empty string to something is a useful way of converting it to a string itself.
Comparisons in JavaScript can be made using <, >, <= and >=. These work for both strings and numbers. Equality is a little less straightforward. The double-equals operator performs type coercion if you give it different types, with sometimes interesting results:
123 == ''123''; // true
1 == true; // true
To avoid type coercion, use the triple-equals operator:
123 === ''123''; // false
1 === true;    // false
There are also != and !== operators.
JavaScript also has bitwise operations. If you want to use them, they''re there.
Control structures
JavaScript has a similar set of control structures to other languages in the C family. Conditional statements are supported by if and else; you can chain them together if you like:
var name = ''kittens'';
if (name == ''puppies'') {
  name += '' woof'';
} else if (name == ''kittens'') {
  name += '' meow'';
} else {
  name += ''!'';
}
name == ''kittens meow'';
JavaScript has while loops and do-while loops. The first is good for basic looping; the second for loops where you wish to ensure that the body of the loop is executed at least once:
while (true) {
  // an infinite loop!
}

var input;
do {
  input = get_input();
} while (inputIsNotValid(input));
JavaScript''s for loop is the same as that in C and Java: it lets you provide the control information for your loop on a single line.
for (var i = 0; i < 5; i++) {
  // Will execute 5 times
}
JavaScript also contains two other prominent for loops: for...of
for (let value of array) {
  // do something with value
}
and for...in:
for (let property in object) {
  // do something with object property
}
The && and || operators use short-circuit logic, which means whether they will execute their second operand is dependent on the first. This is useful for checking for null objects before accessing their attributes:
var name = o && o.getName();
Or for caching values (when falsy values are invalid):
var name = cachedName || (cachedName = getName());
JavaScript has a ternary operator for conditional expressions:
var allowed = (age > 18) ? ''yes'' : ''no'';
The switch statement can be used for multiple branches based on a number or string:
switch (action) {
  case ''draw'':
    drawIt();
    break;
  case ''eat'':
    eatIt();
    break;
  default:
    doNothing();
}
If you don''t add a break statement, execution will "fall through" to the next level. This is very rarely what you want — in fact it''s worth specifically labeling deliberate fallthrough with a comment if you really meant it to aid debugging:
switch (a) {
  case 1: // fallthrough
  case 2:
    eatIt();
    break;
  default:
    doNothing();
}
The default clause is optional. You can have expressions in both the switch part and the cases if you like; comparisons take place between the two using the === operator:
switch (1 + 3) {
  case 2 + 2:
    yay();
    break;
  default:
    neverhappens();
}
Objects
JavaScript objects can be thought of as simple collections of name-value pairs. As such, they are similar to:
- Dictionaries in Python.
- Hashes in Perl and Ruby.
- Hash tables in C and C++.
- HashMaps in Java.
- Associative arrays in PHP.
The fact that this data structure is so widely used is a testament to its versatility. Since everything (bar core types) in JavaScript is an object, any JavaScript program naturally involves a great deal of hash table lookups. It''s a good thing they''re so fast!
The "name" part is a JavaScript string, while the value can be any JavaScript value — including more objects. This allows you to build data structures of arbitrary complexity.
There are two basic ways to create an empty object:
var obj = new Object();
And:
var obj = {};
These are semantically equivalent; the second is called object literal syntax and is more convenient. This syntax is also the core of JSON format and should be preferred at all times.
Object literal syntax can be used to initialize an object in its entirety:
var obj = {
  name: ''Carrot'',
  for: ''Max'', // ''for'' is a reserved word, use ''_for'' instead.
  details: {
    color: ''orange'',
    size: 12
  }
};
Attribute access can be chained together:
obj.details.color; // orange
obj[''details''][''size'']; // 12
The following example creates an object prototype, Person and an instance of that prototype, You.
function Person(name, age) {
  this.name = name;
  this.age = age;
}

// Define an object
var you = new Person(''You'', 24);
// We are creating a new person named "You" aged 24.
Once created, an object''s properties can again be accessed in one of two ways:
//dot notation
obj.name = ''Simon'';
var name = obj.name;
And...
// bracket notation
obj[''name''] = ''Simon'';
var name = obj[''name''];
// can use a variable to define a key
var user = prompt(''what is your key?'')
obj[user] = prompt(''what is its value?'')
These are also semantically equivalent. The second method has the advantage that the name of the property is provided as a string, which means it can be calculated at run-time. However, using this method prevents some JavaScript engine and minifier optimizations being applied. It can also be used to set and get properties with names that are reserved words:
obj.for = ''Simon''; // Syntax error, because ''for'' is a reserved word
obj[''for''] = ''Simon''; // works fine
Starting in ECMAScript 5, reserved words may be used as object property names "in the buff". This means that they don''t need to be "clothed" in quotes when defining object literals. See the ES5 Spec.
For more on objects and prototypes see Object.prototype. For an explanation of object prototypes and the object prototype chains see Inheritance and the prototype chain.
Starting in ECMAScript 2015, object keys can be defined by the variable using bracket notation upon being created. {[phoneType]: 12345} is possible instead of just var userPhone = {}; userPhone[phoneType] = 12345.
Arrays
Arrays in JavaScript are actually a special type of object. They work very much like regular objects (numerical properties can naturally be accessed only using [] syntax) but they have one magic property called ''length''. This is always one more than the highest index in the array.
One way of creating arrays is as follows:
var a = new Array();
a[0] = ''dog'';
a[1] = ''cat'';
a[2] = ''hen'';
a.length; // 3
A more convenient notation is to use an array literal:
var a = [''dog'', ''cat'', ''hen''];
a.length; // 3
Note that array.length isn''t necessarily the number of items in the array. Consider the following:
var a = [''dog'', ''cat'', ''hen''];
a[100] = ''fox'';
a.length; // 101
Remember — the length of the array is one more than the highest index.
If you query a non-existent array index, you''ll get a value of undefined in return:
typeof a[90]; // undefined
If you take the above about [] and length into account, you can iterate over an array using the following for loop:
for (var i = 0; i < a.length; i++) {
  // Do something with a[i]
}
ECMAScript introduced the more concise for...of loop for iterable objects such as arrays:
for (const currentValue of a) {
  // Do something with currentValue
}
You could also iterate over an array using a for...in loop. But if someone added new properties to Array.prototype, they would also be iterated over by this loop. Therefore this loop type is not recommended for arrays.
Another way of iterating over an array that was added with ECMAScript 5 is forEach():
[''dog'', ''cat'', ''hen''].forEach(function(currentValue, index, array) {
  // Do something with currentValue or array[index]
});
If you want to append an item to an array simply do it like this:
a.push(item);
Arrays come with a number of methods. See also the full documentation for array methods.
| Method name | Description |
|---|---|
a.toString() |
Returns a string with the toString() of each element separated by commas. |
a.toLocaleString() |
Returns a string with the toLocaleString() of each element separated by commas. |
a.concat(item1[, item2[, ...[, itemN]]]) |
Returns a new array with the items added on to it. |
a.join(sep) |
Converts the array to a string — with values delimited by the sep param |
a.pop() |
Removes and returns the last item. |
a.push(item1, ..., itemN) |
Appends items to the end of the array. |
a.reverse() |
Reverses the array. |
a.shift() |
Removes and returns the first item. |
a.slice(start[, end]) |
Returns a sub-array. |
a.sort([cmpfn]) |
Takes an optional comparison function. |
a.splice(start, delcount[, item1[, ...[, itemN]]]) |
Lets you modify an array by deleting a section and replacing it with more items. |
a.unshift(item1[, item2[, ...[, itemN]]]) |
Prepends items to the start of the array. |
Functions
Along with objects, functions are the core component in understanding JavaScript. The most basic function couldn''t be much simpler:
function add(x, y) {
  var total = x + y;
  return total;
}
This demonstrates a basic function. A JavaScript function can take 0 or more named parameters. The function body can contain as many statements as you like and can declare its own variables which are local to that function. The return statement can be used to return a value at any time, terminating the function. If no return statement is used (or an empty return with no value), JavaScript returns undefined.
The named parameters turn out to be more like guidelines than anything else. You can call a function without passing the parameters it expects, in which case they will be set to undefined.
add(); // NaN
// You can''t perform addition on undefined
You can also pass in more arguments than the function is expecting:
add(2, 3, 4); // 5
// added the first two; 4 was ignored
That may seem a little silly, but functions have access to an additional variable inside their body called arguments, which is an array-like object holding all of the values passed to the function. Let''s re-write the add function to take as many values as we want:
function add() {
  var sum = 0;
  for (var i = 0, j = arguments.length; i < j; i++) {
    sum += arguments[i];
  }
  return sum;
}

add(2, 3, 4, 5); // 14
That''s really not any more useful than writing 2 + 3 + 4 + 5 though. Let''s create an averaging function:
function avg() {
  var sum = 0;
  for (var i = 0, j = arguments.length; i < j; i++) {
    sum += arguments[i];
  }
  return sum / arguments.length;
}

avg(2, 3, 4, 5); // 3.5
This is pretty useful, but it does seem a little verbose. To diminish this code a bit more we can look at substituting the use of the arguments array through Rest parameter syntax. In this way, we can pass in any number of arguments into the function while keeping our code minimal. The rest parameter operator is used in function parameter lists with the format: ...variable and it will include within that variable the entire list of uncaptured arguments that the function was called with. We will also replace the for loop with a for...of loop to return the values within our variable.
function avg(...args) {
  var sum = 0;
  for (let value of args) {
    sum += value;
  }
  return sum / args.length;
}

avg(2, 3, 4, 5); // 3.5
In the above code, the variable args holds all the values that were passed into the function.
It is important to note that wherever the rest parameter operator is placed in a function declaration it will store all arguments after its declaration, but not before. i.e. function avg(firstValue, ...args) will store the first value passed into the function in the firstValue variable and the remaining arguments in args. Another useful function but it does lead us to a new problem. The avg() function takes a comma-separated list of arguments — but what if you want to find the average of an array? You could just rewrite the function as follows:
function avgArray(arr) {
  var sum = 0;
  for (var i = 0, j = arr.length; i < j; i++) {
    sum += arr[i];
  }
  return sum / arr.length;
}

avgArray([2, 3, 4, 5]); // 3.5
But it would be nice to be able to reuse the function that we''ve already created. Luckily, JavaScript lets you call a function with an arbitrary array of arguments, using the apply() method of any function object.
avg.apply(null, [2, 3, 4, 5]); // 3.5
The second argument to apply() is the array to use as arguments; the first will be discussed later on. This emphasizes the fact that functions are objects too.
You can achieve the same result using the spread operator in the function call.
For instance: avg(...numbers)
JavaScript lets you create anonymous functions.
var avg = function() {
  var sum = 0;
  for (var i = 0, j = arguments.length; i < j; i++) {
    sum += arguments[i];
  }
  return sum / arguments.length;
};
This is semantically equivalent to the function avg() form. It''s extremely powerful, as it lets you put a full function definition anywhere that you would normally put an expression. This enables all sorts of clever tricks. Here''s a way of "hiding" some local variables — like block scope in C:
var a = 1;
var b = 2;

(function() {
  var b = 3;
  a += b;
})();

a; // 4
b; // 2
JavaScript allows you to call functions recursively. This is particularly useful for dealing with tree structures, such as those found in the browser DOM.
function countChars(elm) {
  if (elm.nodeType == 3) { // TEXT_NODE
    return elm.nodeValue.length;
  }
  var count = 0;
  for (var i = 0, child; child = elm.childNodes[i]; i++) {
    count += countChars(child);
  }
  return count;
}
This highlights a potential problem with anonymous functions: how do you call them recursively if they don''t have a name? JavaScript lets you name function expressions for this. You can use named IIFEs (Immediately Invoked Function Expressions) as shown below:
var charsInBody = (function counter(elm) {
  if (elm.nodeType == 3) { // TEXT_NODE
    return elm.nodeValue.length;
  }
  var count = 0;
  for (var i = 0, child; child = elm.childNodes[i]; i++) {
    count += counter(child);
  }
  return count;
})(document.body);
The name provided to a function expression as above is only available to the function''s own scope. This allows more optimizations to be done by the engine and results in more readable code. The name also shows up in the debugger and some stack traces, which can save you time when debugging.
Note that JavaScript functions are themselves objects — like everything else in JavaScript — and you can add or change properties on them just like we''ve seen earlier in the Objects section.
Custom objects
For a more detailed discussion of object-oriented programming in JavaScript, see Introduction to Object-Oriented JavaScript.
In classic Object Oriented Programming, objects are collections of data and methods that operate on that data. JavaScript is a prototype-based language that contains no class statement, as you''d find in C++ or Java (this is sometimes confusing for programmers accustomed to languages with a class statement). Instead, JavaScript uses functions as classes. Let''s consider a person object with first and last name fields. There are two ways in which the name might be displayed: as "first last" or as "last, first". Using the functions and objects that we''ve discussed previously, we could display the data like this:
function makePerson(first, last) {
  return {
    first: first,
    last: last
  };
}
function personFullName(person) {
  return person.first + '' '' + person.last;
}
function personFullNameReversed(person) {
  return person.last + '', '' + person.first;
}

s = makePerson(''Simon'', ''Willison'');
personFullName(s); // "Simon Willison"
personFullNameReversed(s); // "Willison, Simon"
This works, but it''s pretty ugly. You end up with dozens of functions in your global namespace. What we really need is a way to attach a function to an object. Since functions are objects, this is easy:
function makePerson(first, last) {
  return {
    first: first,
    last: last,
    fullName: function() {
      return this.first + '' '' + this.last;
    },
    fullNameReversed: function() {
      return this.last + '', '' + this.first;
    }
  };
}

s = makePerson(''Simon'', ''Willison'');
s.fullName(); // "Simon Willison"
s.fullNameReversed(); // "Willison, Simon"
There''s something here we haven''t seen before: the this keyword. Used inside a function, this refers to the current object. What that actually means is specified by the way in which you called that function. If you called it using dot notation or bracket notation on an object, that object becomes this. If dot notation wasn''t used for the call, this refers to the global object.
Note that this is a frequent cause of mistakes. For example:
s = makePerson(''Simon'', ''Willison'');
var fullName = s.fullName;
fullName(); // undefined undefined
When we call fullName() alone, without using s.fullName(), this is bound to the global object. Since there are no global variables called first or last we get undefined for each one.
We can take advantage of the this keyword to improve our makePerson function:
function Person(first, last) {
  this.first = first;
  this.last = last;
  this.fullName = function() {
    return this.first + '' '' + this.last;
  };
  this.fullNameReversed = function() {
    return this.last + '', '' + this.first;
  };
}
var s = new Person(''Simon'', ''Willison'');
We have introduced another keyword: new. new is strongly related to this. It creates a brand new empty object, and then calls the function specified, with this set to that new object. Notice though that the function specified with this does not return a value but merely modifies the this object. It''s new that returns the this object to the calling site. Functions that are designed to be called by new are called constructor functions. Common practice is to capitalize these functions as a reminder to call them with new.
The improved function still has the same pitfall with calling fullName() alone.
Our person objects are getting better, but there are still some ugly edges to them. Every time we create a person object we are creating two brand new function objects within it — wouldn''t it be better if this code was shared?
function personFullName() {
  return this.first + '' '' + this.last;
}
function personFullNameReversed() {
  return this.last + '', '' + this.first;
}
function Person(first, last) {
  this.first = first;
  this.last = last;
  this.fullName = personFullName;
  this.fullNameReversed = personFullNameReversed;
}
That''s better: we are creating the method functions only once, and assigning references to them inside the constructor. Can we do any better than that? The answer is yes:
function Person(first, last) {
  this.first = first;
  this.last = last;
}
Person.prototype.fullName = function() {
  return this.first + '' '' + this.last;
};
Person.prototype.fullNameReversed = function() {
  return this.last + '', '' + this.first;
};
Person.prototype is an object shared by all instances of Person. It forms part of a lookup chain (that has a special name, "prototype chain"): any time you attempt to access a property of Person that isn''t set, JavaScript will check Person.prototype to see if that property exists there instead. As a result, anything assigned to Person.prototype becomes available to all instances of that constructor via the this object.
This is an incredibly powerful tool. JavaScript lets you modify something''s prototype at any time in your program, which means you can add extra methods to existing objects at runtime:
s = new Person(''Simon'', ''Willison'');
s.firstNameCaps(); // TypeError on line 1: s.firstNameCaps is not a function

Person.prototype.firstNameCaps = function() {
  return this.first.toUpperCase();
};
s.firstNameCaps(); // "SIMON"
Interestingly, you can also add things to the prototype of built-in JavaScript objects. Let''s add a method to String that returns that string in reverse:
var s = ''Simon'';
s.reversed(); // TypeError on line 1: s.reversed is not a function

String.prototype.reversed = function() {
  var r = '''';
  for (var i = this.length - 1; i >= 0; i--) {
    r += this[i];
  }
  return r;
};

s.reversed(); // nomiS
Our new method even works on string literals!
''This can now be reversed''.reversed(); // desrever eb won nac sihT
As mentioned before, the prototype forms part of a chain. The root of that chain is Object.prototype, whose methods include toString() — it is this method that is called when you try to represent an object as a string. This is useful for debugging our Person objects:
var s = new Person(''Simon'', ''Willison'');
s.toString(); // [object Object]

Person.prototype.toString = function() {
  return ''<Person: '' + this.fullName() + ''>'';
}

s.toString(); // "<Person: Simon Willison>"
Remember how avg.apply() had a null first argument? We can revisit that now. The first argument to apply() is the object that should be treated as ''this''. For example, here''s a trivial implementation of new:
function trivialNew(constructor, ...args) {
  var o = {}; // Create an object
  constructor.apply(o, args);
  return o;
}
This isn''t an exact replica of new as it doesn''t set up the prototype chain (it would be difficult to illustrate). This is not something you use very often, but it''s useful to know about. In this snippet, ...args (including the ellipsis) is called the "rest arguments" — as the name implies, this contains the rest of the arguments.
Calling
var bill = trivialNew(Person, ''William'', ''Orange'');
is therefore almost equivalent to
var bill = new Person(''William'', ''Orange'');
apply() has a sister function named call, which again lets you set this but takes an expanded argument list as opposed to an array.
function lastNameCaps() {
  return this.last.toUpperCase();
}
var s = new Person(''Simon'', ''Willison'');
lastNameCaps.call(s);
// Is the same as:
s.lastNameCaps = lastNameCaps;
s.lastNameCaps(); // WILLISON
Inner functions
JavaScript function declarations are allowed inside other functions. We''ve seen this once before, with an earlier makePerson() function. An important detail of nested functions in JavaScript is that they can access variables in their parent function''s scope:
function parentFunc() {
  var a = 1;

  function nestedFunc() {
    var b = 4; // parentFunc can''t use this
    return a + b;
  }
  return nestedFunc(); // 5
}
This provides a great deal of utility in writing more maintainable code. If a function relies on one or two other functions that are not useful to any other part of your code, you can nest those utility functions inside the function that will be called from elsewhere. This keeps the number of functions that are in the global scope down, which is always a good thing.
This is also a great counter to the lure of global variables. When writing complex code it is often tempting to use global variables to share values between multiple functions — which leads to code that is hard to maintain. Nested functions can share variables in their parent, so you can use that mechanism to couple functions together when it makes sense without polluting your global namespace — "local globals" if you like. This technique should be used with caution, but it''s a useful ability to have.
Closures
This leads us to one of the most powerful abstractions that JavaScript has to offer — but also the most potentially confusing. What does this do?
function makeAdder(a) {
  return function(b) {
    return a + b;
  };
}
var x = makeAdder(5);
var y = makeAdder(20);
x(6); // ?
y(7); // ?
The name of the makeAdder() function should give it away: it creates new ''adder'' functions, each of which, when called with one argument, adds it to the argument that it was created with.
What''s happening here is pretty much the same as was happening with the inner functions earlier on: a function defined inside another function has access to the outer function''s variables. The only difference here is that the outer function has returned, and hence common sense would seem to dictate that its local variables no longer exist. But they do still exist — otherwise, the adder functions would be unable to work. What''s more, there are two different "copies" of makeAdder()''s local variables — one in which a is 5 and the other one where a is 20. So the result of that function calls is as follows:
x(6); // returns 11
y(7); // returns 27
Here''s what''s actually happening. Whenever JavaScript executes a function, a ''scope'' object is created to hold the local variables created within that function. It is initialized with any variables passed in as function parameters. This is similar to the global object that all global variables and functions live in, but with a couple of important differences: firstly, a brand new scope object is created every time a function starts executing, and secondly, unlike the global object (which is accessible as this and in browsers as window) these scope objects cannot be directly accessed from your JavaScript code. There is no mechanism for iterating over the properties of the current scope object, for example.
So when makeAdder() is called, a scope object is created with one property: a, which is the argument passed to the makeAdder() function. makeAdder() then returns a newly created function. Normally JavaScript''s garbage collector would clean up the scope object created for makeAdder() at this point, but the returned function maintains a reference back to that scope object. As a result, the scope object will not be garbage-collected until there are no more references to the function object that makeAdder() returned.
Scope objects form a chain called the scope chain, similar to the prototype chain used by JavaScript''s object system.
A closure is the combination of a function and the scope object in which it was created. Closures let you save state — as such, they can often be used in place of objects. You can find several excellent introductions to closures.

An Introduction to Material Design
Google’s material design brings with it new, exciting ways to delight your users with a visually appealing Android app. But wait—what is material design?
Google introduced material design in last year’s I/O, describing it as an interface that incorporates “tactile surfaces, bold graphic design and fluid motion to create beautiful, intuitive experiences.” Material design is the new “user experience philosophy” for Android apps!
In this tutorial, you’ll integrate material design into an app called Travel Wish List. Along the way, you’ll learn how to:
Implement the material theme;
Build dynamic views using new widgets like
RecyclerViewandCardView;Use Palette API to generate color schemes that you can use for text or background views;
Create delightful interactions using the new animation APIs.
This tutorial assumes you have a basic familiarity with Android programming including Java, XML, Android Studio and Gradle. If you’re completely new to Android, you might want to go through our Android Tutorial for Beginners: Part 1 first.
Let’s get started!
Getting Started
Download the starter project, then fire up Android Studio.
To import the starter project, first select Import project from the Quick Start menu:
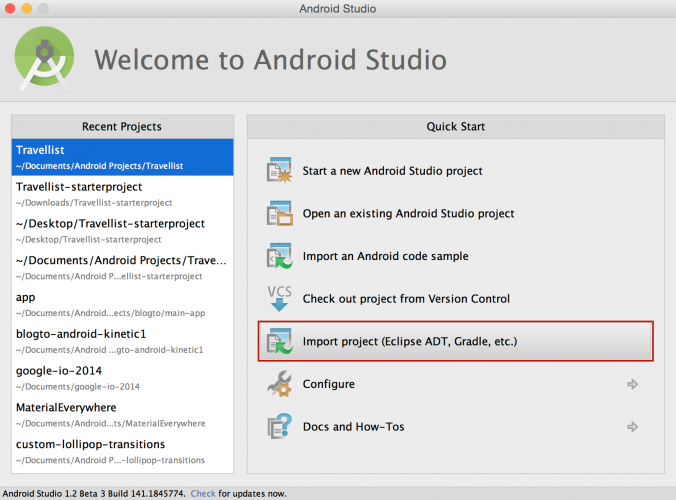
Then select the downloaded project and click OK:

Travel Wish List will be a very simple app. Users will see a grid of pictures from locations around the world, and be able to tap each picture to add notes about what to do and see.
Build and run the starter project, swipe up to get past the lock screen, and you should see a screen with the most basic of interfaces:

Right now, the world is empty! You’re going to add material components to this existing project, including dynamic views, color schemes and animations that will truly complement the beauty of the photos in your dataset.
Open build.gradle for the app module and add the following:
|
Here you’re simply declaring the dependencies that you’ll use throughout the rest of the tutorial. The first few are Google-provided APIs, but the final one, Picasso, is a fantastic image downloading and caching library provided by the good folks at Square.
With the dependencies declared, it’s time to begin incorporating Material Design into your app!
Setting Up the Theme
Before doing anything else, you should set up your theme. Open style.xml under the values directory. By default, the theme selected is android:Theme.Material.Light. Add the following items inside the theme tag:
|
Android will automatically apply android:colorPrimary to the action bar, android:colorPrimaryDark to status bar and android:colorAccent to UI widgets like textfield and checkboxes.
In the code above, you also alter the color of the navigation bar. For android:displayOptions, you passdisableHome to accommodate the screen layouts in this sample app.
Build and run, and you’ll see the new color scheme in the app.

It’s a subtle change, but like every trip on your travel wish list, upgrading this design begins with a single step!
Using the Recycler and Card Views
To give your users a window into all the cool places they might go, you need a view. You can use RecyclerView as a replacement for ListView, but it’s much more versatile than that. Google describes RecyclerView as “a flexible view for providing a limited window into a large data set.” In this section, you’re going to demonstrate this by switching the view from a list to a custom grid that uses the same data source which currently supplies the ListView with the users locations.
Implementing a Recycler View in XML
First, open activity_main.xml and add the following inside the LinearLayout tag:
|
Here you’re adding a RecyclerView to the activity’s layout, and specifying it should match the entire size of the parent view.
Initializing a Recycler View and Applying a Layout Manager
Before adding Java code, configure Android Studio so that it automatically inserts import statements to save you having to add each one manually.
Go to Preferences\Editor\General\Auto Import and select the Add unambiguous imports on the fly checkbox. In MainActivity.java, add the following to the top of the class:
|
Here you’re simply declaring two fields; one to hold a reference to the RecyclerView and another to hold a reference to the LayoutManager.
Next, add the following to the bottom of onCreate():
|
In the code above, you initialize RecyclerView and apply StaggeredGridLayout to it, which you’ll use to create two types of vertically staggered grids. Here you start with the first type, passing 1 for the span count andStaggeredGridLayoutManager.VERTICAL for the orientation. A span count of 1 makes this a list rather than a grid, as you’ll soon see. Later, you’ll add a compact grid formation with two columns.
Creating Rows and Cells Using a Card View
CardView provides a consistent backdrop for your views, including rounded corners and a drop shadow. You’re going to implement it for the row/cell layout of your RecyclerView. By default, CardView extends FrameLayout and therefore includes the ability to host other child views.
From the res\layout directory, create a new Layout resource file and call it row_places.xml. Press OK to create it.

To create your desired cell layout, replace all the contents of this file with the code below:
|
By adding xmlns:card_view="http://schemas.android.com/apk/res-auto", you can define attributes likecard_view:cardCornerRadius and card_view:cardElevation that are responsible for giving Material Design enabled Android apps their signature card-like look.
Notice that for mainHolder, you’ve added ?android:selectableItemBackground as the background. This enables the ripple effect animation when the user touches a cell, as seen in many Android apps now. You’ll get to see it in action soon.
Implementing an Adapter for a Recycler View
You’re going to use an adapter for the RecyclerView to bind data to the view. In the Java folder, right-click on thebhouse.travellist_starterproject package and select New\Java class. Call the class TravelListAdapter.
Add the following code to the class, taking care to preserve the package statement at the top of the file:
|
A couple of things are happening above:
You make
TravelListAdapterextendRecycler.Adapterso that you can implement logic for the override methods you’ll add soon.You add a constructor where the
contextcan be passed when you create an instance ofTravelListAdapterinMainActivity, which you’ll do a bit later in the tutorial.You create the
ViewHolderclass. Whereas the use of theViewHolderpattern is optional inListView,RecyclerViewenforces it. This improves scrolling and performance by avoidingfindViewById()for each cell.
Because your adapter subclasses RecyclerView.Adapter, you need to add the following methods toTravelListAdapter:
|
Here’s what’s happening:
getItemCount()returns the number of items from your data array. In this case, you’re using the size of thePlaceData.placeList().onCreateViewHolder(...)returns a new instance of yourViewHolderby passing an inflated view ofrow_places.onBindViewHolder(...)binds thePlaceobject to the UI elements inViewHolder. You’ll use Picasso to cache the images for the list.
Add a field in MainActivity that will hold a reference to your adapter:
|
And then create an instance of your adapter and pass it to the RecyclerView at the bottom of onCreate(), just after you configure the layout manager:
|
Now build and run the app, and you’ll see a populated list of places.

Which place is calling your name? I like the look of that turquoise water. But wherever you want to go, you’ll want to cultivate your dream by taking notes about what to do there. First, you need to make the cells respond to a user’s touch.

Implementing a Click Interface for Each Cell
Unlike ListView, RecyclerView doesn’t come with an onItemClick interface, so you have to implement one in the adapter. In TravelListAdapter, create a field to hold an instance of OnItemClickListener. Add the following just below the existing fields:
|
Now implement View.OnClickListener by adding the following method stub to the inner ViewHolder class:
|
Finally, hook the two up by adding the following to the bottom of ViewHolder():
|
Above, you initiate setOnClickListener for placeHolder and implement the onClick override method.
You need to do a few more things to implement the onClick interface for the RecyclerView. First, after the innerViewHolder class definition add the following:
|
Next, add the setter method of the onClickListener:
|
Now implement the logic in the empty onClick() stub within the inner ViewHolder class:
|
Build and run the app. Notice the new ripple effect every time you touch a row:

In MainActivity, create an instance of OnItemClickListener below onCreate():
|
Finally, set the listener to the adapter by adding the following code to the bottom of onCreate(), just after where you set the adapter:
|
Build and run once more. Now when you tap a cell you’ll see a Toast notification displaying the position of the cell in the list.

From List to Grid and Back
StaggeredLayoutManager lets you add versatility to your layouts. To change your existing list to a more compact two-column grid, you simply have to change the spanCount of the mLayoutManager in MainActivity.
In toggle(), add the following to the top of the if:
|
And now add the following to the top of the else branch:
|
Here you’re simply switching between single and double span counts, which displays single and double columns respectively.
Build and run and use the action bar button to toggle between list and grid views.

Using the Palette API in the List
Now you can add some interesting Material Design features into the mix, starting with the Palette API. Head back toTravelListAdapter, where you’ll define a background color for placeNameHolder that will be determined dynamically using the colors in the image.
Add the following to the bottom of onBindViewHolder(...):
|
By using generateAsync(...) to generate a color palette in the background, you’ll receive a callback when the palette has been generated in the form of onGenerated(...). Here you can access the generated color palette and set the background color of holder.placeNameHolder. If the color doesn’t exist, the method will apply a fallback color — in this case, android.R.color.black.
Build and run to see the Palette API in action!

Note: The Palette API can extracts the following color profiles from an image:
Vibrant
Vibrant Dark
Vibrant Light
Muted
Muted Dark
Muted Light
I encourage you to experiment with these. Instead of palette.getMutedColor(...), trypalette.getVibrantColor(...), palette.getVibrantDark(...) and so on.
Using the New Material APIs
In this section, you’ll use DetailActivity and its corresponding activity_detail layout, and make them cooler by infusing some of the new Material Design APIs.
First, you’ll want to see how the detail view currently looks in the starter project. To see this, go to MainActivity and create an intent in onItemClickListener. Add the following to the bottom of onItemClick(...):
|
You can pass the position of the place object via the intent so that DetailActivity can retrieve the information and use it to layout the interface. That’s what you’re doing here.
Build and run.

There isn’t anything crazy going on here (yet!), but you’ve got a nice foundation on which to start adding those highly anticipated Material Design APIs, beginning with a floating action button.
Adding a Floating Action Button with Ripple Effect
The floating action button (FAB) pattern is common to most Android apps, such as Gmail, Calendar and Drive. It is essentially the main call to action on the screen.
Create a new drawable resource file under res\drawable. Call the file btn_background.xml and define ripple as the root element, like below:
|
You’ll notice an error asking you to add android:color as an attribute. Hover over the error and you’ll see a red indicator with suggestions:
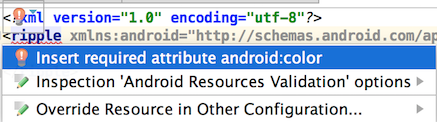
Select Insert required attribute android:color. Also pass in the default touch feedback color and the shape of the button. The completed ripple tag should look like the following:
|
This provides an oval-shaped background with the animation effect for the button.
In activity_detail.xml, add the following inside the ImageButton tag:
|
Here you’re instructing Android to use your new drawable as the background for the button.
Build and run. You’ll see a more prominent FAB that responds to touch with the ripple effect described above.

Adding a Reveal Animation
Now you want to give your users the ability to add notes about what they’d like to do in each of these stunning places. For this, activity_detail.xml already has an edittext that is hidden by default. When a user taps the FAB, it reveals itself with a cool animation like below:

Open DetailActivity. There are two methods you have yet to implement:
revealEditText()hideEditText()
First, add the following lines inside revealEditText():
|
The two int values are getting the x and y positions of the view with a slight offset. This offset gives the illusion that the reveal is happening from the direction of your FAB.
Next, the radius gives the reveal the circular outline that you can see in the GIF above. All of these values — the x-position, y-position and the radius — you pass into the animation instance. This animation is usingViewAnimationUtils, which gives you the ability to create this circular reveal.
Since the EditText view is initially hidden, you set the view’s visibility to VISIBLE and set your boolean checkisEditTextVisible to true. Finally, you can call start() on the animation.
To dismiss the view, add the following to hideEditText():
|
Here your goal is to hide the view and show the circular animation in the opposite direction. Therefore, you make the initial radius the width of the view and the ending radius 0, which shrinks the circle.
You want to show the animation first and then hide the view. To do this, you implement an animation listener and hide the view when the animation ends.
Now build and run and see this animation in action!

Note: If the keyboard presents itself, you’ll need to dismiss it explicitly to see the effect without obstruction. Oh, and don’t worry that your button doesn’t show the plus icon yet, you’ll fix that soon.
Morphing a Bezier Path for a Floating Action Button
Now that you have your reveal animation hiding and showing the edit text field, you can coordinate the icon on your FAB to look and respond just like the one shown below:

The starter project includes the vector paths for the plus and checkmark icons. You’ll learn how to animate – or morph – the paths from the plus to the checkmark, and vice versa.
Under the drawables directory, create a new resource file by going to New\Drawable resource file. Call iticn_morph and define animated-vector as the root element:
|
animated-vector requires an existing android:drawable. In this case, the animated vector will start with a plus sign and morph into a checkmark, so you’ll set the drawable to icn_add.
Now for the actual morphing, add the following inside the animated-vector tag:
|
With the code above, you are essentially transforming the vertical line of the plus icon into a checkmark while fading out the horizontal line, as the diagram below illustrates:
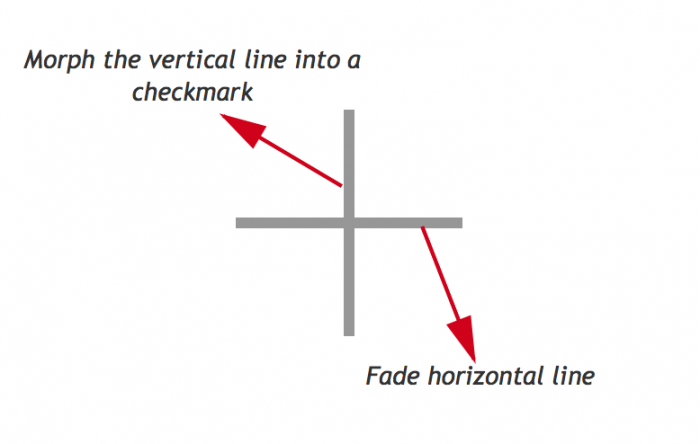
Furthermore, the vertical line is comprised of two paths, a smaller vertical line and a larger one:
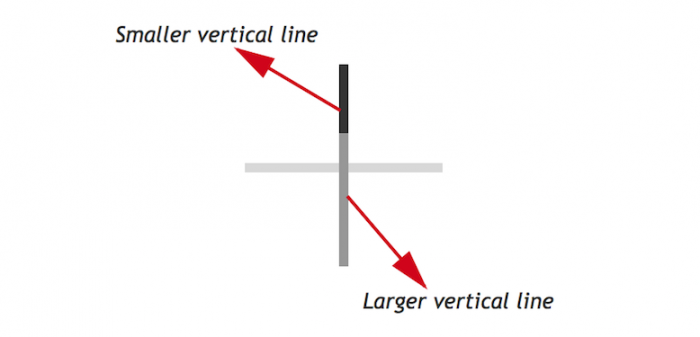
You can see from the diagram above that you can transform the first two targets, sm_vertical_line andlg_vertical_line, into a checkmark by drawing their paths at different angles, which is exactly what you do in the previous code block, along with fading out horizontal_line.
Next, you need to reverse this animation to transform the checkmark back into a plus sign. Create another drawable resource file, this time calling it icon_morph_reverse, and replace it’s contents with the following:
|
The two lines that make up the final vertical line in the plus icon will now morph back into their original states and the horizontal line will fade into view, creating a smooth effect.
Now, to complete the animation. Open DetailActivity.java and add the following to onClick(), just above the ifstatement:
|
Here you’re declaring a field to hold a reference to the animatable that will actually perform the animation. Now, add the following to the bottom of the if block:
|
Here you set the image resource of the button to the icn_morph drawable you created earlier, extract the animatable from it, and then kick-off the animation.
Finally, add the following to the very bottom of the else branch:
|
Here you’re doing almost exactly the same as the previous step, except you assign icn_morph_reverse as the image resource so the animation plays out in the opposite direction.
Along with morphing the icon, the user’s click also adds the text from mEditTextTodo to the mToDoAdapter and refreshes the place activity list. This is not yet visible because of the white text, but in the next section, you’ll add vibrant color to your views so that the text stands out.
Build and run, and watch the magic unfold before your eyes! The FAB icon now morphs between a checkmark and a plus sign when it’s tapped.

Adding Dynamic Colors to Views Using Palette API
It’s time to add colors to this view using the Palette API. And not just any colors—as before, they will be dynamic colors!
In DetailActivity, flesh out colorize() by adding the following:
|
Just like you did previously, you generate a palette from a photo – although this time you do it synchronously – and then pass that palette onto applyPalette(). Replace the existing method stub for applyPalette() with this code:
|
Here you’re you’re using the dark muted color, the muted color, and the light vibrant color as the background colors of the window, title holder, and reveal view respectively.
Finally, to kick-off this chain of events add the following line to the bottom of getPhoto():
|
It’s that time again… build and run your app! You can see the detail activity is now using a color scheme derived from the palette of the associated image.

Activity Transitions With Shared Elements
We’ve all seen and wondered about those nice image and text transitions in Google’s app which have been updated to use Material Design. Well, wait no more—you’re about to learn the intricacies of achieving smooth animation.
Note: Activity transitions, together with shared elements, allow your app to transition between two activities that share common views. For example, you can transition a thumbnail on a list into a larger image on a detail activity, providing continuity of the content.
Between the places list view, MainActivity, and the places detail view, DetailActivity, you’re going to transition the following elements:
The image of the place;
The title of the place;
The background area of the title.
Open row_places.xml and add the following to the declaration of the ImageView tag with an id of placeImage:
|
And then add this to the ImageView tag with an id of placeNameHolder:
|
Notice that placeName doesn’t have a transition name. This is because it is the child of placeNameHolder, which will transition all of its child views. In activity_detail.xml, add the following to the ImageView tag with the id placeImage:
|
And, in a similar fashion, add this to the ImageView tag that has an id of placeNameHolder
|
Shared elements between activities that you want to transition should have the same android:transitionName, which is what you’re setting up here. Also, notice that the size of the image, as well as the height of theplaceNameHolder are much larger in this activity. You’re going to animate all of these layout changes during the activity transition to provide some nice visual continuity.
In onItemClickListener() found in MainActivity, add the following to the bottom of the method:
|
After adding this code, you will need to manually add the import statement import android.support.v4.util.Pair to the top of the file as Android Studio cannot automatically determine that this is the intended package.
There are a couple of things to highlight here:
You get an instance of both
placeImageandplaceNameHolderfor the given position of theRecyclerView.You create a
Paircontaining the view and thetransitionNamefor both the image and the text holder view. Note that you will once again have to manually add the import statement to the top of the file:android.support.v4.util.Pair.To make the activity scene transition with shared views, you pass in your
Pairinstances and start the activity with youroptionsbundle.
Build and run to see the image transition from the main activity to the detail activity:

However, the animation is a bit jumpy in two areas:
The FAB button suddenly appears in
DetailActivity.If you tap on a row under the action or navigation bar, that row appears to jump a bit before it transitions.
You’ll solve the FAB button issue first. Open DetailActivity.java and add the following to windowTransition():
|
The listener you add to the enter transition is triggered when the window transition ends, which you use to fade in the FAB button. For this to be effective, set the alpha to 0 for the FAB in activity_detail.xml. Find the ImageButton with a an id of btn_add and add the following to its declaration:
|
Build and run! You’ll notice the FAB transition is much smoother!:

As for the action bar and navigation bar issues, begin by adding the following to styles.xml, inside of the style tag:
|
Since there is no action bar defined in styles.xml, you’ll have to add it using individual XML views.
Open activity_main.xml and add the following inside LinearLayout, just above the RecyclerView tag:
|
This simply includes a toolbar layout that’s provided as part of the starter project into the current layout. Now you need to make a similar change to the detail activity’s layout.
Open activity_detail.xml and add the following add the very bottom of FrameLayout, just below the closing tag of the inner LinearLayout:
|
Next in MainActivity, you need to create an instance of, and initialize the toolbar. Add the following field to the top of the class:
|
Next, set the value of the field in onCreate(). Add the following to the bottom of the method:
|
Here you assign the result of the findViewById call to the new field, and then call setUpActionBar(). At the moment it’s just an empty method stub. Fix that now by adding the following to setUpActionBar():
|
Here you set the action bar to be an instance of your custom toolbar, set the visibility of the title, disable the home button, and add a subtle drop shadow by setting the elevation.
Build and run. You’ll notice that nothing much has changed, but these changes have laid the foundations of properly being able to transition the toolbar.
Open MainActivity and replace the existing onItemClickListener with this one:
|
The differences between the original implementation and this one are thus:
You’ve renamed the intent to provide more context;
You get references to both the navigation bar and status bar;
You’ve created three new instances of
Pair– one for the navigation bar, one for the status bar, and one for the toolbar;And finally you’ve updated the options that passed to the new activity to include the references to the new views.
Great! Build and run, and you’ll see a much smoother animation:

Now if you tap on a row under the action/toolbar or navigation bar, it doesn’t jump before the transition; it transitions with the rest of the shared elements, which is much more pleasing to the eye. Switch to the grid view and you’ll notice that the transitions work very nicely with that layout as well.
Ta-da! Here is a video of the final app in action:
Where to Go From Here?
Be proud of yourself: You’ve created a full-blown Android material app! To challenge yourself, try the following:
Use
StaggeredLayoutManagerto make a grid with three columns instead of two.Experiment with the
PaletteAPI in bothMainActivityandDetailActivityusing different palette options.Add a button on the place list and transition it to the detail view as a shared element—perhaps a favorite button.
Make those transitioning animations even cooler—check out Android’s Newsstand app and see how it transitions from a grid to a detail view with the reveal animation. You have all the code here to replicate that.
Try to create all the morphing animations you did here, but using
animated-vectors.
And of course, apply this knowledge to your apps so that they can be as cool as this one. :]
To find out more about Material Design then be sure to check out Google’s recently redesigned Google Designwebsite.
You can get the full source code for this project on Github here .
Feel free to share your feedback or ask any questions in the comments below or in the forums.

An Introduction to Mutual SSL Authentication
(pronounced as separate letters) Short for Secure Sockets Layer, a protocol developed by Netscape for transmitting private documents via the Internet. SSL uses a cryptographic system that uses two keys to encrypt data − a public key known to everyone and a private or secret key known only to the recipient of the message. Both Netscape Navigator and Internet Explorer support SSL, and many Web sites use the protocol to obtain confidential user information, such as credit card numbers. By convention, URLs that require an SSL connection start with https: instead of http
In cryptography, a public key certificate (also known as a digital certificate or identity certificate) is an electronic document which uses a digital signature to bind a public key with an identity — information such as the name of a person or an organization, their address, and so forth. The certificate can be used to verify that a public key belongs to an individual.
Public-key In cryptography, a public key is a value provided by some designated authority as an encryption key that, combined with a private key derived from the public key, can be used to effectively encrypt messages and digital signatures. The use of combined public and private keys is known as asymmetric cryptography. A system for using public keys is called a public key infrastructure (PKI).
A public-key infrastructure (PKI) is a set of hardware, software, people, policies, and procedures needed to create, manage, distribute, use, store, and revoke digital certificates.[1]
A digital signature or digital signature scheme is a mathematical scheme for demonstrating the authenticity of a digital message or document. A valid digital signature gives a recipient reason to believe that the message was created by a known sender, and that it was not altered in transit. Digital signatures are commonly used for software distribution, financial transactions, and in other cases where it is important to detect forgery or tampering.
Another protocol for transmitting data securely over the World Wide Web is Secure HTTP (S-HTTP). Whereas SSL creates a secure connection between a client and a server, over which any amount of data can be sent securely, S-HTTP is designed to transmit individual messages securely. SSL and S-HTTP, therefore, can be seen as complementary rather than competing technologies. Both protocols have been approved by the Internet Engineering Task Force (IETF) as a standard.
http://www.webopedia.com/index.php/TERM/S/ssl.html
http://www.codeproject.com/Articles/326574/An-Introduction-to-Mutual-SSL-Authentication

Axure RP Pro - 翻译 - 5.5 Tutorial教程 - AXURE 101 Article 4: Introduction介绍 - Masters共用区块
Axure RP Pro - 翻译 - 5.5 Tutorial教程 - AXURE 101 Article 4: Introduction介绍 - Masters共用区块
Overview
概述
1. Masters Demo
1. 共用区块演示
2. Masters
2. 共用区块
3. Adding Masters to Wireframes
3. 向线框增加共用区块
1. Masters Demo
1. 共用区块演示
请打开扬声器听声音
在Vimeo上观看高清视频,请单击 这里 .
2. Masters
2. 共用区块
Masters are collections of widgets that can be reused throughout your design. Some commonly created masters include headers,footers and navigation. Masters can be placed on pages as well as in other masters. A change to a master is reflected everywhere the master is used.
共用区块 是部件的集合,可在设计范围内重用。创建共用区块经常用于页眉,页脚和导航。共用区块也可以像放置在页面上一样放置在其他的共用区块上。对共用区块的任何 修改都将体现在所有使用该共用区块的地方。
Masters are managed in the Masters pane.
共用区块在Masters“共用区块”面板中管理。

增加,组织和设计共用区块
To add a master,click on the Add Master button in the toolbar of the Masters pane or right click in the pane and select "Add Master".
要增加 一个共用区块,可以在Masters“共用区块”面板的工具栏上单击Add Master“增加共用区块”按钮,或者在面板中右击后选择“Add Master”增加共用区块。
Masters can be organized into folders and reordered in the Masters pane using the toolbar and context menu as well as drag and drop functionality similar to the Sitemap.
共用区块可以以文件夹的形式组织,可以借助工具栏和上下 文菜单在共用区块中调整顺序,也可以像Sitemap“站点地图”一样使用拖放功能。
Double-click on a master in the Masters pane to open it for design. Like the pages,you can design masters by dragging and dropping widgets onto the wireframe.
在共用区块面板中双击一个共用区块将打开并开始设计。和页面相同,也 可以拖放部件到线框上来设计共用区块。
3. Adding Masters to Wireframes
3. 向线框添加共用区块
To add a master to the wireframe of a page or another master,drag and drop the master from the Masters pane to the wireframe pane.
要把一个共用区块 添加到一个页面或者另一个共用区块的线框时,可以从Masters“共用区块”面板拖放共用区块到线框面板。
Depending on the behavior of the master,the instance of the master might have a pink or grey mask. To remove the mask,use Wireframe->Mask Masters in the main menu.
依赖于共用区块不同的行为, 共用区块的实例可能会有粉色或灰色的阴影。如果不希望显示这个阴影,可以在主菜单中单击Wireframe“线框”菜单然后取消选择Mask Masters“共用区块显示阴影”菜单项。
By default masters are set to the normal behavior. Masters can also be changed to the Place In Background and Custom Widget behaviors. To change the behavior of a master,right-click on the master in the Masters pane and use the "Behavior" submenu.
共用区块默认被设置为 normal“普通”行为。共用区块也可被修改为Place In Background“放置在背景”和Custom Widget“自定义部件”行为。要改变一个共用区块的行为,可以在Masters"共用区块"面板中右击共用区块然后选择Behavior“行为”子菜 单。
The behaviors are described below:
各种行为的描述如下:

@H_301_101@普通: 在放置到线框后,共用区块的实例可以被移动到或放置到线框的任何位置。共用区块的任何变化都将反映到共用区块的实例上。
Place in Background: When added to a wireframe,the instance of the master is locked and placed in the bottom layer of the wireframe. The contained widgets are in the same position as they are in the master. This is frequently used when masters are used for templates or layouts for wireframes.
放置在背景: 在添加到线框后,共用区块的实例被锁定放置在线框的低层,包含的部件在和共用区块中相同的位置,经常用于把共用区块作为线框的模板或布局的情况中。
Custom Widget: When a Custom Widget Master is placed on a wireframe,the widgets lose their relationship to the master and can be edited like other widgets. This is similar to a copy and paste action. This can be used for creating a library of commonly used widgets with predefined properties,annotations and/or interactions. For example,a blue button with white text.
自定义部件: 把一个自定义部件放置在线框后,部件就失去了和共用区块之间的关联,可以像其他部件一样编辑,这很像复制和粘贴操作。可用于创建一个包括预定义属性、注释 和/或交互的常用部件库。例如,一个带有白色文档的蓝色按钮。
[Axure RP Pro - 翻译 - 5.5 Tutorial教程 - AXURE 101: Introduction介绍 - Article 4: Masters共用区块 - 文档]
http://www.axure.com/p101_4.aspx
[Axure RP Pro - 官方网站]
http://www.axure.com/[Axure RP Pro - 关键词]
axure[Axure RP Pro - 相关论坛]
http://axure.com/cs/forums/[Axure RP Pro - Download下载]
当 前版本AXure RP Pro 5.5.0.1939,http://axure.cachefly.net/AxureRP-Pro-Setup.exe当 前版本AXure RP Pro 5.5.0.1939,http://www.axure.com/files/AxureRP-Pro-Setup.exe
Microsoft .Net Framework 2.0,http://www.microsoft.com/downloads/details.aspx?FamilyID=0856EACB-4362-4B0D-8EDD-AAB15C5E04F5
翻译,Manual Installation手工安装包,http://www.axure.com/Files/AxureRPFiles.zip
Microsoft Office Compatibility Pack兼容包 Service Pack 1 (SP1),http://www.microsoft.com/downloads/details.aspx?FamilyID=9a1822c5-49c6-47bd-8bec-0d68693ca564
Axure RP Pro 5.1.0.1699,http://www.axure.com/files/5-1-0-1699/AxureRP-Pro-Setup.exe
Axure RP Pro 5.0.0.1515,http://www.axure.com/files/5-0-0-1515/AxureRP-Pro-Setup.exe
[Axure RP Pro - Beta测试版]
下载Axure RP Pro 5.5 Beta,http://www.axure.com/downloadbeta.aspxIntroduction to Version 5.5 Features: Part 1,http://axure.com/cs/blogs/axure/archive/2008/11/19/Introduction-to-Version-5.5-Features_3A00_-Part-1.aspx
Introduction to Version 5.5 Features: Part 2,http://axure.com/cs/blogs/axure/archive/2008/11/13/Introduction-to-Version-5.5-Features_3A00_-Part-2.aspx
Introduction to Version 5.5 Features: Part 3,http://axure.com/cs/blogs/axure/archive/2008/11/13/Introduction-to-Version-5.5-Features_3A00_-Part-3.aspx
[Axure RP Pro - Tutorial教程 - 翻译]
AXURE 101: Introduction介绍 - Article 1: Introduction to Axure RP - Axure RP介绍,http://www.axure.com/p101_1.aspx AXURE 101: Introduction介绍 - Article 2: Annotated Wireframes,http://www.axure.com/p101_2.aspx
AXURE 101: Introduction介绍 - Article 4: Masters主控文档,http://www.axure.com/p101_4.aspx
AXURE 101: Introduction介绍 - Article 6: Functional mq s功能规格,http://www.axure.com/p101_6.aspx
AXURE 102: Flow Diagrams流程图 - Article 1: Flow Shapes & Connectors流程图形和连接符号,http://www.axure.com/p102_1.aspx
AXURE 102: Flow Diagrams流程图 - Article 2: Generating Flow Diagrams生成流程图,http://www.axure.com/p102_2.aspx
AXURE 201: Rich Interactions复杂交互 - Article 1: Dynamic Panels动态面板,http://www.axure.com/p201_1.aspx
AXURE 201: Rich Interactions复杂交互 - Article 2: OnMouseEnter,and Rollover Effects - OnMouseEnter,OnMouseOut和翻转效果,http://www.axure.com/p201_2.aspx
AXURE 201: Rich Interactions复杂交互 - Article 3: Menus菜单,http://www.axure.com/p201_3.aspx
5.5 AXURE 202: Rich Functionality复杂功能 - Article 1: Conditional Logic条件逻辑,http://www.axure.com/p202_1.aspx
AXURE 202: Rich Functionality复杂功能 - Article 2: OnChange Event - OnChange事件,http://www.axure.com/p202_2.aspx
AXURE 202: Rich Functionality复杂功能 - Article 3: OnKeyUp Event - OnKeyUp事件,http://www.axure.com/p202_3.aspx
AXURE 202: Rich Functionality复杂功能 - Article 4: OnFocus and OnLostFocus Events - OnFocus和OnLostFocus事件,http://www.axure.com/p202_4.aspxAXURE 202: Rich Functionality复杂功能 - Article 5: Variables - 变量,http://www.axure.com/p202_5.aspx
AXURE 202: Rich Functionality复杂功能 - Article 6: OnPageLoad Event - OnPageLoad事件,http://www.axure.com/p202_6.aspxAXURE 301: Maximizing Reuse of Masters最大化重用主控 - Article 1: Affecting Widgets in Masters在主控中影响部件,http://www.axure.com/p301_1.aspx
AXURE 301: Maximizing Reuse of Masters最大化重用主控 - Article 2: Raised Events发起事件,http://www.axure.com/p301_2.aspxAXURE 401: Collaboration协作 - Article 1: Shared Projects共享工程,http://www.axure.com/p401_1.aspx
[Axure RP Pro - Introduction介绍]
RP的含义面板的组织方式
[Axure RP Pro - Action动作]
Parent Window父窗口
[Axure RP Pro - Event事件]
窗口间互操作[Axure RP Pro - Master主控文档]
拖放控件Expand.Collapse伸缩控件
将主控文档添加到多个页面
[Axure RP Pro - Prototype原型]
关闭Internet Explorer打开原型时出现的安全警告
[Axure RP Pro - Specification规格文档]
规格文档中显示部件的属性
规 格文档中屏幕截图的脚标
[Axure RP Pro - Wireframe线框]
选择后面的部件rollover style翻转样式的常见误解
[Axure RP Pro - Widget部件]
水平线不能调整高度,垂直线不能调整宽度
如 何实现页内多个锚的效果
菜单部件不支持选中样式
[Axure RP Pro - jQuery]
如何在Axure RP Pro生成的HTML原型文档中集成jQuery,How to integrate jQuery into HTML prototype document generated by Axure RP Pro
如何获取IFrame的URL,How to retrieve the URL of IFrame widget
如何在 Axure RP Pro生成的HTML原型文档中使用自定义脚本,How to integrate customized javascript into HTML prototype document generated by Axure RP Pro
“移 到最前”效果,"Bring to Front" Interaction
如何实现淡入淡出效果,How to implement fade in and fade out effects
如何设置焦点,How to implement the "set focus" action
[Axure RP Pro - 相关问题]
Manual Installation原型中切换页面时会闪一下
让规格文档中的页面图片和标题保持在同一页,fit section header and page image on one page
跨原型链接页面
显示视频OnMouSEOver事件和Rollover翻转效果浏览器不兼容
导入时保持变量有效
变量值与部件内容并不都能相互传递
导出在PDF显示Google地图
在规格文档中描述Inline Frame部件的Default Target规格
渐变填充
使用正则表达式的较验函数在Firefox下出错
Style Editor样式编辑器以及已知的一些缺陷
Text Panel部件在设计时的效果与原型不一致
在不同工程之间使用masters主控文档
判断动态面板的状态
原型中Droplist“下拉列表”部件在IE6中总显示在最前面
设置首页面
自定义样式不能应用于翻转样式
线框中的字号与原型中的字号的关系
修改自定义样式对已应用该样式部件的逻辑
与IFrame部件中的页面互操作
在OnPageLoad事件中使用多个case用例
Open Link in Current Window,Close Current Window,Open Link in Parent Frame将忽略其余动作
使用Google Code服务分享工程的限制及原因
Button按钮部件不支持设置文字以及解决方法
修改生成的prototype原型的css样式表
在文本框中显示提示信息
OnPageLoad事件中的动作不会触发部件的事件
Droplist下拉列表框部件在规格文档中不包括默认值
dynamic panel动态面板上的image图片部件设置了rollover翻转图片后在OnClick事件中不能正确隐藏所在面板
文本不支持Rollover翻转效果以及迂回解决办法
设定多套初始化变量
表格的单元格不能使用动作设置文字
Text Panel文本部件不支持超链接及迂回处理办法
设置页面尺寸
在规格文档中显示部件工具提示
master主控文档的behavior行为是custom widget自定义部件时丢失raised event可触发事件
模拟加法运算设置打开原型的默认浏览器
ListBox列表框部件不支持修改选项
数字键盘checkBox 复选框部件的OnClick事件中复选框的状态已发生了改变
监视变量
Wireframe 线框绘制尺寸的范围及处理方案
不支持最大化显示Popup窗口
使用masters组件监视变量
在规格文档中动态面板中的droplist下拉列表框部件会重复输出选项列表
一些字符无法直接进入编辑部件文字状态
Hyperlink超链接部件不使用浏览器的超链接效果
Specification规格文档中仅包含Dynamic Panel动态面板部件在默认状态下的页面截图

Azure DevOps React Container Production Build JavaScript heap out of memory 错误
如何解决Azure DevOps React Container Production Build JavaScript heap out of memory 错误?
我正在尝试使用 Azure DevOps 管道构建 react prod docker 容器。升级构建环境和代码后,Pipeline 失败。经过一番研究,我在构建命令中添加了“--node-flags --max-old-space-size=8192”语句。不过没关系。我还尝试了构建的相关节点容器,但没有奏效。
> demo1@7.0.6 build /app
> react-scripts build

Creating an optimized production build...

    <--- Last few GCs --->


        [27:0x7f9033ec22b0]   518219 ms: Scavenge 1985.4 (2066.8) -> 1969.9 (2066.8) MB,3.7 / 0.0 ms  (average mu = 0.190,current mu = 0.078) allocation failure
        [27:0x7f9033ec22b0]   518272 ms: Scavenge 1985.8 (2067.0) -> 1970.4 (2067.0) MB,5.7 / 0.0 ms  (average mu = 0.190,current mu = 0.078) allocation failure
        [27:0x7f9033ec22b0]   520448 ms: Mark-sweep 1986.2 (2067.3) -> 1963.8 (2067.3) MB,2137.2 / 0.0 ms  (average mu = 0.257,current mu = 0.320) allocation failure scavenge might not succeed


        <--- JS stacktrace --->

        Fatal error: Ineffective mark-compacts near heap limit Allocation Failed - JavaScript heap out of memory
        npm ERR! code ELIFECYCLE
        npm ERR! errno 1
        npm ERR! demo1@7.0.6 build: `react-scripts build`
        npm ERR! Exit status 1
        npm ERR!
        npm ERR! Failed at the demo1@7.0.6 build script.
        npm ERR! This is probably not a problem with npm. There is likely additional logging output above.

        npm ERR! A complete log of this run can be found in:
        npm ERR!     /root/.npm/_logs/2021-06-13T21_04_02_873Z-debug.log
        The command ''/bin/sh -c npm run-script build --node-flags --max-old-space-size=8192'' returned a non-zero code: 1
        ##[error]The command ''/bin/sh -c npm run-script build --node-flags --max-old-space-size=8192'' returned a non-zero code: 1
        ##[error]The process ''/usr/bin/docker'' Failed with exit code 1
        Finishing: Docker
Dockerfile:
# stage1 - build react app first
FROM node:14.16.1-alpine3.13 as build
workdir /app
ENV PATH /app/node_modules/.bin:$PATH
copY ./package.json /app/
RUN apk --no-cache add g++ gcc libgcc libstdc++ linux-headers make py3-pip git
RUN npm install --quiet node-gyp -g
RUN npm install
copY . /app
RUN npm run-script build --node-flags --max-old-space-size=8192
我的 package.json 文件:
{
    "name": "demo1","version": "7.0.6","private": true,"homepage": "","scripts": {
        "start": "react-scripts start -o","build": "react-scripts build","test": "react-scripts test","eject": "react-scripts eject","lint": "eslint src","format": "prettier --write \"src/**/*.{js,css,scss,html}\"","rtl": "webpack"
    },"eslintConfig": {
        "extends": "react-app"
    },"browserslist": {
        "production": [
            ">0.2%","not dead","not op_mini all","ie 11"
        ],"development": [
            "last 1 chrome version","last 1 firefox version","last 1 safari version","last 1 edge version","IE 11"
        ]
    },"dependencies": {
        "@ant-design/charts": "^1.1.1","@ant-design/icons": "^4.6.2","@babel/standalone": "^7.14.4","@date-io/date-fns": "2.6.1","@emotion/react": "^11.4.0","@formatjs/intl-pluralrules": "1.3.5","@fortawesome/fontawesome-free": "5.13.0","@manaflair/redux-batch": "1.0.0","@material-ui/core": "4.9.14","@material-ui/icons": "4.9.1","@material-ui/lab": "4.0.0-alpha.53","@material-ui/pickers": "3.2.10","@material-ui/styles": "4.9.14","@phuocng/react-pdf-viewer": "^1.7.0","@react-google-maps/api": "^2.2.0","@reduxjs/toolkit": "1.3.6","@tanem/svg-injector": "8.0.50","antd": "^4.13.0","antd-mask-input": "^0.1.15","apexcharts": "3.19.2","axios": "0.19.2","axios-mock-adapter": "1.18.1","bootstrap": "4.5.0","bulma": "^0.9.2","bulma-helpers": "^0.4.0","chart.js": "^3.3.2","classnames": "^2.3.1","clipboard-copy": "3.1.0","clsx": "1.1.0","convert-units": "^2.3.4","cp-cli": "2.0.0","css-mediaquery": "0.1.2","date-fns": "2.8.1","dentist": "^1.0.3","dom-to-image": "^2.6.0","downshift": "3.4.2","email-validator": "^2.0.4","fg-loadcss": "2.1.0","formik": "2.1.4","frappe-gantt-react": "^0.2.2","fs": "*","html-react-parser": "^1.2.5","html2canvas": "*","inputmask-core": "^2.2.0","jquery": "^3.6.0","json2mq": "0.2.0","jspdf": "^2.3.1","jspdf-autotable": "^3.5.14","jss-rtl": "^0.3.0","lodash": "4.17.15","material-ui-popup-state": "1.4.1","node-sass": "^4.0.0","object-path": "0.11.4","pdfjs-dist": "^2.7.570","perfect-scrollbar": "1.5.0","primeicons": "^4.1.0","primereact": "^6.2.1","prop-types": "15.7.2","qrcode.react": "^1.0.1","quill": "^1.3.7","rc-year-calendar": "^1.0.2","react": "16.12.0","react-bootstrap": "1.0.1","react-bootstrap-table-next": "4.0.2","react-bootstrap-table2-editor": "^1.4.0","react-bootstrap-table2-filter": "^1.3.3","react-bootstrap-table2-paginator": "2.1.2","react-bootstrap-table2-toolkit": "^2.1.3","react-color": "^2.19.3","react-contexify": "^4.1.1","react-country-region-selector": "^3.1.0","react-data-table-component": "^6.11.7","react-date-picker": "^8.2.0","react-datepicker": "2.16.0","react-dom": "16.12.0","react-draggable": "4.4.2","react-export-excel": "^0.5.3","react-google-maps": "^9.4.5","react-helmet": "^6.1.0","react-highlight": "^0.14.0","react-highlight-words": "^0.17.0","react-horizontal-timeline": "^1.5.3","react-inlinesvg": "1.2.0","react-intl": "3.6.2","react-is": "16.13.1","react-jvectormap": "0.0.16","react-loader-spinner": "^4.0.0","react-moment": "^1.1.1","react-pdf": "^5.3.0","react-pdfjs-multi": "^0.5.1","react-perfect-scrollbar": "1.5.8","react-phone-input-2": "^2.14.0","react-portal": "4.2.0","react-qr-reader": "^2.2.1","react-qr-scanner": "*","react-redux": "7.1.3","react-router-dom": "5.1.2","react-router-last-location": "^2.0.1","react-scripts": "3.2.0","react-select": "3.1.0","react-share": "^4.4.0","react-swipeable-views": "0.13.9","react-Syntax-Highlighter": "12.2.1","react-to-print": "^2.12.6","react-toggle": "^4.1.2","react-transition-group": "^4.4.2","react-window": "1.8.5","reactjs-pdf-reader": "^1.0.12","reactstrap": "^8.9.0","redux": "4.0.5","redux-devtools-extension": "^2.13.9","redux-logger": "^3.0.6","redux-persist": "6.0.0","redux-promise-middleware": "^6.1.2","redux-saga": "1.1.3","redux-thunk": "^2.3.0","rsuite": "^4.10.2","socicon": "3.0.5","sockjs-client": "^1.4.0","stompjs": "^2.3.3","styled-components": "^5.3.0","xlsx": "0.13.4","yup": "0.29.0"
    },"devDependencies": {
        "@babel/plugin-transform-react-jsx": "^7.14.3","copyfiles": "2.1.1","node-sass": "4.14.0","prettier": "1.19.1","serve": "11.2.0","webpack-cli": "3.3.11","webpack-messages": "2.0.4","webpack-rtl-plugin": "2.0.0"
    }
}
感谢您的帮助!
解决方法
我知道“--max-old-space-size=8192”参数不会传递给构建。所以我决定在 Dockerfile 中添加 ENV,比如“ENV NODE_OPTIONS="--max-old-space-size=8192"”。最后我的 Dockerfile 转换为:
# stage1 - build react app first
FROM node:14.16.1-alpine3.13 as build
WORKDIR /app
ENV NODE_OPTIONS="--max-old-space-size=8192"
ENV PATH /app/node_modules/.bin:$PATH
COPY ./package.json /app/
RUN apk --no-cache add g++ gcc libgcc libstdc++ linux-headers make py3-pip git
RUN npm install --quiet node-gyp -g
RUN npm install
COPY . /app
RUN npm run-script build
然后问题就解决了。谢谢。
今天关于A re-introduction to JavaScript (JS tutorial)的介绍到此结束,谢谢您的阅读,有关An Introduction to Material Design、An Introduction to Mutual SSL Authentication、Axure RP Pro - 翻译 - 5.5 Tutorial教程 - AXURE 101 Article 4: Introduction介绍 - Masters共用区块、Azure DevOps React Container Production Build JavaScript heap out of memory 错误等更多相关知识的信息可以在本站进行查询。
本文标签:


![[转帖]Ubuntu 安装 Wine方法(ubuntu如何安装wine)](https://www.gvkun.com/zb_users/cache/thumbs/4c83df0e2303284d68480d1b1378581d-180-120-1.jpg)

