在这篇文章中,我们将为您详细介绍ConfiguringandauthoringKibanadashboards的内容。此外,我们还会涉及一些关于Commandlineistoolong.Shorten
在这篇文章中,我们将为您详细介绍Configuring and authoring Kibana dashboards的内容。此外,我们还会涉及一些关于Command line is too long. Shorten command line for *** or also for Spring Boot default configuration、java.lang.IllegalStateException:org.springframework.boot.autoconfigure.jdbc.JndiDataSourceAutoConfiguration上的错误处理条件、kibana dashboard 教程、org.springframework.boot.actuate.autoconfigure.EndpointAutoConfiguration的实例源码的知识,以帮助您更全面地了解这个主题。
本文目录一览:- Configuring and authoring Kibana dashboards
- Command line is too long. Shorten command line for *** or also for Spring Boot default configuration
- java.lang.IllegalStateException:org.springframework.boot.autoconfigure.jdbc.JndiDataSourceAutoConfiguration上的错误处理条件
- kibana dashboard 教程
- org.springframework.boot.actuate.autoconfigure.EndpointAutoConfiguration的实例源码

Configuring and authoring Kibana dashboards
https://amazonaws-china.com/blogs/database/configuring-and-authoring-kibana-dashboards/
Kibana is an open-source data visualization and exploration tool. It can be used for log and time-series analytics, application monitoring, and operational intelligence use cases. Kibana also offers powerful, easy-to-use features such as histograms, line graphs, pie charts, heat maps, and built-in geospatial support.
Kibana is tightly integrated with Amazon Elasticsearch Service (Amazon ES), a search and analytics engine, to simplify the analysis of large volumes of data. With its simple, browser-based interface, Amazon ES enables you to create and share dynamic dashboards quickly.
This post demonstrates how to create visualizations and a dashboard. You will use Amazon Relational Database Service (RDS) and Amazon Aurora PostgreSQL logs stored in Amazon ES using Kibana. This post is part two of a two-part series. For part one, refer to Analyze PostgreSQL logs with Amazon Elasticsearch Service.
The following are the high-level steps:
- Create index patterns
- Aggregate text field
- Explore discovery feature
- Explore visualization feature
- Create visualizations
- Create Dashboards
Prerequisites
- A valid AWS account with access to the appropriate AWS services.
- An Aurora/RDS PostgreSQL database. For more information, see Amazon RDS.
- Confirm that the database logs are generated with the required content. Check the parameter group and make sure that the following parameters have the correct value:
log_lock_waits=1(true)log_min_duration_statement=5000(log queries that take more than 5 secs)log_min_messages=warninglog_min_error_statement=errorlog_statement=ddllog_checkpoints=1(true)log_connections=1(true)log_disconnections=1(true)
Creating index patterns
To visualize and explore data in Kibana, you must first create index patterns. An index pattern points Kibana to the Amazon ES indexes containing the data that you want to explore. For example, to explore the data from a particular database in August 2019, create the index pattern: cwl-<dbname>-2019.08*. While setting up Amazon CloudWatch to Amazon ES streaming, configure the indexes in the format: cwl-<dbname>-yyyy.MM.dd.
To create index patterns, complete the following steps:
- Open the Kibana application using the URL from Amazon ES Domain Overview page.
- On the navigation panel, choose the gear icon to open the Management page.
- Choose Index Patterns.
- Choose Create index pattern.
- For Index pattern, enter cwl with an asterisk wild card (
cwl-*) as your default index pattern. - For
Time filter, choose@timestamp. - Choose
Create index pattern.
This index pattern is set as default automatically. If not, choose the star icon, as shown in the screenshot preview below.

- Repeat these steps to create index patterns for each database(
cwl-<databaseName>-*). This is a best practice to improve query performance.
Aggregating on a text field
To see when an error was logged at a particular period or which queries were logged at a particular time, allow aggregation on the message. Aggregations on a text field are not provided by default, so modify that setting. For more information, see Getting Started with Amazon Elasticsearch: Filter Aggregations in Kibana.
This setting could consume more memory based on the size of the data. To make the message field aggregatable, complete the following steps:
- On the navigation pane, choose Dev Tools.
- Enter the following command:
PUT cwl-*/_mapping/?include_type_name=false { "properties": { "message": { "type": "text", "fielddata": true } } } - Now, set the correct shard value. To allow one shard per index, use the following code:
PUT /_template/shards_per_index
{
    "template": "cwl-*",
    "settings": {
        "index" : {
            "number_of_shards": 1,
            "number_of_replicas": 1
        }
    }
}
For more information, see Get Started with Amazon Elasticsearch Service: How Many Shards Do I Need?
Explore the discovery feature
You can explore your data with Kibana’s data discovery functions. You now have access to every event from all the databases. Use the index pattern cwl-*. It is marked as default while creating the index patterns. You can view data by submitting search queries and filter results using Lucene query syntax. You can also see the number of documents that match the search query and get field value statistics.
To perform improvised searches across multiple logs and view from multiple databases, use index pattern cwl-*.
To get data from a single database, choose the correct index pattern instead of cwl-*. Find this by searching the database name in the dropdown menu in the top-left corner of the Discover pane. This helps to boost the query’s performance by invoking only the indexes of that particular database. The following image shows the populated data.
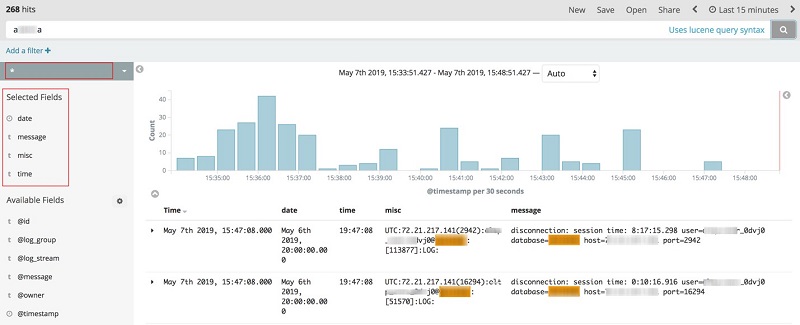
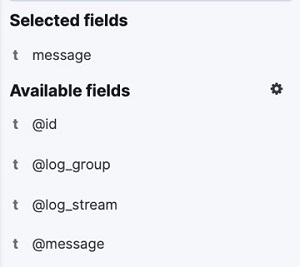
The Selected Fields menu shows the fields you configured while setting up the CloudWatch-to-Amazon ES log streaming (date, time, misc, message). The number of hits is displayed on the top-left corner of the page.
To display the select messages and omit the queries that are not a copy SQL command, use the Lucene query syntax: <databaseName> AND message:"select" -message:"copy"
The search commands are as straightforward as performing an online search. For example, you could also use <databaseName> AND select –copy without using the context field (message).
Explore the visualization feature
To create visualizations based on the data in your Amazon ES indexes, use the visualization function. Kibana visualizations are based on Amazon ES queries. You can create charts that show trends, spikes, and dips by using a series of Amazon ES aggregations to extract and process data. Create visualizations from a search saved from the discovery function or start with a new search query.
To create a new visualization, complete the following steps:
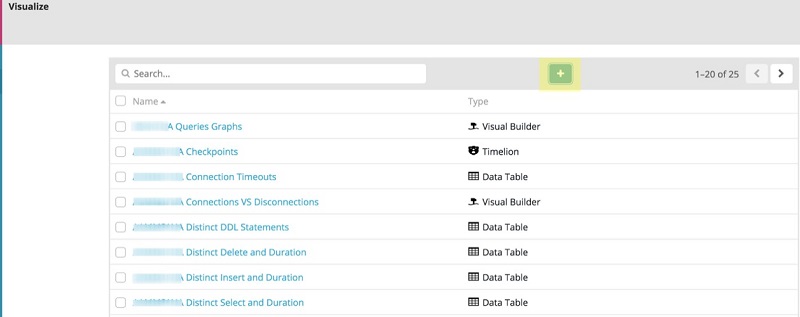
- On the navigation pane, choose Visualization.
- Choose the add icon as shown in the screenshot preview below, represented by a green square with a + sign.
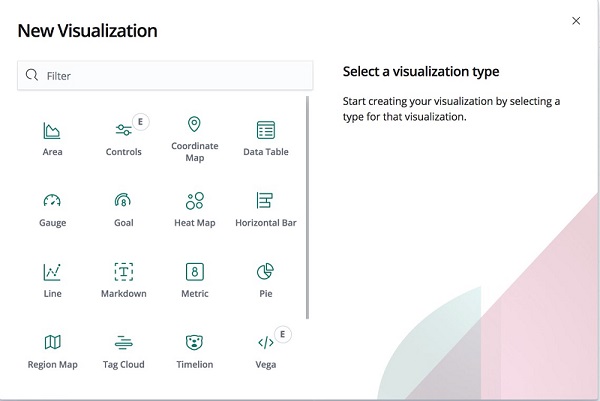
The following screenshot shows the various visualization types to choose.
Creating visualizations for the RDS PostgreSQL DB logs live dashboard
This post creates the following visualizations and adds them to a dashboard:
- A visual builder timeline graph of long-running queries.
- A data table of the locks data.
- A pie chart of the percentage of error, fatal, and warning messages.
- A data table of the error, fatal, and warning messages aggregated by time.
- A data table of the long-running queries aggregated by time.
- A visual builder bar graph of the checkpoints.
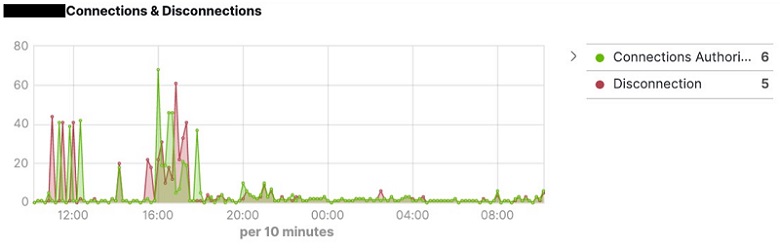
- A visual builder line graph of the connections and disconnections.
- A data table of the DDL statements aggregated by time.
This is not an exhaustive list of visualizations, but helps you understand how you can use each of them.
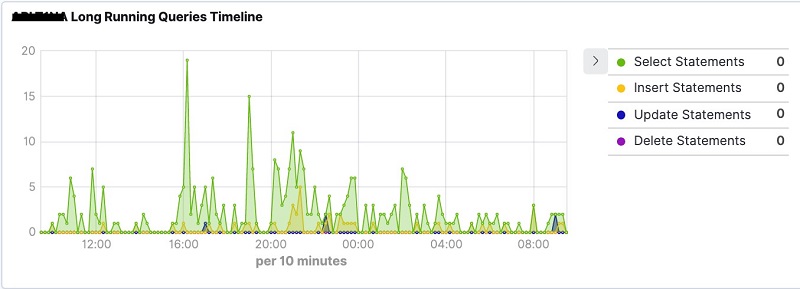
Timeline graph of long-running queries
To create a long-running queries timeline graph, complete the following steps:
- On the Visualizations pane, choose the add icon (represented by a + sign with a circle around it).
- Choose Visual Builder.
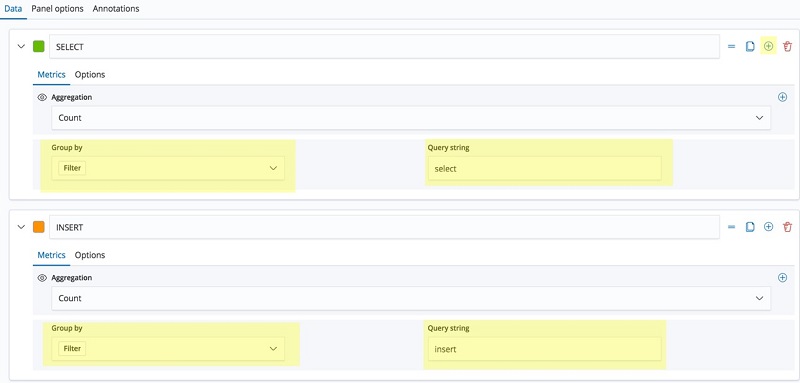
- For each filter (SELECT, INSERT, UPDATE, and DELETE), choose the add icon.
- For Group by, choose Filter.
- For Query string, enter the same string as the filter type (select, insert, update, or delete).
The following screenshot demonstrates steps 3–5.
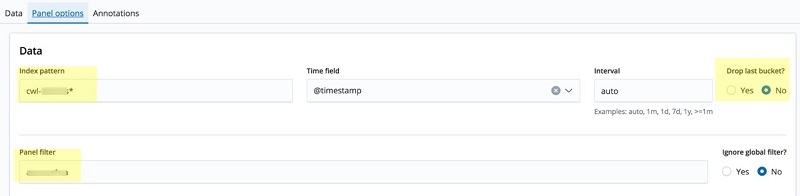
- Choose the Panel options tab.
- For Index pattern, enter the appropriate index pattern (
cwl-<dbName>*). - Choose No under Drop last bucket?
- For Panel filter, enter the database name.
The following screenshot details steps 6–9.
- Choose Save to save the visualization with an appropriate title (for example, “<dbName> Long-Running Queries Graph”). The output of the visualization is displayed as shown in the image below.
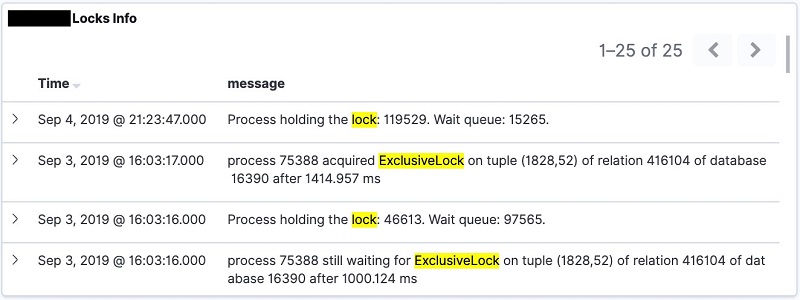
Data table of locks data
To create a data table of locks data, complete the following steps:
- On the Discover page, select the appropriate index pattern (
cwl-<dbName>*). - Add message as the selected field from the list of Available fields by hovering on the message and choosing the Add button. The screenshot below previews the message field selected.
- For Filters, enter the Lucene query:
lock OR exclusivelock OR accesssharelock, as shown in the screenshot below.

- Choose the Refresh
- Choose Save to save the search with an appropriate title (for example, <dbname> Locks Info). The output of the visualization is displayed as shown in the image below.
Pie chart of error, fatal, and warning messages
To create an error, fatal, and warning messages pie chart, complete the following steps:
- On the Visualizations pane, choose the add icon.
- Choose Pie chart.
- From the Index pattern list, choose the appropriate index pattern (
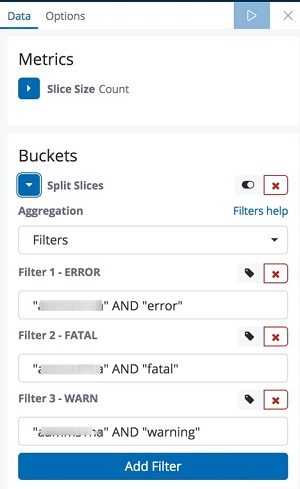
cwl-<dbName>*). - Choose Split Slices under Buckets category.
- For Aggregation, choose Filters.
- Add the following filters and choose Add Filter for each:
"<dbName>" AND "error""<dbName>" AND "fatal""<dbName>" AND "warning"
The following screenshot shows the filters added under the Buckets section.
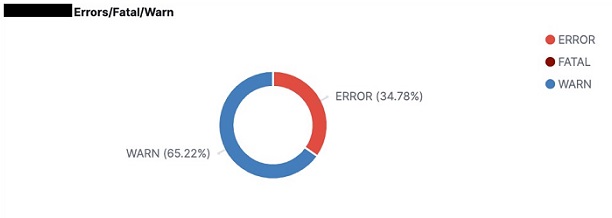
- Choose Save to save the visualization with an appropriate title (for example, <dbName> Error, Fatal, and Warning Chart). The output of the visualization is displayed as shown in the image below.
Data table of the error, fatal, and warning messages
To create an error, fatal, and warning messages data table aggregated by time, complete the following steps:
- On the Visualizations pane, choose the add icon.
- Choose Data Table.
- From the Index pattern list, choose the appropriate index pattern (cwl-*<dbName>).
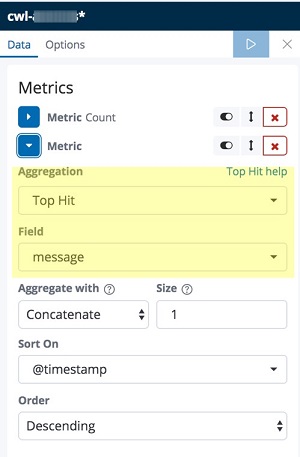
- Choose Add metrics.
- Under Metric, for Aggregation, choose Top Hit.
- For Field, choose message.
The following screenshot preview details steps 4–6.
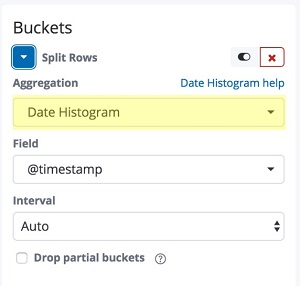
- Under Buckets, choose Split Rows.
- For Aggregation, choose Date Histogram as shown in the screenshot preview below.
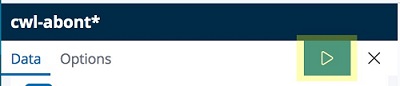
- Choose the play icon as shown below.
- For Filters, add the query string in Lucene syntax “<database name>” AND (“error” OR “fatal” OR “warning”), as shown in the screenshot preview below.

- Choose the Refresh button.
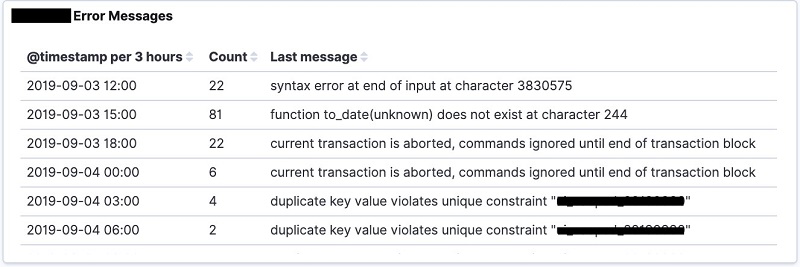
- Choose Save to save the visualization with an appropriate title (for example, <dbname> Error, Fatal, and Warning Messages). The output of the visualization is displayed as shown in the image below.
Data table of long-running queries
To create a long-running queries data table aggregated by time, follow the procedure as with creating the data table for messages, with the following changes:
- Replace the query string with <database name> AND ((“duration” AND “insert”) OR (“duration” AND “select”) OR (“duration” AND “delete”) OR (“duration” AND “update”)).
- Choose Save to save the visualization with an appropriate title (for example, <dbname> Long-Running Queries). The output of the visualization is displayed as shown in the image below.

Graph of checkpoints
To create a checkpoints graph, complete the following steps:
- On the Visualizations pane, choose the add icon.
- Choose Visual Builder.
- For Group by, choose Filters.
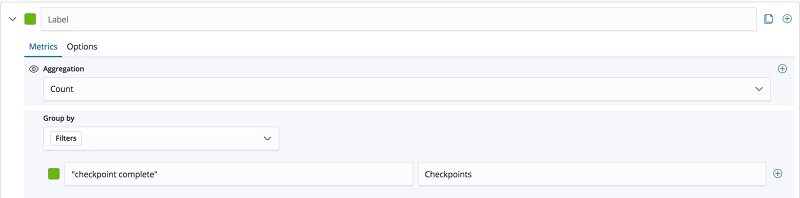
- In the Filters fields, enter “checkpoint complete” and “Checkpoints”, as shown in the screenshot preview below.
- Choose the Options tab.
- Add the appropriate index pattern (cwl-*<dbName>) in the Index pattern text box.
- Choose No under Drop last bucket?
- For Panel filter, enter the database name.
- For Chart type, choose Bar.
- Choose Save to save the visualization with an appropriate title (for example, <dbName> Checkpoint Graph). The output of the visualization is displayed as shown in the image below.

Graph of connections and disconnections
To create a graph of connections and disconnections, complete the following steps:
- On the Visualizations pane, choose the add icon.
- Choose Visual builder.
- For each filter (Connection and Disconnection), choose the add icon.
- For Group by, choose Filter.
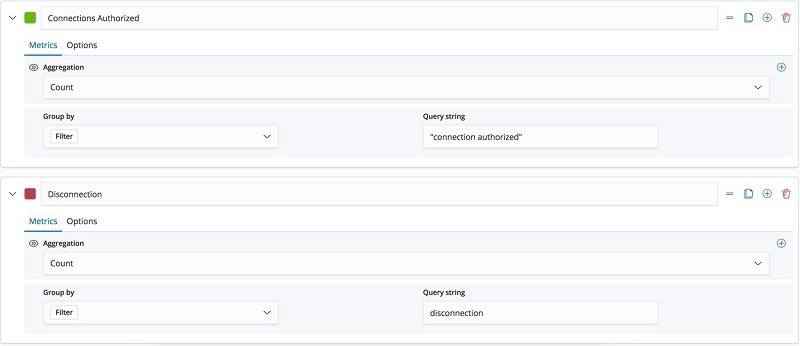
- For Query string, enter either “connection authorized” or disconnection, depending on the filter title.
The following screenshot preview details these steps.
- Choose the Options tab.
- Add the appropriate index pattern (cwl-<dbName>*) in the Index pattern text box.
- Choose No under Drop last bucket?
- For Panel filter, enter the database name.
- Choose Save to save the visualization with an appropriate name (for example, <dbName> Connections and Disconnections Graph). The output of the visualization is displayed as shown in the image below.
Data table of DDL statements
To create a data table of DDL statements aggregated by time, follow the procedure for creating the data table for messages, with the following changes:
Replace the query string with “<database name>” AND (alter OR drop OR create OR copy OR grant).
- Choose Save to save the visualization with an appropriate name (for example, “<dbname> DDL Statements). The output of the visualization is displayed as shown in the image below.

Dashboard
The dashboard displays a collection of visualizations and searches. You can arrange, resize, and edit dashboard content. You can also save and share the dashboard. To configure the dashboard, complete the following steps:
- From the navigation pane, choose Dashboard.
- Choose the add icon.
- Choose each visualization in the list to add it to the dashboard panel. To add the saved visualizations from your discovery search, use the Saved Search tab, as shown in the screenshot below.
 The visualizations and searches in a dashboard are stored in panels that you can move, resize, edit, and delete. To start editing, click Edit in the menu bar.
– To move a panel, click and hold the panel header and drag to the new location.
– To resize a panel, click the resize control on the lower right and drag to the new dimensions. - Adjust the panels as required.
- Choose Save to save the dashboard with the database name as the title.
- Choose Store time with dashboard and Confirm Save.
The following screenshot previews the entire dashboard page with each created visualization.
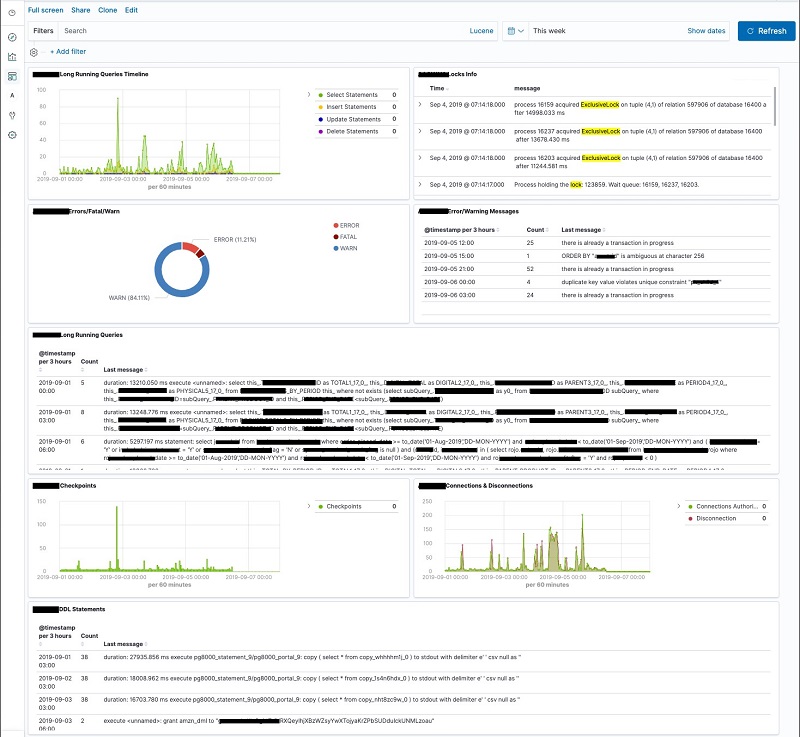
Summary
This post demonstrated how visualizations help you understand data logs efficiently and how the Discover feature lets you look at the formatted data stored in Amazon ES. Furthermore, it showed how dashboards help you look at various visualizations on a single screen.
With this understanding of how to create visualizations and dashboards from the PostgreSQL logs data, you can easily try out other charts. This post is part two of a two-part series. For part one, refer to Analyze PostgreSQL logs with Amazon Elasticsearch Service. AWS welcomes feedback, so please leave your comments and questions below.
About the Author

Marcel George is a Consultant with Amazon Web Services. He works with customers to build scalable, highly available, and secure solutions in AWS cloud. His focus area is homogenous and heterogeneous migrations of on-premise databases to Amazon RDS and Aurora PostgreSQL.

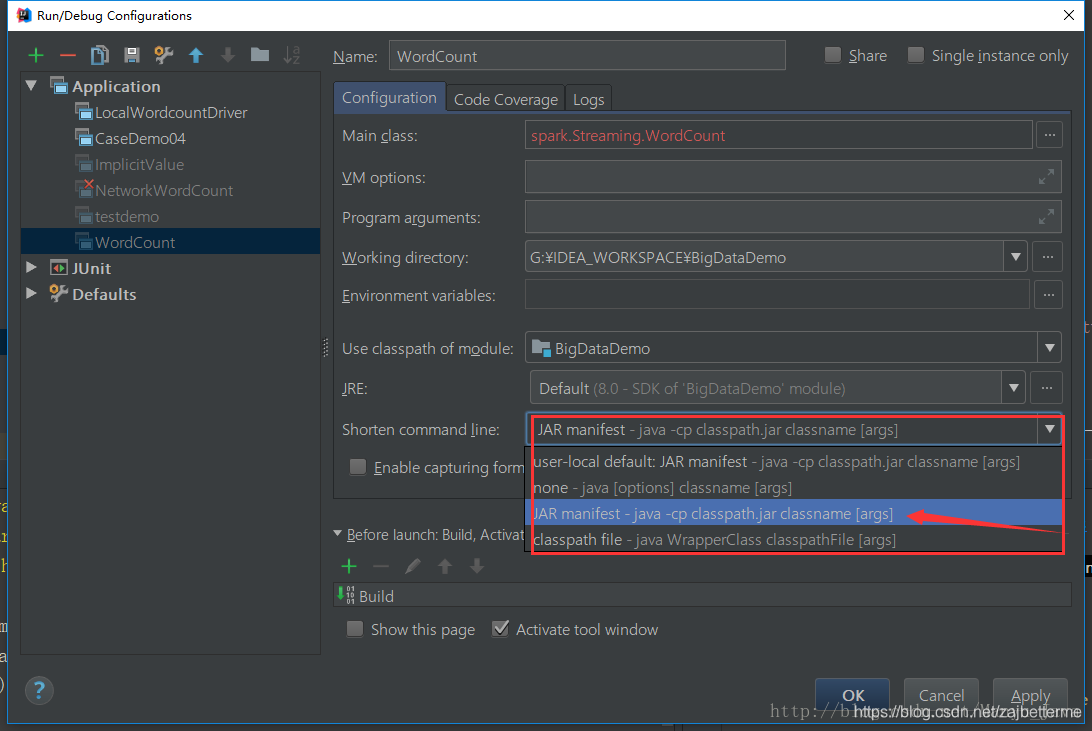
Command line is too long. Shorten command line for *** or also for Spring Boot default configuration
解决方案!
修改项目下 .idea\workspace.xml,找到标签 <component name="PropertiesComponent"> , 在标签里加一行
<property name="dynamic.classpath" value="true" />
方法 2:Run-->Edit Configurations...

java.lang.IllegalStateException:org.springframework.boot.autoconfigure.jdbc.JndiDataSourceAutoConfiguration上的错误处理条件
我正在尝试编写一个独立的可执行jar(fat jar)。我正在使用spring boot gradle插件并编写SpringBoot App来做到这一点。
这是我的Application.java文件
@Configuration@EnableAutoConfiguration@EnableRabbit@EntityScan("persistence.domain")@EnableJpaRepositories("persistence.repository")@ComponentScan(basePackages = {"common","service"})public class Application { public static void main(final String[] args) { final SpringApplicationBuilder appBuilder = new SpringApplicationBuilder( Application.class); appBuilder.profiles("common", "common_db").run(args); } @Bean @Primary @ConfigurationProperties(prefix = "spring.datasource") public DataSource primaryDataSource() { return DataSourceBuilder.create().build(); }}我在yml文件中指定了属性。对于防爆应用-常见等。运行Application.java时出现错误:
[2015-09-24 14:40:22.304] boot - 32791 INFO [main] ---AnnotationConfigEmbeddedWebApplicationContext: Refreshing org.springframework.boot.context.embedded.AnnotationConfigEmbeddedWebApplicationContext@51a282af: startup date [Thu Sep 24 14:40:22 IST 2015]; root of context hierarchy[2015-09-24 14:40:23.194] boot - 32791 WARN [main] --- AnnotationConfigEmbeddedWebApplicationContext: Exception encountered during context initialization - cancelling refresh attemptorg.springframework.beans.factory.BeanDefinitionStoreException: Failed to load bean class: ; nested exception is java.lang.IllegalStateException: Error processing condition on org.springframework.boot.autoconfigure.jdbc.JndiDataSourceAutoConfigurationat org.springframework.context.annotation.ConfigurationClassParser.processDeferredImportSelectors(ConfigurationClassParser.java:392)at org.springframework.context.annotation.ConfigurationClassParser.parse(ConfigurationClassParser.java:165)at org.springframework.context.annotation.ConfigurationClassPostProcessor.processConfigBeanDefinitions(ConfigurationClassPostProcessor.java:305)at org.springframework.context.annotation.ConfigurationClassPostProcessor.postProcessBeanDefinitionRegistry(ConfigurationClassPostProcessor.java:243)at org.springframework.context.support.PostProcessorRegistrationDelegate.invokeBeanDefinitionRegistryPostProcessors(PostProcessorRegistrationDelegate.java:254)at org.springframework.context.support.PostProcessorRegistrationDelegate.invokeBeanFactoryPostProcessors(PostProcessorRegistrationDelegate.java:94)at org.springframework.context.support.AbstractApplicationContext.invokeBeanFactoryPostProcessors(AbstractApplicationContext.java:611)at org.springframework.context.support.AbstractApplicationContext.refresh(AbstractApplicationContext.java:464)at org.springframework.boot.context.embedded.EmbeddedWebApplicationContext.refresh(EmbeddedWebApplicationContext.java:109)at org.springframework.boot.SpringApplication.refresh(SpringApplication.java:691)at org.springframework.boot.SpringApplication.run(SpringApplication.java:320)at org.springframework.boot.builder.SpringApplicationBuilder.run(SpringApplicationBuilder.java:142)at storm.Application.main(Application.java:28)Caused by: java.lang.IllegalStateException: Error processing condition on org.springframework.boot.autoconfigure.jdbc.JndiDataSourceAutoConfigurationat org.springframework.boot.autoconfigure.condition.SpringBootCondition.matches(SpringBootCondition.java:58)at org.springframework.context.annotation.ConditionEvaluator.shouldSkip(ConditionEvaluator.java:92)at org.springframework.context.annotation.ConfigurationClassParser.processConfigurationClass(ConfigurationClassParser.java:190)at org.springframework.context.annotation.ConfigurationClassParser.processImports(ConfigurationClassParser.java:435)at org.springframework.context.annotation.ConfigurationClassParser.processDeferredImportSelectors(ConfigurationClassParser.java:389)... 12 moreCaused by: java.lang.NullPointerExceptionat org.springframework.boot.autoconfigure.condition.OnPropertyCondition.getMatchOutcome(OnPropertyCondition.java:61)at org.springframework.boot.autoconfigure.condition.SpringBootCondition.matches(SpringBootCondition.java:45)... 16 more这是我的build.gradle
def projects= [ ":common", ":persistence", ":adapter"]buildscript {repositories { mavenCentral() maven { url ''http://repo.spring.io/snapshot'' } maven { url ''http://repo.spring.io/milestone'' }}dependencies { classpath group: ''org.springframework.boot'', name: ''spring-boot-gradle-plugin'', version: springBootVersion }}
apply plugin: ''spring-boot''apply plugin: ''maven-publish''apply from: "${rootDir}/deployTasks.gradle"springBoot {main}dependencies { compile project('':common'') compile project('':adapter'') compile project('':persistence'') compile group: ''org.springframework.boot'', name: ''spring-boot-starter-actuator'', version: ''1.1.8.RELEASE'' compile group : ''org.springframework.boot'',name: ''spring-boot-autoconfigure'', version : ''1.1.8.RELEASE'' compile group: ''org.springframework.boot'', name: ''spring-boot-starter-data-jpa'', version: ''1.1.8.RELEASE''}
数据库规范如application-common_db.yml中
database:host: localhostport: 3306schema: subscriptionsusername: rootpassword: rootautoconnect:maxReconnects: 3initialTimeout: 2timeout:connectTimeout: 0socketTimeout: 0failover:host: localhost port: 3306queriesBeforeRetryMaster: 50secondsBeforeRetryMaster: 30spring:datasource:driverClassName: com.mysql.jdbc.Driverurl: jdbc:mysql://${database.host}:${database.port},${database.failover.host}:${database.failover.port}/${database.schema}?${database.properties}username: ${database.username}password: ${database.password}continueOnError: trueinitialize: falseinitialSize: 0timeBetweenEvictionRunsMillis: 5000minEvictableIdleTimeMillis: 5000removeAbandonedTimeout: 60removeAbandoned: trueminIdle: 0我不确定如何解决此错误。nybody可以建议这里出了什么问题以及为什么我会得到nullPointerException。
感谢帮助。
谢谢
答案1
小编典典这是由不匹配的Spring Boot依赖关系引起的。 检查您的类路径以查找有问题的资源。您已明确包含版本 1.1.8.RELEASE
,但还包含了其他3个项目。那些可能包含不同的Spring Boot版本,从而导致此错误。

kibana dashboard 教程
kibana 是一款开源数据可视化平台,用于从数据源(如 elasticsearch)探索、分析和展示数据。创建 kibana 仪表盘的步骤包括:连接到数据源。创建仪表盘。添加可视化效果。布局仪表盘。保存和共享仪表盘。

Kibana 仪表盘教程
什么是 Kibana?
Kibana 是一个开源数据可视化平台,用于探索、分析和展示来自 Elasticsearch 和其他数据源的数据。
如何创建 Kibana 仪表盘
1. 连接到数据源
- 打开 Kibana,转到“管理”选项卡。
- 在“数据源”部分中,单击“添加数据源”。
- 选择数据源类型(例如,Elasticsearch),并按照提示输入连接信息。
2. 创建仪表盘
- 单击 Kibana 左侧栏中的“仪表盘”选项卡。
- 单击“创建仪表盘”。
- 给仪表盘命名,然后单击“创建”。
3. 添加可视化效果
- 拖放可视化效果(例如,表、条形图或折线图)到仪表盘画布上。
- 配置可视化效果,选择要显示的数据和字段。
4. 布局仪表盘
- 调整可视化效果的大小和位置,以创建所需布局。
- 使用小组件来组织和分组可视化效果。
- 添加文本和图像小组件以提供上下文和注释。
5. 保存和共享仪表盘
- 单击“保存”图标保存仪表盘。
- 单击“共享”图标以生成可与他人共享的链接。
提示
- 使用过滤器和分组选项来细化数据。
- 根据数据类型选择适当的可视化效果。
- 利用仪表盘时间范围选项来跟踪数据随时间变化。
- 嵌入仪表盘到网站或应用程序中,以展示实时分析。
以上就是kibana dashboard 教程的详细内容,更多请关注php中文网其它相关文章!

org.springframework.boot.actuate.autoconfigure.EndpointAutoConfiguration的实例源码
@Test
public void indicatorExists() {
    this.context = new AnnotationConfigApplicationContext(
            PropertyPlaceholderAutoConfiguration.class,MongoAutoConfiguration.class,MongoDataAutoConfiguration.class,EndpointAutoConfiguration.class,HealthindicatorAutoConfiguration.class);
    assertthat(this.context.getBeanNamesForType(MongoTemplate.class).length)
            .isEqualTo(1);
    MongoHealthindicator healthindicator = this.context
            .getBean(MongoHealthindicator.class);
    assertthat(healthindicator).isNotNull();
}
@Test
public void indicatorExists() {
    this.context = new AnnotationConfigApplicationContext(
            PropertyPlaceholderAutoConfiguration.class,RabbitAutoConfiguration.class,HealthindicatorAutoConfiguration.class);
    assertthat(this.context.getBeanNamesForType(RabbitAdmin.class).length)
            .isEqualTo(1);
    RabbitHealthindicator healthindicator = this.context
            .getBean(RabbitHealthindicator.class);
    assertthat(healthindicator).isNotNull();
}
@Test
public void indicatorExists() {
    this.context = new AnnotationConfigApplicationContext(
            PropertyPlaceholderAutoConfiguration.class,SolrAutoConfiguration.class,HealthindicatorAutoConfiguration.class);
    assertthat(this.context.getBeanNamesForType(SolrClient.class).length)
            .isEqualTo(1);
    SolrHealthindicator healthindicator = this.context
            .getBean(SolrHealthindicator.class);
    assertthat(healthindicator).isNotNull();
}
@Test
public void indicatorExists() {
    this.context = new AnnotationConfigApplicationContext(
            PropertyPlaceholderAutoConfiguration.class,RedisAutoConfiguration.class,HealthindicatorAutoConfiguration.class);
    assertthat(this.context.getBeanNamesForType(RedisConnectionFactory.class))
            .hasSize(1);
    RedisHealthindicator healthindicator = this.context
            .getBean(RedisHealthindicator.class);
    assertthat(healthindicator).isNotNull();
}
@Before
public void createContext() {
    this.context = new AnnotationConfigWebApplicationContext();
    this.context.setServletContext(new MockServletContext());
    this.context.register(JacksonAutoConfiguration.class,HttpMessageConvertersAutoConfiguration.class,EndpointWebMvcAutoConfiguration.class,ManagementServerPropertiesAutoConfiguration.class,PropertyPlaceholderAutoConfiguration.class,JolokiaAutoConfiguration.class,WebMvcAutoConfiguration.class);
}
@Test
public void indicatorExists() {
    this.context = new AnnotationConfigApplicationContext(
            PropertyPlaceholderAutoConfiguration.class,HealthindicatorAutoConfiguration.class);
    assertthat(this.context.getBeanNamesForType(MongoTemplate.class).length)
            .isEqualTo(1);
    MongoHealthindicator healthindicator = this.context
            .getBean(MongoHealthindicator.class);
    assertthat(healthindicator).isNotNull();
}
@Test
public void indicatorExists() {
    this.context = new AnnotationConfigApplicationContext(
            PropertyPlaceholderAutoConfiguration.class,HealthindicatorAutoConfiguration.class);
    assertthat(this.context.getBeanNamesForType(RabbitAdmin.class).length)
            .isEqualTo(1);
    RabbitHealthindicator healthindicator = this.context
            .getBean(RabbitHealthindicator.class);
    assertthat(healthindicator).isNotNull();
}
@Test
public void indicatorExists() {
    this.context = new AnnotationConfigApplicationContext(
            PropertyPlaceholderAutoConfiguration.class,HealthindicatorAutoConfiguration.class);
    assertthat(this.context.getBeanNamesForType(SolrClient.class).length)
            .isEqualTo(1);
    SolrHealthindicator healthindicator = this.context
            .getBean(SolrHealthindicator.class);
    assertthat(healthindicator).isNotNull();
}
@Test
public void indicatorExists() {
    this.context = new AnnotationConfigApplicationContext(
            PropertyPlaceholderAutoConfiguration.class,HealthindicatorAutoConfiguration.class);
    assertthat(this.context.getBeanNamesForType(RedisConnectionFactory.class))
            .hasSize(1);
    RedisHealthindicator healthindicator = this.context
            .getBean(RedisHealthindicator.class);
    assertthat(healthindicator).isNotNull();
}
@Before
public void createContext() {
    this.context = new AnnotationConfigWebApplicationContext();
    this.context.setServletContext(new MockServletContext());
    this.context.register(JacksonAutoConfiguration.class,WebMvcAutoConfiguration.class);
}
@Test
public void indicatorExists() {
    this.context = new AnnotationConfigApplicationContext(
            PropertyPlaceholderAutoConfiguration.class,HealthindicatorAutoConfiguration.class);
    assertEquals(1,this.context.getBeanNamesForType(MongoTemplate.class).length);
    MongoHealthindicator healthindicator = this.context
            .getBean(MongoHealthindicator.class);
    assertNotNull(healthindicator);
}
@Test
public void indicatorExists() {
    this.context = new AnnotationConfigApplicationContext(
            PropertyPlaceholderAutoConfiguration.class,this.context.getBeanNamesForType(RabbitAdmin.class).length);
    RabbitHealthindicator healthindicator = this.context
            .getBean(RabbitHealthindicator.class);
    assertNotNull(healthindicator);
}
@Test
public void indicatorExists() {
    this.context = new AnnotationConfigApplicationContext(
            PropertyPlaceholderAutoConfiguration.class,this.context.getBeanNamesForType(Solrserver.class).length);
    SolrHealthindicator healthindicator = this.context
            .getBean(SolrHealthindicator.class);
    assertNotNull(healthindicator);
}
@Test
public void indicatorExists() {
    this.context = new AnnotationConfigApplicationContext(
            PropertyPlaceholderAutoConfiguration.class,this.context.getBeanNamesForType(RedisConnectionFactory.class).length);
    RedisHealthindicator healthindicator = this.context
            .getBean(RedisHealthindicator.class);
    assertNotNull(healthindicator);
}
@Before
public void createContext() {
    this.context = new AnnotationConfigWebApplicationContext();
    this.context.setServletContext(new MockServletContext());
    this.context.register(JacksonAutoConfiguration.class,WebMvcAutoConfiguration.class);
}
今天的关于Configuring and authoring Kibana dashboards的分享已经结束,谢谢您的关注,如果想了解更多关于Command line is too long. Shorten command line for *** or also for Spring Boot default configuration、java.lang.IllegalStateException:org.springframework.boot.autoconfigure.jdbc.JndiDataSourceAutoConfiguration上的错误处理条件、kibana dashboard 教程、org.springframework.boot.actuate.autoconfigure.EndpointAutoConfiguration的实例源码的相关知识,请在本站进行查询。
本文标签:


![[转帖]Ubuntu 安装 Wine方法(ubuntu如何安装wine)](https://www.gvkun.com/zb_users/cache/thumbs/4c83df0e2303284d68480d1b1378581d-180-120-1.jpg)

