最近很多小伙伴都在问QuickSilverformac使用教程和quickermac版这两个问题,那么本篇文章就来给大家详细解答一下,同时本文还将给你拓展Animations(SilverlightQ
最近很多小伙伴都在问QuickSilver for mac使用教程和quicker mac版这两个问题,那么本篇文章就来给大家详细解答一下,同时本文还将给你拓展Animations (Silverlight QuickStart)、ArcGIS Viewer for Silverlight 系列:使用Application Builder快速构建GIS应用、bash – Quicksilver Large Type、Build machine learning-powered business intelligence analyses using Amazon QuickSight等相关知识,下面开始了哦!
本文目录一览:- QuickSilver for mac使用教程(quicker mac版)
- Animations (Silverlight QuickStart)
- ArcGIS Viewer for Silverlight 系列:使用Application Builder快速构建GIS应用
- bash – Quicksilver Large Type
- Build machine learning-powered business intelligence analyses using Amazon QuickSight
")
QuickSilver for mac使用教程(quicker mac版)

Quicksilver for mac版这是一款很好用的 Mac 工具,你可以通过 Quicksilver for mac 组合新的快捷键来快速启动你的软件,这样你的Dock栏就可以精简啦!可能因为初次使用Mac系统的原因,很多亲们对这个给力的工具有点不感冒,很多人拿到它都不知道该怎么用。没关系,我们现在来教你quicksilver是怎么用。
1、首先你需要安装安装quicksilver
到quicksilver.blacktree.com下载安装(如果你无法打开上述地址请:在这里下载Quicksilver for mac)。目前的版本是B71。安装完主程序后第一件事是安装插件,在这里强烈推荐的插件有:
clipboard module
del.icio.us bookmarks
dictionary module
web search module
当然,插件很多多。只要你愿意,可以把所有”recommended”下和你平时使用相关的插件都装上。以后你也可以随时点击quicksilver菜单中的preferences然后选择plug-ins安装更多的插件。
2、配置
运行quicksilver后,在菜单中打开preferences窗口。
4、general配置
在application部分,确认”start at login”已经被选中。在command部分选择唤起quicksilver的快捷键,可以用;ctrl-空格”。我因为使用emacs,ctrl-空格有很重要的用途,所以使用了ctrl-q。如果你安装了clipboard插件,可以配置clipboard相关属性,我的选择是抓取最近25条信息,并且粘贴后隐藏。
5、catalog配置
在applications中确认已经选中了applications。
在modules中确认已经选中了你所希望使用的部分。如果不清楚,就全选好了。
如果你安装了del.icio.us插件,需要在custom里配置del.icio.us的账号,选择状态条上的加号键,选择添加del.icio.us bookmars,填写账号和密码,然后点击i旁边的圆圈箭头,quicksilver会自动从网上获取你的del.icio.us的内容。
你也可以随时点击状态条最左边的i来修改相关配置。
6、用quicksilver启动程序
quicksilver最常用的功能之一就是启动程序。知道我打开safari要几步么?1.用快捷键唤起quicksilver。2.按s键。3.回车。你的手完全不用离开键盘,全过程不到一秒钟。有时候你可能要多敲几个字母(sa或者saf)或者使用上下箭头键才能定位你要运行的程序,但quicksilver很聪明,它总会把你经常使用的东西排在最前面。
你学会了用quicksilver启动程序就不会再想用任何其它方式了。而quicksilver的主要使用方式你也已经学会,就是通过你输入的内容匹配出catalog中的结果。因为application在catalog中,所以当你输入的内容匹配到相应程序时,你就可以用quicksilver来启动它了。
用quicksilver打开链接
如果你安装了safari插件或者firefox插件,就可以使用quicksilver打开你浏览器书签中的链接。方法和上面一样。比如我想打开bloglines,只要唤起quicksilver,输入b或者blo,bloglines的链接就会根据你使用的频繁程度出现在被选框或者被选列表中。如果是在列表中,用下箭头选中blogines,然后回车,就可以打开链接了。
你不需要再去一重一重的菜单里寻找了。
7、用quicksilver操作本地文件系统
唤起quicksilver,按下”~”键,会找到你的home目录(如果你是unix用户,你知道为什么用”~”键)。你可以选择直接回车来打开目录,也可以按下右箭头键在quicksilver中打开这个目录,然后选择这个目录下的文件。你也可以直接输入字符来匹配得到已经在catalog里的文件或者文件夹。
其实除了”open”,你还可以做很多其它操作。按下”tab”键,你的焦点到了quicksilver的第二个方框里,这个方框是指定动作框,到目前为止,我们还一直只使用缺省的动作。你可以使用上下箭头或者输入字符来选择相关的动作。对于文件,我们还可以移动、拷贝、删除、用指定程序打开等等。
对于常用目录,你可以把它们加到catalog中方便操作。方式是打开preference到catalog中的custom,选择状态条中的加号键,选择添加files & folder scanner,选择你要加入的目录。
8、用quicksilver访问del.icio.us
如果你已经安装了del.icio.us插件,就已经可以用字符匹配的方式找到所有的链接并打开它们。另外,你还可以通过tag来查找链接。比如你在del.icio.us中有一个tag是mac,可以在唤起quicksilver后输入mac,得到下面这个界面,
右箭头就可以得到tag含mac的链接列表,再用字符匹配找到你想要的链接,打开。比上del.icio.us找快多了。
9、在quicksilver中使用google
唤起quicksilver后,输入goo(有可能你还需要在列表中选取google quicksilversearch),这时候会出来第三个框,按两下tag到第三个框,输入你想搜索的内容,然后回车。
用quicksilver查字典
10、如果你已经安装了dictionary插件,唤起quicksilver后,按下”.”键进入文本模式,输入你想查的单词,按tab到动作框,输入dic,直到字典出现,回车。
11、用quicksilver访问剪贴板
用;苹果-v”你只能粘贴你最后一次拷贝的内容,在安装了clipboard插件后,你可以在唤起quicksilver后按;苹果-l”从你的拷贝历史中选择你要的内容。
当然quicksilver还有很多的玩法,它还能发信、使用ftp、向flickr发照片、gtd…相信大家应该大概对它有个了解了。quicksilver的魅力在于它可以让你用最少的肌肉活动完成最多的事情,如果不喜欢鼠标的话quicksilver将是一个完美的工具。
")
Animations (Silverlight QuickStart)

ArcGIS Viewer for Silverlight 系列:使用Application Builder快速构建GIS应用
ArcGIS Viewer for Silverlight 的Application Builder是一个用于快速构建基于ArcGIS Viewer的向导式应用,是所见即所得的应用。接下来我们来一步一步操作一下。
Application Builder初次安装完成后,在点击“开始”菜单——“所有程序”——“ArcGIS”——“ArcGIS Viewer for Silverlight 1.0.1”——“ArcGIS Viewer for Silverlight 1.0.1”进入向导。

点击创建新的应用程序,
在这个界面是选择是新建地图还是在别人共享的专题地图上修改。我们点击新建地图中的“打开”
这个界面就是配置viewer应用的主界面,可以通过上方三个选项卡配置应用中的基础地图、业务地图、功能工具和布局模板。
在地图选项卡的底图下拉框中选择一个底图服务,并将地图缩放到你要的初始范围。当然你在地图列表中没有找到合适你的底图服务,可以通过右上角的设置按钮设置地图服务列表,添加自已的底图服务,
点击图层选项卡下的浏览,在弹出的窗口中输入你需要加入的业务地图服务的URL,在列出的图层中可以选择添加整个地图服务,也可添加地图服务中的某图层。这时效果如下图:
在图层上点击右键,可以配置其透明度,符号化、弹出窗口、表、过滤器、热点图聚簇等效果。
这里我们就针对添加的POI点做一个热点图。
地图基本配置完成之后,我们可以添加一些工具,通过工具选项卡配置,这里可以添加GP服务,也可以添加内置的工具,当然也可以添加自定义的工具。
这里尝试添加一个打印的工具
下一步,点击配置按钮,配置打印模板
选项一个模板并点击确定
最后通过布局选项卡可以更改应用的名称,logo、链接、应用模板、配色等内容。
最后点击右上角部署按钮将应用部署到IIS里,就可以访问了

bash – Quicksilver Large Type
那么,有没有人知道以编程方式做到这一点的方法?此外,甚至还需要快速燃烧,还是内置于OS X中?我希望能够从bash中触发它.
解决方法

Build machine learning-powered business intelligence analyses using Amazon QuickSight
https://amazonaws-china.com/blogs/big-data/build-machine-learning-powered-business-intelligence-analyses-using-amazon-quicksight/
Imagine you can see the future—to know how many customers will order your product months ahead of time so you can make adequate provisions, or to know how many of your employees will leave your organization several months in advance so you can take preemptive actions to encourage staff retention. For an organization that sees the future, the possibilities are limitless. Machine learning (ML) makes it possible to predict the future with a higher degree of accuracy.
Amazon SageMaker provides every developer and data scientist the ability to build, train, and deploy ML models quickly, but for business users who usually work on creating business intelligence dashboards and reports rather than ML models, Amazon QuickSight is the service of choice. With Amazon QuickSight, you can still use ML to forecast the future. This post goes through how to create business intelligence analyses that use ML to forecast future data points and detect anomalies in data, with no technical expertise or ML experience needed.
Overview of solution
Amazon QuickSight ML Insights uses AWS-proven ML and natural language capabilities to help you gain deeper insights from your data. These powerful, out-of-the-box features make it easy to discover hidden trends and outliers, identify key business drivers, and perform powerful what-if analysis and forecasting with no technical or ML experience. You can use ML insights in sales reporting, web analytics, financial planning, and more. You can detect insights buried in aggregates, perform interactive what-if analysis, and discover what activities you need to meet business goals.
This post imports data from Amazon S3 into Amazon QuickSight and creates ML-powered analyses with the imported data. The following diagram illustrates this architecture.
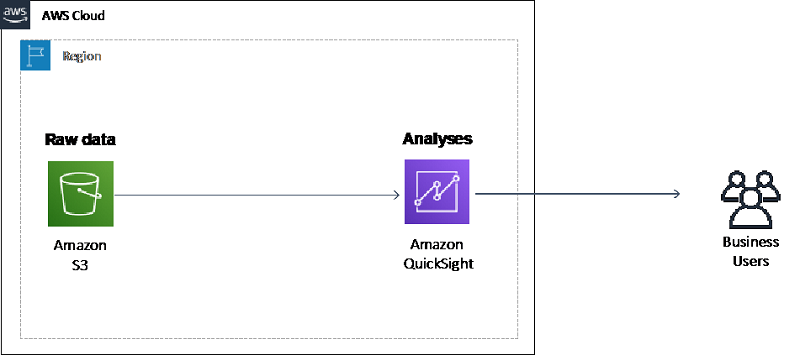
Walkthrough
In this walkthrough, you create an Amazon QuickSight analysis that contains ML-powered visuals that forecast the future demand for taxis in New York City. You also generate ML-powered insights to detect anomalies in your data. This post uses the New York City Taxi and Limousine Commission (TLC) Trip Record Data on the Registry of Open Data on AWS.
The walkthrough includes the following steps:
- Set up and import data into Amazon QuickSight
- Create an ML-powered visual to forecast the future demand for taxis
- Generate an ML-powered insight to detect anomalies in the data set
Prerequisites
For this walkthrough, you should have the following prerequisites:
- An AWS account
- Amazon Quicksight Enterprise edition
- Basic knowledge of AWS
Setting up and importing data into Amazon QuickSight
Set up Amazon Quicksight as an individual user. Complete the following steps:
- On the AWS Management Console, in the Region list, select US East (N. Virginia) or any Region of your choice that Amazon QuickSight
- Under Analytics, for Services, choose Amazon QuickSight.If you already have an existing Amazon QuickSight account, make sure it is the Enterprise edition; if it is not, upgrade to Enterprise edition. For more information, see Upgrading your Amazon QuickSight Subscription from Standard Edition to Enterprise Edition.If you do not have an existing Amazon QuickSight account, proceed with the setup and make sure you choose Enterprise Edition when setting up the account. For more information, see Setup a Free Standalone User Account in Amazon QuickSight.After you complete the setup, a Welcome Wizard screen appears.
- Choose Next on each of the Welcome Wizard screens.
- Choose Get Started.
Before you import the data set, make sure that you have at least 3GB of SPICE capacity. For more information, see Managing SPICE Capacity.
Importing the NYC Taxi data set into Amazon QuickSight
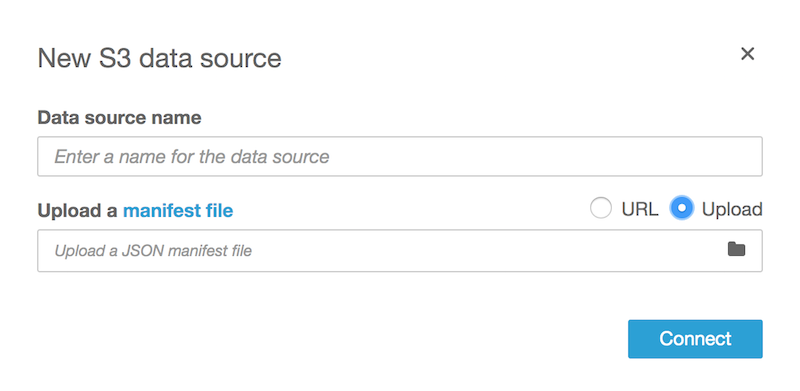
The NYC Taxi data set is in an S3 bucket. To import S3 data into Amazon QuickSight, use a manifest file. For more information, see Supported Formats for Amazon S3 Manifest Files. To import your data, complete the following steps:
- In a new text file, copy and paste the following code:
"fileLocations": [ { "URIs": [ "https://nyc-tlc.s3.amazonaws.com/trip data/green_tripdata_2018-01.csv", "https://nyc-tlc.s3.amazonaws.com/trip data/green_tripdata_2018-02.csv", "https://nyc-tlc.s3.amazonaws.com/trip data/green_tripdata_2018-03.csv", "https://nyc-tlc.s3.amazonaws.com/trip data/green_tripdata_2018-04.csv", "https://nyc-tlc.s3.amazonaws.com/trip data/green_tripdata_2018-05.csv", "https://nyc-tlc.s3.amazonaws.com/trip data/green_tripdata_2018-06.csv", "https://nyc-tlc.s3.amazonaws.com/trip data/green_tripdata_2018-07.csv", "https://nyc-tlc.s3.amazonaws.com/trip data/green_tripdata_2018-08.csv", "https://nyc-tlc.s3.amazonaws.com/trip data/green_tripdata_2018-09.csv", "https://nyc-tlc.s3.amazonaws.com/trip data/green_tripdata_2018-10.csv", "https://nyc-tlc.s3.amazonaws.com/trip data/green_tripdata_2018-11.csv", "https://nyc-tlc.s3.amazonaws.com/trip data/green_tripdata_2018-12.csv" ] } ], "globalUploadSettings": { "textqualifier": "\"" } } - Save the text file as
nyc-taxi.json. - On the Amazon QuickSight console, choose New analysis.
- Choose New data set.
- For data source, choose S3.
- Under New S3 data source, for Data source name, enter a name of your choice.
- For Upload a manifest file field, select Upload.
- Choose the
nyc-taxi.jsonfile you created earlier. - Choose Connect.
The S3 bucket this post uses is a public bucket that contains a public data set and open to the public. When using S3 buckets in your account with Amazon QuickSight, it is highly recommended that the buckets are not open to the public; you need to configure authentication to access your S3 bucket from Amazon QuickSight. For more information about troubleshooting, see I Can’t Connect to Amazon S3.After you choose Connect, the Finish data set creation screen appears. - Choose Visualize.
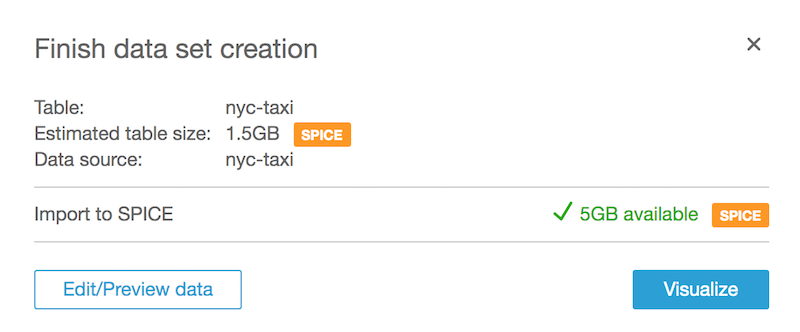
- Wait for the import to complete.
You can see the progress on the top right corner of the screen. When the import is complete, the result shows the number of rows imported successfully and the number of rows skipped.
Creating an ML-powered visual
After you import the data set into Amazon QuickSight SPICE, you can start creating analyses and visuals. Your goal is to create an ML-powered visual to forecast the future demand for taxis. For more information, see Forecasting and Creating What-If Scenarios with Amazon Quicksight.
To create your visual, complete the following steps:
- From the Data source details pop screen, choose Visualize.
- From the field list, select
Lpep_pickup_datetime. - Under Visual types, select the first visual.Amazon QuickSight automatically uses the best visual based on the number and data type of fields you selected. From your selection, Amazon Quicksight displays a line chart visual.
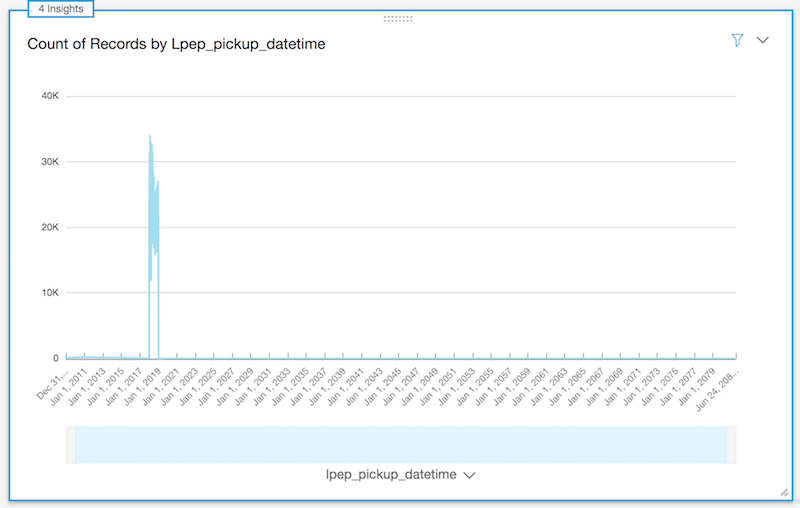 From the preceding graph, you can see that the bulk of your data clusters are around December 31, 2017, to January 1, 2019, for the
 Lpep_pickup_datetimefield. There are a few data points with date ranges up to June 2080. These values are incorrect and can impact your ML forecasts.To clean up your data set, filter out the incorrect data using the data in theLpep_pickup_datetime. This post only uses data in whichLpep_pickup_datetimefalls between January 1, 2018, and December 18, 2018, because there is a more consistent amount of data within this date range. - Use the filter menu to create a filter using the
Lpep_pickup_datetime - Under Filter type, choose Time range and Between.
- For Start date, enter
2018-01-01 00:00. - Select Include start date.
- For End date, enter
2018-12-18 00:00. - Select Include end date.
- Choose Apply.
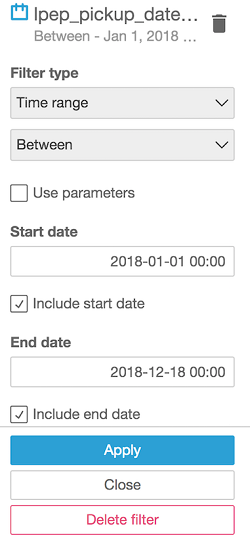
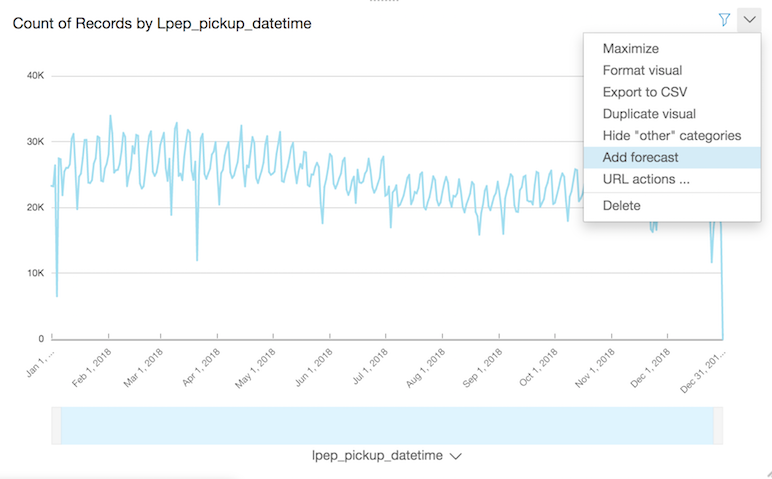
The line chart should now contain only data with Lpep_pickup_datetime from January 1, 2018, and December 18, 2018. You can now add the forecast for the next 31 days to the line chart visual.
Adding the forecast to your visual
To add your forecast, complete the following steps:
- On the visual, choose the arrow.
- From the drop-down menu, choose Add forecast.
- Under Forecast properties, for Forecast length, for Periods forward, enter
31. - For Periods backwards, enter
0. - For Prediction interval, leave at the default value
90. - For Seasonality, leave at the default selection Automatic.
- Choose Apply.
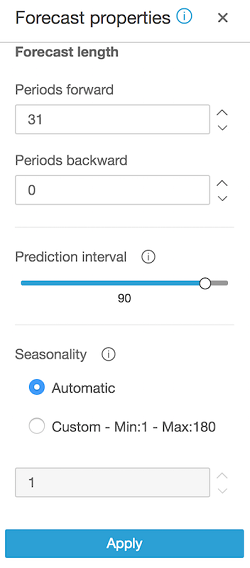
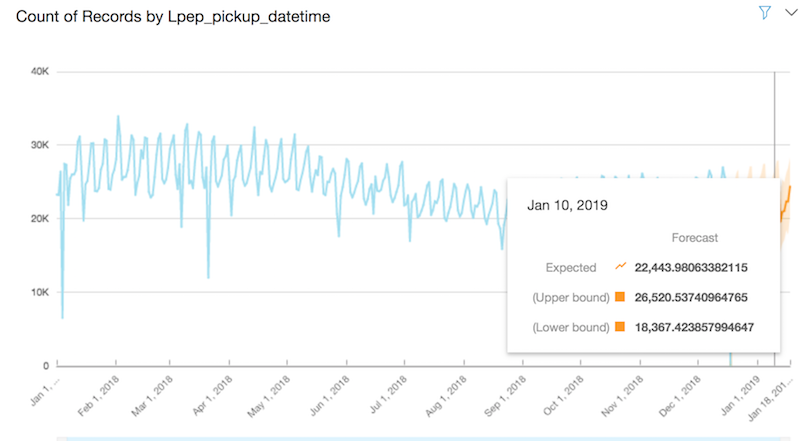
You now see an orange line on your graph, which is the forecasted pickup quantity per day for the next 31 days after December 18, 2018. You can explore the different dates by hovering your cursor over different points on the forecasted pickup line. For example, hovering your cursor over January 10, 2019, shows that the expected forecasted number of pickups for that day is approximately 22,000. The forecast also provides an upper bound (maximum number of pickups forecasted) of about 26,000 and a lower bound (minimum number of pickups forecasted) of about 18,000.
You can create multiple visuals with forecasts and combine them into a sharable Amazon QuickSight dashboard. For more information, see Working with Dashboards.
Generating an ML-powered insight to detect anomalies
In Amazon QuickSight, you can add insights, autonarratives, and ML-powered anomaly detection to your analyses without ML expertise or knowledge. Amazon QuickSight generates suggested insights and autonarratives automatically, but for ML-powered anomaly detection, you need to perform additional steps. For more information, see Using ML-Powered Anomaly Detection.
This post checks if there are any anomalies in the total fare amount over time from select locations. For example, if the total fare charged for taxi rides is about $1,000 and above from the first pickup location (for example, the airport) for most dates in your data set, an anomaly is when the total fare charged deviates from the standard pattern. Anomalies are not necessarily negative, but rather abnormalities that you can choose to investigate further.
To create an anomaly insight, complete the following steps:
- From the top right corner of the analysis creation screen, click the Add drop-down menu and choose Add insight.
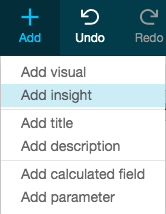
- On the Computation screen, for Computation type, select Anomaly detection.
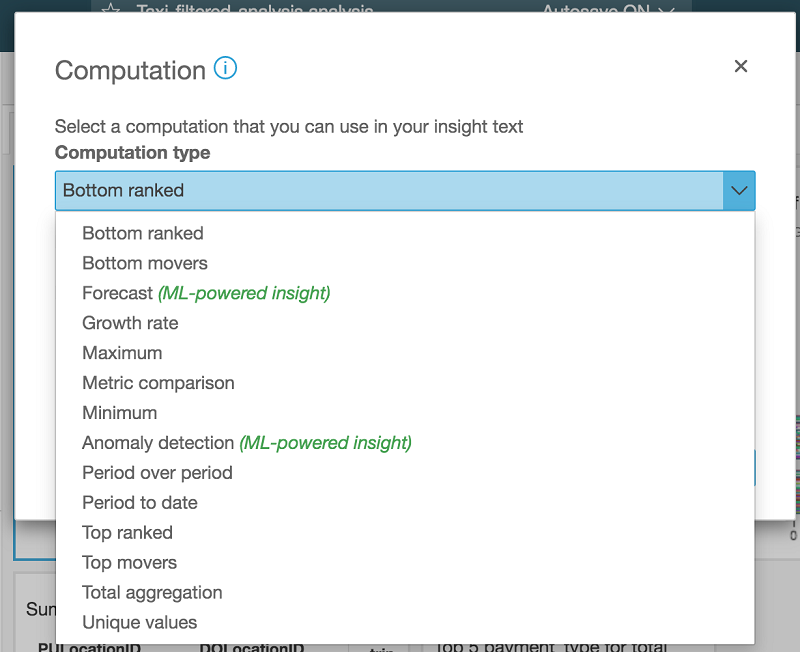
- Under Fields list, choose the following fields:
fare_amountlpep_pickup_datetimePULocationID
- Choose Get started.
- The Configure anomaly detection
- Choose Analyze all combinations of these categories.
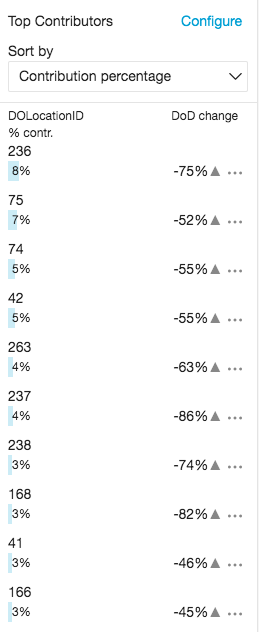
- Leave the other settings as their default.You can now perform a contribution analysis and discover how the drop-off location contributed to the anomalies. For more information, see Viewing Top Contributors.
- Under Contribution analysis, choose
DOLocationID. - Choose Save.
- Choose Run Now.The anomaly detection can take up to 10 minutes to complete. If it is still running after about 10 minutes, your browser may have timed out. Refresh your browser and you should see the anomalies displayed in the visual.
- Choose Explore anomalies.

By default, the anomalies you see are for the last date in your data set. You can explore the anomalies across the entire date range of your data set by choosing SHOW ANOMALIES BY DATE and dragging the slider at the bottom of the visual to display the entire date range from January 1, 2018, to December 30, 2018.
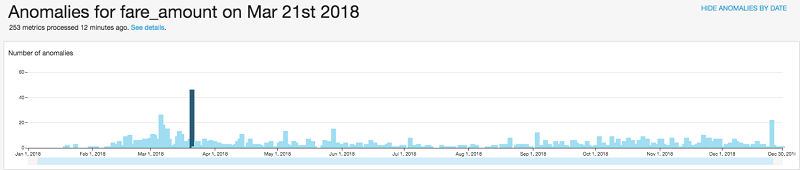
This graph shows that March 21, 2018, has the highest number of anomalies of the fare charged in the entire data set. For example, the total fare amount charged by taxis that picked up passengers from location 74 on March 21, 2018, was 7,181. This is -64% (about 19,728.5) of the total fare charged by taxis for the same pickup location on March 20, 2018. When you explore the anomalies of other pickup locations for that same date, you can see that they all have similar drops in the total fare charged. You can also see the top DOLocationID contributors to these anomalies.
What happened in New York City on March 21, 2018, to cause this drop? A quick online search reveals that New York City experienced a severe weather condition on March 21, 2018.
Publishing your analyses to a dashboard, sharing the dashboard, and setting up email alerts
You can create additional visuals to your analyses, publish the analyses as a dashboard, and share the dashboard with other users. QuickSight anomaly detection allows you to uncover hidden insights in your data by continuously analyzing billions of data points. You can subscribe to receive alerts to your inbox if an anomaly occurs in your business metrics. The email alert also indicates the factors that contribute to these anomalies. This allows you to act immediately on the business metrics that need attention.
From the QuickSight dashboard, you can configure an anomaly alert to be sent to your email with Severity set to High and above and Direction set to Lower than expected. Also make sure to schedule a data refresh so that the anomaly detection runs on your most recent data. For more information, see Refreshing Data.
Cleaning up
To avoid incurring future charges, you need to cancel your Amazon Quicksight subscription.
Conclusion
This post walked you through how to use ML-powered insights with Amazon QuickSight to forecast future data points, detect anomalies, and derive valuable insights from your data without needing prior experience or knowledge of ML. If you want to do more forecasting without ML experience, check out Amazon Forecast.
If you have questions or suggestions, please leave a comment.
About the Author
 Osemeke Isibor is a partner solutions architect at AWS. He works with AWS Partner Network (APN) partners to design secure, highly available, scalable and cost optimized solutions on AWS. He is a science-fiction enthusiast and a fan of anime.
今天关于QuickSilver for mac使用教程和quicker mac版的讲解已经结束,谢谢您的阅读,如果想了解更多关于Animations (Silverlight QuickStart)、ArcGIS Viewer for Silverlight 系列:使用Application Builder快速构建GIS应用、bash – Quicksilver Large Type、Build machine learning-powered business intelligence analyses using Amazon QuickSight的相关知识,请在本站搜索。
本文标签:


![[转帖]Ubuntu 安装 Wine方法(ubuntu如何安装wine)](https://www.gvkun.com/zb_users/cache/thumbs/4c83df0e2303284d68480d1b1378581d-180-120-1.jpg)

