对于springboot项目统一返回感兴趣的读者,本文将会是一篇不错的选择,我们将详细介绍springboot返回一个页面,并为您提供关于Eclipse搭建springboot项目(二)springb
对于springboot项目统一返回感兴趣的读者,本文将会是一篇不错的选择,我们将详细介绍springboot返回一个页面,并为您提供关于Eclipse搭建springboot项目(二)springboot目录、spring boot 2 全局统一返回 RESTful 风格数据、统一异常处理、Spring Boot 2.x(六):优雅的统一返回值、Spring Boot 捕捉全局异常 统一返回值的问题的有用信息。
本文目录一览:- springboot项目统一返回(springboot返回一个页面)
- Eclipse搭建springboot项目(二)springboot目录
- spring boot 2 全局统一返回 RESTful 风格数据、统一异常处理
- Spring Boot 2.x(六):优雅的统一返回值
- Spring Boot 捕捉全局异常 统一返回值的问题
")
springboot项目统一返回(springboot返回一个页面)
在做项目的时候有一个统一的返回格式给到前端或者其他人员还是比较重要的,这次就记录一下。
首先,要考虑到项目中都有哪些情况,比如说接口正确调用产生的返回值,权限校验的结果,系统产生错误的处理,方法返回的不是固定的格式等等
先建一个maven项目,基础的pom配置
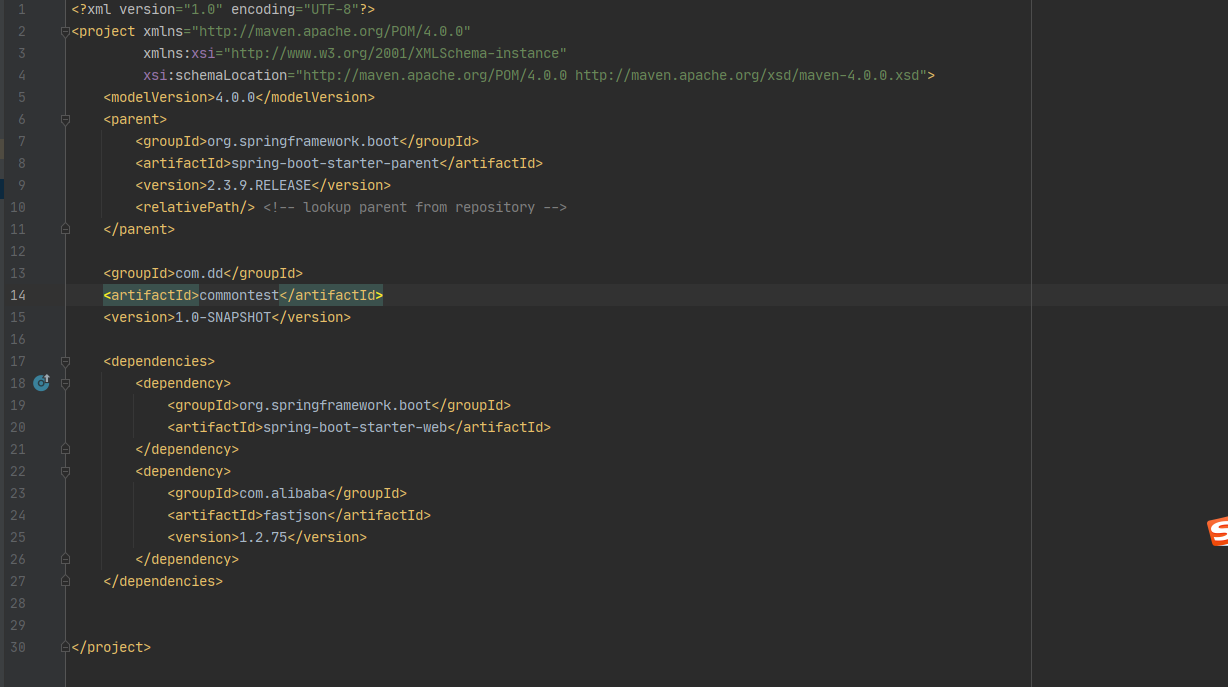
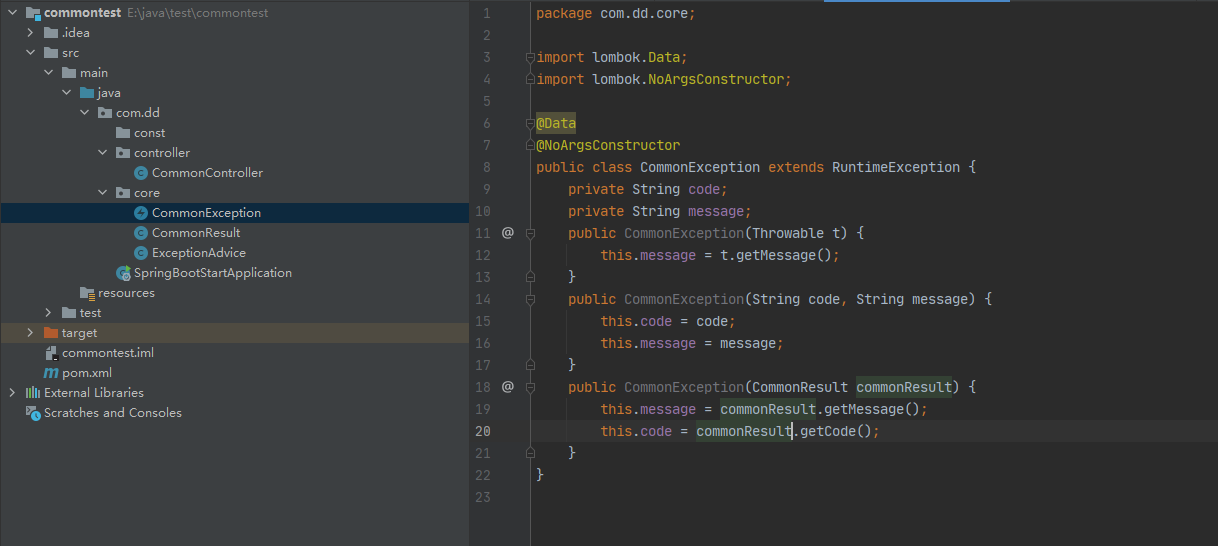
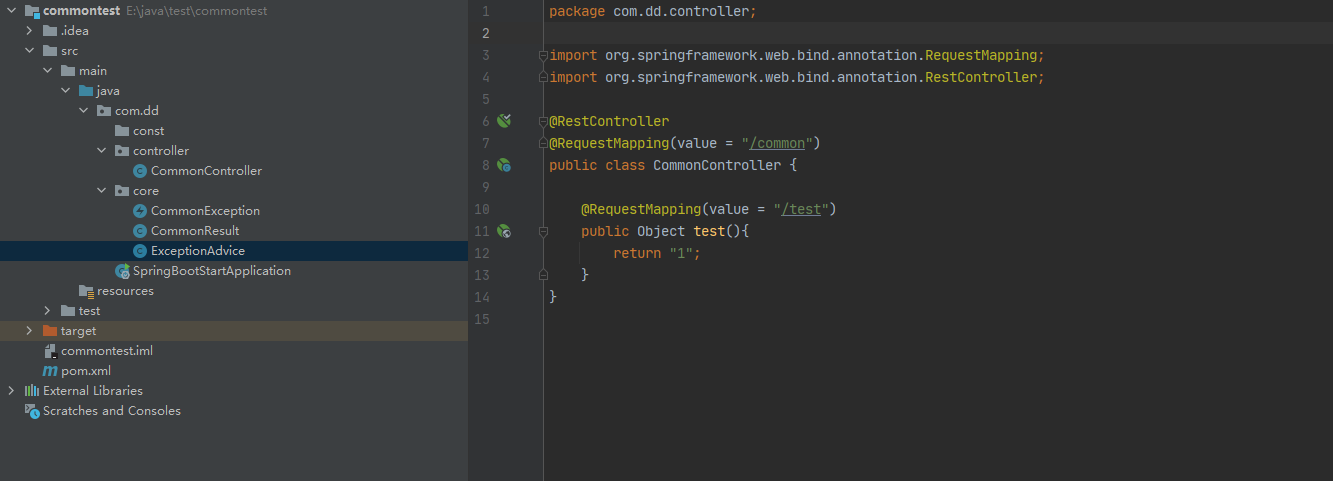
我们新建一个返回消息的实体类,包括返回代码,返回代码描述,返回消息以及一些常用方法
@Data和@NoArgsConstructor需要引入lombok包
@Data
@NoArgsConstructor
public class CommonResult {
    public static final String SUCCESS = "0000";
    public static final String SUCCESS_MSG = "操作成功";
    public static final String FAIL = "9999";

    private String code;
    private String message;
    private Object data;

    public CommonResult(String code) {
        this.code = code;
    }

    public CommonResult(String code, String message) {
        this.code = code;
        this.message = message;
    }

    public CommonResult(String code, String message, Object data) {
        this.code = code;
        this.message = message;
        this.data = data;
    }

    /**
     * 返回成功消息
     *
     * @return 成功消息
     */
    public static CommonResult success() {
        return CommonResult.success(SUCCESS_MSG);
    }

    /**
     * 返回成功数据
     *
     * @return 成功消息
     */
    public static CommonResult success(Object data) {
        return CommonResult.success(SUCCESS_MSG, data);
    }

    /**
     * 返回成功消息
     *
     * @param msg 返回内容
     * @return 成功消息
     */
    public static CommonResult success(String msg) {
        return CommonResult.success(msg, null);
    }

    /**
     * 返回成功消息
     *
     * @param msg 返回内容
     * @param data 数据对象
     * @return 成功消息
     */
    public static CommonResult success(String msg, Object data) {
        return new CommonResult(SUCCESS, msg, data);
    }

    /**
     * 返回错误消息
     *
     * @param msg 返回内容
     */
    public static CommonResult error(String msg) {
        return CommonResult.error(FAIL, msg, null);
    }

    /**
     * 返回错误消息
     *
     * @param code 状态码
     * @param msg 返回内容
     */
    public static CommonResult error(String code, String msg) {
        return CommonResult.error(code, msg, null);
    }

    /**
     * 返回错误消息
     *
     * @param code 状态码
     * @param msg 返回内容
     * @param data 数据对象
     */
    public static CommonResult error(String code, String msg, Object data) {
        return new CommonResult(code, msg, data);
    }
}
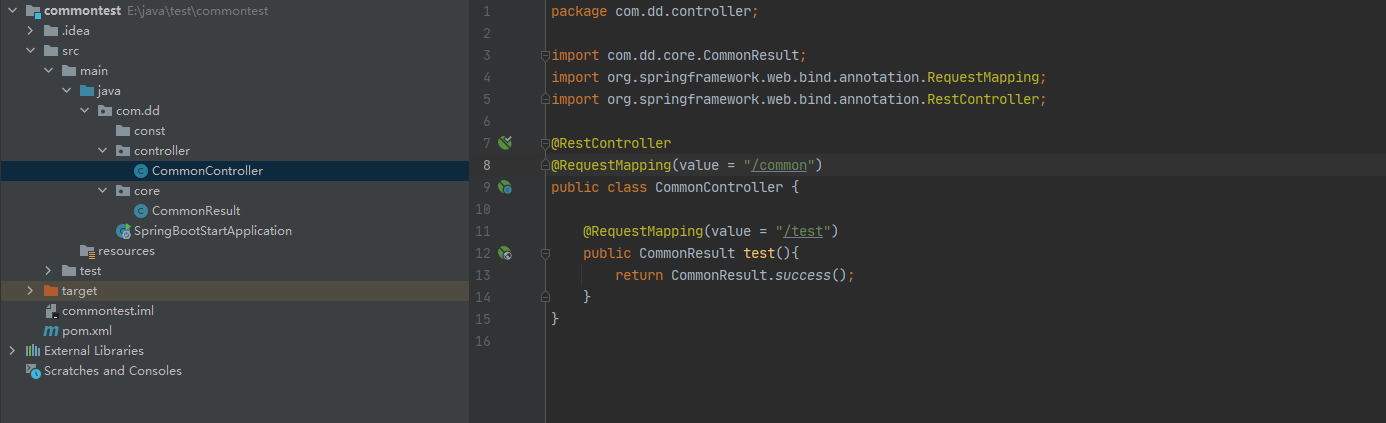
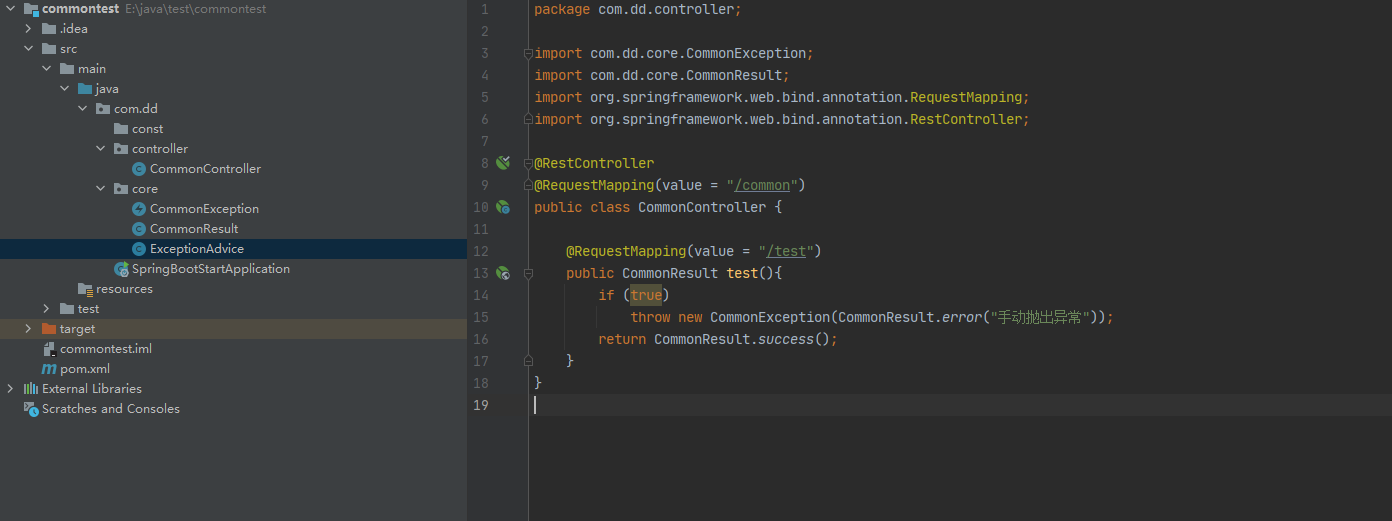
下面新建一个测试的controller看一下返回值是什么样的
用postman请求

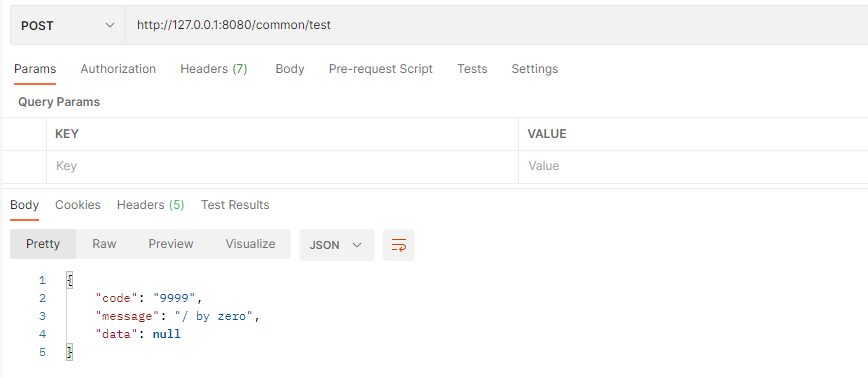
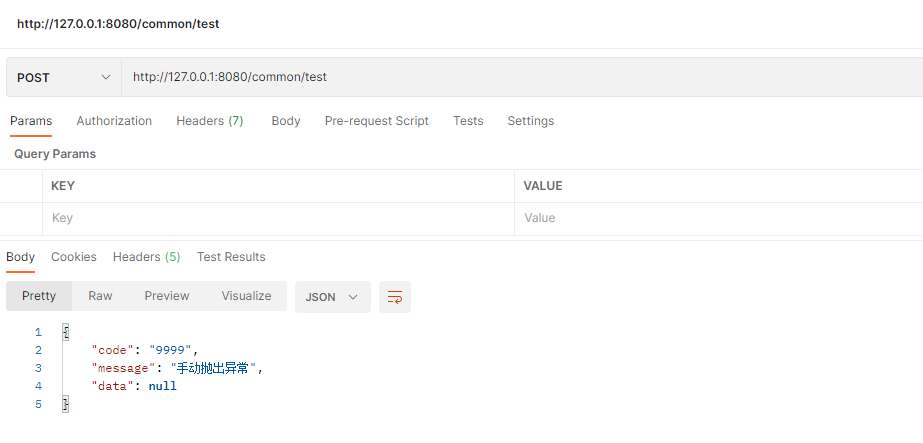
这是没有错误的情况下,如果接口报错会是什么情况呢,接下来试下
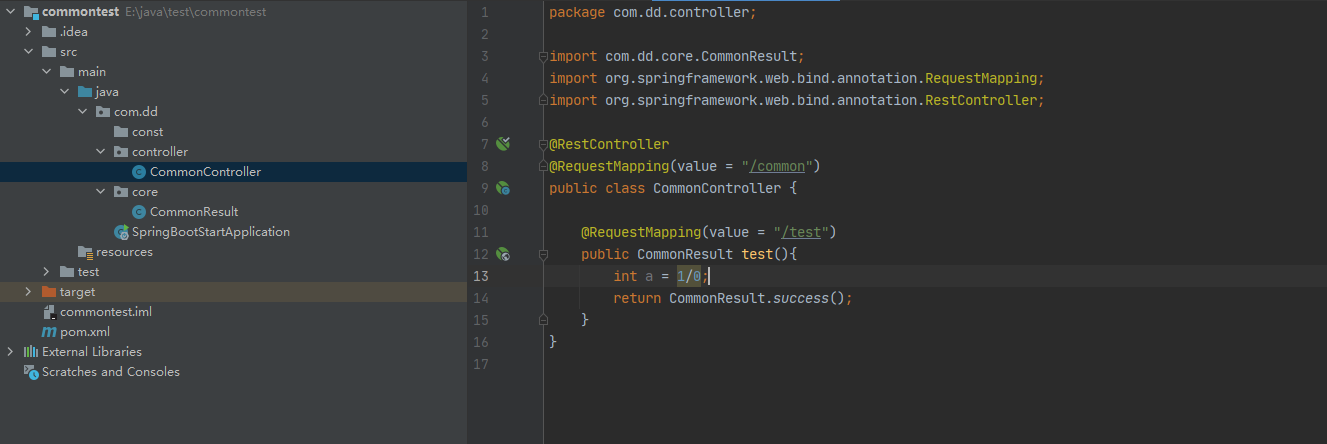
在返回之前接口会报java.lang.ArithmeticException,用postman请求看下
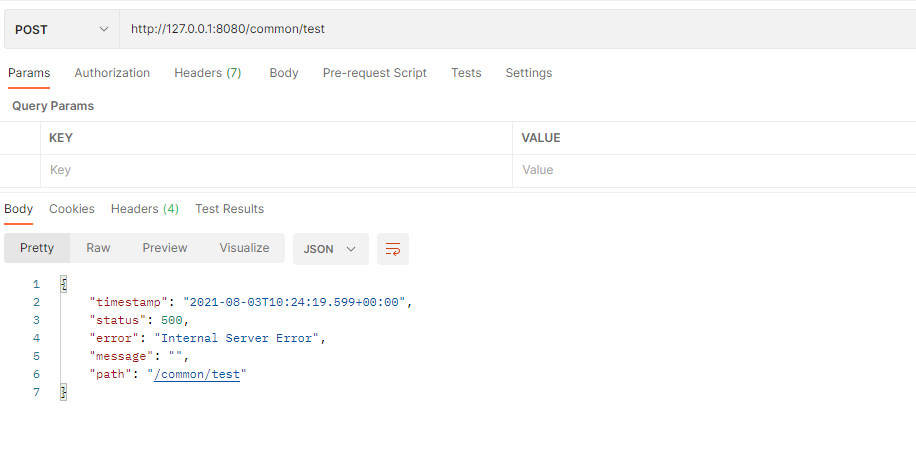
这种返回消息的格式明显就是不是我们想要的,那怎么办呢如果使用try catch那么在代码中会大量出现这种代码,有时候还会返回一些奇奇怪怪的东西
在springboot中有@RestControllerAdvice和@ControllerAdvice两个注解可以实现,
其作用效果相当于@RestControllerAdvice = @ControllerAdvice + @ResponseBody
@ExceptionHandler(RuntimeException.class)是用来捕获指定的异常的
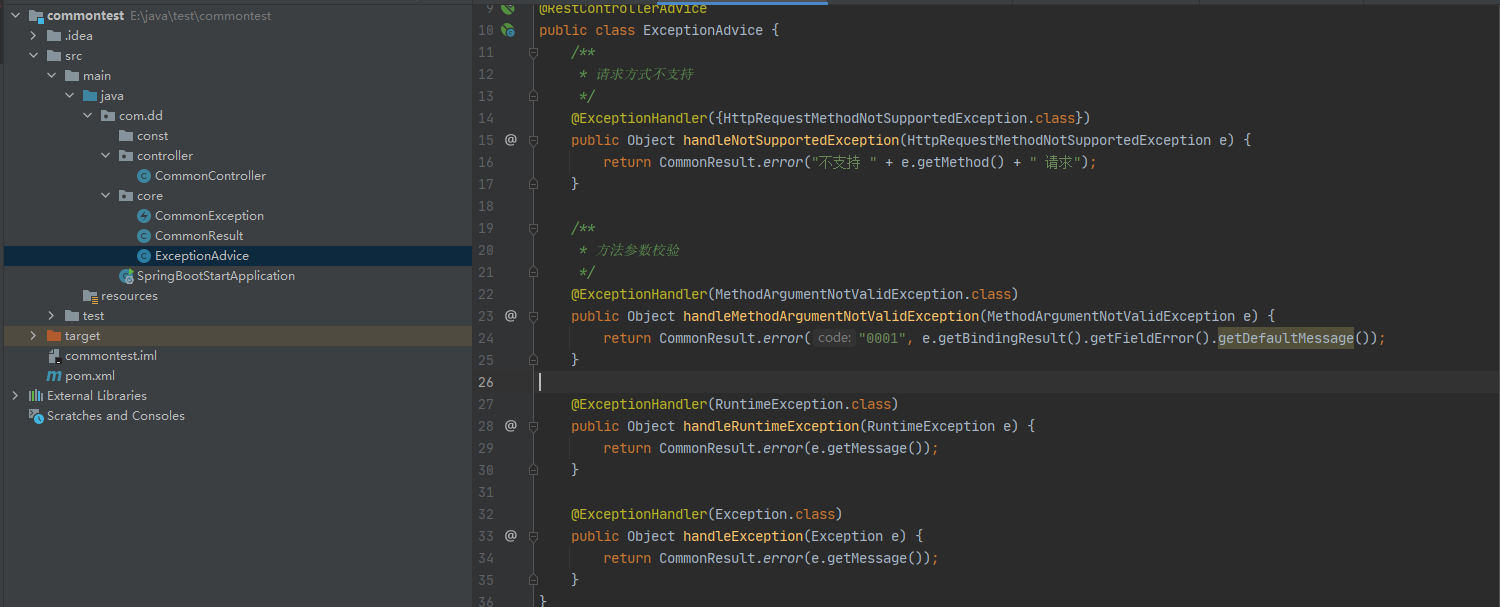
@ExceptionHandler(CommonException.class)
public Object handleCommonException(CommonException e) {
    return CommonResult.error(e.getMessage());
}
改造一下controller中的test方法
再来试下
也是我们想要的返回格式
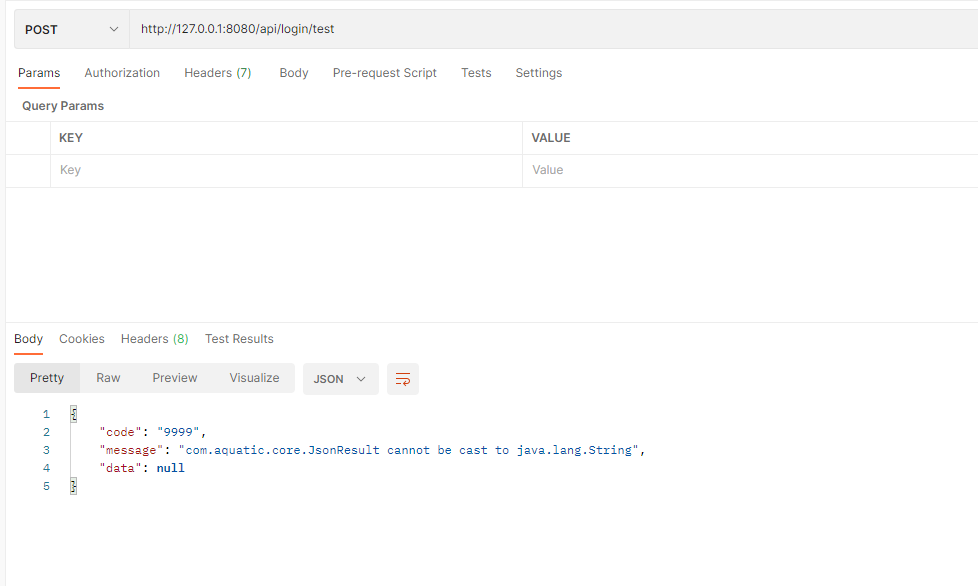
如果test方法中返回的不是CommonResult而是Object会发生什么呢
请求一下可以看到
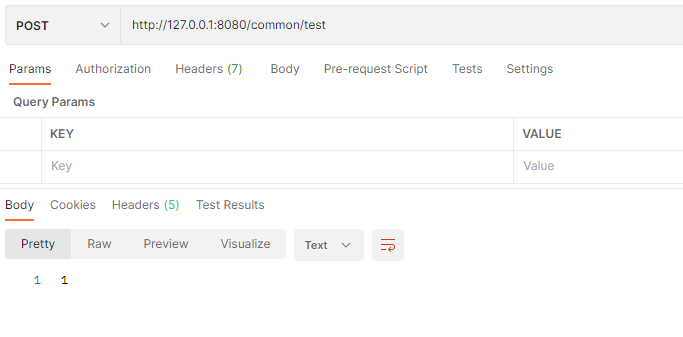
直接就返回了1这个字符串,很明显这不符合我们的预期,在springboot有一个接口叫做ResponseBodyAdvice,这个接口可以帮我们实现我们想要的结果
这个接口有两个方法,supports方法可以决定哪些接口要处理哪些不处理,beforeBodyWrite方法里面具体做一些数据的封装或者其他的一下操作
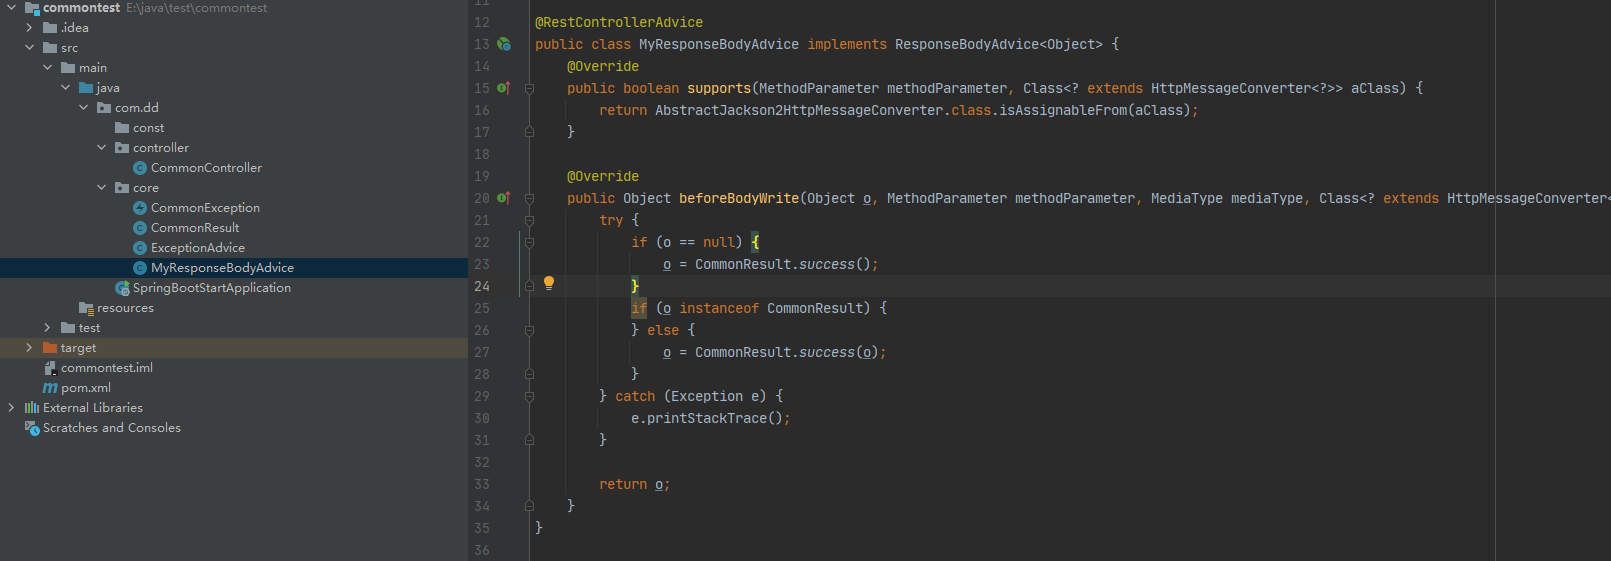
再来访问之前的接口
springboot目录")
Eclipse搭建springboot项目(二)springboot目录
SpringBoot目录文件结构和官方推荐的目录规范
1、目录
src/main/java:存放代码
src/main/resources
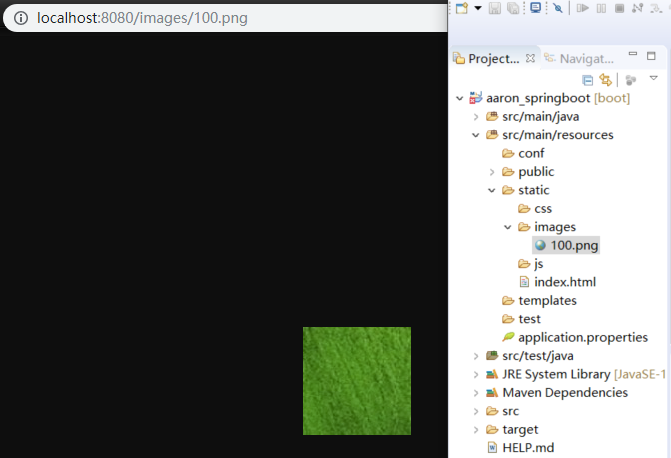
static: 存放静态文件,比如 css、js、image, (访问方式 http://localhost:8080/js/main.js)
templates:存放静态页面jsp,html,tpl
config:存放配置文件,application.properties
resources:
2、引入依赖 Thymeleaf
<dependency>
<groupId>org.springframework.boot</groupId>
<artifactId>spring-boot-starter-thymeleaf</artifactId>
</dependency>
注意:如果不引人这个依赖包,html文件应该放在默认加载文件夹里面,比如resources、static、public这个几个文件夹,才可以访问
3、同个文件的加载顺序,静态资源文件
Spring Boot 默认会挨个从META/resources > resources > static > public 里面找是否存在相应的资源,如果有则直接返回。
4、默认配置
1)官网地址:https://docs.spring.io/spring-boot/docs/current/reference/html/boot-features-developing-web-applications.html#boot-features-spring-mvc-static-content
2)spring.resources.static-locations = classpath:/META-INF/resources/,classpath:/resources/,classpath:/static/,classpath:/public/
5、大公司静态资源文件一般存储在CDN,命中最近的结点,响应特别快
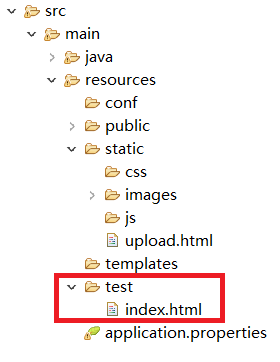
1.创建目录,验证静态页面是否可访问:
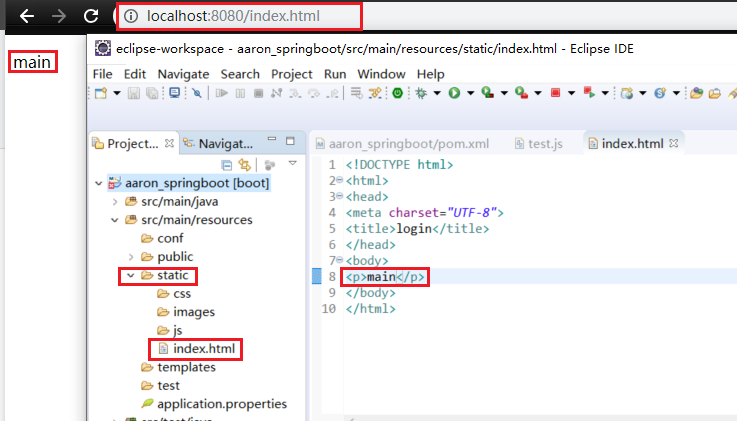
验证静态文件是否可访问:
2.引入Thymeleaf,在application.properties中配置:
spring.resources.static-locations=classpath:/META-INF/resources/,classpath:/resources/,classpath:/static/,classpath:/public/,classpath:/test/
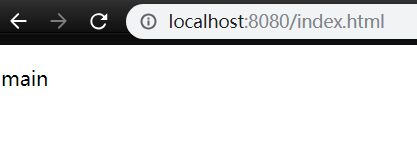
访问验证:

spring boot 2 全局统一返回 RESTful 风格数据、统一异常处理
全局统一返回 RESTful 风格数据,主要是实现 ResponseBodyAdvice 接口的方法,对返回值在输出之前进行修改。
使用注解 @RestControllerAdvice 拦截异常并统一处理。
开发环境:
IntelliJ IDEA 2019.2.2
jdk1.8
Spring Boot 2.2.2
1、创建一个 SpringBoot 项目,pom.xml 引用的依赖包如下
<dependency>
            <groupId>org.springframework.boot</groupId>
            <artifactId>spring-boot-starter-web</artifactId>
        </dependency>

        <dependency>
            <groupId>org.projectlombok</groupId>
            <artifactId>lombok</artifactId>
            <optional>true</optional>
        </dependency>

        <dependency>
            <groupId>com.alibaba</groupId>
            <artifactId>fastjson</artifactId>
            <version>1.2.62</version>
        </dependency>
2、定义一个返回类
package com.example.response.entity;

import lombok.Data;
import lombok.NoArgsConstructor;
import lombok.ToString;

import java.io.Serializable;

@Data
@NoArgsConstructor
@ToString
public class ResponseData<T> implements Serializable {
    /**
     * 状态码:0-成功,1-失败
     * */
    private int code;

    /**
     * 错误消息,如果成功可为空或SUCCESS
     * */
    private String msg;

    /**
     * 返回结果数据
     * */
    private T data;

    public static ResponseData success() {
        return success(null);
    }

    public static ResponseData success(Object data) {
        ResponseData result = new ResponseData();
        result.setCode(0);
        result.setMsg("SUCCESS");
        result.setData(data);
        return result;
    }

    public static ResponseData fail(String msg) {
        return fail(msg,null);
    }

    public static ResponseData fail(String msg, Object data) {
        ResponseData result = new ResponseData();
        result.setCode(1);
        result.setMsg(msg);
        result.setData(data);
        return result;
    }
}
3、统一拦截接口返回数据
新建一个类 GlobalResponseHandler,用注解 @RestControllerAdvice,并且实现 ResponseBodyAdvice 接口的方法,其中方法 supports 可以判断哪些需要拦截,方法 beforeBodyWrite 可以对返回值在输出之前进行修改,从而实现返回统一的接口数据。
package com.example.response.config;

import com.alibaba.fastjson.JSON;
import com.example.response.entity.ResponseData;
import org.springframework.core.MethodParameter;
import org.springframework.http.MediaType;
import org.springframework.http.converter.HttpMessageConverter;
import org.springframework.http.server.ServerHttpRequest;
import org.springframework.http.server.ServerHttpResponse;
import org.springframework.web.bind.annotation.RestControllerAdvice;
import org.springframework.web.servlet.mvc.method.annotation.ResponseBodyAdvice;

/**
 * 实现ResponseBodyAdvice接口,可以对返回值在输出之前进行修改
 */
@RestControllerAdvice
public class GlobalResponseHandler implements ResponseBodyAdvice<Object> {

    //判断支持的类型
    @Override
    public boolean supports(MethodParameter methodParameter, Class<? extends HttpMessageConverter<?>> aClass) {
        // 检查注解是否存在,存在则忽略拦截
        if (methodParameter.getDeclaringClass().isAnnotationPresent(IgnorReponseAdvice.class)) {
            return false;
        }
        if (methodParameter.getMethod().isAnnotationPresent(IgnorReponseAdvice.class)) {
            return false;
        }
        return true;
    }

    @Override
    public Object beforeBodyWrite(Object o, MethodParameter methodParameter, MediaType mediaType, Class<? extends HttpMessageConverter<?>> aClass, ServerHttpRequest serverHttpRequest, ServerHttpResponse serverHttpResponse) {
        // 判断为null构建ResponseData对象进行返回
        if (o == null) {
            return ResponseData.success();
        }
        // 判断是ResponseData子类或其本身就返回Object o本身,因为有可能是接口返回时创建了ResponseData,这里避免再次封装
        if (o instanceof ResponseData) {
            return (ResponseData<Object>) o;
        }
        // String特殊处理,否则会抛异常
        if (o instanceof String) {
            return JSON.toJSON(ResponseData.success(o)).toString();
        }
        return ResponseData.success(o);
    }
}package com.example.response.config;
import java.lang.annotation.ElementType;
import java.lang.annotation.Retention;
import java.lang.annotation.RetentionPolicy;
import java.lang.annotation.Target;
@Target({ElementType.TYPE, ElementType.METHOD})
@Retention(RetentionPolicy.RUNTIME)
public @interface IgnorReponseAdvice {
}4、统一异常处理
package com.example.response.exception;
import com.example.response.entity.ResponseData;
import org.springframework.web.bind.annotation.ExceptionHandler;
import org.springframework.web.bind.annotation.RestControllerAdvice;

@RestControllerAdvice
public class GlobalExceptionHandler {
    @ExceptionHandler(Exception.class)
    public ResponseData exceptionHandler(Exception e) {
        e.printStackTrace();
        return ResponseData.fail("服务器异常:" + e.getMessage());
    }
}
5、新建一个测试用的实体类
package com.example.response.entity;

import lombok.Data;

@Data
public class User {
    private Long userId;
    private String userName;
    public User(Long userId, String userName){
        this.userId = userId;
        this.userName = userName;
    }
}
6、新建一个测试用的控制器类
package com.example.response.controller;
import com.example.response.config.IgnorReponseAdvice;
import com.example.response.entity.ResponseData;
import com.example.response.entity.User;
import org.springframework.web.bind.annotation.*;
import java.util.ArrayList;
import java.util.List;
@RestController
public class DemoController {
@GetMapping("user")
public User user() {
User u = new User(100L, "u1");
return u;
}
@GetMapping("userList")
public List<User> userList(){
List<User> list = new ArrayList<User>();
list.add(new User(100L, "u1"));
list.add(new User(200L, "u2"));
return list;
}
@GetMapping("test1")
public String test1(){
return "test1";
}
@GetMapping("test2")
public ResponseData test2(){
return ResponseData.success("test2");
}
@IgnorReponseAdvice
@GetMapping("test3")
public String test3() {
return "test3";
}
@GetMapping("test4")
public String test4() {
Integer x = 1 / 0;
return x.toString();
}
@GetMapping("test5")
public String test5() throws Exception {
throw new Exception("自定义异常信息");
}
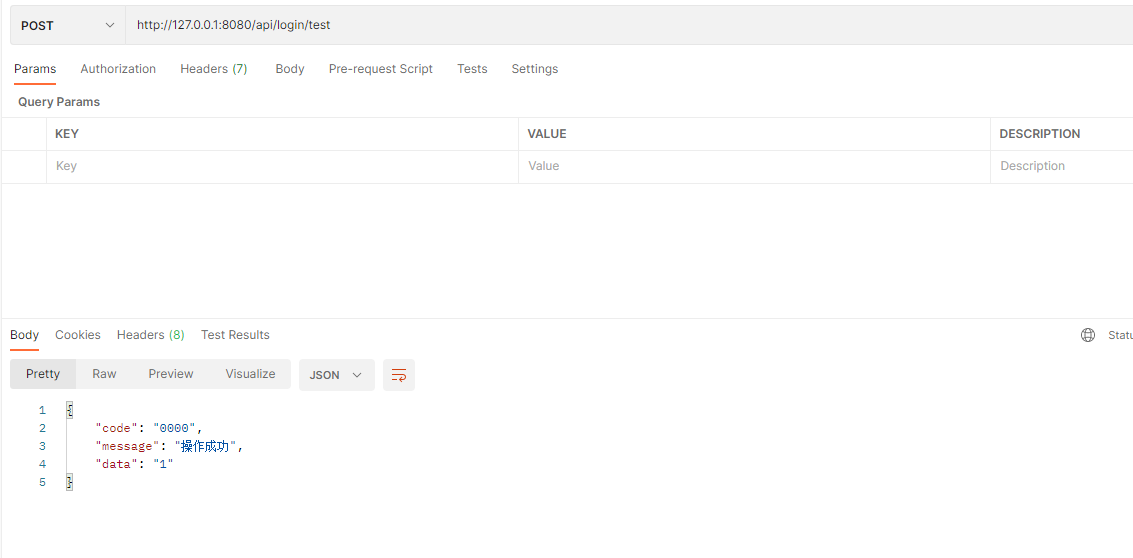
}7、用 Postman 测试
(1) 请求 http://localhost:8080/user,返回
{
    "code": 0,
    "msg": "SUCCESS",
    "data": {
        "userId": 100,
        "userName": "u1"
    }
}
(2) 请求 http://localhost:8080/userList,返回
{
    "code": 0,
    "msg": "SUCCESS",
    "data": [
        {
            "userId": 100,
            "userName": "u1"
        },
        {
            "userId": 200,
            "userName": "u2"
        }
    ]
}
(3) 请求 http://localhost:8080/tes1,返回
{"msg":"SUCCESS","code":0,"data":"test1"}(4) 请求 http://localhost:8080/test2,返回
{
    "code": 0,
    "msg": "SUCCESS",
    "data": "test2"
}
(5) 请求 http://localhost:8080/test3,返回
test3(6) 请求 http://localhost:8080/test4,返回
{
    "code": 1,
    "msg": "服务器异常:/ by zero",
    "data": null
}
(7) 请求 http://localhost:8080/test5,返回
{
    "code": 1,
    "msg": "服务器异常:自定义异常信息",
    "data": null
}
参考文章:
https://blog.csdn.net/lrt890424/article/details/83624761
https://www.cnblogs.com/Purgeyao/p/11599810.html
:优雅的统一返回值")
Spring Boot 2.x(六):优雅的统一返回值
为什么要统一返回值
在我们做后端应用的时候,前后端分离的情况下,我们经常会定义一个数据格式,通常会包含code,message,data这三个必不可少的信息来方便我们的交流,下面我们直接来看代码
ReturnVO
package indi.viyoung.viboot.util;

import java.util.Properties;

/**
 * 统一定义返回类
 *
 * @author yangwei
 * @since 2018/12/20
 */
public class ReturnVO {

    private static final Properties properties = ReadPropertiesUtil.getProperties(System.getProperty("user.dir") + "/viboot-common/src/main/resources/response.properties");

    /**
     * 返回代码
     */
    private String code;

    /**
     * 返回信息
     */
    private String message;

    /**
     * 返回数据
     */
    private Object data;


    public Object getData() {
        return data;
    }

    public void setData(Object data) {
        this.data = data;
    }

    public String getMessage() {
        return message;
    }

    public void setMessage(String message) {
        this.message = message;
    }

    public String getCode() {
        return code;
    }

    public void setCode(String code) {
        this.code = code;
    }

    /**
     * 默认构造,返回操作正确的返回代码和信息
     */
    public ReturnVO() {
        this.setCode(properties.getProperty(ReturnCode.SUCCESS.val()));
        this.setMessage(properties.getProperty(ReturnCode.SUCCESS.msg()));
    }

    /**
     * 构造一个返回特定代码的ReturnVO对象
     * @param code
     */
    public ReturnVO(ReturnCode code) {
        this.setCode(properties.getProperty(code.val()));
        this.setMessage(properties.getProperty(code.msg()));
    }

    /**
     * 默认值返回,默认返回正确的code和message
     * @param data
     */
    public ReturnVO(Object data) {
        this.setCode(properties.getProperty(ReturnCode.SUCCESS.val()));
        this.setMessage(properties.getProperty(ReturnCode.SUCCESS.msg()));
        this.setData(data);
    }

    /**
     * 构造返回代码,以及自定义的错误信息
     * @param code
     * @param message
     */
    public ReturnVO(ReturnCode code, String message) {
        this.setCode(properties.getProperty(code.val()));
        this.setMessage(message);
    }

    /**
     * 构造自定义的code,message,以及data
     * @param code
     * @param message
     * @param data
     */
    public ReturnVO(ReturnCode code, String message, Object data) {
        this.setCode(code.val());
        this.setMessage(message);
        this.setData(data);
    }

    @Override
    public String toString() {
        return "ReturnVO{" +
                "code=''" + code + ''\'''' +
                ", message=''" + message + ''\'''' +
                ", data=" + data +
                ''}'';
    }
}
在这里,我提供了几个构造方法以供不同情况下使用。代码的注释已经写得很清楚了,大家也可以应该看的比较清楚~
ReturnCode
细心的同学可能发现了,我单独定义了一个ReturnCode枚举类用于存储代码和返回的Message:
package indi.viyoung.viboot.util;

/**
 * @author yangwei
 * @since 2018/12/20
 */
public enum ReturnCode {

    /** 操作成功 */
    SUCCESS("SUCCESS_CODE", "SUCCESS_MSG"),

    /** 操作失败 */
    FAIL("FAIL_CODE", "FAIL_MSG"),

    /** 空指针异常 */
    NullpointerException("NPE_CODE", "NPE_MSG"),

    /** 自定义异常之返回值为空 */
    NullResponseException("NRE_CODE", "NRE_MSG");


    private ReturnCode(String value, String msg){
        this.val = value;
        this.msg = msg;
    }

    public String val() {
        return val;
    }

    public String msg() {
        return msg;
    }

    private String val;
    private String msg;
}
这里,我并没有将需要存储的数据直接放到枚举中,而是放到了一个配置文件中,这样既可以方便我们进行相关信息的修改,并且阅读起来也是比较方便。
SUCCESS_CODE=2000
SUCCESS_MSG=操作成功

FAIL_CODE=5000
FAIL_MSG=操作失败

NPE_CODE=5001
NPE_MSG=空指针异常

NRE_CODE=5002
NRE_MSG=返回值为空
注意,这里的属性名和属性值分别与枚举类中的value和msg相对应,这样,我们才可以方便的去通过I/O流去读取。
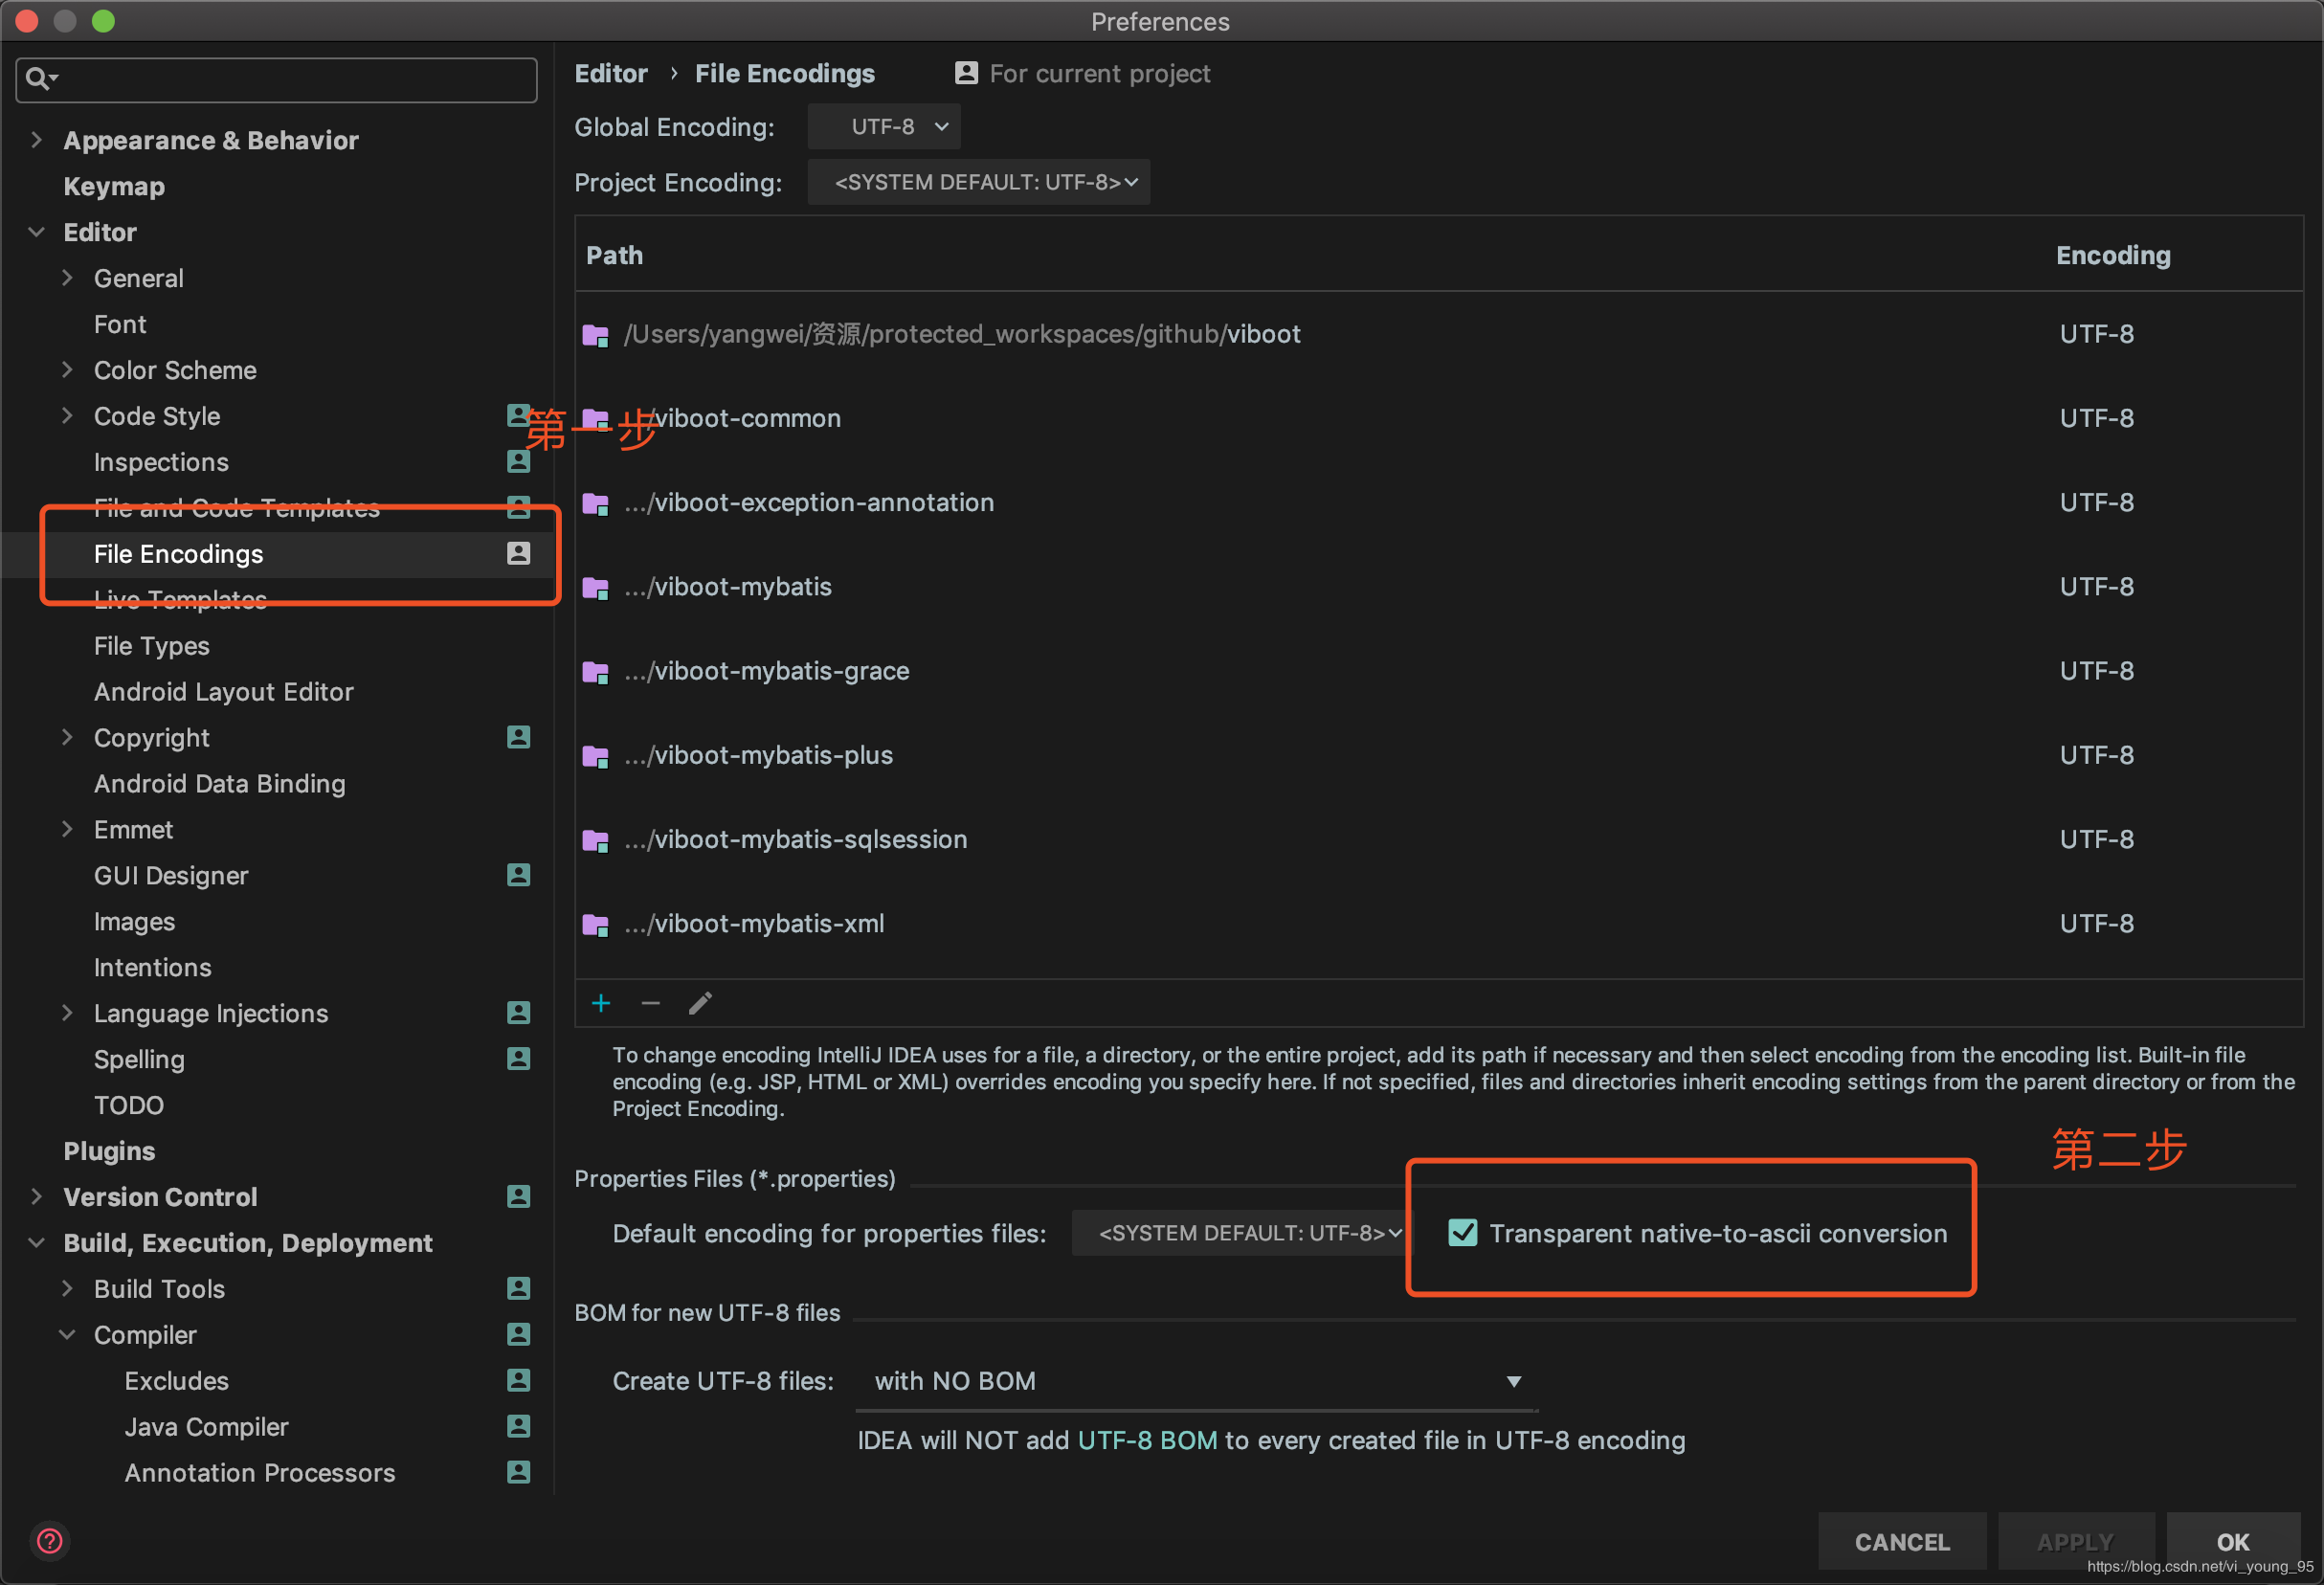
这里需要注意一点,如果你使用的是IDEA编辑器,需要修改以下的配置,这样你编辑配置文件的时候写的是中文,实际上保存的是ASCII字节码。
下面,来看一下读取的工具类:
package indi.viyoung.viboot.util;

import java.io.*;
import java.util.Iterator;
import java.util.Properties;

/**
 * 读取*.properties中的属性
 * @author vi
 * @since 2018/12/24 7:33 PM
 */
public class ReadPropertiesUtil {

    public static Properties getProperties(String propertiesPath){
        Properties properties = new Properties();
        try {
            InputStream inputStream = new BufferedInputStream(new FileInputStream(propertiesPath));
            properties.load(inputStream);
        } catch (IOException e) {
            e.printStackTrace();
        }
        return properties;
    }
}
这里我直接写了一个静态的方法,传入的参数是properties文件的位置,这样的话,本文最初代码中的也就得到了解释。
private static final Properties properties = ReadPropertiesUtil.getProperties(System.getProperty("user.dir") + "/viboot-common/src/main/resources/response.properties");
使用ReturnVO
    @RequestMapping("/test")
    public ReturnVO test(){
        try {
           //省略
            //省略
        }  catch (Exception e) {
            e.printStackTrace();
        }
        return new ReturnVO();
    }
下面我们可以去访问这个接口,看看会得到什么:
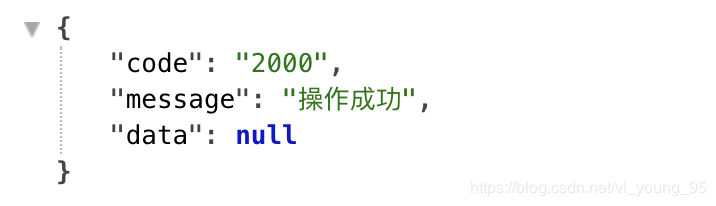
但是,现在问题又来了,因为try...catch...的存在,总是会让代码变得重复度很高,一个接口你都至少要去花三到十秒去写这个接口,如果不知道编辑器的快捷键,更是一种噩梦。我们只想全心全意的去关注实现业务,而不是花费大量的时间在编写一些重复的"刚需"代码上。
使用AOP进行全局异常的处理
(这里,我只是对全局异常处理进行一个简单的讲解,后面也就是下一节中会详细的讲述)
/**
 * 统一封装返回值和异常处理
 *
 * @author vi
 * @since 2018/12/20 6:09 AM
 */
@Slf4j
@Aspect
@Order(5)
@Component
public class ResponseAop {

    private static final Properties properties = ReadPropertiesUtil.getProperties(System.getProperty("user.dir") + "/viboot-common/src/main/resources/response.properties");

    /**
     * 切点
     */
    @Pointcut("execution(public * indi.viyoung.viboot.*.controller..*(..))")
    public void httpResponse() {
    }

    /**
     * 环切
     */
    @Around("httpResponse()")
    public ReturnVO handlerController(ProceedingJoinPoint proceedingJoinPoint) {
        ReturnVO returnVO = new ReturnVO();
        try {
             //获取方法的执行结果
            Object proceed = proceedingJoinPoint.proceed();
            //如果方法的执行结果是ReturnVO,则将该对象直接返回
            if (proceed instanceof ReturnVO) {
                returnVO = (ReturnVO) proceed;
            } else {
                //否则,就要封装到ReturnVO的data中
                returnVO.setData(proceed);
            }
        }  catch (Throwable throwable) {
             //如果出现了异常,调用异常处理方法将错误信息封装到ReturnVO中并返回
            returnVO = handlerException(throwable);
        }
        return returnVO;
    }

    /**
     * 异常处理
     */
    private ReturnVO handlerException(Throwable throwable) {
        ReturnVO returnVO = new ReturnVO();
        //这里需要注意,返回枚举类中的枚举在写的时候应该和异常的名称相对应,以便动态的获取异常代码和异常信息
        //获取异常名称的方法
        String errorName = throwable.toString();
        errorName = errorName.substring(errorName.lastIndexOf(".") + 1);
        //直接获取properties文件中的内容
         returnVO.setMessage(properties.getProperty(ReturnCode.valueOf(errorName).msg()));
        returnVO.setCode(properties.getProperty(ReturnCode.valueOf(errorName).val()));
        return returnVO;
    }
}
如果,我们需要在每一个项目中都可以这么去做,需要将这个类放到一个公用的模块中,然后在pom中导入这个模块
        <dependency>
            <groupId>indi.viyoung.course</groupId>
            <artifactId>viboot-common</artifactId>
            <version>1.0-SNAPSHOT</version>
        </dependency>
这里需要注意一点,必须保证你的切点的正确书写!!否则就会导致切点无效,同时需要在启动类中配置:
@ComponentScan(value = "indi.viyoung.viboot.*")
导入的正是common包下的所有文件,以保证可以将ResponseAop这个类加载到Spring的容器中。
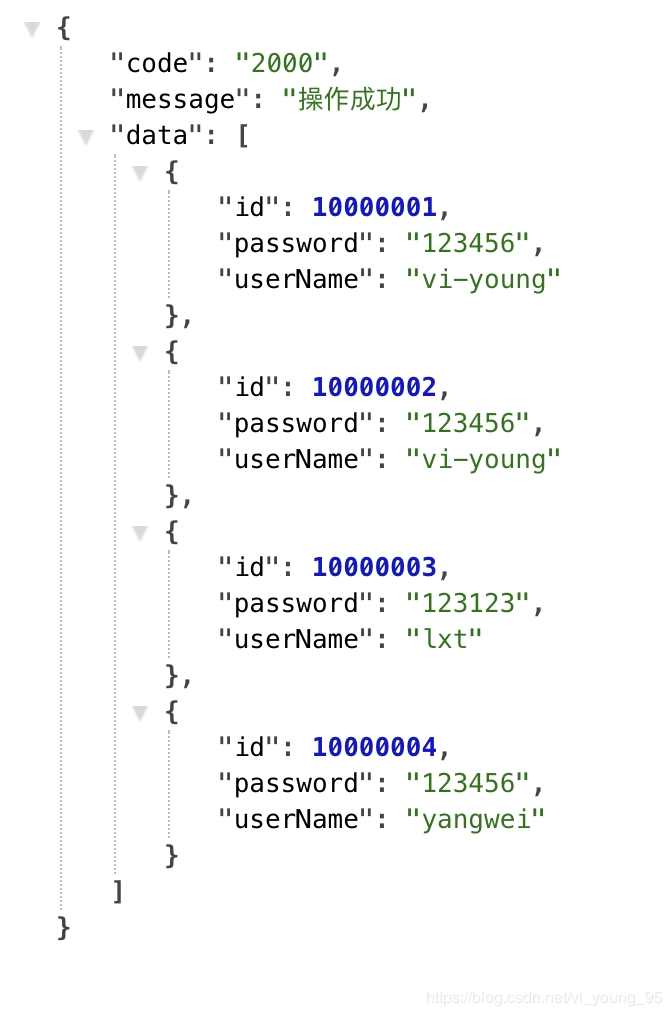
下面我们来测试一下,访问我们经过修改后的编写的findAll接口:
    @RequestMapping("/findAll")
    public Object findAll(){
        return userService.list();
    }
PS:这里我将返回值统一为Object,以便数据存入data,实际类型应是Service接口的返回类型。如果没有返回值的话,那就可以new一个ReturnVO对象直接通过构造方法赋值即可。关于返回类型为ReturnVO的判断,代码中也已经做了特殊的处理,并非存入data,而是直接返回。
下面,我们修改一下test方法,让他抛出一个我们自定义的查询返回值为空的异常:
    @RequestMapping("/test")
    public ReturnVO test(){
        throw new NullResponseException();
    }
下面,我们再来访问以下test接口:
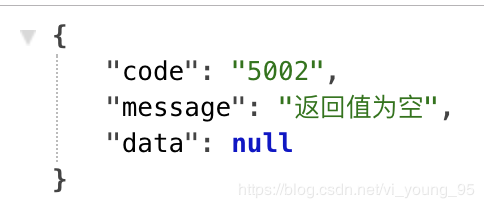
可以看到,正如我们properties中定义的那样,我们得到了我们想要的消息。
源码可以去github或者码云上进行下载,后续的例子都会同步更新。
公众号

原创文章,文笔有限,才疏学浅,文中若有不正之处,万望告知。

Spring Boot 捕捉全局异常 统一返回值的问题
这篇文章主要介绍了Spring Boot 捕捉全局异常 统一返回值,本文通过实例代码给大家介绍的非常详细,对大家的学习或工作具有一定的参考借鉴价值,需要的朋友可以参考下
在前后端分离的情况下,我们经常会定义一个统一的反回数据格式,通常都会包含状态码,返回信息,返回的数据,是否成功等参数。
1、ResultCode
单独定义了一个ReturnCode枚举类用于存储代码和返回的Message
public enum ResultCode { //成功 SUCCESS(200), // 失败 FAIL(400), // 未认证(签名错误) UNAUTHORIZED(401), // 接口不存在 NOT_FOUND(404), // 服务器内部错误 INTERNAL_SERVER_ERROR(500); public int code; ResultCode(int code) { this.code=code; } }
2、ResponseResult
/* 统一返回信息 */ public class ResponseResult { public int code; //返回状态码200成功 private String msg; //返回描述信息 private T data; //返回内容体 public ResponseResult setCode(ResultCode retCode) { this.code = retCode.code; return this; } public int getCode() { return code; } public ResponseResult setCode(int code) { this.code = code; return this; } public String getMsg() { return msg; } public ResponseResult setMsg(String msg) { this.msg = msg; return this; } public T getData() { return data; } public ResponseResult setData(T data) { this.data = data; return this; } }
在定义一个统一返回类:
3、Response
public class Response { private final static String SUCCESS = "success"; private final static String FAIL = "fail"; public static ResponseResult makeOKRsp() { return new ResponseResult().setCode(ResultCode.SUCCESS).setMsg(SUCCESS); } public static ResponseResult makeOKRsp(String message) { return new ResponseResult().setCode(ResultCode.SUCCESS).setMsg(message); } public static ResponseResult makeOKRsp(T data) { return new ResponseResult().setCode(ResultCode.SUCCESS).setMsg(SUCCESS).setData(data); } public static ResponseResult makeErrRsp(String message) { return new ResponseResult().setCode(ResultCode.INTERNAL_SERVER_ERROR).setMsg(message); } public static ResponseResult makeRsp(int code, String msg) { return new ResponseResult().setCode(code).setMsg(msg); } public static ResponseResult makeRsp(int code, String msg, T data) { return new ResponseResult().setCode(code).setMsg(msg).setData(data); } }
4、新建 IUserService
新建测试用户接口类
package com.example.demo.service; import com.example.demo.entity.User; public interface IUserService { public User getUserInfo(); }
5、新建 UserServiceImpl
新建测试用户信息服务类
package com.example.demo.service.impl; import com.example.demo.entity.User; import com.example.demo.service.UserService; import org.springframework.stereotype.Service; import java.io.File; import java.text.SimpleDateFormat; import java.util.Date; import java.util.logging.SimpleFormatter; @Service public class UserServiceImpl implements IUserService { public User getUserInfo(){ User user = new User(); user.setName("jack"); user.setPassword(12341234); return user; } }
6、在controller调用
@Autowired UserService service; @RequestMapping(value = "/getUserItem",method = RequestMethod.GET) public ResponseResult getUserItem(){ try { User user = service.getUserInfo(); String[] arr= new String[]{"测试"}; return Response.makeOKRsp(user); }catch (Exception e) { return Response.makeErrRsp("查询用户信息异常"); } }
返回结果:

7、全局异常处理器
/** * 全局异常处理 */ @RestControllerAdvice public class GlobalExceptionHandler { /*============= 请求错误 start ==============================================*/ /** * HTTP 请求方式不支持异常 * HttpRequestMethodNotSupportedException * @return {@link ResponseResult} */ @ExceptionHandler(value = HttpRequestMethodNotSupportedException.class) public ResponseResult httpRequestMethodNotSupportException(HttpRequestMethodNotSupportedException e, HttpServletRequest request) { return Response.makeErrRsp("请求方式不支持异常"); } /*============= 请求错误 end ==============================================*/ }
修改一下getUserItem让其抛出自定义查询返回null的异常:

总结
到此这篇关于Spring Boot 捕捉全局异常 统一返回值的文章就介绍到这了,更多相关Spring Boot 捕捉全局异常 内容请搜索小编以前的文章或继续浏览下面的相关文章希望大家以后多多支持小编!
今天的关于springboot项目统一返回和springboot返回一个页面的分享已经结束,谢谢您的关注,如果想了解更多关于Eclipse搭建springboot项目(二)springboot目录、spring boot 2 全局统一返回 RESTful 风格数据、统一异常处理、Spring Boot 2.x(六):优雅的统一返回值、Spring Boot 捕捉全局异常 统一返回值的问题的相关知识,请在本站进行查询。
本文标签:


![[转帖]Ubuntu 安装 Wine方法(ubuntu如何安装wine)](https://www.gvkun.com/zb_users/cache/thumbs/4c83df0e2303284d68480d1b1378581d-180-120-1.jpg)

