对于想了解springboot打包部署共享依赖包的读者,本文将提供新的信息,我们将详细介绍分布式开发集中式部署微服务,并且为您提供关于SpringBoot+Docker微服务分布式服务架构设计和部署案
对于想了解springboot 打包部署 共享依赖包的读者,本文将提供新的信息,我们将详细介绍分布式开发集中式部署微服务,并且为您提供关于Spring Boot+Docker 微服务分布式服务架构设计和部署案例、spring boot打包部署问题、Spring Cloud Spring Boot mybatis分布式微服务云架构(三十五)使用Redis做集中式缓存(1)、Spring Cloud Spring Boot mybatis分布式微服务云架构(三十六)使用Redis做集中式缓存(2)的有价值信息。
本文目录一览:- springboot 打包部署 共享依赖包(分布式开发集中式部署微服务)(springboot项目打包部署到服务器)
- Spring Boot+Docker 微服务分布式服务架构设计和部署案例
- spring boot打包部署问题
- Spring Cloud Spring Boot mybatis分布式微服务云架构(三十五)使用Redis做集中式缓存(1)
- Spring Cloud Spring Boot mybatis分布式微服务云架构(三十六)使用Redis做集中式缓存(2)
(springboot项目打包部署到服务器)")
springboot 打包部署 共享依赖包(分布式开发集中式部署微服务)(springboot项目打包部署到服务器)
####1、此文初衷
平常我们在进行微服务开发完毕后,单个微服务理应部署单个虚机上(docker 也可),然后服务集中发布到服务注册中心上,但是有些小的项目,这样做未免太过繁杂增加了部署难度,这里主要讲述的是如何在单机上通过共享 jar 包的方式来部署多个微服务,解决以上部署难度同时在带宽不够或者网速慢的情况下如何快速的发布部署。
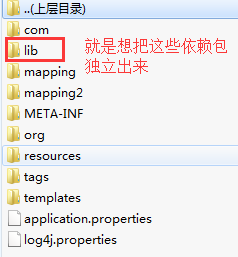
####2、部署目录结构
部署目录解答 -》
各个微服务与依赖包(lib 文件夹下)在同一级目录下,此为图 1 内容。图二内容展示的是单个微服务内的文件结构,部署配置文件以及所打的 jar 包,这里可以看到单个微服务的 jar 包只有 32KB,非常小。 ####3、如何利用 maven 打包 ##### 大家只需要在自己的 springboot 项目的 pom 文件中按照如下方式修改
<build>
		<plugins>
			<plugin>
				<artifactId>maven-jar-plugin</artifactId>
				<configuration>
					<archive>
						<manifest>
							<addClasspath>true</addClasspath>
							<classpathPrefix>lib/</classpathPrefix>
							<useUniqueVersions>false</useUniqueVersions>
							<mainClass>com.rzt.TestApplication</mainClass>
						</manifest>
					</archive>
					<excludes>
						<exclude>*.properties</exclude>
					</excludes>
				</configuration>
			</plugin>
			<plugin>
				<groupId>org.apache.maven.plugins</groupId>
				<artifactId>maven-dependency-plugin</artifactId>
				<executions>
					<execution>
						<id>copy</id>
						<phase>package</phase>
						<goals>
							<goal>copy-dependencies</goal>
						</goals>
						<configuration>
							<outputDirectory>
								${project.build.directory}/lib
							</outputDirectory>
						</configuration>
					</execution>
				</executions>
			</plugin>
		</plugins>
	</build>
这样就可以了
本篇文章由一文多发平台 ArtiPub 自动发布

Spring Boot+Docker 微服务分布式服务架构设计和部署案例
j360-microservice
spring-boot+docker 微服务设计之 j360-microservice:(欢迎 star、fork)
https://github.com/xuminwlt/j360-microservice
前言
自从 spring4 发布 spring boot 开始,springboot 非常自然的成为了 spring 的顶级项目,打开 spring 的网站,springboot 也位列第二,在他爹地 spring io platform 后面,发展到现在 springboot 已经在很多场景下发挥了巨大的生产力,尤其是通过内置容器的方式,简单一个 java -jar xxx.jar 便可以发布该工程,随着 springboot 被越来越多的人使用并且推荐,包括我,springboot 为微服务架构方式不再只停留在概念阶段,springboot 为创建微服务架构提供了稳定的基础,作为大家耳熟能详的 SOA 架构,各说纷纭,微服务在我理解范围内,特别是在得到 springboot 的支持下,微服务更加能体现出分布式服务的精髓,微服务的颗粒度更小,作为单一的功能而言,springboot 更加能快速简单的提供服务支撑。
Docker 自从 14 年热吧热吧以来,在今年 docker 已经占据了所有容器板块的头条位置,docker 也很努力,发展迭代马不停蹄。
从分别关注 springboot 和 docker 一开始我便一直在思考如何让两个人在一起,满足我的私欲,必须在一起,不为别的,springboot 是 1,docker 是 0.
介绍
微服务
微服务的特点是将每个单一服务能够独立提供服务,这个概念和 SOA 非常相似,就是所有的服务都必须提供服务的方式,在基于 springboot 的微服务架构中,使用 restful 的 api 是官方推荐的接口,也就是基于 HTTP 协议的通信方式。
微服务使用 springmvc 可以很好的提供 rest 服务,而作为客户端可以基于 Spring 中的 RestTemplate 进行创建。springboot 的就是为服务方和客户端提供良好的支撑。
容器部署
使用 docker 可以很方便地为 springboot 提供容器服务,在任何安装 jdk 的 docker 环境中,springboot 都可以发布。
案例
通过案例来介绍 springboot 和 docker 是一件很有意思的事情,本案例 j360-microservice 通过两个服务来描述快递下单和查询订单的功能,订单的底层服务交给 j360-order 服务,订单的查询和下单交给 j360-express,通过微服务设计的高度可扩展性,j360-order 同样还可以处理来源于其他的客户端发来的请求,同样 j360-express 可以给其他的快递公司发送请求,通过在 docker 中实现分布式集群部署,体现出了微服务强大的可伸缩性。
工程结构图:

演示界面:
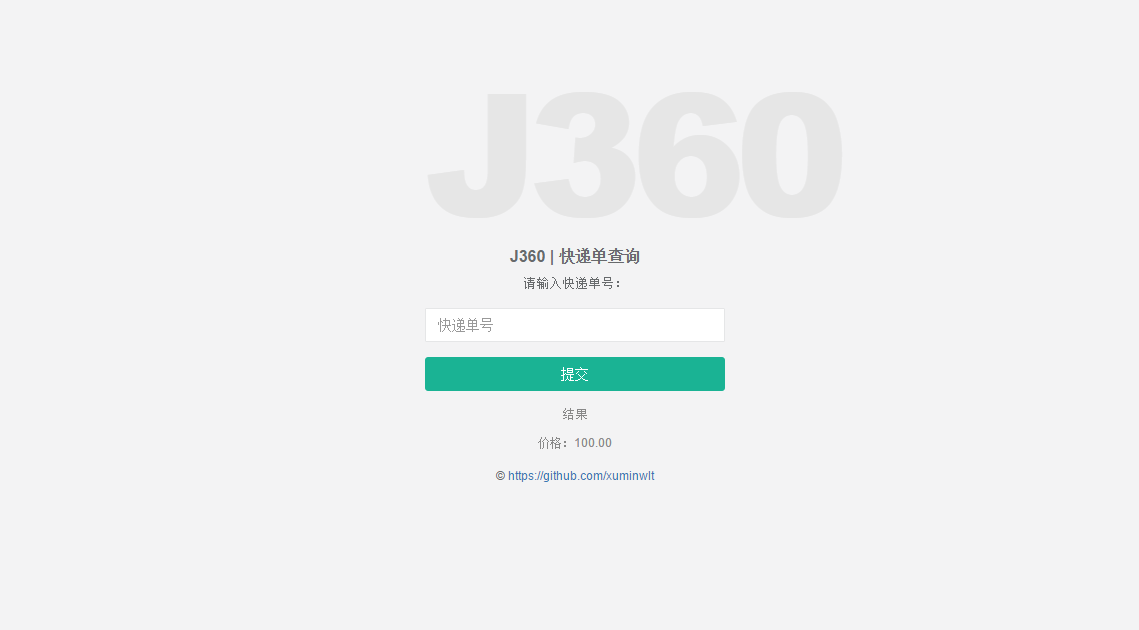
输入快递单号,结果输出快递单的信息
部分代码演示:
j360-order:微服务服务提供方
pom.xml
<?xml version="1.0" encoding="UTF-8"?>
<project xmlns="http://maven.apache.org/POM/4.0.0"
         xmlns:xsi="http://www.w3.org/2001/XMLSchema-instance"
         xsi:schemaLocation="http://maven.apache.org/POM/4.0.0 http://maven.apache.org/xsd/maven-4.0.0.xsd">
    <parent>
        <artifactId>j360-microservice</artifactId>
        <groupId>me.j360.boot.microservice</groupId>
        <version>1.0-SNAPSHOT</version>
    </parent>
    <modelVersion>4.0.0</modelVersion>

    <artifactId>j360-order</artifactId>
    <properties>
        <java.version>1.7</java.version>
    </properties>

    <!-- Add typical dependencies for a web application -->
    <dependencies>
        <dependency>
            <groupId>org.springframework.boot</groupId>
            <artifactId>spring-boot-starter-web</artifactId>
        </dependency>
        <dependency>
            <groupId>org.springframework.boot</groupId>
            <artifactId>spring-boot-starter-data-rest</artifactId>
        </dependency>

        <!--jpa-->
        <dependency>
            <groupId>org.hibernate</groupId>
            <artifactId>hibernate-entitymanager</artifactId>
        </dependency>
        <dependency>
            <groupId>org.hsqldb</groupId>
            <artifactId>hsqldb</artifactId>
            <scope>runtime</scope>
        </dependency>
        <dependency>
            <groupId>org.springframework</groupId>
            <artifactId>spring-orm</artifactId>
        </dependency>
        <dependency>
            <groupId>org.springframework.boot</groupId>
            <artifactId>spring-boot-starter-data-jpa</artifactId>
        </dependency>

        <dependency>
            <groupId>org.springframework.boot</groupId>
            <artifactId>spring-boot-starter-test</artifactId>
            <scope>test</scope>
        </dependency>

        <!--使用SpringLoaded工具,war包可以使用,但是必须使用内置的容器,去掉private的scope-->
        <dependency>
            <groupId>org.springframework.boot</groupId>
            <artifactId>spring-boot-devtools</artifactId>
        </dependency>
    </dependencies>

    <!--不是每个人都喜欢继承 spring-boot-starter-parent POM。你可能需要使用公司标准parent,或你可能倾向于显式声明所有
    Maven配置。如果你不使用 spring-boot-starter-parent ,通过使用一个 scope=import 的依赖,你仍能获取到依赖管理的好处-->
    <dependencyManagement>
        <dependencies>
            <dependency>
                <!-- Import dependency management from Spring Boot -->
                <groupId>org.springframework.boot</groupId>
                <artifactId>spring-boot-dependencies</artifactId>
                <version>1.3.0.BUILD-SNAPSHOT</version>
                <type>pom</type>
                <scope>import</scope>
            </dependency>
        </dependencies>
    </dependencyManagement>

    <!-- Package as an executable jar -->
    <build>
        <plugins>
            <plugin>
                <groupId>org.springframework.boot</groupId>
                <artifactId>spring-boot-maven-plugin</artifactId>
                <version>1.3.0.BUILD-SNAPSHOT</version>
                <!--为了在Maven命令行下使用Spring Loaded,你只需将它作为一个依赖添加到Spring Boot插件声明中即可-->
                <dependencies>
                    <dependency>
                        <groupId>org.springframework</groupId>
                        <artifactId>springloaded</artifactId>
                        <version>1.2.5.BUILD-SNAPSHOT</version>
                    </dependency>
                </dependencies>
                <executions>
                    <execution>
                        <goals>
                            <goal>repackage</goal>
                        </goals>
                    </execution>
                </executions>
            </plugin>
            <plugin>
                <groupId>org.apache.maven.plugins</groupId>
                <artifactId>maven-surefire-plugin</artifactId>
                <configuration>
                    <useSystemClassLoader>false</useSystemClassLoader>
                </configuration>
            </plugin>
            <plugin>
                <artifactId>maven-war-plugin</artifactId>
                <configuration>
                    <failOnMissingWebXml>false</failOnMissingWebXml>
                </configuration>
            </plugin>
        </plugins>

    </build>
    <!-- Additional lines to be added here... -->
    <!-- (you don''t need this if you are using a .RELEASE version) -->
    <repositories>
        <repository>
            <id>spring-snapshots</id>
            <url>http://repo.spring.io/snapshot</url>
            <snapshots><enabled>true</enabled></snapshots>
        </repository>
        <repository>
            <id>spring-milestones</id>
            <url>http://repo.spring.io/milestone</url>
        </repository>
    </repositories>
    <pluginRepositories>
        <pluginRepository>
            <id>spring-snapshots</id>
            <url>http://repo.spring.io/snapshot</url>
        </pluginRepository>
        <pluginRepository>
            <id>spring-milestones</id>
            <url>http://repo.spring.io/milestone</url>
        </pluginRepository>
    </pluginRepositories>
</project>
package me.j360.boot.microservice.order.web;
import me.j360.boot.microservice.order.entity.Express;
import me.j360.boot.microservice.order.repository.ExpressRepository;
import me.j360.boot.microservice.order.validator.ExpressValidator;
import org.springframework.beans.factory.annotation.Autowired;
import org.springframework.hateoas.EntityLinks;
import org.springframework.hateoas.ExposesResourceFor;
import org.springframework.hateoas.Resource;
import org.springframework.hateoas.Resources;
import org.springframework.http.HttpEntity;
import org.springframework.http.HttpStatus;
import org.springframework.http.ResponseEntity;
import org.springframework.stereotype.Controller;
import org.springframework.web.bind.WebDataBinder;
import org.springframework.web.bind.annotation.*;
/**
* Created with j360-microservice -> me.j360.boot.microservice.order.web.
* User: min_xu
* Date: 2015/9/27
* Time: 21:07
* 说明:通过restController实现的restAPI
*/
@RestController
@RequestMapping("/expresses")
public class ExpressController {
private final ExpressRepository repository;
private final ExpressValidator validator;
@Autowired
public ExpressController(ExpressRepository repository,ExpressValidator validator) {
this.repository = repository;
this.validator = validator;
}
@InitBinder
protected void initBinder(WebDataBinder binder) {
binder.addValidators(validator);
}
@RequestMapping(method = RequestMethod.GET)
public Iterable findAll() {
return repository.findAll();
}
@RequestMapping(method = RequestMethod.POST)
public Express create(@RequestBody Express express) {
return repository.save(express);
}
@RequestMapping(value = "/{id}", method = RequestMethod.GET)
public Express find(@PathVariable long id) {
Express detail = repository.findOne(id);
if (detail == null) {
throw new ExpressNotFoundException();
} else {
return detail;
}
}
@ResponseStatus(HttpStatus.NOT_FOUND)
static class ExpressNotFoundException extends RuntimeException {
}
}@Entity
public class Express {
@Id
@GeneratedValue(strategy = GenerationType.AUTO)
private Long id;
private BigDecimal cost;
private String no;
@OneToMany(mappedBy = "express",fetch = FetchType.LAZY)
@OrderBy("id desc")
private List<Track> tracks;
public List<Track> getTracks() {
return tracks;
}
public void setTracks(List<Track> tracks) {
this.tracks = tracks;
}
public String getNo() {
return no;
}
public void setNo(String no) {
this.no = no;
}
public BigDecimal getCost() {
return cost;
}
public void setCost(BigDecimal cost) {
this.cost = cost;
}
public long getId() {
return id;
}
public void setId(long id) {
this.id = id;
}
}j360-deliver:用户界面,调用微服务
@Override
public Map getMap(Long id) {
    ResponseEntity<Express> entity =  restTemplate.getForEntity("http://localhost:8080/expresses/1",Express.class);
    Express express = entity.getBody();
    Map<String,Object> map = new HashMap<>();
    map.put("cost",express.getCost());
    return map;
}
@Aspect
@Service
public class HystrixAdvice {
private static final String GROUP = "express";
private static final int TIMEOUT = 60000;
private static final Logger logger = LoggerFactory
.getLogger(HystrixAdvice.class);
/*
* 定义object需要转化为Object对象,此处省略
@Around("execution(* me.j360.boot.microservice.service.ExpressService.findOne(..))")
public Object hystrixCommand(final ProceedingJoinPoint pjp){
logger.info("log Around method: "
+ pjp.getTarget().getClass().getName() + "."
+ pjp.getSignature().getName());
List<Callable<AsyncResponse>> callables = new ArrayList<Callable<AsyncResponse>>();
callables.add(new BackendServiceCallable("express", getExpressMap(pjp)));
Map<String, Map<String, Object>> map = HystrixService.doBackendAsyncServiceCall(callables);
try {
String json = new ObjectMapper().writeValueAsString(map.get("express"));
return new ObjectMapper().readValue(json,Express.class);
} catch (IOException e) {
e.printStackTrace();
}
return null;
}*/
@Around("execution(* me.j360.boot.microservice.service.ExpressService.getMap(..))")
public Map<String, Object> hystrixCommandMap(final ProceedingJoinPoint pjp){
logger.info("log Around method: "
+ pjp.getTarget().getClass().getName() + "."
+ pjp.getSignature().getName());
List<Callable<AsyncResponse>> callables = new ArrayList<Callable<AsyncResponse>>();
callables.add(new BackendServiceCallable("express", getExpressMap(pjp)));
Map<String, Map<String, Object>> map = HystrixService.doBackendAsyncServiceCall(callables);
return map.get("express");
}
@Cacheable
private HystrixCommand<Map<String, Object>> getExpressMap(final ProceedingJoinPoint pjp) {
return new HystrixCommand<Map<String, Object>>(
HystrixCommand.Setter
.withGroupKey(HystrixCommandGroupKey.Factory.asKey(GROUP))
.andCommandKey(HystrixCommandKey.Factory.asKey("getExpressMap"))
.andCommandPropertiesDefaults(
HystrixCommandProperties.Setter()
.withExecutionIsolationThreadTimeoutInMilliseconds(TIMEOUT)
)
) {
@Override
protected Map<String, Object> run() throws Exception {
try {
return (Map<String, Object>) pjp.proceed();
} catch (Throwable throwable) {
throwable.printStackTrace();
}
return new HashMap<String, Object>();
}
@Override
protected Map getFallback() {
return new HashMap<String, Object>();
}
};
}
}@Controller
public class ExpressController {
@Autowired
private ExpressService expressService;
@RequestMapping(value = "/",method = RequestMethod.GET)
public String index() {
return "index";
}
@RequestMapping(value = "/express",method = RequestMethod.GET)
public String express(Model model) {
Map<String,Object> map = expressService.getMap(1l);
model.addAttribute("express",map);
return "index";
}
}此处演示用的是写死的 id 查找,需要单号需要再封装一个单号查询方法即可。
部署 Docker
1、通过 maven package 分别生成对应的 jar 文件
2、如果使用 docker maven 的话,在 docker 中安装 git+maven 直接生成 jar 也可以,这里涉及到持续集成的过程,略过
参考:
Daniel Woods 是一位技术狂热者,尤其是在企业级的 Java、Groovy,和 Grails 开发方面。他在 JVM 软件开发方面已经具有超过十年以上的经验,并且通过对 Grails 和 Ratpack web 框架这样的开源项目进行贡献的方式分享他的经验。Dan 也是 Gr8conf 和 SpringOne 2GX 会议上的演讲者,他在会议上展现了他在 JVM 的企业级应用架构上的专业知识。
http://www.infoq.com/cn/articles/boot-microservices

spring boot打包部署问题
基于Maven打包部署spring boot项目,在网上大部分都是:
<plugin>
            <groupId>org.springframework.boot</groupId>
            <artifactId>spring-boot-maven-plugin</artifactId>
            <configuration>
                <fork>true</fork>
                <mainClass>${start-class}</mainClass>
            </configuration>
              <executions>
                <execution>
                  <goals>
                    <goal>repackage</goal>
                  </goals>
                </execution>
            </executions>
        </plugin>
问题是打包后整个项目是jar,它所依赖的其它jar也会包含进去,导致整个项目很大,每次更新项目都得整个jar包更新,很麻烦。
我想问有没有一种方式是把项目依赖的jar单独出来?在部署更新项目时,只需要更新项目自身代码,有时我只需要更新几个class文件而已,不用更新依赖包。
使用Redis做集中式缓存(1)")
Spring Cloud Spring Boot mybatis分布式微服务云架构(三十五)使用Redis做集中式缓存(1)
准备工作
可以下载案例Chapter4-4-1,进行下面改造步骤。
先来回顾一下在此案例中,我们做了什么内容:
- 引入了
spring-data-jpa和EhCache - 定义了
User实体,包含id、name、age字段 - 使用
spring-data-jpa实现了对User对象的数据访问接口UserRepository - 使用
Cache相关注解配置了缓存 - 单元测试,通过连续的查询和更新数据后的查询来验证缓存是否生效
开始改造
-
删除EhCache的配置文件
src/main/resources/ehcache.xml -
pom.xml中删除EhCache的依赖,增加redis的依赖:<dependency> <groupId>org.springframework.boot</groupId> <artifactId>spring-boot-starter-redis</artifactId> </dependency> application.properties中增加redis配置,以本地运行为例,比如:spring.redis.host=localhost spring.redis.port=6379 spring.redis.pool.max-idle=8 spring.redis.pool.min-idle=0 spring.redis.pool.max-active=8 spring.redis.pool.max-wait=-1我们需要做的配置到这里就已经完成了,Spring Boot会在侦测到存在Redis的依赖并且Redis的配置是可用的情况下,使用
RedisCacheManager初始化CacheManager。为此,我们可以单步运行我们的单元测试,可以观察到此时
CacheManager的实例是org.springframework.data.redis.cache.RedisCacheManager,并获得下面的执行结果:Hibernate: insert into user (age, name) values (?, ?) Hibernate: select user0_.id as id1_0_, user0_.age as age2_0_, user0_.name as name3_0_ from user user0_ where user0_.name=? 第一次查询:10 第二次查询:10 Hibernate: select user0_.id as id1_0_0_, user0_.age as age2_0_0_, user0_.name as name3_0_0_ from user user0_ where user0_.id=? Hibernate: update user set age=?, name=? where id=? 第三次查询:10可以观察到,在第一次查询的时候,执行了select语句;第二次查询没有执行select语句,说明是从缓存中获得了结果;而第三次查询,我们获得了一个错误的结果,根据我们的测试逻辑,在查询之前我们已经将age更新为20,但是我们从缓存中获取到的age还是为10。
-
 源码来源
源码来源
使用Redis做集中式缓存(2)")
Spring Cloud Spring Boot mybatis分布式微服务云架构(三十六)使用Redis做集中式缓存(2)
问题思考
为什么同样的逻辑在EhCache中没有问题,但是到Redis中会出现这个问题呢?
在EhCache缓存时没有问题,主要是由于EhCache是进程内的缓存框架,第一次通过select查询出的结果被加入到EhCache缓存中,第二次查询从EhCache取出的对象与第一次查询对象实际上是同一个对象(可以在使用Chapter4-4-1工程中,观察u1==u2来看看是否是同一个对象),因此我们在更新age的时候,实际已经更新了EhCache中的缓存对象。
而Redis的缓存独立存在于我们的Spring应用之外,我们对数据库中数据做了更新操作之后,没有通知Redis去更新相应的内容,因此我们取到了缓存中未修改的数据,导致了数据库与缓存中数据的不一致。
因此我们在使用缓存的时候,要注意缓存的生命周期,利用好上一篇上提到的几个注解来做好缓存的更新、删除
进一步修改
针对上面的问题,我们只需要在更新age的时候,通过@CachePut来让数据更新操作同步到缓存中,就像下面这样:
@CacheConfig(cacheNames = "users")
public interface UserRepository extends JpaRepository<User, Long> {

    @Cacheable(key = "#p0")
    User findByName(String name);

    @CachePut(key = "#p0.name")
    User save(User user);

}
在redis-cli中flushdb,清空一下之前的缓存内容,再执行单元测试,可以获得下面的结果:
Hibernate: insert into user (age, name) values (?, ?)
第一次查询:10
第二次查询:10
Hibernate: select user0_.id as id1_0_0_, user0_.age as age2_0_0_, user0_.name as name3_0_0_ from user user0_ where user0_.id=?
Hibernate: update user set age=?, name=? where id=?
第三次查询:20
可以看到,我们的第三次查询获得了正确的结果!同时,我们的第一次查询也不是通过select查询获得的,因为在初始化数据的时候,调用save方法时,就已经将这条数据加入了redis缓存中,因此后续的查询就直接从redis中获取了。
本文内容到此为止,主要介绍了为什么要使用Redis做缓存,以及如何在Spring Boot中使用Redis做缓存,并且通过一个小问题来帮助大家理解缓存机制,在使用过程中,一定要注意缓存生命周期的控制,防止数据不一致的情况出现。
 源码来源
源码来源
今天关于springboot 打包部署 共享依赖包和分布式开发集中式部署微服务的分享就到这里,希望大家有所收获,若想了解更多关于Spring Boot+Docker 微服务分布式服务架构设计和部署案例、spring boot打包部署问题、Spring Cloud Spring Boot mybatis分布式微服务云架构(三十五)使用Redis做集中式缓存(1)、Spring Cloud Spring Boot mybatis分布式微服务云架构(三十六)使用Redis做集中式缓存(2)等相关知识,可以在本站进行查询。
本文标签:


![[转帖]Ubuntu 安装 Wine方法(ubuntu如何安装wine)](https://www.gvkun.com/zb_users/cache/thumbs/4c83df0e2303284d68480d1b1378581d-180-120-1.jpg)

