如果您想了解idea(windows)发布spring项目到远程linux机器docker和idea远程部署springboot的知识,那么本篇文章将是您的不二之选。我们将深入剖析idea(windo
如果您想了解idea (windows) 发布 spring 项目到远程 linux 机器 docker和idea远程部署spring boot的知识,那么本篇文章将是您的不二之选。我们将深入剖析idea (windows) 发布 spring 项目到远程 linux 机器 docker的各个方面,并为您解答idea远程部署spring boot的疑在这篇文章中,我们将为您介绍idea (windows) 发布 spring 项目到远程 linux 机器 docker的相关知识,同时也会详细的解释idea远程部署spring boot的运用方法,并给出实际的案例分析,希望能帮助到您!
本文目录一览:- idea (windows) 发布 spring 项目到远程 linux 机器 docker(idea远程部署spring boot)
- Docker for Windows (Linux Container) 使用代理
- Docker Windows Boot2Docker/Linux version 4.9.89-boot2docker/SSH login
- Docker 使用 jenkins 部署 java 项目到远程 linux(三)
- Docker之IntelliJ IDEA部署SpringBoot应用到Docker
 发布 spring 项目到远程 linux 机器 docker(idea远程部署spring boot)")
idea (windows) 发布 spring 项目到远程 linux 机器 docker(idea远程部署spring boot)
0安装 docker
在 linux 服务器上装好 docker,我的 linux 版本为 centos7,这里不建议使用 #yum install docker 方式安装,因为这种方式安装的版本比较旧,而且在配置远程 api 时要好多错误,建议使用方式
#curl -fsSL https://get.docker.com/ | sh 或 #yum install docker-engine, 这里以 17.0.3-ce 版本为例,使用
#docker version 命令即可验证是否安装成功,接下来要想在 windows 中操作远程 linux 中的 docker,那前提是必须
开启 docker 远程 API,
修改 docker 配置文件 #vi /usr/lib/systemd/system/docker.service ,
进入编辑模式后,将 ExecStart 这一行后面加上 -H tcp://0.0.0.0:2375 -H unix:///var/run/docker.sock ,改完后如下所示
ExecStart=/usr/bin/dockerd -H tcp://0.0.0.0:2375 -H unix:///var/run/docker.sock ,这里就写 4 个 0,你可别改成自己的 ip 哦,保存后退出,
重新加载配置文件 #systemctl daemon-reload ,
启动 docker #systemctl start docker ,
输入 #netstat -anp|grep 2375
显示 docker 正在监听 2375 端口
1 pom 文件中新加 plugin
<plugin>
<groupId>com.spotify</groupId>
<artifactId>docker-maven-plugin</artifactId>
<version>0.4.13</version>
<configuration>
<imageName>${docker.image.prefix}/${project.artifactId}</imageName>
<dockerDirectory>src/main/docker</dockerDirectory>
<skipDockerBuild>false</skipDockerBuild>
<resources>
<resource>
+ <targetPath>/</targetPath>
<directory>${project.build.directory}</directory>
<include>${project.build.finalName}.jar</include>
</resource>
</resources>
</configuration>
</plugin>
2 增加 docker file
FROM frolvlad/alpine-oraclejdk8:slim
VOLUME /tmp
ADD springboot-mybatis-1.0-SNAPSHOT.jar app.jar
RUN sh -c ''touch /app.jar''
ENV JAVA_OPTS=""
ENTRYPOINT [ "sh", "-c", "java $JAVA_OPTS -Djava.security.egd=file:/dev/./urandom -jar /app.jar" ]
3 idea 中 新增 Docker 插件
(安装后注意错误提示)
并修改配置环境变量 DOCKER_HOST :tcp://192.168.57.128:2375 [192.168.57.128] 为远程机器地址
4 执行构建成为 docker image:
docker run -p 8011:8011 -t waylau/docker-spring-boot
5 检查应用程序的正确性,
访问 http://192.168.57.128:8011/demo.html#
参考文章:
http://blog.csdn.net/kkkloveyou/article/details/50942275
http://blog.csdn.net/weixin_36667844/article/details/74644233
 使用代理")
Docker for Windows (Linux Container) 使用代理
前提:
在国内环境,因为某种原因,使用 docker 下载 image 非常缓慢。因此,为了更好的下载效率,需要使用代理。
所需条件:
1. VPS(offshore)
2. ss
遇到的坑:

这样设置后,发现并没有生效。理由如下:
docker login
username: ***
password: ***
提示连接被拒绝。
原因:
docker MobyLinuxVM 并不与本地 127.0.0.1 共享同一个 IP。

通过以上截图可以看到 docker 有内置的以太网适配器。
解决:
step1,任务栏右击 ss:
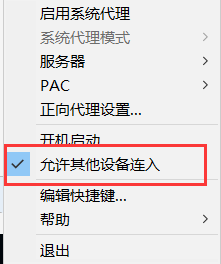
钩选红框部分。
step2,将 docker setting proxy 的代理 IP 地址重新设置下,使用 docker MobyLinuxVM 的子网地址(刚才截图的):
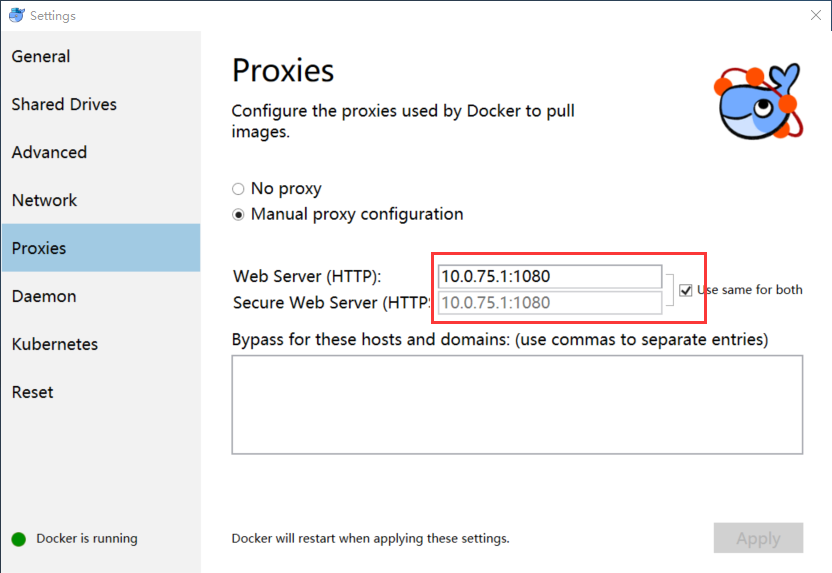
完成。
确认:
docker login
username: ***
password: ***
成功。

Docker Windows Boot2Docker/Linux version 4.9.89-boot2docker/SSH login
### 断网
C:\Users\Administrator>
C:\Users\Administrator>"C:\Program Files\Git\bin\bash.exe" --login -i "C:\Program Files\Docker ToolBox\start.sh"
Running pre-create checks...
(default) Unable to get the latest Boot2Docker ISO release version: Get https://api.github.com/repos/boot2docker/boot2docker/releases/latest: dial tcp: lookup api.github.com: no such host
Creating machine...
(default) Unable to get the latest Boot2Docker ISO release version: Get https://api.github.com/repos/boot2docker/boot2docker/releases/latest: dial tcp: lookup api.github.com: no such host
(default) copying C:\Users\Administrator\.docker\machine\cache\boot2docker.iso to C:\Users\Administrator\.docker\machine\machines\default\boot2docker.iso...
(default) Creating VirtualBox VM...
(default) Creating SSH key...
(default) Starting the VM...
(default) Check network to re-create if needed...
(default) Windows might ask for the permission to create a network adapter. Sometimes, such confirmation window is minimized in the taskbar.
(default) Found a new host-only adapter: "VirtualBox Host-Only Ethernet Adapter #4"
(default) Windows might ask for the permission to configure a network adapter. Sometimes, such confirmation window is minimized in the taskbar.
(default) Windows might ask for the permission to configure a dhcp server. Sometimes, such confirmation window is minimized in the taskbar.
(default) Waiting for an IP...
Waiting for machine to be running, this may take a few minutes...
Detecting operating system of created instance...
Waiting for SSH to be available...
Detecting the provisioner...
Provisioning with boot2docker...
copying certs to the local machine directory...
copying certs to the remote machine...
Setting Docker configuration on the remote daemon...
Checking connection to Docker...
Docker is up and running!
To see how to connect your Docker Client to the Docker Engine running on this virtual machine, run: C:\Program Files\Docker ToolBox\docker-machine.exe env default
## .
## ## ## ==
## ## ## ## ## ===
/"""""""""""""""""\___/ ===
~~~ {~~ ~~~~ ~~~ ~~~~ ~~~ ~ / ===- ~~~
\______ o __/
\ \ __/
\____\_______/
docker is configured to use the default machine with IP 192.168.99.100
For help getting started, check out the docs at https://docs.docker.com
Start interactive shell
Administrator@Win10 MINGW64 ~
$ boot2docker status
bash: boot2docker: command not found
Administrator@Win10 MINGW64 ~
$ ssh lake@192.168.99.100
The authenticity of host '192.168.99.100 (192.168.99.100)' can't be established.
ECDSA key fingerprint is SHA256:XG+WBjjl/PP3ksIJ8B4QFSrQ4OsmNn1cyoLMeEyLkuc.
Are you sure you want to continue connecting (yes/no)? yes
Warning: Permanently added '192.168.99.100' (ECDSA) to the list of kNown hosts.
lake@192.168.99.100's password:
Permission denied, please try again.
lake@192.168.99.100's password:
Permission denied, please try again.
lake@192.168.99.100's password:
lake@192.168.99.100: Permission denied (publickey,password,keyboard-interactive).
Administrator@Win10 MINGW64 ~
$
Administrator@Win10 MINGW64 ~
$ docker run hello-world
Unable to find image 'hello-world:latest' locally
latest: Pulling from library/hello-world
1b930d010525: Pull complete
Digest: sha256:6540fc08ee6e6b7b63468dc3317e3303aae178cb8a45ed3123180328bcc1d20f
Status: Downloaded newer image for hello-world:latest
Hello from Docker!
This message shows that your installation appears to be working correctly.
To generate this message, Docker took the following steps:
1. The Docker client contacted the Docker daemon.
2. The Docker daemon pulled the "hello-world" image from the Docker Hub.
(amd64)
3. The Docker daemon created a new container from that image which runs the
executable that produces the output you are currently reading.
4. The Docker daemon streamed that output to the Docker client, which sent it
to your terminal.
To try something more ambitIoUs, you can run an Ubuntu container with:
$ docker run -it ubuntu bash
Share images, automate workflows, and more with a free Docker ID:
https://hub.docker.com/
For more examples and ideas, visit:
https://docs.docker.com/get-started/
Administrator@Win10 MINGW64 ~
$ docker run hello-world
Hello from Docker!
This message shows that your installation appears to be working correctly.
To generate this message, Docker took the following steps:
1. The Docker client contacted the Docker daemon.
2. The Docker daemon pulled the "hello-world" image from the Docker Hub.
(amd64)
3. The Docker daemon created a new container from that image which runs the
executable that produces the output you are currently reading.
4. The Docker daemon streamed that output to the Docker client, which sent it
to your terminal.
To try something more ambitIoUs, you can run an Ubuntu container with:
$ docker run -it ubuntu bash
Share images, automate workflows, and more with a free Docker ID:
https://hub.docker.com/
For more examples and ideas, visit:
https://docs.docker.com/get-started/
Administrator@Win10 MINGW64 ~
$
############ ssh login in Docker
Administrator@Win10 MINGW64 ~
$ docker-machine start default
Starting "default"...
Machine "default" is already running.
Administrator@Win10 MINGW64 ~
Administrator@Win10 MINGW64 ~
$ docker-machine ls
NAME ACTIVE DRIVER STATE URL SWARM DOCKER ERRORS
default * virtualBox Running tcp://192.168.99.100:2376 v18.03.0-ce
Administrator@Win10 MINGW64 ~
$ docker-machine ssh default
## .
## ## ## ==
## ## ## ## ## ===
/"""""""""""""""""\___/ ===
~~~ {~~ ~~~~ ~~~ ~~~~ ~~~ ~ / ===- ~~~
\______ o __/
\ \ __/
\____\_______/
_ _ ____ _ _
| |__ ___ ___ | |_|___ \ __| | ___ ___| | _____ _ __
| '_ \ / _ \ / _ \| __| __) / _` |/ _ \ / __| |/ / _ \ '__|
| |_) | (_) | (_) | |_ / __/ (_| | (_) | (__| < __/ |
|_.__/ \___/ \___/ \__|_____\__,_|\___/ \___|_|\_\___|_|
Boot2Docker version 18.03.0-ce, build HEAD : 404ee40 - Thu Mar 22 17:12:23 UTC 2018
Docker version 18.03.0-ce, build 0520e24
docker@default:~$ uname -a
Linux default 4.9.89-boot2docker #1 SMP Thu Mar 22 17:02:51 UTC 2018 x86_64 GNU/Linux
docker@default:~$ cat /proc/version
Linux version 4.9.89-boot2docker (root@e63d0b14ae7b) (gcc version 6.3.0 20170516 (Debian 6.3.0-18+deb9u1) ) #1 SMP Thu Mar 22 17:02:51 UTC 2018
docker@default:~$
docker@default:~$ ifconfig
docker0 Link encap:Ethernet HWaddr 02:42:47:36:CA:BC
inet addr:172.17.0.1 Bcast:172.17.255.255 Mask:255.255.0.0
inet6 addr: fe80::42:47ff:fe36:cabc/64 Scope:Link
UP broADCAST MULTICAST MTU:1500 Metric:1
RX packets:0 errors:0 dropped:0 overruns:0 frame:0
TX packets:4 errors:0 dropped:0 overruns:0 carrier:0
collisions:0 txqueuelen:0
RX bytes:0 (0.0 B) TX bytes:348 (348.0 B)
eth0 Link encap:Ethernet HWaddr 08:00:27:6C:E7:AB
inet addr:10.0.2.15 Bcast:10.0.2.255 Mask:255.255.255.0
inet6 addr: fe80::a00:27ff:fe6c:e7ab/64 Scope:Link
UP broADCAST RUNNING MULTICAST MTU:1500 Metric:1
RX packets:1031 errors:0 dropped:0 overruns:0 frame:0
TX packets:686 errors:0 dropped:0 overruns:0 carrier:0
collisions:0 txqueuelen:1000
RX bytes:204621 (199.8 KiB) TX bytes:179896 (175.6 KiB)
eth1 Link encap:Ethernet HWaddr 08:00:27:F4:EC:FC
inet addr:192.168.99.100 Bcast:192.168.99.255 Mask:255.255.255.0
inet6 addr: fe80::a00:27ff:fef4:ecfc/64 Scope:Link
UP broADCAST RUNNING MULTICAST MTU:1500 Metric:1
RX packets:176 errors:0 dropped:0 overruns:0 frame:0
TX packets:126 errors:0 dropped:0 overruns:0 carrier:0
collisions:0 txqueuelen:1000
RX bytes:36612 (35.7 KiB) TX bytes:33784 (32.9 KiB)
lo Link encap:Local Loopback
inet addr:127.0.0.1 Mask:255.0.0.0
inet6 addr: ::1/128 Scope:Host
UP LOOPBACK RUNNING MTU:65536 Metric:1
RX packets:32 errors:0 dropped:0 overruns:0 frame:0
TX packets:32 errors:0 dropped:0 overruns:0 carrier:0
collisions:0 txqueuelen:1
RX bytes:2752 (2.6 KiB) TX bytes:2752 (2.6 KiB)
docker@default:~$
docker@default:~$
docker@default:~$
docker@default:~$ df
Filesystem Size Used Available Use% Mounted on
tmpfs 896.1M 227.5M 668.6M 25% /
tmpfs 497.8M 0 497.8M 0% /dev/shm
/dev/sda1 17.9G 45.1M 16.9G 0% /mnt/sda1
cgroup 497.8M 0 497.8M 0% /sys/fs/cgroup
c/Users 200.0G 136.2G 63.8G 68% /c/Users
/dev/sda1 17.9G 45.1M 16.9G 0% /mnt/sda1/var/lib/docker
docker@default:~$ mount
tmpfs on / type tmpfs (rw,relatime,size=917576k)
proc on /proc type proc (rw,relatime)
sysfs on /sys type sysfs (rw,relatime)
devpts on /dev/pts type devpts (rw,relatime,mode=600,ptmxmode=000)
tmpfs on /dev/shm type tmpfs (rw,relatime)
fusectl on /sys/fs/fuse/connections type fusectl (rw,relatime)
/dev/sda1 on /mnt/sda1 type ext4 (rw,relatime,data=ordered)
cgroup on /sys/fs/cgroup type tmpfs (rw,relatime,mode=755)
cgroup on /sys/fs/cgroup/cpuset type cgroup (rw,relatime,cpuset)
cgroup on /sys/fs/cgroup/cpu type cgroup (rw,relatime,cpu)
cgroup on /sys/fs/cgroup/cpuacct type cgroup (rw,relatime,cpuacct)
cgroup on /sys/fs/cgroup/blkio type cgroup (rw,relatime,blkio)
cgroup on /sys/fs/cgroup/memory type cgroup (rw,relatime,memory)
cgroup on /sys/fs/cgroup/devices type cgroup (rw,relatime,devices)
cgroup on /sys/fs/cgroup/freezer type cgroup (rw,relatime,freezer)
cgroup on /sys/fs/cgroup/net_cls type cgroup (rw,relatime,net_cls)
cgroup on /sys/fs/cgroup/perf_event type cgroup (rw,relatime,perf_event)
cgroup on /sys/fs/cgroup/net_prio type cgroup (rw,relatime,net_prio)
cgroup on /sys/fs/cgroup/hugetlb type cgroup (rw,relatime,hugetlb)
cgroup on /sys/fs/cgroup/pids type cgroup (rw,relatime,pids)
c/Users on /c/Users type vBoxsf (rw,nodev,relatime)
/dev/sda1 on /mnt/sda1/var/lib/docker type ext4 (rw,relatime,data=ordered)
docker@default:~$ cat /proc/cpuinfo
processor : 0
vendor_id : GenuineIntel
cpu family : 6
model : 158
model name : Intel(R) Core(TM) i7-8850H cpu @ 2.60GHz
stepping : 10
cpu MHz : 2592.000
cache size : 9216 KB
physical id : 0
siblings : 1
core id : 0
cpu cores : 1
apicid : 0
initial apicid : 0
fpu : yes
fpu_exception : yes
cpuid level : 22
wp : yes
flags : fpu vme de pse tsc msr pae mce cx8 apic sep mtrr pge mca cmov pat pse36 clflush mmx fxsr sse sse2 syscall nx rdtscp lm constant_tsc rep_good nopl xtopology nonstop_tsc eagerfpu pni pclmulqdq monitor ssse3 cx16 sse4_1 sse4_2 movbe popcnt aes xsave avx rdrand hypervisor lahf_lm abm 3dNowprefetch kaiser avx2 rdseed clflushopt
bugs : cpu_meltdown spectre_v1 spectre_v2
bogomips : 5184.00
clflush size : 64
cache_alignment : 64
address sizes : 39 bits physical, 48 bits virtual
power management:
docker@default:~$
docker@default:~$
docker@default:~$ free
total used free shared buff/cache available
Mem: 1019528 73460 694980 232924 251088 632748
Swap: 1176084 0 1176084
docker@default:~$
docker@default:~$
")
Docker 使用 jenkins 部署 java 项目到远程 linux(三)
实现功能:从本地提交代码到 gogs 上,本地的代码会被检测一遍 如果检测通过才能 commit 成功 然后可以继续执行 push 命令 。push 后在 gogs 上使用 web 钩子自动推送到 jenkins 触发构建,jenkins 构建成功会自动完成项目的部署。
(1)安装 Docker 容器(相当于一个 linux 服务器),在 Docker 容器里安装 jenkins,gogs.tomcat,jdk
远程 linux 中需要安装 jdk
(2) 使用 eclipse 创建 maven 项目,项目目录结构如下: (java 项目)

ApplicationMain.java
package cn.demo.JavademoIn7.application;
/**
 * 测试java项目 in server 172.150.15.7
 * 本地使用git钩子检测 findbugs插件
 * gogs上自动推送
 * jenkins也检测然后自动部署到Docker容器中
 * @author Administrator
 *
 */
public class ApplicationMain {

    public static void main(String[] args) {
        System.out.println("*******************ApplicationMain()****************");
    }

    public void hello(){
        System.out.println("This method in demo.");
    }

}
ApplicationMainTest.java
package cn.demo.JavademoIn7.application;

import static org.junit.Assert.*;

import org.junit.AfterClass;
import org.junit.BeforeClass;
import org.junit.Test;
/**
 * ApplicationMain的测试类
 * @author Administrator
 *
 */
public class ApplicationMainTest {

  //测试之前执行的方法
    @BeforeClass
    public static void setUpBeforeClass() throws Exception {
        System.out.println("---Before()---");
    }

  //测试执行执行的方法
    @AfterClass
    public static void tearDownAfterClass() throws Exception {
        System.out.println("---After()---");
    }

  //测试ApplicationMain类中的hello方法
    @Test
    public void testHello() {
        System.out.println("executing.............");
        ApplicationMain amt = new ApplicationMain();
        amt.hello();
    }

}
script.sh (这是执行该项目的脚本命令)
#!/bin/sh
cd  /usr/src/myapp  #进入jar包存放目录

#得到进程ID pid,kill该进程
pid=`cat  /usr/src/myapp/pid`  #得到该目录下 pid文件中的进程id
if [ -n "$pid" ]
then
    echo "kill -9 的pid:" $pid
    kill -9 $pid    #kill该进程
fi

#执行jar,并将进程挂起,保存进程ID到 pid文件
echo "Execute shell Finish"
#执行项目jar包,将进程挂起,然后将进程id写入当前目录下的pid文件中
BUILD_ID=dontKillMe nohup java -jar /usr/src/myapp/JavademoIn7.jar  & echo "$!" > pid
script.xml (这是将脚本命令打包的描述文件)
<assembly xmlns="http://maven.apache.org/plugins/maven-assembly-plugin/assembly/1.1.2"
         xmlns:xsi="http://www.w3.org/2001/XMLSchema-instance"
         xsi:schemaLocation="http://maven.apache.org/plugins/maven-assembly-plugin/assembly/1.1.2
          http://maven.apache.org/xsd/assembly-1.1.2.xsd">

    <id>script</id>

    <formats><!--打包的文件格式 -->
        <format>zip</format>
    </formats>

    <fileSets>
        <fileSet>
            <directory>src/main/resources/script</directory><!--需要打包的目录 -->
            <outputDirectory>/</outputDirectory> <!-- 打包后输出的路径 输出子啊target目录下 -->
        </fileSet>
    </fileSets>

</assembly>
pom.xml
<project xmlns="http://maven.apache.org/POM/4.0.0" xmlns:xsi="http://www.w3.org/2001/XMLSchema-instance"
  xsi:schemaLocation="http://maven.apache.org/POM/4.0.0 http://maven.apache.org/xsd/maven-4.0.0.xsd">
  <modelVersion>4.0.0</modelVersion>

    <groupId>cn.demo</groupId>
    <artifactId>JavademoIn7</artifactId>
    <version>0.0.1-SNAPSHOT</version>
    <packaging>jar</packaging> <!-- 打包成jar包 -->
    <name>JavademoIn7</name>
    <url>http://maven.apache.org</url>

    <build>
        <finalName>JavademoIn7</finalName>
        <plugins>
            <plugin>
                <inherited>true</inherited>
                <groupId>org.apache.maven.plugins</groupId>
                <artifactId>maven-compiler-plugin</artifactId>
                <version>3.1</version>
                <configuration>
                    <source>${compiler.source}</source>
                    <target>${compiler.target}</target>
                    <encoding>${project.build.sourceEncoding}</encoding>
                </configuration>
            </plugin>

            <!-- 指定执行的主类(main方法所在的类)-->
            <plugin>
                <groupId>org.apache.maven.plugins</groupId>
                <artifactId>maven-jar-plugin</artifactId>
                <version>2.6</version>
                <configuration>
                    <archive>
                    <!-- 添加index则不从mainfest中读取classpath,而是从Index.list中读取 -->
                    <!-- <index>true</index> -->
                        <manifest>
                            <mainClass>cn.demo.JavademoIn7.application.ApplicationMain</mainClass>
                        </manifest>

                    </archive>
                </configuration>
            </plugin>

            <!-- 将执行项目的脚本文件一起打包 -->
             <plugin>
               <groupId>org.apache.maven.plugins</groupId>
                <artifactId>maven-assembly-plugin</artifactId>
                <version>2.4.1</version>
                <executions>
                    <execution>
                        <id>${project.version}</id><!--名字任意 -->
                        <phase>package</phase>   <!-- 绑定到package生命周期阶段上 -->
                        <goals>
                            <goal>single</goal>   <!-- 只运行一次 -->
                        </goals>

                        <configuration>
                            <descriptors>   <!--描述文件路径-->
                                <descriptor>src/main/resources/script.xml</descriptor>
                            </descriptors>
                            <!--这样配置后,mvn deploy不会把assembly打的zip包上传到nexus-->
                            <attach>false</attach>
                        </configuration>
                    </execution>
                </executions>
            </plugin>

        <!-- findbugs插件 :静态检查代码的错误-->
        <plugin>
            <groupId>org.codehaus.mojo</groupId>
            <artifactId>findbugs-maven-plugin</artifactId>
            <version>3.0.4</version>
            <configuration>
                <!-- 设置分析工作的等级,可以为Min、Default和Max -->
                <effort>Low</effort>
                <!-- Low、Medium和High (Low最严格) -->
                <threshold>Medium</threshold>
                <failOnError>true</failOnError>
                <includeTests>true</includeTests>
                <!--findbugs需要忽略的错误的配置文件-->
               <!--  <excludeFilterFile>compile.bat</excludeFilterFile> -->
            </configuration>
            <executions>
                <execution>
                    <id>run-findbugs</id>
                    <!-- 在install 阶段触发执行findbugs检查,比如执行 mvn clean package-->
                    <phase>install</phase>
                    <goals>
                        <goal>check</goal>
                    </goals>
                </execution>
            </executions>
        </plugin>

    </plugins>
    </build>

    <properties>
        <project.build.sourceEncoding>UTF-8</project.build.sourceEncoding>
        <compiler.source>1.7</compiler.source>
        <compiler.target>1.7</compiler.target>
        <junit.version>4.12</junit.version>
    </properties>

    <dependencies>

        <dependency>
            <groupId>org.apache.maven.plugins</groupId>
            <artifactId>maven-clean-plugin</artifactId>
            <version>2.5</version>
        </dependency>
        <dependency>
            <groupId>junit</groupId>
            <artifactId>junit</artifactId>
            <version>${junit.version}</version>
            <scope>test</scope>
        </dependency>
    </dependencies>
</project>
(3)关于 git 和 gogs 代码存放在 gogs 管理的仓库中,本地通过 git bash here 界面使用 git 命令提交代码
将 Eclipse 上的项目复制到桌面,进入项目文件夹,目录如下: (红色标记的是项目中没有的,需要使用命令生成或手动创建的)

.gitignore 文件的作用:忽略的文件,就是不需要被上传到 gogs 的文件 内容如下:
#忽略的文件
.settings
target
.classpath
.project
compile.bat
package.bat
package.sh
右击进入 git bash here 界面,使用 git init 命令,生成 .git 文件夹
进入 .git -> hooks 目录如下 (红色标记的文件是自己添加进去的)

pre-commit 文件的作用:在执行 git commit -m "description" 这条命令之前,先执行 pre-commit 文件中的脚本命令。
这里执行 mvn clean install, 先清除项目信息,然后再 install,前面在 pom.xml 中配置了 install 中嵌套了 findbugs 插件的 check 命令
所以执行 mvn install 命令时,也会执行 findbugs:findbugs 命令。当检测出有 bug 时,会 build 失败,commit 也失败;反之则成功
pre-commit 内容如下:
#!/bin/sh
#execute shell before commit,check the code
mvn clean install

#recieve the  execute result
result=$?
#output the result ,if the result less or equal 0 ,it proves this project has bugs,otherwise don''t.
echo $result

if [ $result -ne 0 ]
then
    mvn findbugs:gui  #返回非0值表示构建失败,这里弹出findbugs的gui,里面会显示bug的详细信息。
    echo "REGRETFUL! BUILD FAILURE"
    exit 1   #这里返回非0值,使得commit失败。
else
    echo "CONGRATURATION! BUILD SUCCESS"
    exit 0
fi
本地操作命令:
git init #初始化本地仓库
git add . #将所有文件添加到临时存放区 (被忽略的文件除外)
git commit -m "test java program" #将添加到临时存放区的文件提交
git remote add origin http://172.150.12.5:10080/test/JavademoIn7.git #添加远程仓库的连接 这里需要将本机的 ssh key 添加到 gogs 的 SSHkey 中,如果没有添加也可以用 gogs 的登录账号和密码去建立连接
git push origin master #将本地代码推送到 gogs 上
gogs 中的仓库界面显示,(推送后)

点击仓库设置 --》管理 web 钩子 --》添加 web 钩子: 格式如下
http://172.150.15.52:8080/gogs-webhook/?job=JavademoIn7
172.150.15.52:8080 #是访问 jenkins 的链接
JavademoIn7 #是 jenkins 的项目名
添加 web 钩子的作用: 当下次本地执行 git push 命令时,会自动触发 jenkins 项目执行构建。
(4)jenkins 中的配置,jenkins 主界面如下

进入 系统管理 --》 Global Tool Configuration :
JDK 勾中自动安装,maven 选择合适的版本自动安装,其他的都保持不变,然后保存就行了
进入 系统管理 --》插件管理: 界面如下

选中 可选择插件,在红色标记的这里分别查询以下插件,并且选择直接安装 (安装 jenkins 的时候,选择的是默认安装方法,其中 jenkins 会自动下载有些插件)
Maven Intergration plugin, Checkstyle plugin , Findbugs plugin ,Deploy to Container Plugin,Publish over SSH plugin,gogs plugin。
Maven Intergration plugin #用于构建 maven 项目的插件
Checkstyle plugin #检测代码的格式是否规范的插件
Findbugs plugin #对提交的代码静态检测,静态语法
Deploy to Container Plugin #将项目部署到 Tomcat 中需要用到的插件 (或者其他容器)
Publish over SSH plugin #需要部署项目到远程 linux 时需要到的插件
Gogs plugin #使用 web 钩子推送时,必须下载此插件,不然就会报 403 错误
插件下载完之后,再进入 系统管理 --》 系统设置 :
前面的配置都不用管,使用默认的就行了。直接下拉到 Publish Over SSH
Passphrase :这里配置的是你在 docker 容器中,使用 ssh-keygen -t rsa 命令生成秘钥对时的 passphrse, 如果你直接按了回车,这里就不用填写了
Path to key : 这里写 Docker 容器里 ssh-keygen -t rsa 生成 id_rsa 的路径
key :这里写 ssh-keygen -t rsa 生成的 id_rsa 中的内容
Path to Key 和 Key 二选一就行了,只要填其中一个就可以了。
附: 进入 docker 容器的命令 docker exec -it 容器 ID bash

接下来配置需要部署项目的远程 linux (SSH Servers),如果需要部署在多台远程 linux 上,可以配置多个 SSH Servers (下面有增加命令)
Name:这里你自己定义名字,只要非中文,不是非法字符都行
Hostname : 这里可以写远程主机名或者是主机 IP,建议写主机 IP
Username :用来执行的用户 一般为 root
Remote Directory :这里写远程目录名,/ 表示直接使用根目录
配置完这里后,记得单击下面的 高级 按钮,然后选择 Use password authentication ,or use a different key
在 Passphrase /password 这里填写你的 用户登录的密码,就是 root 用户,登录的密码
其他的都空着,使用默认的就行,然后下面有个 testConfiguration , 点击一下,没问题的话 会出现 SUCCESS

jenkins 的基本配置到此结束了,接下来使用 jenkins 构建项目
(5)新建 -- 填写项目名后 -- 构建 maven 风格的项目 -- ok
然后开始进行项目的基本配置
1、General:自己写项目的基本介绍吧

2、源码管理 :这里选择 Git 管理
Repository URL :这里写你的 gogs 对应的仓库链接
Credentials:这里如果没有配置,点击右侧的 Add , 然后填写 username 和 password (分别填 gogs 的登录名和密码) 然后再选中就可以了

3、构建触发器 : 触发远程构建
身份验证令牌: 填当前 jenkins 构建的项目名

4、Build :maven 项目的构建,命令执行; Post Step :直接选择 Run only if build success 就行了 (中间的构建环境和 Pre Steps 可以不用写,直接空着)
Root POM :带路径写出 pom.xml 的位置,一般是在根目录下的
Goals and options : 这里写执行的命令, 先 clean , 再 install
findbugs:findbgus :是执行 jenkins 中的 findbugs 插件命令。
checkstyle:checkstyle: 是执行 jenkins 中的 checkstyle 插件命令。

5、构建设置 :勾中需要的插件。这里表示使用 checkstyle 和 findbugs 插件
关于这两个插件的高级配置,查看以往的博客,里面有详细介绍。

6、构建后操作:选中 Send build artifacts over SSH
Name:是你在系统配置 --》 SSH server 中配置的 Name (那边配置了,这边下拉框才会有显示)
******Transger : 指定是需要被传输的内容以及相关命令操作 *******
Source Files : 以项目的工作空间为根目录,需要传送到远程 linux 的文件直接带路径写上去就行,多个文件使用逗号分隔开
Remove Prefix:需要被移除的文件前缀
Remote Directory :这里是被传送的目录,远程 linux 接收文件的目录
Exec command:这里写脚本命令,由于执行项目的脚本已经通过 pom.xml 打包好了,在 target 目录下的 JavademoIn7-script..zip 目录下,所以这里就写脚本命令,解压缩该 zip,然后运行里面的脚本文件。

Exec command 中的内容:
#!/bin/sh
cd /usr/src/myapp/   #进入远程目录

unzip -o  /usr/src/myapp/JavademoIn7-script.zip -d  /usr/src/myapp/ #将存放脚本文件的压缩包解压

cd JavademoIn7  #打开解压后的文件夹
sh script.sh #执行脚本文件
所有的配置就到这里结束了,保存 --》 执行构建 就行了。
也可以在本地做个小修改,然后重新提交,git add . git commit -m "re commit to test" git push origin master 完之后,项目会自动部署到远程 linux。
直接可以在 jenkins 的 Console Output 中查看构建结果。

Docker之IntelliJ IDEA部署SpringBoot应用到Docker
Docker开启远程访问
vim /usr/lib/systemd/system/docker.service
在 ExecStart=/usr/bin/dockerd-current 后 增加 -H tcp://0.0.0.0:2375 -H unix:///var/run/docker.sock
最终为 ExecStart=/usr/bin/dockerd -H tcp://0.0.0.0:2375 -H unix:///var/run/docker.sock
systemctl daemon-reload
systemctl restart docker
查看端口是否开启
netstat -nlpt
测试2375是否通
curl http://127.0.0.1:2375/info
打开2375防火墙
firewall-cmd --zone=public --add-port=2375/tcp --permanent
firewall-cmd --reload
IntelliJ IDEA安装Docker插件
搜索docker安装并重启
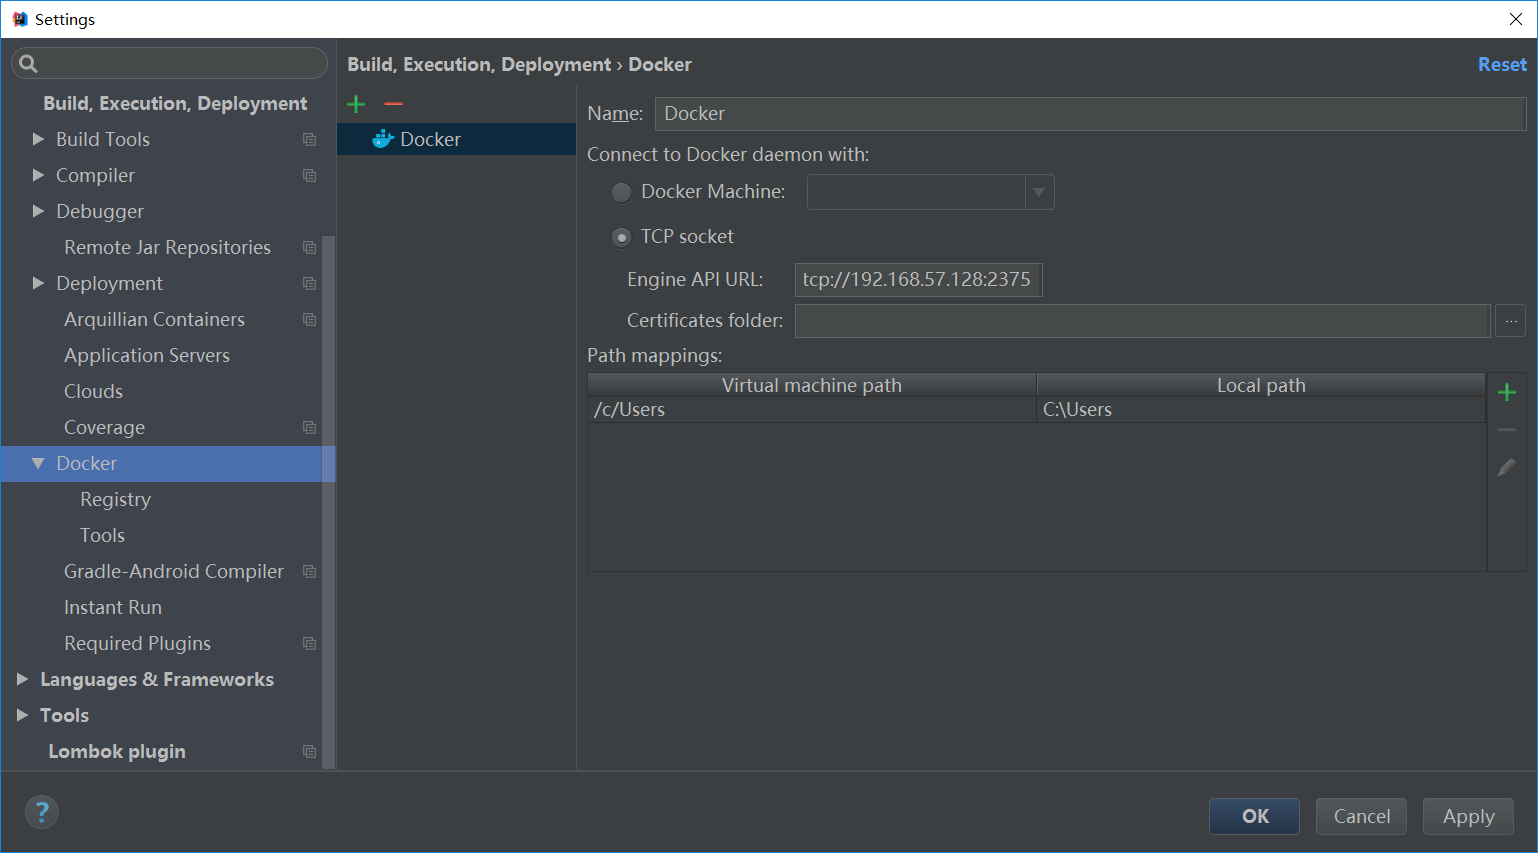
重启后继续打开File->settings->Build...->Docker->点击+号->选中TCP socket->输入你服务器的ip和docker远程连接的端口号2375,name可以随便取名,比如docker-connect-test
输入后会自动建立连接,如果这时候你看到显示连接成功后->apply->ok.
如果显示连接失败,请关闭windows防火墙,并确认服务器端防火墙的2375端口是否已开放且处于监听状态(netstat -tnl 去找一下是否有2375且显示Listen状态)
成功后可以在IDEA左下角找到Docker,或者通过依次打开view -> toolwindows -> Docker打开
点击左上角的运行按钮,即可连接到服务器的docker
Spring Boot服务docker部署
新建一个Spring Boot工程,设置端口为8080,在工程里写一个REST接口,如下,简单返回一个字符串
@Controller
public class HelloController {
@RequestMapping("/hello")
@ResponseBody
public String hello() {
  return "hello world";
}
}
在项目应用根目录下增加一个Dockerfile文件,内容如下
FROM java:8
VOLUME /tmp
ADD target/SpringBoottest-1.0.0.jar SpringBoottest-1.0.0.jar
RUN bash -c 'touch /SpringBoottest-1.0.0.jar'
EXPOSE 8080
ENTRYPOINT ["java","-Djava.security.egd=file:/dev/./urandom","-jar","/SpringBoottest-1.0.0.jar"]
修改pom文件,添加properties,添加plugin
<properties>
<!-- 镜像前缀 -->
<docker.image.prefix>zns</docker.image.prefix>
</properties>
<plugin>
<groupId>com.spotify</groupId>
<artifactId>docker-maven-plugin</artifactId>
<version>1.0.0</version>
<configuration>
<imageName>${docker.image.prefix}/${project.artifactId}</imageName>
<!--<dockerHost>http://docker服务器ip:2375</dockerHost> -->
<dockerDirectory></dockerDirectory>
<resources>
<resource>
<targetPath>/</targetPath>
<directory>${project.build.directory}</directory>
<include>${project.build.finalName}.jar</include>
</resource>
</resources>
</configuration>
</plugin>
点击run->edit configuration,增加一个Docker配置,选择dockerfile类型,在弹出的界面填写信息
name可以随便取名
Server选择刚刚创建的docker-connect-test
Dockerfile选择dockerfile文件的位置
Image tag填写镜像名称 比如zns/springboottest:1.0.0
Container name填写容器名称 比如zns-springboottest
Bind ports填写服务器主机端口和docker容器端口映射 比如 18080:8080,注意这里的8080需跟EXPOSE 8080设置的端口一致
点击确定
然后启动SpringBoot应用和刚刚配置的docker应用
服务器打开18080防火墙
firewall-cmd --zone=public --add-port=18080/tcp --permanent
firewall-cmd --reload
访问服务器ip加上18080端口测试
我们今天的关于idea (windows) 发布 spring 项目到远程 linux 机器 docker和idea远程部署spring boot的分享已经告一段落,感谢您的关注,如果您想了解更多关于Docker for Windows (Linux Container) 使用代理、Docker Windows Boot2Docker/Linux version 4.9.89-boot2docker/SSH login、Docker 使用 jenkins 部署 java 项目到远程 linux(三)、Docker之IntelliJ IDEA部署SpringBoot应用到Docker的相关信息,请在本站查询。
本文标签:


![[转帖]Ubuntu 安装 Wine方法(ubuntu如何安装wine)](https://www.gvkun.com/zb_users/cache/thumbs/4c83df0e2303284d68480d1b1378581d-180-120-1.jpg)

