以上就是给各位分享你的响应阻塞了没有?--Spring-WebFlux源码分析,其中也会对springmvc响应处理结果进行解释,同时本文还将给你拓展java-带@EnableWebFlux批注的Sp
以上就是给各位分享你的响应阻塞了没有?--Spring-WebFlux 源码分析,其中也会对springmvc响应处理结果进行解释,同时本文还将给你拓展java-带@EnableWebFlux批注的SpringWebFlux错误、Kotlin 使用 Spring WebFlux 实现响应式编程、Spring 5 WebFlux、Spring Boot 2 (十):Spring Boot 中的响应式编程和 WebFlux 入门等相关知识,如果能碰巧解决你现在面临的问题,别忘了关注本站,现在开始吧!
本文目录一览:- 你的响应阻塞了没有?--Spring-WebFlux 源码分析(springmvc响应处理结果)
- java-带@EnableWebFlux批注的SpringWebFlux错误
- Kotlin 使用 Spring WebFlux 实现响应式编程
- Spring 5 WebFlux
- Spring Boot 2 (十):Spring Boot 中的响应式编程和 WebFlux 入门
")
你的响应阻塞了没有?--Spring-WebFlux 源码分析(springmvc响应处理结果)
1. Spring WebFlux 是什么?
Spring WebFlux 是 Spring Framework 5.0 中引入的新的反应式 Web 框架。 与 Spring MVC 不同,它不需要 Servlet API,完全异步和非阻塞, 并通过 Reactor 项目实现 Reactive Streams 规范。 并且可以在诸如 Netty,Undertow 和 Servlet 3.1 + 容器的服务器上运行。
Reactor 也是 Spring 5 中反应式编程的基础,它一个新的反应式编程库。
2. Reactor 是什么?
Reactor offers non-blocking and backpressure-ready network runtimes including local TCP/HTTP/UDP client & servers based on the robust Netty framework.
Reactor 提供了一个非阻塞的,高并发的基于健壮的 Netty 框架的网络运行 API,包括本地 tcp/http/udp 客户端和服务端。
重要的两个概念
Flux 和 Mono 是 Reactor 中的两个基本概念。Flux 表示的是包含 0 到 N 个元素的异步序列。在该序列中可以包含三种不同类型的消息通知:正常的包含元素的消息、序列结束的消息和序列出错的消息。当消息通知产生时,订阅者中对应的方法 onNext (), onComplete () 和 onError () 会被调用。Mono 表示的是包含 0 或者 1 个元素的异步序列。该序列中同样可以包含与 Flux 相同的三种类型的消息通知。Flux 和 Mono 之间可以进行转换。对一个 Flux 序列进行计数操作,得到的结果是一个 Mono<Long > 对象。把两个 Mono 序列合并在一起,得到的是一个 Flux 对象。
简单说 Mono 返回单个元素,Flux 返回多个元素
3. spring webflux 处理请求流程
核心控制器 DispatcherHandler,等同于阻塞方式的 DispatcherServlet
/**
 * Central dispatcher for HTTP request handlers/controllers. Dispatches to
 * registered handlers for processing a request, providing convenient mapping
 * facilities.
 *
 * <p>{@code DispatcherHandler} discovers the delegate components it needs from
 * Spring configuration. It detects the following in the application context:
 * <ul>
 * <li>{@link HandlerMapping} -- map requests to handler objects
 * <li>{@link HandlerAdapter} -- for using any handler interface
 * <li>{@link HandlerResultHandler} -- process handler return values
 * </ul>
 *
 * <p>{@code DispatcherHandler} is also designed to be a Spring bean itself and
 * implements {@link ApplicationContextAware} for access to the context it runs
 * in. If {@code DispatcherHandler} is declared with the bean name "webHandler"
 * it is discovered by {@link WebHttpHandlerBuilder#applicationContext} which
 * creates a processing chain together with {@code WebFilter},
 * {@code WebExceptionHandler} and others.
 *
 * <p>A {@code DispatcherHandler} bean declaration is included in
 * {@link org.springframework.web.reactive.config.EnableWebFlux @EnableWebFlux}
 * configuration.
 *
 * @author Rossen Stoyanchev
 * @author Sebastien Deleuze
 * @author Juergen Hoeller
 * @since 5.0
 * @see WebHttpHandlerBuilder#applicationContext(ApplicationContext)
 */
3.1 初始化
获取 HandlerMapping,HandlerAdapter,HandlerResultHandler 的所有实例
protected void initStrategies(ApplicationContext context) {
        Map<String, HandlerMapping> mappingBeans = BeanFactoryUtils.beansOfTypeIncludingAncestors(
                context, HandlerMapping.class, true, false);  //1

        ArrayList<HandlerMapping> mappings = new ArrayList<>(mappingBeans.values());
        AnnotationAwareOrderComparator.sort(mappings);
        this.handlerMappings = Collections.unmodifiableList(mappings);

        Map<String, HandlerAdapter> adapterBeans = BeanFactoryUtils.beansOfTypeIncludingAncestors(
                context, HandlerAdapter.class, true, false);  //2

        this.handlerAdapters = new ArrayList<>(adapterBeans.values());
        AnnotationAwareOrderComparator.sort(this.handlerAdapters);

        Map<String, HandlerResultHandler> beans = BeanFactoryUtils.beansOfTypeIncludingAncestors(
                context, HandlerResultHandler.class, true, false); //3

        this.resultHandlers = new ArrayList<>(beans.values());
        AnnotationAwareOrderComparator.sort(this.resultHandlers);
    }
其中,1. 获取所有 HandlerMapping 实例
2. 获取所有 HandlerAdapter 实例
3. 获取所有 HandlerResultHandler 实例
3.2 流式处理请求
public Mono<Void> handle(ServerWebExchange exchange) {
        if (this.handlerMappings == null) {
            return createNotFoundError();
        }
        return Flux.fromIterable(this.handlerMappings)
                .concatMap(mapping -> mapping.getHandler(exchange))//1
                .next()
                .switchIfEmpty(createNotFoundError())//2
                .flatMap(handler -> invokeHandler(exchange, handler))//3
                .flatMap(result -> handleResult(exchange, result));//4
    }
其中,第一步,从 handlerMapping 这个 map 中获取 HandlerMapping
第二步,触发 HandlerApter 的 handle 方法
private Mono<HandlerResult> invokeHandler(ServerWebExchange exchange, Object handler) {
        if (this.handlerAdapters != null) {
            for (HandlerAdapter handlerAdapter : this.handlerAdapters) {
                if (handlerAdapter.supports(handler)) {
                    return handlerAdapter.handle(exchange, handler);
                }
            }
        }
        return Mono.error(new IllegalStateException("No HandlerAdapter: " + handler));
    }
第三步,触发 HandlerResultHandler 的 handleResult 方法
private Mono<Void> handleResult(ServerWebExchange exchange, HandlerResult result) {
return getResultHandler(result).handleResult(exchange, result)
.onErrorResume(ex -> result.applyExceptionHandler(ex).flatMap(exceptionResult ->
getResultHandler(exceptionResult).handleResult(exchange, exceptionResult)));
}
private HandlerResultHandler getResultHandler(HandlerResult handlerResult) {
if (this.resultHandlers != null) {
for (HandlerResultHandler resultHandler : this.resultHandlers) {
if (resultHandler.supports(handlerResult)) {
return resultHandler;
}
}
}
throw new IllegalStateException("No HandlerResultHandler for " + handlerResult.getReturnValue());
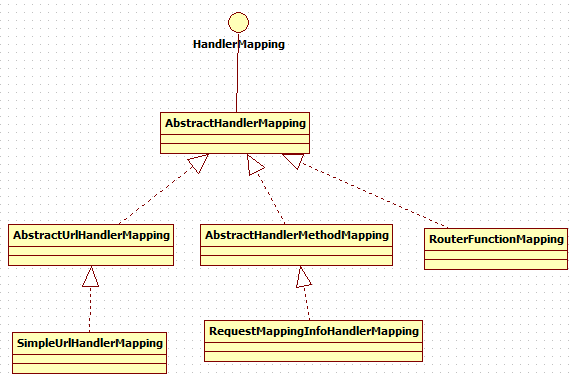
}4.HandlerMapping 实现
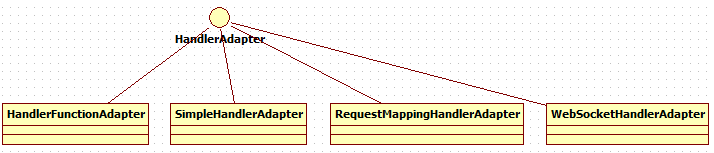
5.HanlderAdapter 的实现
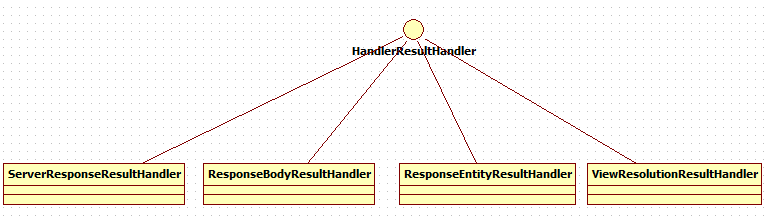
6.HandlerResultHandler 的实现
7. 不同容器的实现
7.1 Reactor 实现 ReactorHttpHandlerAdapter
执行 apply 方法
    @Override
    public Mono<Void> apply(HttpServerRequest reactorRequest, HttpServerResponse reactorResponse) {
        NettyDataBufferFactory bufferFactory = new NettyDataBufferFactory(reactorResponse.alloc());
        try {
            ReactorServerHttpRequest request = new ReactorServerHttpRequest(reactorRequest, bufferFactory);
            ServerHttpResponse response = new ReactorServerHttpResponse(reactorResponse, bufferFactory);

            if (request.getMethod() == HttpMethod.HEAD) {
                response = new HttpHeadResponseDecorator(response);
            }

            return this.httpHandler.handle(request, response)
                    .doOnError(ex -> logger.trace(request.getLogPrefix() + "Failed to complete: " + ex.getMessage()))
                    .doOnSuccess(aVoid -> logger.trace(request.getLogPrefix() + "Handling completed"));
        }
        catch (URISyntaxException ex) {
            if (logger.isDebugEnabled()) {
                logger.debug("Failed to get request URI: " + ex.getMessage());
            }
            reactorResponse.status(HttpResponseStatus.BAD_REQUEST);
            return Mono.empty();
        }
    }
其中,HttpHandler 的定义
**
 * Lowest level contract for reactive HTTP request handling that serves as a
 * common denominator across different runtimes.
 *
 * <p>Higher-level, but still generic, building blocks for applications such as
 * {@code WebFilter}, {@code WebSession}, {@code ServerWebExchange}, and others
 * are available in the {@code org.springframework.web.server} package.
 *
 * <p>Application level programming models such as annotated controllers and
 * functional handlers are available in the {@code spring-webflux} module.
 *
 * <p>Typically an {@link HttpHandler} represents an entire application with
 * higher-level programming models bridged via
 * {@link org.springframework.web.server.adapter.WebHttpHandlerBuilder}.
 * Multiple applications at unique context paths can be plugged in with the
 * help of the {@link ContextPathCompositeHandler}.
 *
 * @author Arjen Poutsma
 * @author Rossen Stoyanchev
 * @since 5.0
 * @see ContextPathCompositeHandler
 */
具体的实现类为:ContextPathCompositeHandler
/**
 * {@code HttpHandler} delegating requests to one of several {@code HttpHandler}''s
 * based on simple, prefix-based mappings.
 *
 * <p>This is intended as a coarse-grained mechanism for delegating requests to
 * one of several applications -- each represented by an {@code HttpHandler}, with
 * the application "context path" (the prefix-based mapping) exposed via
 * {@link ServerHttpRequest#getPath()}.
 *
 * @author Rossen Stoyanchev
 * @since 5.0
 */
    @Override
    public Mono<Void> handle(ServerHttpRequest request, ServerHttpResponse response) {
        // Remove underlying context path first (e.g. Servlet container)
        String path = request.getPath().pathWithinApplication().value();
        return this.handlerMap.entrySet().stream()
                .filter(entry -> path.startsWith(entry.getKey()))
                .findFirst()
                .map(entry -> {
                    String contextPath = request.getPath().contextPath().value() + entry.getKey();
                    ServerHttpRequest newRequest = request.mutate().contextPath(contextPath).build();
                    return entry.getValue().handle(newRequest, response);
                })
                .orElseGet(() -> {
                    response.setStatusCode(HttpStatus.NOT_FOUND);
                    return response.setComplete();
                });
    }
基于前缀的映射 Handler
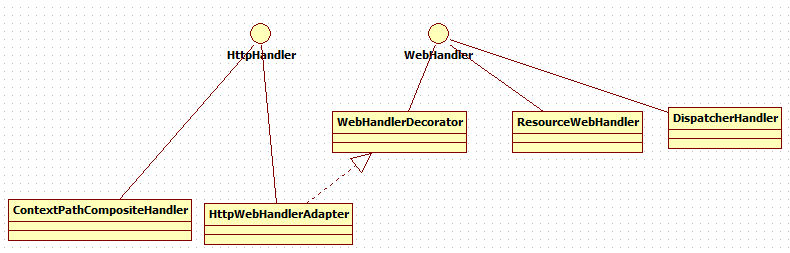
7.2 Jetty 实现 JettyHttpHandlerAdapter
继承自 ServletHttpHandlerAdapter 实现了 Servlet,执行 service 方法
@Override
    public void service(ServletRequest request, ServletResponse response) throws ServletException, IOException {
        // Check for existing error attribute first
        if (DispatcherType.ASYNC.equals(request.getDispatcherType())) {
            Throwable ex = (Throwable) request.getAttribute(WRITE_ERROR_ATTRIBUTE_NAME);
            throw new ServletException("Failed to create response content", ex);
        }

        // Start async before Read/WriteListener registration
        AsyncContext asyncContext = request.startAsync();
        asyncContext.setTimeout(-1);

        ServletServerHttpRequest httpRequest;
        try {
            httpRequest = createRequest(((HttpServletRequest) request), asyncContext);//1
        }
        catch (URISyntaxException ex) {
            if (logger.isDebugEnabled()) {
                logger.debug("Failed to get request  URL: " + ex.getMessage());
            }
            ((HttpServletResponse) response).setStatus(400);
            asyncContext.complete();
            return;
        }

        ServerHttpResponse httpResponse = createResponse(((HttpServletResponse) response), asyncContext, httpRequest);//2
        if (httpRequest.getMethod() == HttpMethod.HEAD) {
            httpResponse = new HttpHeadResponseDecorator(httpResponse);
        }

        AtomicBoolean isCompleted = new AtomicBoolean();
        HandlerResultAsyncListener listener = new HandlerResultAsyncListener(isCompleted, httpRequest);
        asyncContext.addListener(listener);

        HandlerResultSubscriber subscriber = new HandlerResultSubscriber(asyncContext, isCompleted, httpRequest);
        this.httpHandler.handle(httpRequest, httpResponse).subscribe(subscriber);//3
    }
其中,1. 创建 request
2. 创建 response
3.handler 执行的结果进行 subscribe
JettyHttpHandlerAdapter 是 ServletHttpHandlerAdapter 的扩展,重写了创建 request 创建 response 方法
7.3 Tomcat 实现 TomcatHttpHandlerAdapter
TomcatHttpHandlerAdapter 是 ServletHttpHandlerAdapter 的扩展,重写了创建 request 创建 response 方法
7.4 AbstractReactiveWebInitializer 抽象类
继承自 AbstractReactiveWebInitializer 的类可以在 servlet 容器中安装一个 Spring Reactive Web Application。
@Override
    public void onStartup(ServletContext servletContext) throws ServletException {
        String servletName = getServletName();
        Assert.hasLength(servletName, "getServletName() must not return null or empty");

        ApplicationContext applicationContext = createApplicationContext();
        Assert.notNull(applicationContext, "createApplicationContext() must not return null");

        refreshApplicationContext(applicationContext);
        registerCloseListener(servletContext, applicationContext);

        HttpHandler httpHandler = WebHttpHandlerBuilder.applicationContext(applicationContext).build();
        ServletHttpHandlerAdapter servlet = new ServletHttpHandlerAdapter(httpHandler);

        ServletRegistration.Dynamic registration = servletContext.addServlet(servletName, servlet);
        if (registration == null) {
            throw new IllegalStateException("Failed to register servlet with name ''" + servletName + "''. " +
                    "Check if there is another servlet registered under the same name.");
        }

        registration.setLoadOnStartup(1);
        registration.addMapping(getServletMapping());
        registration.setAsyncSupported(true);
    }
它通过将 ServletHttpHandlerAdapter 实例作为一个 servlet 安装到 servler 容器中。
8. 总结
DispatcherHandler 的流程是
1. 通过 HandlerMapping(和 DispathcherServlet 中的 HandlerMapping 不同)获取到 HandlerAdapter 放到 ServerWebExchange 的属性中
2. 获取到 HandlerAdapter 后触发 handle 方法,得到 HandlerResult
3. 通过 HandlerResult,触发 handleResult,针对不同的返回类找到不同的 HandlerResultHandler 如
视图渲染 ViewResolutionResultHandler,
ServerResponseResultHandler,ResponseBodyResultHandler,ResponseEntityResultHandler不同容器有不同的实现,如 Reactor,Jetty,Tomcat 等。
参考文献:
【1】https://blog.csdn.net/qq_15144655/article/details/80708915
【2】https://www.ibm.com/developerworks/cn/java/j-cn-with-reactor-response-encode/index.html

java-带@EnableWebFlux批注的SpringWebFlux错误
我正在使用Spring Boot 2.1.1版本并使用@EnableWebFlux,但出现了一些错误.
错误是
org.springframework.beans.factory.BeanCreationException: Error creating bean with name 'org.springframework.web.reactive.config.DelegatingWebFluxConfiguration': Initialization of bean Failed; nested exception is java.lang.IllegalStateException: The Java/XML config for Spring MVC and Spring WebFlux cannot both be enabled,e.g. via @EnableWebMvc and @EnableWebFlux,in the same application
我该如何解决此问题.
enabling MVC and WebFlux in the same application context which triggers a conflict
you can’t have them in the same process currently.
它提供了使用反应式存储库的解决方法:
However,you can use reactive repositories from your existing Spring MVC application,and return the reactive types (Flux or Mono),from Spring MVC controller methods.

Kotlin 使用 Spring WebFlux 实现响应式编程
Kotlin 使用 Spring WebFlux 实现响应式编程
IBM的研究称,整个人类文明所获得的全部数据中,有90%是过去两年内产生的。在此背景下,包括NoSQL,Hadoop, Spark, Storm, Kylin在内的大批新技术应运而生。其中以RxJava和Reactor为代表的响应式(Reactive)编程技术针对的就是经典的大数据
4V定义: Volume,Variety,Velocity,Value)
中的Velocity,即高并发问题,而在即将发布的Spring 5中,也引入了响应式编程的支持。在接下来的博客文章中,我会围绕响应式编程相关的主题与你分享我的学习心得。作为第一篇,首先从Spring 5 和 Spring WebFlux 谈起。
响应式宣言
响应式宣言和敏捷宣言一样,说起响应式编程,必先提到响应式宣言。
We want systems that are Responsive, Resilient, Elastic and Message Driven. We call these Reactive Systems. - The Reactive Manifesto
响应式宣言中也包含了4组关键词:
Responsive: 可响应的。要求系统尽可能做到在任何时候都能及时响应。
Resilient: 可恢复的。要求系统即使出错了,也能保持可响应性。
Elastic: 可伸缩的。要求系统在各种负载下都能保持可响应性。
Message Driven: 消息驱动的。要求系统通过异步消息连接各个组件。
可以看到,对于任何一个响应式系统,首先要保证的就是可响应性,否则就称不上是响应式系统。从这个意义上来说,动不动就蓝屏的Windows系统显然不是一个响应式系统。
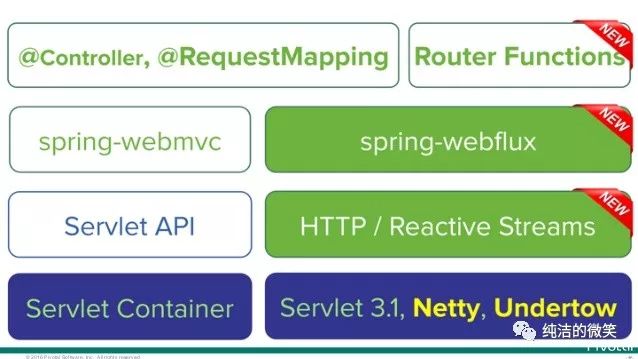
Spring 5 响应式Web框架架构图

(https://docs.spring.io/spring...)
左侧是传统的基于Servlet的Spring Web MVC框架
右侧是5.0版本新引入的基于Reactive Streams的Spring WebFlux框架
从上到下依次是
- Router Functions
- WebFlux
- Reactive Streams
三个新组件。
Router Functions:
对标@Controller,@RequestMapping等标准的Spring MVC注解,提供一套函数式风格的API,用于创建Router,Handler和Filter。
WebFlux: 核心组件
协调上下游各个组件提供响应式编程支持。
Reactive Streams
一种支持背压(Backpressure)的异步数据流处理标准,主流实现有RxJava和Reactor,Spring WebFlux默认集成的是Reactor。
在Web容器的选择上,Spring WebFlux既支持像Tomcat,Jetty这样的的传统容器(前提是支持Servlet 3.1 Non-Blocking IO API),又支持像Netty,Undertow那样的异步容器。不管是何种容器,Spring WebFlux都会将其输入输出流适配成Flux<DataBuffer>格式,以便进行统一处理。
值得一提的是,除了新的Router Functions接口,Spring WebFlux同时支持使用老的Spring MVC注解声明Reactive Controller。和传统的MVC Controller不同,Reactive Controller操作的是非阻塞的ServerHttpRequest和ServerHttpResponse,而不再是Spring MVC里的HttpServletRequest和HttpServletResponse。
下面是示例工程详解。
示例工程详解


工程目录结构
~/ak47/webflux$ tree
.
├── build.gradle
├── gradle
│   └── wrapper
│       ├── gradle-wrapper.jar
│       └── gradle-wrapper.properties
├── gradlew
├── gradlew.bat
├── src
│   ├── main
│   │   ├── java
│   │   ├── kotlin
│   │   │   └── com
│   │   │       └── easy
│   │   │           └── kotlin
│   │   │               └── webflux
│   │   │                   └── WebfluxApplication.kt
│   │   └── resources
│   │       └── application.properties
│   └── test
│       ├── java
│       ├── kotlin
│       │   └── com
│       │       └── easy
│       │           └── kotlin
│       │               └── webflux
│       │                   └── WebfluxApplicationTests.kt
│       └── resources
└── webflux.iml

19 directories, 11 files
项目依赖配置
buildscript {
    ext {
        kotlinVersion = ''1.1.51''
        springBootVersion = ''2.0.0.BUILD-SNAPSHOT''
    }
    repositories {
        mavenCentral()
        maven { url "https://repo.spring.io/snapshot" }
        maven { url "https://repo.spring.io/milestone" }
    }
    dependencies {
        classpath("org.springframework.boot:spring-boot-gradle-plugin:${springBootVersion}")
        classpath("org.jetbrains.kotlin:kotlin-gradle-plugin:${kotlinVersion}")
        classpath("org.jetbrains.kotlin:kotlin-allopen:${kotlinVersion}")
    }
}

apply plugin: ''kotlin''
apply plugin: ''kotlin-spring''
apply plugin: ''eclipse''
apply plugin: ''org.springframework.boot''
apply plugin: ''io.spring.dependency-management''

group = ''com.easy.kotlin''
version = ''0.0.1-SNAPSHOT''
sourceCompatibility = 1.8
compileKotlin {
    kotlinOptions.jvmTarget = "1.8"
}
compileTestKotlin {
    kotlinOptions.jvmTarget = "1.8"
}

repositories {
    mavenCentral()
    maven { url "https://repo.spring.io/snapshot" }
    maven { url "https://repo.spring.io/milestone" }
}


dependencies {
    compile(''org.springframework.boot:spring-boot-starter-webflux'')
    compile("org.jetbrains.kotlin:kotlin-stdlib-jre8")
    compile("org.jetbrains.kotlin:kotlin-reflect")
    testCompile(''org.springframework.boot:spring-boot-starter-test'')
    testCompile(''io.projectreactor:reactor-test'')
}
这是 Spring Initializr 帮我们自动生成的样板工程。下面我们分别来加入 Model 、dao 、 service 、 handler 等模块的内容。
源码目录结构设计如下
├── src
│   ├── main
│   │   ├── java
│   │   ├── kotlin
│   │   │   └── com
│   │   │       └── easy
│   │   │           └── kotlin
│   │   │               └── webflux
│   │   │                   ├── WebfluxApplication.kt
│   │   │                   ├── dao
│   │   │                   │   └── PersonRepository.kt
│   │   │                   ├── handler
│   │   │                   │   └── PersonHandler.kt
│   │   │                   ├── model
│   │   │                   │   └── Person.kt
│   │   │                   ├── router
│   │   │                   │   └── RouterConfig.kt
│   │   │                   ├── server
│   │   │                   │   └── HttpServerConfig.kt
│   │   │                   └── service
│   │   │                       └── PersonService.kt
│   │   └── resources
│   │       └── application.properties
Person
package com.easy.kotlin.webflux.model

import com.fasterxml.jackson.annotation.JsonProperty

class Person(@JsonProperty("name") val name: String, @JsonProperty("age") val age: Int) {

    override fun toString(): String {
        return "Person{" +
                "name=''" + name + ''\'''' +
                ", age=" + age +
                ''}''
    }
}
PersonRepository
package com.easy.kotlin.webflux.dao

import com.easy.kotlin.webflux.model.Person
import reactor.core.publisher.Flux
import reactor.core.publisher.Mono


interface PersonRepository {

    fun getPerson(id: Int): Mono<Person>

    fun allPeople(): Flux<Person>

    fun savePerson(person: Mono<Person>): Mono<Void>
}


/*
 * Mono 和 Flux 是由 Project Reactor 提供的 Reactive 类型。
 * Springs 同时支持其他 Reactive 流实现,如 RXJava。
 * Mono 和 Flux 是由 Reactive 流的 Publisher 中实现的。
 * Mono 是一个用来发送 0 或者单值数据的发布器,
 * Flux 可以用来发送 0 到 N 个值。
 *
 * 这非常类似 Flowable 和 RxJava 中的 Observable 。它们表示在订阅这些发布服务时发送数值流。 */
PersonService
package com.easy.kotlin.webflux.service

import com.easy.kotlin.webflux.model.Person
import com.easy.kotlin.webflux.dao.PersonRepository
import org.springframework.stereotype.Service
import reactor.core.publisher.Flux
import reactor.core.publisher.Mono

@Service
class PersonService : PersonRepository {
    var persons: MutableMap<Int, Person> = hashMapOf()

    constructor() {
        this.persons[1] = Person("Jack", 20)
        this.persons[2] = Person("Rose", 16)
    }


    override fun getPerson(id: Int): Mono<Person> {
        return Mono.justOrEmpty(this.persons[id])
    }

    override fun allPeople(): Flux<Person> {
        return Flux.fromIterable(this.persons.values)
    }

    override fun savePerson(person: Mono<Person>): Mono<Void> {
        return person.doOnNext {
            val id = this.persons.size + 1
            persons.put(id, it)
            println("Saved ${person} with ${id}")
        }.thenEmpty(Mono.empty())

    }
}
PersonHandler
package com.easy.kotlin.webflux.handler

import com.easy.kotlin.webflux.dao.PersonRepository
import com.easy.kotlin.webflux.model.Person
import org.springframework.beans.factory.annotation.Autowired
import reactor.core.publisher.Mono

import org.springframework.web.reactive.function.server.ServerRequest
import org.springframework.web.reactive.function.server.ServerResponse

import org.springframework.http.MediaType.APPLICATION_JSON
import org.springframework.stereotype.Service
import org.springframework.web.reactive.function.BodyInserters.fromObject


@Service
class PersonHandler {

    @Autowired lateinit var repository: PersonRepository


    fun getPerson(request: ServerRequest): Mono<ServerResponse> {
        val personId = Integer.valueOf(request.pathVariable("id"))!!
        val notFound = ServerResponse.notFound().build()
        val personMono = this.repository.getPerson(personId)
        return personMono
            .flatMap { person -> ServerResponse.ok().contentType(APPLICATION_JSON).body(fromObject(person)) }
            .switchIfEmpty(notFound)
    }


    fun createPerson(request: ServerRequest): Mono<ServerResponse> {
        val person = request.bodyToMono(Person::class.java)
        return ServerResponse.ok().build(this.repository.savePerson(person))
    }

    fun listPeople(request: ServerRequest): Mono<ServerResponse> {
        val people = this.repository.allPeople()
        return ServerResponse.ok().contentType(APPLICATION_JSON).body(people, Person::class.java)
    }


}
RouterConfig
package com.easy.kotlin.webflux.router


import com.easy.kotlin.webflux.handler.PersonHandler
import org.springframework.beans.factory.annotation.Autowired
import org.springframework.context.annotation.Bean
import org.springframework.context.annotation.Configuration
import org.springframework.http.MediaType.APPLICATION_JSON
import org.springframework.web.reactive.function.server.HandlerFunction
import org.springframework.web.reactive.function.server.RequestPredicates.GET
import org.springframework.web.reactive.function.server.RequestPredicates.accept
import org.springframework.web.reactive.function.server.RouterFunction
import org.springframework.web.reactive.function.server.RouterFunctions.route


@Configuration
class RouterConfig {

    @Autowired lateinit var personHandler: PersonHandler

    @Bean
    fun routerFunction(): RouterFunction<*> {
        return route(GET("/api/person").and(accept(APPLICATION_JSON)),
                HandlerFunction { personHandler.listPeople(it) })

            .and(route(GET("/api/person/{id}").and(accept(APPLICATION_JSON)),
                    HandlerFunction { personHandler.getPerson(it) }))
    }

}
HttpServerConfig
package com.easy.kotlin.webflux.server

import org.springframework.beans.factory.annotation.Autowired
import org.springframework.context.annotation.Bean
import org.springframework.context.annotation.Configuration
import org.springframework.core.env.Environment
import org.springframework.http.server.reactive.ReactorHttpHandlerAdapter
import org.springframework.web.reactive.function.server.RouterFunction
import org.springframework.web.reactive.function.server.RouterFunctions
import reactor.ipc.netty.http.server.HttpServer


@Configuration
class HttpServerConfig {
    @Autowired
    lateinit var environment: Environment

    @Bean
    fun httpServer(routerFunction: RouterFunction<*>): HttpServer {
        val httpHandler = RouterFunctions.toHttpHandler(routerFunction)
        val adapter = ReactorHttpHandlerAdapter(httpHandler)
        val server = HttpServer.create("localhost", environment.getProperty("server.port").toInt())
        server.newHandler(adapter)
        return server
    }

}
项目启动入口类 WebfluxApplication
package com.easy.kotlin.webflux

import org.springframework.boot.autoconfigure.SpringBootApplication
import org.springframework.boot.runApplication

@SpringBootApplication
class WebfluxApplication

fun main(args: Array<String>) {
    runApplication<WebfluxApplication>(*args)
}
启动运行

注意到这行:
Mapped ((GET && /api/person) && Accept: [application/json]) -> com.easy.kotlin.webflux.router.RouterConfig$routerFunction$1@46292372
((GET && /api/person/{id}) && Accept: [application/json]) -> com.easy.kotlin.webflux.router.RouterConfig$routerFunction$2@126be319
完整启动日志
  .   ____          _            __ _ _
 /\\ / ___''_ __ _ _(_)_ __  __ _ \ \ \ \
( ( )\___ | ''_ | ''_| | ''_ \/ _` | \ \ \ \
 \\/  ___)| |_)| | | | | || (_| |  ) ) ) )
  ''  |____| .__|_| |_|_| |_\__, | / / / /
 =========|_|==============|___/=/_/_/_/
 :: Spring Boot ::  (v2.0.0.BUILD-SNAPSHOT)

2017-11-04 00:39:46.046  INFO 2884 --- [           main] c.e.kotlin.webflux.WebfluxApplicationKt  : Starting WebfluxApplicationKt on jacks-MacBook-Air.local with PID 2884 (/Users/jack/ak47/webflux/out/production/classes started by jack in /Users/jack/ak47/webflux)
2017-11-04 00:39:46.077  INFO 2884 --- [           main] c.e.kotlin.webflux.WebfluxApplicationKt  : No active profile set, falling back to default profiles: default
2017-11-04 00:39:46.247  INFO 2884 --- [           main] .r.c.ReactiveWebServerApplicationContext : Refreshing org.springframework.boot.web.reactive.context.ReactiveWebServerApplicationContext@4b0b0854: startup date [Sat Nov 04 00:39:46 CST 2017]; root of context hierarchy
2017-11-04 00:39:48.995  INFO 2884 --- [           main] o.s.w.r.f.s.s.RouterFunctionMapping      : Mapped ((GET && /api/person) && Accept: [application/json]) -> com.easy.kotlin.webflux.router.RouterConfig$routerFunction$1@46292372
((GET && /api/person/{id}) && Accept: [application/json]) -> com.easy.kotlin.webflux.router.RouterConfig$routerFunction$2@126be319
2017-11-04 00:39:49.017  INFO 2884 --- [           main] o.s.w.r.handler.SimpleUrlHandlerMapping  : Mapped URL path [/webjars/**] onto handler of type [class org.springframework.web.reactive.resource.ResourceWebHandler]
2017-11-04 00:39:49.017  INFO 2884 --- [           main] o.s.w.r.handler.SimpleUrlHandlerMapping  : Mapped URL path [/**] onto handler of type [class org.springframework.web.reactive.resource.ResourceWebHandler]
2017-11-04 00:39:49.215  INFO 2884 --- [           main] o.s.w.r.r.m.a.ControllerMethodResolver   : Looking for @ControllerAdvice: org.springframework.boot.web.reactive.context.ReactiveWebServerApplicationContext@4b0b0854: startup date [Sat Nov 04 00:39:46 CST 2017]; root of context hierarchy
2017-11-04 00:39:50.309  INFO 2884 --- [           main] o.s.j.e.a.AnnotationMBeanExporter        : Registering beans for JMX exposure on startup
2017-11-04 00:39:50.459  INFO 2884 --- [ctor-http-nio-1] r.ipc.netty.tcp.BlockingNettyContext     : Started HttpServer on /0:0:0:0:0:0:0:0:9000
2017-11-04 00:39:50.459  INFO 2884 --- [           main] o.s.b.web.embedded.netty.NettyWebServer  : Netty started on port(s): 9000
2017-11-04 00:39:50.466  INFO 2884 --- [           main] c.e.kotlin.webflux.WebfluxApplicationKt  : Started WebfluxApplicationKt in 5.047 seconds (JVM running for 6.276)
测试输出
$ curl http://127.0.0.1:9000/api/person
[{"name":"Jack","age":20},{"name":"Rose","age":16}]


$ curl http://127.0.0.1:9000/api/person/1
{"name":"Jack","age":20}


$ curl http://127.0.0.1:9000/api/person/2
{"name":"Rose","age":16}
小结
Spring Web 是一个命令式的编程框架,可以很方便的进行开发和调试。你需要根据实际情况去决定采用 Spring 5 Reactive 或者是 Spring Web 命令式框架。在很多情况下,命令式的编程风格就可以满足,但当你的应用需要高可伸缩性,那么 Reactive 非堵塞方式是最适合的。
本章工程源代码:https://github.com/EasyKotlin...
参考资料
参考书籍:
《 Kotlin + Spring Boot : K2EE 服务端开发实战 》
《 Kotlin 极简教程》
参考文章:
Spring Framework 5.0 M5 Update : https://spring.io/blog/2017/0...
https://github.com/poutsma/we...

Spring 5 WebFlux
Reactor
Spring 5的一大亮点是对响应式编程的支持,下面的图片展示了传统Spring Web MVC结构以及Spring 5中新增加的基于Reactive Streams的Spring WebFlux框架,可以使用webFlux模块来构建异步的、非堵塞的、事件驱动的服务,在伸缩性方面表现非常好。
从上面的结构图中可以看出,WebFlux模块从上到下依次是Router Functions,WebFlux,Reactive Streams三个新组件,WebFlux模块需要运行在实现了Servlet 3.1+规范的容器之上,Servlet 3.1规范中新增了对异步处理的支持,在新的Servlet规范中,Servlet线程不需要一直阻塞等待直到业务处理完成,也就是说,Servlet线程将不需要等待业务处理完成再进行结果输出,然后再结束Servlet线程,而是在接到新的请求之后,Servlet线程可以将这个请求委托给另外一个线程(业务线程)来完成,Servlet线程将委托完成之后变返回到容器中去接收新的请求,Servlet 3.1 规范特别适用于那种业务处理非常耗时的场景之下,可以减少服务器资源的占用,并且提高并发处理速度,而对于那些能快速响应的场景收益并不大。下面介绍上图中webFlux各个模块:
- Router Functions: 对标@Controller,@RequestMapping等标准的Spring MVC注解,提供一套函数式风格的API,用于创建Router,Handler和Filter。
- WebFlux: 核心组件,协调上下游各个组件提供响应式编程支持。
- Reactive Streams: 一种支持背压(Backpressure)的异步数据流处理标准,主流实现有RxJava和Reactor,Spring WebFlux默认集成的是Reactor。
上面提到WebFlux默认集成的Reactive Streams组件是Reactor,Reactor类似于RxJava 2.0,同属于第四代响应式框架,下面主要介绍一下Reactor中的两个关键概念,Flux以及Mono。
Flux
如果去查看源代码的话,可以发现,Flux和Mono都实现了Reactor的Publisher接口,从这里可以看出,Flux和Mono属于事件发布者,类似与生产者,对消费者提供订阅接口,当有事件发生的时候,Flux或者Mono会通过回调消费者的相应的方法来通知消费者相应的事件,这也就是所谓的相应式编程模型,生产者和消费者减耦,它们之间通过实现一个共同的方法组来实现相互联系(生产者通知事件是通过回调消费者的方法,而实现通知很多时候是通过代理)。
下面这张图是Flux的工作流程图:
可以从这张图中很明显的看出来Flux的工作模式,可以看出Flux可以emit很多item,并且这些item可以经过若干Operators然后才被subscrib,下面是使用Flux的一个小例子:
Flux.fromIterable(getSomeLongList())
    .mergeWith(Flux.interval(100))
    .doOnNext(serviceA::someObserver)
    .map(d -> d * 2)
    .take(3)
    .onErrorResumeWith(errorHandler::fallback)
    .doAfterTerminate(serviceM::incrementTerminate)
    .subscribe(System.out::println);
Mono
下面的图片展示了Mono的处理流程,可以很直观的看出来Mono和Flux的区别:
Mono只能emit最多只能emit一个item,下面是使用Mono的一个小例子:
Mono.fromCallable(System::currentTimeMillis)
    .flatMap(time -> Mono.first(serviceA.findRecent(time), serviceB.findRecent(time)))
    .timeout(Duration.ofSeconds(3), errorHandler::fallback)
    .doOnSuccess(r -> serviceM.incrementSuccess())
    .subscribe(System.out::println);
WebFlux实战
上文中简单介绍了Reactor的两个重要组件Flux和Mono,本文将介绍如何使用Spring 5的新组件WebFlux来进行应用开发,对于WebFlux底层的实现细节不在本文的分析范围之内,当然本文也不会分析总结Spring 5的新特性,这些内容将在其他的文章中进行分析总结,下面将完整的描述一个使用WebFlux的步骤。
首先需要新建一个Spring项目,然后添加Spring 5的依赖,下面是添加的maven依赖:
    <properties>
        <spring.version>5.0.0.RELEASE</spring.version>
    </properties>

    <dependencies>

        <dependency>
            <groupId>org.reactivestreams</groupId>
            <artifactId>reactive-streams</artifactId>
        </dependency>
        <dependency>
            <groupId>io.projectreactor</groupId>
            <artifactId>reactor-core</artifactId>
        </dependency>
        <dependency>
            <groupId>io.projectreactor.ipc</groupId>
            <artifactId>reactor-netty</artifactId>
        </dependency>
        <dependency>
            <groupId>org.apache.tomcat.embed</groupId>
            <artifactId>tomcat-embed-core</artifactId>
            <version>8.5.4</version>
        </dependency>
        <dependency>
            <groupId>org.springframework</groupId>
            <artifactId>spring-context</artifactId>
            <version>${spring.version}</version>
        </dependency>
        <dependency>
            <groupId>org.springframework</groupId>
            <artifactId>spring-webflux</artifactId>
            <version>${spring.version}</version>
        </dependency>
        <dependency>
            <groupId>com.fasterxml.jackson.core</groupId>
            <artifactId>jackson-databind</artifactId>
            <version>2.9.1</version>
        </dependency>
        <dependency>
            <groupId>org.apache.logging.log4j</groupId>
            <artifactId>log4j-core</artifactId>
            <version>2.9.1</version>
        </dependency>
        <dependency>
            <groupId>junit</groupId>
            <artifactId>junit</artifactId>
            <version>4.12</version>
            <scope>test</scope>
        </dependency>
        <dependency>
            <groupId>org.springframework</groupId>
            <artifactId>spring-test</artifactId>
            <version>${spring.version}</version>
            <scope>test</scope>
        </dependency>
    </dependencies>
然后定义ViewModel类,下面是本文例子涉及的model类定义:
/**
 * Created by hujian06 on 2017/11/23.
 *
 * the result model
 */
public class ResultModel {

    private int id;
    private String content;

    public ResultModel() {

    }

    /**
     * read property from json string
     * @param id id
     * @param content data
     */
    public ResultModel(@JsonProperty("id") int id,
                       @JsonProperty("context") String content) {
        this.id = id;
        this.content = content;
    }
}

public class ResultViewModel {

    private int code;
    private String message;
    private ResultModel data;
}
上面的ResultViewModel类是最后将要返回的Vo类,包含了code、message以及data这三个标准返回内容,响应内容将以json格式返回。下面介绍Service的实现细节,可以从上面Vo类中的ResultModel中看出返回内容很简单,就是id和Content,下面首先mock几个数据:
    //*************mock data**************//
    private static List<ResultModel> resultModelList = new ArrayList<>();

    static {
        ResultModel model = new ResultModel();
        model.setId(1);
        model.setContent("This is first model");
        resultModelList.add(model);

        model = new ResultModel();
        model.setId(2);
        model.setContent("This is second model");
        resultModelList.add(model);
    }
在本例中要实现的接口包括查询单个内容(根据id)、查询所有内容、插入数据。下面分别介绍每一个接口的山西爱你细节,首先是根据id查询单个内容的实现:
    /**
     * get the result by the pathVar {"id"}
     * @param serverRequest the request
     * @return the result model
     */
    public Mono<ResultViewModel> extraResult(ServerRequest serverRequest) {
        int id = Integer.parseInt(serverRequest.pathVariable("id"));
        ResultModel model = null;
        ResultViewModel resultViewModel;

        for (ResultModel m : resultModelList) {
            if (m.getId() == id) {
                model = m;
                break;
            }
        }

        if (model != null) {
            resultViewModel = new ResultViewModel(200, "ok", model);
        } else {
            resultViewModel = ResultViewModel.EMPTY_RESULT;
        }

        //return the result.
        return Mono.just(resultViewModel);
    }
需要注意的是,和传统的MVC Controller不同,Reactive Controller操作的是非阻塞的ServerRequest和ServerResponse,而不再是Spring MVC里的HttpServletRequest和HttpServletResponse。上面的方法中最为关键的一点是最后的return语句,返回了一个Mono,并且这个Mono包含了查询的结果。下面是查询所有内容的方法细节:
    /**
     * return total result view
     * @param serverRequest the request
     * @return flux of total result model view
     */
    public Flux<ResultViewModel> flowAllResult(ServerRequest serverRequest) {
        List<ResultViewModel> result = new ArrayList<>();
        for (ResultModel model : resultModelList) {
            result.add(new ResultViewModel(200, "ok", model));
        }

        return Flux.fromIterable(result);
    }
这个方法的实现就非常简洁了,最后返回的内容是一个Flux,意味着这个方法会返回多个item,方法中使用了Flux的fromIterable静态方法来构造Flux,还有很多其他的静态方法来构造Flux,具体的内容可以参考源代码。最后是插入一条内容的方法实现:
    /**
     * the "write" api
     * @param serverRequest the request
     * @return the write object
     */
    public Mono<ResultViewModel> putItem(ServerRequest serverRequest) {

        //get the object and put to list
        Mono<ResultModel> model = serverRequest.bodyToMono(ResultModel.class);
        final ResultModel[] data = new ResultModel[1];

        model.doOnNext(new Consumer<ResultModel>() {
            @Override
            public void accept(ResultModel model) {

                //check if we can put this data
                boolean check = true;
                for (ResultModel r : resultModelList) {
                    if (r.getId() == model.getId()) {
                        check= false;
                        break;
                    }
                }

                if (check) {
                    data[0] = model;
                    //put it!
                    resultModelList.add(model);
                } else {
                    data[0] = null; //error
                }
            }
        }).thenEmpty(Mono.empty());

        ResultViewModel resultViewModel;
        if (data[0] == null) { //error
            resultViewModel = new ResultViewModel(200, "ok", data[0]);
        } else { //success
            resultViewModel = ResultViewModel.EMPTY_RESULT;
        }

        //return the result
        return Mono.just(resultViewModel);
    }
这个方法看起来优点费解,首先通过ServerRequest的body构造除了一个Mono(通过bodyToMono方法),然后通过调用这个Mono的doOnNext方法来进行具体的插入逻辑处理。这个时候就需要看Reactor的另外一个重要的角色Subscriber了,也就是所谓的订阅者,或者消费者,下面是Subscriber提供的几个方法:
    /**
     * Invoked after calling {@link Publisher#subscribe(Subscriber)}.
     * <p>
     * No data will start flowing until {@link Subscription#request(long)} is invoked.
     * <p>
     * It is the responsibility of this {@link Subscriber} instance to call {@link Subscription#request(long)} whenever more data is wanted.
     * <p>
     * The {@link Publisher} will send notifications only in response to {@link Subscription#request(long)}.
     *
     * @param s
     *            {@link Subscription} that allows requesting data via {@link Subscription#request(long)}
     */
    public void onSubscribe(Subscription s);

    /**
     * Data notification sent by the {@link Publisher} in response to requests to {@link Subscription#request(long)}.
     *
     * @param t the element signaled
     */
    public void onNext(T t);

    /**
     * Failed terminal state.
     * <p>
     * No further events will be sent even if {@link Subscription#request(long)} is invoked again.
     *
     * @param t the throwable signaled
     */
    public void onError(Throwable t);

    /**
     * Successful terminal state.
     * <p>
     * No further events will be sent even if {@link Subscription#request(long)} is invoked again.
     */
    public void onComplete();
结合所谓的响应式编程模型,publisher在做一件subscriber委托的事情的关键节点的时候需要通知subscribe,比如开始做、出错、完成。关于响应式编程模型的具体分析总结,等完成了RxJava 2.0的相关分析总结之后再来补充。到此为止本例的Service已经编写完成了,下面来编写handler,handler其实是对Service的一层包装,将返回类型包装成ServerResponse,因为是包装,所以只展示根据id查询内容的接口的包装细节:
    /**
     * get the result from service first, then trans the result to {@code ServerResponse}
     * @param serverRequest the req
     * @return the ServerResponse
     */
    public Mono<ServerResponse> extraResult(ServerRequest serverRequest) {
        //get the result from service
        //todo : do some check here.

        Mono<ResultViewModel> resultViewModelMono = resultService.extraResult(serverRequest);

        Mono<ServerResponse> notFound = ServerResponse.notFound().build();

        //trans to ServerResponse and return.
        //todo : too many code

        return resultViewModelMono.flatMap(new Function<ResultViewModel, Mono<ServerResponse>>() {
            @Override
            public Mono<ServerResponse> apply(ResultViewModel resultViewModel) {
                return ServerResponse
                        .ok()
                        .contentType(APPLICATION_JSON)
                        .body(fromObject(resultViewModel));
            }
        }).switchIfEmpty(notFound);
    }
ServerResponse提供了丰富的静态方法来支持将Reactor类型的结果转换为ServerResponse,到目前为止,业务层面已经编写完成,现在可以开始来进行router的编程了,router就和他的意义一样就是用来路由的,将url路由给具体的handler来实现处理,WebFlux需要返回一个RouterFunction来进行设置路由信息,下面是本例子中使用到的RouterFunction细节:
    /**
     * build the router
     * @return the router
     */
    public RouterFunction<ServerResponse> buildResultRouter() {
        return RouterFunctions
                .route(RequestPredicates.GET("/s5/get/{id}")
                        .and(RequestPredicates
                                .accept(MediaType.APPLICATION_JSON_UTF8)), requestHandler::extraResult)
                .andRoute(RequestPredicates.GET("/s5/list")
                        .and(RequestPredicates
                                .accept(MediaType.APPLICATION_JSON_UTF8)), requestHandler::listResult)
                .andRoute(RequestPredicates.POST("/s5/put/")
                        .and(RequestPredicates
                                .accept(MediaType.APPLICATION_JSON_UTF8)), requestHandler::createView);
    }
可以发现,其实就是将一个url和一个handler的具体方法绑定在一起来实现将一个url路由给一个handler方法进行处理,RequestPredicates提供了大量有用的静态方法进行该部分的工作,具体的内容可以参考RequestPredicates的源码以及在项目中多实践积累。到目前为止,一个url请求可以路由到一个handler进行处理了,下面将使用Netty或者Tomcat来将这个例子运行起来,并且进行测试,文章开头提到,WebFlux需要运行在实现了Servlet 3.1规范的容器中,而包括Tomcat、Jetty、Netty等都有实现,但是推荐使用Netty来运行WebFlux应用,因为Netty是非阻塞异步的,和WebFlux搭配效果更佳。所以下面的代码展示了如何使用Netty来启动例子:
    public void nettyServer() {

        RouterFunction<ServerResponse> router = buildResultRouter();

        HttpHandler httpHandler = RouterFunctions.toHttpHandler(router);

        ReactorHttpHandlerAdapter httpHandlerAdapter = new ReactorHttpHandlerAdapter(httpHandler);

        //create the netty server
        HttpServer httpServer = HttpServer.create("localhost", 8600);

        //start the netty http server
        httpServer.newHandler(httpHandlerAdapter).block();

        //block
        try {
            System.in.read();
        } catch (IOException e) {
            e.printStackTrace();
        }
    }
如何想使用Tomcate来启动例子,则可以参考下面的例子:
    public void tomcatServer() {

        RouterFunction<?> route = buildResultRouter();
        HttpHandler httpHandler = toHttpHandler(route);

        Tomcat tomcatServer = new Tomcat();
        tomcatServer.setHostname("localhost");
        tomcatServer.setPort(8600);
        Context rootContext = tomcatServer.addContext("", System.getProperty("java.io.tmpdir"));
        ServletHttpHandlerAdapter servlet = new ServletHttpHandlerAdapter(httpHandler);
        Tomcat.addServlet(rootContext, "httpHandlerServlet", servlet);
        rootContext.addServletMapping("/", "httpHandlerServlet");
        try {
            tomcatServer.start();
        } catch (LifecycleException e) {
            e.printStackTrace();
        }

        //block
        try {
            System.in.read();
        } catch (IOException e) {
            e.printStackTrace();
        }
    }
运行项目之后,就可以测试是否成功了,下面是一个测试:
curl http://127.0.0.1:8600/s5/get/1
{
  "code":200,
  "message":"ok",
  "data": {
       "id":1,
       "content":"This is first model"
       }
}

curl http://127.0.0.1:8600/s5/list
[
  {
    "code":200,
    "message":"ok",
    "data": {
         "id":1,
         "content":"This is first model"
         }
  },
  {
     "code":200,
     "message":"ok",
     "data": {
           "id":2,
           "content":"This is second model"
           }
  }
]
:Spring Boot 中的响应式编程和 WebFlux 入门")
Spring Boot 2 (十):Spring Boot 中的响应式编程和 WebFlux 入门
Spring 5.0 中发布了重量级组件 Webflux,拉起了响应式编程的规模使用序幕。
WebFlux 使用的场景是异步非阻塞的,使用 Webflux 作为系统解决方案,在大多数场景下可以提高系统吞吐量。Spring Boot 2.0 是基于 Spring5 构建而成,因此 Spring Boot 2.X 将自动继承了 Webflux 组件,本篇给大家介绍如何在 Spring Boot 中使用 Webflux 。
为了方便大家理解,我们先来了解几个概念。
响应式编程
在计算机中,响应式编程或反应式编程(英语:Reactive programming)是一种面向数据流和变化传播的编程范式。这意味着可以在编程语言中很方便地表达静态或动态的数据流,而相关的计算模型会自动将变化的值通过数据流进行传播。
例如,在命令式编程环境中,a=b+c 表示将表达式的结果赋给 a,而之后改变 b 或 c 的值不会影响 a 。但在响应式编程中,a 的值会随着 b 或 c 的更新而更新。
响应式编程是基于异步和事件驱动的非阻塞程序,只需要在程序内启动少量线程扩展,而不是水平通过集群扩展。
用大白话讲,我们以前编写的大部分都是阻塞类的程序,当一个请求过来时任务会被阻塞,直到这个任务完成后再返回给前端;响应式编程接到请求后只是提交了一个请求给后端,后端会再安排另外的线程去执行任务,当任务执行完成后再异步通知到前端。
Reactor
Java 领域的响应式编程库中,最有名的算是 Reactor 了。Reactor 也是 Spring 5 中反应式编程的基础,Webflux 依赖 Reactor 而构建。
Reactor 是一个基于 JVM 之上的异步应用基础库。为 Java 、Groovy 和其他 JVM 语言提供了构建基于事件和数据驱动应用的抽象库。Reactor 性能相当高,在最新的硬件平台上,使用无堵塞分发器每秒钟可处理 1500 万事件。
简单说,Reactor 是一个轻量级 JVM 基础库,帮助你的服务或应用高效,异步地传递消息。Reactor 中有两个非常重要的概念 Flux 和 Mono 。
Flux 和 Mono
Flux 和 Mono 是 Reactor 中的两个基本概念。Flux 表示的是包含 0 到 N 个元素的异步序列。在该序列中可以包含三种不同类型的消息通知:正常的包含元素的消息、序列结束的消息和序列出错的消息。当消息通知产生时,订阅者中对应的方法 onNext(), onComplete()和 onError()会被调用。
Mono 表示的是包含 0 或者 1 个元素的异步序列。该序列中同样可以包含与 Flux 相同的三种类型的消息通知。Flux 和 Mono 之间可以进行转换。对一个 Flux 序列进行计数操作,得到的结果是一个 Mono<Long>对象。把两个 Mono 序列合并在一起,得到的是一个 Flux 对象。
WebFlux 是什么?
WebFlux 模块的名称是 spring-webflux,名称中的 Flux 来源于 Reactor 中的类 Flux。Spring webflux 有一个全新的非堵塞的函数式 Reactive Web 框架,可以用来构建异步的、非堵塞的、事件驱动的服务,在伸缩性方面表现非常好。
非阻塞的关键预期好处是能够以小的固定数量的线程和较少的内存进行扩展。在服务器端 WebFlux 支持2种不同的编程模型:
- 基于注解的 @Controller 和其他注解也支持 Spring MVC
- Functional 、Java 8 lambda 风格的路由和处理
如图所示,WebFlux 模块从上到下依次是 Router Functions、WebFlux、Reactive Streams 三个新组件。
- Router Functions 对标准的 @Controller,@RequestMapping 等的 Spring MVC 注解,提供一套 函数式风格的 API,用于创建 Router、Handler 和Filter。
- WebFlux 核心组件,协调上下游各个组件提供 响应式编程 支持。
- Reactive Streams 一种支持 背压 (Backpressure) 的 异步数据流处理标准,主流实现有 RxJava 和 Reactor,Spring WebFlux 集成的是 Reactor。
默认情况下,Spring Boot 2 使用 Netty WebFlux,因为 Netty 在异步非阻塞空间中被广泛使用,异步非阻塞连接可以节省更多的资源,提供更高的响应度。通过比较 Servlet 3.1 非阻塞 I / O 没有太多的使用,因为使用它的成本比较高,Spring WebFlux 打开了一条实用的通路。
值得注意的是:支持 reactive 编程的数据库只有 MongoDB, redis, Cassandra, Couchbase
Spring Webflux
Spring Boot 2.0 包括一个新的 spring-webflux 模块。该模块包含对响应式 HTTP 和 WebSocket 客户端的支持,以及对 REST,HTML 和 WebSocket 交互等程序的支持。一般来说,Spring MVC 用于同步处理,Spring Webflux 用于异步处理。
Spring Boot Webflux 有两种编程模型实现,一种类似 Spring MVC 注解方式,另一种是基于 Reactor 的响应式方式。
快速上手
添加 webflux 依赖
<dependency>
    <groupId>org.springframework.boot</groupId>
    <artifactId>spring-boot-starter-webflux</artifactId>
</dependency>

通过 IEDA 的依赖关系图我们可以返现spring-boot-starter-webflux依赖于spring-webflux、Reactor 和 Netty 相关依赖包。
创建 Controller
@RestController
public class HelloController {

    @GetMapping("/hello")
    public Mono<String> hello() {
        return Mono.just("Welcome to reactive world ~");
    }
}
通过上面的示例可以发现,开发模式和之前 Spring Mvc 的模式差别不是很大,只是在方法的返回值上有所区别。
just()方法可以指定序列中包含的全部元素。- 响应式编程的返回值必须是 Flux 或者 Mono ,两者之间可以相互转换。
测试类
@RunWith(SpringRunner.class)
@WebFluxTest(controllers = HelloController.class)
public class HelloTests {
    @Autowired
    WebTestClient client;

    @Test
    public void getHello() {
        client.get().uri("/hello").exchange().expectStatus().isOk();
    }
}
运行测试类,测试用例通过表示服务正常。启动项目后,访问地址:http://localhost:8080/hello,页面返回信息:
Welcome to reactive world ~
证明 Webflux 集成成功。
以上便是 Spring Boot 集成 Webflux 最简单的 Demo ,后续我们继续研究 Webflux 的使用。
示例
全网最全的 Spring Boot 学习示例项目,击下方链接即可获取。
示例代码-github
示例代码-码云
原文出处:https://www.cnblogs.com/ityouknow/p/10372752.html
今天关于你的响应阻塞了没有?--Spring-WebFlux 源码分析和springmvc响应处理结果的介绍到此结束,谢谢您的阅读,有关java-带@EnableWebFlux批注的SpringWebFlux错误、Kotlin 使用 Spring WebFlux 实现响应式编程、Spring 5 WebFlux、Spring Boot 2 (十):Spring Boot 中的响应式编程和 WebFlux 入门等更多相关知识的信息可以在本站进行查询。
本文标签:


![[转帖]Ubuntu 安装 Wine方法(ubuntu如何安装wine)](https://www.gvkun.com/zb_users/cache/thumbs/4c83df0e2303284d68480d1b1378581d-180-120-1.jpg)

