最近很多小伙伴都在问springboot实现xml传参和返回值和springxml转对象这两个问题,那么本篇文章就来给大家详细解答一下,同时本文还将给你拓展C++函数指针:传参和返回值、javascr
最近很多小伙伴都在问springboot 实现 xml 传参和返回值和spring xml转对象这两个问题,那么本篇文章就来给大家详细解答一下,同时本文还将给你拓展C++ 函数指针:传参和返回值、javascript函数的声明、调用、传参和返回值、Spring Boot 实现 xml 传参和返回值、Spring Boot接口参数和返回值统一加密等相关知识,下面开始了哦!
本文目录一览:- springboot 实现 xml 传参和返回值(spring xml转对象)
- C++ 函数指针:传参和返回值
- javascript函数的声明、调用、传参和返回值
- Spring Boot 实现 xml 传参和返回值
- Spring Boot接口参数和返回值统一加密
")
springboot 实现 xml 传参和返回值(spring xml转对象)
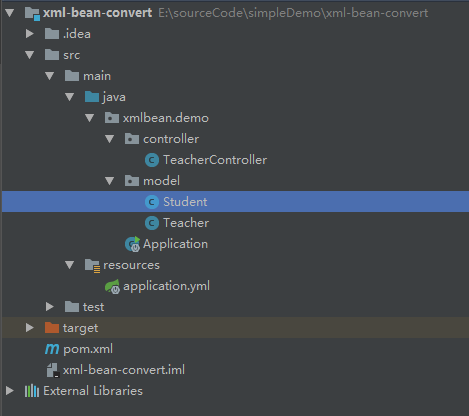
1、新建 maven 工程 xml-bean-convert
pom.xml 如下
<?xml version="1.0" encoding="UTF-8"?>
<project xmlns="http://maven.apache.org/POM/4.0.0"
         xmlns:xsi="http://www.w3.org/2001/XMLSchema-instance"
         xsi:schemaLocation="http://maven.apache.org/POM/4.0.0 http://maven.apache.org/xsd/maven-4.0.0.xsd">
    <modelVersion>4.0.0</modelVersion>

    <groupId>xml.bean.convert</groupId>
    <artifactId>xml-bean-convert</artifactId>
    <version>1.0-SNAPSHOT</version>
    <parent>
        <groupId>org.springframework.boot</groupId>
        <artifactId>spring-boot-starter-parent</artifactId>
        <version>1.4.1.RELEASE</version>
    </parent>
    <dependencies>
        <dependency>
            <groupId>org.springframework.boot</groupId>
            <artifactId>spring-boot-starter-web</artifactId>
        </dependency>
        <dependency>
            <groupId>com.fasterxml.jackson.dataformat</groupId>
            <artifactId>jackson-dataformat-xml</artifactId>
            <version>2.9.8</version>
        </dependency>
    </dependencies>

</project>
红色加粗部分是 xml 和 bean 转换依赖的包
2、启动类
@SpringBootApplication
public class Application {
    public static void main(String[] args) throws Exception {
        SpringApplication.run(Application.class, args);
    }
}
3、新建实体类,并添加 xml 和和 bean 转换的注解(注意,注解要写在 get 方法上)
public class Student {
    private Integer id;
    private String stuName;
    private String sex;

    @JacksonXmlProperty(isAttribute = true,localName = "STUDENT_ID")
    public Integer getId() {
        return id;
    }

    public void setId(Integer id) {
        this.id = id;
    }

    @JacksonXmlProperty(localName = "STUDENT_NAME")
    public String getStuName() {
        return stuName;
    }

    public void setStuName(String stuName) {
        this.stuName = stuName;
    }

    @JacksonXmlProperty(localName = "STUDENT_SEX")
    public String getSex() {
        return sex;
    }

    public void setSex(String sex) {
        this.sex = sex;
    }

    @Override
    public String toString() {
        return "Student{" +
                "id=" + id +
                ", stuName=''" + stuName + ''\'''' +
                ", sex=''" + sex + ''\'''' +
                ''}'';
    }
}
@JacksonXmlRootElement(localName ="MESSAGE")
public class Teacher {
private Integer id;
private String teacherName;
private List<Student> studentList;
@JacksonXmlProperty(isAttribute = true,localName = "TEACHER_ID")
public Integer getId() {
return id;
}
public void setId(Integer id) {
this.id = id;
}
@JacksonXmlProperty(localName = "TEACHER_NAME")
public String getTeacherName() {
return teacherName;
}
public void setTeacherName(String teacherName) {
this.teacherName = teacherName;
}
@JacksonXmlElementWrapper(localName ="STUDENT_LIST")
@JacksonXmlProperty(localName ="STUDENT")
public List<Student> getStudentList() {
return studentList;
}
public void setStudentList(List<Student> studentList) {
this.studentList = studentList;
}
@Override
public String toString() {
return "Teacher{" +
"id=" + id +
", teacherName=''" + teacherName + ''\'''' +
", studentList=" + studentList +
''}'';
}
}4、写 controller 进行测试
@RestController
@RequestMapping("/teacher")
public class TeacherController {
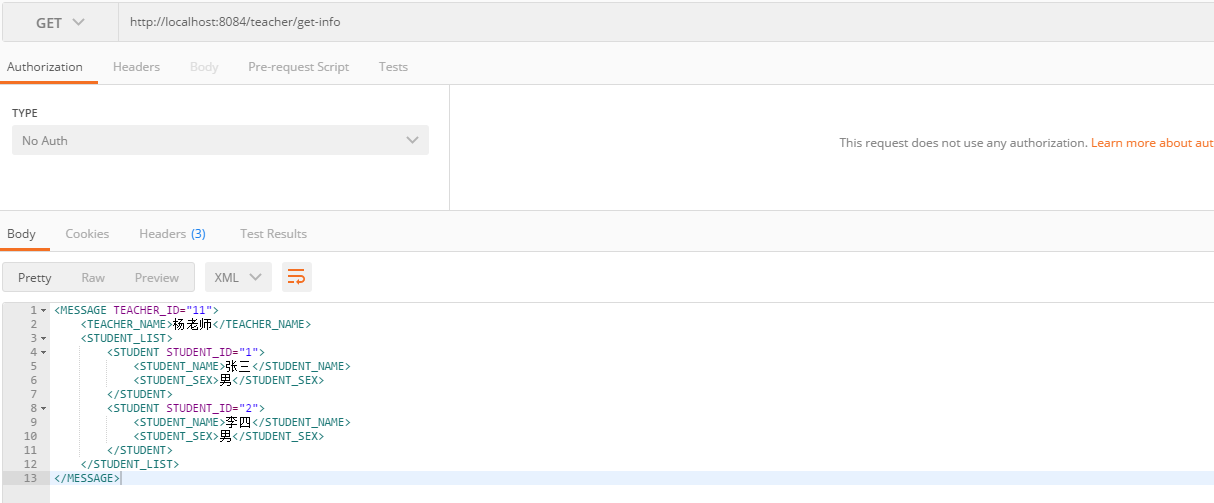
@RequestMapping(value = "/get-info",method = RequestMethod.GET, produces = "application/xml")
@ResponseBody
public Teacher getTest(){
Student student1 = new Student();
student1.setId(1);
student1.setStuName("张三");
student1.setSex("男");
Student student2 = new Student();
student2.setId(2);
student2.setStuName("李四");
student2.setSex("男");
Teacher teacher = new Teacher();
teacher.setId(11);
teacher.setTeacherName("杨老师");
teacher.setStudentList(Arrays.asList(student1,student2));
return teacher;
}
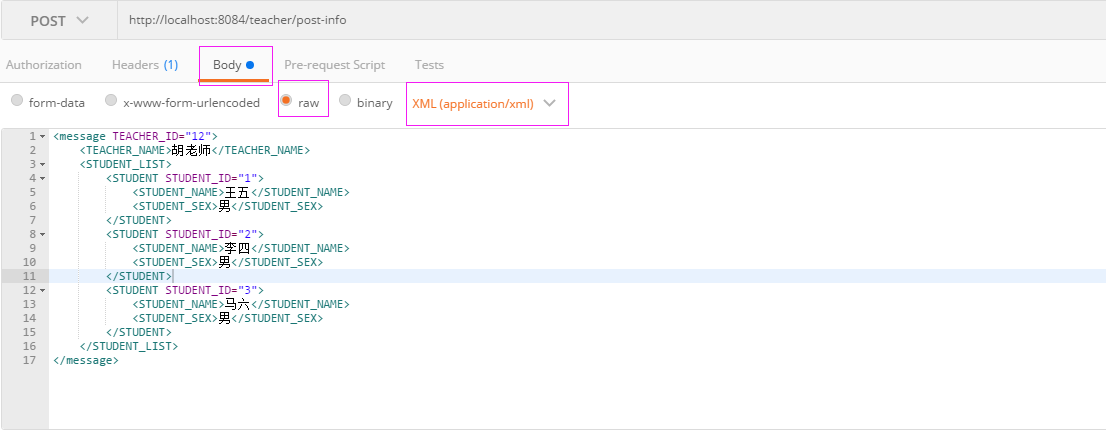
@RequestMapping(value = "/post-info",method = RequestMethod.POST, consumes = "application/xml")
public void postTest(@RequestBody Teacher teacher){
System.out.println("postman传过来的xml信息转换成实体类如下:==========");
System.out.println(teacher.toString());
}
}
1)首先用 postman 测试返回 xml
2)首先用 postman 测试用 xml 格式传参


C++ 函数指针:传参和返回值
函数指针在

C++ 函数指针:传参和返回值
简介
函数指针是一种指向函数地址的变量。它允许我们将函数作为参数传递给另一个函数或将其存储在数据结构中。在 C++ 中,函数指针使用特殊的运算符 * 和 & 来定义和解引用。
立即学习“C++免费学习笔记(深入)”;
定义函数指针
要定义一个函数指针,我们指定要指向的函数类型,后跟星号(*)。例如,指向返回整数并接受一个整数参数的函数的函数指针可以定义为:
1 |
|
传参
当我们通过函数指针调用函数时,函数指针本身就像一个函数。因此,我们可以向其传递参数。例如,如果我们有一个名为 add 的函数,它接受两个整数参数并返回其和,我们可以使用函数指针如下调用它:
1 2 3 4 5 6 7 |
|
返回值
函数指针还可以返回一个值,就像普通函数一样。要获取函数指针调用的返回值,我们使用解引用运算符(*):
1 2 3 4 5 6 |
|
实战案例
函数指针在 C++ 中的常见应用之一是对回调函数进行编程。回调函数是在特定事件发生时被调用的函数。例如,我们可以使用函数指针创建一个事件处理函数,它将在按下按钮时被触发:
1 2 3 4 5 6 7 8 9 10 11 12 13 14 15 16 17 18 19 |
|
总结
(本文没有出现总结话语)
以上就是C++ 函数指针:传参和返回值的详细内容,更多请关注php中文网其它相关文章!

javascript函数的声明、调用、传参和返回值
在javascript中函数的声明方法有两种:
function func (){
alert("hello,world");
}


var func =new Function (alert("hello,world"));


var func = function(){
alert("hello,world");
}
第一种属于声明式函数,而第二种称为函数构造函数又称为匿名函数,第三种称为函数直接量或者函数表达式。在实际的使用过程中,我们经常用到的是第一种和第三种,因为第二种函数需要每次调用的时候都解析,所以并不多用。
函数有无参函数和有参函数(如下)
function func(a){
	alert(a);
}
var a="hello world"
func(a);
在可以使用有参函数的情况下尽量避免使用无参函数,同时使用局部变量代替全局变量,这样有利于函数的封装。
同时,如果在函数的参数不确定的情况下我们使用arguments来调用函数的参数
function func(){
	alert(arguments[0]+":"+arguments[1]);
}
var a="hello", b="world"
func(a,b);当我们在使用有参函数和局部变量的时候,那么不可避免的要将函数中部分值传递出去,那么就需要用到返回值。
function func(){
	return arguments[0]+":"+arguments[1]
}
var a="hello", b="world"
alert(func(a,b));function func(){
return {x:arguments[0], y:arguments[1]}
}
var a="hello", b="world"
alert(func(a,b).x+" "+func(a,b).y);

Spring Boot 实现 xml 传参和返回值
阅读文本大概需要 3 分钟。
虽然 json 作为数据传输的格式大型其道,但是使用 xml 格式传输的系统还是在一些存量的系统中存在。另外 WebService 本身就是使用 xml 格式进行数据传输。今天用个小例子看看 Spring Boot 如何实现 xml 传参和返回值。
1、新建 maven 项目,添加依赖
<project xmlns="http://maven.apache.org/POM/4.0.0" xmlns:xsi="http://www.w3.org/2001/XMLSchema-instance"xsi:schemaLocation="http://maven.apache.org/POM/4.0.0 http://maven.apache.org/xsd/maven-4.0.0.xsd"><modelVersion>4.0.0</modelVersion><groupId>com.jemter</groupId><artifactId>com-lesson17</artifactId><version>0.0.1-SNAPSHOT</version><packaging>jar</packaging><name>com-lesson1</name><url>http://maven.apache.org</url><parent><groupId>org.springframework.boot</groupId><artifactId>spring-boot-starter-parent</artifactId><version>2.0.4.RELEASE</version></parent><properties><project.build.sourceEncoding>UTF-8</project.build.sourceEncoding></properties><dependencies><dependency><groupId>org.springframework.boot</groupId><artifactId>spring-boot-starter-web</artifactId></dependency><dependency><groupId>com.fasterxml.jackson.dataformat</groupId><artifactId>jackson-dataformat-xml</artifactId></dependency></dependencies></project>
jackson-dataformat-xml 是 xml 和 bean 转换依赖的包
2、新建实体类,并添加 xml 和和 bean 转换的注解(注解要写在 get 方法上)
教师实体类
package com.lesson17.model;import java.util.List;import com.fasterxml.jackson.dataformat.xml.annotation.JacksonXmlElementWrapper;import com.fasterxml.jackson.dataformat.xml.annotation.JacksonXmlProperty;import com.fasterxml.jackson.dataformat.xml.annotation.JacksonXmlRootElement;@JacksonXmlRootElement(localName = "MESSAGE")public class Teacher {private Integer id;private String teacherName;private List<Student> studentList;@JacksonXmlProperty(isAttribute = true, localName = "TEACHER_ID")public Integer getId() {return id;}public void setId(Integer id) {this.id = id;}@JacksonXmlProperty(localName = "TEACHER_NAME")public String getTeacherName() {return teacherName;}public void setTeacherName(String teacherName) {this.teacherName = teacherName;}@JacksonXmlElementWrapper(localName = "STUDENT_LIST")@JacksonXmlProperty(localName = "STUDENT")public List<Student> getStudentList() {return studentList;}public void setStudentList(List<Student> studentList) {this.studentList = studentList;}@Overridepublic String toString() {return "Teacher{" + "id=" + id + ", teacherName=" + teacherName + ", studentList=" + studentList + "}";}}
学生实体类
package com.lesson17.model;import com.fasterxml.jackson.dataformat.xml.annotation.JacksonXmlProperty;public class Student {private Integer id;private String stuName;private String sex;@JacksonXmlProperty(isAttribute = true, localName = "STUDENT_ID")public Integer getId() {return id;}public void setId(Integer id) {this.id = id;}@JacksonXmlProperty(localName = "STUDENT_NAME")public String getStuName() {return stuName;}public void setStuName(String stuName) {this.stuName = stuName;}@JacksonXmlProperty(localName = "STUDENT_SEX")public String getSex() {return sex;}public void setSex(String sex) {this.sex = sex;}@Overridepublic String toString() {return "Student{" + "id=" + id + ", stuName=" + stuName + ", sex=" + sex + "}";}}
3、编程控制类
package com.lesson17.controller;import java.util.Arrays;import java.util.HashMap;import java.util.Map;import org.springframework.web.bind.annotation.RequestBody;import org.springframework.web.bind.annotation.RequestMapping;import org.springframework.web.bind.annotation.RequestMethod;import org.springframework.web.bind.annotation.ResponseBody;import org.springframework.web.bind.annotation.RestController;import com.lesson17.model.Student;import com.lesson17.model.Teacher;@RestController@RequestMapping("/teacher")public class TeacherController {@RequestMapping(value = "/getInfo", method = RequestMethod.GET, produces = "application/xml")@ResponseBodypublic Teacher getInfo() {Student student1 = new Student();student1.setId(1);student1.setStuName("张三");student1.setSex("男");Student student2 = new Student();student2.setId(2);student2.setStuName("李四");student2.setSex("男");Teacher teacher = new Teacher();teacher.setId(11);teacher.setTeacherName("杨老师");teacher.setStudentList(Arrays.asList(student1, student2));return teacher;}@RequestMapping(value = "/postInfo", method = RequestMethod.POST, consumes = "application/xml")public Map<String, Object> postInfo(@RequestBody Teacher teacher) {System.out.println("postman传过来的xml信息转换成实体类如下:==========" + teacher.toString());Map<String, Object> results = new HashMap<String, Object>();results.put("code", "000000");results.put("msg", "success");return results;}}
注:关键步骤是 RequestMapping 注解的 produces 和 consumes 这两个属性,如果参数是 xml,则需要把 consumes 配置成 application/xml;如果是返回值是 xml,则需要把把 produces 配置成 application/xml。
4、编写 SpringBoot 启动类
package com.lesson17;import org.springframework.boot.SpringApplication;import org.springframework.boot.autoconfigure.SpringBootApplication;@SpringBootApplicationpublic class Application {public static void main(String[] args) {SpringApplication.run(Application.class, args);}}
5、application.yml 配置如下
server:port: 8080servlet:context-path: /lesson17spring:application:name: jmeter-lesson17
6、启动验证
请求 http://127.0.0.1:8080/lesson17/teacher/getInfo 接口
请求 http://127.0.0.1:8080/lesson17/teacher/postInfo 接口
☆
往期精彩
☆
01 漫谈发版哪些事,好课程推荐
02 Linux 的常用最危险的命令
03 精讲 Spring Boot— 入门 + 进阶 + 实例
04 优秀的 Java 程序员必须了解的 GC 哪些
05 互联网支付系统整体架构详解
关注我
每天进步一点点

本文分享自微信公众号 - JAVA 乐园(happyhuangjinjin88)。
如有侵权,请联系 support@oschina.cn 删除。
本文参与 “OSC 源创计划”,欢迎正在阅读的你也加入,一起分享。

Spring Boot接口参数和返回值统一加密
阅读文本大概需要3分钟。
对敏感信息加密是软件开发的一个永恒的话题,特别现在国家这么重视个人用户信息的泄露问题。今天给大家介绍一个网友开发的Spring Boot starter。如果以后工作中遇到需要对接口的参数和返回值统一加密,说不定这个starter就可以派上用场,即使不使用这个starter,也可以参考一下别人是怎么对接口的数据进行统一加解密的。
代码仓库
https://gitee.com/agile-bpm/rsa-encrypt-body-spring-boot
0x01:pom文件中引入
<dependency>
  <groupId>cn.shuibo</groupId>
  <artifactId>rsa-encrypt-body-spring-boot</artifactId>
  <version>1.0.0.RELEASE</version>
</dependency>
0x02:启动类Application中添加@EnableSecurity注解
@SpringBootApplication
@EnableSecurity
public class DemoApplication {
    public static void main(String[] args) {
        SpringApplication.run(DemoApplication.class, args);
    }
}
0x03:在application.yml或者application.properties中添加RSA公钥及私钥
rsa:
  encrypt:
    debug: false # true表示开启调试,不加密。(方便开发时测试)
    publicKey: xxxxxx
    privateKey: xxxxxx
0x04:对返回值进行加密
@Encrypt
@GetMapping("/encryption")
public TestBean encryption(){
    TestBean testBean = new TestBean();
    testBean.setName("shuibo.cn");
    testBean.setAge(18);
    return testBean;
}
0x05:对传过来的加密参数解密
@Decrypt
@PostMapping("/decryption")
public String Decryption(@RequestBody TestBean testBean){
    return testBean.toString();
}
0x06:可以借鉴的经验
小编在项目开发中经常遇到对敏感信息加密的情况,主要像身份证、手机号、姓名等。使用最多的是RSA和AES加解密,比对这两种加解密时有这样的一些经验
RSA如果对长数据加密需要使用分段加密,JS分段加解密非常麻烦
AES非常容易对长数据进行加密
RSA加解密
参考:https://www.cnblogs.com/jiafuwei/p/7054500.html
AEs加解密
package demo.security;

import java.io.IOException;
import java.io.UnsupportedEncodingException;
import java.security.InvalidKeyException;
import java.security.NoSuchAlgorithmException;
import java.security.SecureRandom;
import java.util.Base64;
import java.util.Scanner;

import javax.crypto.BadPaddingException;
import javax.crypto.Cipher;
import javax.crypto.IllegalBlockSizeException;
import javax.crypto.KeyGenerator;
import javax.crypto.NoSuchPaddingException;
import javax.crypto.SecretKey;
import javax.crypto.spec.SecretKeySpec;

import sun.misc.BASE64Decoder;
import sun.misc.BASE64Encoder;

/*
 * AES对称加密和解密
 */
public class SymmetricEncoder {
  /*
   * 加密
   * 1.构造密钥生成器
   * 2.根据ecnodeRules规则初始化密钥生成器
   * 3.产生密钥
   * 4.创建和初始化密码器
   * 5.内容加密
   * 6.返回字符串
   */
    public static String AESEncode(String encodeRules,String content){
        try {
            //1.构造密钥生成器,指定为AES算法,不区分大小写
            KeyGenerator keygen=KeyGenerator.getInstance("AES");
            //2.根据ecnodeRules规则初始化密钥生成器
            //生成一个128位的随机源,根据传入的字节数组
            keygen.init(128, new SecureRandom(encodeRules.getBytes()));
              //3.产生原始对称密钥
            SecretKey original_key=keygen.generateKey();
              //4.获得原始对称密钥的字节数组
            byte [] raw=original_key.getEncoded();
            //5.根据字节数组生成AES密钥
            SecretKey key=new SecretKeySpec(raw, "AES");
              //6.根据指定算法AES自成密码器
            Cipher cipher=Cipher.getInstance("AES");
              //7.初始化密码器,第一个参数为加密(Encrypt_mode)或者解密解密(Decrypt_mode)操作,第二个参数为使用的KEY
            cipher.init(Cipher.ENCRYPT_MODE, key);
            //8.获取加密内容的字节数组(这里要设置为utf-8)不然内容中如果有中文和英文混合中文就会解密为乱码
            byte [] byte_encode=content.getBytes("utf-8");
            //9.根据密码器的初始化方式--加密:将数据加密
            byte [] byte_AES=cipher.doFinal(byte_encode);
          //10.将加密后的数据转换为字符串
            //这里用Base64Encoder中会找不到包
            //解决办法:
            //在项目的Build path中先移除JRE System Library,再添加库JRE System Library,重新编译后就一切正常了。
            String AES_encode=new String(new BASE64Encoder().encode(byte_AES));
          //11.将字符串返回
            return AES_encode;
        } catch (NoSuchAlgorithmException e) {
            e.printStackTrace();
        } catch (NoSuchPaddingException e) {
            e.printStackTrace();
        } catch (InvalidKeyException e) {
            e.printStackTrace();
        } catch (IllegalBlockSizeException e) {
            e.printStackTrace();
        } catch (BadPaddingException e) {
            e.printStackTrace();
        } catch (UnsupportedEncodingException e) {
            e.printStackTrace();
        }

        //如果有错就返加nulll
        return null;
    }
    /*
     * 解密
     * 解密过程:
     * 1.同加密1-4步
     * 2.将加密后的字符串反纺成byte[]数组
     * 3.将加密内容解密
     */
    public static String AESDncode(String encodeRules,String content){
        try {
            //1.构造密钥生成器,指定为AES算法,不区分大小写
            KeyGenerator keygen=KeyGenerator.getInstance("AES");
            //2.根据ecnodeRules规则初始化密钥生成器
            //生成一个128位的随机源,根据传入的字节数组
            keygen.init(128, new SecureRandom(encodeRules.getBytes()));
              //3.产生原始对称密钥
            SecretKey original_key=keygen.generateKey();
              //4.获得原始对称密钥的字节数组
            byte [] raw=original_key.getEncoded();
            //5.根据字节数组生成AES密钥
            SecretKey key=new SecretKeySpec(raw, "AES");
              //6.根据指定算法AES自成密码器
            Cipher cipher=Cipher.getInstance("AES");
              //7.初始化密码器,第一个参数为加密(Encrypt_mode)或者解密(Decrypt_mode)操作,第二个参数为使用的KEY
            cipher.init(Cipher.DECRYPT_MODE, key);
            //8.将加密并编码后的内容解码成字节数组
            byte [] byte_content= new BASE64Decoder().decodeBuffer(content);
            /*
             * 解密
             */
            byte [] byte_decode=cipher.doFinal(byte_content);
            String AES_decode=new String(byte_decode,"utf-8");
            return AES_decode;
        } catch (NoSuchAlgorithmException e) {
            e.printStackTrace();
        } catch (NoSuchPaddingException e) {
            e.printStackTrace();
        } catch (InvalidKeyException e) {
            e.printStackTrace();
        } catch (IOException e) {
            e.printStackTrace();
        } catch (IllegalBlockSizeException e) {
            e.printStackTrace();
        } catch (BadPaddingException e) {
            e.printStackTrace();
        }

        //如果有错就返加nulll
        return null;
    }

    public static void main(String[] args) {
        SymmetricEncoder se=new SymmetricEncoder();
        Scanner scanner=new Scanner(System.in);
        /*
         * 加密
         */
        System.out.println("使用AES对称加密,请输入加密的规则");
        String encodeRules=scanner.next();
        System.out.println("请输入要加密的内容:");
        String content = scanner.next();
        System.out.println("根据输入的规则"+encodeRules+"加密后的密文是:"+se.AESEncode(encodeRules, content));

        /*
         * 解密
         */
        System.out.println("使用AES对称解密,请输入加密的规则:(须与加密相同)");
         encodeRules=scanner.next();
        System.out.println("请输入要解密的内容(密文):");
         content = scanner.next();
        System.out.println("根据输入的规则"+encodeRules+"解密后的明文是:"+se.AESDncode(encodeRules, content));
    }

}
项目中通常可以采取这样的规则进行加解密:使用非对称加密算法RSA对对称加密算法AES的密钥进行加密,然后使用对称加密算法AES对参数和返回的数据进行加解密
☆
往期精彩
☆
01 漫谈发版哪些事,好课程推荐
02 Linux的常用最危险的命令
03 精讲Spring Boot—入门+进阶+实例
04 优秀的Java程序员必须了解的GC哪些
05 互联网支付系统整体架构详解
关注我
每天进步一点点


![[转帖]Ubuntu 安装 Wine方法(ubuntu如何安装wine)](https://www.gvkun.com/zb_users/cache/thumbs/4c83df0e2303284d68480d1b1378581d-180-120-1.jpg)

