想了解springboot基于shiro/springsecurity实现自定义登录的新动态吗?本文将为您提供详细的信息,我们还将为您解答关于springsecurity自定义登录页面的相关问题,此外
想了解spring boot 基于 shiro /spring security 实现自定义登录的新动态吗?本文将为您提供详细的信息,我们还将为您解答关于spring security 自定义登录页面的相关问题,此外,我们还将为您介绍关于4. Spring Boot 中 Spring Security 自定义用户认证、Spring Boot + Spring Security 实现自动登录功能、Spring Boot + Spring Security自定义用户认证、Spring Boot 整合 Spring Security + JWT(实现无状态登录)的新知识。
本文目录一览:- spring boot 基于 shiro /spring security 实现自定义登录(spring security 自定义登录页面)
- 4. Spring Boot 中 Spring Security 自定义用户认证
- Spring Boot + Spring Security 实现自动登录功能
- Spring Boot + Spring Security自定义用户认证
- Spring Boot 整合 Spring Security + JWT(实现无状态登录)
")
spring boot 基于 shiro /spring security 实现自定义登录(spring security 自定义登录页面)
shiro
shiro 配置文件
/**
 * Shiro配置
 *
 * @see ShiroAutoConfiguration
 */
@Configuration
@RequiredArgsConstructor
public class ShiroConf extends AbstractShiroConfiguration {

    private final UserDetailService userDetailService;

    private final TokenService tokenService;

    private final CaptchaService captchaService;

    private final Gson gson;

    /**
     * 自定义权限管理
     *
     * @see ShiroConfiguration
     * @see DefaultSecurityManager
     */
    @Bean
    public DefaultWebSecurityManager securityManager(List<Realm> realms) {
        DefaultWebSecurityManager securityManager = new DefaultWebSecurityManager();
        securityManager.setRealms(realms);
        securityManager.setSubjectDAO(subjectDAO());
        ModularRealmAuthenticator authenticator = (ModularRealmAuthenticator) securityManager.getAuthenticator();
        authenticator.setAuthenticationStrategy(authenticationStrategy());
        return securityManager;
    }

    @Override
    protected AuthenticationStrategy authenticationStrategy() {
        // multiple realms none exception captured
        return new FirstExceptionStrategy();
    }

    @Override
    protected SessionStorageEvaluator sessionStorageEvaluator() {
        DefaultSessionStorageEvaluator defaultSessionStorageEvaluator = new DefaultSessionStorageEvaluator();
        // disable session
        defaultSessionStorageEvaluator.setSessionStorageEnabled(false);
        return defaultSessionStorageEvaluator;
    }

    @Bean
    public Realm userAuthenticatingRealm() {
        UserAuthenticatingRealm userAuthenticatingRealm = new UserAuthenticatingRealm();
        userAuthenticatingRealm.setUserDetailService(userDetailService);
        userAuthenticatingRealm.setCaptchaService(captchaService);
        PasswordMatcher passwordMatcher = new PasswordMatcher();
        passwordMatcher.setPasswordService(passwordService());
        userAuthenticatingRealm.setCredentialsMatcher(passwordMatcher);
        return userAuthenticatingRealm;
    }

    @Bean
    public Realm tokenAuthorizingRealm() {
        TokenAuthorizingRealm tokenAuthorizingRealm = new TokenAuthorizingRealm();
        tokenAuthorizingRealm.setTokenService(tokenService);
        return tokenAuthorizingRealm;
    }

    @Bean(name = "user_authc")
    public UserFilter userAuthenticatingFilter() {
        UserFilter userFilter = new UserFilter();
        userFilter.setTokenService(tokenService);
        userFilter.setGson(gson);
        return userFilter;
    }

    @Bean(name = "token_authc")
    public TokenFilter tokenAuthenticatingFilter() {
        return new TokenFilter();
    }


    /**
     * @see DefaultFilter
     */
    @Bean(name = "shiroFilterChainDefinition")
    public ShiroFilterChainDefinition shiroFilterChainDefinition() {
        DefaultShiroFilterChainDefinition chainDefinition = new DefaultShiroFilterChainDefinition();
        chainDefinition.addPathDefinition("/sys/login", "user_authc");
        chainDefinition.addPathDefinition("/sys/logout", "anon");
        chainDefinition.addPathDefinition("/sys/**", "token_authc");
        chainDefinition.addPathDefinition("/manage/**", "anon");
        chainDefinition.addPathDefinition("/wx/**", "anon");
        chainDefinition.addPathDefinition("/**", "anon");
        return chainDefinition;
    }

    @Bean(name = "shiroFilterFactoryBean")
    public ShiroFilterFactoryBean shiroFilterFactoryBean(SecurityManager securityManager,
                                                         ShiroFilterChainDefinition shiroFilterChainDefinition,
                                                         Map<String, Filter> filterMap) {
        ShiroFilterFactoryBean filterFactoryBean = new ShiroFilterFactoryBean();
        filterFactoryBean.setSecurityManager(securityManager);
        filterFactoryBean.setFilterChainDefinitionMap(shiroFilterChainDefinition.getFilterChainMap());
        filterFactoryBean.setFilters(filterMap);
        return filterFactoryBean;
    }

    @Bean
    @DependsOn("lifecycleBeanPostProcessor")
    public DefaultAdvisorAutoProxyCreator defaultAdvisorAutoProxyCreator() {
        DefaultAdvisorAutoProxyCreator proxyCreator = new DefaultAdvisorAutoProxyCreator();
        // 非接口使用 cglib, 防止额外的 aop 导致 @RequiresPermissions 注解失效
        proxyCreator.setProxyTargetClass(true);
        return proxyCreator;
    }

    @ConditionalOnMissingBean
    @Bean
    public PasswordService passwordService() {
        return new DefaultPasswordService();
    }

}
AbstractAuthenticationStrategy
/**
 * {@link org.apache.shiro.authc.pam.AuthenticationStrategy} implementation that throws the first exception it gets
 * and ignores all subsequent realms. If there is no exceptions it works as the {@link FirstSuccessfulStrategy}
 * <p>
 * WARN: This approach works fine as long as there is ONLY ONE Realm per Token type.
 */
public class FirstExceptionStrategy extends FirstSuccessfulStrategy {

    @Override
    public AuthenticationInfo afterAttempt(Realm realm, AuthenticationToken token, AuthenticationInfo singleRealmInfo, AuthenticationInfo aggregateInfo, Throwable t) throws AuthenticationException {
        if ((t instanceof AuthenticationException)) throw (AuthenticationException) t;
        return super.afterAttempt(realm, token, singleRealmInfo, aggregateInfo, t);
    }

}
认证
/**
 * AuthenticationToken —— 待认证 token
 */
public class UserAuthentication implements AuthenticationToken {
    private static final long serialVersionUID = 1L;

    private final Object principal;

    private Object credentials;

    /**
     * 验证码
     */
    private String captcha;

    private String uuid;

    private boolean refresh;

    /**
     * 需要进行认证
     */
    public UserAuthentication(Object principal, Object credentials) {
        this.principal = principal;
        this.credentials = credentials;
    }

    /**
     * 需要进行认证(附带验证码)
     */
    public UserAuthentication(Object principal, Object credentials, String captcha) {
        this.principal = principal;
        this.credentials = credentials;
        this.captcha = captcha;
    }

    /**
     * 需要进行认证(附带验证码)
     */
    public UserAuthentication(Object principal, Object credentials, String captcha, String uuid) {
        this.principal = principal;
        this.credentials = credentials;
        this.captcha = captcha;
        this.uuid = uuid;
    }

    /**
     * 以旧换新, 无须通过密码校验
     */
    public UserAuthentication(Object principal, boolean refresh) {
        this.principal = principal;
        this.refresh = refresh;
    }

    @Override
    public Object getPrincipal() {
        return principal;
    }

    @Override
    public Object getCredentials() {
        return credentials;
    }

    public String getCaptcha() {
        return captcha;
    }

    public String getUuid() {
        return uuid;
    }

}
filter
/**
 * 自定义 AuthenticatingFilter 认证过滤器
 * <p>
 * 登录认证
 */
@Slf4j
public class UserFilter extends AuthenticatingFilter {

    private SysUserTokenService sysUserTokenService;

    private Gson gson;

    /**
     * 返回待 AuthorizingRealm 认证的 AuthenticationToken, 参见 {@link UserAuthenticatingRealm#doGetAuthenticationInfo}
     */
    @Override
    protected AuthenticationToken createToken(ServletRequest request, ServletResponse response) throws Exception {
        HttpServletRequest req = (HttpServletRequest) request;
        ServletInputStream inputStream = req.getInputStream();
        InputStreamReader reader = new InputStreamReader(inputStream);
        JsonObject jsonObject = getGson().fromJson(reader, JsonObject.class);
        String principle = jsonObject.get(obtainUsernameParam()).getAsString();
        String credentials = jsonObject.get(obtainPasswordParam()).getAsString();
        String captcha = jsonObject.get(obtainCaptchaParam()).getAsString();
        String uuid = jsonObject.get(obtainUuidParam()).getAsString();
        return new UserAuthentication(principle, credentials, captcha, uuid);
    }

    /**
     * 判断是否是登录请求
     */
    @Override
    public String getLoginUrl() {
        return SecurityConstant.loginUrl;
    }

    /**
     * 放行非登录请求(如 logout)
     */
    @Override
    protected boolean isAccessAllowed(ServletRequest request, ServletResponse response, Object mappedValue) {
        return super.isAccessAllowed(request, response, mappedValue);
    }

    /**
     * 拦截登录请求 —> 执行
     */
    @Override
    protected boolean onAccessDenied(ServletRequest request, ServletResponse response) throws Exception {
        if (isLoginRequest(request, response)) {
            if (isLoginSubmission(request, response)) {
                super.executeLogin(request, response);
            } else {
                //可能是登录页,故不禁止访问
                return true;
            }
        }
        return false;
    }

    /**
     * 登录失败回调
     */
    @SuppressWarnings("Duplicates")
    @SneakyThrows
    @Override
    protected boolean onLoginFailure(AuthenticationToken token, AuthenticationException exp, ServletRequest request, ServletResponse response) {
        HttpServletResponse httpServletResponse = (HttpServletResponse) response;
        Map<String, Object> map = new HashMap<>();
        String errorMsg = "未知异常";
        int errorCode = 500;
        if (exp instanceof CaptchaInvalidException) {
            errorMsg = "验证码填写错误";
        } else if (exp instanceof UnknownAccountException) {
            errorMsg = "账号不存在";
        } else if (exp instanceof CredentialsException) {
            errorMsg = "密码错误";
        } else if (exp instanceof LockedAccountException) {
            errorMsg = "账号已锁定";
        } else {
            log.error("login fail {}", exp.getMessage());
        }
        map.put("code", errorCode);
        map.put("msg", errorMsg);
        map.put("success", false);
        httpServletResponse.setContentType("application/json");
        httpServletResponse.setStatus(HttpServletResponse.SC_OK);
        try {
            ObjectMapper mapper = new ObjectMapper();
            mapper.writeValue(httpServletResponse.getOutputStream(), map);
        } catch (Exception er) {
            throw new ServletException();
        }
        // 尝试重新登录
        return true;
    }

    /**
     * 登录成功回调
     */
    @SuppressWarnings("Duplicates")
    @Override
    protected boolean onLoginSuccess(AuthenticationToken token, Subject subject, ServletRequest request, ServletResponse response) throws Exception {
        HttpServletResponse httpServletResponse = (HttpServletResponse) response;
        SysUserEntity userEntity = (SysUserEntity) SecurityUtils.getSubject().getPrincipal();
        Result r = getSysUserTokenService().createToken(userEntity.getUserId());
        httpServletResponse.setContentType("application/json");
        httpServletResponse.setStatus(HttpServletResponse.SC_OK);
        try {
            ObjectMapper mapper = new ObjectMapper();
            mapper.writeValue(httpServletResponse.getOutputStream(), r);
        } catch (Exception e) {
            throw new ServletException();
        }
        return true;
    }

    protected String obtainUsernameParam() {
        return "username";
    }

    protected String obtainPasswordParam() {
        return "password";
    }

    protected String obtainCaptchaParam() {
        return "captcha";
    }

    protected String obtainUuidParam() {
        return "uuid";
    }

    protected boolean isLoginSubmission(ServletRequest request, ServletResponse response) {
        return (request instanceof HttpServletRequest) && WebUtils.toHttp(request).getMethod().equalsIgnoreCase(POST_METHOD);
    }

    public SysUserTokenService getSysUserTokenService() {
        Assert.notNull(this.sysUserTokenService, "sysUserTokenService is needed");
        return sysUserTokenService;
    }

    public void setSysUserTokenService(SysUserTokenService sysUserTokenService) {
        this.sysUserTokenService = sysUserTokenService;
    }

    public Gson getGson() {
        Assert.notNull(this.gson, "gson is needed");
        return gson;
    }

    public void setGson(Gson gson) {
        this.gson = gson;
    }

}
AuthenticatingRealm
/**
 * 用户登录认证
 */
public class UserAuthenticatingRealm extends AuthenticatingRealm {

    private ShiroService shiroService;

    private SysCaptchaService sysCaptchaService;

    public void setShiroService(ShiroService shiroService) {
        this.shiroService = shiroService;
    }

    public SysCaptchaService getSysCaptchaService() {
        Assert.notNull(this.sysCaptchaService, "getSysCaptchaService is needed");
        return sysCaptchaService;
    }

    public void setSysCaptchaService(SysCaptchaService sysCaptchaService) {
        this.sysCaptchaService = sysCaptchaService;
    }

    @Override
    public boolean supports(AuthenticationToken token) {
        return token instanceof UserAuthentication;
    }

    /**
     * 认证
     * <p>
     * 从数据库查询真实个人信息
     *
     * @see org.apache.shiro.realm.AuthenticatingRealm#getAuthenticationInfo
     * @see org.apache.shiro.realm.AuthenticatingRealm#assertCredentialsMatch
     */
    @Override
    protected AuthenticationInfo doGetAuthenticationInfo(AuthenticationToken authenticationToken) throws AuthenticationException {
        // 校验验证码
        UserAuthentication userAuthentication = (UserAuthentication) authenticationToken;
        String captcha = userAuthentication.getCaptcha();
        String uuid = userAuthentication.getUuid();
        boolean validated = getSysCaptchaService().validate(uuid, captcha);
        if (!validated) {
            throw new CaptchaInvalidException("验证码无效");
        }
        String username = (String) authenticationToken.getPrincipal();
        SysUserEntity user = shiroService.queryByUsername(username);
        if (user == null) {
            throw new UnknownAccountException("账号不存在");
        } else if (user.getStatus() == 0) {
            throw new LockedAccountException("账号已被锁定, 请联系管理员");
        }
        return new SimpleAuthenticationInfo(user, user.getPassword(), getName());
    }

}
AuthenticationException
public class CaptchaInvalidException extends AuthenticationException {
    public CaptchaInvalidException(String msg) {
        super(msg);
    }
}
鉴权与授权
/**
 * AuthenticationToken —— 待认证 token
 */
public class XxAuthenticationToken implements AuthenticationToken {
    private static final long serialVersionUID = 1L;
    private final String token;

    public XxAuthenticationToken(String token) {
        this.token = token;
    }

    @Override
    public Object getPrincipal() {
        return token;
    }

    @Override
    public Object getCredentials() {
        return token;
    }

    public String getToken() {
        return token;
    }
}
filter
@Slf4j
public class TokenFilter extends AuthenticatingFilter {

    protected static final String AUTHORIZATION_HEADER = "token";

    @Override
    protected AuthenticationToken createToken(ServletRequest request, ServletResponse response) throws Exception {
        String token = extractRequestToken(request);
        return new XxAuthenticationToken(token);
    }

    @Override
    protected boolean isAccessAllowed(ServletRequest request, ServletResponse response, Object mappedValue) {
        // super.isAccessAllowed 基于 session 级别放行,这里进行重写
        // or call org.apache.shiro.mgt.DefaultSessionStorageEvaluator.setSessionStorageEnabled to disable the session
        return false;
    }

    @Override
    protected boolean onAccessDenied(ServletRequest request, ServletResponse response) throws Exception {
        boolean loggedIn = false;
        if (isLoginRequest(request, response)) {
            loggedIn = executeLogin(request, response);
        }
        if (!loggedIn) {
            //认证失败,提示 token 无效
            Map<String, Object> map = new HashMap<>();
            String errorMsg = "invalid token";
            int errorCode = 500;
            map.put("code", errorCode);
            map.put("msg", errorMsg);
            map.put("success", false);
            HttpServletResponse httpResponse = WebUtils.toHttp(response);
            httpResponse.setContentType("application/json");
            httpResponse.setStatus(HttpServletResponse.SC_OK);
            try {
                ObjectMapper mapper = new ObjectMapper();
                mapper.writeValue(httpResponse.getOutputStream(), map);
            } catch (Exception er) {
                throw new ServletException();
            }
        }
        return loggedIn;
    }

    @Override
    protected final boolean isLoginRequest(ServletRequest request, ServletResponse response) {
        return StringUtils.isNotBlank(extractRequestToken(request));
    }

    private String extractRequestToken(ServletRequest request) {
        HttpServletRequest httpRequest = WebUtils.toHttp(request);
        String token = httpRequest.getHeader(AUTHORIZATION_HEADER);
        if (StringUtils.isBlank(token)) {
            token = httpRequest.getParameter(AUTHORIZATION_HEADER);
        }
        return token;
    }

}
realm
/**
 * 基于 token 的 鉴权与授权
 */
public class TokenAuthorizingRealm extends AuthorizingRealm {

    private ShiroService shiroService;

    public ShiroService getShiroService() {
        Assert.notNull(this.shiroService, "shiroService is needed");
        return shiroService;
    }

    public void setShiroService(ShiroService shiroService) {
        this.shiroService = shiroService;
    }

    @Override
    public boolean supports(AuthenticationToken token) {
        return token instanceof XxAuthenticationToken;
    }

    /**
     * 认证
     *
     * 从数据库查询真实个人信息
     *
     * @see org.apache.shiro.realm.AuthenticatingRealm#getAuthenticationInfo
     * @see org.apache.shiro.realm.AuthenticatingRealm#assertCredentialsMatch
     */
    @Override
    protected AuthenticationInfo doGetAuthenticationInfo(AuthenticationToken authenticationToken) throws AuthenticationException {
        String accessToken = (String) authenticationToken.getPrincipal();
        SysUserTokenEntity tokenEntity = shiroService.queryByToken(accessToken);
        if (tokenEntity == null || tokenEntity.getExpireTime().getTime() < System.currentTimeMillis()) {
            throw new IncorrectCredentialsException("token失效,请重新登录");
        }
        SysUserEntity user = shiroService.queryUser(tokenEntity.getUserId());
        if (user.getStatus() == 0) {
            throw new LockedAccountException("账号已被锁定,请联系管理员");
        }
        return new SimpleAuthenticationInfo(user, accessToken, getName());
    }

    /**
     * 授权
     *
     * 从数据库获取权限信息
     *
     * @see org.apache.shiro.realm.AuthorizingRealm#isPermitted
     */
    @Override
    protected AuthorizationInfo doGetAuthorizationInfo(PrincipalCollection principals) {
        SysUserEntity user = (SysUserEntity) principals.getPrimaryPrincipal();
        Long userId = user.getUserId();
        //用户权限列表
        Set<String> permsSet = getShiroService().getUserPermissions(userId);
        SimpleAuthorizationInfo info = new SimpleAuthorizationInfo();
        info.setStringPermissions(permsSet);
        return info;
    }

}
Spring Security
spring security 配置文件
@EnableWebSecurity
@AllArgsConstructor
@EnableGlobalMethodSecurity(prePostEnabled = true, securedEnabled = true)
public class SecurityConf extends WebSecurityConfigurerAdapter {

    private TokenAuthenticationConfig tokenAuthenticationConfig;

    private CorsFilter corsFilter;

    private IPermissionService permissionService;

    @Override
    protected void configure(HttpSecurity http) throws Exception {
        ExpressionUrlAuthorizationConfigurer<HttpSecurity>.ExpressionInterceptUrlRegistry registry = http.csrf().disable()

                .addFilterBefore(corsFilter, UsernamePasswordAuthenticationFilter.class)
                .exceptionHandling()
                .authenticationEntryPoint(new Http401UnAuthEntryPoint())
                .accessDeniedHandler(new XxAccessDeniedHandler())

                .and()
                .headers()
                .frameOptions()
                .disable()

                // create no session
                .and()
                .sessionManagement()
                .sessionCreationPolicy(SessionCreationPolicy.STATELESS)

                .and()

                .authorizeRequests()
                .antMatchers("/doc.htm**", "/service-worker.js",
                        "/v2/api-docs", "/configuration/ui", "/swagger-resources/**", "/v2/api-docs-ext",
                        "/configuration/security", "/swagger-ui.html", "/webjars/**",
                        "/favicon.ico", "/static/**",
                        "/acc/**", "/third/**", "/public/**"
                ).permitAll();

        registry.antMatchers("/actuator/**")
                .hasRole("ADMIN");

        plusPermissions(registry);

        registry
                .anyRequest()
                .authenticated()
                .and()
                .apply(tokenAuthenticationConfig);
    }

    @Bean
    @Override
    public AuthenticationManager authenticationManagerBean() throws Exception {
        return super.authenticationManagerBean();
    }

    private void plusPermissions(ExpressionUrlAuthorizationConfigurer<HttpSecurity>.ExpressionInterceptUrlRegistry registry) {
        List<Permission> permissions = permissionService.list();
        if (CollectionUtil.isNotEmpty(permissions)) {
            permissions.forEach(permission -> {
                String urls = permission.getUrls();
                if (StringUtil.isNotBlank(urls)) {
                    String[] urlArr = urls.split(",");
                    String curPerm = "PERMISSION_" + permission.getCode();
                    String access = String.format("hasRole(''%s'') or hasAuthority(''%s'')", RoleName.ADMIN.getName(), curPerm);
                    if (urlArr.length > 0) {
                        registry.antMatchers(urlArr)
                                .access(access);
                    }
                }
            });
        }
    }
}
认证
public class TokenAuthentication extends AbstractAuthenticationToken {

    private static final long serialVersionUID = SpringSecurityCoreVersion.SERIAL_VERSION_UID;

    private final Object principal;

    private Object credentials;

    /**
     * 认证前
     */
    public TokenAuthentication(Object principal, Object credentials) {
        super(null);
        this.principal = principal;
        this.credentials = credentials;
        setAuthenticated(false);
    }

    /**
     * 认证后
     */
    public TokenAuthentication(Object principal, Object credentials,
                                               Collection<? extends GrantedAuthority> authorities) {
        super(authorities);
        this.principal = principal;
        this.credentials = credentials;
        super.setAuthenticated(true); // must use super, as we override
    }

    @Override
    public Object getCredentials() {
        return this.credentials;
    }

    @Override
    public Object getPrincipal() {
        return this.principal;
    }

    @Override
    public void eraseCredentials() {
        super.eraseCredentials();
        credentials = null;
    }

    @Override
    public void setAuthenticated(boolean isAuthenticated) throws IllegalArgumentException {
        if (isAuthenticated) {
            throw new IllegalArgumentException(
                    "Cannot set this token to trusted - use constructor which takes a GrantedAuthority list instead");
        }

        super.setAuthenticated(false);
    }
}
filter
/**
 * doFilter 负责预鉴权(验证码,安全码是否一致)
 * attemptAuthentication 负责提取 token
 */
@Slf4j
public class TokenAuthenticationFilter extends AbstractAuthenticationProcessingFilter {

    private TokenService tokenService;

    public TokenAuthenticationFilter() {
        super(new AntPathRequestMatcher(SecurityConstant.LOGIN_URL, "POST"));
    }

    public void setTokenService(TokenService tokenService) {
        this.tokenService = tokenService;
    }

    public TokenService getTokenService() {
        Assert.notNull(this.tokenService, "tokenService is needed");
        return this.tokenService;
    }

    /**
     * 鉴权
     * - 路由规则匹配
     * - 验证码校验(短信验证码或阿里云人机校验)
     */
    @Override
    public void doFilter(ServletRequest request, ServletResponse response, FilterChain chain) throws IOException, ServletException {
        HttpServletRequest req = (HttpServletRequest) request;
        HttpServletResponse res = (HttpServletResponse) response;
        // 判断是否是登录请求 LOGIN_URL
        if (!requiresAuthentication(req, res)) {
            chain.doFilter(request, response);
            return;
        }
        try {
            // 校验参数与验证码
            getTokenService().checkParams(req, res);
        } catch (AuthenticationException error) {
            unsuccessfulAuthentication(req, res,  error);
            return;
        }
        super.doFilter(req, res, chain);
    }

    /**
     * 返回一个待 Provider 认证的 token(TokenAuthentication)
     */
    @Override
    public Authentication attemptAuthentication(HttpServletRequest request, HttpServletResponse response) throws AuthenticationException, IOException, ServletException {
        // 拦截非 POST 请求
        if (!request.getMethod().equals(HttpMethod.POST.name())) {
            throw new AuthenticationServiceException(
                    "Authentication method not supported: " + request.getMethod());
        }
        TokenAuthentication tokenAuthentication = new TokenAuthentication(obtainUsername(request), obtainPassword(request));
        return this.getAuthenticationManager().authenticate(tokenAuthentication);
    }

    @Nullable
    protected String obtainUsername(HttpServletRequest request) {
        return request.getParameter("username");
    }

    @Nullable
    protected String obtainPassword(HttpServletRequest request) {
        return request.getParameter("password");
    }

}
provider
/**
 * 认证, 返回已认证的 token(Authentication)
 */
public class TokenAuthenticationProvider implements AuthenticationProvider {

    protected final Log logger = LogFactory.getLog(getClass());

    private UserDetailsService userDetailsService;

    private PasswordEncoder passwordEncoder;

    private BlackTool blackTool;

    private static final String USER_NOT_FOUND_PASSWORD = "userNotFoundPassword";

    private volatile String userNotFoundEncodedPassword;

    private UserDetailsChecker preAuthenticationChecks = new TokenAuthenticationProvider.DefaultPreAuthenticationChecks();

    private UserCache userCache = new NullUserCache();

    public void setUserDetailsService(UserDetailsService userDetailsService) {
        this.userDetailsService = userDetailsService;
    }

    public void setPasswordEncoder(PasswordEncoder passwordEncoder) {
        this.passwordEncoder = passwordEncoder;
    }

    public void setBlackTool(BlackTool blackTool) {
        this.blackTool = blackTool;
    }

    public UserDetailsService getUserDetailsService() {
        Assert.notNull(this.userDetailsService, "userDetailsService could not be null");
        return userDetailsService;
    }

    public PasswordEncoder getPasswordEncoder() {
        Assert.notNull(this.passwordEncoder, "passwordEncoder could not be null");
        return passwordEncoder;
    }

    public BlackTool getBlackTool() {
        Assert.notNull(this.blackTool, "blackTool could not be null");
        return blackTool;
    }

    /**
     * i18n 字符串
     */
    protected MessageSourceAccessor messages = SpringSecurityMessageSource.getAccessor();

    @Override
    public Authentication authenticate(Authentication authentication) throws AuthenticationException {
        // 校验 token 的 class 类型
        Assert.isInstanceOf(TokenAuthentication.class, authentication,
                messages.getMessage(
                        "SocialAuthenticationProvider.onlySupports",
                        "Only SocialAuthenticationToken is supported"));

        // 通过 username 提取用户信息
        String username = (authentication.getPrincipal() == null) ? "NONE_PROVIDED"
                : authentication.getName();

        //检查是否在黑名单中
        checkBlackList(username);

        // 从缓存中获取用户信息
        boolean cacheWasUsed = true;
        UserDetails user = this.userCache.getUserFromCache(username);

        // 缓存中没有,则从数据库中获取用户信息
        if (user == null) {
            cacheWasUsed = false;
            try {
                user = this.retrieveUser(username, (TokenAuthentication) authentication);
            } catch (UsernameNotFoundException notFound) {
                logger.debug("User username ''" + username + "'' not found");
                throw notFound;
            }

            Assert.notNull(user,
                    "retrieveUser returned null - a violation of the interface contract");
        }

        //检查信息是否匹配有效
        try {
            preAuthenticationChecks.check(user);
            // password check
            checkPassword(user, (TokenAuthentication) authentication);
        } catch (AuthenticationException exception) {
            //重新再试一下
            if (cacheWasUsed) {
                // There was a problem, so try again after checking
                // we''re using latest data (i.e. not from the cache)
                cacheWasUsed = false;
                user = retrieveUser(username,
                        (TokenAuthentication) authentication);
                preAuthenticationChecks.check(user);
                checkPassword(user,
                        (TokenAuthentication) authentication);
            } else {
                throw exception;
            }
        }

        // 加入缓存
        if (!cacheWasUsed) {
            this.userCache.putUserInCache(user);
        }
        TokenAuthentication authenticationToken = new TokenAuthentication(user, null, user.getAuthorities());
        authenticationToken.setDetails(user);
        return authenticationToken;
    }

    /**
     * 过滤该 provider 支持认证的 authentication
     */
    @Override
    public boolean supports(Class<?> authentication) {
        return TokenAuthentication.class.isAssignableFrom(authentication);
    }

    private class DefaultPreAuthenticationChecks implements UserDetailsChecker {
        public void check(UserDetails user) {
            if (!user.isAccountNonLocked()) {
                logger.debug("User account is locked");

                throw new LockedException(messages.getMessage(
                        "AbstractUserDetailsAuthenticationProvider.locked",
                        "User account is locked"));
            }

            if (!user.isEnabled()) {
                logger.debug("User account is disabled");

                throw new DisabledException(messages.getMessage(
                        "AbstractUserDetailsAuthenticationProvider.disabled",
                        "User is disabled"));
            }

            if (!user.isAccountNonExpired()) {
                logger.debug("User account is expired");

                throw new AccountExpiredException(messages.getMessage(
                        "AbstractUserDetailsAuthenticationProvider.expired",
                        "User account has expired"));
            }
        }
    }

    public void checkBlackList(String blackKey) {
        if (getBlackTool().existInBlackList(blackKey)) {
            // 在黑名单中,拒绝访问
            throw new AuthFrequentFailException("您已连续5次密码输入错误,请15分钟后再试");
        }
    }
    /**
     * 连续多次输入错误,直接禁止登录
     */
    public void checkPassword(UserDetails userDetails,
                              TokenAuthentication authentication) throws AuthenticationException {
        if (authentication.getCredentials() == null) {
            logger.debug("Authentication failed: no credentials provided");
            throw new BadCredentialsException(messages.getMessage(
                    "AbstractUserDetailsAuthenticationProvider.badCredentials",
                    "Bad credentials"));
        }

        String blackKey = authentication.getPrincipal().toString();

        String presentedPassword = authentication.getCredentials().toString();

        if (!getPasswordEncoder().matches(presentedPassword, userDetails.getPassword())) {
            logger.debug("Authentication failed: password does not match stored value");
            // 黑名单计数
            getBlackTool().incr(blackKey);
            throw new BadCredentialsException(messages.getMessage(
                    "AbstractUserDetailsAuthenticationProvider.badCredentials",
                    "Bad credentials"));
        }
        // 黑名单重置
        getBlackTool().reset(blackKey);
    }

    protected final UserDetails retrieveUser(String username,
                                             TokenAuthentication authentication)
            throws AuthenticationException {
        prepareTimingAttackProtection();
        try {
            UserDetails loadedUser = this.getUserDetailsService().loadUserByUsername(username);
            if (loadedUser == null) {
                throw new InternalAuthenticationServiceException(
                        "UserDetailsService returned null, which is an interface contract violation");
            }
            return loadedUser;
        } catch (UsernameNotFoundException ex) {
            mitigateAgainstTimingAttack(authentication);
            throw ex;
        } catch (InternalAuthenticationServiceException ex) {
            throw ex;
        } catch (Exception ex) {
            throw new InternalAuthenticationServiceException(ex.getMessage(), ex);
        }
    }

    private void prepareTimingAttackProtection() {
        if (this.userNotFoundEncodedPassword == null) {
            this.userNotFoundEncodedPassword = this.passwordEncoder.encode(USER_NOT_FOUND_PASSWORD);
        }
    }

    private void mitigateAgainstTimingAttack(TokenAuthentication authentication) {
        if (authentication.getCredentials() != null) {
            String presentedPassword = authentication.getCredentials().toString();
            this.passwordEncoder.matches(presentedPassword, this.userNotFoundEncodedPassword);
        }
    }
}
TokenAuthenticationConfig
@Component
@AllArgsConstructor
public class TokenAuthenticationConfig extends SecurityConfigurerAdapter<DefaultSecurityFilterChain, HttpSecurity> {

    private TokenService tokenService;

    private PasswordEncoder passwordEncoder;

    private UserDetailsService userDetailsService;

    private BlackTool blackTool;

    @Override
    public void configure(HttpSecurity http) {
        // check filter
        TokenCheckFilter checkFilter = new TokenCheckFilter(tokenService);

        // handler
        TokenFailHandler failHandler = new TokenFailHandler();
        TokenSuccessHandler successHandler = new TokenSuccessHandler(tokenService);

        // authentication filter
        TokenAuthenticationFilter tokenFilter = new TokenAuthenticationFilter();
        tokenFilter.setTokenService(tokenService);
        tokenFilter.setAuthenticationManager(http.getSharedObject(AuthenticationManager.class));
        tokenFilter.setAuthenticationSuccessHandler(successHandler);
        tokenFilter.setAuthenticationFailureHandler(failHandler);

        // provider
        TokenAuthenticationProvider tokenProvider = new TokenAuthenticationProvider();
        tokenProvider.setPasswordEncoder(passwordEncoder);
        tokenProvider.setUserDetailsService(userDetailsService);
        tokenProvider.setBlackTool(blackTool);

        http.authenticationProvider(tokenProvider)
                .addFilterBefore(checkFilter, UsernamePasswordAuthenticationFilter.class)
                .addFilterAfter(tokenFilter, UsernamePasswordAuthenticationFilter.class);
    }
}
401
public class Http401UnAuthEntryPoint implements AuthenticationEntryPoint {

    @Override
    public void commence(HttpServletRequest request,
                         HttpServletResponse response,
                         AuthenticationException authException) throws IOException {
        // This is invoked when user tries to access a secured REST resource without supplying any credentials
        // We should just send a 401 Unauthorized response because there is no ''login page'' to redirect to
        // Here you can place any message you want
        response.sendError(HttpServletResponse.SC_UNAUTHORIZED, authException.getMessage());
    }
}
403
@Slf4j
public class XxAccessDeniedHandler implements AccessDeniedHandler {

    @Override
    public void handle(HttpServletRequest httpServletRequest, HttpServletResponse httpServletResponse, AccessDeniedException e) throws IOException, ServletException {
        String requestURI = httpServletRequest.getRequestURI();
        log.error("access {} wad denied.", requestURI, e);
        httpServletResponse.setStatus(HttpServletResponse.SC_FORBIDDEN);
        httpServletResponse.getWriter().write("access denied");
    }
}
fail handler
@Slf4j
public class TokenFailHandler implements AuthenticationFailureHandler {

    @Override
    public void onAuthenticationFailure(HttpServletRequest httpServletRequest, HttpServletResponse httpServletResponse, AuthenticationException exp) throws IOException, ServletException {
        Map<String, Object> map = new HashMap<>();
        String errorMsg = "未知异常";
        int errorCode = 400;
        if (exp instanceof UsernameNotFoundException) {
            errorMsg = "账号不存在";
        } else if (exp instanceof BadCredentialsException) {
            errorMsg = "账号或密码错误";
            errorCode = 401;
        } else if (exp instanceof AuthParamFormatException) {
            errorMsg = exp.getMessage();
        } else if (exp instanceof AuthEmptyException) {
            errorMsg = exp.getMessage();
        } else if (exp instanceof AuthFrequentFailException) {
            errorMsg = exp.getMessage();
            errorCode = 403;
        }  else if(exp instanceof AuthAfsFailException) {
            errorMsg = exp.getMessage();
            errorCode = AfsConstant.FAIL_CODE;
        } else if (exp instanceof DisabledException) {
            errorMsg = "账号已被禁用";
        } else if (exp instanceof AccountExpiredException) {
            errorMsg = "账号过期";
        } else if (exp instanceof LockedException) {
            errorMsg = "该账号已被锁定";
        } else if (exp instanceof InsufficientAuthenticationException) {
            errorMsg = "验证失败";
        } else{
            log.error("auth error", exp);
        }
        map.put("code", errorCode);
        map.put("msg", errorMsg);
        map.put("success", false);
        httpServletResponse.setContentType("application/json");
        httpServletResponse.setStatus(HttpServletResponse.SC_OK);
        try {
            ObjectMapper mapper = new ObjectMapper();
            mapper.writeValue(httpServletResponse.getOutputStream(), map);
        } catch (Exception er) {
            throw new ServletException();
        }
    }
}
success handler
public class TokenSuccessHandler  implements AuthenticationSuccessHandler {

    private TokenService tokenService;

    public TokenSuccessHandler(TokenService tokenService) {
        this.tokenService = tokenService;
    }

    @Override
    public void onAuthenticationSuccess(HttpServletRequest httpServletRequest, HttpServletResponse httpServletResponse, Authentication authentication) throws IOException, ServletException {
        Map<String, Object> map = new HashMap<>();
        map.put("code", 200);
        map.put("success", true);
        map.put("msg", "成功");
        XxRequestToken xxRequestToken = tokenService.generateToken(authentication);
        map.put("data", xxRequestToken);
        httpServletResponse.setContentType("application/json");
        httpServletResponse.setStatus(HttpServletResponse.SC_OK);
        try {
            XxUserDetails userDetails = SecurityUtil.getUserDetails(authentication);
            if (userDetails != null) {
                String ipAddr = IPUtil.getIpAddr(httpServletRequest);
                SpringUtil.publishEvent(new LoginOkEvent(new LoginInfo(userDetails.getId(), ipAddr)));
            }
            ObjectMapper mapper = new ObjectMapper();
            mapper.writeValue(httpServletResponse.getOutputStream(), map);
        } catch (Exception e) {
            throw new ServletException();
        }
    }

}
鉴权与授权
/**
 * 校验 token
 */
@Slf4j
public class TokenCheckFilter extends GenericFilterBean {
    private static final String AUTHORIZATION_HEADER = "Authorization";

    private TokenService tokenService;

    public TokenCheckFilter(TokenService tokenService) {
        this.tokenService = tokenService;
    }

    @Override
    public void doFilter(ServletRequest servletRequest, ServletResponse servletResponse, FilterChain filterChain) throws IOException, ServletException {
        HttpServletRequest req = (HttpServletRequest) servletRequest;
        HttpServletResponse res = (HttpServletResponse) servletResponse;
        String tokenKey = resolveToken(req);
        String requestURI = req.getRequestURI();
        boolean hasAuth = false;
        if (StringUtils.hasText(tokenKey) && tokenService.validateToken(tokenKey)) {
            Authentication authentication = tokenService.getAuthentication(tokenKey);
            if (authentication != null) {
                //authentication 中的 principle 可以转换为 XxUserDetails,供 SecurityUtil 提取权限信息
                SecurityContextHolder.getContext().setAuthentication(authentication);
                hasAuth = true;
            }
        }
        if (requestURI.startsWith(SecurityConstant.LOGOUT_URL)) {
            logout(hasAuth, tokenKey, res);
            return;
        }
        filterChain.doFilter(servletRequest, servletResponse);
    }

    private String resolveToken(HttpServletRequest request) {
        String bearerToken = request.getHeader(AUTHORIZATION_HEADER);
        if (StringUtils.hasText(bearerToken) && bearerToken.startsWith("Bearer ")) {
            return bearerToken.substring(7);
        }
        return null;
    }

    private void logout(boolean isAuthenticated, String tokenKey, HttpServletResponse response) throws ServletException {
        Map<String, Object> map = new HashMap<>();
        if (isAuthenticated && tokenService.offline(tokenKey)) {
            map.put("code", 200);
            map.put("success", true);
            map.put("msg", "注销成功");
        } else {
            map.put("code", 400);
            map.put("success", false);
            map.put("msg", "注销失败/已注销");
        }
        response.setContentType("application/json");
        response.setStatus(HttpServletResponse.SC_OK);
        try {
            ObjectMapper mapper = new ObjectMapper();
            mapper.writeValue(response.getOutputStream(), map);
        } catch (Exception e) {
            throw new ServletException();
        }
    }

}

4. Spring Boot 中 Spring Security 自定义用户认证
自定义认证过程
自定义认证的过程需要实现 Spring Security 提供的 UserDetailService 接口,该接口只有一个抽象方法 loadUserByUsername,源码如下:
public interface UserDetailsService {
    UserDetails loadUserByUsername(String username) throws UsernameNotFoundException;
}
loadUserByUsername 方法返回一个 UserDetail 对象,该对象也是一个接口,包含一些用于描述用户信息的方法,源码如下:
public interface UserDetails extends Serializable {

    Collection<? extends GrantedAuthority> getAuthorities();

    String getPassword();

    String getUsername();

    boolean isAccountNonExpired();

    boolean isAccountNonLocked();

    boolean isCredentialsNonExpired();

    boolean isEnabled();
}
这些方法的含义如下:
-
getAuthorities获取用户包含的权限,返回权限集合,权限是一个继承了GrantedAuthority的对象; -
getPassword和getUsername用于获取密码和用户名; -
isAccountNonExpired方法返回 boolean 类型,用于判断账户是否未过期,未过期返回 true 反之返回 false; -
isAccountNonLocked方法用于判断账户是否未锁定; -
isCredentialsNonExpired用于判断用户凭证是否没过期,即密码是否未过期; -
isEnabled方法用于判断用户是否可用。
实际中我们可以自定义 UserDetails 接口的实现类,也可以直接使用 Spring Security 提供的 UserDetails 接口实现类 org.springframework.security.core.userdetails.User。
说了那么多,下面我们来开始实现 UserDetailService 接口的 loadUserByUsername 方法。
首先创建一个 MyUser 对象,用于存放模拟的用户数据(实际中一般从数据库获取,这里为了方便直接模拟):
public class MyUser implements Serializable {
    private static final long serialVersionUID = 3497935890426858541L;

    private String userName;

    private String password;

    private boolean accountNonExpired = true;

    private boolean accountNonLocked= true;

    private boolean credentialsNonExpired= true;

    private boolean enabled= true;

    // get,set略
}
接着创建 MyUserDetailService 实现 UserDetailService:
@Configuration
public class UserDetailService implements UserDetailsService {

    @Autowired
    private PasswordEncoder passwordEncoder;

    @Override
    public UserDetails loadUserByUsername(String username) throws UsernameNotFoundException {
        // 模拟一个用户,替代数据库获取逻辑
        MyUser user = new MyUser();
        user.setUserName(username);
        user.setPassword(this.passwordEncoder.encode("123456"));
        // 输出加密后的密码
        System.out.println(user.getPassword());

        return new User(username, user.getPassword(), user.isEnabled(),
                user.isAccountNonExpired(), user.isCredentialsNonExpired(),
                user.isAccountNonLocked(), AuthorityUtils.commaSeparatedStringToAuthorityList("admin"));
    }
}
这里我们使用了 org.springframework.security.core.userdetails.User 类包含 7 个参数的构造器,其还包含一个三个参数的构造器 User(String username, String password,Collection<? extends GrantedAuthority> authorities),由于权限参数不能为空,所以这里先使用 AuthorityUtils.commaSeparatedStringToAuthorityList 方法模拟一个 admin 的权限,该方法可以将逗号分隔的字符串转换为权限集合。
此外我们还注入了 PasswordEncoder 对象,该对象用于密码加密,注入前需要手动配置。我们在 BrowserSecurityConfig 中配置它:
@Configuration
public class BrowserSecurityConfig extends WebSecurityConfigurerAdapter {

    @Bean
    public PasswordEncoder passwordEncoder() {
        return new BCryptPasswordEncoder();
    }
    ...
}
PasswordEncoder 是一个密码加密接口,而 BCryptPasswordEncoder 是 Spring Security 提供的一个实现方法,我们也可以自己实现 PasswordEncoder。不过 Spring Security 实现的 BCryptPasswordEncoder 已经足够强大,它对相同的密码进行加密后可以生成不同的结果。
这时候重启项目,访问 http://localhost:8080/login,便可以使用任意用户名以及 123456 作为密码登录系统。我们多次进行登录操作,可以看到控制台输出的加密后的密码如下:

可以看到,BCryptPasswordEncoder 对相同的密码生成的结果每次都是不一样的。
替换默认登录页
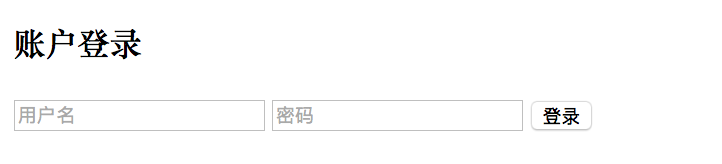
默认的登录页面过于简陋,我们可以自己定义一个登录页面。为了方便起见,我们直接在 src/main/resources/resources 目录下定义一个 login.html(不需要 Controller 跳转):
<!DOCTYPE html>
<html>
<head>
    <meta charset="UTF-8">
    <title>登录</title>
</head>
<body>
    <form class="login-page" action="/login" method="post">
        <div class="form">
            <h3>账户登录</h3>
            <input type="text" placeholder="用户名" name="username" required="required" />
            <input type="password" placeholder="密码" name="password" required="required" />
            <button type="submit">登录</button>
        </div>
    </form>
</body>
</html>
要怎么做才能让 Spring Security 跳转到我们自己定义的登录页面呢?很简单,只需要在 BrowserSecurityConfig 的 configure 中添加一些配置:
@Override
protected void configure(HttpSecurity http) throws Exception {
    http.formLogin() // 表单登录
            // http.httpBasic() // HTTP Basic
            .loginPage("/login.html")
            .loginProcessingUrl("/login")
            .and()
            .authorizeRequests() // 授权配置
            .antMatchers("/login.html").permitAll()
            .anyRequest()  // 所有请求
            .authenticated(); // 都需要认证
}上面代码中.loginPage("/login.html") 指定了跳转到登录页面的请求 URL,.loginProcessingUrl("/login") 对应登录页面 form 表单的 action="/login",.antMatchers("/login.html").permitAll() 表示跳转到登录页面的请求不被拦截,否则会进入无限循环。
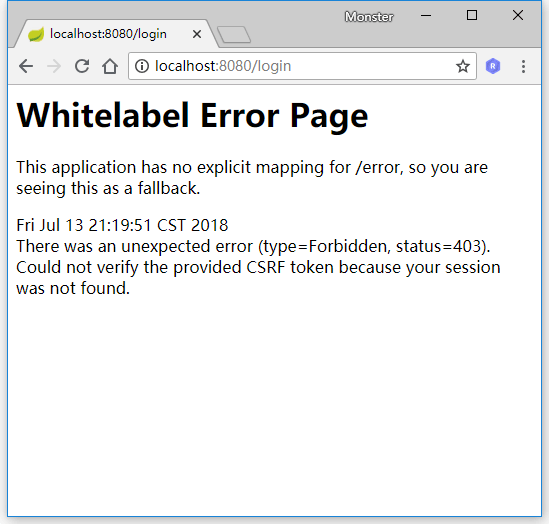
这时候启动系统,访问 http://localhost:8080/hello,会看到页面已经被重定向到了 http://localhost:8080/login.html:
输入用户名和密码发现页面报错:
我们先把 CSRF 攻击防御关了,修改 BrowserSecurityConfig 的 configure:
Override
protected void configure(HttpSecurity http) throws Exception {
    http.formLogin() // 表单登录
            // http.httpBasic() // HTTP Basic
            .loginPage("/login.html") // 登录跳转 URL
            .loginProcessingUrl("/login") // 处理表单登录 URL
            .and()
            .authorizeRequests() // 授权配置
            .antMatchers("/login.html").permitAll() // 登录跳转 URL 无需认证
            .anyRequest()  // 所有请求
            .authenticated() // 都需要认证
            .and().csrf().disable();
}
重启项目便可正常登录。
假如现在有这样一个需求:在未登录的情况下,当用户访问 html 资源的时候跳转到登录页,否则返回 JSON 格式数据,状态码为 401。
要实现这个功能我们将 loginPage 的 URL 改为 /authentication/require,并且在 antMatchers 方法中加入该 URL,让其免拦截:
@Override
protected void configure(HttpSecurity http) throws Exception {
    http.formLogin() // 表单登录
            // http.httpBasic() // HTTP Basic
            .loginPage("/authentication/require") // 登录跳转 URL
            .loginProcessingUrl("/login") // 处理表单登录 URL
            .and()
            .authorizeRequests() // 授权配置
            .antMatchers("/authentication/require", "/login.html").permitAll() // 登录跳转 URL 无需认证
            .anyRequest()  // 所有请求
            .authenticated() // 都需要认证
            .and().csrf().disable();
}
然后定义一个控制器 BrowserSecurityController,处理这个请求:
@RestController
public class BrowserSecurityController {
    private RequestCache requestCache = new HttpSessionRequestCache();
    private RedirectStrategy redirectStrategy = new DefaultRedirectStrategy();

    @GetMapping("/authentication/require")
    @ResponseStatus(HttpStatus.UNAUTHORIZED)
    public String requireAuthentication(HttpServletRequest request, HttpServletResponse response) throws IOException {
        SavedRequest savedRequest = requestCache.getRequest(request, response);
        if (savedRequest != null) {
            String targetUrl = savedRequest.getRedirectUrl();
            if (StringUtils.endsWithIgnoreCase(targetUrl, ".html")) {
                redirectStrategy.sendRedirect(request, response, "/login.html");
            }
        }
        return "访问的资源需要身份认证!";
    }
}
其中 HttpSessionRequestCache 为 Spring Security 提供的用于缓存请求的对象,通过调用它的 getRequest 方法可以获取到本次请求的 HTTP 信息。DefaultRedirectStrategy 的 sendRedirect 为 Spring Security 提供的用于处理重定向的方法。
上面代码获取了引发跳转的请求,根据请求是否以.html 为结尾来对应不同的处理方法。如果是以.html 结尾,那么重定向到登录页面,否则返回” 访问的资源需要身份认证!” 信息,并且 HTTP 状态码为 401(HttpStatus.UNAUTHORIZED)。
这样当我们访问 http://localhost:8080/hello 的时候页面便会跳转到 http://localhost:8080/authentication/require,并且输出” 访问的资源需要身份认证!”,当我们访问 http://localhost:8080/hello.html 的时候,页面将会跳转到登录页面。
处理成功和失败
Spring Security 有一套默认的处理登录成功和失败的方法:当用户登录成功时,页面会跳转会引发登录的请求,比如在未登录的情况下访问 http://localhost:8080/hello,页面会跳转到登录页,登录成功后再跳转回来;登录失败时则是跳转到 Spring Security 默认的错误提示页面。下面我们通过一些自定义配置来替换这套默认的处理机制。
自定义登录成功逻辑
要改变默认的处理成功逻辑很简单,只需要实现 org.springframework.security.web.authentication.AuthenticationSuccessHandler 接口的 onAuthenticationSuccess 方法即可:
@Component
public class MyAuthenticationSucessHandler implements AuthenticationSuccessHandler {
    @Autowired
    private ObjectMapper mapper;

    @Override
    public void onAuthenticationSuccess(HttpServletRequest request, HttpServletResponse response,
                                        Authentication authentication) throws IOException, ServletException {
        response.setContentType("application/json;charset=utf-8");
        response.getWriter().write(mapper.writeValueAsString(authentication));
    }
}
其中 Authentication 参数既包含了认证请求的一些信息,比如 IP,请求的 SessionId 等,也包含了用户信息,即前面提到的 User 对象。通过上面这个配置,用户登录成功后页面将打印出 Authentication 对象的信息。
要使这个配置生效,我们还的在 BrowserSecurityConfig 的 configure 中配置它:
@Configuration
public class BrowserSecurityConfig extends WebSecurityConfigurerAdapter {
    @Autowired
    private MyAuthenticationSucessHandler authenticationSucessHandler;

    @Bean
    public PasswordEncoder passwordEncoder() {
        return new BCryptPasswordEncoder();
    }

    @Override
    protected void configure(HttpSecurity http) throws Exception {
        http.formLogin() // 表单登录
                // http.httpBasic() // HTTP Basic
                .loginPage("/authentication/require") // 登录跳转 URL
                .loginProcessingUrl("/login") // 处理表单登录 URL
                .successHandler(authenticationSucessHandler) // 处理登录成功
                .and()
                .authorizeRequests() // 授权配置
                .antMatchers("/authentication/require", "/login.html").permitAll() // 登录跳转 URL 无需认证
                .anyRequest()  // 所有请求
                .authenticated() // 都需要认证
                .and().csrf().disable();
    }
}
我们将 MyAuthenticationSucessHandler 注入进来,并通过 successHandler 方法进行配置。
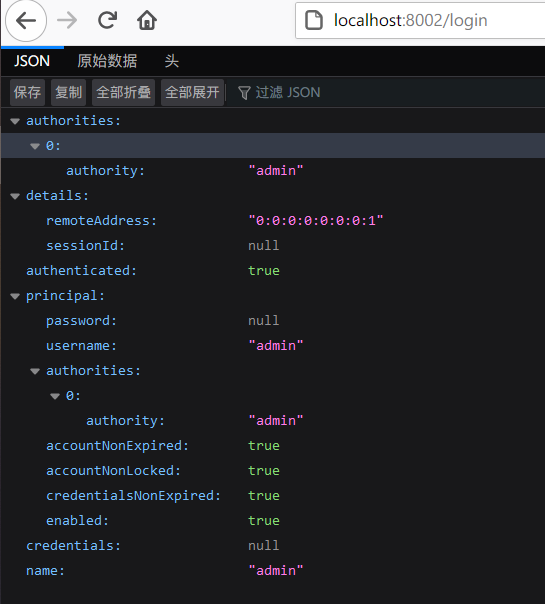
这时候重启项目登录后页面将会输出如下 JSON 信息:
{
	"authorities": [{
		"authority": "admin"
	}],
	"details": {
		"remoteAddress": "127.0.0.1",
		"sessionId": "2131709E2D8F89FEBC3DB7A62B76B243"
	},
	"authenticated": true,
	"principal": {
		"password": null,
		"username": "111",
		"authorities": [{
			"authority": "admin"
		}],
		"accountNonExpired": true,
		"accountNonLocked": true,
		"credentialsNonExpired": true,
		"enabled": true
	},
	"credentials": null,
	"name": "111"
}
像 password,credentials 这些敏感信息,Spring Security 已经将其屏蔽。
除此之外,我们也可以在登录成功后做页面的跳转,修改 MyAuthenticationSucessHandler:
@Component
public class MyAuthenticationSucessHandler implements AuthenticationSuccessHandler {
private RequestCache requestCache = new HttpSessionRequestCache();
private RedirectStrategy redirectStrategy = new DefaultRedirectStrategy();
@Override
public void onAuthenticationSuccess(HttpServletRequest request, HttpServletResponse response,
Authentication authentication) throws IOException {
SavedRequest savedRequest = requestCache.getRequest(request, response);
redirectStrategy.sendRedirect(request, response, savedRequest.getRedirectUrl());
}
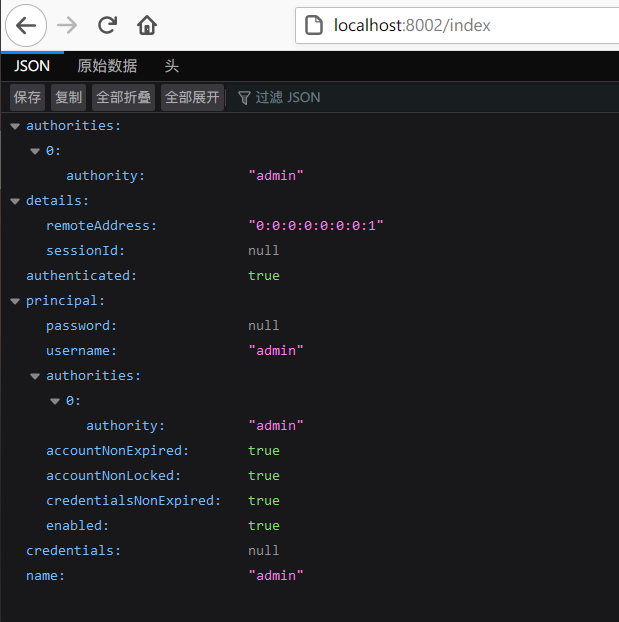
}通过上面配置,登录成功后页面将跳转回引发跳转的页面。如果想指定跳转的页面,比如跳转到 /index,可以将 savedRequest.getRedirectUrl() 修改为 /index:
@Component
public class MyAuthenticationSucessHandler implements AuthenticationSuccessHandler {
    private RedirectStrategy redirectStrategy = new DefaultRedirectStrategy();

    @Override
    public void onAuthenticationSuccess(HttpServletRequest request, HttpServletResponse response,
                                        Authentication authentication) throws IOException {
        redirectStrategy.sendRedirect(request, response, "/index");
    }
}
然后在 TestController 中定义一个处理该请求的方法:
@RestController
public class TestController {
    @GetMapping("index")
    public Object index(){
        return SecurityContextHolder.getContext().getAuthentication();
    }
}
登录成功后,便可以使用 SecurityContextHolder.getContext().getAuthentication() 获取到 Authentication 对象信息。除了通过这种方式获取 Authentication 对象信息外,也可以使用下面这种方式:
@RestController
public class TestController {
    @GetMapping("index")
    public Object index(Authentication authentication) {
        return authentication;
    }
}
重启项目,登录成功后,页面将跳转到 http://localhost:8080/index:

自定义登录失败逻辑
和自定义登录成功处理逻辑类似,自定义登录失败处理逻辑需要实现 org.springframework.security.web.authentication.AuthenticationFailureHandler 的 onAuthenticationFailure 方法:
@Component
public class MyAuthenticationFailureHandler implements AuthenticationFailureHandler {
@Override
public void onAuthenticationFailure(HttpServletRequest request, HttpServletResponse response,
AuthenticationException exception) throws IOException {
}
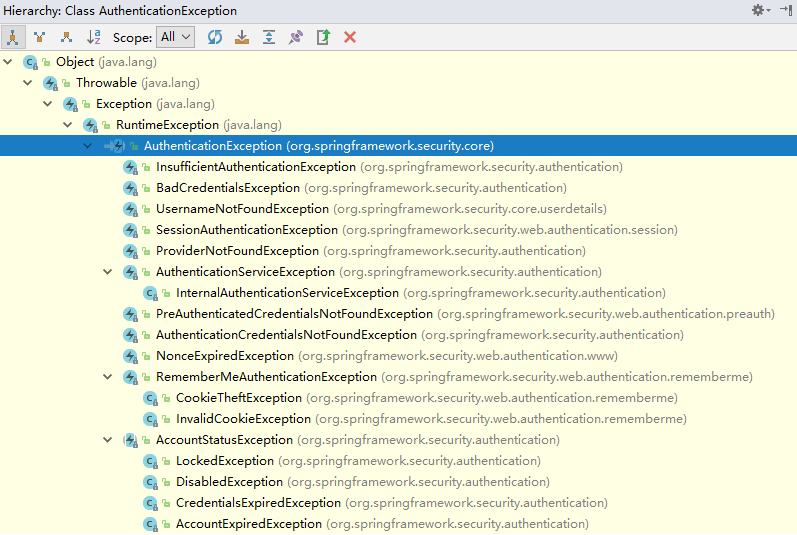
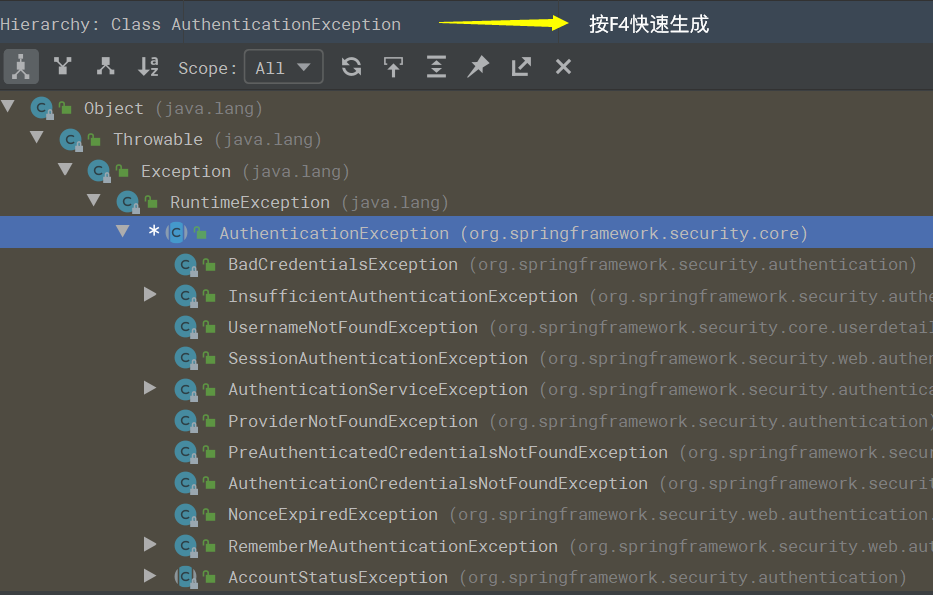
}onAuthenticationFailure 方法的 AuthenticationException 参数是一个抽象类,Spring Security 根据登录失败的原因封装了许多对应的实现类,查看 AuthenticationException 的 Hierarchy:
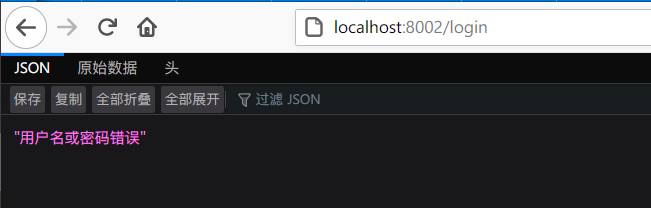
不同的失败原因对应不同的异常,比如用户名或密码错误对应的是 BadCredentialsException,用户不存在对应的是 UsernameNotFoundException,用户被锁定对应的是 LockedException 等。
假如我们需要在登录失败的时候返回失败信息,可以这样处理:
@Component
public class MyAuthenticationFailureHandler implements AuthenticationFailureHandler {

    @Autowired
    private ObjectMapper mapper;

    @Override
    public void onAuthenticationFailure(HttpServletRequest request, HttpServletResponse response,
                                        AuthenticationException exception) throws IOException {
        response.setStatus(HttpStatus.INTERNAL_SERVER_ERROR.value());
        response.setContentType("application/json;charset=utf-8");
        response.getWriter().write(mapper.writeValueAsString(exception.getMessage()));
    }
}
状态码定义为 500(HttpStatus.INTERNAL_SERVER_ERROR.value()),即系统内部异常。
同样的,我们需要在 BrowserSecurityConfig 的 configure 中配置它:
@Configuration
public class BrowserSecurityConfig extends WebSecurityConfigurerAdapter {
    @Autowired
    private MyAuthenticationSucessHandler authenticationSucessHandler;

    @Autowired
    private MyAuthenticationFailureHandler authenticationFailureHandler;

    @Override
    protected void configure(HttpSecurity http) throws Exception {
        http.formLogin() // 表单登录
                // http.httpBasic() // HTTP Basic
                .loginPage("/authentication/require") // 登录跳转 URL
                .loginProcessingUrl("/login") // 处理表单登录 URL
                .successHandler(authenticationSucessHandler) // 处理登录成功
                .failureHandler(authenticationFailureHandler) // 处理登录失败
                .and()
                .authorizeRequests() // 授权配置
                .antMatchers("/authentication/require", "/login.html").permitAll() // 登录跳转 URL 无需认证
                .anyRequest()  // 所有请求
                .authenticated() // 都需要认证
                .and().csrf().disable();
    }
}
重启项目,当输入错误的密码时,页面输出如下:

源码:https://gitee.com/hekang_admin/security-demo1.git

Spring Boot + Spring Security 实现自动登录功能
今日干货

公众号后台回复 ssm,免费获取松哥纯手敲的 SSM 框架学习干货。
自动登录是我们在软件开发时一个非常常见的功能,例如我们登录 QQ 邮箱:
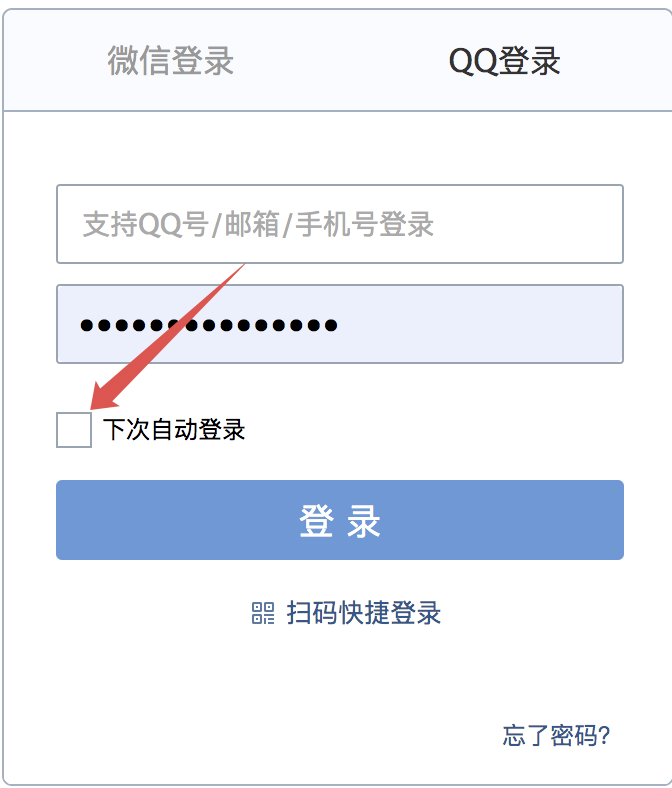
很多网站我们在登录的时候都会看到类似的选项,毕竟总让用户输入用户名密码是一件很麻烦的事。
自动登录功能就是,用户在登录成功后,在某一段时间内,如果用户关闭了浏览器并重新打开,或者服务器重启了,都不需要用户重新登录了,用户依然可以直接访问接口数据。
作为一个常见的功能,我们的 Spring Security 肯定也提供了相应的支持,本文我们就来看下 Spring Security 中如何实现这个功能。
本文是松哥最近在连载的 Spring Security 系列第 8 篇,阅读本系列前面的文章可以更好的理解本文(如果大家对松哥录制的 Spring Security 视频感兴趣,也可以看看这里:SpringBoot+Vue+微人事视频教程):
-
挖一个大坑,Spring Security 开搞! -
松哥手把手带你入门 Spring Security,别再问密码怎么解密了 -
手把手教你定制 Spring Security 中的表单登录 -
Spring Security 做前后端分离,咱就别做页面跳转了!统统 JSON 交互 -
Spring Security 中的授权操作原来这么简单 -
Spring Security 如何将用户数据存入数据库? -
Spring Security+Spring Data Jpa 强强联手,安全管理只有更简单!
这个功能实现起来简单,但是还是会涉及到很多细节,所以我会分两篇文章来逐一介绍,本文是第一篇。
1.实战代码
首先,要实现记住我这个功能,其实只需要其实只需要在 Spring Security 的配置中,添加如下代码即可:
@Override
protected void configure(HttpSecurity http) throws Exception {
    http.authorizeRequests()
            .anyRequest().authenticated()
            .and()
            .formLogin()
            .and()
            .rememberMe()
            .and()
            .csrf().disable();
}
大家看到,这里只需要添加一个 .rememberMe() 即可,自动登录功能就成功添加进来了。
接下来我们随意添加一个测试接口:
@RestController
public class HelloController {
    @GetMapping("/hello")
    public String hello() {
        return "hello";
    }
}
重启项目,我们访问 hello 接口,此时会自动跳转到登录页面:
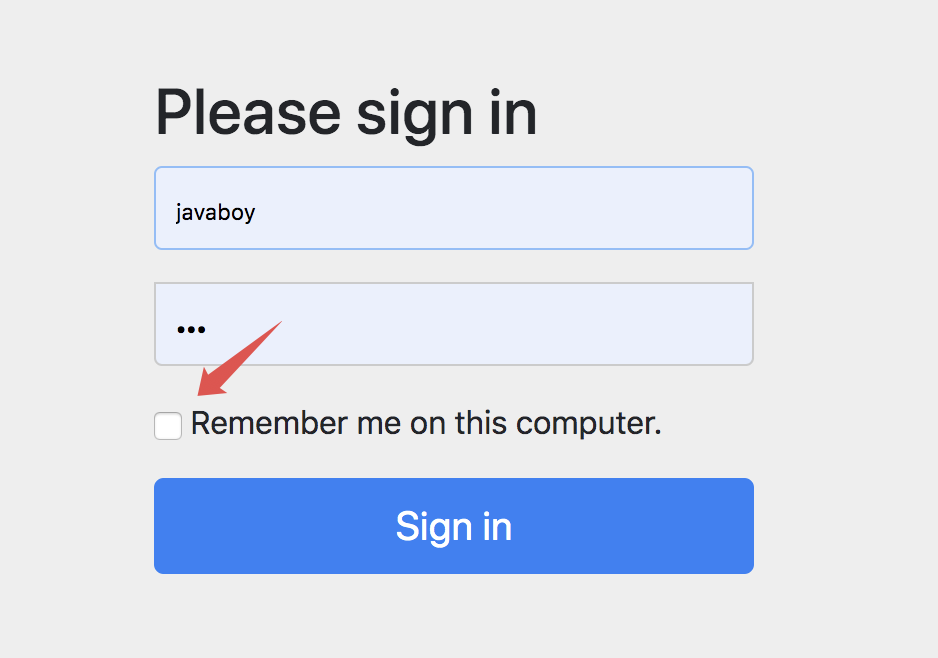
这个时候大家发现,默认的登录页面多了一个选项,就是记住我。我们输入用户名密码,并且勾选上记住我这个框,然后点击登录按钮执行登录操作:
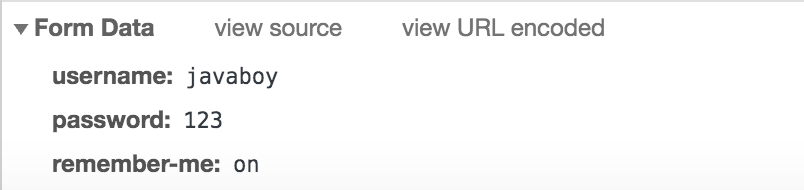
可以看到,登录数据中,除了 username 和 password 之外,还有一个 remember-me,之所以给大家看这个,是想告诉大家,如果你你需要自定义登录页面,RememberMe 这个选项的 key 该怎么写。
登录成功之后,就会自动跳转到 hello 接口了。我们注意,系统访问 hello 接口的时候,携带的 cookie:

大家注意到,这里多了一个 remember-me,这就是这里实现的核心,关于这个 remember-me 我一会解释,我们先来测试效果。
接下来,我们关闭浏览器,再重新打开浏览器。正常情况下,浏览器关闭再重新打开,如果需要再次访问 hello 接口,就需要我们重新登录了。但是此时,我们再去访问 hello 接口,发现不用重新登录了,直接就能访问到,这就说明我们的 RememberMe 配置生效了(即下次自动登录功能生效了)。
2.原理分析
按理说,浏览器关闭再重新打开,就要重新登录,现在竟然不用等了,那么这个功能到底是怎么实现的呢?
首先我们来分析一下 cookie 中多出来的这个 remember-me,这个值一看就是一个 Base64 转码后的字符串,我们可以使用网上的一些在线工具来解码,可以自己简单写两行代码来解码:
@Test
void contextLoads() throws UnsupportedEncodingException {
    String s = new String(Base64.getDecoder().decode("amF2YWJveToxNTg5MTA0MDU1MzczOjI1NzhmZmJjMjY0ODVjNTM0YTJlZjkyOWFjMmVmYzQ3"), "UTF-8");
    System.out.println("s = " + s);
}
执行这段代码,输出结果如下:
s = javaboy:1589104055373:2578ffbc26485c534a2ef929ac2efc47
可以看到,这段 Base64 字符串实际上用 : 隔开,分成了三部分:
-
第一段是用户名,这个无需质疑。 -
第二段看起来是一个时间戳,我们通过在线工具或者 Java 代码解析后发现,这是一个两周后的数据。 -
第三段我就不卖关子了,这是使用 MD5 散列函数算出来的值,他的明文格式是 username + ":" + tokenExpiryTime + ":" + password + ":" + key,最后的 key 是一个散列盐值,可以用来防治令牌被修改。
了解到 cookie 中 remember-me 的含义之后,那么我们对于记住我的登录流程也就很容易猜到了了。
在浏览器关闭后,并重新打开之后,用户再去访问 hello 接口,此时会携带着 cookie 中的 remember-me 到服务端,服务到拿到值之后,可以方便的计算出用户名和过期时间,再根据用户名查询到用户密码,然后通过 MD5 散列函数计算出散列值,再将计算出的散列值和浏览器传递来的散列值进行对比,就能确认这个令牌是否有效。
流程就是这么个流程,接下来我们通过分析源码来验证一下这个流程对不对。
3.源码分析
接下来,我们通过源码来验证一下我们上面说的对不对。
这里主要从两个方面来介绍,一个是 remember-me 这个令牌生成的过程,另一个则是它解析的过程。
3.1 生成
生成的核心处理方法在:TokenBasedRememberMeServices#onLoginSuccess:
@Override
public void onLoginSuccess(HttpServletRequest request, HttpServletResponse response,
  Authentication successfulAuthentication) {
 String username = retrieveUserName(successfulAuthentication);
 String password = retrievePassword(successfulAuthentication);
 if (!StringUtils.hasLength(password)) {
  UserDetails user = getUserDetailsService().loadUserByUsername(username);
  password = user.getPassword();
 }
 int tokenLifetime = calculateLoginLifetime(request, successfulAuthentication);
 long expiryTime = System.currentTimeMillis();
 expiryTime += 1000L * (tokenLifetime < 0 ? TWO_WEEKS_S : tokenLifetime);
 String signatureValue = makeTokenSignature(expiryTime, username, password);
 setCookie(new String[] { username, Long.toString(expiryTime), signatureValue },
   tokenLifetime, request, response);
}
protected String makeTokenSignature(long tokenExpiryTime, String username,
  String password) {
 String data = username + ":" + tokenExpiryTime + ":" + password + ":" + getKey();
 MessageDigest digest;
 digest = MessageDigest.getInstance("MD5");
 return new String(Hex.encode(digest.digest(data.getBytes())));
}
这段方法的逻辑其实很好理解:
-
首先从登录成功的 Authentication 中提取出用户名/密码。 -
由于登录成功之后,密码可能被擦除了,所以,如果一开始没有拿到密码,就再从 UserDetailsService 中重新加载用户并重新获取密码。 -
再接下来去获取令牌的有效期,令牌有效期默认就是两周。 -
再接下来调用 makeTokenSignature 方法去计算散列值,实际上就是根据 username、令牌有效期以及 password、key 一起计算一个散列值。如果我们没有自己去设置这个 key,默认是在 RememberMeConfigurer#getKey 方法中进行设置的,它的值是一个 UUID 字符串。 -
最后,将用户名、令牌有效期以及计算得到的散列值放入 Cookie 中。
关于第四点,我这里再说一下。
由于我们自己没有设置 key,key 默认值是一个 UUID 字符串,这样会带来一个问题,就是如果服务端重启,这个 key 会变,这样就导致之前派发出去的所有 remember-me 自动登录令牌失效,所以,我们可以指定这个 key。指定方式如下:
@Override
protected void configure(HttpSecurity http) throws Exception {
    http.authorizeRequests()
            .anyRequest().authenticated()
            .and()
            .formLogin()
            .and()
            .rememberMe()
            .key("javaboy")
            .and()
            .csrf().disable();
}
如果自己配置了 key,「即使服务端重启,即使浏览器打开再关闭」,也依然能够访问到 hello 接口。
这是 remember-me 令牌生成的过程。至于是如何走到 onLoginSuccess 方法的,大家可以参考松哥之前的文章:松哥手把手带你捋一遍 Spring Security 登录流程。这里可以给大家稍微提醒一下思路:
AbstractAuthenticationProcessingFilter#doFilter -> AbstractAuthenticationProcessingFilter#successfulAuthentication -> AbstractRememberMeServices#loginSuccess -> TokenBasedRememberMeServices#onLoginSuccess。
3.2 解析
那么当用户关掉并打开浏览器之后,重新访问 /hello 接口,此时的认证流程又是怎么样的呢?
我们之前说过,Spring Security 中的一系列功能都是通过一个过滤器链实现的,RememberMe 这个功能当然也不例外。
Spring Security 中提供了 RememberMeAuthenticationFilter 类专门用来做相关的事情,我们来看下 RememberMeAuthenticationFilter 的 doFilter 方法:
public void doFilter(ServletRequest req, ServletResponse res, FilterChain chain)
  throws IOException, ServletException {
 HttpServletRequest request = (HttpServletRequest) req;
 HttpServletResponse response = (HttpServletResponse) res;
 if (SecurityContextHolder.getContext().getAuthentication() == null) {
  Authentication rememberMeAuth = rememberMeServices.autoLogin(request,
    response);
  if (rememberMeAuth != null) {
    rememberMeAuth = authenticationManager.authenticate(rememberMeAuth);
    SecurityContextHolder.getContext().setAuthentication(rememberMeAuth);
    onSuccessfulAuthentication(request, response, rememberMeAuth);
    if (this.eventPublisher != null) {
     eventPublisher
       .publishEvent(new InteractiveAuthenticationSuccessEvent(
         SecurityContextHolder.getContext()
           .getAuthentication(), this.getClass()));
    }
    if (successHandler != null) {
     successHandler.onAuthenticationSuccess(request, response,
       rememberMeAuth);
     return;
    }
   }
  chain.doFilter(request, response);
 }
 else {
  chain.doFilter(request, response);
 }
}
可以看到,就是在这里实现的。
这个方法最关键的地方在于,如果从 SecurityContextHolder 中无法获取到当前登录用户实例,那么就调用 rememberMeServices.autoLogin 逻辑进行登录,我们来看下这个方法:
public final Authentication autoLogin(HttpServletRequest request,
  HttpServletResponse response) {
 String rememberMeCookie = extractRememberMeCookie(request);
 if (rememberMeCookie == null) {
  return null;
 }
 logger.debug("Remember-me cookie detected");
 if (rememberMeCookie.length() == 0) {
  logger.debug("Cookie was empty");
  cancelCookie(request, response);
  return null;
 }
 UserDetails user = null;
 try {
  String[] cookieTokens = decodeCookie(rememberMeCookie);
  user = processAutoLoginCookie(cookieTokens, request, response);
  userDetailsChecker.check(user);
  logger.debug("Remember-me cookie accepted");
  return createSuccessfulAuthentication(request, user);
 }
 catch (CookieTheftException cte) {

  throw cte;
 }
 cancelCookie(request, response);
 return null;
}
可以看到,这里就是提取出 cookie 信息,并对 cookie 信息进行解码,解码之后,再调用 processAutoLoginCookie 方法去做校验,processAutoLoginCookie 方法的代码我就不贴了,核心流程就是首先获取用户名和过期时间,再根据用户名查询到用户密码,然后通过 MD5 散列函数计算出散列值,再将拿到的散列值和浏览器传递来的散列值进行对比,就能确认这个令牌是否有效,进而确认登录是否有效。
好了,这里的流程我也根据大家大致上梳理了一下。
4.总结
看了上面的文章,大家可能已经发现,如果我们开启了 RememberMe 功能,最最核心的东西就是放在 cookie 中的令牌了,这个令牌突破了 session 的限制,即使服务器重启、即使浏览器关闭又重新打开,只要这个令牌没有过期,就能访问到数据。
一旦令牌丢失,别人就可以拿着这个令牌随意登录我们的系统了,这是一个非常危险的操作。
但是实际上这是一段悖论,为了提高用户体验(少登录),我们的系统不可避免的引出了一些安全问题,不过我们可以通过技术将安全风险降低到最小。
那么如何让我们的 RememberMe 功能更加安全呢?松哥下篇文章来和大家继续分享--持久化令牌方案。
小伙伴们要是觉得看懂了,不妨点个在看鼓励下松哥~
今日干货
公众号后台回复 2TB,免费获取 2TB Java 学习资料。
本文分享自微信公众号 - 江南一点雨(a_javaboy)。
如有侵权,请联系 support@oschina.cn 删除。
本文参与“OSC源创计划”,欢迎正在阅读的你也加入,一起分享。

Spring Boot + Spring Security自定义用户认证
- 引入依赖:
  <dependency>
            <groupId>org.springframework.boot</groupId>
            <artifactId>spring-boot-starter-web</artifactId>
        </dependency>

        <dependency>
            <groupId>org.springframework.boot</groupId>
            <artifactId>spring-boot-starter-security</artifactId>
        </dependency>
		 <dependency>
            <groupId>org.projectlombok</groupId>
            <artifactId>lombok</artifactId>
            <optional>true</optional>
        </dependency>
- 自定义认证过程 自定义认证的过程需要实现Spring Security提供的UserDetailService接口 ,源码如下:
public interface UserDetailsService {
    UserDetails loadUserByUsername(String username) throws UsernameNotFoundException;
}
loadUserByUsername方法返回一个UserDetail对象,该对象也是一个接口,包含一些用于描述用户信息的方法,源码如下:
public interface UserDetails extends Serializable {
	// 获取用户包含的权限,返回权限集合,权限是一个继承了GrantedAuthority的对象;
    Collection<? extends GrantedAuthority> getAuthorities();
	// 获取密码
    String getPassword();
  // 获取账号/用户名
    String getUsername();
	// 账户是否过期
    boolean isAccountNonExpired();
	//账户是否被锁定
    boolean isAccountNonLocked();
	//用户凭证是否过期
    boolean isCredentialsNonExpired();
	//用户是否可用
    boolean isEnabled();
}
- 创建实现自定义认证接口的类:
@Configuration
public class UserDetailService implements UserDetailsService {

    @Autowired
    private PasswordEncoder passwordEncoder;

    @Override
    public UserDetails loadUserByUsername(String username) throws UsernameNotFoundException {
        // 模拟一个用户,实际项目中应为: 根据用户名查找数据库,如果没有记录则会返回null,有则返回UserDetails对象
        MyUser user = new MyUser();
        user.setUserName(username);
        user.setPassword(this.passwordEncoder.encode("123456"));
        // 输出加密后的密码
        System.out.println(user.getPassword());
		// 返回对象之后 会在内部进行认证(密码/盐/加密过密码等)
        return new User(username, user.getPassword(), user.isEnabled(),
                user.isAccountNonExpired(), user.isCredentialsNonExpired(),
                user.isAccountNonLocked(), AuthorityUtils.commaSeparatedStringToAuthorityList("admin"));
    }
}
- 创建用户类
@Data
public class MyUser implements Serializable {
    private static final long serialVersionUID = 3497935890426858541L;

    private String userName;

    private String password;

    private boolean accountNonExpired = true;

    private boolean accountNonLocked= true;

    private boolean credentialsNonExpired= true;

    private boolean enabled= true;

}
- 配置类:
@Configuration
public class MySecurityConfig extends WebSecurityConfigurerAdapter {

    @Bean
    public PasswordEncoder passwordEncoder() {
        return new BCryptPasswordEncoder();
    }
    ...
}
注:PasswordEncoder是一个密码加密接口,而BCryptPasswordEncoder是Spring Security提供的一个实现方法,我们也可以自己实现PasswordEncoder。
    不过Spring Security实现的BCryptPasswordEncoder已经足够强大,它对相同的密码进行加密后可以生成不同的结果
启动项目:访问http://localhost:8080/login, 便可以使用任意用户名以及123456作为密码登录系统

BCryptPasswordEncoder对相同的密码生成的结果每次都是不一样的
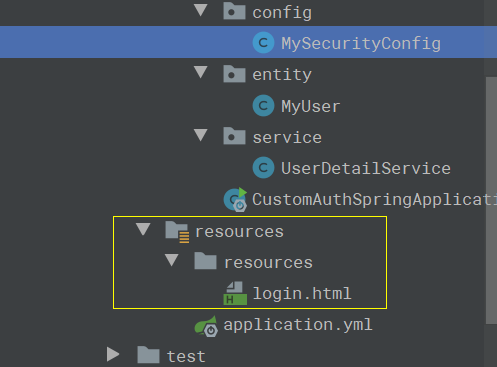
- 替换默认登录页 直接在src/main/resources/resources目录下定义一个login.html(不需要Controller跳转)
<!DOCTYPE html>
<html>
<head>
    <meta charset="UTF-8">
    <title>登录</title>
    <link rel="stylesheet" href="css/login.css" type="text/css">
</head>
<body>
    <formaction="/login" method="post">
        <div>
            <h3>账户登录</h3>
            <input type="text" placeholder="用户名" name="username" required="required" />
            <input type="password" placeholder="密码" name="password" required="required" />
            <button type="submit">登录</button>
        </div>
    </form>
</body>
</html>
在MySecurityConfig中添加:
@Override
protected void configure(HttpSecurity http) throws Exception {
    http.formLogin() // 表单登录
            // http.httpBasic() // HTTP Basic
            .loginPage("/login.html") //指定了跳转到登录页面的请求URL
            .loginProcessingUrl("/login") //对应登录页面form表单的action="/login"
            .and()
            .authorizeRequests() // 授权配置
			//.antMatchers("/login.html").permitAll()表示跳转到登录页面的请求不被拦截,否则会进入无限循环
            .antMatchers("/login.html").permitAll()
            .anyRequest()  // 所有请求
            .authenticated()// 都需要认证
			.and().csrf().disable(); // 关闭csrf防御
}
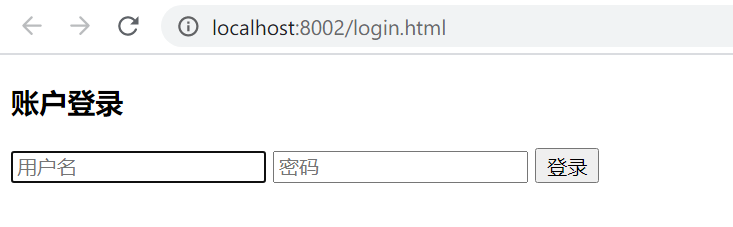
访问http://localhost:8080/hello ,会看到页面已经被重定向到了http://localhost:8080/login.html 使用任意用户名+密码123456登录
在未登录的情况下,当用户访问html资源的时候,如果已经登陆则返回JSON数据,否则直接跳转到登录页,状态码为401。
要实现这个功能我们将loginPage的URL改为/authentication/require,并且在antMatchers方法中加入该URL,让其免拦截:
@Override
protected void configure(HttpSecurity http) throws Exception {
    http.formLogin() // 表单登录
            // http.httpBasic() // HTTP Basic
            .loginPage("/authentication/require") // 登录跳转 URL
            .loginProcessingUrl("/login") // 处理表单登录 URL
            .and()
            .authorizeRequests() // 授权配置
            .antMatchers("/authentication/require", "/login.html").permitAll() // 登录跳转 URL 无需认证
            .anyRequest()  // 所有请求
            .authenticated() // 都需要认证
            .and().csrf().disable();
}
创建控制器MySecurityController,处理这个请求:
@RestController
public class MySecurityController {
	//RequestCache requestCache是Spring Security提供的用于缓存请求的对象
    private RequestCache requestCache = new HttpSessionRequestCache();
	//DefaultRedirectStrategy是Spring Security提供的重定向策略
    private RedirectStrategy redirectStrategy = new DefaultRedirectStrategy();

    @GetMapping("/authentication/require")
    @ResponseStatus(HttpStatus.UNAUTHORIZED)   //HttpStatus.UNAUTHORIZED 未认证 状态码401
    public String requireAuthentication(HttpServletRequest request, HttpServletResponse response) throws IOException {
				//getRequest方法可以获取到本次请求的HTTP信息
        SavedRequest savedRequest = requestCache.getRequest(request, response);
        if (savedRequest != null) {
            String targetUrl = savedRequest.getRedirectUrl();
            if (StringUtils.endsWithIgnoreCase(targetUrl, ".html"))
							//sendRedirect为Spring Security提供的用于处理重定向的方法
                redirectStrategy.sendRedirect(request, response, "/login.html");
        }
        return "访问的资源需要身份认证!";
    }
}
上面代码获取了引发跳转的请求,根据请求是否以.html为结尾来对应不同的处理方法。如果是以.html结尾,那么重定向到登录页面,否则返回”访问的资源需要身份认证!”信息,并且HTTP状态码为401(HttpStatus.UNAUTHORIZED)。
这样当我们访问http://localhost:8080/hello 的时候页面便会跳转到http://localhost:8080/authentication/require,
 ,
,
当我们访问http://localhost:8080/hello.html 的时候,页面将会跳转到登录页面。
- 处理成功和失败 Spring Security有一套默认的处理登录成功和失败的方法:当用户登录成功时,页面会跳转会引发登录的请求,比如在未登录的情况下访问http://localhost:8080/hello, 页面会跳转到登录页,登录成功后再跳转回来;登录失败时则是跳转到Spring Security默认的错误提示页面。下面 通过一些自定义配置来替换这套默认的处理机制。
自定义登录成功逻辑 要改变默认的处理成功逻辑很简单,只需要实现org.springframework.security.web.authentication.AuthenticationSuccessHandler接口的onAuthenticationSuccess方法即可:
@Component
public class MyAuthenticationSucessHandler implements AuthenticationSuccessHandler {
    @Autowired
    private ObjectMapper mapper;
    @Override
    public void onAuthenticationSuccess(HttpServletRequest request, HttpServletResponse response,
                                        Authentication authentication) throws IOException, ServletException {
        response.setContentType("application/json;charset=utf-8");
		// 将认证信息转换成jsonString写入response
        response.getWriter().write(mapper.writeValueAsString(authentication));
    }
}
其中Authentication参数既包含了认证请求的一些信息,比如IP,请求的SessionId等,也包含了用户信息,即前面提到的User对象。通过上面这个配置,用户登录成功后页面将打印出Authentication对象的信息。
要使这个配置生效,我们还在MySecurityConfig的configure中配置它:
@Configuration
public class MySecurityConfig extends WebSecurityConfigurerAdapter {
    @Autowired
    private MyAuthenticationSucessHandler authenticationSucessHandler;

    @Bean
    public PasswordEncoder passwordEncoder() {
        return new BCryptPasswordEncoder();
    }

    @Override
    protected void configure(HttpSecurity http) throws Exception {
        http.formLogin() // 表单登录
                // http.httpBasic() // HTTP Basic
                .loginPage("/authentication/require") // 登录跳转 URL
                .loginProcessingUrl("/login") // 处理表单登录 URL
                .successHandler(authenticationSucessHandler) // 处理登录成功
                .and()
                .authorizeRequests() // 授权配置
                .antMatchers("/authentication/require", "/login.html").permitAll() // 登录跳转 URL 无需认证
                .anyRequest()  // 所有请求
                .authenticated() // 都需要认证
                .and().csrf().disable();
    }
}
我们将MyAuthenticationSucessHandler注入进来,并通过successHandler方法进行配置。
这时候重启项目登录后页面将会输出如下JSON信息:
像password,credentials这些敏感信息,Spring Security已经将其屏蔽。
除此之外,我们也可以在登录成功后做页面的跳转,修改MyAuthenticationSucessHandler:
@Component
public class MyAuthenticationSucessHandler implements AuthenticationSuccessHandler {
    private RequestCache requestCache = new HttpSessionRequestCache();
    private RedirectStrategy redirectStrategy = new DefaultRedirectStrategy();

    @Override
    public void onAuthenticationSuccess(HttpServletRequest request, HttpServletResponse response,
                                        Authentication authentication) throws IOException {
        SavedRequest savedRequest = requestCache.getRequest(request, response);
        redirectStrategy.sendRedirect(request, response, savedRequest.getRedirectUrl());
    }
}
通过上面配置,登录成功后页面将跳转回引发跳转的页面。如果想指定跳转的页面,比如跳转到/index,可以将savedRequest.getRedirectUrl()修改为/index:
@Component
public class MyAuthenticationSucessHandler implements AuthenticationSuccessHandler {
    private RedirectStrategy redirectStrategy = new DefaultRedirectStrategy();

    @Override
    public void onAuthenticationSuccess(HttpServletRequest request, HttpServletResponse response,
                                        Authentication authentication) throws IOException {
        redirectStrategy.sendRedirect(request, response, "/index");
    }
}
在IndexController中定义一个处理该请求的方法:
@RestController
public class IndexController {
    @GetMapping("index")
    public Object index(){
        return SecurityContextHolder.getContext().getAuthentication();
    }
}
登录成功后,便可以使用SecurityContextHolder.getContext().getAuthentication()获取到Authentication对象信息。除了通过这种方式获取Authentication对象信息外,也可以使用下面这种方式:
@RestController
public class IndexController {
    @GetMapping("index")
    public Object index(Authentication authentication) {
        return authentication;
    }
}
重启项目,登录成功后,页面将跳转到http://localhost:8080/index:
- 自定义登录失败逻辑 和自定义登录成功处理逻辑类似,自定义登录失败处理逻辑需要实现org.springframework.security.web.authentication.AuthenticationFailureHandler的onAuthenticationFailure方法:
@Component
public class MyAuthenticationFailureHandler implements AuthenticationFailureHandler {
    @Override
    public void onAuthenticationFailure(HttpServletRequest request, HttpServletResponse response,
                                        AuthenticationException exception) throws IOException {
    }
}
onAuthenticationFailure方法的AuthenticationException参数是一个抽象类,Spring Security根据登录失败的原因封装了许多对应的实现类,
不同的失败原因对应不同的异常,比如用户名或密码错误对应的是BadCredentialsException,用户不存在对应的是UsernameNotFoundException,用户被锁定对应的是LockedException等。
假如我们需要在登录失败的时候返回失败信息,可以这样处理:
@Component
public class MyAuthenticationFailureHandler implements AuthenticationFailureHandler {

    @Autowired
    private ObjectMapper mapper;

    @Override
    public void onAuthenticationFailure(HttpServletRequest request, HttpServletResponse response,
                                        AuthenticationException exception) throws IOException {
        response.setStatus(HttpStatus.INTERNAL_SERVER_ERROR.value());
        response.setContentType("application/json;charset=utf-8");
        response.getWriter().write(mapper.writeValueAsString(exception.getMessage()));
    }
}
状态码定义为500(HttpStatus.INTERNAL_SERVER_ERROR.value()),即系统内部异常。
同样的,我们需要在BrowserSecurityConfig的configure中配置它:
@Configuration
public class BrowserSecurityConfig extends WebSecurityConfigurerAdapter {
    @Autowired
    private MyAuthenticationSucessHandler authenticationSucessHandler;

    @Autowired
    private MyAuthenticationFailureHandler authenticationFailureHandler;

    @Override
    protected void configure(HttpSecurity http) throws Exception {
        http.formLogin() // 表单登录
                // http.httpBasic() // HTTP Basic
                .loginPage("/authentication/require") // 登录跳转 URL
                .loginProcessingUrl("/login") // 处理表单登录 URL
                .successHandler(authenticationSucessHandler) // 处理登录成功
                .failureHandler(authenticationFailureHandler) // 处理登录失败
                .and()
                .authorizeRequests() // 授权配置
                .antMatchers("/authentication/require", "/login.html").permitAll() // 登录跳转 URL 无需认证
                .anyRequest()  // 所有请求
                .authenticated() // 都需要认证
                .and().csrf().disable();
    }
}
重启项目之后,使用错误的密码登录 图示如下:
本博文代码均经过测试,可以正常运行!
源码地址: https://github.com/ttdys/springboot/tree/master/springboot_security/02_custom_authentication
")
Spring Boot 整合 Spring Security + JWT(实现无状态登录)
学习在 Spring Boot 中整合 Spring Security 和 JWT ,实现无状态登录,可做为前后端分离时的解决方案,技术上没问题,但实际上还是推荐使用 OAuth2 中的 password 模式。
1 登录概述
1.1 有状态登录
有状态服务,即服务端需要记录每次会话的客户端信息,从而识别客户端身份,根据用户身份进行请求的处理,如 Tomcat 中的 Session 。例如:用户登录后,我们把用户的信息保存在服务端 session 中,并且给用户一个 cookie 值,记录对应的 session ,然后下次请求,用户携带 cookie 值来(这一步由浏览器自动完成),我们就能识别到对应 session ,从而找到用户的信息。这种方式目前来看最方便,但是也有一些缺陷,如下:
- 服务端保存大量数据,增加服务端压力。
- 服务端保存用户状态,不支持集群化部署。
1.2 无状态登录
微服务集群中的每个服务,对外提供的都使用 RESTful 风格的接口。而 RESTful 风格的一个最重要的规范就是:服务的无状态性,即:
- 服务端不保存任何客户端请求者信息。
- 客户端的每次请求必须具备自描述信息,通过这些信息识别客户端身份。
优势:
- 客户端请求不依赖服务端的信息,多次请求不需要必须访问到同一台服务器。
- 服务端的集群和状态对客户端透明。
- 服务端可以任意的迁移和伸缩(可以方便的进行集群化部署)。
- 减小服务端存储压力。
1.3 无状态登录的流程
无状态登录的流程:
- 首先客户端发送账户名/密码到服务端进行认证。
- 认证通过后,服务端将用户信息加密并且编码成一个 token ,返回给客户端。
- 以后客户端每次发送请求,都需要携带认证的 token 。
- 服务端对客户端发送来的 token 进行解密,判断是否有效,并且获取用户登录信息。
2 JWT 概述
2.1 JWT 简介
JWT (Json Web Token),是一种 JSON 风格的轻量级的授权和身份认证规范,可实现无状态、分布式的 Web 应用授权。官网:https://jwt.io/

JWT 作为一种规范,并没有和某一种语言绑定在一起,常用的 Java 实现是 GitHub 上的开源项目 jjwt ,地址如下:https://github.com/jwtk/jjwt
2.2 JWT 数据格式
JWT 包含三部分数据:
-
Header:头部,通常头部有两部分信息:- 声明类型,这里是 JWT 。
- 加密算法,自定义。
我们会对头部进行 Base64 编码(可解码),得到第一部分数据。
-
Payload:载荷,就是有效数据,在官方文档中(RFC7519),这里给了 7 个示例信息:- iss (issuer):表示签发人。
- exp (expiration time):表示token过期时间。
- sub (subject):主题。
- aud (audience):受众。
- nbf (Not Before):生效时间。
- iat (Issued At):签发时间。
- jti (JWT ID):编号。
这部分也会采用 Base64 编码,得到第二部分数据。
-
Signature:签名,是整个数据的认证信息。一般根据前两步的数据,再加上服务端的密钥 secret (密钥保存在服务端,不能泄露给客户端),通过 Header 中配置的加密算法生成,用于验证整个数据的完整性和可靠性。
比如,生成的数据格式:
eyJhbGciOiJIUzUxMiJ9.eyJhdXRob3JpdGllcyI6IlJPTEVfdXNlciwiLCJzdWIiOiJ1c2VyIiwiZXhwIjoxNTc0NzczNTkyfQ.FuPIltzXi5j14t_gSL1GoIMUZxTHKK0FvB3gds6eTZFDkQr1ZxWVxdqZ5YFbCxdkwQ_VXtPK-GgcW5Kzzx3wvw
注意,这里的数据通过 . 隔开成了三部分,分别对应前面提到的三部分:
- Header :头部(声明类型、加密算法),采用 Base64 编码,如:
eyJhbGciOiJIUzUxMiJ9。 - Payload :载荷,就是有效数据,采用 Base64 编码,如:
eyJhdXRob3JpdGllcyI6IlJPTEVfdXNlciwiLCJzdWIiOiJ1c2VyIiwiZXhwIjoxNTc0NzczNTkyfQ - Signature :签名,如:
FuPIltzXi5j14t_gSL1GoIMUZxTHKK0FvB3gds6eTZFDkQr1ZxWVxdqZ5YFbCxdkwQ_VXtPK-GgcW5Kzzx3wvw。
2.3 JWT 交互流程
- 应用程序或客户端向授权服务器请求授权。
- 获取到授权后,授权服务器会向应用程序返回访问令牌。
- 应用程序使用访问令牌来访问受保护资源(如 API )。
因为 JWT 签发的 token 中已经包含了用户的身份信息,并且每次请求都会携带,这样服务端就无需保存用户信息,甚至无需去数据库查询,这样就完全符合了 RESTful 的无状态规范。
2.4 JWT 问题
说了这么多, JWT 也不是天衣无缝,由客户端维护登录状态带来的一些问题在这里依然存在,如下:
- 续签问题,这是被很多人诟病的问题之一,传统的 cookie + session 的方案天然的支持续签,但是 JWT 由于服务端不保存用户状态,因此很难完美解决续签问题,如果引入 Redis ,虽然可以解决问题,但是 JWT 也变得不伦不类了。
- 注销问题,由于服务端不再保存用户信息,所以一般可以通过修改 secret 来实现注销,服务端 secret 修改后,已经颁发的未过期的 token 就会认证失败,进而实现注销,不过毕竟没有传统的注销方便。
- 密码重置,密码重置后,原本的 token 依然可以访问系统,这时候也需要强制修改 secret 。
- 基于第 2 点和第 3 点,一般建议不同用户取不同 secret 。
3 实战
3.1 创建工程
创建 Spring Boot 项目 spring-boot-springsecurity-jwt ,添加 Web/Spring Security 依赖,如下:

之后手动在 pom 文件中添加 jjwt 依赖,最终的依赖如下:
<dependencies>
    <dependency>
        <groupId>org.springframework.boot</groupId>
        <artifactId>spring-boot-starter-security</artifactId>
    </dependency>
    <dependency>
        <groupId>org.springframework.boot</groupId>
        <artifactId>spring-boot-starter-web</artifactId>
    </dependency>
    <dependency>
        <groupId>io.jsonwebtoken</groupId>
        <artifactId>jjwt</artifactId>
        <version>0.9.1</version>
    </dependency>
    <dependency>
        <groupId>org.springframework.boot</groupId>
        <artifactId>spring-boot-starter-test</artifactId>
        <scope>test</scope>
        <exclusions>
            <exclusion>
                <groupId>org.junit.vintage</groupId>
                <artifactId>junit-vintage-engine</artifactId>
            </exclusion>
        </exclusions>
    </dependency>
    <dependency>
        <groupId>org.springframework.security</groupId>
        <artifactId>spring-security-test</artifactId>
        <scope>test</scope>
    </dependency>
</dependencies>
3.2 创建接口
新建实体类 User 实现 UserDetails 接口,如下:
public class User implements UserDetails {
    private String username;
    private String password;
    private List<GrantedAuthority> authorities;

    @Override
    public Collection<? extends GrantedAuthority> getAuthorities() {
        return authorities;
    }

    @Override
    public String getPassword() {
        return password;
    }

    @Override
    public String getUsername() {
        return username;
    }

    @Override
    public boolean isAccountNonExpired() {
        return true;
    }

    @Override
    public boolean isAccountNonLocked() {
        return true;
    }

    @Override
    public boolean isCredentialsNonExpired() {
        return true;
    }

    @Override
    public boolean isEnabled() {
        return true;
    }

    public void setUsername(String username) {
        this.username = username;
    }

    public void setPassword(String password) {
        this.password = password;
    }

    public void setAuthorities(List<GrantedAuthority> authorities) {
        this.authorities = authorities;
    }
}
新建 HelloController ,如下:
@RestController
public class HelloController {
    @GetMapping("/hello")
    public String hello() {
        return "hello";
    }

    @GetMapping("/admin/hello")
    public String admin() {
        return "hello admin";
    }

    @GetMapping("/user/hello")
    public String user() {
        return "hello user";
    }
}
3.3 配置过滤器
这里主要配置两个过滤器:
- 用户登录的过滤器
// 过滤器1:用户登录的过滤器,在用户的登录的过滤器中校验用户是否登录成功,
// 如果登录成功,则生成一个 token 返回给客户端,登录失败则给前端一个登录失败的提示
public class JwtLoginFilter extends AbstractAuthenticationProcessingFilter {

    public JwtLoginFilter(String defaultFilterProcessesUrl, AuthenticationManager authenticationManager) {
        super(new AntPathRequestMatcher(defaultFilterProcessesUrl));
        setAuthenticationManager(authenticationManager);
    }

    @Override
    public Authentication attemptAuthentication(HttpServletRequest req, HttpServletResponse httpServletResponse) throws AuthenticationException, IOException {
        // 这里只支持 JSON 的登录方式
        // 如果想表单方式也支持,可参考 spring-boot-springsecurity-loginbyjson 中的 MyAuthenticationFilter
        // 获取输入参数,如 {"username":"user","password":"123456"}
        User user = new ObjectMapper().readValue(req.getInputStream(), User.class);
        // 进行登录校验,如果校验成功,会到 successfulAuthentication 的回调中,否则到 unsuccessfulAuthentication 的回调中
        return getAuthenticationManager().authenticate(new UsernamePasswordAuthenticationToken(user.getUsername(), user.getPassword()));
    }

    @Override
    protected void successfulAuthentication(HttpServletRequest request, HttpServletResponse resp, FilterChain chain, Authentication authResult) throws IOException, ServletException {
        // 获取登录用户的角色
        Collection<? extends GrantedAuthority> authorities = authResult.getAuthorities();
        StringBuffer sb = new StringBuffer();
        for (GrantedAuthority authority : authorities) {
            sb.append(authority.getAuthority()).append(",");
        }

        // 生成 token 并返回
        // 数据格式:分 3 部分用 . 隔开,如:eyJhbGciOiJIUzUxMiJ9.eyJhdXRob3JpdGllcyI6IlJPTEVfdXNlciwiLCJzdWIiOiJ1c2VyIiwiZXhwIjoxNTc0NzczNTkyfQ.FuPIltzXi5j14t_gSL1GoIMUZxTHKK0FvB3gds6eTZFDkQr1ZxWVxdqZ5YFbCxdkwQ_VXtPK-GgcW5Kzzx3wvw
        // 1.Header:头部(声明类型、加密算法),采用 Base64 编码,如:eyJhbGciOiJIUzUxMiJ9
        // 2.Payload:载荷,就是有效数据,采用 Base64 编码,如:eyJhdXRob3JpdGllcyI6IlJPTEVfdXNlciwiLCJzdWIiOiJ1c2VyIiwiZXhwIjoxNTc0NzczNTkyfQ
        // 3.Signature:签名,是整个数据的认证信息。一般根据前两步的数据,再加上服务的的密钥 secret (密钥保存在服务端,不能泄露给客户端),通过 Header 中配置的加密算法生成。用于验证整个数据完整和可靠性。
        String jwt = Jwts.builder()
                .claim("authorities", sb) // 配置用户角色
                .setSubject(authResult.getName()) // 配置主题
                .setExpiration(new Date(System.currentTimeMillis() + 60 * 60 * 1000)) // 配置过期时间
                .signWith(SignatureAlgorithm.HS512, "abc@123") // 配置加密算法和密钥
                .compact();
        resp.setContentType("application/json;charset=utf-8");
        Map<String, String> map = new HashMap<>();
        map.put("token", jwt);
        map.put("msg", "登录成功");
        PrintWriter out = resp.getWriter();
        out.write(new ObjectMapper().writeValueAsString(map));
        out.flush();
        out.close();
    }

    @Override
    protected void unsuccessfulAuthentication(HttpServletRequest req, HttpServletResponse resp, AuthenticationException failed) throws IOException, ServletException {
        resp.setContentType("application/json;charset=utf-8");
        Map<String, String> map = new HashMap<>();
        map.put("msg", "登录失败");
        PrintWriter out = resp.getWriter();
        out.write(new ObjectMapper().writeValueAsString(map));
        out.flush();
        out.close();
    }
}
- 校验 token 的过滤器
// 过滤器2:当其他请求发送来,校验 token 的过滤器,如果校验成功,就让请求继续执行
// 请求时注意认证方式选择 Bearer Token
public class JwtFilter extends GenericFilterBean {
    @Override
    public void doFilter(ServletRequest servletRequest, ServletResponse servletResponse, FilterChain filterChain) throws IOException, ServletException {
        HttpServletRequest req = (HttpServletRequest) servletRequest;
        // 获取 token ,注意获取方式要跟前台传的方式保持一致
        // 这里请求时注意认证方式选择 Bearer Token,会用 header 传递
        String jwtToken = req.getHeader("authorization");
        // 注意 "abc@123" 要与生成 token 时的保持一致
        Jws<Claims> jws = Jwts.parser().setSigningKey("abc@123")
                .parseClaimsJws(jwtToken.replace("Bearer", ""));
        Claims claims = jws.getBody();
        // 获取用户名
        String username = claims.getSubject();
        // 获取用户角色,注意 "authorities" 要与生成 token 时的保持一致
        List<GrantedAuthority> authorities = AuthorityUtils.commaSeparatedStringToAuthorityList((String) claims.get("authorities"));
        UsernamePasswordAuthenticationToken token = new UsernamePasswordAuthenticationToken(username, null, authorities);
        SecurityContextHolder.getContext().setAuthentication(token);
        filterChain.doFilter(servletRequest, servletResponse);
    }
}
3.4 配置 Spring Security
新增 SecurityConfig 配置类,如下:
@Configuration
public class SecurityConfig extends WebSecurityConfigurerAdapter {
    @Bean
    PasswordEncoder passwordEncoder() {
        // return NoOpPasswordEncoder.getInstance();// 密码不加密
        return new BCryptPasswordEncoder();// 密码加密
    }

    @Override
    protected void configure(AuthenticationManagerBuilder auth) throws Exception {
        // 在内存中配置2个用户
        /*auth.inMemoryAuthentication()
                .withUser("admin").password("123456").roles("admin")
                .and()
                .withUser("user").password("123456").roles("user");// 密码不加密*/

        auth.inMemoryAuthentication()
                .withUser("admin").password("$2a$10$fB2UU8iJmXsjpdk6T6hGMup8uNcJnOGwo2.QGR.e3qjIsdPYaS4LO").roles("admin")
                .and()
                .withUser("user").password("$2a$10$3TQ2HO/Xz1bVHw5nlfYTBON2TDJsQ0FMDwAS81uh7D.i9ax5DR46q").roles("user");// 密码加密
    }

    @Override
    protected void configure(HttpSecurity http) throws Exception {
        http.authorizeRequests()
                .antMatchers("/admin/**").hasRole("admin")
                .antMatchers("/user/**").access("hasAnyRole(''user'',''admin'')")
                .antMatchers(HttpMethod.POST, "/login").permitAll()
                .anyRequest().authenticated()
                .and()
                .addFilterBefore(new JwtLoginFilter("/login", authenticationManager()), UsernamePasswordAuthenticationFilter.class)
                .addFilterBefore(new JwtFilter(), UsernamePasswordAuthenticationFilter.class)
                .csrf().disable();
    }
}
3.5 测试
项目启动之后,用 Postman 完成测试。

取出 token 的第 1 部分, Base64 解码得到 Header ,如下:

取出 token 的第 2 部分, Base64 解码得到 Payload ,如下:

因为 Base64 是一种编码方案,并不是加密方案,因此不建议将用户的敏感信息放在 token 中。
最后拿着上述 token 访问 /user/hello ,可正常访问。注意:认证方式 Authorization 选择 Bearer Token 。
- Spring Boot 教程合集(微信左下方阅读全文可直达)。
- Spring Boot 教程合集示例代码:https://github.com/cxy35/spring-boot-samples
- 本文示例代码:https://github.com/cxy35/spring-boot-samples/tree/master/spring-boot-security/spring-boot-springsecurity-jwt
扫码关注微信公众号 程序员35 ,获取最新技术干货,畅聊 #程序员的35,35的程序员# 。独立站点:https://cxy35.com

今天关于spring boot 基于 shiro /spring security 实现自定义登录和spring security 自定义登录页面的分享就到这里,希望大家有所收获,若想了解更多关于4. Spring Boot 中 Spring Security 自定义用户认证、Spring Boot + Spring Security 实现自动登录功能、Spring Boot + Spring Security自定义用户认证、Spring Boot 整合 Spring Security + JWT(实现无状态登录)等相关知识,可以在本站进行查询。
本文标签:


![[转帖]Ubuntu 安装 Wine方法(ubuntu如何安装wine)](https://www.gvkun.com/zb_users/cache/thumbs/4c83df0e2303284d68480d1b1378581d-180-120-1.jpg)

