在这篇文章中,我们将带领您了解[android]手机卫士接收打电话广播显示号码归属地的全貌,包括来电播报归属地的相关情况。同时,我们还将为您介绍有关android之访问WebService显示手机号码
在这篇文章中,我们将带领您了解[android] 手机卫士接收打电话广播显示号码归属地的全貌,包括来电播报归属地的相关情况。同时,我们还将为您介绍有关android 之访问WebService显示手机号码归属地、Android 基础-2.0 拔打电话号码、android 手机号码归属地查询 代码、Android 简单几步实现手机号码归属地查询,可监听文本框的变化自动查询的知识,以帮助您更好地理解这个主题。
本文目录一览:- [android] 手机卫士接收打电话广播显示号码归属地(来电播报归属地)
- android 之访问WebService显示手机号码归属地
- Android 基础-2.0 拔打电话号码
- android 手机号码归属地查询 代码
- Android 简单几步实现手机号码归属地查询,可监听文本框的变化自动查询
![[android] 手机卫士接收打电话广播显示号码归属地(来电播报归属地)](http://www.gvkun.com/zb_users/upload/2025/02/9b2cb7d5-6739-40b0-9260-d377e41eb85e1740556982472.jpg "[android] 手机卫士接收打电话广播显示号码归属地(来电播报归属地)")
[android] 手机卫士接收打电话广播显示号码归属地(来电播报归属地)
使用广播接收者接收打电话的意图,显示号码归属地
新建一个类OutCallReceiver继承系统的broadcastReceiver
重写onReceive()方法
调用getResultData()方法,获取到String电话号码,查询数据库获取到归属地
package com.qingguow.mobilesafe.receiver;

import com.qingguow.mobilesafe.utils.NumberQueryAddressUtil;

 android.content.broadcastReceiver;
 android.content.Context;
 android.content.Intent;
 android.widget.Toast;
/**
 * 接收打电话广播
 * @author taoshihan
 *
 */
public class OutcallReceiver extends broadcastReceiver {

    @Override
    void onReceive(Context arg0,Intent arg1) {
        String phone=getResultData();
        String address=NumberQueryAddressUtil.queryAddress(phone);
        System.out.println("111"+address);
        Toast.makeText(arg0,address,1).show();
    }

}
清单文件中定义<receiver>节点,和<intent-filter>节点,设置<action>节点名称,android:name=”android.intent.action.NEW_OUTGOING_CALL”
需要权限,android.permission.PROCESS_OUTGOING_CALLS
代码注册广播
此时的广播接收者,只要一打电话就会被调用,用户体验不好,我们使用代码注册广播接收者,用设置中心的开启监听电话来电的部分来控制这个广播
在服务里面调用registerReceiver()方法,注册广播,参数:broadcastReceiver对象,IntentFilter对象
获取IntentFilter对象,调用IntentFilter对象的addAction()方法,参数:android.intent.action.NEW_OUTGOING_CALL
在服务里面解除注册广播,调用unregisterReceiver()方法,参数:broadcastReceiver对象
 com.qingguow.mobilesafe.service;

 com.qingguow.mobilesafe.receiver.OutcallReceiver;
 android.app.Service;
 android.content.IntentFilter;
 android.os.IBinder;
 android.telephony.PhonestateListener;
 android.telephony.TelephonyManager;
 android.widget.Toast;


 * 来电显示
 *
 *  taoshihan
 *
 class AddressService  Service {
    private TelephonyManager tm;
     MyPhonestateListener phonestateListener;
     OutcallReceiver outcallReceiver;
    @Override
    public IBinder onBind(Intent arg0) {
        // Todo Auto-generated method stub
        return null;
    }

     * 服务创建
     */
    @Override
     onCreate() {
        super.onCreate();
        tm = (TelephonyManager) getSystemService(TELEPHONY_SERVICE);
        phonestateListener = new MyPhonestateListener();
        tm.listen(phonestateListener,PhonestateListener.LISTEN_CALL_STATE);

        注册广播
        outcallReceiver= OutcallReceiver();
        IntentFilter filter= IntentFilter();
        filter.addAction("android.intent.action.NEW_OUTGOING_CALL");
        registerReceiver(outcallReceiver,filter);
    }

    private class MyPhonestateListener  PhonestateListener {
        @Override
        void onCallStateChanged(int state,String incomingNumber) {
            .onCallStateChanged(state,incomingNumber);
            switch (state) {
            case TelephonyManager.CALL_STATE_RINGING:
                String info = NumberQueryAddressUtil
                        .queryAddress(incomingNumber);
                Toast.makeText(getApplicationContext(),info,1)">).show();
                break;
            default:
                ;
            }
        }
    }

     * 服务销毁
      onDestroy() {
        .onDestroy();
        取消监听
        tm.listen(phonestateListener,PhonestateListener.LISTEN_NONE);
        phonestateListener=;
        解除注册广播
        unregisterReceiver(outcallReceiver);
        outcallReceiver=;
    }
}

android 之访问WebService显示手机号码归属地
发送XML
通过URL封装路径打开一个HttpURLConnection
设置请求方式,Content-Type和Content-Length
XML文件的Content-Type为:text/xml; charset=UTF-8
使用HttpURLConnection获取输出流输出数据
WebService
WebService是发布在网络上的API,可以通过发送XML调用,WebService返回结果也是XML数据
WebService没有语言限制,只要可以发送XML数据和接收XML数据即可
http://www.webxml.com.cn 网站上提供了一些WebService服务,我们可以对其进行调用
http://webservice.webxml.com.cn/WebServices/MobileCodeWS.asmx?op=getMobileCodeInfo 中提供了电话归属地查询的使用说明
内容如下:
SOAP 1.2
以下是 SOAP 1.2 请求和响应示例。所显示的占位符需替换为实际值。
POST /WebServices/MobileCodeWS.asmx HTTP/1.1
Host: webservice.webxml.com.cn
Content-Type: application/soap+xml; charset=utf-8
Content-Length: length

<?xml version="1.0" encoding="utf-8"?>
<soap12:Envelope xmlns:xsi="http://www.w3.org/2001/XMLSchema-instance" xmlns:xsd="http://www.w3.org/2001/XMLSchema" xmlns:soap12="http://www.w3.org/2003/05/soap-envelope">
  <soap12:Body>
    <getMobileCodeInfo xmlns="http://WebXml.com.cn/">
      <mobileCode>string</mobileCode>
      <userID>string</userID>
    </getMobileCodeInfo>
  </soap12:Body>
</soap12:Envelope>
HTTP/1.1 200 OK
Content-Type: application/soap+xml; charset=utf-8
Content-Length: length

<?xml version="1.0" encoding="utf-8"?>
<soap12:Envelope xmlns:xsi="http://www.w3.org/2001/XMLSchema-instance" xmlns:xsd="http://www.w3.org/2001/XMLSchema" xmlns:soap12="http://www.w3.org/2003/05/soap-envelope">
  <soap12:Body>
    <getMobileCodeInfoResponse xmlns="http://WebXml.com.cn/">
      <getMobileCodeInfoResult>string</getMobileCodeInfoResult>
    </getMobileCodeInfoResponse>
  </soap12:Body>
</soap12:Envelope>
HTTP GET
以下是 HTTP GET 请求和响应示例。所显示的占位符需替换为实际值。
GET /WebServices/MobileCodeWS.asmx/getMobileCodeInfo?mobileCode=string&userID=string HTTP/1.1
Host: webservice.webxml.com.cn
HTTP/1.1 200 OK
Content-Type: text/xml; charset=utf-8
Content-Length: length

<?xml version="1.0" encoding="utf-8"?>
<string xmlns="http://WebXml.com.cn/">string</string>
HTTP POST
以下是 HTTP POST 请求和响应示例。所显示的占位符需替换为实际值。
POST /WebServices/MobileCodeWS.asmx/getMobileCodeInfo HTTP/1.1
Host: webservice.webxml.com.cn
Content-Type: application/x-www-form-urlencoded
Content-Length: length

mobileCode=string&userID=string
HTTP/1.1 200 OK
Content-Type: text/xml; charset=utf-8
Content-Length: length

<?xml version="1.0" encoding="utf-8"?>
<string xmlns="http://WebXml.com.cn/">string</string>
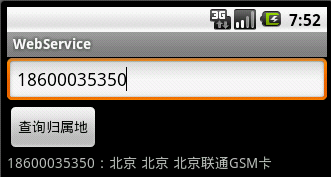
下面为具体实例及代码:
界面显示:
向WebService发送的XML文件: send.xml(放置在SRC路径下)
<?xml version="1.0" encoding="utf-8"?>
<soap12:Envelope xmlns:xsi="http://www.w3.org/2001/XMLSchema-instance" xmlns:xsd="http://www.w3.org/2001/XMLSchema" xmlns:soap12="http://www.w3.org/2003/05/soap-envelope">
  <soap12:Body>
    <getMobileCodeInfo xmlns="http://WebXml.com.cn/">
      <mobileCode>$number</mobileCode>
      <userID></userID>
    </getMobileCodeInfo>
  </soap12:Body>
</soap12:Envelope>
布局文件man.xml
<?xml version="1.0" encoding="utf-8"?>
<LinearLayout xmlns:android="http://schemas.android.com/apk/res/android"
    android:layout_width="fill_parent"
    android:layout_height="fill_parent"
    android:orientation="vertical" >

    <EditText
        android:id="@+id/phoneET"
        android:layout_width="match_parent"
        android:layout_height="wrap_content"
        android:inputType="phone" >

        <requestFocus />
    </EditText>

    <Button
        android:onClick="onClick"
        android:layout_width="wrap_content"
        android:layout_height="wrap_content"
        android:text="归属地查询" />

    <TextView
        android:id="@+id/locationTV"
        android:layout_width="wrap_content"
        android:layout_height="wrap_content"
        android:textSize="25sp"
/>

</LinearLayout>
功能清单文件AndroidManifest.xml
<?xml version="1.0" encoding="utf-8"?>
<manifest xmlns:android="http://schemas.android.com/apk/res/android"
    package="com.itheima.webservice"
    android:versionCode="1"
    android:versionName="1.0" >

    <uses-sdk android:minSdkVersion="10" />
    <uses-permission android:name="android.permission.INTERNET"/>
      <instrumentation
        android:name="android.test.InstrumentationTestRunner"
        android:targetPackage="com.itheima.webservice"
        />
    <application
        android:icon="@drawable/ic_launcher"
        android:label="@string/app_name" >
    <uses-library android:name="android.test.runner" />
        <activity
            android:name=".MainActivity"
            android:label="@string/app_name" >
            <intent-filter>
                <action android:name="android.intent.action.MAIN" />

                <category android:name="android.intent.category.LAUNCHER" />
            </intent-filter>
        </activity>
    </application>

</manifest>
MainActivity:
package com.itheima.webservice;

import com.itheima.webservice.service.NumberService;

import android.app.Activity;
import android.os.Bundle;
import android.view.View;
import android.widget.EditText;
import android.widget.TextView;
import android.widget.Toast;

public class MainActivity extends Activity {
    private EditText phoneET;
	private TextView locationTV;
	public void onCreate(Bundle savedInstanceState) {
        super.onCreate(savedInstanceState);
        setContentView(R.layout.main);
        phoneET = (EditText) findViewById(R.id.phoneET);
       locationTV = (TextView) findViewById(R.id.locationTV);


    }

	public void onClick(View view){
		try {
			NumberService service = new NumberService();
			String num = phoneET.getText().toString();
			String loacation = service.getLocation(num);
			locationTV.setText(loacation);
		} catch (Exception e) {
			e.printStackTrace();
			Toast.makeText(getApplicationContext(), "查无此号", 1).show();
		}
	}


}
NumberService:
package com.itheima.webservice.service;

import java.io.InputStream;
import java.net.HttpURLConnection;
import java.net.URL;

import org.xmlpull.v1.XmlPullParser;

import android.util.Xml;

import com.itheima.webservice.util.StreamUtil;

public class NumberService {

	public String getLocation(String number) throws Exception {
		// 读取本地准备好的文件, 用输入的号码替换原来的占位符
				InputStream in = NumberService.class.getClassLoader().getResourceAsStream("send.xml");
				byte[] data = StreamUtil.load(in);
				String content = new String(data);
				content = content.replace("$number", number);

				// 创建连接对象, 设置请求头, 按照Webservice服务端提供的要求来设置
				URL url = new URL("http://webservice.webxml.com.cn/WebServices/MobileCodeWS.asmx");
				HttpURLConnection conn = (HttpURLConnection) url.openConnection();
				conn.setConnectTimeout(5000);
				conn.setRequestProperty("Host", "webservice.webxml.com.cn");
				conn.setRequestProperty("Content-Type", "application/soap+xml; charset=utf-8");
				conn.setRequestProperty("Content-Length", content.getBytes().length + "");
				conn.setRequestMethod("POST");

				// 输出数据
				conn.setDoOutput(true);
				conn.getOutputStream().write(content.getBytes());


//				// 获取服务端传回的数据, 解析XML, 得到结果
				XmlPullParser parser = Xml.newPullParser();
				parser.setInput(conn.getInputStream(), "UTF-8");

				for (int type = parser.getEventType();type!=XmlPullParser.END_DOCUMENT;type=parser.next())
				  if(type==XmlPullParser.START_TAG&&parser.getName().equals("getMobileCodeInfoResult")){
					  return parser.nextText();
				  }
				return "没有找到此号码";
	}

}
读取输入流工具类StreamUtil:
package com.itheima.webservice.util;


import java.io.ByteArrayOutputStream;
import java.io.IOException;
import java.io.InputStream;

public class StreamUtil {
   public static byte[] load(InputStream in ) throws IOException{
	   ByteArrayOutputStream baos = new ByteArrayOutputStream();
	   byte b [] = new byte[1024];
	   int len = -1;
	   while((len=in.read(b))!=-1){
		   baos.write(b,0,len);
	   }
	   baos.close();
	   return baos.toByteArray();
   }
}
原文链接: http://blog.csdn.net/t12x3456/article/details/7686448

Android 基础-2.0 拔打电话号码
1、添加权限
在AndroidManifest.xml 添加打电话权限
<uses-permission android:name="android.permission.CALL_PHONE"/>
2、自动布局设置页面


<?xml version="1.0" encoding="utf-8"?>
<androidx.constraintlayout.widget.ConstraintLayout xmlns:android="http://schemas.android.com/apk/res/android"
    xmlns:app="http://schemas.android.com/apk/res-auto"
    xmlns:tools="http://schemas.android.com/tools"
    android:layout_width="match_parent"
    android:layout_height="match_parent"
    tools:context=".MainActivity">


    <TextView
        android:id="@+id/tv_phone"
        android:layout_width="wrap_content"
        android:layout_height="wrap_content"
        android:layout_marginTop="10dp"
        android:layout_marginLeft="10dp"
        android:text="@string/textPhone"
        app:layout_constraintStart_toStartOf="parent"
        app:layout_constraintTop_toTopOf="parent" />

    <EditText
        android:id="@+id/et_phone"
        android:layout_width="0dp"
        android:layout_height="wrap_content"
        android:layout_marginLeft="10dp"
        android:layout_marginTop="10dp"
        android:layout_marginRight="10dp"
        android:hint="@string/textPhoneHint"
        app:layout_constraintEnd_toEndOf="parent"
        app:layout_constraintStart_toStartOf="parent"
        app:layout_constraintTop_toBottomOf="@+id/tv_phone" />

    <Button
        android:id="@+id/btn_call"
        android:layout_width="wrap_content"
        android:layout_height="wrap_content"
        android:layout_marginStart="10dp"
        android:layout_marginLeft="10dp"
        android:layout_marginTop="16dp"
        android:text="@string/textPhoneButton"
        app:layout_constraintStart_toStartOf="parent"
        app:layout_constraintTop_toBottomOf="@+id/et_phone" />


</androidx.constraintlayout.widget.ConstraintLayout>
页面效果

3、给Activity添加拔打代码
public class MainActivity extends  BaseActivity {

    private Button eBtCall;
    private EditText mEtPhone;

    @Override
    protected void onCreate(Bundle savedInstanceState) {
        super.onCreate(savedInstanceState);
        setContentView(R.layout.activity_main);

        eBtCall = findViewById(R.id.btn_call);
        mEtPhone = findViewById(R.id.et_phone);
        eBtCall.setonClickListener(new View.OnClickListener() {
            @Override
            public void onClick(View v) {
                performCodeWithPermission("拔打电话权限",new PermissionCallback() {
                    @Override
                    public void hasPermission() {
                        Intent intent = new Intent(Intent.ACTION_CALL,Uri.parse("tel:" + mEtPhone.getText()));
                        startActivity(intent);
                    }

                    @Override
                    public void nopermission() {

                    }
                },Manifest.permission.CALL_PHONE);
            }
        });
    }
}
4、这里要注意,安卓在6.0之后是动态申请系统权限,因而封装一个权限的BaseActivity类,专门用于处理权限相关的。
package com.jiangys.telephonedial;

import android.content.DialogInterface;
import android.content.pm.PackageManager;
import android.os.Build;
import android.widget.Toast;

import androidx.annotation.NonNull;
import androidx.appcompat.app.AlertDialog;
import androidx.appcompat.app.AppCompatActivity;
import androidx.core.app.ActivityCompat;

/**
 * @author Admin
 * @version $Rev$
 * @des ${Todo}
 * @updateAuthor $Author$
 * @updateDes ${Todo}
 */
public class BaseActivity extends AppCompatActivity {
    //**************** Android M Permission (Android 6.0权限控制代码封装)
    private int permissionRequestCode = 88;
    private PermissionCallback permissionRunnable;

    public interface PermissionCallback {
        void hasPermission();

        void nopermission();
    }

    /**
     * Android M运行时权限请求封装
     *
     * @param permissionDes 权限描述
     * @param runnable      请求权限回调
     * @param permissions   请求的权限(数组类型),直接从Manifest中读取相应的值,比如Manifest.permission.WRITE_CONTACTS
     */
    public void performCodeWithPermission(@NonNull String permissionDes,PermissionCallback runnable,@NonNull String... permissions) {
        if (permissions == null || permissions.length == 0)
            return;
        //        this.permissionrequestCode = requestCode;
        this.permissionRunnable = runnable;
        if ((Build.VERSION.SDK_INT < Build.VERSION_CODES.M) || checkPermissionGranted(permissions)) {
            if (permissionRunnable != null) {
                permissionRunnable.hasPermission();
                permissionRunnable = null;
            }
        } else {
            //permission has not been granted.
            requestPermission(permissionDes,permissionRequestCode,permissions);
        }

    }

    private boolean checkPermissionGranted(String[] permissions) {
        boolean flag = true;
        for (String p : permissions) {
            if (ActivityCompat.checkSelfPermission(this,p) != PackageManager.PERMISSION_GRANTED) {
                flag = false;
                break;
            }
        }
        return flag;
    }

    private void requestPermission(String permissionDes,final int requestCode,final String[] permissions) {
        if (shouldShowRequestPermissionRationale(permissions)) {
            /*1. 第一次请求权限时,用户拒绝了,下一次:shouldShowRequestPermissionRationale()  返回 true,应该显示一些为什么需要这个权限的说明
            2.第二次请求权限时,用户拒绝了,并选择了“不在提醒”的选项时:shouldShowRequestPermissionRationale()  返回 false
            3. 设备的策略禁止当前应用获取这个权限的授权:shouldShowRequestPermissionRationale()  返回 false*/
            // Provide an additional rationale to the user if the permission was not granted
            // and the user would benefit from additional context for the use of the permission.
            // For example,if the request has been denied prevIoUsly.

            //            Snackbar.make(getwindow().getDecorView(),requestName,//                    Snackbar.LENGTH_INDEFINITE)
            //                    .setAction(R.string.common_ok,new View.OnClickListener() {
            //                        @Override
            //                        public void onClick(View view) {
            //                            ActivityCompat.requestPermissions(BaseAppCompatActivity.this,//                                    permissions,//                                    requestCode);
            //                        }
            //                    })
            //                    .show();
            //如果用户之前拒绝过此权限,再提示一次准备授权相关权限
            new AlertDialog.Builder(this)
                    .setTitle("提示")
                    .setMessage(permissionDes)
                    .setPositiveButton("授权",new DialogInterface.OnClickListener() {
                        @Override
                        public void onClick(DialogInterface dialog,int which) {
                            ActivityCompat.requestPermissions(BaseActivity.this,permissions,requestCode);
                        }
                    }).show();

        } else {
            // Contact permissions have not been granted yet. Request them directly.
            ActivityCompat.requestPermissions(BaseActivity.this,requestCode);
        }
    }

    private boolean shouldShowRequestPermissionRationale(String[] permissions) {
        boolean flag = false;
        for (String p : permissions) {
            if (ActivityCompat.shouldShowRequestPermissionRationale(this,p)) {
                flag = true;
                break;
            }
        }
        return flag;
    }

    /**
     * Callback received when a permissions request has been completed.
     */
    @Override
    public void onRequestPermissionsResult(int requestCode,@NonNull String[] permissions,@NonNull int[] grantResults) {
        if (requestCode == permissionRequestCode) {
            if (verifyPermissions(grantResults)) {
                if (permissionRunnable != null) {
                    permissionRunnable.hasPermission();
                    permissionRunnable = null;
                }
            } else {
                Toast.makeText(this,"暂无权限执行相关操作!",Toast.LENGTH_SHORT).show();
                if (permissionRunnable != null) {
                    permissionRunnable.nopermission();
                    permissionRunnable = null;
                }
            }
        } else {
            super.onRequestPermissionsResult(requestCode,grantResults);
        }

    }

    public boolean verifyPermissions(int[] grantResults) {
        // At least one result must be checked.
        if (grantResults.length < 1) {
            return false;
        }

        // Verify that each required permission has been granted,otherwise return false.
        for (int result : grantResults) {
            if (result != PackageManager.PERMISSION_GRANTED) {
                return false;
            }
        }
        return true;
    }
    //********************** END Android M Permission ****************************************
}


![[转帖]Ubuntu 安装 Wine方法(ubuntu如何安装wine)](https://www.gvkun.com/zb_users/cache/thumbs/4c83df0e2303284d68480d1b1378581d-180-120-1.jpg)

