在本文中,我们将给您介绍关于华工软院IBMLinuxONECommunityCloud云计算实验文档的详细内容,并且为您解答华工软件学院院长的相关问题,此外,我们还将为您提供关于10+commonly
在本文中,我们将给您介绍关于华工软院 IBM LinuxONE Community Cloud 云计算实验文档的详细内容,并且为您解答华工软件学院院长的相关问题,此外,我们还将为您提供关于10+ commonly using find command switches with example Unix/Linux、64位Windows7安装MySQL社区版(community)5.7.23(mysql-installer-community-5.7.23.0.msi)、Citrix收购云计算软件公司Cloud.com、ClarkConnect Community Edition 5.0 的详细配置的知识。
本文目录一览:- 华工软院 IBM LinuxONE Community Cloud 云计算实验文档(华工软件学院院长)
- 10+ commonly using find command switches with example Unix/Linux
- 64位Windows7安装MySQL社区版(community)5.7.23(mysql-installer-community-5.7.23.0.msi)
- Citrix收购云计算软件公司Cloud.com
- ClarkConnect Community Edition 5.0 的详细配置
")
华工软院 IBM LinuxONE Community Cloud 云计算实验文档(华工软件学院院长)
此博文介绍华南理工大学软件学院 “云计算开发与应用” 实验课。本人在大二期间选修了这门课,实验课内容是把已有的 app 部署到云服务器上运行。虽然实验内容很简单 (作者大概一个小时就做完了两天的实验内容),但觉得这次实验是我在华工期间做过的为数不多有意义的实验之一,故作此博客记录实验详细过程。此博客以 linux 环境为准。
实验所需材料与环境配置:
本地环境:Manjaro 18.0.4 (kernel version: x86_64 Linux 5.0.15-1-MANJARO)。需先生成 ssh 密钥对以便访问服务器。需要安装 node.js。
云服务器:IBM LinuxONE Community Cloud。登录 / 注册地址:https://linuxone.cloud.marist.edu/cloud/#/login
IBM 账户 (登录 / 注册地址:https://developer.ibm.com/linuxone/),一个自己的 github 账号。
Day 1:
先到 IBM LinuxONE Community Cloud 注册账号。因为是人工审核,所以注册流程比想象中要久一些。登录之后就可以看到这样的界面:
我们不着急去创建实例,先去右上角的个人用户设置,把本地生成的 id_rsa.pub 公钥文件上传上去。(什么你告诉我你不会?还不赶紧学?)
新创建的账户最上方不会有 Containers 的选项,不用管。点击 Virtual Server 就可以看到下面的界面,右边的 Quota 显示我们最多只能创建一个 vm 实例。点击黄色的 Create 按钮,来创建我们第一个 vm 实例。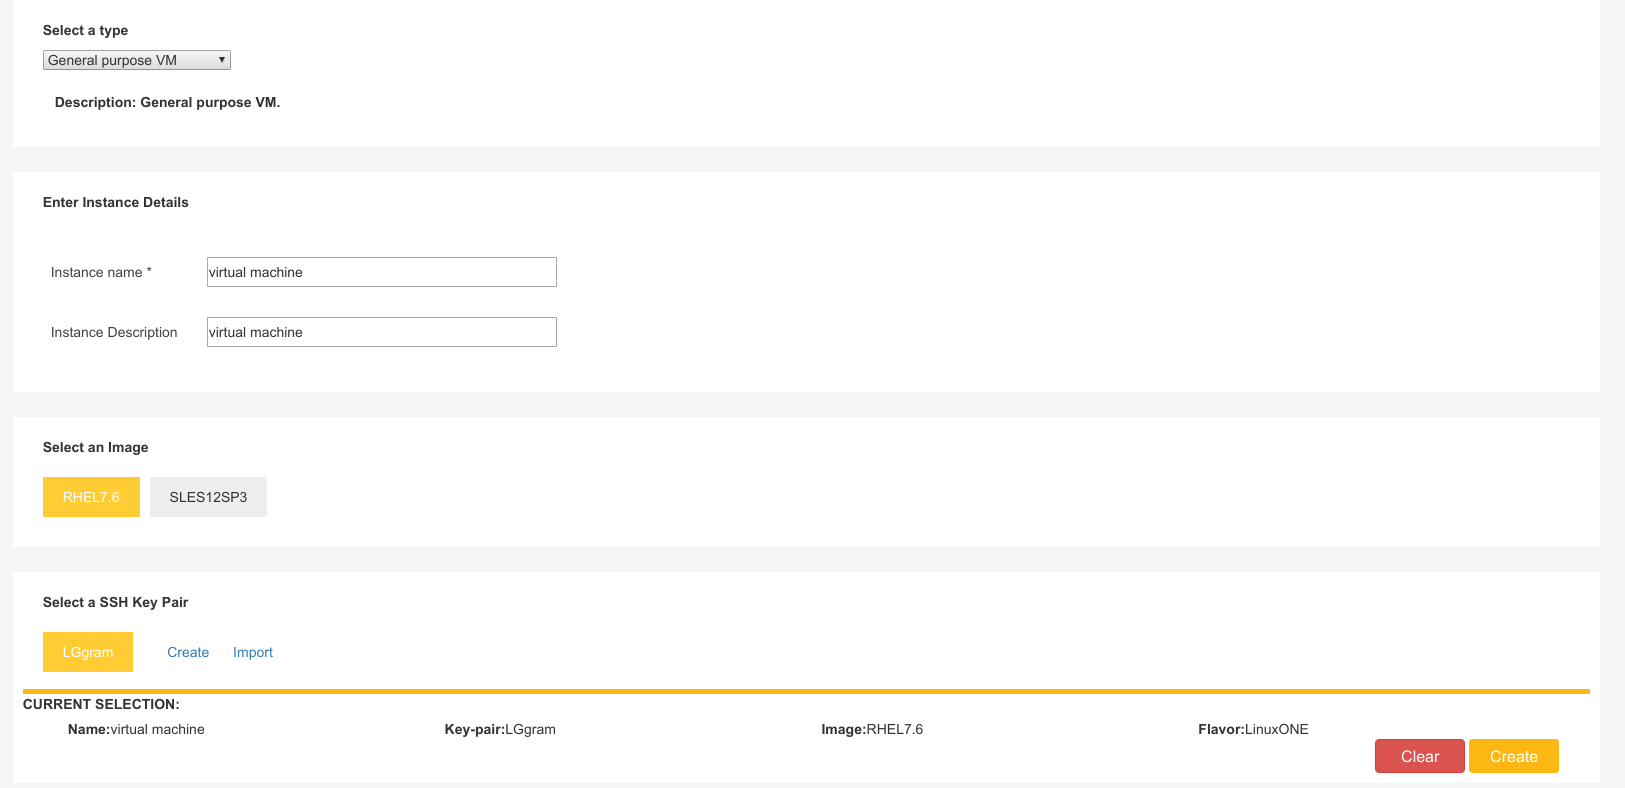
点击 Create 之后稍等一会 (可能有点久,要手动刷新一下),就可以看到我们的 vm 已经准备就绪了。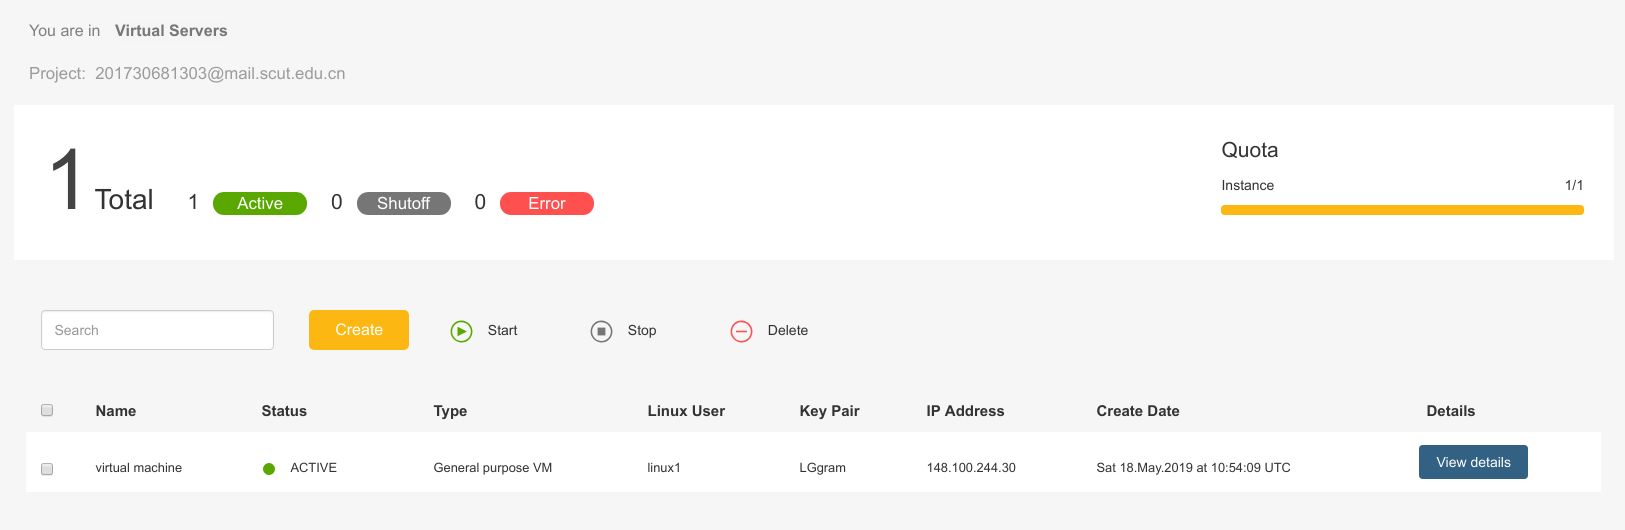
启动 terminal,ssh linux1@ip 连接到我们的 vm 实例。


ssh linux1@148.100.244.30
The authenticity of host ''148.100.244.30 (148.100.244.30)'' can''t be established.
ECDSA key fingerprint is SHA256:JPXviVE88jNGDCGvyFFg1iVyQ1fngC6V78pqJCsKCrg.
Are you sure you want to continue connecting (yes/no/[fingerprint])? yes
Warning: Permanently added ''148.100.244.30'' (ECDSA) to the list of known hosts.
==============================================================================
Welcome to IBM LinuxONE Community Cloud!

This server is for authorized users only. All activity is logged and monitored.
Individuals using this server must abide to the Terms and Conditions listed here:
https://developer.ibm.com/linuxone/terms-of-use/
Your access will be revoked for any non-compliance.
=============================================================================第一个实验是把已有的 app (Github Repo: https://github.com/IBM/Cloud-Native-Workloads-on-LinuxONE) 部署到云服务器上,通过 docker 来运行。输入以下内容:
1 sudo su
2 cd ~
3 wget ftp://ftp.unicamp.br/pub/linuxpatch/s390x/redhat/rhel7.3/docker-17.05.0-ce-rhel7.3-20170523.tar.gz
4 tar -xzvf docker-17.05.0-ce-rhel7.3-20170523.tar.gz
5 cp docker-17.05.0-ce-rhel7.3-20170523/docker* /usr/bin/
这里直接 cp 到 /usr/bin 就好,因为 /usr/local/bin 不在 PATH 环境变量里。效果如下所示。


[linux1@virtual-machine ~]$ sudo su
[root@virtual-machine linux1]# cd ~
[root@virtual-machine ~]# wget ftp://ftp.unicamp.br/pub/linuxpatch/s390x/redhat/rhel7.3/docker-17.05.0-ce-rhel7.3-20170523.tar.gz
--2019-05-18 07:12:50--  ftp://ftp.unicamp.br/pub/linuxpatch/s390x/redhat/rhel7.3/docker-17.05.0-ce-rhel7.3-20170523.tar.gz
           => ‘docker-17.05.0-ce-rhel7.3-20170523.tar.gz’
Resolving ftp.unicamp.br (ftp.unicamp.br)... 143.106.10.149
Connecting to ftp.unicamp.br (ftp.unicamp.br)|143.106.10.149|:21... connected.
Logging in as anonymous ... Logged in!
==> SYST ... done.    ==> PWD ... done.
==> TYPE I ... done.  ==> CWD (1) /pub/linuxpatch/s390x/redhat/rhel7.3 ... done.
==> SIZE docker-17.05.0-ce-rhel7.3-20170523.tar.gz ... 27694090
==> PASV ... done.    ==> RETR docker-17.05.0-ce-rhel7.3-20170523.tar.gz ... done.
Length: 27694090 (26M) (unauthoritative)

100%[==========================================================================>] 27,694,090  8.20MB/s   in 3.2s

2019-05-18 07:12:55 (8.20 MB/s) - ‘docker-17.05.0-ce-rhel7.3-20170523.tar.gz’ saved [27694090]

[root@virtual-machine ~]# tar -xzvf docker-17.05.0-ce-rhel7.3-20170523.tar.gz
docker-17.05.0-ce-rhel7.3-20170523/
docker-17.05.0-ce-rhel7.3-20170523/docker
docker-17.05.0-ce-rhel7.3-20170523/docker-containerd
docker-17.05.0-ce-rhel7.3-20170523/docker-containerd-ctr
docker-17.05.0-ce-rhel7.3-20170523/docker-containerd-shim
docker-17.05.0-ce-rhel7.3-20170523/docker-init
docker-17.05.0-ce-rhel7.3-20170523/docker-proxy
docker-17.05.0-ce-rhel7.3-20170523/docker-runc
docker-17.05.0-ce-rhel7.3-20170523/dockerd
docker-17.05.0-ce-rhel7.3-20170523/INSTALL
docker-17.05.0-ce-rhel7.3-20170523/URLs
docker-17.05.0-ce-rhel7.3-20170523/gcc-libffi-LICENSE
docker-17.05.0-ce-rhel7.3-20170523/gcc-libgo-LICENSE
docker-17.05.0-ce-rhel7.3-20170523/gcc-libgo-PATENTS
docker-17.05.0-ce-rhel7.3-20170523/libgo-PATENTS
docker-17.05.0-ce-rhel7.3-20170523/LICENSE
docker-17.05.0-ce-rhel7.3-20170523/NOTICE
[root@virtual-machine ~]# cp docker-17.05.0-ce-rhel7.3-20170523/docker* /usr/bin/之后启动 docker daemon:
1 docker daemon -g /local/docker/lib &

[root@virtual-machine ~]# docker daemon -g /local/docker/lib &
[1] 21401
[root@virtual-machine ~]# Command "daemon" is deprecated, and will be removed in Docker 17.12. Please run `dockerd` directly.
WARN[0000] the "-g / --graph" flag is deprecated. Please use "--data-root" instead
WARN[0000] could not change group /var/run/docker.sock to docker: group docker not found
INFO[0000] libcontainerd: new containerd process, pid: 21410
WARN[0000] containerd: low RLIMIT_NOFILE changing to max  current=1024 max=4096
INFO[0001] Graph migration to content-addressability took 0.00 seconds
INFO[0001] Loading containers: start.
INFO[0001] Default bridge (docker0) is assigned with an IP address 172.17.0.0/16. Daemon option --bip can be used to set a preferred IP address
INFO[0001] Loading containers: done.
INFO[0001] Daemon has completed initialization
INFO[0001] Docker daemon                                 commit=89658be graphdriver=overlay version=17.05.0-ce
INFO[0001] API listen on /var/run/docker.sock启动完成后检查一下后台有无 docker 进程在运行:
1 ps aux | grep docker

[root@virtual-machine ~]# ps aux | grep docker
root     21401  0.2  0.6 332008 24708 pts/0    Sl   07:18   0:00 dockerd -g /local/docker/lib
root     21410  0.0  0.1 203992  5536 ?        Ssl  07:18   0:00 docker-containerd -l unix:///var/run/docker/libcontainerd/docker-containerd.sock --metrics-interval=0 --start-timeout 2m --state-dir /var/run/docker/libcontainerd/containerd --shim docker-containerd-shim --runtime docker-runc
root 21532 0.0 0.0 106276 904 pts/0 S+ 07:19 0:00 grep --color=auto docker接下来我们要安装 docker-compose:
1 yum info python-setuptools
2 # 要先禁用ipv6服务,不然接下来安装pip会非常慢
3 sysctl -w net.ipv6.conf.all.disable_ipv6=1
4 sysctl -w net.ipv6.conf.default.disable_ipv6=1
5 easy_install pip
6 pip install backports.ssl_match_hostname --upgrade --ignore-installed

[root@virtual-machine ~]# yum info python-setuptools
Loaded plugins: product-id, search-disabled-repos, subscription-manager
This system is not registered with an entitlement server. You can use subscription-manager to register.
Installed Packages
Name        : python-setuptools
Arch        : noarch
Version     : 0.9.8
Release     : 7.el7
Size        : 1.9 M
Repo        : installed
From repo   : rhel7-base
Summary     : Easily build and distribute Python packages
URL         : http://pypi.python.org/pypi/setuptools
License     : Python or ZPLv2.0
Description : Setuptools is a collection of enhancements to the Python distutils that allow
            : you to more easily build and distribute Python packages, especially ones that
            : have dependencies on other packages.
            :
            : This package contains the runtime components of setuptools, necessary to
            : execute the software that requires pkg_resources.py.
            :
            : This package contains the distribute fork of setuptools.

[root@virtual-machine ~]# sysctl -w net.ipv6.conf.all.disable_ipv6=1
net.ipv6.conf.all.disable_ipv6 = 1
[root@virtual-machine ~]# sysctl -w net.ipv6.conf.default.disable_ipv6=1
net.ipv6.conf.default.disable_ipv6 = 1
[root@virtual-machine ~]# easy_install pip
Searching for pip
Reading https://pypi.python.org/simple/pip/
Best match: pip 19.1.1
Downloading https://files.pythonhosted.org/packages/93/ab/f86b61bef7ab14909bd7ec3cd2178feb0a1c86d451bc9bccd5a1aedcde5f/pip-19.1.1.tar.gz#sha256=44d3d7d3d30a1eb65c7e5ff1173cdf8f7467850605ac7cc3707b6064bddd0958
Processing pip-19.1.1.tar.gz
Writing /tmp/easy_install-VwlKKm/pip-19.1.1/setup.cfg
Running pip-19.1.1/setup.py -q bdist_egg --dist-dir /tmp/easy_install-VwlKKm/pip-19.1.1/egg-dist-tmp-7Zx6_R
/usr/lib64/python2.7/distutils/dist.py:267: UserWarning: Unknown distribution option: ''python_requires''
  warnings.warn(msg)
warning: no files found matching ''docs/docutils.conf''
warning: no previously-included files found matching ''.coveragerc''
warning: no previously-included files found matching ''.mailmap''
warning: no previously-included files found matching ''.appveyor.yml''
warning: no previously-included files found matching ''.travis.yml''
warning: no previously-included files found matching ''tox.ini''
warning: no files found matching ''Makefile'' under directory ''docs''
warning: no files found matching ''*.bat'' under directory ''docs''
warning: no previously-included files found matching ''src/pip/_vendor/six''
warning: no previously-included files found matching ''src/pip/_vendor/six/moves''
warning: no previously-included files matching ''*.pyi'' found under directory ''src/pip/_vendor''
no previously-included directories found matching ''.github''
no previously-included directories found matching ''.azure-pipelines''
no previously-included directories found matching ''docs/build''
no previously-included directories found matching ''news''
no previously-included directories found matching ''tasks''
no previously-included directories found matching ''tests''
no previously-included directories found matching ''tools''
Adding pip 19.1.1 to easy-install.pth file
Installing pip script to /usr/bin
Installing pip2.7 script to /usr/bin
Installing pip2 script to /usr/bin

Installed /usr/lib/python2.7/site-packages/pip-19.1.1-py2.7.egg
Processing dependencies for pip
Finished processing dependencies for pip
[root@virtual-machine ~]# pip install backports.ssl_match_hostname --upgrade --ignore-installed
DEPRECATION: Python 2.7 will reach the end of its life on January 1st, 2020. Please upgrade your Python as Python 2.7 won''t be maintained after that date. A future version of pip will drop support for Python 2.7.
Collecting backports.ssl_match_hostname
  Downloading https://files.pythonhosted.org/packages/ff/2b/8265224812912bc5b7a607c44bf7b027554e1b9775e9ee0de8032e3de4b2/backports.ssl_match_hostname-3.7.0.1.tar.gz
Installing collected packages: backports.ssl-match-hostname
  Running setup.py install for backports.ssl-match-hostname ... done
Successfully installed backports.ssl-match-hostname-3.7.0.1最后,使用 pip 安装 docker-compose:
1 yum install python-devel libffi-devel
2 pip install docker-compose==1.13.0

[root@virtual-machine ~]# yum install python-devel libffi-devel
Loaded plugins: product-id, search-disabled-repos, subscription-manager
This system is not registered with an entitlement server. You can use subscription-manager to register.
Resolving Dependencies
--> Running transaction check
---> Package libffi-devel.s390x 0:3.0.13-18.el7 will be installed
---> Package python-devel.s390x 0:2.7.5-77.el7_6 will be installed
--> Finished Dependency Resolution

Dependencies Resolved

====================================================================================================================
 Package                      Arch                  Version                        Repository                  Size
====================================================================================================================
Installing:
 libffi-devel                 s390x                 3.0.13-18.el7                  rhel7-base                  23 k
 python-devel                 s390x                 2.7.5-77.el7_6                 rhel7-base                 398 k

Transaction Summary
====================================================================================================================
Install  2 Packages

Total download size: 421 k
Installed size: 1.1 M
Is this ok [y/d/N]: y
Downloading packages:
(1/2): libffi-devel-3.0.13-18.el7.s390x.rpm                                                  |  23 kB  00:00:00
(2/2): python-devel-2.7.5-77.el7_6.s390x.rpm                                                 | 398 kB  00:00:00
--------------------------------------------------------------------------------------------------------------------
Total                                                                               5.7 MB/s | 421 kB  00:00:00
Running transaction check
Running transaction test
Transaction test succeeded
Running transaction
  Installing : python-devel-2.7.5-77.el7_6.s390x                                                                1/2
  Installing : libffi-devel-3.0.13-18.el7.s390x                                                                 2/2
  Verifying  : libffi-devel-3.0.13-18.el7.s390x                                                                 1/2
  Verifying  : python-devel-2.7.5-77.el7_6.s390x                                                                2/2

Installed:
  libffi-devel.s390x 0:3.0.13-18.el7                       python-devel.s390x 0:2.7.5-77.el7_6

Complete!
[root@virtual-machine ~]# pip install docker-compose==1.13.0
DEPRECATION: Python 2.7 will reach the end of its life on January 1st, 2020. Please upgrade your Python as Python 2.7 won''t be maintained after that date. A future version of pip will drop support for Python 2.7.
Collecting docker-compose==1.13.0
  Downloading https://files.pythonhosted.org/packages/37/2b/f564105d548d8d92925aac550468b14282504e144d83b0c17139ce350fa3/docker_compose-1.13.0-py2.py3-none-any.whl (94kB)
     |████████████████████████████████| 102kB 12.3MB/s
Requirement already satisfied: PyYAML<4,>=3.10 in /usr/lib/python2.7/site-packages/PyYAML-3.11-py2.7-linux-s390x.egg (from docker-compose==1.13.0) (3.11)
Collecting websocket-client<1.0,>=0.32.0 (from docker-compose==1.13.0)
  Downloading https://files.pythonhosted.org/packages/29/19/44753eab1fdb50770ac69605527e8859468f3c0fd7dc5a76dd9c4dbd7906/websocket_client-0.56.0-py2.py3-none-any.whl (200kB)
     |████████████████████████████████| 204kB 29.7MB/s
Requirement already satisfied: backports.ssl-match-hostname>=3.5; python_version < "3.5" in /usr/lib/python2.7/site-packages (from docker-compose==1.13.0) (3.7.0.1)
Collecting dockerpty<0.5,>=0.4.1 (from docker-compose==1.13.0)
  Downloading https://files.pythonhosted.org/packages/8d/ee/e9ecce4c32204a6738e0a5d5883d3413794d7498fe8b06f44becc028d3ba/dockerpty-0.4.1.tar.gz
Collecting cached-property<2,>=1.2.0 (from docker-compose==1.13.0)
  Downloading https://files.pythonhosted.org/packages/3b/86/85c1be2e8db9e13ef9a350aecd6dea292bd612fa288c2f40d035bb750ded/cached_property-1.5.1-py2.py3-none-any.whl
Collecting docker<3.0,>=2.2.1 (from docker-compose==1.13.0)
  Downloading https://files.pythonhosted.org/packages/6b/01/74d61c7de9fb99cebbbfab62ee5c88a9b23e8b1c25a57eded5fc22e87bd2/docker-2.7.0-py2.py3-none-any.whl (119kB)
     |████████████████████████████████| 122kB 90.7MB/s
Requirement already satisfied: requests!=2.11.0,<2.12,>=2.6.1 in /usr/lib/python2.7/site-packages/requests-2.11.1-py2.7.egg (from docker-compose==1.13.0) (2.11.1)
Requirement already satisfied: ipaddress>=1.0.16; python_version < "3.3" in /usr/lib/python2.7/site-packages (from docker-compose==1.13.0) (1.0.16)
Collecting colorama<0.4,>=0.3.7 (from docker-compose==1.13.0)
  Downloading https://files.pythonhosted.org/packages/db/c8/7dcf9dbcb22429512708fe3a547f8b6101c0d02137acbd892505aee57adf/colorama-0.3.9-py2.py3-none-any.whl
Collecting enum34<2,>=1.0.4; python_version < "3.4" (from docker-compose==1.13.0)
  Downloading https://files.pythonhosted.org/packages/c5/db/e56e6b4bbac7c4a06de1c50de6fe1ef3810018ae11732a50f15f62c7d050/enum34-1.1.6-py2-none-any.whl
Requirement already satisfied: six<2,>=1.3.0 in /usr/lib/python2.7/site-packages (from docker-compose==1.13.0) (1.9.0)
Collecting texttable<0.9,>=0.8.1 (from docker-compose==1.13.0)
  Downloading https://files.pythonhosted.org/packages/74/49/23d944a6f7d4dd20846b2df2914fe108c96a253567c140c416edbf270f80/texttable-0.8.8.tar.gz
Collecting jsonschema<3,>=2.5.1 (from docker-compose==1.13.0)
  Downloading https://files.pythonhosted.org/packages/77/de/47e35a97b2b05c2fadbec67d44cfcdcd09b8086951b331d82de90d2912da/jsonschema-2.6.0-py2.py3-none-any.whl
Collecting docopt<0.7,>=0.6.1 (from docker-compose==1.13.0)
  Downloading https://files.pythonhosted.org/packages/a2/55/8f8cab2afd404cf578136ef2cc5dfb50baa1761b68c9da1fb1e4eed343c9/docopt-0.6.2.tar.gz
Collecting docker-pycreds>=0.2.1 (from docker<3.0,>=2.2.1->docker-compose==1.13.0)
  Downloading https://files.pythonhosted.org/packages/f5/e8/f6bd1eee09314e7e6dee49cbe2c5e22314ccdb38db16c9fc72d2fa80d054/docker_pycreds-0.4.0-py2.py3-none-any.whl
Collecting functools32; python_version == "2.7" (from jsonschema<3,>=2.5.1->docker-compose==1.13.0)
  Downloading https://files.pythonhosted.org/packages/c5/60/6ac26ad05857c601308d8fb9e87fa36d0ebf889423f47c3502ef034365db/functools32-3.2.3-2.tar.gz
ERROR: docker 2.7.0 has requirement requests!=2.18.0,>=2.14.2, but you''ll have requests 2.11.1 which is incompatible.
Installing collected packages: websocket-client, dockerpty, cached-property, docker-pycreds, docker, colorama, enum34, texttable, functools32, jsonschema, docopt, docker-compose
  Running setup.py install for dockerpty ... done
  Running setup.py install for texttable ... done
  Running setup.py install for functools32 ... done
  Running setup.py install for docopt ... done
Successfully installed cached-property-1.5.1 colorama-0.3.9 docker-2.7.0 docker-compose-1.13.0 docker-pycreds-0.4.0 dockerpty-0.4.1 docopt-0.6.2 enum34-1.1.6 functools32-3.2.3.post2 jsonschema-2.6.0 texttable-0.8.8 websocket-client-0.56.0别忘记验证一下 docker-compose 是否已经安装:
1 docker-compose version 

[root@virtual-machine ~]# docker-compose version
docker-compose version 1.13.0, build 1719ceb
docker-py version: 2.7.0
CPython version: 2.7.5
OpenSSL version: OpenSSL 1.0.2k-fips 26 Jan 2017接下来我们要手动拉取 websphere-liberty 镜像到本地,后台运行 docker 并指定端口映射规则:
1 docker image pull s390x/websphere-liberty:webProfile7
2 docker images
3 docker run -d -p 80:9080 -p 443:9443 s390x/websphere-liberty:webProfile7
4 docker ps

[root@virtual-machine ~]# docker image pull s390x/websphere-liberty:webProfile7
webProfile7: Pulling from s390x/websphere-liberty
a39cfce7a60d: Pull complete
4e699efbddb6: Pull complete
9a3ffeac4412: Pull complete
52c5a080fd6d: Pull complete
6f0d27faa63a: Pull complete
a3d346a6c218: Pull complete
e9129f75e0bc: Pull complete
905ebfd4a924: Pull complete
bd9b8600bfe7: Pull complete
5746a3a16c6e: Pull complete
621479e04496: Pull complete
26db9a45b5d9: Pull complete
32c81cd7fa4a: Pull complete
705855d9301f: Pull complete
0bd5ae8e4470: Pull complete
Digest: sha256:87e41c209fa1c8ab33fc0cd0e126eec1493a50c49fe557f398707b4f4755d07a
Status: Downloaded newer image for s390x/websphere-liberty:webProfile7
[root@virtual-machine ~]# docker images
REPOSITORY                TAG                 IMAGE ID            CREATED             SIZE
s390x/websphere-liberty   webProfile7         def868b21def        2 days ago          473MB
[root@virtual-machine ~]# docker run -d -p 80:9080 -p 443:9443 s390x/websphere-liberty:webProfile7
8a2910700aab9c7b459e10c65778b20318822a957112d20f9bb9f4d948bde546
[root@virtual-machine ~]# docker ps
CONTAINER ID        IMAGE                                 COMMAND                  CREATED             STATUS              PORTS                                         NAMES
8a2910700aab s390x/websphere-liberty:webProfile7 "/opt/ibm/helpers/..." 5 seconds ago Up 4 seconds 0.0.0.0:80->9080/tcp, 0.0.0.0:443->9443/tcp goofy_hoover打开浏览器,直接访问服务器的公网 ip 就可以看到如图效果:
接下来我们要安装并运行 WorkPress:
1 alias vim=''vi''
2 source ~/.bashrc
3 vim docker-compose.yml
把以下内容复制到新的文件中去:
 1 version: ''2''
 2 services:
 3   wordpress:
 4     image: s390x/wordpress
 5     ports:
 6       - 8080:80 # 将本地 8080 端口映射到容器的 80 端口
 7     environment:
 8       WORDPRESS_DB_PASSWORD: example
 9   mysql:
10     image: brunswickheads/mariadb-5.5-s390x
11     environment:
12       MYSQL_ROOT_PASSWORD: example
创建新的 wordpress 目录方便整理:
1 mkdir wordpress
2 mv docker-compose.yml wordpress/
3 cd wordpress/
4 ls

[root@virtual-machine ~]# alias vim=''vi''
[root@virtual-machine ~]# source ~/.bashrc
[root@virtual-machine ~]# vim docker-compose.yml
[root@virtual-machine ~]# cat docker-compose.yml
version: ''2''
services:
  wordpress:
    image: s390x/wordpress
    ports:
      - 8080:80 # 将本地 8080 端口映射到容器的 80 端口
    environment:
      WORDPRESS_DB_PASSWORD: example
  mysql:
    image: brunswickheads/mariadb-5.5-s390x
    environment:
      MYSQL_ROOT_PASSWORD: example
[root@virtual-machine ~]# mkdir wordpress
[root@virtual-machine ~]# mv docker-compose.yml wordpress/
[root@virtual-machine ~]# cd wordpress/
[root@virtual-machine wordpress]# ls
docker-compose.yml最后,根据 docker-compose.yml 中定义的服务启动容器:
1 docker-compose up -d

[root@virtual-machine wordpress]# docker-compose up -d
Creating network "wordpress_default" with the default driver
Pulling wordpress (s390x/wordpress:latest)...
latest: Pulling from s390x/wordpress
a0a92d62c165: Pull complete
23fb66856860: Pull complete
b38a4e89ae8f: Pull complete
2fa08f5a322d: Pull complete
bbf2af7622ca: Pull complete
3dacb3b3a74e: Pull complete
7b49a00cab66: Pull complete
0226e5908d56: Pull complete
af4747f0be82: Pull complete
caa0c91ea082: Pull complete
ecabe806d92c: Pull complete
5d55f6a2617f: Pull complete
d0e6cfaadf87: Pull complete
0f9356af4b28: Pull complete
e61aa2870c8c: Pull complete
0c6cf289ae6c: Pull complete
22cc2d6c6f63: Pull complete
e43117da3e19: Pull complete
Digest: sha256:435a9522b41c7e2f5c8dd984a5fde0422ecd87cef67811c269601618e21c5b03
Status: Downloaded newer image for s390x/wordpress:latest
Pulling mysql (brunswickheads/mariadb-5.5-s390x:latest)...
latest: Pulling from brunswickheads/mariadb-5.5-s390x
67ebcd5ec325: Pull complete
a3ed95caeb02: Pull complete
817149461e92: Pull complete
124b1e67e903: Pull complete
Digest: sha256:7e67bc8c7d4323dcb3398539f0f819beba4dcae93ded0f72ea6dcf35f39ad10f
Status: Downloaded newer image for brunswickheads/mariadb-5.5-s390x:latest
Creating wordpress_mysql_1 ...
Creating wordpress_wordpress_1 ...
Creating wordpress_mysql_1
Creating wordpress_wordpress_1 ... done查看相关容器的状态:
1 docker-compose ps

[root@virtual-machine wordpress]# docker-compose ps
        Name                       Command               State          Ports
-------------------------------------------------------------------------------------
wordpress_mysql_1       /docker-entrypoint.sh mysq ...   Up      3306/tcp
wordpress_wordpress_1 docker-entrypoint.sh apach ... Up 0.0.0.0:8080->80/tcp登录服务器公网 ip:8080,可看到如下界面:
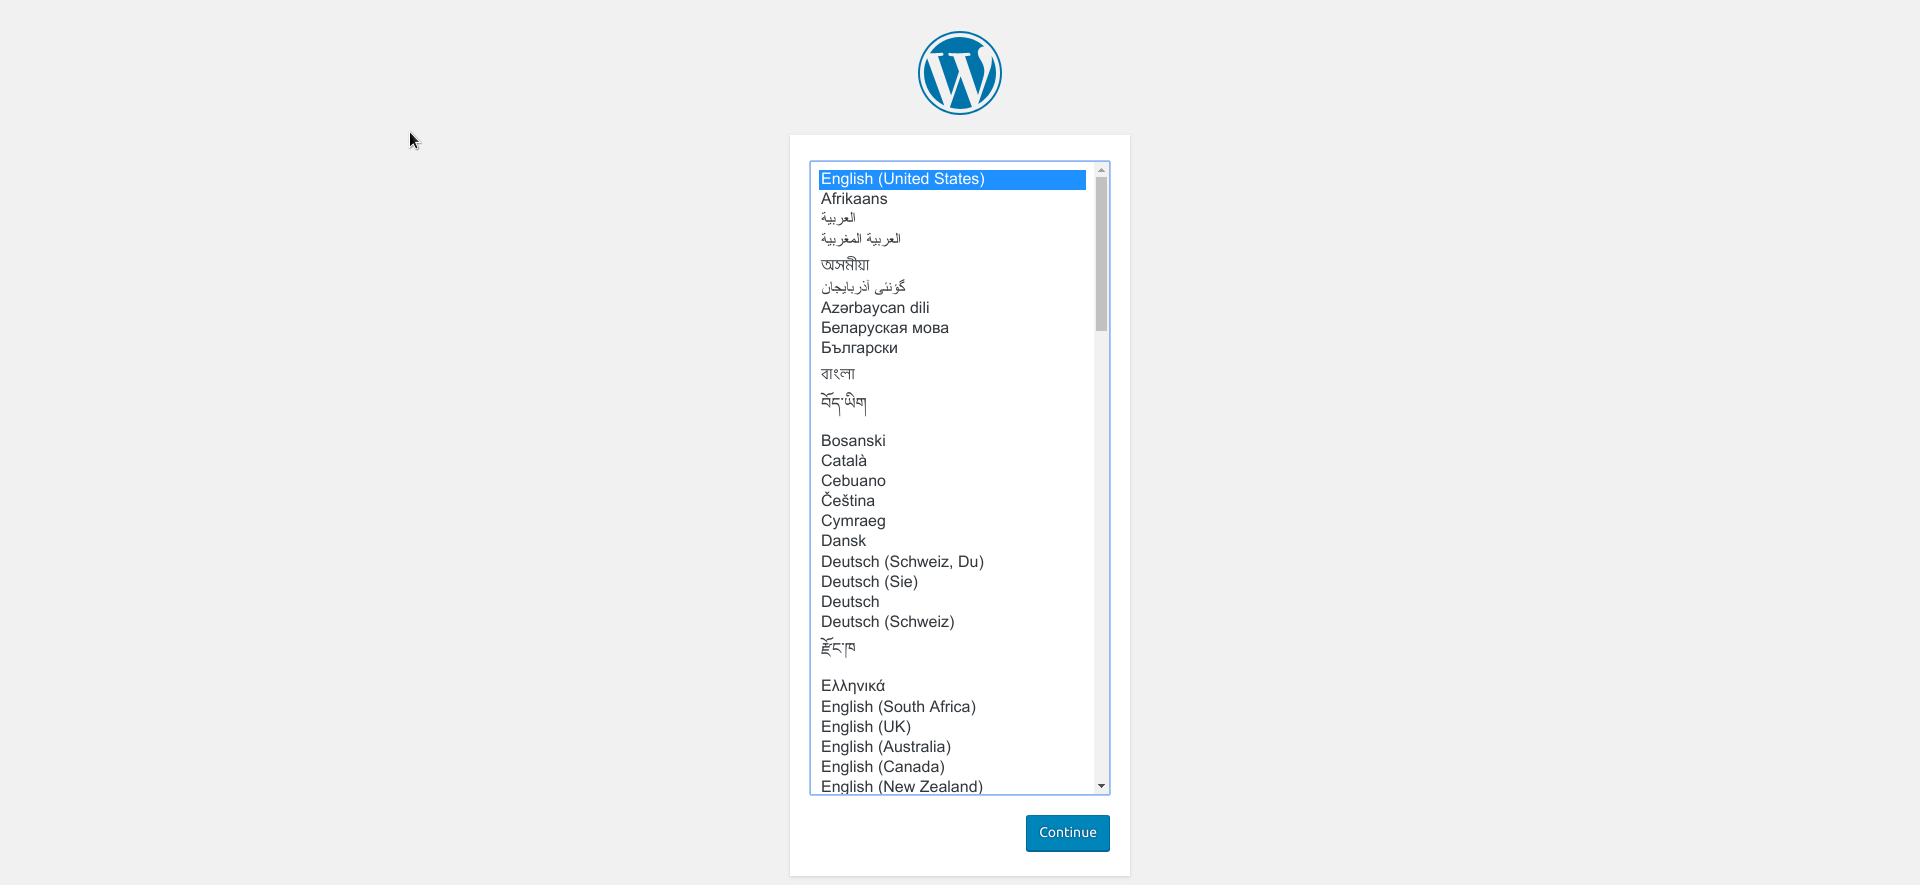
接下来我们要准备 MEAN Stack 环境。
1 cd ~
2 git clone https://github.com/IBM/Cloud-Native-Workloads-on-LinuxONE
3 cp -r Cloud-Native-Workloads-on-LinuxONE/files/mean-docker ./
4 yum install -y tree
5 tree mean-docker

[root@virtual-machine wordpress]# cd ~
[root@virtual-machine ~]# git clone https://github.com/IBM/Cloud-Native-Workloads-on-LinuxONE
Cloning into ''Cloud-Native-Workloads-on-LinuxONE''...
remote: Enumerating objects: 866, done.
remote: Total 866 (delta 0), reused 0 (delta 0), pack-reused 866
Receiving objects: 100% (866/866), 2.80 MiB | 0 bytes/s, done.
Resolving deltas: 100% (102/102), done.
[root@virtual-machine ~]# cp -r Cloud-Native-Workloads-on-LinuxONE/files/mean-docker ./
[root@virtual-machine ~]# yum install -y tree
Loaded plugins: product-id, search-disabled-repos, subscription-manager
This system is not registered with an entitlement server. You can use subscription-manager to register.
Resolving Dependencies
--> Running transaction check
---> Package tree.s390x 0:1.6.0-10.el7 will be installed
--> Finished Dependency Resolution

Dependencies Resolved

====================================================================================================================
 Package                Arch                    Version                          Repository                    Size
====================================================================================================================
Installing:
 tree                   s390x                   1.6.0-10.el7                     rhel7-base                    45 k

Transaction Summary
====================================================================================================================
Install  1 Package

Total download size: 45 k
Installed size: 87 k
Downloading packages:
tree-1.6.0-10.el7.s390x.rpm                                                                  |  45 kB  00:00:00
Running transaction check
Running transaction test
Transaction test succeeded
Running transaction
  Installing : tree-1.6.0-10.el7.s390x                                                                          1/1
  Verifying  : tree-1.6.0-10.el7.s390x                                                                          1/1

Installed:
  tree.s390x 0:1.6.0-10.el7

Complete!
[root@virtual-machine ~]# tree mean-docker
mean-docker
├── docker-compose.yml
├── express-server
│   ├── app
│   │   ├── models
│   │   │   └── todo.js
│   │   └── routes.js
│   ├── config
│   │   └── database.js
│   ├── Dockerfile
│   ├── license
│   ├── package.json
│   ├── public
│   │   ├── index.html
│   │   └── js
│   │       ├── controllers
│   │       │   └── main.js
│   │       ├── core.js
│   │       └── services
│   │           └── todos.js
│   ├── README.md
│   └── server.js
└── README.md

8 directories, 14 files因为我们之前占用了 8080 端口,所以需要修改一下配置文件使服务正常启动。
1 cd mean-docker/
2 vim docker-compose.yml
3 # 把两个8080都改成8081并保存退出
4 vim express-server/Dockerfile
5 # 把8080改成8081,并在文件末尾新建一行添加"ENV PORT 8081"

[root@virtual-machine ~]# cd mean-docker/
[root@virtual-machine mean-docker]# vim docker-compose.yml
[root@virtual-machine mean-docker]# vim express-server/Dockerfile
[root@virtual-machine mean-docker]# ^C
[root@virtual-machine mean-docker]# cat docker-compose.yml
version: ''2'' # specify docker-compose version

# Define the services/containers to be run
services:
  express: #name of the first service
    build: express-server # specify the directory of the Dockerfile
    ports:
      - "8081:8081" #specify ports forwarding
    links:
      - database

  database: # name of the second service
    image: sinenomine/mongodb-s390x # specify image to build container from
    ports:
      - "27017:27017" # specify port forwarding
[root@virtual-machine mean-docker]# cat express-server/Dockerfile
# Create image based off of the official Node 6 image
FROM s390x/ibmnode:latest

# Create a directory where our app will be placed
RUN mkdir -p /usr/src

# Change directory so that our commands run inside this new dir
WORKDIR /usr/src

# Copy dependency definitions
COPY package.json /usr/src

# Install dependecies
RUN npm install

# Get all the code needed to run the app
COPY . /usr/src

# Expose the port the app runs in
EXPOSE 8081

# Serve the app
CMD ["npm", "start"]

# Express listening port
ENV PORT 8081在 mean-docker 目录下运行 docker-compose up:
1 docker-compose up -d

[root@virtual-machine mean-docker]# docker-compose up
Creating network "meandocker_default" with the default driver
Pulling database (sinenomine/mongodb-s390x:latest)...
latest: Pulling from sinenomine/mongodb-s390x
7c5b25b1702b: Pull complete
f7e2beee24dc: Pull complete
f77a8563476a: Pull complete
Digest: sha256:e2c2f0a83664b31d4148b35e6c31895fd8397efec55830823379efa227682bc2
Status: Downloaded newer image for sinenomine/mongodb-s390x:latest
Building express
Step 1/9 : FROM s390x/ibmnode:latest
latest: Pulling from s390x/ibmnode
b1ebf925223c: Pull complete
cd8a07f0c922: Pull complete
2d1c359f5ed9: Pull complete
c35fcc66064c: Pull complete
d624275f8e7d: Pull complete
818d5fa6bb92: Pull complete
64c9cabe7e6e: Pull complete
c052205f20b1: Pull complete
7df1929f5b12: Pull complete
639d72997f7b: Pull complete
Digest: sha256:32e54c7e09999a0113966754324a56009506403fb73635edacc753af0df09213
Status: Downloaded newer image for s390x/ibmnode:latest
 ---> 9a87e4f94692
Step 2/9 : RUN mkdir -p /usr/src
 ---> Running in e30a90bc8bb9
INFO[2622] Layer sha256:11fecd029e26edf344a0dec27d27e73f5f5ab6447296850e7def60577dcf7d12 cleaned up
 ---> d68450f5b19a
Removing intermediate container e30a90bc8bb9
Step 3/9 : WORKDIR /usr/src
INFO[2624] Layer sha256:11fecd029e26edf344a0dec27d27e73f5f5ab6447296850e7def60577dcf7d12 cleaned up
 ---> 834db0a5158c
Removing intermediate container 0acfc10c188c
Step 4/9 : COPY package.json /usr/src
 ---> 6250d20c51df
Removing intermediate container aba7994dfa15
Step 5/9 : RUN npm install
 ---> Running in 987b22a5c3a5
npm notice created a lockfile as package-lock.json. You should commit this file.
npm WARN node-todo@0.0.1 No repository field.

added 82 packages in 2.46s
 ---> 5ce9e9ccc178
Removing intermediate container 987b22a5c3a5
Step 6/9 : COPY . /usr/src
 ---> 2deda2d689e5
Removing intermediate container 3711106be602
Step 7/9 : EXPOSE 8081
 ---> Running in 856746e042e0
INFO[2640] Layer sha256:d382aae1568c2bb9c4a9fb25b7d809059d4742b00bfd7df97b34bc2a42938a70 cleaned up
 ---> 0b78f2cfb933
Removing intermediate container 856746e042e0
Step 8/9 : CMD npm start
 ---> Running in 9e32fa5348f2
INFO[2646] Layer sha256:d382aae1568c2bb9c4a9fb25b7d809059d4742b00bfd7df97b34bc2a42938a70 cleaned up
 ---> ff4f8b8205a2
Removing intermediate container 9e32fa5348f2
Step 9/9 : ENV PORT 8081
 ---> Running in e369dd139028
INFO[2650] Layer sha256:d382aae1568c2bb9c4a9fb25b7d809059d4742b00bfd7df97b34bc2a42938a70 cleaned up
 ---> 470ea5a42df7
Removing intermediate container e369dd139028
Successfully built 470ea5a42df7
Successfully tagged meandocker_express:latest
WARNING: Image for service express was built because it did not already exist. To rebuild this image you must use `docker-compose build` or `docker-compose up --build`.
Creating meandocker_database_1 ...
Creating meandocker_database_1 ... done
Creating meandocker_express_1 ...
Creating meandocker_express_1 ... done
Attaching to meandocker_database_1, meandocker_express_1
database_1  | note: noprealloc may hurt performance in many applications
express_1   |
express_1   | > node-todo@0.0.1 start /usr/src
express_1   | > node server.js
express_1   |
express_1   | App listening on port 8081
express_1 | (node:17) DeprecationWarning: `open()` is deprecated in mongoose >= 4.11.0, use `openUri()` instead, or set the `useMongoClient` option if using `connect()` or `createConnection()`. See http://mongoosejs.com/docs/4.x/docs/connections.html#use-mongo-client然后还要修改 index.html 里的 angular 的引用地址。因为某些大家都懂的原因,会导致访问速度非常慢。
1 vim mean-docker/express-server/public/index.html
2 #找到<script src="****angular.min.js">那一行,把引号内容修改为下面的地址即可
3 http://cdn.staticfile.org/angular.js/1.2.16/angular.min.js
此时访问服务器公网 ip:8081 即可使用一个 Todo App。实验一也就到此结束了。
实验二也是把一个 app 部署到云服务器上。这次我们需要登录自己的 github 账户,并 fork https://github.com/IBM/ICp-banking-microservices,然后 clone 到本机中 (不是服务器)。用 vscode 打开 repo 里的 banking-application 文件夹 (然后不用理它)。
浏览器访问 https://developer-contest-spbodieusibmcom-prod.developer.us.apiconnect.ibmcloud.com 并注册一个账户 (邮箱必须与注册 IBM ID 的邮箱相同)
注册完毕后登录,在 Apps 选项卡下点击 Create new App 创建新应用,Title 输入 My Banking Application 即可,之后点击 Submit 提交。这时需要记录下 Client ID 和 Client Secret,之后会用到。
然后需要申请 banking API。在 API Products 选项卡下找到 Banking Product,点击Subscribe申请Default Plan,选择刚才创建的应用My Banking Application。
最后回到 vscode,打开 banking-application/public/js/bankingAPI.js 并修改里面的 Client ID 和 Client Secret。在vscode里启动终端:
1 npm install
2 node app.js
此时浏览器访问 http://localhost:3000,即可使用应用。随便选择一个 customer ID 测试,若有 JSON 格式的数据返回,则说明 API 可用。(实际上经常出现超时的情况)
更新代码并推送到远程仓库:
1 git add public/js/bankingAPI.js
2 git commit -m "Update of bankingAPI.js"
3 git push origin master
回到服务器终端,把刚刚更新完的 repo clone 下来:
1 cd ~
2 git clone https://github.com/JHSeng/ICp-banking-microservices.git
之后使用 docker build 命令构建镜像:
1 cd ICp-banking-microservices/
2 cd banking-application/
3 ls
4 #可以把jhseng改成你的用户名
5 docker build -t "jhseng-banking-image:latest" ./

[root@virtual-machine ~]# cd ICp-banking-microservices/
[root@virtual-machine ICp-banking-microservices]# cd banking-application/
[root@virtual-machine banking-application]# ls
app.js  Dockerfile  package.json  public
[root@virtual-machine banking-application]# docker build -t "jhseng-banking-image:latest" ./
Sending build context to Docker daemon  316.9kB
Step 1/9 : FROM ibmcom/ibmnode
latest: Pulling from ibmcom/ibmnode
b1ebf925223c: Already exists
cd8a07f0c922: Already exists
2d1c359f5ed9: Already exists
c35fcc66064c: Already exists
d624275f8e7d: Already exists
818d5fa6bb92: Already exists
64c9cabe7e6e: Already exists
c052205f20b1: Already exists
7df1929f5b12: Already exists
639d72997f7b: Already exists
Digest: sha256:44c68d2ee535472c3be166263bd5c3f0f208da64d59deb19fcd8c409ad0d9908
Status: Downloaded newer image for ibmcom/ibmnode:latest
 ---> 9a87e4f94692
Step 2/9 : WORKDIR "/app"
 ---> b11ff994a9ba
Removing intermediate container 24b113bc87db
Step 3/9 : COPY package.json /app/
 ---> 6a5bab8455bd
Removing intermediate container e857801a6aaf
Step 4/9 : RUN cd /app; npm install; npm prune --production
 ---> Running in 21acc1391fa2
npm notice created a lockfile as package-lock.json. You should commit this file.
npm WARN banking-application@1.0.0 No repository field.

added 58 packages in 1.672s
npm WARN banking-application@1.0.0 No repository field.

up to date in 0.217s
 ---> 3479d760c479
Removing intermediate container 21acc1391fa2
Step 5/9 : COPY . /app
 ---> 1f716ac1e072
Removing intermediate container f3fce68e43a6
Step 6/9 : ENV NODE_ENV production
 ---> Running in 6d99b81bf11c
INFO[4152] Layer sha256:7c0bd4434c13bc4e8510693eaf43b29d2e2dec4a8b4e61cb72a428781511c4ae cleaned up
 ---> b2a5fa1cd291
Removing intermediate container 6d99b81bf11c
Step 7/9 : ENV PORT 3000
 ---> Running in b6d671bdfff3
INFO[4155] Layer sha256:7c0bd4434c13bc4e8510693eaf43b29d2e2dec4a8b4e61cb72a428781511c4ae cleaned up
 ---> f50429c9c3aa
Removing intermediate container b6d671bdfff3
Step 8/9 : EXPOSE 3000
 ---> Running in 970f3c104aea
INFO[4159] Layer sha256:7c0bd4434c13bc4e8510693eaf43b29d2e2dec4a8b4e61cb72a428781511c4ae cleaned up
 ---> f910bdb952f5
Removing intermediate container 970f3c104aea
Step 9/9 : CMD npm start
 ---> Running in 2480f35ef6c8
INFO[4163] Layer sha256:7c0bd4434c13bc4e8510693eaf43b29d2e2dec4a8b4e61cb72a428781511c4ae cleaned up
 ---> 47523b9ade76
Removing intermediate container 2480f35ef6c8
Successfully built 47523b9ade76
Successfully tagged jhseng-banking-image:latest运行容器:
1 docker run -p 3000:3000 jhseng-banking-image访问服务器公网 ip:3000 即可访问应用。
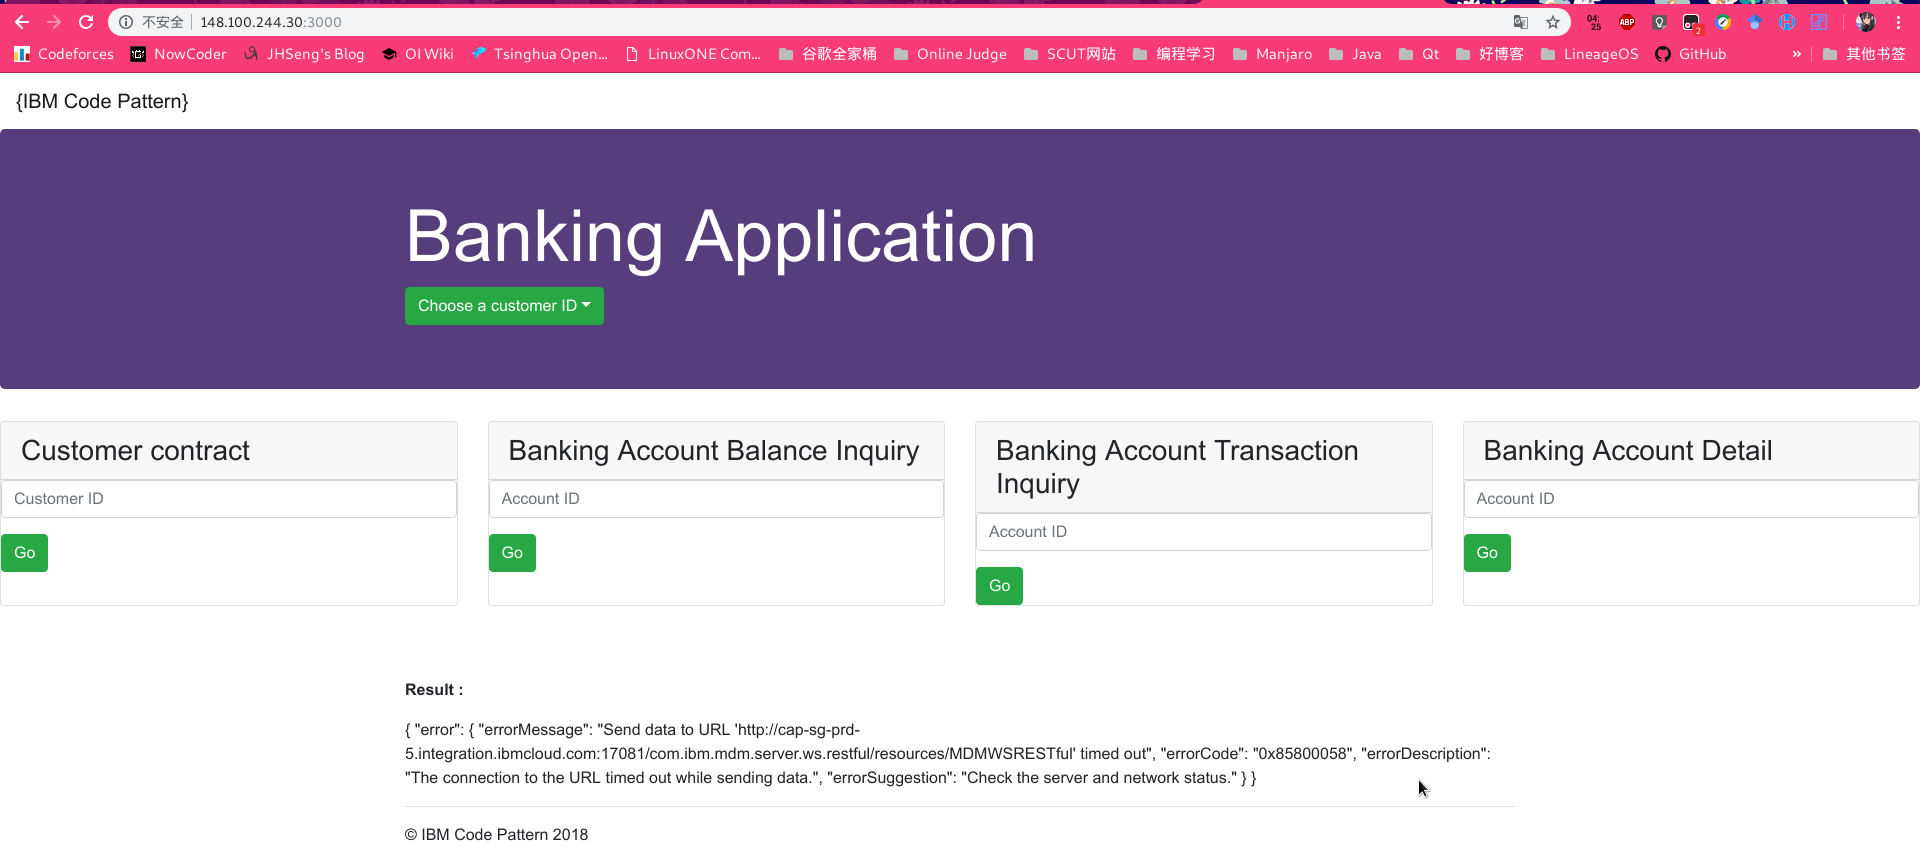
day1 的实验到此结束。
Day 2:
day2 的实验需要用到 container (就是之前注册 linuxONE 账户之后看不到的那个选项卡)。注册地址:https://linuxone.cloud.marist.edu/cloud/#/register?flag=container。务必使用注册 linuxONE 用的邮箱,填完之后邮箱下面会出现提示,直接点 click here 再去验证邮件即可。
点击 container 并登陆,就可以看到欢迎界面。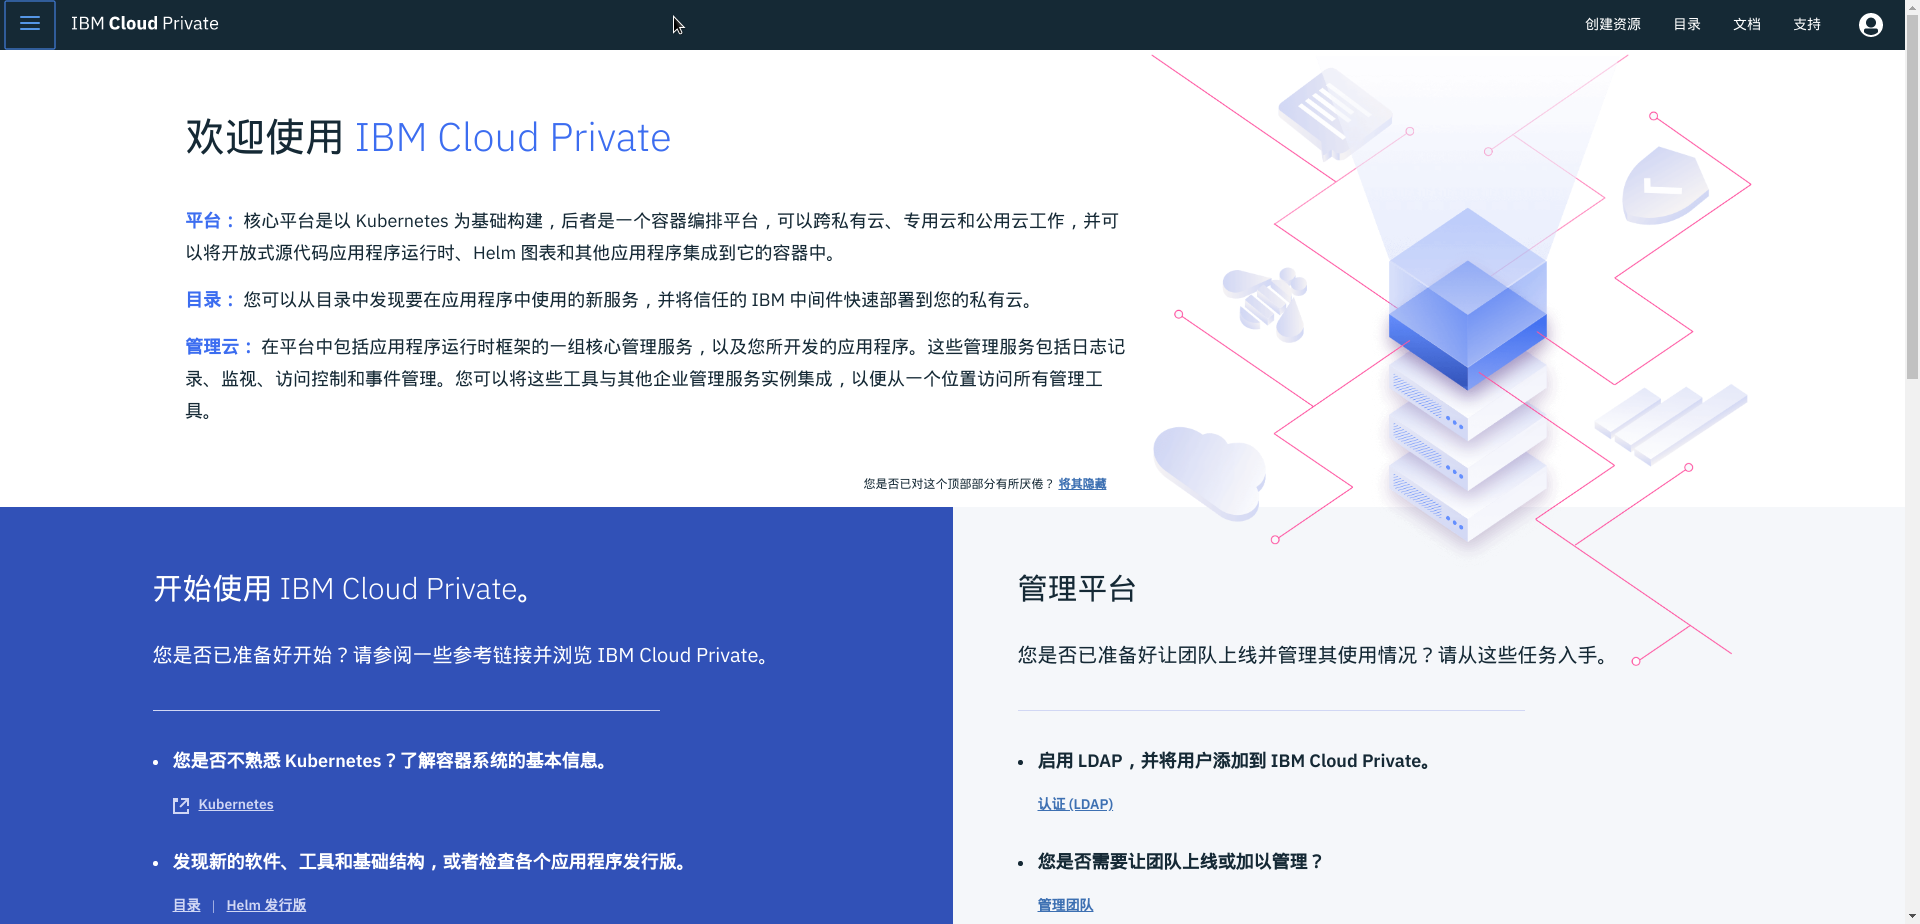
点击右上角的目录 (加载速度巨慢,IBM 的工程师说就是土豆服务器,连 100 人的并发都支持不了),然后就可以看到若干软件包。选择 openmplbank 并点击 config,填个发行版名称,选择一下目标名称空间就 ok 了,剩下都不用改。点击安装,会弹出安装已经开始并查看 helm 发行版的提示,点击就可以看到我们已经部署好的应用了。
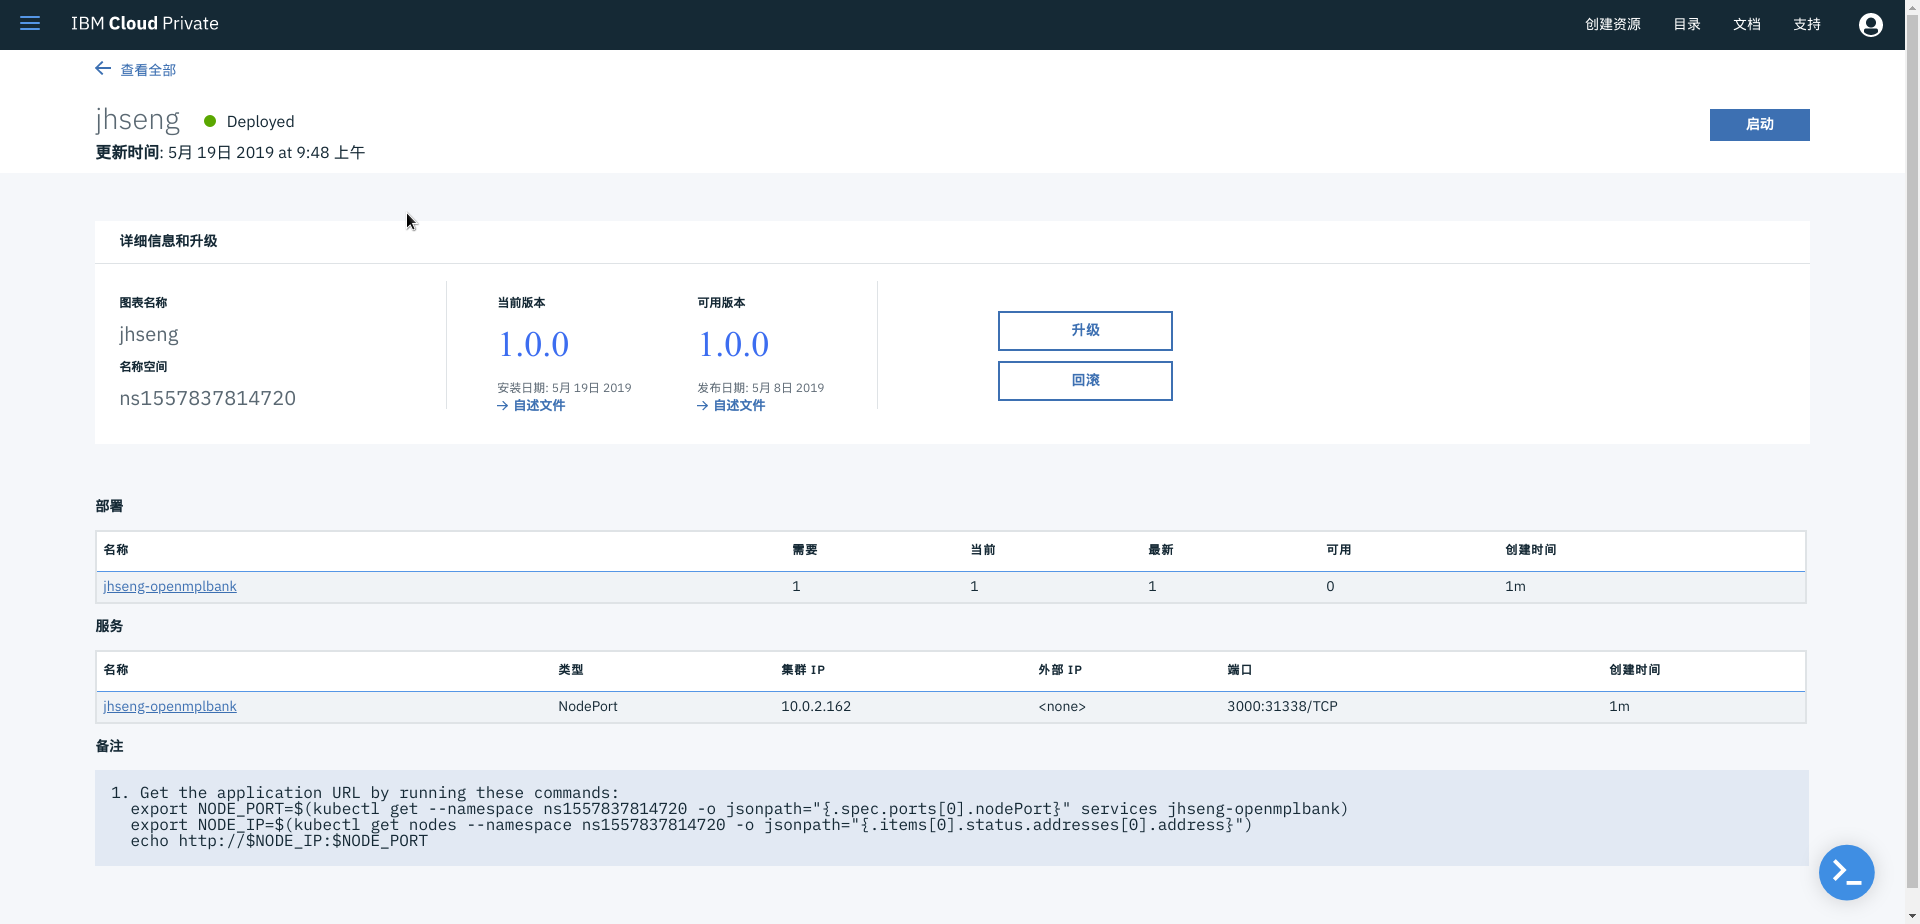
点击右上角的启动,就可以看到之前我们手动部署 app 成功之后的页面。
之后老师有一个大作业 demo 展示,这里给出 b 站视频:https://www.bilibili.com/video/av52951028/

10+ commonly using find command switches with example Unix/Linux
http://crybit.com/find-command-usage-with-example-unixlinux/
find command is one of the best search tool under UNIX/LINUX. Here I’m discussing some common switches of find command with detailed example. Like the name find,the “find” command is using for search files under a directory hierarchy. One simle example is shown below,find / name linux ;here the second part that means “/” has an important role in the find command Syntax. This is the path for searching the file having name linux. This command will return the file linux if it is exist under “/” .
Numeric arguments
+n >> for greater than n,-n >> for less than n,n >> for exactly n.
Switchs and usage:
1. -name pattern ==> Find the matched name pattern.
1.1 -iname pattern ==> Like -name,but the match is case insensitive.Examples;
# find / -name test123.txt
/home/***/crybit/test123.txt
# find / -iname TeSt123.txt

/home/***/crybit/test123.txt
# find / -iname TeSt.txt

/home//crybit/test123.txt
# find / -name te**.txt

/home/***/crybit/test123.txt
2. -path pattern ==> It will list out the exact path if it is exist.
Examples,
# find / -path "/e**wd"
/etc/pam.d/chpasswd
/etc/pam.d/passwd
/etc/cron.daily/passwd
/etc/passwd
/etc/security/opasswd
............
# find / -path "/us**.conf"
/usr/share/onboard/onboard-defaults.conf
/usr/share/popularity-contest/default.conf
/usr/share/base-files/nsswitch.conf
/usr/share/samba/smb.conf
............
# find / -path "/us**.sh"
/usr/share/onboard/scripts/changekbd.sh
/usr/share/alsa-base/alsa-info.sh
/usr/share/libreoffice/shell-lib-extensions.sh
/usr/share/debconf/confmodule.sh
............
3. -perm mode ==> File’s permission bits are exactly mode (octal or symbolic).
Example;# lltotal 8drwxrwxr-x 2 root root 4096 Sep 5 20:37 ./drwxr-xr-x 34 root root 4096 Sep 5 19:52 ../-rwxrwxrwx 1 root eclinux 0 Sep 5 20:37 test1234.txt*-rwx–x–x 1 root root 0 Sep 5 20:37 test1235.txt*-rw-rw-r– 1 root root 0 Sep 5 20:38 test123.txt
# find ./ -perm 664./test123.txt{./ is the path for searching(current directory). This will find out the file having permission 664}
3.1 -readable >> Matches files which are readable.
3.2 -writable >> Matches files which are writable.
3.3 -executable >> Matches files which are executable.
Example;
# find ./ -executable
./
./test1235.txt
./test1234.txt
4. -gid & -uid
4.1 -gid n >> File's numeric group ID is n.
4.2 -group gname >> File belongs to group gname (numeric group ID allowed).
4.3 uid n >> File's numeric user ID is n.
4.4 -user name >> File belongs to user name (numeric user ID allowed).
Examples;
# ll
total 8
drwxrwxr-x 2 root root 4096 Sep 5 20:37 ./
drwxr-xr-x 34 root root 4096 Sep 5 19:52 ../
-rwxrwxrwx 1 root eclinux 0 Sep 5 20:37 test1234.txt*
-rwx--x--x 1 root root 0 Sep 5 20:37 test1235.txt*
-rw-rw-r-- 1 root root 0 Sep 5 20:38 test123.txt
# find ./ -gid 1003

./test1234.txt
find ./ -group eclinux
./test1234.txt
Similarly we can use -uid & -user.
5. -empty : this will find all files having empty content.
Example;
# find ./ -empty
./test1235.txt
./test1234.txt
./test123.txt
6. -size n[cwbkMG] ==> File uses n units of space. The following suffixes can be used:
'b' for 512-byte blocks (this is the default if no suffix is used)
'c' for bytes
'w' for two-byte words
'k' for Kilobytes (units of 1024 bytes)
'M' for Megabytes (units of 1048576 bytes)
'G' for Gigabytes (units of 1073741824 bytes)
7. -type ==> Specify the file type.
b block (buffered) special
c character (unbuffered) special
d directory
p named pipe (FIFO)
f regular file
l symbolic link
s socket
D door (Solaris)
Example;
# find ./ -type f
./test1235.txt
./test1234.txt
./test123.txt
8. Switches related to modification time
8.1 -amin n >> File was last accessed n minutes ago.
8.2 -atime n >> File was last accessed n*24 hours ago.
8.3 -cmin n >> File's status was last changed n minutes ago.
8.4 -ctime n >> File's status was last changed n*24 hours ago.
8.5 -mmin n >> File's data was last modified n minutes ago.
8.6 -mtime n >> File's data was last modified n*24 hours ago.
Example;
# find ./ -mmin +1
./test1235.txt
./test1234.txt
9. inode & links
9.1 -inum n >> File has inode number n.
9.2 -samefile name >> File refers to the same inode as name.
9.3 -links n >> File has n links.
Example;
ls -i to find out the inode number.
# ls -i test123.txt
1316256 test123.txt
# find ./ -inum 1316256
./test123.txt
# ll

total 8

drwxrwxr-x 2 root root 4096 Sep 5 20:37 ./

drwxr-xr-x 34 root root 4096 Sep 5 19:52 ../

-rwxrwxrwx 1 root eclinux 0 Sep 5 20:37 test1234.txt

-rwx--x--x 1 root root 0 Sep 5 20:37 test1235.txt

-rw-rw-r-- 1 root root 0 Sep 5 20:38 test123.txt


find ./ -links 1
./test1235.txt

./test1234.txt

./test123.txt
All three files having single links.
10. -delete & -exec operations
10.1 -delete : This switch is use to remove a particular that already specified in the find command. Use this switch with extra care.
Example;
# find ./ -inum 1316256
./test123.txt
# find ./ -inum 1316256 -delete
# find ./ -inum 1316256
In this case,-delete switch remove the file test123.txt . Similarly we can remove anything that found by find command.
10.2 -exec : This will execute commands on the find Syntax.
Example;
# ll
total 8
drwxrwxr-x 2 root root 4096 Sep 5 20:37 ./
drwxr-xr-x 34 root root 4096 Sep 5 19:52 ../
-rwxrwxrwx 1 root eclinux 0 Sep 5 20:37 test1234.txt*
-rwx--x--x 1 root root 0 Sep 5 20:37 test1235.txt*
-rw-rw-r-- 1 root root 0 Sep 5 20:38 test123.txt
Run the command to change the permission.
# find ./ -type f -exec chmod 777 {} \;
# ll
total 8
drwxrwxr-x 2 root root 4096 Sep 5 20:37 ./
drwxr-xr-x 34 root root 4096 Sep 5 19:52 ../
-rwxrwxrwx 1 root eclinux 0 Sep 5 20:37 test1234.txt*
-rwxrwxrwx 1 root root 0 Sep 5 20:37 test1235.txt*
-rwxrwxrwx 1 root root 0 Sep 5 20:38 test123.txt*
the chmod command after -exec in find command change the file permission to 777.
# find ./ -type f -exec rm -rf {} \;
This will remove all files in the current working directory.
I think this article gave some ideas about the usages of find command under UNIX/LINUX to you.Thank you for your time.
More:, , , , , , , , , , , , ,
5.7.23(mysql-installer-community-5.7.23.0.msi)")
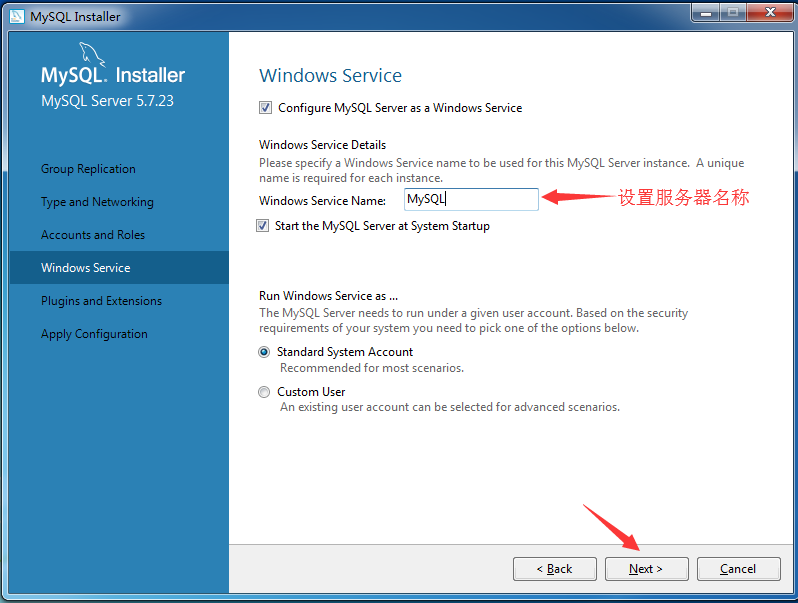
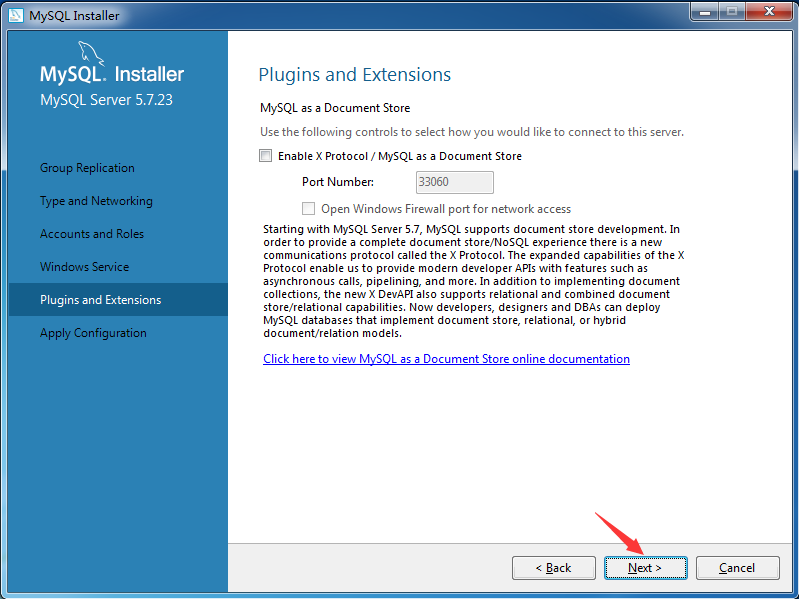
64位Windows7安装MySQL社区版(community)5.7.23(mysql-installer-community-5.7.23.0.msi)
系统环境:
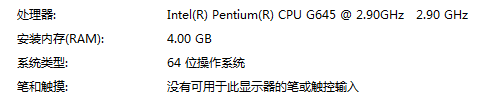
操作系统:Windows7 旗舰版 64位
MySQL安装包(版本):mysql-installer-community-5.7.23.0.msi (32bit)
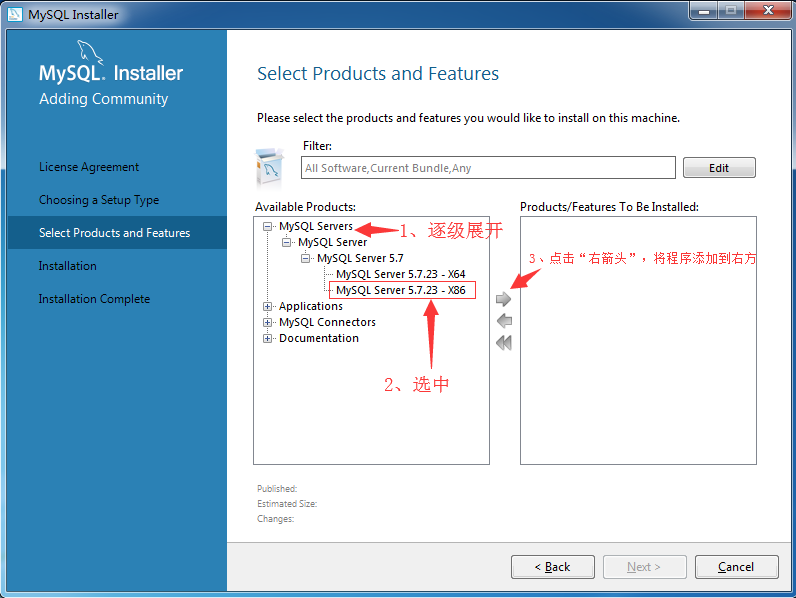
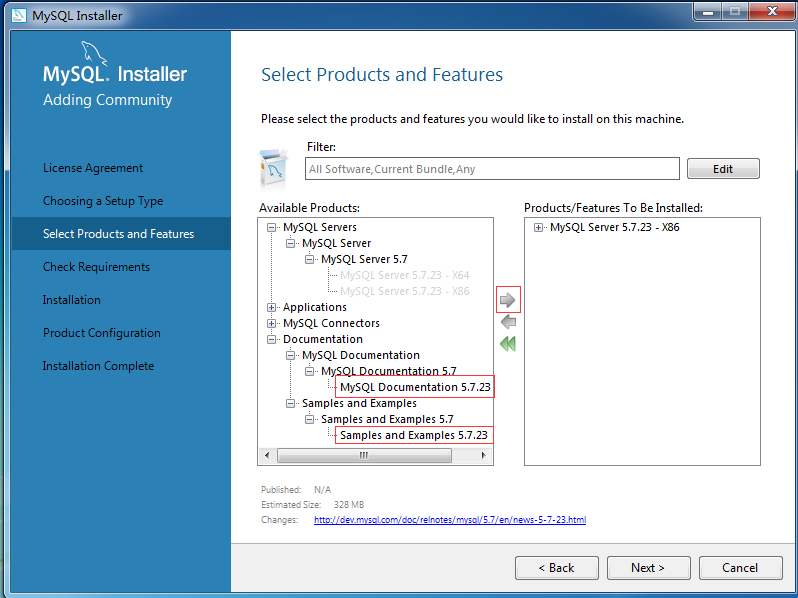
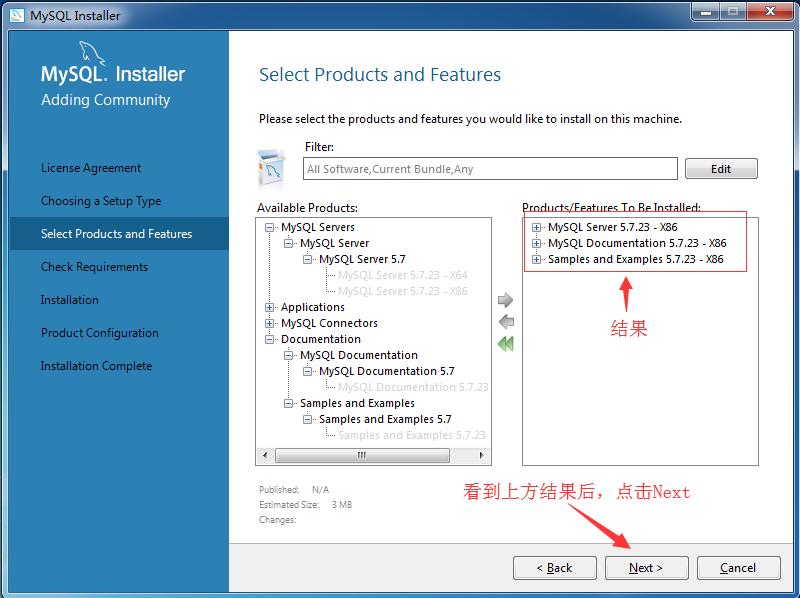
MySQL选择的安装类型:自定义安装类型(Custom)
接下来开始安装:
1、安装MySQL所需框架.NET Framework 4.5.2(64位。步骤略);
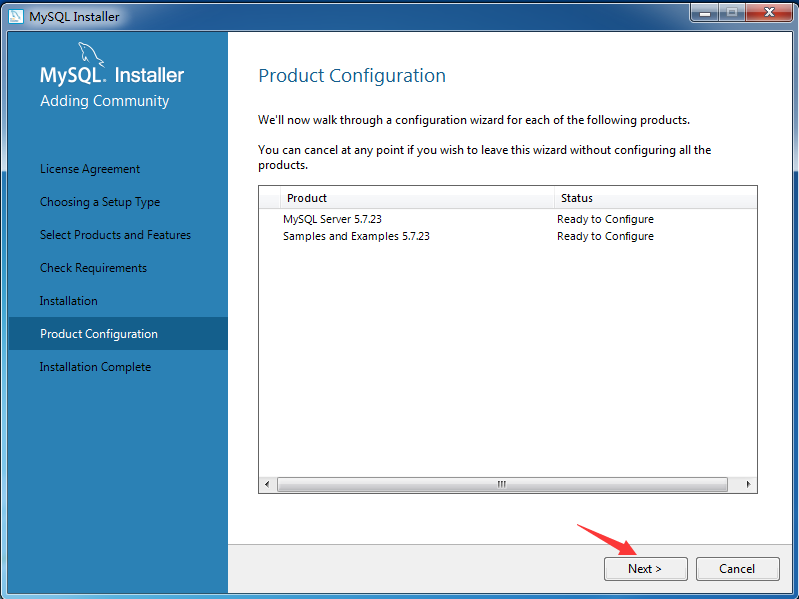
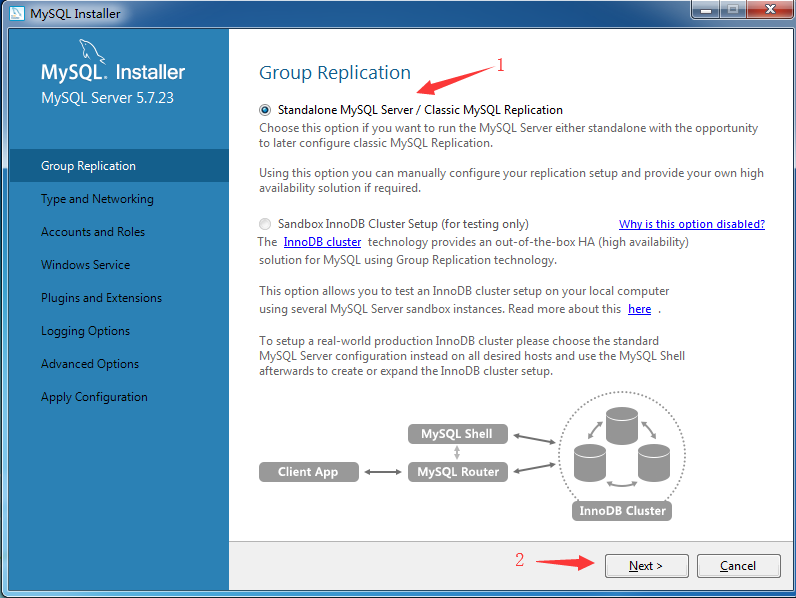
2、双击安装包mysql-installer-community-5.7.23.0.msi,弹出安装界面;


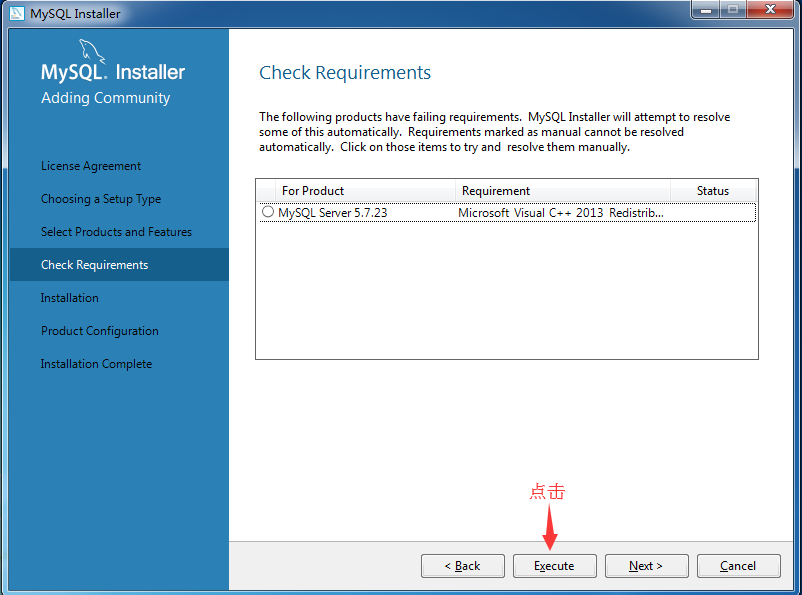
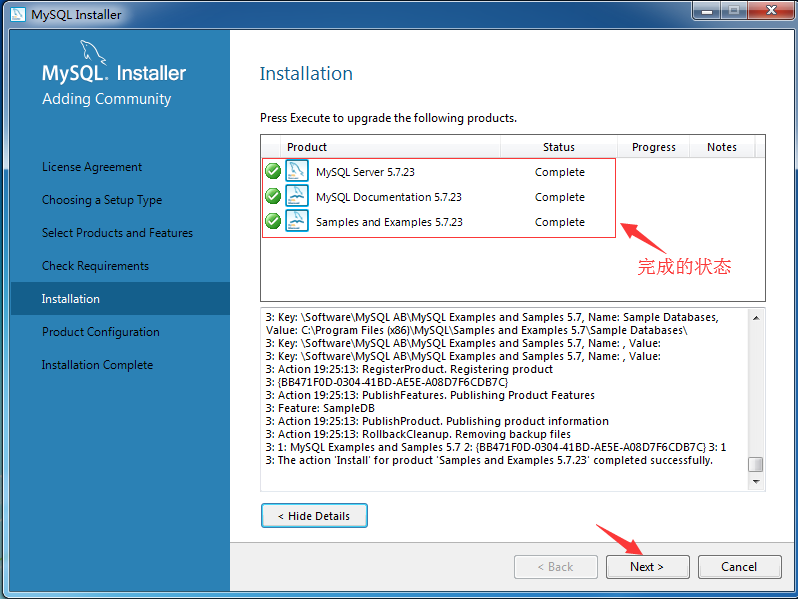
然后程序就开始安装了......
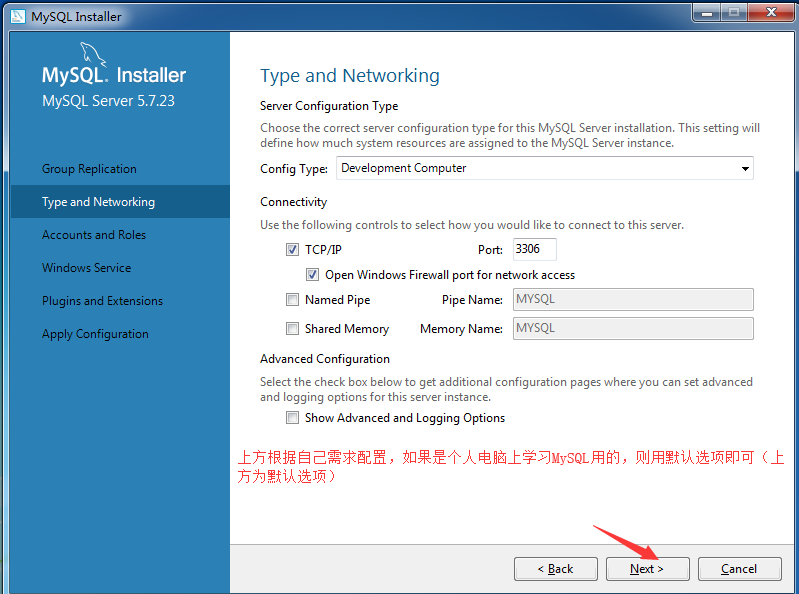
如果此时3306端口被占用,可参考 CMD中查看【端口】与【相关进程】
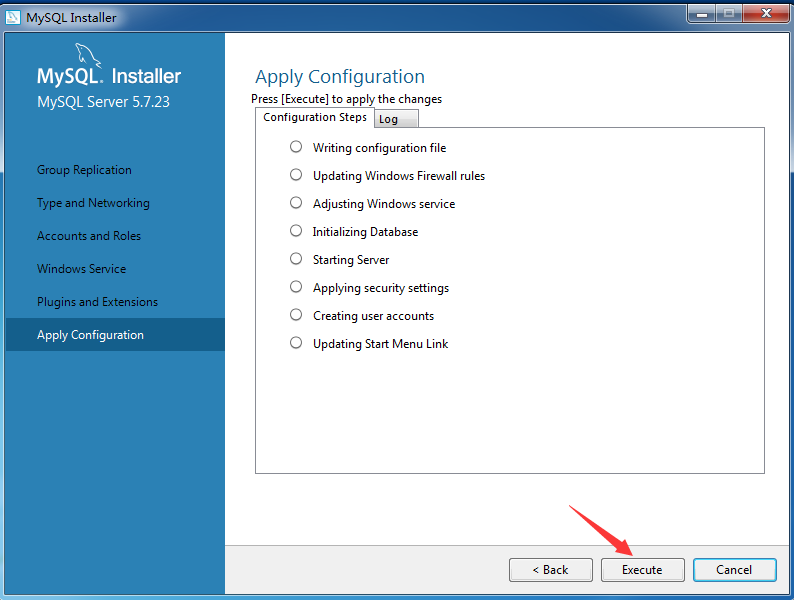
等待......
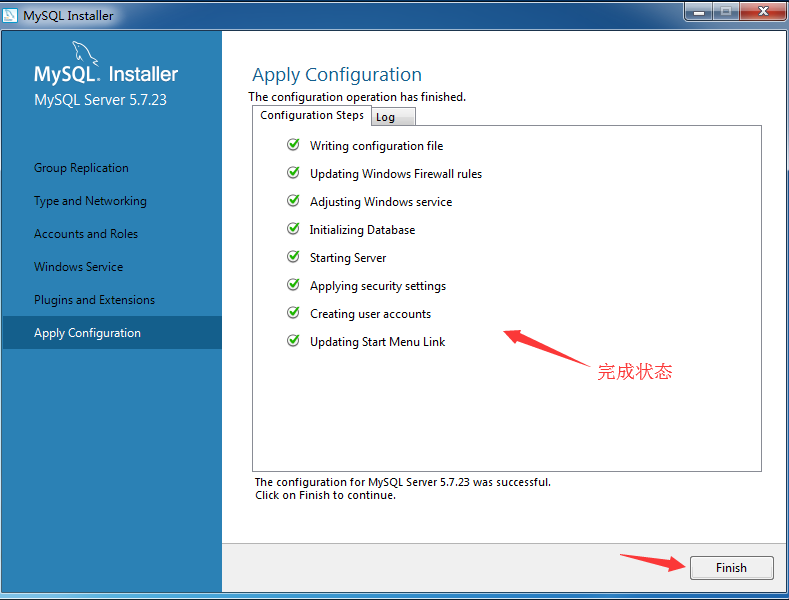
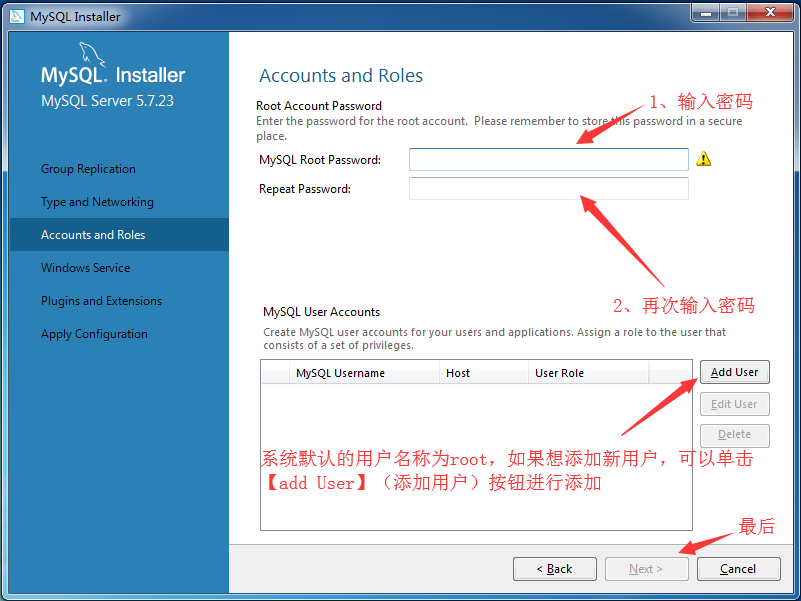
如果我们在windows10系统中安装mysql后,没有配置环境变量的话,在使用命令行(CMD)进行mysql操作时就必须要进入mysql安装目录中的bin目录才行。这样操作起来感觉会非常麻烦。这该怎么办呢?请参考:win10系统中配置mysql环境变量的方法

Citrix收购云计算软件公司Cloud.com
北京时间7月12日晚间消息,计算机网络软件厂商Citrix Systems周二表示,已同意收购创业企业Cloud.com。Citrix没有公布这笔收购的价格,Cloud.com的软件能帮助企业将计算任务转移至大型数据中心。
Citrix表示,通过这笔收购,该公司客户将可以以更快的速度、更便宜的价格使用云计算软件。收购完成后,Citrix将进军云计算基础设施软件领域,而相关业务的营收到2013年时预计将达到80亿美元。
通过Cloud.com,Citrix将专注于私有云技术,即帮助企业在自己的服务器上运行云计算服务。例如,企业的分公司将可以在不同地点连接至公司的数据中心。而服务提供商也可以使用Cloud.com的软件为客户提供计算服务。
收购完成后,Citrix与VMware和亚马逊的竞争将会更加激烈。VMware周二举行了一个新产品发布活动,该公司在虚拟化技术方面处于 领先。 VMware的技术可以提升软件运行效率,从而减少所需的服务器数量。亚马逊网络服务则帮助企业以较低的价格在亚马逊服务器上运行软件,而微软的 Windows Azure也瞄准这一市场。分析师将相关技术称作“基础设施即服务”。
Cloud.com的客户包括Zynga、GoDaddy、诺基亚、塔塔咨询以及韩国运营商KT。Zynga依靠Cloud.com的软件来处理游戏内的巨大流量。诺基亚的研究人员则使用该软件在服务器上搭建环境并运行软件。
Forrester分析师詹姆斯·斯泰滕(James Staten)表示,Cloud.com的CloudStack软件帮助软件自动调用单独的计算和存储设备,来完成工作。相对于VMware和微软的云计 算产品,使用该软件的成本仅为1/10。斯泰滕表示:“如果你利用VMware或微软的平台来搭建云计算系统,你需要与它们分享利润。”
Citrix从上世纪90年代开始发展,该公司的软件帮助Windows PC运行一些存储在服务器或大型机上的较老的应用。这使得企业在部署PC的同时能够保护此前的投资。Citrix目前大部分营收仍来自桌面至网络软件。(张楠)

ClarkConnect Community Edition 5.0 的详细配置

身为网络管理员的你,是否有这样的经历。
市面上买的好几百块钱路由器性能,稳定低下,不能满足企业网络应用苛刻的要求。
市面上买的好上千的路由器, 虽然性能较好, 但功能又有较多局限.
市面上性能好,功能又强大的路由器, 往往好几千才能够得着。
尝试使用软路由!, 付费的一大堆, 配置超级复杂难以操作。
而且对机器的配置, 网卡等硬件要求较高, 动不动就因没有驱动而无法安装。
但现在只要拥有Linux开源软件的帮助,并且再拥有一点来自ClarkConnect的帮助,你就可以将一台标准的PC机转化成一台专用的宽带网关和易用的网络服务器。ClarkConnect对小型企业、家庭办公室和联网家庭而言是一份优秀的解决方案。它在Red Hat的基础上移除了不必要的软件并进行了安全加固,一些有用的Internet网关软件被添加进来,并且安装过程也被设计得更加简便。
最近 ClarkConnect 发布了全新的 Community Edition 5.0 同样基于 RedHat 。
核心版本号为 2.6.18-128.2.16.v5 应该是基于 RedHat As5.x
内置的功能已经可以满足大部分 Home & office 甚至网吧用户的需求。例如:
1,大家最感兴趣的单个用户IP 流量限制。(或者称QOS)
2,强大的防火墙,上网行为管理,轻易封掉用户的 QQ,MSN...的 TM 软件,又或者是 BT,迅雷,emule...
3,构建自己的内网邮件服务器。
4,Proxy 反向代理功能。
...... 等等....
但唯一遗憾的是由于该版本在 ClarkConnect 定位是 for Home & office,所以并不具备双线均衡负载的功能。
项目主页: http://www.clarkconnect.com/ 下载地址: http://www.clarkconnect.com/downloads/
安装方式都是以向导形式的,相对简单!
只要你把下载下来的ISO镜像刻录成光盘.
放到配置不是太太太低的电脑上启动,就能一步步完成系统的安装.
CPU: 不限
内存: 64M 以上
硬盘: 4G 以上
网卡: 最好为常见品牌,型号。
下边是配置过程! 
引导后, 出现第一个界面, 输入 linux 然后回车 
选择语言, 这里万分建议保持默认的英文. 因为经我试验,中文显示出的是乱码.让你无法看。 
键盘布局也维持默认的 US 
选择安装的来源, 选择光驱 
选择安装的模式, 全新安装还是升级, 我们这里选择全新安装 
友情告示, 全新安装将完全删除本机硬盘中所有数据, 请谨慎操作.
确认安装请输入 "ClarkConnect” 
选择工作模式, 网关还是路由, 我们这里选择网关。 
选择你所要共享的网络类型, ADSL 的选 PPPOE, 我的网络环境是 LAN 的,所以选择 Ethernet。 
选择 Ethernet 的类型, 自动获取IP, 或者手动指定。我选择了手动指定. 
输入所指定的
IP地址, 子网俺码.
网关地址.
DNS 服务器地址. 
设置管理员的密码 
硬盘分区的设置, 一般选择第一个默认就ok了. 
选择路由器的配置, 即路由的功能, 建议全部都选上. 
选择路由器的高级服务, 例如 httpd 服务器, 邮件服务器, FTP服务器, 文件服务器....
建议都选上, 顶多占多几百M空间. 不如以后想到要用起就必须重装才有了。 
确认你所有的配置, 选择 Done 开始安装。 
安装进行中 
安装完毕后需重新启动 
重新启动后本地所看到的界面。
然后在你内网的机器, ping 一下你刚才在路由器上所设置的 ip。
看路由器是否已经连上网络。
一般如果ping不同, 试试调换一下内网跟外网的网线。
好了, 这时候可以把本机的鼠标键盘卸下了. 我们可以通过web界面远程配置路由器。 
打开浏览器 输入 https://路由器ip:81
例如 https://192.168.1.1:81/
请注意是 https 而不是 http 很多网友都因为这样无法登陆倒web而苦恼。
接下来就可以按照下边的图一步步照着做。 
选择语言,只能是 English 了,中文的话肯定乱码 
默认 DNS server #1 填写的地址是 127.0.0.1 的
推荐修改为 202.96.128.86 (中国电信DNS的IP) 
第三步是在线注册的账号, 可以跳过 
第四步是选择时区, 我们选亚洲香港。 
第五步是路由器的名字, 可以写你自己喜欢的。 
第六也是类似注册的信息,不可以跳过,就硬着头皮随便填点什么吧。
完成后我们就可以正式进行设置了。
首先现在作为网关的路由器应该是能正常对网络进行服务了。
就是说已经是能上网了。
基本的功能完成后,我们可以根据需要再做些设置。
例如是, 开启并设置 DHCP, 自动分配IP功能。
IP 速度规划(限速) 功能。
下边是 DHCP
在Network 菜单中选择 DHCP 

配置很简单, 我就不详细说了。
下边是 IP 规划,限速.
在Network 菜单中选择 Bandwidth 

把 IP 规划服务开启。
先设置总宽带, 例如我把上传跟下载都设置成 4096 即 4M (400K)
然后再往下设置受限制的IP范围.
选择 Bindwith Manager 中的 Add Advanced Rule
如图所示, IP Address / IP address Range 选项为 Destination 。
IP范围由 192.168.1.100 至 192.168.1.150
Port 端口号 选项为 Destination 后边的输入框为空即所有端口。
Direction 限制类型为 Download / upload (下载/上传)
Rate 跟 Ceiling 都设置为 所允许的最大流量数。
Greed 优先级可以为 Medium 中等。
然后点 Add 即可添加到 Bandwidth 列表中。
速度控制立即起效
备注,在使用ADSL 这种上下行非对称宽带的时候,按照上面的设置,upload 限速可能会不起效。
如果遇到这个问题,需要在设置upload速率的时候把 IP Address / IP address Range 选项设为 Source
监控功能: 
ClarkConnect Community Edition 5.0 内置有系统状况监控功能。
在 Reports 菜单中选择 Statistcs 就能看到包括网卡流量, 内存, CPU, .... 的曲线图。
相当专业。(貌似这图是 MRTG 出的呵..)
但, ClarkConnect 并没有内置 SNMP 功能。
如果你想通过snmp软件统一监控设备的话, 未免有点麻烦。
但这好解决! 因为 ClarkConnect 是基于 RedHat 核心构建的.
我们可以自己装!!
就跟普通linux Redhat 一样. 使用 putty 等ssh工具。
远程登录到路由器.
账号 root 密码 跟是你所设置的管理员密码
其实就是个 Linux 系统。
clarkconnect 为了缩小体积, 紧紧集成了满足基本自身系统基本功能的软件包。
但值得一赞的是,其在保持瘦身的前提下,还保留了 YUM 。
熟悉Linux 的朋友就不用多说了吧? Yum 能够很好的解决 rpm 之间的依存关系,自动从网上或者本地自动安装好你所需要的软件包。
这么我们就现在就只需在 clarkconnect 的 ssh 控制台上输入命令
# yum install net-snmp*
稍等一下,就会自动把以下所有包都下载并提示是否安装。
# rpm -ivh lm_sensors-2.10.0-3.1.i386.rpm --nodeps
# rpm -ivh lm_sensors-devel-2.10.0-3.1.i386.rpm --nodeps
# rpm -ivh net-snmp-5.3.1-24.el5.i386.rpm --nodeps
# rpm -ivh net-snmp-devel-5.3.1-24.el5.i386.rpm --nodeps
# rpm -ivh net-snmp-libs-5.3.1-24.el5.i386.rpm --nodeps
# rpm -ivh net-snmp-utils-5.3.1-24.el5.i386.rpm --nodeps
安装完毕后,就普通RedHat Linux 修改snmpd 配置一样.
# vim /etc/snmpd/snmpd.conf
把配置修改为 Cacti 可读取的模式后保存.
# service snmpd start (启动 snmpd 服务)
# ntsysv (系统服务选项中把 snmpd 项选中,即可在重启路由的时候都自动开启)
成功后 cacti 就能顺利读取到路由的 系统状态了. 
至此,大功告成!!
ClarkConnect Community Edition 5.0 最基本的应用配置我就写到这里。
但这个强大的软路由系统能做的远远不止这些!
例如内置的不单是传统的防火墙,还集成了上网行为管理。 ”Protocol filter“

能通过屏蔽协议来达到例如 封QQ,BT,MSN 等..近百个的控制。
而且我们之前安装时勾选的特殊服务都还没有介绍到。
这些都交给你们去研究实践了.
总之.ClarkConnect 基于 RedHat linux 而构建的。就拥有了无限了可能!!
今天的关于华工软院 IBM LinuxONE Community Cloud 云计算实验文档和华工软件学院院长的分享已经结束,谢谢您的关注,如果想了解更多关于10+ commonly using find command switches with example Unix/Linux、64位Windows7安装MySQL社区版(community)5.7.23(mysql-installer-community-5.7.23.0.msi)、Citrix收购云计算软件公司Cloud.com、ClarkConnect Community Edition 5.0 的详细配置的相关知识,请在本站进行查询。
本文标签:


![[转帖]Ubuntu 安装 Wine方法(ubuntu如何安装wine)](https://www.gvkun.com/zb_users/cache/thumbs/4c83df0e2303284d68480d1b1378581d-180-120-1.jpg)

