本文将为您提供关于ASP.NETWebAPI项目自定义接口路由和HTTP请求方式的详细介绍,我们还将为您解释asp.netwebapi设计的相关知识,同时,我们还将为您提供关于.NET6-Asp.Ne
本文将为您提供关于ASP.NET Web API项目自定义接口路由和HTTP请求方式的详细介绍,我们还将为您解释asp.net web api设计的相关知识,同时,我们还将为您提供关于.NET6-Asp.Net Core webapi -从零开始的webapi项目、Android HTTP请求方式Android HTTP请求方式、asp.net core webapi项目配置全局路由的方法示例、ASP.NET Web API项目自动生成接口文档和测试页面的实用信息。
本文目录一览:- ASP.NET Web API项目自定义接口路由和HTTP请求方式(asp.net web api设计)
- .NET6-Asp.Net Core webapi -从零开始的webapi项目
- Android HTTP请求方式Android HTTP请求方式
- asp.net core webapi项目配置全局路由的方法示例
- ASP.NET Web API项目自动生成接口文档和测试页面
")
ASP.NET Web API项目自定义接口路由和HTTP请求方式(asp.net web api设计)
总结
以上是小编为你收集整理的ASP.NET Web API项目自定义接口路由和HTTP请求方式全部内容。
如果觉得小编网站内容还不错,欢迎将小编网站推荐给好友。

.NET6-Asp.Net Core webapi -从零开始的webapi项目
本项目为本人22年毕设项目,后续会不断更新本篇文章,全部内容都会写在这一篇文章里,喜欢的请持续关注。
一、如何创建 Asp.Net Core webapi 项目
二、如何使用 EntityFrameWorkCore DbFirst:
需要用到的程序包:

1.数据库创建好表
2.程序包管理器控制台-执行命令
Scaffold-DbContext "server=localhost;port=3306;user=root;password=a.1234;database=lrms;Persist Security Info=True;" Pomelo.EntityFrameworkCore.MysqL -o Models -f

3.执行成功后会在项目下生成你指定的的文件夹(这里是命令中的Models),里面会生成对应的表类和一个连接数据库的上下文类(这里是 “数据库名+Context” )。

Android HTTP请求方式Android HTTP请求方式
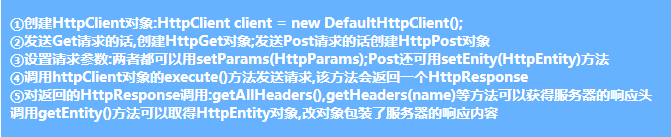
1.HttpClient使用流程
基本流程:
2.HttpClient使用示例
1)使用HttpClient发送GET请求
直接贴下简单的发送Get请求的代码:
public class MainActivity extends Activity implements OnClickListener {

    private Button btnGet;
    private WebView wView;
    public static final int SHOW_DATA = 0X123;
    private String detail = "";

    private Handler handler = new Handler() {
        public void handleMessage(Message msg) {
            if(msg.what == SHOW_DATA)
            {
                wView.loadDataWithBaseURL("",detail, "text/html","UTF-8","");
            }
        };
    };
    @Override
    protected void onCreate(Bundle savedInstanceState) {
        super.onCreate(savedInstanceState);
        setContentView(R.layout.activity_main);
        initView();
        setView();
    }

    private void initView() {
        btnGet = (Button) findViewById(R.id.btnGet);
        wView = (WebView) findViewById(R.id.wView);
    }

    private void setView() {
        btnGet.setOnClickListener(this);
        wView.getSettings().setDomStorageEnabled(true);
    }
    @Override
    public void onClick(View v) {
        if (v.getId() == R.id.btnGet) {
            GetByHttpClient();
        }
    }
    private void GetByHttpClient() {
        new Thread()
        {
            public void run()
            {
                    try {
                        HttpClient httpClient = new DefaultHttpClient();
                        HttpGet httpGet = new HttpGet("http://www.w3cschool.cc/python/python-tutorial.html");
                        HttpResponse httpResponse = httpClient.execute(httpGet);
                        if (httpResponse.getStatusLine().getStatusCode() == 200) {
                            HttpEntity entity = httpResponse.getEntity();
                            detail = EntityUtils.toString(entity, "utf-8");
                            handler.sendEmptyMessage(SHOW_DATA);
                        }
                    } catch (Exception e) {
                        e.printStackTrace();
                    }
            };
        }.start();
    }

}
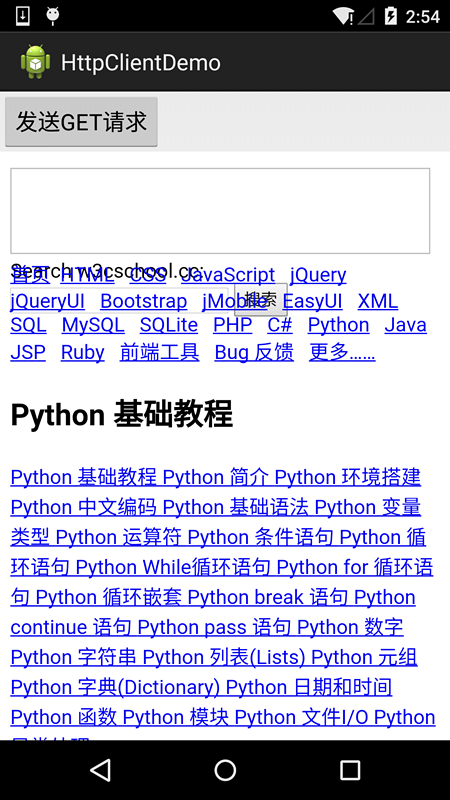
运行截图
另外,如果是带有参数的GET请求的话,我们可以将参数放到一个List集合中,再对参数进行URL编码, 最后和URL拼接下就好了:
List<BasicNameValuePair> params = new LinkedList<BasicNameValuePair>();
params.add(new BasicNameValuePair("user", "猪小弟"));
params.add(new BasicNameValuePair("pawd", "123"));
String param = URLEncodedUtils.format(params, "UTF-8");
HttpGet httpGet = new HttpGet("http://www.baidu.com"+"?"+param);
2)使用HttpClient发送POST请求
POST请求比GET稍微复杂一点,创建完HttpPost对象后,通过NameValuePair集合来存储等待提交 的参数,并将参数传递到UrlEncodedFormEntity中,最后调用setEntity(entity)完成, HttpClient.execute(HttpPost)即可;这里就不写例子了,暂时没找到Post的网站,又不想 自己写个Servlet,So,直接贴核心代码吧~
核心代码:
private void PostByHttpClient(final String url)
{
    new Thread()
    {
        public void run()
        {
            try{
                HttpClient httpClient = new DefaultHttpClient();
                HttpPost httpPost = new HttpPost(url);
                List<NameValuePair> params = new ArrayList<NameValuePair>();
                params.add(new BasicNameValuePair("user", "猪大哥"));
                params.add(new BasicNameValuePair("pawd", "123"));
                UrlEncodedFormEntity entity = new UrlEncodedFormEntity(params,"UTF-8");
                httpPost.setEntity(entity);
                HttpResponse httpResponse =  httpClient.execute(httpPost);
                if (httpResponse.getStatusLine().getStatusCode() == 200) {
                    HttpEntity entity2 = httpResponse.getEntity();
                    detail = EntityUtils.toString(entity2, "utf-8");
                    handler.sendEmptyMessage(SHOW_DATA);
                }
            }catch(Exception e){e.printStackTrace();}
        };
    }.start();
}

3.HttpClient抓数据示例(教务系统数据抓取)
其实关于HttpClient的例子有很多,比如笔者曾经用它来抓学校教务系统上学生的课程表: 这就涉及到Cookie,模拟登陆的东西,说到抓数据(爬虫),一般我们是搭配着JSoup来解析 抓到数据的,有兴趣可以自己查阅相关资料,这里贴下笔者毕设app里获取网页部分的关键 代码!大家可以体会下:
HttpClient可以通过下述代码获取与设置Cookie: HttpResponse loginResponse = new DefaultHttpClient().execute(getLogin); 获得Cookie:cookie = loginResponse.getFirstHeader("Set-Cookie").getValue(); 请求时带上Cookie:httpPost.setHeader("Cookie", cookie);
//获得链接,模拟登录的实现:
public int getConnect(String user, String key) throws Exception {
    // 先发送get请求 获取cookie值和__ViewState值
    HttpGet getLogin = new HttpGet(true_url);
    // 第一步:主要的HTML:
    String loginhtml = "";
    HttpResponse loginResponse = new DefaultHttpClient().execute(getLogin);
    if (loginResponse.getStatusLine().getStatusCode() == 200) {
        HttpEntity entity = loginResponse.getEntity();
        loginhtml = EntityUtils.toString(entity);
        // 获取响应的cookie值
        cookie = loginResponse.getFirstHeader("Set-Cookie").getValue();
        System.out.println("cookie= " + cookie);
    }

    // 第二步:模拟登录
    // 发送Post请求,禁止重定向
    HttpPost httpPost = new HttpPost(true_url);
    httpPost.getParams().setParameter(ClientPNames.HANDLE_REDIRECTS, false);

    // 设置Post提交的头信息的参数
    httpPost.setHeader("User-Agent",
            "Mozilla/5.0 (Windows NT 6.3; WOW64; Trident/7.0; rv:11.0) like Gecko");
    httpPost.setHeader("Referer", true_url);
    httpPost.setHeader("Cookie", cookie);

    // 设置请求数据
    List<NameValuePair> params = new ArrayList<NameValuePair>();

    params.add(new BasicNameValuePair("__VIEWSTATE",
            getViewState(loginhtml)));// __VIEWSTATE参数,如果变化可以动态抓取获取
    params.add(new BasicNameValuePair("Button1", ""));
    params.add(new BasicNameValuePair("hidPdrs", ""));
    params.add(new BasicNameValuePair("hidsc", ""));
    params.add(new BasicNameValuePair("lbLanguage", ""));
    params.add(new BasicNameValuePair("RadioButtonList1", "%D1%A7%C9%FA"));
    params.add(new BasicNameValuePair("txtUserName", user));
    params.add(new BasicNameValuePair("TextBox2", key));
    params.add(new BasicNameValuePair("txtSecretCode", "")); // ( ╯□╰ )逗比正方,竟然不需要验证码

    // 设置编码方式,响应请求,获取响应状态码:
    httpPost.setEntity(new UrlEncodedFormEntity(params, "gb2312"));
    HttpResponse response = new DefaultHttpClient().execute(httpPost);
    int Status = response.getStatusLine().getStatusCode();
    if(Status == 200)return Status;
    System.out.println("Status= " + Status);

    // 重定向状态码为302
    if (Status == 302 || Status == 301) {
        // 获取头部信息中Location的值
        location = response.getFirstHeader("Location").getValue();
        System.out.println(location);
        // 第三步:获取管理信息的主页面
        // Get请求
        HttpGet httpGet = new HttpGet(ip_url + location);// 带上location地址访问
        httpGet.setHeader("Referer", true_url);
        httpGet.setHeader("Cookie", cookie);

        // 主页的html
        mainhtml = "";
        HttpResponse httpResponseget = new DefaultHttpClient()
                .execute(httpGet);
        if (httpResponseget.getStatusLine().getStatusCode() == 200) {
            HttpEntity entity = httpResponseget.getEntity();
            mainhtml = EntityUtils.toString(entity);
        }

    }
    return Status;
}
4.使用HttpPut发送Put请求
示例代码如下:
public static int PutActCode(String actCode, String licPlate, Context mContext) {
    int resp = 0;
    String cookie = (String) SPUtils.get(mContext, "session", "");
    HttpPut httpPut = new HttpPut(PUTACKCODE_URL);
    httpPut.setHeader("Cookie", cookie);
    try {

        List<NameValuePair> params = new ArrayList<NameValuePair>();
        params.add(new BasicNameValuePair("activation_code", actCode));
        params.add(new BasicNameValuePair("license_plate", licPlate));
        httpPut.setEntity(new UrlEncodedFormEntity(params, "UTF-8"));
        HttpResponse course_response = new DefaultHttpClient().execute(httpPut);
        if (course_response.getStatusLine().getStatusCode() == 200) {
            HttpEntity entity2 = course_response.getEntity();
            JSONObject jObject = new JSONObject(EntityUtils.toString(entity2));
            resp = Integer.parseInt(jObject.getString("status_code"));
            return resp;
        }
    } catch (Exception e) {
        e.printStackTrace();
    }
    return resp;
}

asp.net core webapi项目配置全局路由的方法示例
一、前言
在开发项目的过程中,我新创建了一个controller,发现vs会给我们直接在controller头添加前缀,比如[Route("api/[controller]")],即在访问接口的时候会变成http://localhost:8000/api/values,但是如果控制器有很多个,或者要进行版本迭代时,我们会发现痛苦的时刻降临了,要一个一个的修改。
如果在这个时候可以进行全局配置前缀那真是福利呀,修改一处即可。为了能达到此目的我们就来运用一下吧。
二、配置
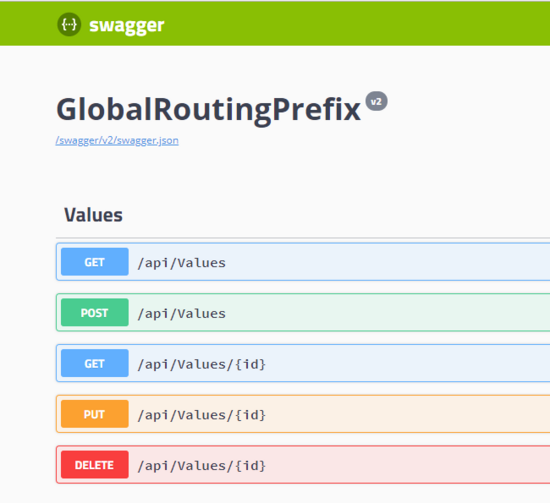
0、在配置前我们先来看看接口的前缀吧。 立图为证

用swagger打开
1、我们需要用到 IApplicationModelConvention 这个接口,它是位于 Microsoft.AspNetCore.Mvc.ApplicationModels 命令空间下面。

MVC框架有一些约定俗成的东西,这个接口主就是用来定义一些MVC约定的东西。我们就可以通过 Apply方法中的 ApplicationModel 来修改或者添加一些约定,而且MV框架本身在启动的时候会把此接口注入,以便于我们使用。
不过我们还是要来看一下这个ApplicationModel 对象里面有什么我们可以用到的地方,我们继续深入:

看到这是不是很爽,我们可以看一下 每个属性的给出的解释
ApiExplorerModel:包括描述信息,群组信息,可见性等。
ControllerModel:主要是 Comtroller 默认约定相关的了,这个里面东西就比较多了,有 控制器名称、路由值、Actions等,我们接下去的配置也将会在此展开
IFilterMetadata :空接口,主要起到标记的作用。
2、配置
第一步:先定义一个类,用来实现IApplicationModelConvention 接口。
/// <summary>
  /// 全局路由前缀配置
  /// </summary>
  public class RouteConvention : IApplicationModelConvention
  {
    /// <summary>
    /// 定义一个路由前缀变量
    /// </summary>
    private readonly AttributeRouteModel _centralPrefix;
    /// <summary>
    /// 调用时传入指定的路由前缀
    /// </summary>
    /// <param name="routeTemplateProvider"></param>
    public RouteConvention(IRouteTemplateProvider routeTemplateProvider)
    {
      _centralPrefix = new AttributeRouteModel(routeTemplateProvider);
    }

    //接口的Apply方法
    public void Apply(ApplicationModel application)
    {
      //遍历所有的 Controller
      foreach (var controller in application.Controllers)
      {
        // 1、已经标记了 RouteAttribute 的 Controller
         //这一块需要注意,如果在控制器中已经标注有路由了,则会在路由的前面再添加指定的路由内容。

        var matchedSelectors = controller.Selectors.Where(x => x.AttributeRouteModel != null).ToList();
        if (matchedSelectors.Any())
        {
          foreach (var selectorModel in matchedSelectors)
          {
            // 在 当前路由上 再 添加一个 路由前缀
            selectorModel.AttributeRouteModel = AttributeRouteModel.CombineAttributeRouteModel(_centralPrefix,
              selectorModel.AttributeRouteModel);
          }
        }

        //2、 没有标记 RouteAttribute 的 Controller
        var unmatchedSelectors = controller.Selectors.Where(x => x.AttributeRouteModel == null).ToList();
        if (unmatchedSelectors.Any())
        {
          foreach (var selectorModel in unmatchedSelectors)
          {
            // 添加一个 路由前缀
            selectorModel.AttributeRouteModel = _centralPrefix;
          }
        }
      }
    }
  }
此处代码需要注意下,上面代码分为两部分,一部分是控制器有路由配置,一部分是没有路由配置。因此需要根据具体的情况来选择使用。
第二步:添加上面后,我们就定义一个类来插入我们的路由吧。
定义MvcOptionsExtensions.cs,此方法主要是扩展了MVCoptions类
public static class MvcOptionsExtensions
  {
    /// <summary>
    /// 扩展方法
    /// </summary>
    /// <param name="opts"></param>
    /// <param name="routeAttribute"></param>
    public static void UseCentralRoutePrefix(this MvcOptions opts, IRouteTemplateProvider routeAttribute)
    {
      // 添加我们自定义 实现IApplicationModelConvention的RouteConvention
      opts.Conventions.Insert(0, new RouteConvention(routeAttribute));
    }
  }
说明:routeAttribute 为我们自定的前缀内容。
第三步:在startup.cs 里面ConfigureServices 方法添加配置信息
#region 配置全局路由
      //在各个控制器添加前缀(没有特定的路由前面添加前缀)
      services.AddMvc(opt =>
      {
        opt.UseCentralRoutePrefix(new RouteAttribute("lg/v1/[action]"));
        //opt.UseCentralRoutePrefix(new RouteAttribute("api/[controller]/[action]"));

      });
      #endregion
说明:上面的方括号在这边是有效的。其中内容可以自定义。
第四步:运行
1、原先控制器路由前缀保留

2、把原先的路由前缀去除

三、总结
至此,已很好的实现全局路由配置前缀啦。可以开心的玩耍啦。
github代码地址:github
以上就是本文的全部内容,希望对大家的学习有所帮助,也希望大家多多支持。
- ASP.NET Core3.1 Ocelot路由的实现
- 详解ASP.NET Core端点路由的作用原理
- ASP.NET Core3.X 终端中间件转换为端点路由运行详解
- ASP.NET Core MVC学习教程之路由(Routing)
- asp.net Core3.0区域与路由配置的方法
- ASP.NET Core 2.2中的Endpoint路由详解
- ASP.NET Core中自定义路由约束的实现
- 详解ASP.NET Core 2.0 路由引擎之网址生成(译)
- ASP.NET Core自动生成小写破折号路由的实现方法

ASP.NET Web API项目自动生成接口文档和测试页面
总结
以上是小编为你收集整理的ASP.NET Web API项目自动生成接口文档和测试页面全部内容。
如果觉得小编网站内容还不错,欢迎将小编网站推荐给好友。
关于ASP.NET Web API项目自定义接口路由和HTTP请求方式和asp.net web api设计的问题就给大家分享到这里,感谢你花时间阅读本站内容,更多关于.NET6-Asp.Net Core webapi -从零开始的webapi项目、Android HTTP请求方式Android HTTP请求方式、asp.net core webapi项目配置全局路由的方法示例、ASP.NET Web API项目自动生成接口文档和测试页面等相关知识的信息别忘了在本站进行查找喔。
本文标签:


![[转帖]Ubuntu 安装 Wine方法(ubuntu如何安装wine)](https://www.gvkun.com/zb_users/cache/thumbs/4c83df0e2303284d68480d1b1378581d-180-120-1.jpg)

