对于HTML5Canvas感兴趣的读者,本文将会是一篇不错的选择,我们将详细介绍HTML5Canvas,并为您提供关于canvas-a11htmlANDcanvas.html_html/css_WEB
对于HTML5 Canvas感兴趣的读者,本文将会是一篇不错的选择,我们将详细介绍HTML5 Canvas,并为您提供关于canvas-a11htmlANDcanvas.html_html/css_WEB-ITnose、html2canvas属性和使用方法以及如何使用html2canvas将HTML内容写入Canvas生成图片、html5 canvas 使用示例 _html5教程技巧、HTML5 canvas 基本语法_html5教程技巧的有用信息。
本文目录一览:- HTML5 Canvas(HTML5 Canvas)
- canvas-a11htmlANDcanvas.html_html/css_WEB-ITnose
- html2canvas属性和使用方法以及如何使用html2canvas将HTML内容写入Canvas生成图片
- html5 canvas 使用示例 _html5教程技巧
- HTML5 canvas 基本语法_html5教程技巧
")
HTML5 Canvas(HTML5 Canvas)
canvas 元素用于在网页上绘制图形。
什么是 Canvas?
HTML5 的 canvas 元素使用 JavaScript 在网页上绘制图像。 (推荐学习:html教程)
画布是一个矩形区域,您可以控制其每一像素。
canvas 拥有多种绘制路径、矩形、圆形、字符以及添加图像的方法。
创建 Canvas 元素
向 HTML5 页面添加 canvas 元素。
规定元素的 id、宽度和高度:
<canvas id=myCanvas width=200 height=100></canvas>
通过 JavaScript 来绘制
canvas 元素本身是没有绘图能力的。所有的绘制工作必须在 JavaScript 内部完成:
<script type=text/javascript>
var c=document.getElementById(myCanvas);
var cxt=c.getContext(2d);
cxt.fillStyle=#FF0000;
cxt.fillRect(0,0,150,75);
</script>

canvas-a11htmlANDcanvas.html_html/css_WEB-ITnose
<!DOCTYPE html><html lang="en"><head> <meta charset="UTF-8"> <title>Document</title></head><style> #canvas-wrapper{ width: 1200px; height: 800px; position: relative; margin:50px auto; } #canvas{ border: 1px #ddd solid; } #controller{ position: absolute; top:30px; left:30px; background:rgba(0,85,116,0.7); padding:5px 20px 25px 20px; border-radius: 10px 10px; } #controller h1{ color: white; font-weight: bold; font-family: "Microsoft Yahei"; } #controller #canvas-btn{ display: inline-block; background: #8b0; color: white; font-size: 14px; padding: 5px 15px; } #controller #canvas-btn:hover{ text-decoration: none; background:#7a0; } #controller .color-btn{ display: inline-block; padding:5px 15px; border-radius: 6px 6px; font-size: 14px; margin-top: 10px; margin-right: 5px; text-decoration: none; } #controller .color-btn:hover{ text-decoration: none; } #controller #white-color-btn{ background-color: white; } #controller #black-color-btn{ background-color: black; }</style><body> <div id="canvas-wrapper"> <canvas id="canvas"> 当前游览器不支持Canvas,请更换游览器再试! </canvas> <div id="controller"> <h1>Canvas 绘图之旅</h1> <a href="#" id="canvas-btn">stop</a> <a href="#"id="white-color-btn">white</a> <a href="#"id="black-color-btn">black</a> </div> </div> <script> var balls = []; var isMoving = true; var themeColor = "white"; var canvas = document.getElementById("canvas"); window.onload = function(){ canvas.width = 1200; canvas.height = 800; if(canvas.getContext(''2d'')){ var context = canvas.getContext(''2d''); // 产生100个小球 for(var i=0;i<100;i++){ var R = Math.floor(Math.random()*255); var G = Math.floor(Math.random()*255); var B = Math.floor(Math.random()*255); var radius = Math.random()*50+20; aBall = { color : "rgb(" + R + "," + G + "," + B + ")", radius : radius, x : Math.random()*(canvas.width-2*radius) + radius, y : Math.random()*(canvas.height-2*radius) + radius, vx : (Math.random()*5 + 5) * Math.pow(-1,Math.floor(Math.random()*100)), vy : (Math.random()*5 + 5) * Math.pow(-1,Math.floor(Math.random()*100)), } balls[i] = aBall; } // 绘制并运动 setInterval(function(){ draw(context); if(isMoving){ update(canvas.width,canvas.height) } },50) // stop document.getElementById("canvas-btn").onclick = function(event){ if(isMoving){ isMoving = false; this.text = "start"; }else{ isMoving = true; this.text = "stop"; } return false; } // white document.getElementById("white-color-btn").onclick = function(event){ themeColor = "white"; return false; } // black document.getElementById("black-color-btn").onclick = function(event){ themeColor = "black"; return false; } }else{ alert("当前游览器不支持Canvas,请更换游览器再试!") } } function draw(cxt){ // var canvas = cxt.canvas; cxt.clearRect(0,0,canvas.width,canvas.height); if(themeColor == "black"){ console.log("black theme"); cxt.fill; cxt.fillRect(0,0,canvas.width,canvas.height) } for(var i=0;i<balls.length;i++){ cxt.fillStyle = balls[i].color; cxt.beginPath(); cxt.arc(balls[i].x,balls[i].y,balls[i].radius,0,Math.PI*2); cxt.closePath(); cxt.fill(); } } function update(){ for(var i=0;i<balls.length;i++){ balls[i].x += balls[i].vx; balls[i].y += balls[i].vy; // 边缘检测 if(balls[i].x - balls[i].radius <= 0){ balls[i].vx = -balls[i].vx; balls[i].x = balls[i].radius; } if(balls[i].x + balls[i].radius >= canvas.width){ balls[i].vx = -balls[i].vx; balls[i].x = canvas.width - balls[i].radius; } if(balls[i].y - balls[i].radius <= 0){ balls[i].vy = -balls[i].vy; balls[i].y = balls[i].radius; } if(balls[i].y + balls[i].radius >= canvas.height){ balls[i].vy = -balls[i].vy; balls[i].y = canvas.height - balls[i].radius; } } } </script></body></html>

html2canvas属性和使用方法以及如何使用html2canvas将HTML内容写入Canvas生成图片
如何使用JS截取HTML页面为图片呢,下面为大家介绍一款JS截图插件html2canvas.js
html2canvas.js 能够实现在用户浏览器端直接对整个或部分页面进行截屏。
html2canvas.js可以将当页面渲染成一个Canvas图片,通过读取DOM并将不同的样式应用到这些元素上实现。
它不需要来自服务器任何渲染,整张图片都是在客户端浏览器创建。当
浏览器不支持Canvas时,将采用Flashcanvas或ExplorerCanvas技术代替实现。
以下浏览器能够很好的支持该脚本:Firefox 3.5+,Google Chrome,Opera新的版本,IE9以上的浏览器。
基本语法
html2canvas(element,options);
html2canvas(document.body,{
 onrendered: function(canvas) {
  var url = canvas.toDataURL();//图片地址
  document.body.appendChild(canvas);
 },width: 300,height: 300
或者使用ES6的promise
//两个参数:所需要截图的元素id,截图后要执行的函数, canvas为截图后返回的最后一个canvas html2canvas(document.getElementById('id')).then(function(canvas) {document.body.appendChild(canvas);});
html2canvas基本参数说明
| 参数名称 | 类型 | 默认值 | 描述 |
|---|---|---|---|
| allowTaint | boolean | false | Whether to allow cross-origin images to taint the canvas---允许跨域 |
| background | string | #fff | Canvas background color,if none is specified in DOM. Set undefined for transparent---canvas的背景颜色,如果没有设定默认透明 |
| height | number | null | Define the heigt of the canvas in pixels. If null,renders with full height of the window.---canvas高度设定 |
| letterRendering | boolean | false | Whether to render each letter seperately. Necessary if letter-spacing is used.---在设置了字间距的时候有用 |
| logging | boolean | false | Whether to log events in the console.---在console.log()中输出信息 |
| proxy | string | undefined | Url to the proxy which is to be used for loading cross-origin images. If left empty,cross-origin images won't be loaded.---代理地址 |
| taintTest | boolean | true | Whether to test each image if it taints the canvas before drawing them---是否在渲染前测试图片 |
| timeout | number | 0 | Timeout for loading images,in milliseconds. Setting it to 0 will result in no timeout.---图片加载延迟,默认延迟为0,单位毫秒 |
| width | number | null | Define the width of the canvas in pixels. If null,renders with full width of the window.---canvas宽度 |
| useCORS | boolean | false | Whether to attempt to load cross-origin images as CORS served,before reverting back to proxy--这个我也不知道是干嘛的 |
例子
<!DOCTYPE html>
<html>

<head>
  <Meta charset="utf-8">
  <Meta http-equiv="X-UA-Compatible" content="IE=edge">
  <title>html2canvas example</title>
  <script type="text/javascript" src="html2canvas.js"></script>
</head>
<script type="text/javascript">
function takeScreenshot() {
 console.log('test');
  html2canvas(document.getElementById('view'),{
    onrendered: function(canvas) {
      document.body.appendChild(canvas);
    },// width: 300,// height: 300
  });
}
</script>
<body>
  <div id="view">
    <input type="button" value="截图" onclick="takeScreenshot()">
  </div>
</body>

</html>
效果图如下:

截图效果如下:
最后附上html2canvas官网链接
官网
Github

html5 canvas 使用示例 _html5教程技巧

HTML5 canvas 基本语法_html5教程技巧
HTML 5 canvas —— 基本语法
简述
5 规范引进了很多新特性,其中最令人期待的之一就是 元素。html 5 提供了通过 javascript 绘制图形的方法,此方法使用简单但功能强大。每一个 元素都有一个"上下文( context )" (想象成绘图板上的一页),在其中可以绘制任意图形。浏览器支持多个 canvas 上下文,并通过不同的 提供图形绘制功能。 5 规范引进了很多新特性,其中最令人期待的之一就是 元素。 5 提供了通过 javascript 绘制图形的方法,此方法使用简单但功能强大。每一个 元素都有一个"上下文( context )" (想象成绘图板上的一页),在其中可以绘制任意图形。浏览器支持多个 canvas 上下文,并通过不同的 提供图形绘制功能。
大部分的浏览器都支持 2D canvas 上下文——包括 Opera, Firefox, Konqueror 和 Safari。而且某些版本的 Opera 还支持 3D canvas ,Firefox 也可以通过插件形式支持 3D canvas :
- 下载支持 3D canvas, HTML video 和 File I/O 的 Opera
- 关于 Opera 3D canvas 上下文的文章
- 关于 Firefox 3D canvas
上下文的文章
本文介绍 2D canvas
基础以及如何使用基本 canvas 函数,如线条、形状、图像和文字等。为了理解此文章,你最好了解 JavaScript 基础知识。
可以点击此处批量下载本文实例代码
canvas 基础
创建 canvas 的方法很简单,只需要在 HTML 页面中添加 元素:
<canvas id="myCanvas" width="300" height="150">
Fallback content, in case the browser does not support Canvas.
</canvas>
为了能在 JavaScript 中引用元素,最好给元素设置 ID ;也需要给 canvas 设定高度和宽度。
立即学习“前端免费学习笔记(深入)”;
创建好了画布后,让我们来准备画笔。要在画布中绘制图形需要使用 JavaScript 。首先通过 getElementById 函数找到 canvas
元素,然后初始化上下文。之后可以使用上下文 API 绘制各种图形。下面的脚本在 canvas 中绘制一个矩形 (点击此处查看效果):
// Get a reference to the element.
var elem = document.getElementById(''myCanvas'');

// Always check for properties 和 methods, to make sure your code doesn''t break
// in other browsers.
if (elem && elem.getContext) {
  // Get the 2d context.
  // Remember: you can only initialize one context per element.
  var context = elem.getContext(''2d'');
  if (context) {
    // You are done! Now you can draw your first rectangle.
    // You only need to provide the (x,y) coordinates, followed by the width and
    // height dimensions.
    context.fillRect(0, 0, 150, 100);
  }
}可以把上面代码放置在文档 head 部分中,或者放在外部文件中。
2D context API
介绍了如何创建 canvas 后,让我们来看看 2D canvas API,看看能用这些函数做些什么。
基本线条
上面的例子中展示了绘制矩形是多么简单。
通过 fillStyle 和 strokeStyle 属性可以轻松的设置矩形的填充和线条。颜色值使用方法和 十六进制数、()、() 和 ()( 若浏览器支持,如 Opera10 和 Firefox 3)。十六进制数、()、() 和 ()( 若浏览器支持,如 Opera10 和 Firefox 3)。
通过 fillRect 可以绘制带填充的矩形。使用 strokeRect 可以绘制只有边框没有填充的矩形。如果想清除部分 canvas 可以使用 clearRect。上述三个方法的参数相同:x, y, width, height。前两个参数设定 (x,y) 坐标,后两个参数设置矩形的高度和宽度。
可以使用 lineWidth 属性改变线条粗细。让我们看看使用了fillRect,
strokeRect clearRect 和其他的例子:
context.fill#00f''; // blue
context.stroke#f00''; // red
context.lineWidth   = 4;

// Draw some rectangles.
context.fillRect  (0,   0, 150, 50);
context.strokeRect(0,  60, 150, 50);
context.clearRect (30, 25,  90, 60);
context.strokeRect(30, 25,  90, 60);
此例子效果图见图1.
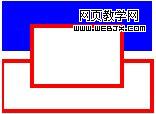
图 1: fillRect, strokeRect 和
clearRect效果图
路径
通过 canvas 路径(path)可以绘制任意形状。可以先绘制轮廓,然后绘制边框和填充。创建自定义形状很简单,使用 beginPath()开始绘制,然后使用直线、曲线和其他图形绘制你的图形。绘制完毕后调用 fill 和 stroke 即可添加填充或者设置边框。调用 closePath() 结束自定义图形绘制。
下面是一个绘制三角形的例子:
// Set the style properties.
context.fill#00f'';
context.stroke#f00'';
context.lineWidth   = 4;

context.beginPath();
// Start from the top-left point.
context.moveTo(10, 10); // give the (x,y) coordinates
context.lineTo(100, 10);
context.lineTo(10, 100);
context.lineTo(10, 10);

// Done! Now fill the shape, 和 draw the stroke.
// Note: your shape will not be visible until you call any of the two methods.
context.fill();
context.stroke();
context.closePath();
其效果图见图2.

图 2: 三角形
另一个较负责的例子中使用了直线、曲线和圆弧。
插入图像
drawImage 方法允许在 canvas 中插入其他图像
( img 和 canvas 元素) 。在 Opera 中可以再 canvas 中绘制 SVG 图形。此方法比较复杂,可以有3个、5个或9个参数:
- 3个参数:最基本的 drawImage 使用方法。一个参数指定图像位置,另两个参数设置图像在 canvas中的位置。
- 5个参数:中级的 drawImage 使用方法,包括上面所述3个参数,加两个参数指明插入图像宽度和高度 (如果你想改变图像大小)。
- 9个参数:最复杂 drawImage 杂使用方法,包含上述5个参数外,另外4个参数设置源图像中的位置和高度宽度。这些参数允许你在显示图像前动态裁剪源图像。
下面是上述三个使用方法的例子:
// Three arguments: the element, destination (x,y) coordinates.
context.drawImage(<var>img_elem</var>, <var>dx</var>, <var>dy</var>);

// Five arguments: the element, destination (x,y) coordinates, and destination
// width and height (if you want to resize the source image).
context.drawImage(<var>img_elem</var>, <var>dx</var>, <var>dy</var>, <var>dw</var>, <var>dh</var>);

// Nine arguments: the element, source (x,y) coordinates, source width and
// height (for cropping), destination (x,y) coordinates, and destination width
// and height (resize).
context.drawImage(<var>img_elem</var>, <var>sx</var>, <var>sy</var>, <var>sw</var>, <var>sh</var>, <var>dx</var>, <var>dy</var>, <var>dw</var>, <var>dh</var>);
其效果见图3.

图 3: drawImage 效果图。
像素级操作
2D Context API 提供了三个方法用于像素级操作:createImageData, getImageData, 和
putImageData。
ImageData对象保存了图像像素值。每个对象有三个属性: width, height 和
data。data 属性类型为CanvasPixelArray,用于储存width*height*4个像素值。每一个像素有RGB值和透明度alpha值(其值为 0 至
255,包括alpha在内!)。像素的顺序从左至右,从上到下,按行存储。
为了更好的理解其原理,让我们来看一个例子——绘制红色矩形
// Create an ImageData object.
var imgd = context.createImageData(50,50);
var pix = imgd.data;

// Loop over each pixel 和 set a transparent red.
for (var i = 0; n = pix.length, i
<p>注意: 不是所有浏览器都实现了<font face="NSimsun"> createImageData</font>。在支持的浏览器中,需要通过<font face="NSimsun"> getImageData</font> 方法获取<font face="NSimsun"> ImageData</font> 对象。请参考示例代码。</p>
<p>通过 <font face="NSimsun">ImageData</font> 可以完成很多功能。如可以实现图像滤镜,或可以实现数学可视化 (如分形和其他特效)。下面特效实现了简单的颜色反转滤镜:</p>
<pre>// Get the CanvasPixelArray from the given coordinates and dimensions.
var imgd = context.getImageData(<var>x</var>, <var>y</var>, <var>width</var>, <var>height</var>);
var pix = imgd.data;

// Loop over each pixel and invert the color.
for (var i = 0, n = pix.length; i x, <var>y</var>);
图 4 显示了使用此滤镜后的 Opera
图像 (图 3是原图)。

图 4: 颜色反转滤镜
文字
虽然最近的 WebKit 版本和 Firefox 3.1 nightly build 才开始支持 Text API ,为了保证文章完整性我决定仍在这里介绍文字 API 。
context 对象可以设置以下 text 属性:
- font:文字字体,同属性 属性
-
textAlign:文字水平对齐方式。可取属性值: start, end, left,
right, center。默认值:
start. -
textBaseline:文字竖直对齐方式。可取属性值:top, hanging, middle,
alphabetic, ideographic, bottom。默认值:alphabetic.
有两个方法可以绘制文字: fillText 和 strokeText。第一个绘制带 fillStyle 填充的文字,后者绘制只有 strokeStyle 边框的文字。两者的参数相同:要绘制的文字和文字的位置(x,y) 坐标。还有一个可选选项——最大宽度。如果需要的话,浏览器会缩减文字以让它适应指定宽度。
文字对齐属性影响文字与设置的
(x,y) 坐标的相对位置。
下面是一个在 canvas 中绘制"hello world" 文字的例子
context.fill#00f'';
context.font         = ''italic 30px sans-serif'';
context.textBaseline = ''top'';
context.fillText  (''Hello world!'', 0, 0);
context.font         = ''bold 30px sans-serif'';
context.strokeText(''Hello world!'', 0, 50);图 5 是其效果图。

图 5: 文字效果
阴影
目前只有 Konqueror 和 Firefox 3.1 nightly build 支持 Shadows API 。API 的属性为:
- shadowColor:阴影颜色。其值和 CSS 颜色值一致。
- shadowBlur:设置阴影模糊程度。此值越大,阴影越模糊。其效果和 Photoshop 的高斯模糊滤镜相同。
- shadowOffsetX 和 shadowOffsetY:阴影的 x 和 y 偏移量,单位是像素。
下面是 canvas 阴影的例子:
context.shadowOffsetX = 5;
context.shadowOffsetY = 5;
context.shadowBlur    = 4;
context.shadowColor   = ''rgba(255, 0, 0, 0.5)'';
context.fill#00f'';
context.fillRect(20, 20, 150, 100);
其效果见图 6。
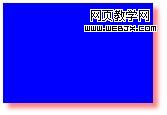
图 6: canvas 阴影效果——蓝色矩形,红色阴影
颜色渐变
除了 CSS 颜色, fillStyle 和 strokeStyle 属性可以设置为 CanvasGradient 对象。——通过 CanvasGradient可以为线条和填充使用颜色渐变。
欲创建 CanvasGradient 对象,可以使用两个方法:createLinearGradient 和 createRadialGradient。前者创建线性颜色渐变,后者创建圆形颜色渐变。
创建颜色渐变对象后,可以使用对象的 addColorStop 方法添加颜色中间值。
下面的代码演示了颜色渐变使用方法:
// You need to provide the source 和 destination (x,y) coordinates
// for the gradient (from where it starts 和 where it ends).
var gradient1 = context.createLinearGradient(<var>sx</var>, <var>sy</var>, <var>dx</var>, <var>dy</var>);

// Now you can add colors in your gradient.
// The first argument tells the position for the color in your gradient. The
// accepted value range is from 0 (gradient start) to 1 (gradient end).
// The second argument tells the color you want, using the CSS color format.
gradient1.addColorStop(0,   ''#f00''); // red
gradient1.addColorStop(0.5, ''#ff0''); // yellow
gradient1.addColorStop(1,   ''#00f''); // blue

// For the radial gradient you also need to provide source
// 和 destination circle radius.
// The (x,y) coordinates define the circle center points (start 和
// destination).
var gradient2 = context.createRadialGradient(<var>sx</var>, <var>sy</var>, <var>sr</var>, <var>dx</var>, <var>dy</var>, <var>dr</var>);

// Adding colors to a radial gradient is the same as adding colors to linear
// gradients.
我也准备了一个更复杂的例子,使用了线性颜色渐变、阴影和文字。其效果见图 7。

图 7: 使用线性颜色渐变的例子
canvas 演示
如果你想知道使用 Canvas可以做些什么,可以参看以下的工程:
- Opera Widget:
- SimAquarium
- Artist''s
Sketchbook - Spirograph
- 在线工程和演示
- Newton polynomial
- Canvascape - "3D Walker"
- Paint.Web - painting
demo, open-source - Star-field
flight - Interactive blob
小节
Canvas 是 HTML 5最让人期待的特性之一,目前已获得大部分 Web 浏览器支持。Canvas 可以帮助创建游戏、增强图形用户界面。2D context
API 提供大量图形绘制功能——我希望通过本文你了解了 canvas 使用,并且你有兴趣了解更多!
我们今天的关于HTML5 Canvas和HTML5 Canvas的分享就到这里,谢谢您的阅读,如果想了解更多关于canvas-a11htmlANDcanvas.html_html/css_WEB-ITnose、html2canvas属性和使用方法以及如何使用html2canvas将HTML内容写入Canvas生成图片、html5 canvas 使用示例 _html5教程技巧、HTML5 canvas 基本语法_html5教程技巧的相关信息,可以在本站进行搜索。
本文标签:


![[转帖]Ubuntu 安装 Wine方法(ubuntu如何安装wine)](https://www.gvkun.com/zb_users/cache/thumbs/4c83df0e2303284d68480d1b1378581d-180-120-1.jpg)

