针对aspnetcore容器化部属到阿里云全过程记录和.netcore容器化部署到阿里这两个问题,本篇文章进行了详细的解答,同时本文还将给你拓展.NetCore结合AspNetCoreRateLimi
针对aspnetcore 容器化部属到阿里云全过程记录和.net core容器化部署到阿里这两个问题,本篇文章进行了详细的解答,同时本文还将给你拓展.Net Core 结合 AspNetCoreRateLimit 实现限流、.NET Core+MySql+Nginx 容器化部署、.NET Core使用Topshelf方式创建Windows服务的全过程记录、.net core入门-发布及部署_异常(处理程序“aspNetCore”在其模块列表中有一个错误模块“AspNetCoreModuleV2")处理等相关知识,希望可以帮助到你。
本文目录一览:- aspnetcore 容器化部属到阿里云全过程记录(.net core容器化部署到阿里)
- .Net Core 结合 AspNetCoreRateLimit 实现限流
- .NET Core+MySql+Nginx 容器化部署
- .NET Core使用Topshelf方式创建Windows服务的全过程记录
- .net core入门-发布及部署_异常(处理程序“aspNetCore”在其模块列表中有一个错误模块“AspNetCoreModuleV2")处理
")
aspnetcore 容器化部属到阿里云全过程记录(.net core容器化部署到阿里)
第一次写博客,作为一个全栈 er,记录一下从阿里云到产品运维上线的全过程
一、阿里云上的设置
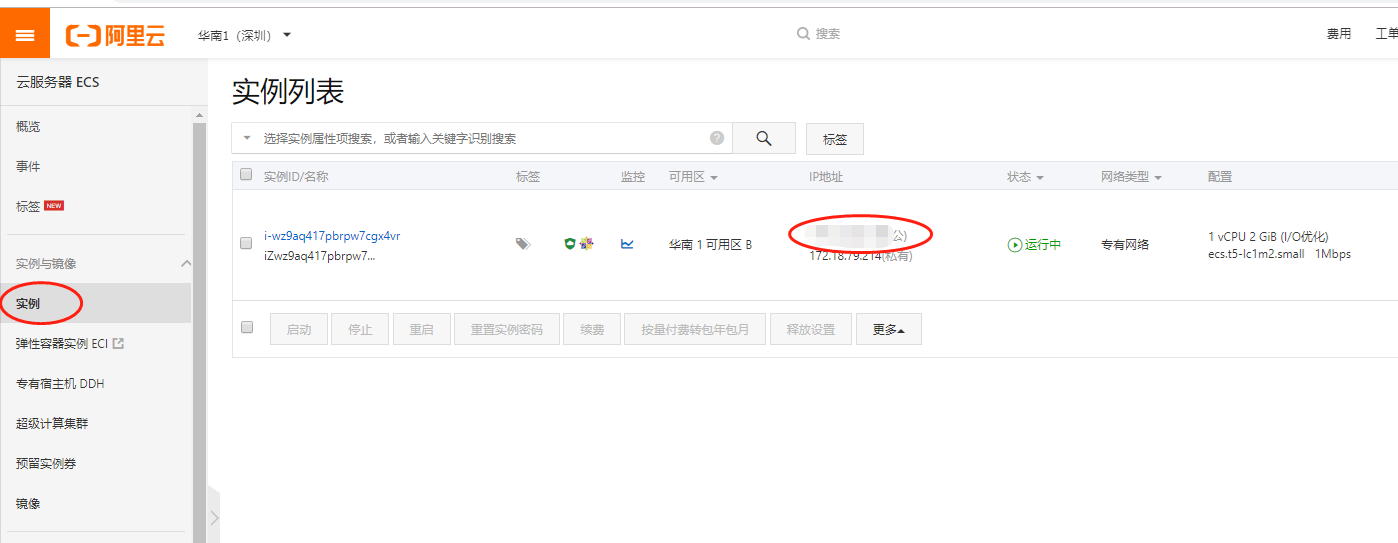
购买阿里云 ECS 后:
进控制台查看实例公网 IP
在控制台、网络与安全 -》安全组,配置规则
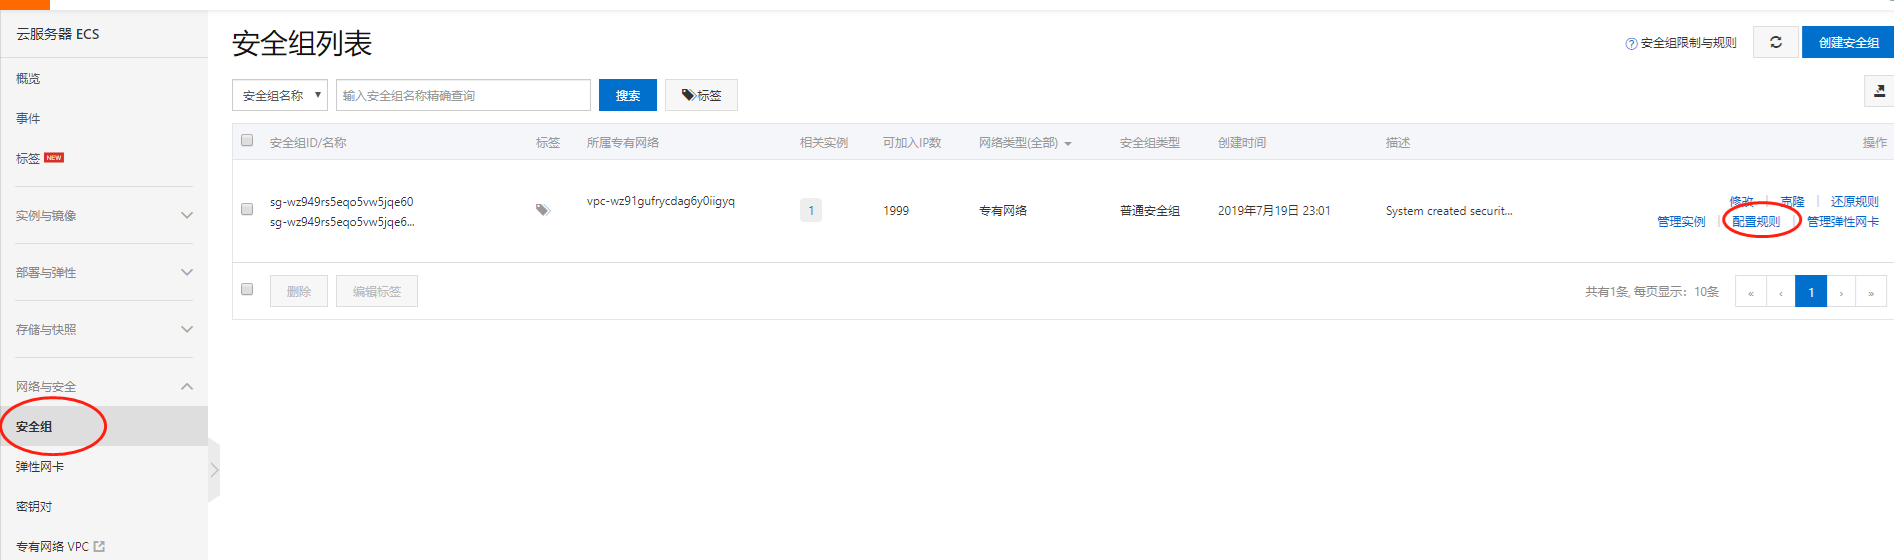
点击进去可以看到
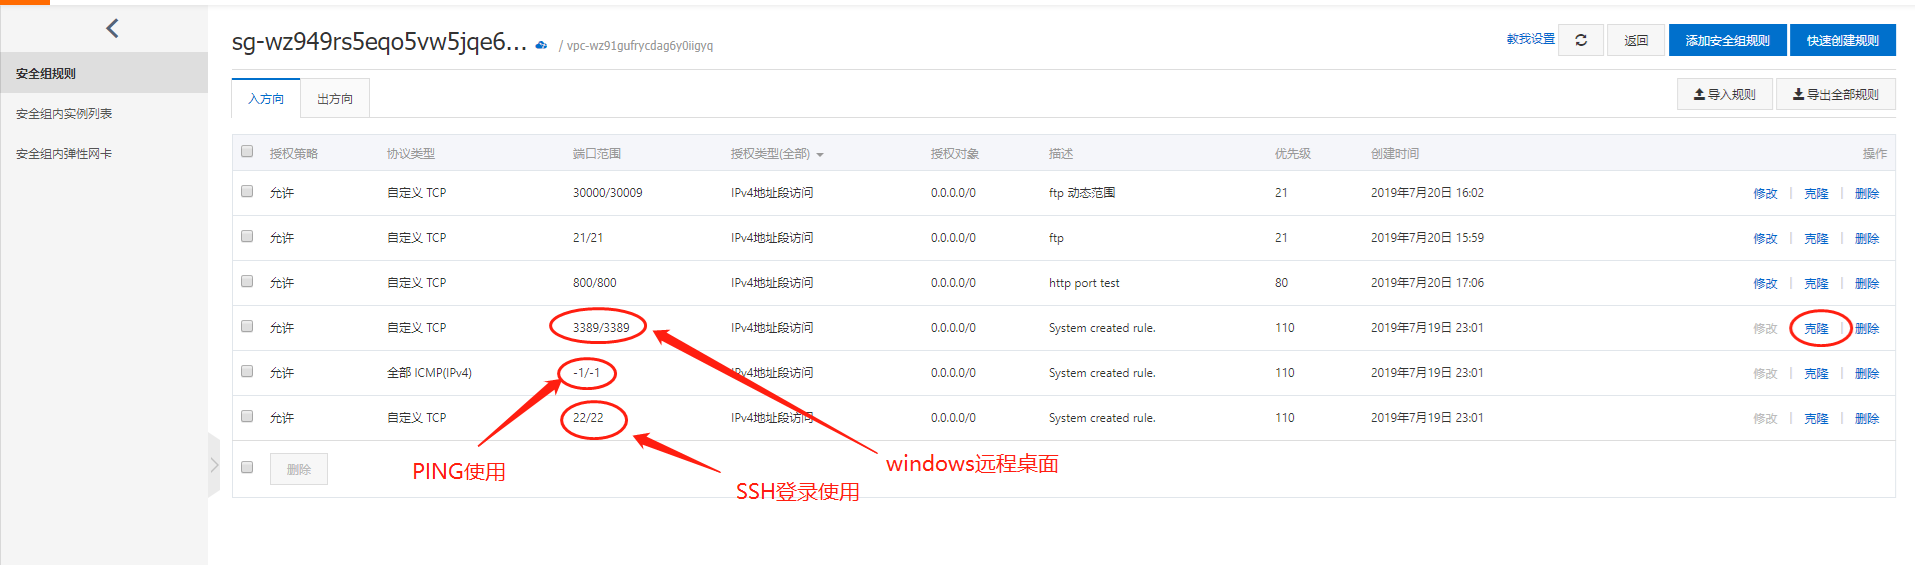
系统默认创建了 3 个规则,icmp 用来 ping 的,22 是 linux 服务器 ssh 远程端口,3389 是 windows 服务器远程端口
【他的这个网络安全,就相当于阿里云自己在所有的服务器外围加了一个自己的网络防火墙,所以进到系统之后可以看到 firewall 和 iptables 都是没有的】
我这里给 ftp 添加了 21 端口的,ftp 动态范围添加了 30000/30009 的
然后给 web 测试网站对外添加了 8081 这个 tcp 端口
现在可以通过 xshell 远程登录到我的服务器了
二、centos 服务器上软件的安装
既然切换到 netcore 做开发,那么跨平台这个特性肯定是要发挥一下的。
既然是在 linux 上,Docker 容器化这么火,肯定是尝试一下的!
所以这里我们的所有应用都放到 docker 容器中,数据库 mysql 也是部属在容器里,不会直接装在服务器本身上。
2.1、centos 上 docker 的安装(一行一行复制,执行就可以了)
sudo yum install -y yum-utils device-mapper-persistent-data lvm2
sudo yum-config-manager --add-repo http://mirrors.aliyun.com/docker-ce/linux/centos/docker-ce.repo
sudo yum makecache fast
sudo yum -y install docker-ce
sudo systemctl enable docker
sudo systemctl start docker
Docker 加速(用阿里云的仓储镜像)
vi /etc/docker/daemon.json
{
    "registry-mirrors": ["https://0c27u24p.mirror.aliyuncs.com"]
}
systemctl daemon-reload
systemctl restart docker2.2、FTP 服务安装
既然是服务器,肯定要把开发好的应用发布到服务器上的,那么就涉及到 ftp 服务器的安装
在 linux 上最流行的 ftp 服务器是 vsftp,这个软件的安装折腾了 2 天才莫名其妙的搞定。
整体的思路其实是很简单的:
s1:安装软件
我自己收藏的 2 个笔记
http://note.youdao.com/noteshare?id=0442a68077dd91a08db759ccafce0a53&sub=78FCD074B2BC40589B8CCF7FD84D5A3A
1、检查是否已安装vsftpd
#rpm -q vsftpd
或者
#rpm -qa|grep vsftpd
或者(查看vsftpd版本)
#vsftpd -v

2、安装vsftpd
#yum -y install vsftpd

3、查看位置
#whereis vsftpd

4、启动
#systemctl start vsftpd.service
或者
#systemctl start vsftpd

5、检查服务是否正常启动
#ps -ef|grep vsftpd

6、查看端口21是否被占用
#netstat -lnp|grep 21
s2:配置(最最坑爹的地方)
配置文件
先备份一份配置文件:
#cp /etc/vsftpd/vsftpd.conf /etc/vsftpd/vsftpd.conf.bak然后编辑配置文件
#vi /etc/vsftpd/vsftpd.conf总结了一个可用的配置
anonymous_enable=NO
local_enable=YES
write_enable=YES
local_umask=022
dirmessage_enable=YES
xferlog_enable=YES
connect_from_port_20=YES
xferlog_std_format=YES
listen=NO
listen_ipv6=YES
pam_service_name=vsftpd
userlist_enable=YES
tcp_wrappers=YES
pasv_min_port=30000
pasv_max_port=30009
chroot_local_user=YES
chroot_list_enable=YES
chroot_list_file=/etc/vsftpd/chroot_list
直接拿这个用就可以了,每一项的意思可以百度
添加一个 ftp 用户
增加用户 ftpuser,指向目录 /home/wwwroot/ftpuser, 禁止登录 SSH 权限。
useradd -d /home/wwwroot/ftpuser -g ftp -s /sbin/nologin ftpuser设置用户口令
passwd ftpuser编辑文件 chroot_list(内容为 ftp 用户名,每个用户名占一行):
vi /etc/vsftpd/chroot_list启用 pasv 模式【就是上面配置最后几个】
pasv_enable=YES         #启用被动模式
pasv_min_port=30000     #被动模式使用端口范围
pasv_max_port=30009     #被动模式使用端口范围
然后重启 ftp 服务
# systemctl restart vsftpd 重启服务S3:更坑爹的地方!
网上找的方法都是去配置服务器的防火墙了比如 iptables,firewall
但是阿里云的 ecs 默认是没有装防火墙的。而是在阿里云的控制台里面去设置的!!!
所以这里一定要注意,是在阿里云控制台配置网络安全组,添加对应的端口规则!
最后:
这样我们就可以用 ftp 客户端软件,连接到服务器上了,用户名是自己创建的用户名 ftpuser 和密码
三、dotnetcore 程序的发布
演示项目,随便建一个 core 的 web 项目,直接发布到文件夹即可
然后用 ftp 工具,把 publish 目录发布到服务器上,在服务器上创建 Dockerfile 文件

容器化部属最主要的是 Dockerfile 文件,我用的以下方式,每个参数可以百度查一下就知道了
from 是用来构建的镜像
workdir 是容器里面的工作目录,即容器启动默认的文件夹
expose 是容器对外暴露端口号
copy 将服务器上的目录,拷贝到容器里的目录
entrypoint 容器中使用 dotnet 命令,执行 TestWeb.dll 程序
FROM mcr.microsoft.com/dotnet/core/aspnet:2.2-stretch-slim AS final
WORKDIR /app
EXPOSE 800
COPY ./publish .
ENTRYPOINT ["dotnet", "TestWeb.dll"]
然后用 docker 生成自己的镜像【注意命令中的最后一个点 代表的是命令从你的当前目录下执行】
#docker build -t test003 .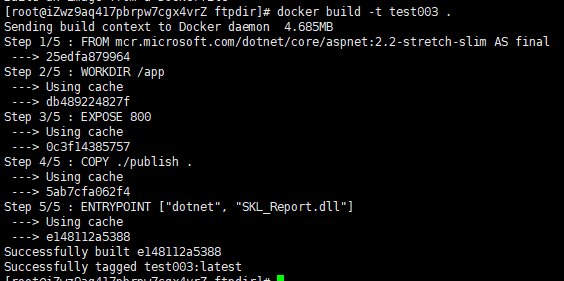
然后查看刚刚生成的镜像
>docker images
然后镜像运行生成实例容器
docker run --name testweb -d -p 900:80 test003--name 指定容器的名字
-d 后台进程。
-p 是进行宿主和容器之间的端口映射,(-p 宿主端口:容器端口)
最后参数是使用的镜像名

然后用 docker ps 查看当前运行中的容器

可以看到使用的镜像是 test003, 容器的名字是 testweb
我这里添加了一个对外端口 900,容器里面的端口 80 的映射,
现在访问是访问不了的!要去阿里云的网络组里面设置开放 900 端口

最后,容器的停止和删除
然后停止该容器
#docker stop testweb删除容器
#docker rm 容器名称或ID重启容器
#docker start testweb删除镜像的命令
#docker rmi 镜像名称或ID
四、在 docker 里面安装 mysql 并访问
参考教程:https://www.runoob.com/docker/docker-install-mysql.html
docker 操作老套路
step1:拉镜像
>docker pull mysqlstep2: 查看本地镜像
>docker images | grep mysqlstep3: 运行镜像
>docker run -p 3306:3306 --name mymysql -v $PWD/conf:/etc/mysql/conf.d -v $PWD/logs:/logs -v $PWD/data:/var/lib/mysql -e MYSQL_ROOT_PASSWORD=123456 -d mysql:5.6说明:
-v 将 mysql 三个主要的目录映射到 host 主机,conf 配置、data 数据、logs 日志
-e 设置 root 密码
step4: 查看容器
>docker psstep5: 进容器查看
>docker exec -it mymysql bash进去之后是基本的 mysql 命令
>mysql -u root -p

输入密码

>show databases;

>其他的看mysql操作命令的笔记
五、nginx 部署
aspnetcore 的默认 web 服务器是 kestrel,官方也不建议直接用,而是用 nginx 等 web 服务器来转发
有几个好处:
1 安全:kestrel 本身并没有太多的功能,比如安全方面的。所以在他前面加一层代理,安全方面由 nginx 控制
2nginx 做负载均衡转发
又是 docker 常规操作
s1、拉镜像
>docker pull nginxs2、运行镜像生成容器
>docker run --name mynginx -p 8081:80 -d nginx参数说明:(都一样的)
--name 自定义容器的名称
-p 将宿主的端口 8081 映射到容器的端口 80
-d 也就是 deamon 的缩写,后台守护进程维护,也就是在后台一直运行
s3、宿主机器上创建 3 个目录,用来映射到 nginx 容器里面
这样以后修改 nginx 配置等操作,就不用进到容器里面了
>mkdir -p ~/nginx/www ~/nginx/logs ~/nginx/confwww 放置网站文章
logs 放日志文件
conf 放配置文件
s4、从容器里面 copy 一份 nginx 的配置出来
>docker cp 6dd4380ba708:/etc/nginx/nginx.conf ~/nginx/conf其中容器 id 自己用 ps 命令查
s5、删掉原来的容器(原来的容器,作用是 copy 一份配置出来的
>docker stop mynginx

>docker rm mynginxs6、重新部署 nginx 容器
docker run -d -p 8081:80 --name mynginx -v ~/nginx/www:/usr/share/nginx/html -v ~/nginx/conf/nginx.conf:/etc/nginx/nginx.conf -v ~/nginx/logs:/var/log/nginx nginx命令说明:
- -p 8081:80: 将容器的 80 端口映射到主机的 8082 端口。
- --name mynginx:将容器命名为 mynginx。
- -v ~/nginx/www:/usr/share/nginx/html:将我们自己创建的 www 目录挂载到容器的 /usr/share/nginx/html。
- -v ~/nginx/conf/nginx.conf:/etc/nginx/nginx.conf:将我们自己创建的 nginx.conf 挂载到容器的 /etc/nginx/nginx.conf。
- -v ~/nginx/logs:/var/log/nginx:将我们自己创建的 logs 挂载到容器的 /var/log/nginx。
s7、放一个 index.html 网页测试文件到 www 目录
>vi ~/nginx/www/index.html随便编辑一些信息进去测试用
s8、查看 nginx 的访问日志、错误日志
>tail -f ~/nginx/logs/access.logs9、用 nginx 反向代理,做负载均衡(默认轮询算法)
nginx 的 docker 映射端口 8081:80
web 集群是 800 到 803 共 4 台,用内网 IP
改 nginx 的配置
>vi ~/nginx/conf/nginx.conf在 http 里面加
upstream my_test_web {
server 172.18.79.214:800;
server 172.18.79.214:801;
server 172.18.79.214:802;
server 172.18.79.214:803;
}
server{
listen 80;
location / {
proxy_pass http://my_test_web;
proxy_set_header Host $host;
}
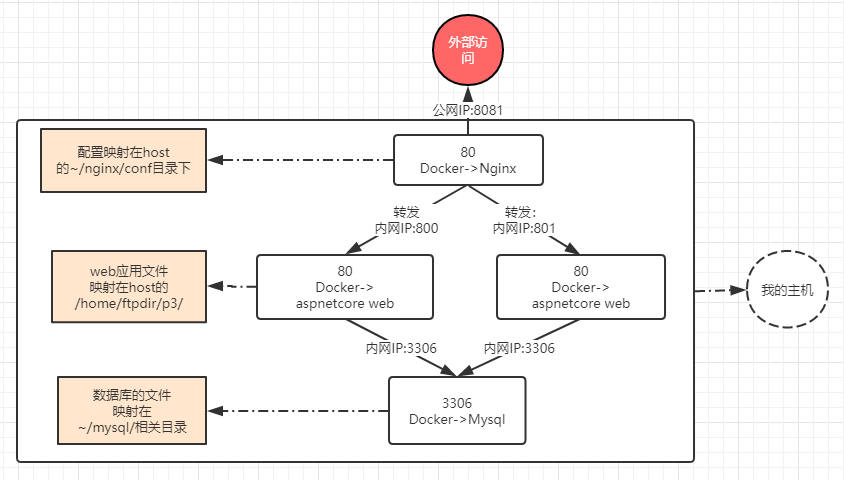
}最后整体网络架构图是这样的
六、思考总结
docker 命令里的 - v 参数
是将宿主主机上的目录或文件,挂载到 docker 容器里面,
这样我们不用单独去操作一个一个的容器
比如 mysql 的配置文件,和数据文件目录,都挂载在宿主机器上
将 nginx 的配置文件和虚拟目录文件都放在宿主机器上
将我们要发布的网站文件都放在宿主机器上,然后多个容器都映射到这个目录,这样发布都只需要发布一个目录?
且不需要挨个进到容器里面去操作!!!
发布、更新完之后,只需要重启一下容器就可以了?
七、应用部署升级
构建 Dockerfile 时有个 copy 命令,将 host 上的发布文件夹里的内容,复制到镜像的目录
COPY ./publish .现在思考,我们的应用采用集群部署,部署到 4-5 个容器中,
每次发布更新后,我们都要经历这样几个步骤:
s1、ftp 上传文件到 host 的 publish 目录,
s2、重新生成新的镜像》docker build -t crmImg002
s3、停止原来的应用集群》docker stop web001、docker stop web002 等等【可以批量操作 docker stop $(docker ps -qf name=web80)】
s4、删除原来的应用集群》docker rm web001、等等【可批量 docker rm $(docker ps -qf name=web80)】
s5、删除原来的镜像》docker rmi crmImg001
s6、运行新的镜像,生成容器集群》docker run --name web800 -d -p 800:80 crmImg002
依次生成多个端口的 800、801、802、803.。。。。。等等
整个步骤又长,又重复,而且随着集群数量变多,操作重复易遗漏。
根据上面对 docker run 的参数 - v 的思考,大胆尝试一下:
步骤如下:
s1、修改 Dockerfile 文件,去掉 copy 那一行,镜像不需要拷贝文件进去了
s2、重新生成镜像,crmImg003 以后发布程序后都不用重新生成了
s3、停止原来的容器,删除原来的容器
【docker stop $(docker ps -qf name=web80)】
【docker rm $(docker ps -qf name=web80)】
s4、启动新的容器(关键是 - v 参数的使用)
docker run --name crm_web001 -d -p 800:80 -v /home/ftpdir/p3:/app img01
docker run --name crm_web002 -d -p 801:80 -v /home/ftpdir/p3:/app img01
docker run --name crm_web003 -d -p 802:80 -v /home/ftpdir/p3:/app img01
docker run --name crm_web004 -d -p 803:80 -v /home/ftpdir/p3:/app img01
OK, 启动了 4 个应用,
s5、在 nginx 中集群服务中添加这 4 个应用的端口即可!
以后程序更新后的发布操作:
s1、ftp 上传程序到 p3 目录
s2、重启这 4 个容器
docker restart crm_web001
docker restart crm_web002
docker restart crm_web003
docker restart crm_web004
或者用批量操作(-q 只显示 id,-f 过滤,name=crm_web 名字有 crm_web 字符的)
docker restart $(docker ps -qf name=crm_web)至此:以后发布程序只需此 2 步即可!(发布、重启) 省事!!
八、Docker 常规操作总结
1、看有哪些容器在运行
docker ps
参数:
-q 只看 id
-f 过滤条件,key=value 格式,支持正则
2、删除容器
docker rm 容器名
3、删除对应镜像
docker rmi 镜像名
4、重新 build 镜像
docker build -t img001 .
注意最后的符号.
5、重新运行容器
docker run --name web800 -d -p 800:80 img001
docker run --name web801 -d -p 801:80 img001
这样就用同一个镜像 img001,运行了 2 个容器 web800 和 web801 分别对应的端口是 800 和 801
6、查看容器日志
linux 查看一个文件用 > tail -f wenjian.conf
容器里面可以用
docker logs -f mynginx

.Net Core 结合 AspNetCoreRateLimit 实现限流

前言
相信使用过 WebApiThrottle 的童鞋对 AspNetCoreRateLimit 应该不陌生,AspNetCoreRateLimit 是一个 ASP.NET Core 速率限制的解决方案,旨在控制客户端根据 IP 地址或客户端 ID 向 Web API 或 MVC 应用发出的请求的速率。AspNetCoreRateLimit 包含一个 IpRateLimitMiddleware 和 ClientRateLimitMiddleware,每个中间件可以根据不同的场景配置限制允许 IP 或客户端,自定义这些限制策略,也可以将限制策略应用在每个 API URL 或具体的 HTTP Method 上。
实践
起初是因为新做的项目中,有天查询日志发现,对外的几个公共接口经常被 “恶意” 调用,考虑到接口安全性问题,增加限流策略。
AspNetCoreRateLimit GayHub:https://github.com/stefanprodan/AspNetCoreRateLimit
根据 IP 进行限流
通过 nuget 安装 AspNetCoreRateLimit,当前版本是 3.0.5,因为实际项目中用的都是分布式缓存,在这里不用内存存储,而是结合 Redis 进行使用,内存存储直接参考官方的 Wiki 就可以了。
Install-Package AspNetCoreRateLimit

Install-Package Microsoft.Extensions.Caching.Redis
在 Startup.ConfigureServices 中将服务和其他依赖注入
public void ConfigureServices(IServiceCollection services)
        {
            #region MVC
            services.AddMvc(
              options =>
              {
                  options.UseCentralRoutePrefix(new RouteAttribute("api/"));
              }
              ).SetCompatibilityVersion(CompatibilityVersion.Version_2_2);
            #endregion

            services.AddDistributedRedisCache(options =>
            {
                options.Configuration = "127.0.0.1:6379,password=123456,connectTimeout=5000,syncTimeout=10000";
                options.InstanceName = "WebRatelimit";
            });
            //加载配置
            services.AddOptions();
            //从appsettings.json获取相应配置
            services.Configure<IpRateLimitOptions>(Configuration.GetSection("IpRateLimiting"));

            //注入计数器和规则存储
            services.AddSingleton<IIpPolicyStore, DistributedCacheIpPolicyStore>();
            services.AddSingleton<IRateLimitCounterStore, DistributedCacheRateLimitCounterStore>();

            services.AddSingleton<IHttpContextAccessor, HttpContextAccessor>();
            //配置(计数器密钥生成器)
            services.AddSingleton<IRateLimitConfiguration, RateLimitConfiguration>();
        }
在 Startup.Configure 启用
// This method gets called by the runtime. Use this method to configure the HTTP request pipeline.
        public void Configure(IApplicationBuilder app, IHostingEnvironment env)
        {
            if (env.IsDevelopment())
            {
                app.UseDeveloperExceptionPage();
            }
            else
            {
                app.UseHsts();
            }
            //启用限流,需在UseMvc前面
            app.UseIpRateLimiting();
            app.UseMvc();
        }
为了不影响 appsettings.json 的美观吧,可以新建一个 RateLimitConfig.json,并 Program 中启动加载中增加
public static IWebHostBuilder CreateWebHostBuilder(string[] args) =>
            WebHost.CreateDefaultBuilder(args)
                .UseStartup<Startup>().ConfigureAppConfiguration((host,config)=>
                {
                    config.AddJsonFile($"RateLimitConfig.json", optional: true, reloadOnChange: true);
                });
RateLimitConfig.json 配置如下:
{
  "IpRateLimiting": {
    //false则全局将应用限制,并且仅应用具有作为端点的规则* 。 true则限制将应用于每个端点,如{HTTP_Verb}{PATH}
    "EnableEndpointRateLimiting": true,
    //false则拒绝的API调用不会添加到调用次数计数器上
    "StackBlockedRequests": false,
    "RealIpHeader": "X-Real-IP",
    "ClientIdHeader": "X-ClientId",
    "HttpStatusCode": 200,
    "QuotaExceededResponse": {
      "Content": "{{\"code\":429,\"msg\":\"访问过于频繁,请稍后重试\",\"data\":null}}",
      "ContentType": "application/json",
      "StatusCode": 200
    },
    "IpWhitelist": [ ],
    "EndpointWhitelist": [],
    "ClientWhitelist": [],
    "GeneralRules": [
      {
        "Endpoint": "*:/api/values/test",
        "Period": "5s",
        "Limit": 3
      }
    ]
  }
}
重要配置说明:
QuotaExceededResponse 是自定义返回的内容,所以必须设置 HttpStatusCode 和 StatusCode 为 200。
GeneralRules 是具体的策略,根据不同需求配置不同端点即可, Period 的单位可以是 s, m, h, d,Limint 是单位时间内的允许访问的次数;
IpWhitelist 是 IP 白名单,本地调试或者 UAT 环境,可以加入相应的 IP,略过策略的限制;
EndpointWhitelist 是端点白名单,如果全局配置了访问策略,设置端点白名单相当于 IP 白名单一样,略过策略的限制;
其他配置项请参考 Wiki:https://github.com/stefanprodan/AspNetCoreRateLimit/wiki/IpRateLimitMiddleware#setup
Fiddler 开始测试
测试接口:http://127.0.0.1:5000/api/values/Test
        [HttpGet]
        public object test()
        {
            return "ok";
        }
调用结果:

调用次数和剩余调用次数在 Head 可以看到,(吃我一个链接:https://www.cnblogs.com/EminemJK/p/12720691.html)

如果调用超过策略后,调用失败,返回我们自定义的内容

在 Redis 客户端可以看到策略的一些情况,
其他
通常在项目中,Authorization 授权是少不了了,加入限流后,在被限流的接口调用后,限流拦截器使得跨域策略失效,故重写拦截器中间件,继承 IpRateLimitMiddleware 即可:
public class IPLimitMiddleware : IpRateLimitMiddleware
    {
        public IPLimitMiddleware(RequestDelegate next, IOptions<IpRateLimitOptions> options, IRateLimitCounterStore counterStore, IIpPolicyStore policyStore, IRateLimitConfiguration config, ILogger<IpRateLimitMiddleware> logger)
            : base(next, options, counterStore, policyStore, config, logger)
        {
        }

        public override Task ReturnQuotaExceededResponse(HttpContext httpContext, RateLimitRule rule, string retryAfter)
        {
            httpContext.Response.Headers.Append("Access-Control-Allow-Origin", "*");
            return base.ReturnQuotaExceededResponse(httpContext, rule, retryAfter);
        }
    }
然后修改 Startup.Configure,
//启用限流,需在UseMvc前面
        //app.UseIpRateLimiting();
        app.UseMiddleware<IPLimitMiddleware>();
app.UseMvc(); 特别需要注意的坑是,在其他文章的教程中,他们会写成:
app.UseMiddleware<IPLimitMiddleware>().UseIpRateLimiting();//错误的演示 https://www.cnblogs.com/EminemJK/p/12720691.html
这些写你测试的时候会发现,

X-Rate-Limit-Remaining 递减量会变成 2,也不是递减 1,举栗子,配置如下:
"Endpoint": "*:/api/values/test",
        "Period": "3s",
        "Limit": 1
表示 3 秒内可以访问的次数是 1 一次,当发生调用的时候会直接返回被限制的提示,而不能正常访问接口。
最后
AspNetCoreRateLimit 还可以根据客户端 ID 进行配置策略,具体可以看一下官方的 Wiki 吧。

.NET Core+MySql+Nginx 容器化部署
1. 引言
上两节我们通过简单的demo学习了docker的基本操作。这一节我们来一个进阶学习,完成ASP.NET Core + MySql + Nginx的容器化部署。
本文是基于CentOS 7.4环境进行演示,示例项目可以访问Docker.NetCore.MySql进行下载。
2. Hello MySQL
同样我们还是以循序渐进的方式来展开。首先来基于Docker来试玩一下MySQL。
2.1. 创建MySql实例
//拉取mysql镜像
 docker pull mysql$ docker images$REPOSITORY                           TAG                 IMAGE ID            CREATED             SIZEdocker.io/mysql                      latest              7d83a47ab2d2        13 days ago         408.2 MB//创建一个mysql实例$ docker run --name hello.mysql -e MYSQL_ROOT_PASSWORD=123456 -d mysql$ docker ps
CONTAINER ID        IMAGE      COMMAND                  CREATED             STATUS              PORTS          NAMESe21bbd84e0b5        mysql      "docker-entrypoint.sh"   3 minutes ago       Up 3 minutes        3306/tcp        hello.mysql
下面我们直接在容器中连接到我们刚刚创建的mysql数据库:
$ docker exec -it hello.mysql \
> mysql -uroot -p123456
mysql: [Warning] Using a password on the command line interface can be insecure.
Welcome to the MySQL monitor.  Commands end with ; or \g.
Your MySQL connection id is 8Server version: 5.7.20 MySQL Community Server (GPL)

Copyright (c) 2000, 2017, Oracle and/or its affiliates. All rights reserved.

Oracle is a registered trademark of Oracle Corporation and/or its
affiliates. Other names may be trademarks of their respective
owners.

Type ''help;'' or ''\h'' for help. Type ''\c'' to clear the current input statement.mysql> show databases;
+--------------------+
| Database           |
+--------------------+
| information_schema |
| mysql              |
| performance_schema |
| sys                |
+--------------------+4 rows in set (0.00 sec)
2.2. 挂载数据卷
上面创建的mysql实例其数据都在容器内部存储,这样就暴露了一个问题,如果容器销毁,那么对应的数据库数据就会丢失。那如何持久化存储容器内数据呢?我们可以通过挂载数据卷的方式来解决这一问题。
//创建数据卷
$ docker volume create --name hello.dbhello.db
//查看数据卷信息
$ docker volume inspect hello.db
[
    {        "Name": "hello.db",        "Driver": "local",
    "Mountpoint": "/var/lib/docker/volumes/hello.db/_data",
        "Labels": {},        "Scope": "local"
    }
]
// 挂载数据卷启动MySql实例
$ docker run --name hello.mysql \> -v hello.db:/var/lib/mysql \
> -e MYSQL_ROOT_PASSWORD=123456 -d mysql上面是使用使用了docker volume create命令创建了一个数据卷,当然我们也可以自行挂载某个目录作为数据卷。
3. 准备.NET Core+EFCore+MySql项目
为了演示方便,我准备了一个ASP.NET Core+EFCore+MySql的示例项目。其结构如下所示: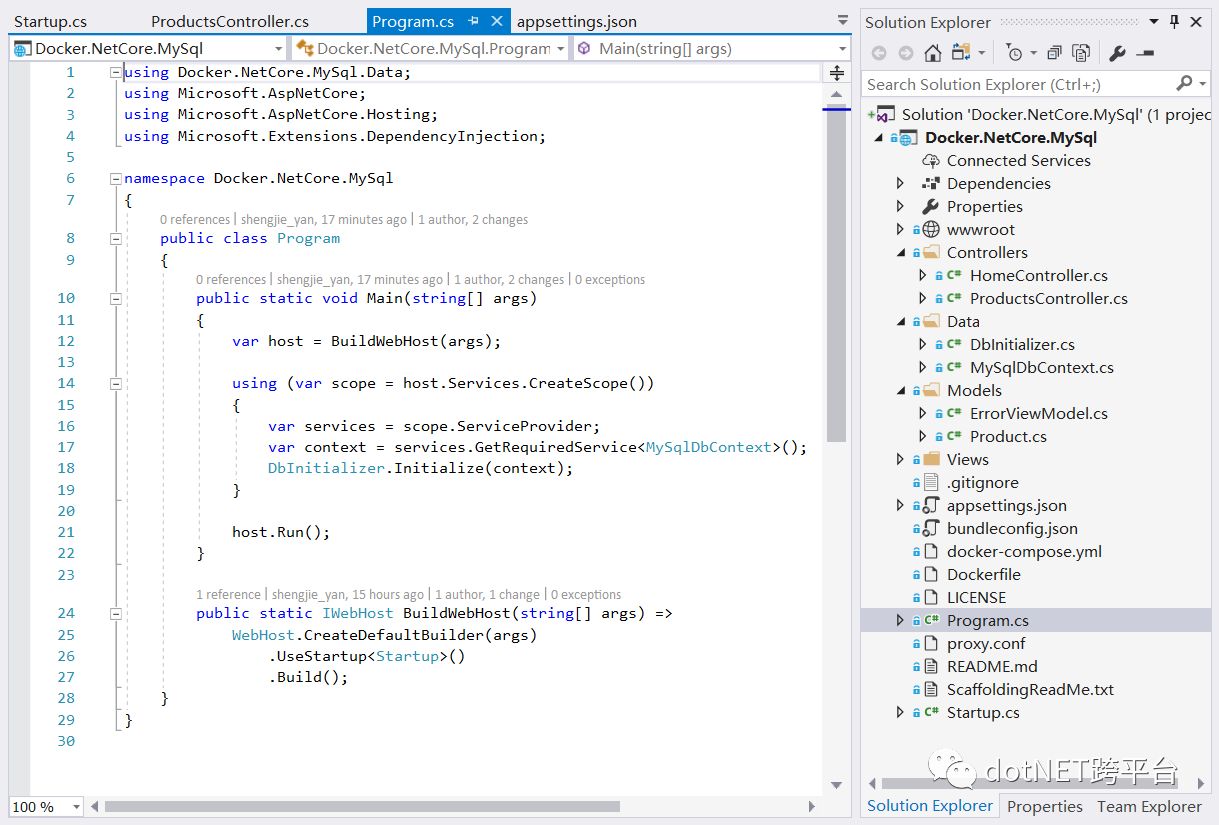
是基于.NET Core Mvc模板项目,其中定义了一个Product实体,并通过ProductsController暴露WebApi接口。核心代码如下:
Product实体类:
public class Product{
    public int ProductId { get; set; }
    public string Name { get; set; }
   public decimal Price { get; set; }
   public int StockQty { get; set; }
}
DbContext类:
public class MySqlDbContext : DbContext{

public MySqlDbContext (DbContextOptions<MySqlDbContext> options)
        : base(options)
  {
    }    public DbSet<Product> Products { get; set; }
}
数据库初始化类:
public class DbInitializer{
  public static void Initialize(MySqlDbContext context)    {
        context.Database.EnsureCreated();
    if (context.Products.Any())
        {
      return;
        }
       var products = new Product[]
        {
         new Product{Name="iphone 6",Price=5000,StockQty=10 },
                   new Product{Name="iphone 7",Price=6000,StockQty=10 },            new Product{Name="iphone 7 plus",Price=7000,StockQty=10 },            new Product{Name="iphone x",Price=8000,StockQty=10 }
        };

        context.Products.AddRange(products);

        context.SaveChanges();
    }
}
该数据库初始化类会在项目启动时运行。详细代码可参考Docker.NetCore.MySql。
4. 基于示例项目进行实操演练
4.1 安装Git并Clone示例项目
$ yum install git
$ git --version
git version 1.8.3.1$ cd ~/demo
$ git clone https://github.com/yanshengjie/Docker.NetCore.MySql.gitCloning into ''Docker.NetCore.MySql''...remote: Counting objects: 155, done.remote: Compressing objects: 100% (125/125), done.remote: Total 155 (delta 42), reused 123 (delta 25), pack-reused 0Receiving objects: 100% (155/155), 534.30 KiB | 333.00 KiB/s, done.
Resolving deltas: 100% (42/42), done.
4.2. 构建镜像
细心的你会发现,项目中已经定义了Dockerfile,所以我们可以直接使用docker build构建镜像。
# cd Docker.NetCore.MySql[root@iZ288a3qazlZ Docker.NetCore.MySql]# lsappsettings.Development.json  docker-compose.yml           Program.cs             Viewsappsettings.json              Dockerfile                   proxy.conf             wwwrootbundleconfig.json             Docker.NetCore.MySql.csproj  README.mdControllers                   LICENSE                      ScaffoldingReadMe.txtData                          Models                       Startup.cs
//构建镜像# docker build -t docker.netcore.mysql .Sending build context to Docker daemon 3.045 MBStep 1 : FROM microsoft/dotnet:latest ---> 7d4dc5c258ebStep 2 : WORKDIR /app ---> Using cache
 ---> 98d48a4e278cStep 3 : COPY . /app ---> 6b1bf8bb5261Removing intermediate container b86460477977Step 4 : RUN dotnet restore ---> Running in 4e0a46f762bb
  Restoring packages for /app/Docker.NetCore.MySql.csproj...  Installing Microsoft.CodeAnalysis.Razor 2.0.0.
  .....  Restore completed in 216.83 ms for /app/Docker.NetCore.MySql.csproj. ---> 4df70c77916eRemoving intermediate container 4e0a46f762bbStep 5 : EXPOSE 5000
 ---> Running in 11b421b3bd3e
 ---> 3506253060feRemoving intermediate container 11b421b3bd3eStep 6 : ENV ASPNETCORE_URLS http://*:5000
 ---> Running in 201aabbab72c
 ---> 7f29963a8d96Removing intermediate container 201aabbab72cStep 7 : ENTRYPOINT dotnet run ---> Running in c79f73cba162
 ---> 9d1fb6ee46cbRemoving intermediate container c79f73cba162Successfully built 9d1fb6ee46cb
[root@iZ288a3qazlZ Docker.NetCore.MySql]# docker images docker.netcore.mysqlREPOSITORY             TAG                 IMAGE ID            CREATED             SIZEdocker.netcore.mysql   latest              9d1fb6ee46cb        13 seconds ago      1.756 GB
4.3. 启动镜像并连接到指定数据库
docker提供了--link参数用于在容器之间建立连接。下面我们实例化创建的镜像docker.netcore.mysql并命名容器名为hello.netcore.mysql,并使用--link参数与我们文章开头建立的hello.mysql容器建立连接。
# docker run --name hello.netcore.mysql --link hello.mysql:db -d -p 5000:5000 docker.netcore.mysql这里需要特别注意一下
--link=hello.mysql:db,这个参数就是告诉Docker容器需要使用hello.mysql容器,并将其别名命名为db,这样在hello.netcore.mysql这个容器中就可以使用db来作为提供mysql数据库服务的服务器。这也就是为什么我们.NET Core项目中连接字符串设置为server=db;的原因。"ConnectionStrings": { "MySql": "server=db;database=MySqlDbContext;uid=root;pwd=123456;" }
//查看运行中容器列表# docker ps CONTAINER ID IMAGE COMMAND CREATED STATUS PORTS NAMES5cbfd27ebe2a docker.netcore.mysql "dotnet run" 2 minutes ago Up 2 minutes 0.0.0.0:5000->5000/tcp hello.netcore.mysql4dfa4159b669 mysql "docker-entrypoint.sh" About an hour ago Up About an hour 3306/tcp hello.mysql//访问api/products[root@iZ288a3qazlZ Docker.NetCore.MySql]# curl http://localhost:5000/api/products[{"productId":1,"name":"iphone 6","price":5000.0000000000000000000000000,"stockQty":10},{"productId":2,"name":"iphone 7","price":6000.0000000000000000000000000,"stockQty":10},{"productId":3,"name":"iphone 7 plus","price":7000.0000000000000000000000000,"stockQty":10},{"productId":4,"name":"iphone x","price":8000.000000000000000000000000,"stockQty":10}]从上图可知,我们完成了.NET Core与MySql的连接。
5. ASP.NET Core + MySql + Nginx
结合上一篇文章.NET Core容器化之多容器应用部署@Docker-Compose,我们来使用docker-compose完成asp.net core + mysql + nginx的多容器部署。
5.1. 定义 docker-compose.yml
version: ''2''services:  db:    container_name: hello.db    environment:      MYSQL_ROOT_PASSWORD: 123456  volumes:
    - ./mysql:/var/lib/mysql
  web:    container_name: hello.web    build: .    depends_on:
      - db    links:
      - db

  reverse-proxy:    container_name: hello.proxy    image: nginx    depends_on:
      - web    ports:
      - "9090:8080"    volumes:
      - ./proxy.conf:/etc/nginx/conf.d/default.conf
其中定义了三个服务:
db:使用mysql镜像,并挂载当前项目下的mysql文件夹来持久化存储。
web:基于当前项目构建的容器服务,依赖于db服务。
reverse-proxy:使用nginx定义反向代理服务,其中挂载了当前项目下的proxy.conf文件作为反向代理配置文件。其中proxy.conf的配置如下(注意proxy_pass指定的url为http://web:5000):
server {listen 8080;location / {    proxy_pass http://web:5000;
}
}
5.2. 启动Compose
在启动Compose之前,建议清空上面创建的容器。也可以使用docker rm $(docker ps -qa)清除所有容器。
//启动compose
[root@iZ288a3qazlZ Docker.NetCore.MySql]# docker-compose up -dCreating network "dockernetcoremysql_default" with the default driverBuilding webStep 1 : FROM microsoft/dotnet:latest ---> 7d4dc5c258ebStep 2 : WORKDIR /app ---> Using cache
 ---> 98d48a4e278cStep 3 : COPY . /app ---> d41b32323c0fRemoving intermediate container 1259f5fb82bcStep 4 : RUN dotnet restore ---> Running in d482e355de77
  Restoring packages for /app/Docker.NetCore.MySql.csproj...  Installing Microsoft.CodeAnalysis.Razor 2.0.0.
  .....  Restore completed in 216.83 ms for /app/Docker.NetCore.MySql.csproj. ---> a0658008f161Removing intermediate container d482e355de77Step 5 : EXPOSE 5000
 ---> Running in dc6eeb29fd5e
 ---> a419314ece08Removing intermediate container dc6eeb29fd5eStep 6 : ENV ASPNETCORE_URLS http://*:5000
 ---> Running in c1d1474b14a0
 ---> 9cc13c549042Removing intermediate container c1d1474b14a0Step 7 : ENTRYPOINT dotnet run ---> Running in efdf0e857a84
 ---> 830ac11428cfRemoving intermediate container efdf0e857a84Successfully built 830ac11428cfCreating hello.db ... doneCreating hello.web ... doneCreating hello.proxy ... doneCreating hello.web ...Creating hello.proxy ...
[root@iZ288a3qazlZ Docker.NetCore.MySql]# docker psCONTAINER ID        IMAGE                    COMMAND                  CREATED             STATUS              PORTS                            NAMES6253bf85682e        nginx                    "nginx -g ''daemon off"   33 seconds ago      Up 28 seconds       80/tcp, 0.0.0.0:9090->8080/tcp   hello.proxyea553a9e22f2        dockernetcoremysql_web   "dotnet run"             37 seconds ago      Up 32 seconds       5000/tcp                         hello.weba1f5aa981bfb        mysql                    "docker-entrypoint.sh"   38 seconds ago      Up 36 seconds       3306/tcp                         hello.db
[root@iZ288a3qazlZ Docker.NetCore.MySql]# docker-compose ps   Name                 Command             State               Ports----------------------------------------------------------------------------------hello.db      docker-entrypoint.sh mysqld   Up      3306/tcphello.proxy   nginx -g daemon off;          Up      80/tcp, 0.0.0.0:9090->8080/tcphello.web     dotnet run                    Up      5000/tcp
[root@iZ288a3qazlZ Docker.NetCore.MySql]# curl http://localhost:9090/api/products
[{"productId":1,"name":"iphone 6","price":5000.0000000000000000000000000,"stockQty":10},{"productId":2,"name":"iphone 7","price":6000.0000000000000000000000000,"stockQty":10},{"productId":3,"name":"iphone 7 plus","price":7000.0000000000000000000000000,"stockQty":10},{"productId":4,"name":"iphone x","price":8000.000000000000000000000000,"stockQty":10}]
上面的运行结果显示,我们已经成功完成了ASP.NET Core+MySql+Nginx的多容器应用部署。通过浏览器访问http:<ipaddress>:9090/api/products即可访问我们暴露的api。
5.3. 数据库验证
我们来验证一下数据库是否成功创建:
[root@iZ288a3qazlZ Docker.NetCore.MySql]# ls mysqlauto.cnf         client-key.pem         ib_logfile0  performance_schema  server-key.pem
ca-key.pem       MySqlDbContext  ib_logfile1  private_key.pem     sys
ca.pem           ib_buffer_pool         ibtmp1       public_key.pem
client-cert.pem  ibdata1                mysql        server-cert.pem
[root@iZ288a3qazlZ Docker.NetCore.MySql]# docker exec -it hello.db mysql -uroot -p123456mysql: [Warning] Using a password on the command line interface can be insecure.
Welcome to the MySQL monitor.  Commands end with ; or \g.
Your MySQL connection id is 8Server version: 5.7.20 MySQL Community Server (GPL)

Copyright (c) 2000, 2017, Oracle and/or its affiliates. All rights reserved.

Oracle is a registered trademark of Oracle Corporation and/or its
affiliates. Other names may be trademarks of their respective
owners.

Type ''help;'' or ''\h'' for help. Type ''\c'' to clear the current input statement.mysql> show databases;
+-----------------------+
| Database              |
+-----------------------+
| information_schema    |
| MySqlDbContext  |
| mysql                 |
| performance_schema    |
| sys                   |
+-----------------------+5 rows in set (0.00 sec)

mysql> use MySqlDbContext;
Reading table information for completion of table and column names
You can turn off this feature to get a quicker startup with -A

Database changed
mysql> show tables;
+---------------------------------+
| Tables_in_MySqlDbContext |
+---------------------------------+
| Products                        |
+---------------------------------+1 row in set (0.00 sec)

mysql> select * from Products;
+-----------+---------------+-------------------------------------+----------+
| ProductId | Name          | Price       | StockQty |
+-----------+---------------+-------------------------------------+----------+
|         1 | iphone 6      | 5000.000000000000000000000000000000 |       10 |
|         2 | iphone 7      | 6000.000000000000000000000000000000 |       10 |
|         3 | iphone 7 plus | 7000.000000000000000000000000000000 |       10 |
|         4 | iphone x      | 8000.000000000000000000000000000000 |       10 |
+-----------+---------------+-------------------------------------+----------+
4 rows in set (0.00 sec)
从上面的运行结果可知,我们成功将项目文件夹下的mysql文件夹挂载到容器内部进行数据持久化。
6. 最后
本文通过先介绍如何基于Docker实例化MySQL容器,再介绍如何通过挂载数据卷来持久化MySQL数据,以及如何使用--Link参数进行容器之间的连接,完成了.NET Core连接MySQL数据库。
最后,使用Docker-Compose综合ASP.NET Core+MySQL+Nginx完成了容器化部署。
下一节我们来介绍下如何使用Docker-Swarm进行集群部署。
相关文章:
Docker容器中开始.NETCore之路
.NET Core容器化@Docker
微服务革命:容器化的应用、数据及其它一切
ABP .Net Core Entity Framework迁移使用MySql数据库
ASP.NET Core 2.0 + EF6 + Linux +MySql混搭
.NET Core容器化之多容器应用部署@Docker-Compose
原文地址:https://www.cnblogs.com/sheng-jie/p/8249660.html
.NET社区新闻,深度好文,欢迎访问公众号文章汇总 http://www.csharpkit.com
本文分享自微信公众号 - dotNET跨平台(opendotnet)。
如有侵权,请联系 support@oschina.cn 删除。
本文参与“OSC源创计划”,欢迎正在阅读的你也加入,一起分享。

.NET Core使用Topshelf方式创建Windows服务的全过程记录
前言
Topshelf是一个.NET Standard库,它消除了在.NET Framework和.NET Core中创建Windows服务的那些麻烦。
安装
Install-Package Topshelf

代码
using System;
using System.Collections.Generic;
using System.Text;
using Topshelf;


namespace ConsoleApp2222
{
 public class LoggingService : ServiceControl
 {
  private void Log(string logMessage)
  {
   Console.WriteLine(logMessage);
  }


  public bool Start(HostControl hostControl)
  {
   Log("Starting");
   return true;
  }


  public bool Stop(HostControl hostControl)
  {
   Log("Stopping");
   return true;
  }
 }
}
在Program.cs文件的Main方法中
1、服务的名称
2、服务是否自动启动
3、服务崩溃之后的重启时间
using System;
using Topshelf;


namespace ConsoleApp2222
{
 internal class Program
 {
  private static void Main(string[] args)
  {
   HostFactory.Run(x =>
   {
    x.Service<LoggingService>();
    x.EnableServiceRecovery(r => r.RestartService(TimeSpan.FromSeconds(10)));
    x.SetServiceName("TestService");
    x.StartAutomatically();
   }
  );
  }
 }
}
部署服务

ConsoleApp2222.exe install
ConsoleApp2222.exe start
调试服务
如果我们的服务代码已经在Visual Studio中打开了,我们就可以直接启动调试。Topshelf会模拟在控制台中启动服务。我们应该能在控制台中看到以下的消息。

这确实符合了我们的需求。它启动了我们的服务,并像真正的Windows服务一样在后台运行。我们可以像往常一样设置断点,基本上它遵循的流程和正常安装的服务一样。
我们可以通过ctrl+c, 来关闭我们的应用,但是在运行服务执行Stop方法之前,它是不能被关闭的,这使我们可以调试服务的关闭流程。与调试指令和配置标志相比,这要容易的多。
这里需要注意一个问题。如果你收到的以下内容的消息:

这意味着你尝试调试的服务实际上已经作为Windows服务被安装在系统中了,你需要停止(不需要卸载)这个正在运行的服务,才可以正常调试。
参考文档
https://topshelf.readthedocs.io/en/latest/configuration/config_api.html
https://github.com/Topshelf/Topshelf
http://topshelf-project.com/
总结
到此这篇关于.NET Core使用Topshelf方式创建Windows服务的文章就介绍到这了,更多相关.NET Core用Topshelf创建Windows服务内容请搜索以前的文章或继续浏览下面的相关文章希望大家以后多多支持!
- .net core部署到windows服务上的完整步骤
- 用.NET创建Windows服务的方法
- 使用.NET Core3.0创建一个Windows服务的方法
- .Net Core WebApi部署到Windows服务器上的步骤

.net core入门-发布及部署_异常(处理程序“aspNetCore”在其模块列表中有一个错误模块“AspNetCoreModuleV2")处理
备注:本人使用开发工具:VS2017,.NET Core 2.2,其中VS2017原本自带2.1,我单独从官网下载了2.2的程序集安装包,但是没有下配套的运行环境,运行项目时出了一个问题。
以下是我在发布Core项目后部署到IIS后运行时遇到的一个异常:处理程序“aspNetCore”在其模块列表中有一个错误模块“AspNetCoreModuleV2"
这里备注一下,如果仅仅是在IIS上运行发布好的项目,只需要安装AspNetCoreModuleV2模块就够了。不需要管模块:AspNetCoreModule 。
如果项目还运行不了,报HTTP Error 500.30 - ANCM In-Process Start Failure ,只需要检查应用程序池的配置是否是无托管代码版本。
先摆出微软Core的官方文档对IIS支持的描述吧:https://docs.microsoft.com/zh-cn/aspnet/core/host-and-deploy/iis/?view=aspnetcore-3.0
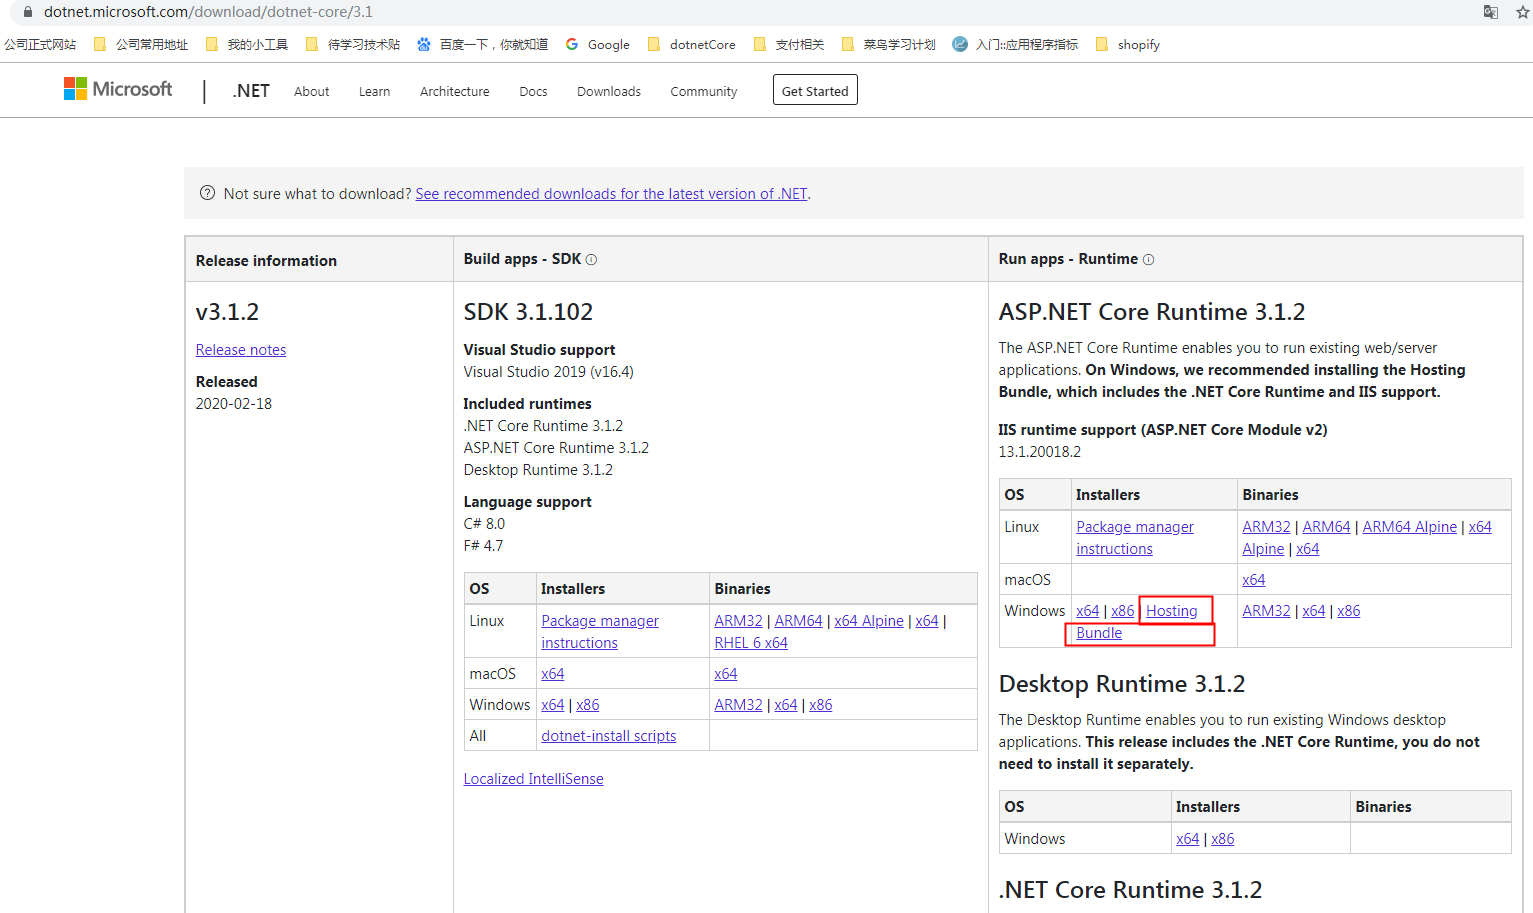
下载中心:https://dotnet.microsoft.com/download/dotnet-core/3.1 选择IIS支持中的IIS runtime support,里面的Hosting Bundle(托管捆绑包)链接下载
或者直接点击这个地址:https://docs.microsoft.com/zh-cn/aspnet/core/host-and-deploy/iis/?view=aspnetcore-3.1#install-the-net-core-hosting-bundle
1-发布设置:
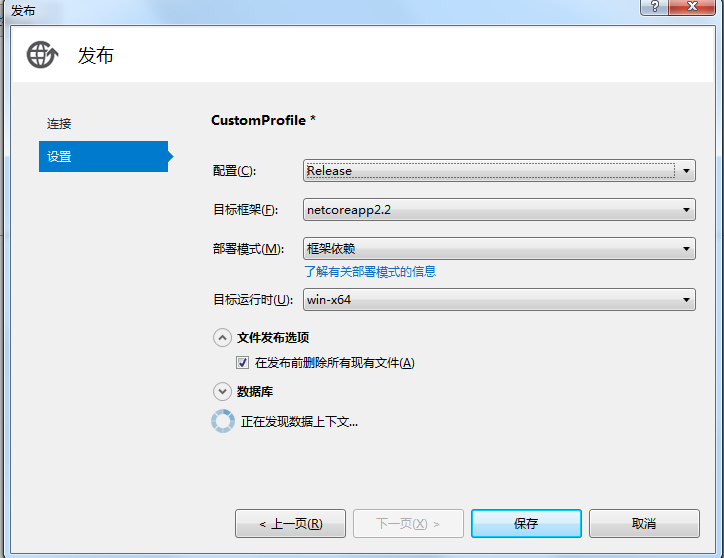
在发布过程中,项目一直还原nuget包没有结果?后来我转移了项目的位置,从C盘桌面挪到F盘,重新编译发布项目,居然可以了! 可能是在C盘还原的时候遇到了只读或权限不足的问题吧,贴图如下

发布成功后,在IIS配置网站到push发布目录中,应用程序池:.net framework版本设置成无托管代码(其实设置了v4.0貌似也没有毛病),
在运行项目时报错如下:处理程序“aspNetCore”在其模块列表中有一个错误模块“AspNetCoreModuleV2"
只需要在运行的服务器上下载一个捆绑运行程序包,就OK了:
下载地址:
https://dotnet.microsoft.com/download/dotnet-core/3.1
选择好版本后,点击去,找到Core运行时的支持:IIS runtime support,里面的Hosting Bundle(托管捆绑包)链接下载。
今天的关于aspnetcore 容器化部属到阿里云全过程记录和.net core容器化部署到阿里的分享已经结束,谢谢您的关注,如果想了解更多关于.Net Core 结合 AspNetCoreRateLimit 实现限流、.NET Core+MySql+Nginx 容器化部署、.NET Core使用Topshelf方式创建Windows服务的全过程记录、.net core入门-发布及部署_异常(处理程序“aspNetCore”在其模块列表中有一个错误模块“AspNetCoreModuleV2")处理的相关知识,请在本站进行查询。
本文标签:


